
Red Hat Training
A Red Hat training course is available for Red Hat JBoss Developer Studio
Chapter 4. Getting Started with JavaScript Development for Neon 3
Use JBoss Developer Studio and Neon 3 to complete the following tasks:
Neon 3 now also uses the new Esprima parser that supports ECMAScript 2015 (JavaScript 6). This parser is intuitive and assists in the following tasks:
- Syntax coloration
- Validation
- Content assist
- Templates for keywords
- Class definition
- Template literals
- Integration with Outline View
4.1. Using the Package Managers
Bower and npm are Package Managers that allow you to install, in a single click, all the dependencies required for the plugins to work.
In this section, we list steps for enabling Bower Init and npm Init. You may choose to work with any one of these Package Managers and follow the respective procedure:
If you are using npm you must use the file package.json and if using Bower, use the file bower.json.
4.1.1. Prerequisites
Ensure that npm and bower are installed on your system by running the npm -v and bower -v commands on the command line.
If installing both npm and bower, ensure that you install npm before you install Bower.
- For detailed instructions to install npm, see Section 4.4.2, “Installing npm” in the Appendix.
-
To install Bower, run the command
npm install -g boweras the root user.
4.1.2. Creating a New Project
In this section, you create a new project so that you can later enable the dependencies and see how the Neon 3 features work with JBoss Developer Studio.
To create a project:
- Click File > Project.
- In the New Project wizard, click General > Project. Click Next.
- In the Project name field, type the name of the project (Neon3_features, in this example).
- Edit the other fields if required and then click Finish.
Result: The new project is listed in the Project Explorer view.
4.1.3. Enabling Bower Init
After you have enabled Bower Init the result will be a bower.json file listed under the project in the Project Explorer view.
To enable Bower Init:
- In the Project Explorer view, right-click Neon3_features and then click New > Other.
- In the New wizard, type filter text field, type bower. After Bower Init is selected, click Next.
Optionally, in the Bower Initialization Wizard:
- Clear the Use default configuration check box.
- In the Version field, type 0.0.1.
- In the License field, type MIT.
- Click Finish.
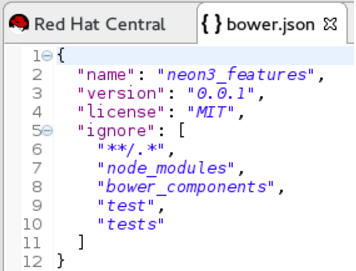
Result: The bower.json file opens in the default editor.
Figure 4.1. Contents of the bower.json File
4.1.4. Enabling npm Init
To enable npm Init:
- In the Project Explorer view, right-click Neon3_features and then click New > Other.
- In the New wizard, type filter text field, type npm. After npm Init is selected, click Next.
Optionally, in the npm Initialization Wizard:
- Clear the Use default configuration check box.
- In the Version field, type 0.0.1.
- In the License field, type MIT.
- Click Finish.
Result: The package.json file opens in the default editor.
4.1.5. Creating a New index.html File
In this section, you create an index.html file so that you can use it in Section 4.1.6, “Using the Bower Tool”.
To create an index.html file:
- In the Project Explorer view, right-click Neon3_features and click New > File.
In the New File wizard:
- Ensure that Neon3_features is selected as the parent folder.
- In the File name field, type index.html.
-
Click Finish. The empty
index.htmlfile opens in the default editor. Copy the following code snippet and paste it in the
index.htmlfile.<!DOCTYPE html> <html> <head> <title>npm / bower / JSON editor</title> <script type="text/javascript" src="bower_components/jquery/dist/jquery.min.js"></script> <script type="text/javascript" src="bower_components/bootstrap/dist/js/bootstrap.min.js"></script> <link rel="stylesheet" href="bower_components/bootstrap/dist/css/bootstrap.min.css"> <link rel="stylesheet" href="bower_components/bootstrap/dist/css/bootstrap-theme.min.css"> </head> <body> <div class="container"> <div class="jumbotron"> <h1>My First Bootstrap Page</h1> <p>Resize this responsive page to see the effect!</p> </div> <div class="row"> <div class="col-sm-4"> <h3>Column 1</h3> </div> <div class="col-sm-4"> <h3>Column 2</h3> </div> <div class="col-sm-4"> <h3>Column 3</h3> </div> </div> </div> </body> </html>
- Save the file.
4.1.6. Using the Bower Tool
To use the Bower tool:
-
In the Project Explorer view, expand Neon3_features to view
bower.jsonandindex.html. -
Double-click
index.htmlto open it in the default editor, if not already open. The editor shows the bootstrap template. Right-click index.html and click Open With > Web Browser. Notice that the page does not show any bootstrap theme or style applied to it.
Figure 4.2. index.html Page without Theme and Style Applied to it

To be able to view the themes and styles applied to the page, you must edit the
bower.jsonfile that contains the dependencies.To edit the
bower.jsonfile:In the Project Explorer view, double-click bower.json to open it in the default text editor. The json editor Outline support:
- Allows you to navigate through the json file
- Allows you to validate syntax errors
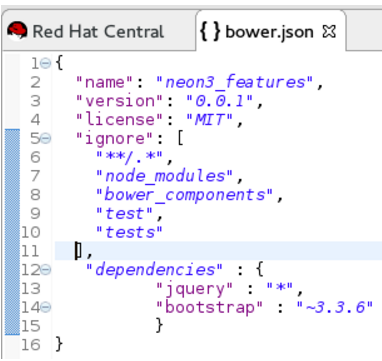
To define the jquery and bootstrap dependencies:
- After the closing square bracket ], add a comma (,).
On the next line type:
       "dependencies" : {
          "jquery" : "*",
          "bootstrap" : "~3.3.6"
          }
Save the file. The contents of the file are as displayed in the following image.
Figure 4.3. bower.json File Edited
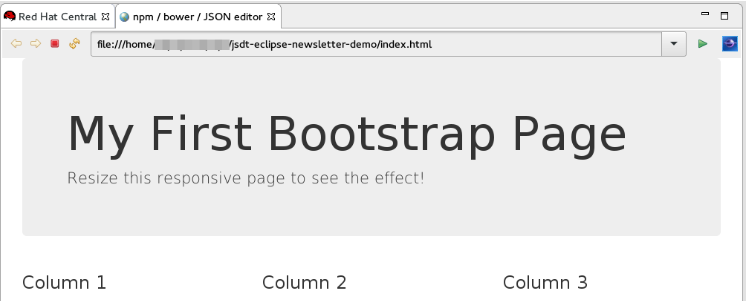
- Right-click bower.json and then click Run As > Bower Install. You can see the progress of installation of the dependencies in the Console view.
- Expand the bower_components folder to ensure that it contains bootstrap and jquery.
- Refresh the index.html web page.
Result: The page shows the bootstrap template with a responsive design.
Figure 4.4. index.html Page with Responsive Design
4.2. Using the Build Systems
In this section, you will use the npm Package Manager and hence the package.json file.
You can either use the Grunt or the Gulp build systems to run your tasks directly from the IDE instead of switching to the CLI every time you want to run a task.
4.2.1. Prerequisites
Ensure that Gulp or Grunt plugins are installed on your system by running the following command:
-
For Gulp plugin, run the command:
gulp -v -
For the Grunt plugin, run the command:
grunt -v
-
For Gulp plugin, run the command:
If not installed, use the following commands to install them:
-
To install the Gulp plugin, run the command
npm install --global gulp-clias the root user. -
To install the Grunt plugin, run the command
npm install --global grunt-clias the root user.
This section describes the workflow for Gulp. However, Grunt and Gulp are both supported and they both have similar workflows.
4.2.2. Adding Dependencies to the package.json File
This section is applicable only if you are using the package.json file. Skip this section if you are using the bower.json file.
You must add the dependencies to the package.json file to be able to use it in Section 4.2.3, “Enabling the Gulp Plugin”.
To add the dependencies:
- In the Project Explorer view, expand neon3_features and double-click package.json to open the file in the default editor.
- After "license": "ISC", add a comma (,).
On the next line add the following code snippet:
"devDependencies" : { "jquery" : "*", "angular" : "*", "bootstrap" : "~3.3.6" }-
Save the file. The contents of the
package.jsonfile are as displayed in the following image.
Figure 4.5. package.json File as Edited

4.2.3. Enabling the Gulp Plugin
To be able to use the task runners Grunt or Gulp, you must first define the following dependencies required for these plugins:
-
In the
bower.jsonfile, under dependencies you must have “gulp”:”” or “grunt”:”*”. -
In the
package.jsonfile, under dependencies you must have “gulp”:”” or “grunt”:””.
In this section, we elaborate steps to enable the Gulp plugin. Use the same steps to enable the Grunt plugin.
To enable the Gulp plugin:
- In the Project Explorer view, expand neon3_features and double-click package.json to open it in the default editor.
-
In the
package.jsonfile, under devDependencies, after the last dependency defined in the file, type a comma (,). - On the next line, type "gulp": "*".
On the next line type "gulp-rename": "*" and save the file. The contents of the
package.jsonfile are as displayed in the following image.Figure 4.6. package.json File with Gulp Enabled

-
In the
package.jsonfile, click Run As > npm Install. The Console view shows the progress of the task. Overlook any warnings at this point of time.
Result: The node_modules folder displays under the project in the Project Explorer view.
4.2.4. Creating the gulpfile.js File
In this section, you create the gulpfile.js file to be used in Section 4.2.5, “Using the Gulp Plugin”.
To create the gulpfile.js:
- Right-click neon3_features and then click New > Other.
- In the New wizard, search field, type JavaScript.
Click JavaScript Source File and then click Next. In the New JavaScript file window:
- Cick neon3_features.
- In the File name field, type gulpfile.js.
- Click Finish. The empty file opens in the default editor.
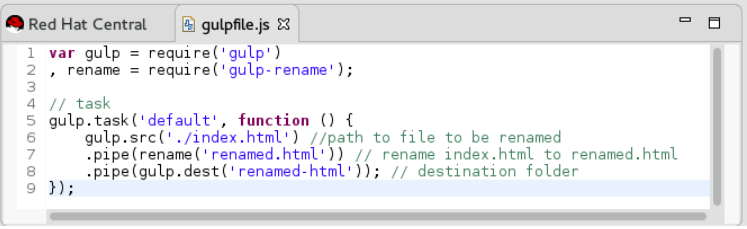
Copy the following content and paste it in the
gulpfile.jsfile:var gulp = require('gulp') , rename = require('gulp-rename'); // task gulp.task('default', function () { gulp.src('./index.html') //path to file to be renamed .pipe(rename('renamed.html')) // rename index.html to renamed.html .pipe(gulp.dest('renamed-html')); // destination folder });-
Save the file. The contents of the
gulpfile.jsfile are as displayed in the following image.
Figure 4.7. gulpfile.js File
4.2.5. Using the Gulp Plugin
To use the Gulp plugin:
- In the Project Explorer view, expand neon3_features and double-click gulpfile.js to open the file in the editor. The file has several Gulp tasks defined.
- Right-click gulpfile.js and click Run As > Gulp Task. The Console view shows the progress of the task.
- You may also choose to expand gulpfile.js in the Project Explorer view and view all the tasks. Right-click each task and click Run As > Gulp Task to view the task.
Result: A new directory named renamed-html is created under neon3_features. Expand the renamed-html directory to see the renamed.html file.
4.3. Working with the Node.js Application
In this section, you will use the project at: https://github.com/ibuziuk/jsdt-node-test-project.
4.3.1. Prerequisites
- Ensure npm and node.js are installed. For details to install, see the Appendix.
4.3.2. Importing the jsdt-node-test-project
To import the jsdt-node-test-project:
-
Run the command
git clone https://github.com/ibuziuk/jsdt-node-test-projectto clone the project on your local system: . - In the IDE, click File > Open Projects from File System.
- In the Open Projects from File System or Archive window, click Directory next to the Open Source field.
- Locate the jsdt-node-test-project and click OK.
- In the Open Projects from File System or Archive window, click Finish.
Result: The jsdt-node-test-project is listed in the Project Explorer view.
4.3.3. Running the index.js File
To work with the node.js application:
- In the Project Explorer view, expand jsdt-node-test-project.
- Right-click package.json and click Run As > npm Install. The Console view shows the progress of the task.
- Right-click index.js and click Run As > Node.js Application.
Result: The Console view shows the Listening on port 3000 message. Open localhost:3000 to see the output on a web page.
Figure 4.8. Output of the index.js File

4.3.4. Debugging the Node.js Application
To debug the node.js application:
- In the Project Explorer view, expand jsdt-node-test-project and double-click index.js to open it in the default editor.
- To add a breakpoint, right-click on the line number where you want the execution of the code to stop, and then click Toggle Breakpoint. Save the file.
- Right-click index.js, click Debug As > Node.js Application.
Result: The Console view shows the debugger listening on port <port_number> message.
Figure 4.9. Debugging the Node.js Application

Use the following features to carry out different tasks:
- Inspecting Variables: All the variables are listed in the Variables view. Use this view to search for specific variables and inspect them.
-
Inspecting the main
node.jsfile: The mainnode.jsfile opens in the default editor (index.js, in this case). You can hover the mouse over the variables to see the functions. -
Editing the main
node.jsfile: You can edit the mainnode.jsfile and save it to see the changes automatically propagated to VM.
4.4. Appendix
4.4.1. Installing node.js
To install node.js:
- On Windows, macOS, and Linux, see https://nodejs.org/en/.
- On RHEL, see https://www.softwarecollections.org/en/ .
4.4.2. Installing npm
npm is distributed with node.js. So, when you install node.js, npm will be available for use.