-
Language:
English
-
Language:
English
Red Hat Training
A Red Hat training course is available for Red Hat JBoss Developer Studio
Chapter 2. Developing for the Cloud with OpenShift 3
2.1. Creating an OpenShift Container Platform Application in Red Hat JBoss Developer Studio
Using the OpenShift Container Platform Tooling you can create, import, and modify OpenShift Container Platform applications by:
- Creating a New OpenShift Container Platform Connection
- Creating a New OpenShift Container Platform Project
- Creating a New OpenShift Container Platform Application
- Importing an Existing OpenShift Container Platform Application into the IDE
- Deploying an Application Using the Server Adapter
- Viewing an Existing Application in a Web Browser
- Deleting an OpenShift Container Platform Project
2.1.1. Creating a New OpenShift Container Platform Connection
To use the OpenShift Container Platform tooling in the IDE, you must first create an OpenShift Container Platform connection. To create a new connection:
- In the OpenShift Explorer view, click New Connection Wizard. If the OpenShift Explorer view is not available, click Window > Show View > Other and then search for OpenShift Explorer and after you find it, click OK.
In the New OpenShift Connection wizard:
- In the Connection list, click <New Connection>.
- In the Server type list, click OpenShift 3.
- In the Server field, type the URL for an OpenShift Container Platform server.
- In the Authentication section, in the Protocol list, click OAuth to authenticate using the token or click Basic to authenticate using login credentials.
- Click Finish.
Figure 2.1. Set up a New OpenShift Container Platform Connection

Result: The connection is listed in the OpenShift Explorer view.
2.1.2. Creating a New OpenShift Container Platform Project
To create a new OpenShift Container Platform project:
- In the OpenShift Explorer view, right-click the connection and click New > Project.
In the Create OpenShift Project window:
- In the Project Name field, type a name for the project. Project names must be alphanumeric and can contain the character “-” but must not begin or end with this character.
- In the Display Name field, type a display name for the project. This name is used as the display name for your project in the OpenShift Explorer view and on the OpenShift Container Platform web console after the project is created.
- In the Description field, type a description of the project.
- Click Finish.
Result: The project is listed in the OpenShift Explorer view, under the relevant connection.
2.1.3. Creating a New OpenShift Container Platform Application
Use the New OpenShift Application wizard to create OpenShift Container Platform applications from default or custom templates. Using a template to create an application is useful because the same template can be used to create multiple similar applications with different or identical configurations for each of them.
To learn more about using and creating templates with OpenShift Container Platform, see Templates.
To create a new OpenShift Container Platform application:
- In the OpenShift Explorer view, right-click the connection and click New > Application.
- If required, in the New OpenShift Application wizard, sign in to your OpenShift Container Platform server using the Basic protocol (username and password) or the OAuth protocol (token) and click Next.
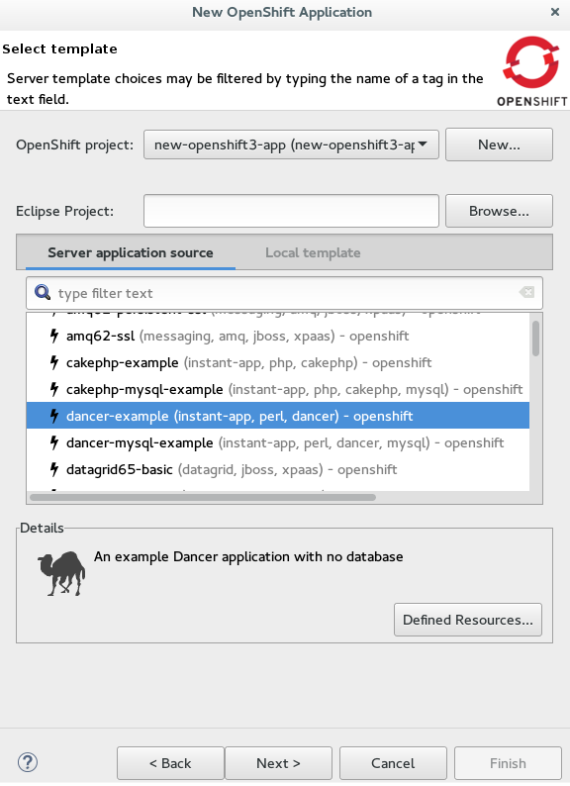
In the Select Template window, click the Server application source tab.
NoteTo create an application from a local template, click the Local template tab and then click Browse File System or Browse Workspace to locate the template that you want to base the project on.
- From the list, click the template that you want to base your project on. You can also use the type filter text field to search for specific templates.
Click Next.
Figure 2.2. Select a Template for Project Creation

- In the Template Parameters window, confirm the parameter values and click Next.
- In the Resource Labels window, confirm the labels that you want to add to each resource. You can also click Add or Edit to add labels or edit the existing ones.
- Click Finish.
- In the Results of creating the resources from the {template_name} window, review the details and click OK.
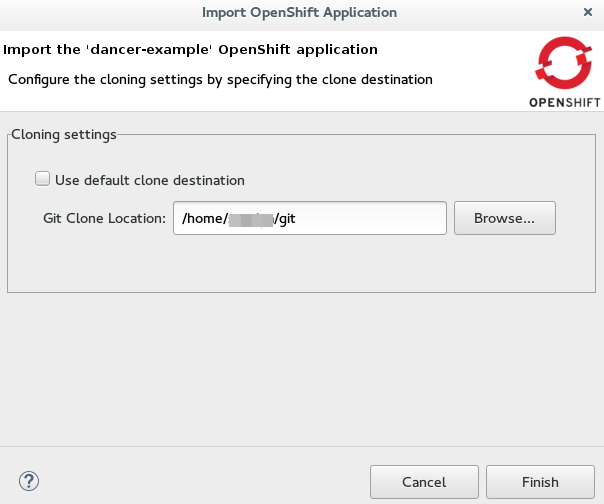
In the Import Application window, click Use default clone destination to clone the application at the default location or in the Git Clone Location field, type or browse for the location where you want to clone the application and click Finish.
Figure 2.3. Selecting a Git Clone Location
 Note
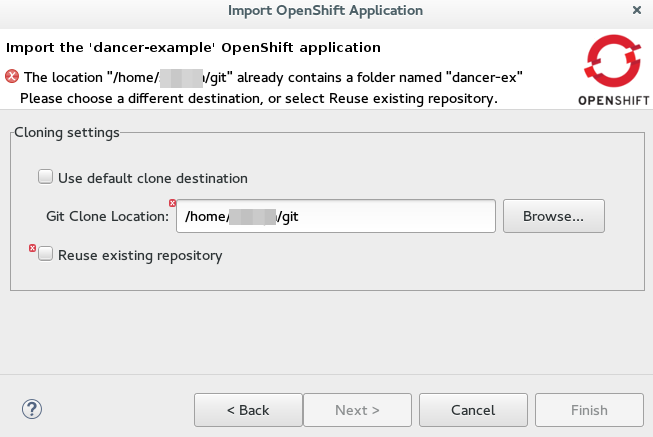
NoteIf the Git location chosen to clone the application already contains a folder with the application name that you are trying to import, you must select a new location for the Git clone. If you do not select a new location, the existing repository will be reused with the changes you made being retained but not reflected on the OpenShift Container Platform console.
Figure 2.4. Git Clone Location Reuse

Result: The application appears in the Project Explorer view.
2.1.4. Importing an Existing OpenShift Container Platform Application into the IDE
Only an application that has its source specified in the build config file can be imported into the workspace.
Applications associated with your OpenShift Container Platform account(s) are listed in the OpenShift Explorer view. The source code for these applications can be individually imported into the IDE using the Import OpenShift Application wizard. Once imported, the user can easily modify the application source code, as required, build the application, and view it in a web browser.
To import an existing OpenShift Container Platform application as a new project in the existing IDE workspace:
- If required, sign into your OpenShift Container Platform server using the Basic protocol or the OAuth protocol.
- In the OpenShift Explorer view, expand the connection to locate the application to import.
Right-click the {project name} and click Import Application.
NoteTo import a particular application from a service, right-click the service and then click Import Application. If you right-click a project and click Import Application, and if there are more than one build configurations with source code under a project, you will be prompted to select the desired application for import because of existence of several applications under one project.
- In the Import OpenShift Application wizard, Existing Build Configs list, click the application that you want to import and click Next.
- Ensure the location in the Git Clone Destination field corresponds to where you want to make a local copy of the application Git repository and click Finish.
Result: The application is listed in the Project Explorer view.
2.1.5. Deploying an Application Using the Server Adapter
The server adapter allows incremental deployment of applications directly into the deployed pods on OpenShift Container Platform.
To deploy an application:
- In the OpenShift Explorer view, expand the connection, the project, and then the application.
- Right-click the {application name} and click Server Adapter.
In the Server Settings window, Resources section, select the service.
NoteA workspace project will be selected automatically, if the OpenShift service has a Build Configuration with a git URL matching the git remote URL of one of the workspace projects.
- Click Finish.
Result: The Servers view is the view in focus with the server showing [Started, Publishing…] followed by the Console view showing the progress of application publishing.
Figure 2.5. Console View Showing Application Publication Progress

2.1.6. Viewing an Existing Application in a Web Browser
After an application has been successfully deployed, to view it in the internal web browser, in the OpenShift Explorer view, right-click the application, and click Show In > Web browser.
Result: The application displays in the built-in web browser.
2.1.7. Deleting an OpenShift Container Platform Project
You may choose to delete a project from the workspace to make a fresh start in project development or after you have concluded development in a project. All resources associated with a project get deleted when the project is deleted.
To delete a project:
- In the OpenShift Explorer view, expand the connection and then the project to locate the application you want to delete.
- Right-click the {project name} and click Delete Project.
- In the OpenShift resource deletion window, click OK.
To delete more than one project (and the containing applications), in the OpenShift Explorer view, click the project to select it and while holding the Control key select another project that you want to delete and then press Delete.
2.1.8. Did You Know
- Scale the project deployment, using the context menu for the service (the first node below the project). You can also scale the deployment from the Properties tab of a deployment (replication controller) and deploymentconfig.
- View the rsync output in the Console view. You can also see the progress of the file transfer after you publish local changes to OpenShift Container Platform.
2.2. Setting up and Remotely Monitoring an OpenShift Container Platform Application
In some scenarios, the user already has a remote instance of OpenShift Container Platform running with various applications on it and may want to monitor it. The IDE allows users to set up a connection to a remote instance of OpenShift Container Platform and then use logs (application logs and build logs) to troubleshoot and monitor running applications. Connect to and work with a remote OpenShift Container Platform instance by:
2.2.1. Setting up OpenShift Client Binaries
Before setting up port forwarding or streaming application and build logs, it is mandatory to set up OpenShift Client Binaries.
To set up the OpenShift Client Binaries:
- In the IDE, click Window > Preferences > JBoss Tools > OpenShift 3.
- Click the here link.
- In the Download from GitHub section, click the Release page link.
- Scroll to the Downloads section and click the appropriate link to begin the client tools download for the binary for your operating system.
- After the download is complete, extract the contents of the file.
- Click Window > Preferences > JBoss Tools > OpenShift 3.
- Click Browse and select the location of the OpenShift Client executable file.
- Click Apply and Close.
Result: OpenShift Client Binaries are now set up for your IDE.
2.2.2. Setting up Port Forwarding
Using the Application Port Forwarding window, you can connect the local ports to their remote counterparts to access data or debug the application. Port forwarding automatically stops due to any one of the following reasons:
- The OpenShift Container Platform connection terminates
- The IDE shuts down
- The workspace is changed
Port forwarding must be enabled each time to connect to OpenShift Container Platform from the IDE.
Prerequisite: Ensure that the OpenShift Client Binaries are set up (see Setting up OpenShift Client Binaries for instructions).
To set up port forwarding:
- In the OpenShift Explorer view, expand the connection, the project, the services, and then the Pods.
Right-click the relevant pod and then click Port Forwarding.
Figure 2.6. Setting up Port Forwarding

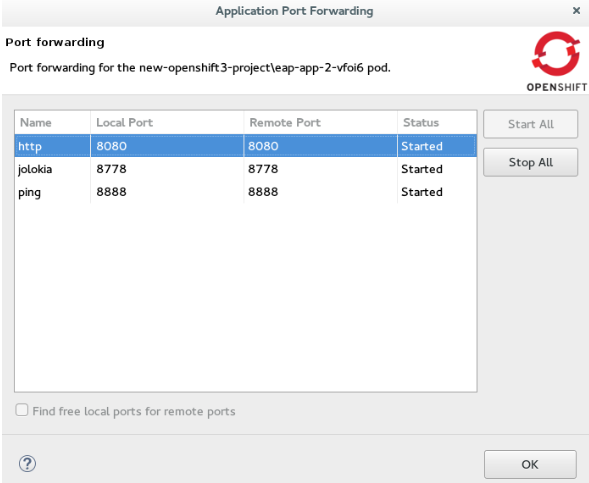
- In the Application Port Forwarding window, click the Find free local ports for remote ports check box and then click Start All.
Result: The Status column shows Started, indicating that port forwarding is now active. Additionally, the Console view shows the status of port forwarding for the particular service.
Figure 2.7. Start Port Forwarding

2.2.3. Streaming Pod Logs
Pod logs are general logs for an application running on a remote OpenShift Container Platform instance. The streaming application logs feature in the IDE is used to monitor applications and use the previous pod log to troubleshoot if the application fails or returns errors.
Prerequisite: Ensure that the OpenShift Client Binaries are set up (see Setting up OpenShift Client Binaries for instructions).
To stream the application logs:
- In the OpenShift Explorer view, expand the project, the services, and then the Pods.
- Right-click the relevant Pod and then click Pod Log.
Figure 2.8. Streaming Pod Log

Result: The Console view displays the Pod log.
2.2.4. Streaming Build Logs
Build logs are logs that document changes to applications running on a remote OpenShift Container Platform instance. The streaming build logs feature in the IDE is used to view the progress of the application build process and to debug the application.
Prerequisite: Ensure that the OpenShift Client Binaries are set up (see Setting up OpenShift Client Binaries for instructions).
To stream build logs:
- In the OpenShift Explorer view, expand the project, the services, and then the build.
- Right-click the relevant build instance and click Build Log.
Figure 2.9. Streaming Build Log

Result: The Console view is now the view in focus showing the build log.
2.3. Building and Deploying Docker-formatted Container Image to Container Development Kit OpenShift Registry
In this article we deploy the Docker based microservices, frontend and bonjour, into an OpenShift Container Platform instance running on Red Hat Container Development Kit, in JBoss Developer Studio 10. We use the Helloworld-MSA tutorial available in GitHub at: https://github.com/redhat-helloworld-msa/helloworld-msa.
The article shows how you can easily build a local Docker image, not present on Docker Hub, to Container Development Environment and then deploy that image to an OpenShift Container Platform instance, using JBoss Developer Studio. frontend and bonjour microservices, used here, are examples of such private images that are not present in Docker Hub.
You can build and deploy a Docker-formatted Container Image to Container Development Kit OpenShift Registry by:
2.3.1. Prerequisites
- Install nmp: Before running JBoss Developer Studio, install npm on your system. See the npm documentation for instructions for various platforms: https://docs.npmjs.com/getting-started/what-is-npm.
- Download and install JDK 8.
Install JBoss Developer Studio and Red Hat Container Development Kit.
- On a Windows system: Install Red Hat Development Suite to automatically install both: JBoss Developer Studio and Red Hat Container Development Kit (for installation instructions, see https://access.redhat.com/documentation/en/red-hat-development-suite/1.1/paged/installation-guide/).
- On other operating systems: Install JBoss Developer Studio (for installation instructions, see: https://access.redhat.com/documentation/en/red-hat-jboss-developer-studio/10.1/paged/installation-guide/) and install Red Hat Container Development Kit (for installation instructions, see https://access.redhat.com/documentation/en/red-hat-container-development-kit/2.2/paged/installation-guide/).
Clone the following projects and then import them into JBoss Developer Studio using the Import wizard (from File > Open Projects from File System).
- bonjour project from: https://github.com/redhat-helloworld-msa/bonjour
- frontend project from: https://github.com/redhat-helloworld-msa/frontend
- Set up the oc client binaries in the IDE from Window > Preferences, expand JBoss Tools, and then click OpenShift 3.
2.3.2. Installing the javascript Modules
To download and install all the required javascript modules:
-
In the Project Explorer view, expand frontend and right-click
package.json. - Click Run As > npm Install to download and install the required javascript modules in the project.
Result: After the build is complete, a new node_modules folder is listed under the project in the Project Explorer view.
2.3.3. Building the frontend Microservice
In this section we build the frontend microservice which is the landing page for the application being built. The frontend microservice calls other microservices (bonjour, in this case) and displays the results from these calls.
To build the Docker-formatted Container image:
- In the Project Explorer view, expand frontend and right-click Dockerfile and then click Run As > Docker Image Build.
In the Docker Image Build Configuration window:
- In the Connection list, select Container Development Environment.
- In the Repository Name field, type demo/frontend.
- Click OK.
Result: The Docker-formatted Container image starts building against the Docker Daemon running in the Container Development Environment.
2.3.3.1. Deploying the frontend Microservice
After the build is complete, the Docker-formatted Container image demo/frontend is available in the Docker Explorer under Container Development Environment.
To deploy the frontend microservice:
- In the Docker Explorer view, Container Development Environment > Images, right-click demo/frontend and click Deploy to OpenShift.
- In the Deploy an Image window, click New.
In the Create OpenShift Project window:
- In the Project Name field, type the name of the new project, demo.
- Optionally, in the Display Name and Description fields, enter the required details.
- Click OK.
- In the Deploy an Image window, click the Push Image to Registry check box and click Next.
In the Deployment Configuration & Scalability window, change the following environment variables:
- Click OS_PROJECT to open the Environment Variable window and in the Value field, type demo (from step 5) and click OK.
- In the Deployment Configuration & Scalability window, click Next and then click Finish. After the Docker-formatted Container image is pushed to the Docker Registry on OpenShift Container Platform, the Eclipse plugin generates all the required OpenShift Container Platform resources for the application to run.
- In the Deploy Image to OpenShift window, review the details of deploying the image and click OK.
- In the OpenShift Explorer view, expand the connection > {project name} > Service > Pod to see the Pod running. Right-click the Pod and click Pod Log. The Console view shows the frontend service running. In the OpenShift Explorer view, expand the application and right-click the service and click Show In > Web Browser.
Result: The frontend microservice, in the Bonjour Service shows: Error getting value from service <microservice> meaning the bonjour microservice must be connected.
2.3.4. Connecting the frontend and bonjour Microservices
In this section we build the bonjour microservice and then view it on the frontend microservice. The bonjour microservice is a simple node.js application that returns the string bonjour-de-<pod_ID>.
To connect the Microservices:
- In the Project Explorer view, expand bonjour and right-click package.json.
- Click Run As > npm Install.
- In the Project Explorer view, expand bonjour and right-click Dockerfile.
- Click Run As > Docker Image Build.
In the Docker Image Build Configuration window:
- In the Connectio*n list, select *Container Development Environment.
- In the Repository Name field, type demo/bonjour.
- Click OK.
2.3.4.1. Deploying the bonjour Microservice
You can either deploy the Docker-formatted Container image from the Docker Explorer (as done in step 3 of the Building a Docker-formatted Container Image section above), or in the following way from the OpenShift Explorer view:
- In the OpenShift Explorer view, right-click the project (demo), and click Deploy Docker Image.
In the Deploy an Image window:
- In the Docker Connection list, click the Docker connection.
-
In the Image Name field, type
demo/bonjour. - Click the Push Image to Registry check box.
- Click Next.
- In the Deployment Configuration & Scalability window, click Next.
- In the Services and Routing Settings window, click Finish.
- In the Deploy Image to OpenShift window, click OK.
2.3.4.2. Scalling the Pod
To see the bonjour service with the Pod running:
- In the OpenShift Explorer view, expand the application name (demo).
- Right-click the pod and click Pod Log to check if the pod is running.
- Navigate to the browser where you have the application running and click Refresh Results. You will see a greeting from the bonjour service with a hostname that matches the Pod name in the OpenShift Explorer view.
- In the OpenShift Explorer view, right-click the service and click Scale > Up. You now have two Pods running on OpenShift Container Platform.
Result: Navigate to the browser and click Refresh Results to see the service balancing between the two Pods.
2.3.5. Editing the bonjour Microservice
In this section we edit the bonjour microservice and then view the results on the frontend microservice.
To edit the bonjour microservice:
- In the Project Explorer view, expand bonjour, and double-click bonjour.js to open it in the default editor.
Find
function say_bonjour(){
    Return “Bonjour de “ + os.hostname();
Change it to:
function say_bonjour(){ Return “Salut de “ + os.hostname();- Save the file.
2.3.5.1. Viewing the Edited bonjour Microservice on the frontend Microservice
After you have edited the bonjour microservice:
- In the Project Explorer view, expand bonjour, and right-click Dockerfile.
Click Run As > Docker Image Build.
NoteHere, the Docker run configuration, the connection, and the repository name used earlier are being reused. To edit the configuration, open the Run Configuration window.
After the Console view shows that the Docker-formatted Container image has been successfully pushed to the Docker Daemon:
- In the Docker Explorer view, expand Container Development Environment > Images.
- Right-click the image and click Deploy to OpenShift.
- In the Deploy an Image window, click Push Image to Registry and then click Next.
- In the Deployment Configuration & Scalability window, click Finish. The OpenShift Explorer view, under bonjour shows the Pods being added and then running. Navigate to the browser and click Refresh Results.
Result: The new greeting appears.
2.3.6. Troubleshooting
2.3.6.1. No Docker Connection Available
Error message: No Docker Connection available to build the image.
Issue: You have installed JBoss Developer Studio through Red Hat Development Suite and you must start Red Hat Container Development Kit for it to be available. Resolution:
- In the Servers view, right-click Container Development Environment and click Start.
- Enter your credentials in the box provided.
If, after doing this the Container Development Environment does not start and you get the following error: Error message: Server Container Development Environment failed to start.
On the command prompt, cd to cdk/components/rhel/rhel-ose and run the vagrant destroy command. After it is destroyed, run the vagrant up command. In the IDE, in the Servers view, right-click Container Development Environment and click Start once again.

