
Red Hat Training
A Red Hat training course is available for Red Hat JBoss Data Virtualization
10.3. Transformation Editor
10.3.1. Transformation Editor
The Teiid Designer's Transformation Editor enables you to create the query transformations that describe how to derive your virtual metadata information from physical metadata sources or other virtual metadata and how to update the sources.
The Transformation Editor provides a robust set of tools that you can use to create SQL queries. You can use the tools, or you can type an SQL query into the Transformation Editor.
To edit a transformation:
- Double-click Edit.
- A relational view table or procedure in the Model Explorer or Diagram Editor
- A transformation node in a transformation diagram or mapping transformation diagram
- Right-click Edit action on selected object in the Model Explorer, Diagram Editor or Table Editor.
- A relational view table or procedure
- A transformation node in a transformation diagram or mapping transformation diagram
- A mapping class in a mapping diagram or mapping transformation diagram
A Model Editor is opened if it is not currently open for the selected object's model.
After the corresponding transformation diagram is opened in the Diagram Editor, the Transformation Editor is displayed in the lower section of the Diagram Editor.
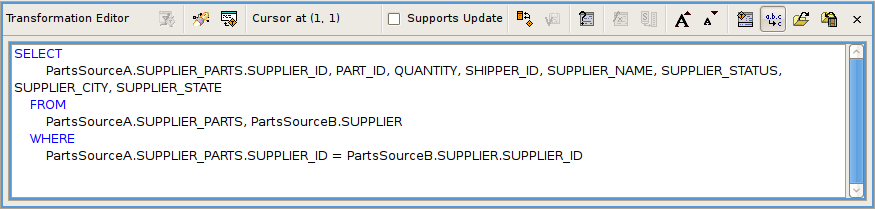
Figure 10.13. Editing String Property
If this virtual class supports updates, the tabs on the bottom of the Transformation Editor allow you to enter SQL for each type of query that virtual class supports. If this virtual class does not support updates, only the SELECT tab is available.
You can enter separate SQL queries on each available tab to accommodate that type of query.
Within the Transformation Editor, you can:
- Disable specific update transformation types on this virtual class.
- Start your transformation with a provided SQL Template.
- Build or edit a criteria clause to use in your transformation.
- Build or edit an expression to use in your transformation.
- Find and replace a string within your transformation.
- Validate the transformation to ensure its content contains no errors.
- Reconcile target attributes to ensure the symbols in your transformation match the attributes in your virtual metadata class.
You can also set preferences that impact the display of your Transformation Editor.
- The Transformation Editor toolbar actions are summarized below.
 Preview Virtual Data - executes a simple preview query for the target table or procedure of the transformation being edited.
 Search Transformations - provides a simple way select and edit another transformation based SQL text search criteria.
 Edit Transformation - provides a simple way to change which transformation to edit without searching in a diagram or the Model Explorer. Click the action and select from a list of views, tables, procedures or operations from the currently edited model.
 Cursor Position (line, column) - shows the current line and column position of the insertion cursor. For example, Cursor Position(1,4) indicates that the cursor is presently located at column 4 of line 1.
 Supports Update - checkbox allows you to enable or disable updates for the current transformation target. If Supports Update is selected, the editor shows four tabs at the bottom for the Select, Update, Insert and Delete transformations. If Supports Update is cleared, all updates are disabled and only the Select transformation is displayed.
 Reconcile - allows you to resolve any discrepancies between the transformation symbols and the target attributes. Clicking this button will display the Reconcile Virtual Target Attributes dialog box in which you can resolve discrepancies.
 Save/Validate - saves edits to the current transformation and validates the transformation SQL. Any Warning or Error messages will be displayed at the bottom of the editor in the messages area. If the SQL validates without error, the message area is not displayed.
 Criteria Builder - allows you to build a criteria clause in your transformation. The button will enable if the cursor position is within a query that allows a criteria. Pressing the button will launch the Criteria Builder dialog. If the Criteria Builder is launched inside an existing criteria, that criteria will be displayed for edit, otherwise the Criteria Builder will be initially empty.
 Expression Builder - allows you to build an expression within your transformation. The button will enable if the cursor position is at a location that allows an expression. Pressing the button will launch the Expression Builder dialog. If the Expression Builder is launched inside an existing expression, that expression will be displayed for edit, otherwise the Expression Builder will be initially empty.
 Expand Select * - allows you to expand a SELECT * clause into a SELECT clause which contains all of the SELECT symbols. The button will enable only if the cursor is within a query that contains a SELECT * clause that can be expanded.
 Increase Font Size - increases the font size of all editor text by 1.
 Decrease Font Size - decreases the font size of all editor text by 1.

 Show/Hide Messages - toggles the display of the message area at the bottom of the transformation editor.
 Optimize SQL - when toggled ON, will use the short names of all SQL symbols that can be optimized. Some symbol names may remain fully qualified in the event of a duplicate name or if the optimizer is unable to optimize it. When the action is toggled OFF, all symbol names will be fully qualified.
 Import SQL Text - allows you to import an SQL statement from a text file on your file system. Pressing this button will display an import dialog in which you can navigate to the file.
 Export SQL Text - allows you to export the currently displayed SQL statement into a text file on your file system. Pressing this button will display an export dialog in which you can choose the location for export.
- Close X - closes the transformation editor.
- The Transformation Editor context menu can be displayed by clicking the right mouse button within the editor's text area. The context menu is show below:Following is a summary of the context menu actions:

Figure 10.14. Transformation Editor context menu
- Cut - Copy - Paste - Typical text editor actions to cut, copy or paste text within the editor.
- Undo - Redo - Allows you to Undo or Redo the previous action.
- Find - Displays a Find and Replace Dialog which allows you to search and replace text within the transformation.
- Apply Template... - Displays the Choose an SQL Template Dialog, which allows you to choose a starting SQL Template from a list of common SQL patterns. See View Table wizard section for a description of this dialog.
10.3.2. Using the Reconciler
The Transformation Editor's Reconciler offers you a quick, graphical means to reconcile the Target View attributes and the Transformation SQL. As you make changes, the overall status will appear at the top of the dialog to assist you in successfully completing your edits.
To launch the Reconciler, click the Reconcile Transformation button
in the Transformation Editor.
in the Transformation Editor.
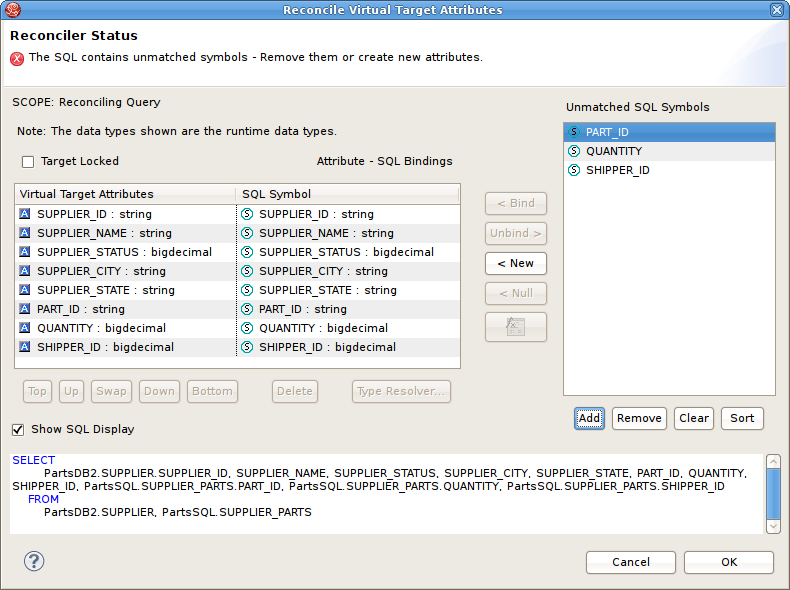
Figure 10.15. Reconciler Dialog
To summarize the different sections of the dialog:
- Target Attributes - SQL Symbol Table: This table shows the target attributes in the left column and the SQL Symbols in the right column. The SQL Symbols are the symbols that are projected from the SQL transformation. A symbol is referred to as being bound to a target attribute when it is displayed next to the attribute.If a target attribute is unbound, its row is highlighted in red. The transformation is not valid until all attributes have a corresponding SQL symbol binding.Here are a few things you can do in the table section:
- Lock Target Attributes: To lock the target attribute ordering, select the Lock Target Attributes checkbox. This will lock the attributes in place.
- Re-Order Attributes: To change the ordering of the target attributes, use the Top, Up, Swap, Down, and Bottom controls beneath the table. Select single or multiple table rows, then click the desired action button.
- Delete Attributes: To delete one or more of the target attributes, select the table row(s) that you want to delete and then click the Delete button.
- Resolve Types: If an Attribute-SQL Symbol binding has a datatype conflict, a message will be displayed. To assist in resolving the datatype conflict, a Datatype Resolver Dialog is provided. Click on the table row, then click the Type Resolver... button to display the dialog. See Using Datatype Resolver section for further information.
- Unmatched SQL Symbols list: This list is to the right of the attribute-symbol binding table, and shows the SQL symbols from the transformation SQL that are not bound to a target table attribute.Here are a few things you can do in the list section:
- Add SQL Symbols: To add SQL Symbols to the list, click the Add button. You will be presented with a dialog showing all available symbols from your transformation source tables. Click on the symbols that you want to add, then click OK.
- Remove or Clear Symbols: To remove one or more of the SQL symbols, select the list items then click the Remove button. To clear the entire SQL symbols list, click the Clear button.
- Sort Symbols: By default, the symbols are shown in the order that they appear in the SQL query. To show them alphabetically in the list, click the Sort button.
- Binding Controls: The Binding Controls are located between the Attribute-Symbol table and the Unmatched SQL Symbols list. Use these buttons to define the Attribute-Symbol bindings.Here are a few things you can do with the binding controls:
- Bind: This button will bind an SQL Symbol to a target attribute. Select an Unmatched SQL symbol and select a target attribute, then click Bind to establish the binding.
- Unbind: This button will unbind an Attribute-Symbol binding. Select an already bound attribute in the table, then click Unbind. The SQL Symbol will be released to the Unmatched Symbols list.
- New: This button will create a new target attribute, using an Unmatched SQL Symbol. Select an Unmatched Symbol from the list, then click New. A new target attribute will be added to the bottom of the Attribute-Symbol table, bound to the selected SQL symbol.
- Null: This button allows you to bind null to a target attribute instead of binding an SQL Symbol to it. Select a row in the Attribute-Symbol table, then click Null. The target attribute will be bound to null. If it was originally bound to an SQL Symbol, the symbol will be released to the Unmatched Symbol list.
- Function: This button allows you to define an expression instead of an SQL Symbol for the binding. To define the expression, select a row in the Attribute-Symbol table, then click the Function button. The Expression Builder Dialog will display, allowing you to define any type of expression. See Using Expression Builder section for further information about the Expression Builder.
- SQL Display: The current transformation SQL is shown at the bottom of the Reconciler dialog. As you add/remove SQL symbols and make other changes, you can see the SQL display change to reflect those changes. When you click OK, this SQL will be your new transformation SQL. If desired, the SQL Display can be hidden by clearing the Show SQL Display checkbox.
Once you are finished defining the bindings and resolving datatypes, click OK to accept the changes. The transformation SQL will change to reflect your edits.
10.3.3. Using the Datatype Resolver
This dialog is accessible from the Reconciler dialog (See Using Reconciler section) and offers you a quick way to resolve datatype conflicts between a target attribute and its SQL Symbol. You can resolve the conflicts in the datatype bindings either by converting all source SQL symbol datatypes or by changing all target column datatypes.
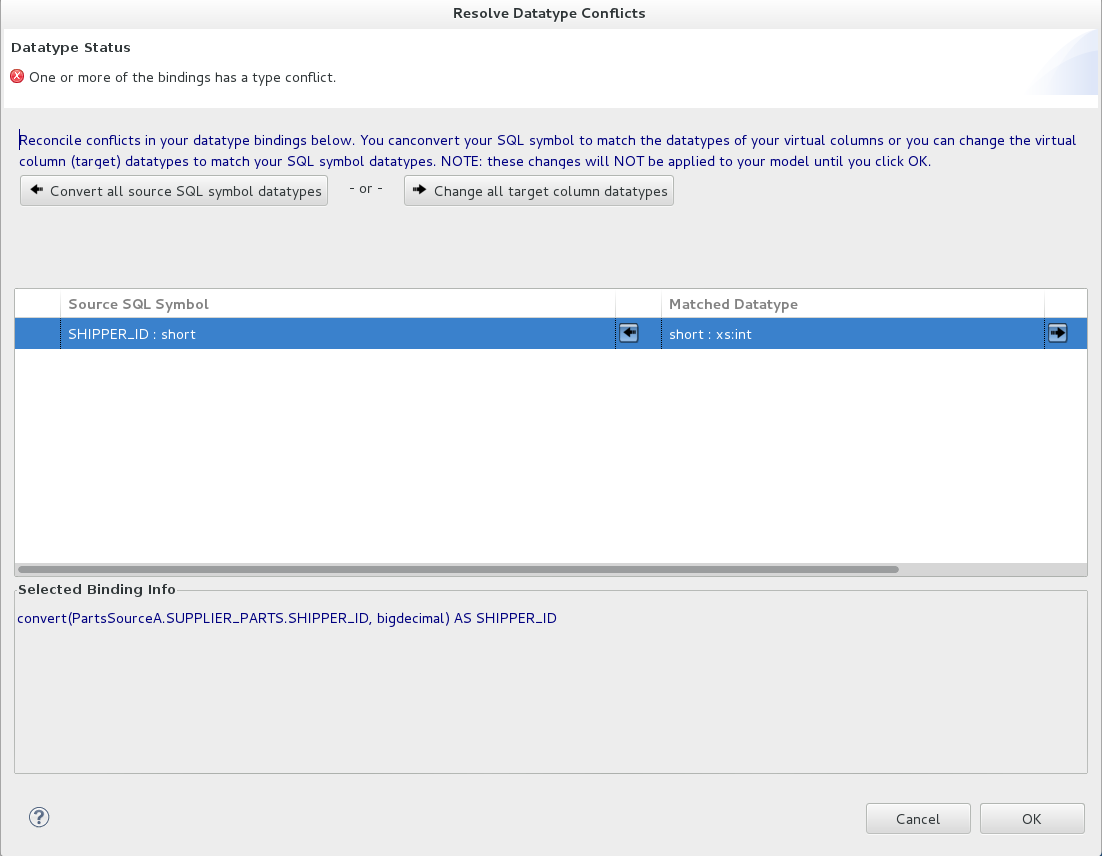
Figure 10.16. Datatype Resolver Dialog
To summarize the different sections of the dialog:
- Convert all source SQL symbol datatypes: Click this button to apply a CONVERT function to all of SQL symbols in the table so that their datatype is compatible with the corresponding attribute datatype.
- Change all target column datatypes: If the suggested datatype is not acceptable, click this button to choose your own datatype from the datatype dialog.
- Source SQL Symbol - Matched Datatype Table: This table shows all SQL Symbol datatype information for the selected binding. Select on a table row to populate the lower panel.
- Selected Binding Info: The lower panel shows the binding information for the selected SQL symbol. hows all SQL Symbol datatype information for the selected binding. Select on a table row to populate the lower panel.
Once you are finished resolving datatypes, click OK to accept the changes. You are directed back to the Reconciler Dialog, which will be updated to reflect your edits.
10.3.4. Using the Criteria Builder
The Transformation Editor's Criteria Builder offers you a quick, graphical means to build criteria clauses in your transformations based on meta objects in your diagram. If you launch the Criteria Builder with your cursor within an existing criteria in your transformation SQL, the builder will open in Edit mode. If your cursor is not in an existing criteria location, the builder will open in create mode and allow you to create it from scratch.
This procedure provides an example of building a criteria clause using the Criteria Builder. When building your own criteria, you can mix and match the values and constants with whatever logic you need to build powerful and complex criteria.
To use the Criteria Builder:
- In the Transformation Editor, click the Launch Criteria Builder button.
- The Criteria Builder displays.
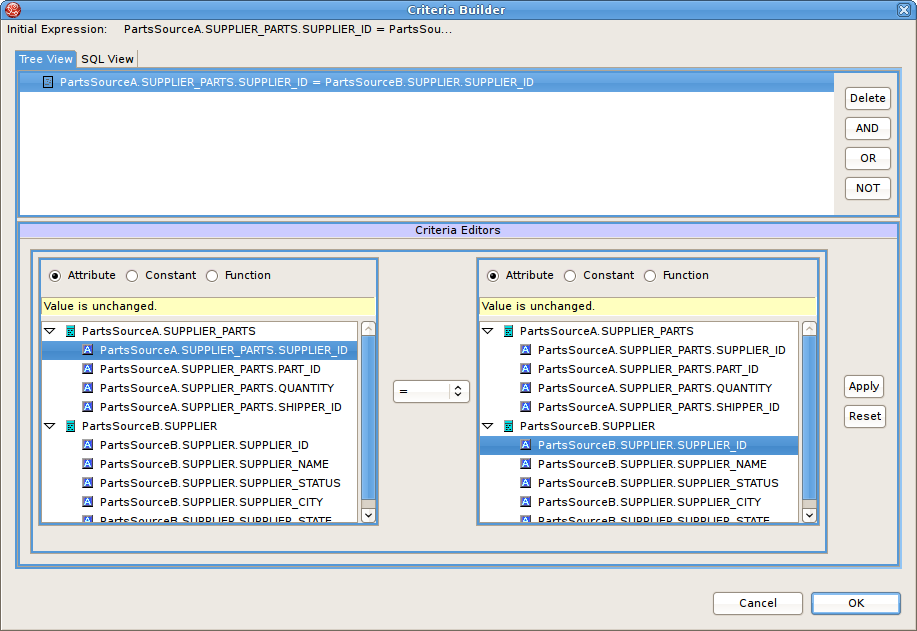
Figure 10.17. Editing String Property
The two tabs at the top, Tree View and SQL View, show the current contents of the criteria you have built.The Criteria Editor at the bottom allows you to build a criteria clause. To build a criteria clause, you must add information to the left side of the predicate, select a comparison operator, and add a value to the right side. - The radio buttons on either side of the Predicate Editor let you choose what type of content to place in that side of your predicate. Click the radio button of the type of content you want to place in your criteria. You can click:
- Attribute to add an attribute to the predicate. If you click the Attribute radio button, the Predicate Editor looks like this:
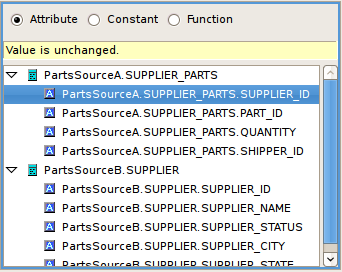
Figure 10.18. Attribute Panel
From the tree, select the attribute you want to add to the expression. You can select an attribute from any of the source classes in the transformation. - Constant to add a hardwired constant value to the predicate. If you click this radio button, the Predicate Editor looks like this:
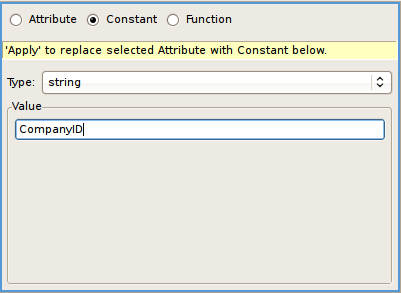
Figure 10.19. Constants Panel
Select the datatype for this constant from the Type drop-down list and enter the value in the Value edit box. - Function to add a function.

Figure 10.20. Functions
Click the Edit button to use the Expression Builder to construct a function to use in the predicate of your SQL Criterion.
- Set a value left side of the predicate and, when necessary, the right side of the predicate. If the right side of the predicate does not require a value of some sort, the Criteria Builder will not let you enter one.
- Click Apply.
- When you have created both a Left Expression and a Right Expression in the Predicate Editor, click Apply to add the criterion to the tree view at the top of the dialog box.
The criteria clause displays in the Criteria tree.
You can create complex criteria by joining other criteria with this one. To join criteria with this one, select the criteria in the Criteria tree and click:
- Delete to remove the selected criterion.
- AND to create a new criterion that must also be true.
- OR to create a new criterion that can be true instead of the selected criterion.
- NOT to establish negative criterion.
If you join a criterion to the one you just completed, you build the expression the same way, using the Expression Editors panel and the Predicate Editor panel. You can create complex, nested criteria by judicious use of the AND and OR buttons.
Once you have created the complete criteria you want, click OK to add it to your transformation.
10.3.5. Using the Expression Builder
The Transformation Editor's Expression Builder offers you a quick, graphical means to build expressions in your transformations. This Expression Builder lets you create:
- Attributes by selecting an attribute.
- Constants by selecting the datatype and value.
- Functions from both the standard Teiid Designer SQL functions and your enterprise's custom user defined functions. If you select a function before you launch the Expression Builder, you can use the Expression Builder to edit the selected function; otherwise, you can create a new function from scratch.
Note
The functions made available through the expression builder are described in the Teiid Reference Guide.
To use the Expression Builder:
- In the Transformation Editor, click the location where you want to insert the function.
- Click the Expression Builder button.
The SQL Expression Builder displays.
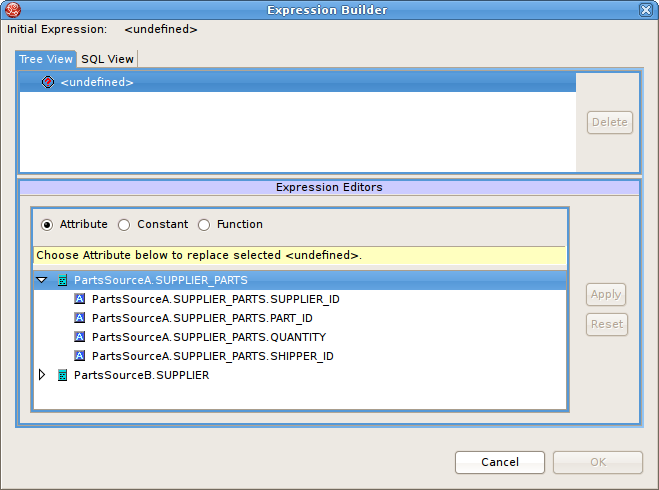
Figure 10.21. Expression Builder
The two tabs at the top, Tree View and SQL View, show the current contents of the expression you have built. To build an expression, you must specify the type of expression you want to build and populate it. In most cases, you will use the Expression Builder to construct a complex expression. - Click the Function radio button to add a function.
Note
You can simply add constants and attributes as expressions by themselves using the Attribute or Constant radio buttons; however, the Expression Editor is most useful for functions. - The Expression Editor displays the Function editor.

Figure 10.22. Function Panel Selected
From the Category drop-down list, choose the type of function you want to add. By default, the Teiid Designer offers the following categories:- Conversion for functions that convert one datatype into another.
- Datetime for functions that handle date or time information.
- Miscellaneous for other functions.
- Numeric for mathematical and other numeric functions.
- String for string manipulation functions.
Note
Any additional categories represent those containing user defined functions your site has created. - From the Function drop-down list, select the function you want. The table beneath the drop-down lists displays the number of arguments required for this function.
- Click Apply.
- Your function displays in the tree at the top. Sub nodes display for each argument you need to set for this function.

Figure 10.23. New Blank Function Created
You need to set an attribute or constant value for each sub node in the tree to specify the arguments this function needs. You can also nest another function in the tree using the Function editor.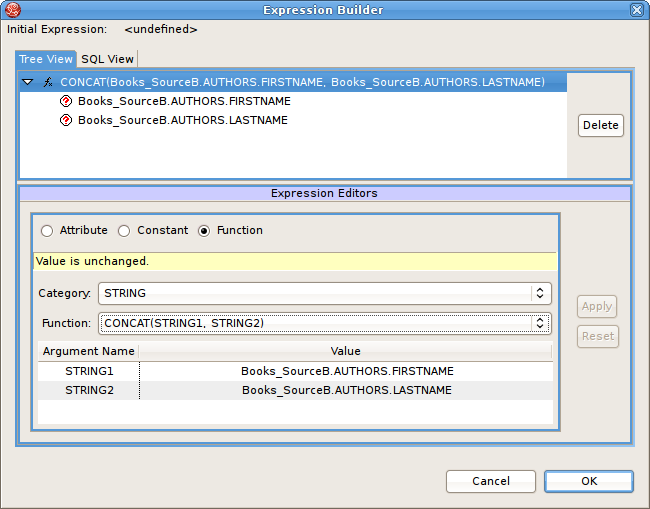
Figure 10.24. Nested Function Example
- Click each sub node in the tree and use the editors at the bottom of the dialog box to apply an attribute, constant, or function value to it.
- When you have added values to all nodes, as shown below, click OK to add this expression to your query or Cancel to close the dialog box without inserting the expression.If the OK button does not enable, you have not added a value to all nodes in the tree.
You can also nest functions within your expressions by selecting an argument and selecting a function for that argument. The nested function displays in the tree beneath your root function and its arguments display as well. Using the Expression Builder and nested functions, you can create complex logic within your query transformations.