Red Hat Training

A Red Hat training course is available for Red Hat JBoss Data Virtualization

User Guide Volume 2: Modeshape Tools

Red Hat JBoss Data Virtualization 6.2

This guide is for developers.

Red Hat Customer Content Services

Abstract

This document will guide user through use of the ModeShape Tooling plug-in for Red Hat JBoss Data Virtualization.

Chapter 1. Read Me

1.1. Back Up Your Data

Warning

Red Hat recommends that you back up your system settings and data before undertaking any of the configuration tasks mentioned in this book.

1.2. Variable Name: EAP_HOME

EAP_HOME refers to the root directory of the Red Hat JBoss Enterprise Application Platform installation on which JBoss Data Virtualization has been deployed.

1.3. Variable Name: MODE

MODE will either be standalone or domain depending on whether JBoss Data Virtualization is running in standalone or domain mode. Substitute one of these whenever you see MODE in a file path in this documentation. (You need to set this variable yourself, based on where the product has been installed in your directory structure.)

1.4. Red Hat Documentation Site

Red Hat's official documentation site is available at https://access.redhat.com/site/documentation/. There you will find the latest version of every book, including this one.

Chapter 2. Introduction

2.1. Features of ModeShape Tools

ModeShape Tools possesses following functionalities:
  • the ability to publish or upload resources from Eclipse workspaces to ModeShape repositories, and
  • the ability to create and edit Compact Node Type Definition (CND) files using the included CND form-based editor.

Note

The CND editor does not require a connection to a ModeShape or any other JCR repository. ModeShape repositories are persisted within the workspace, from session to session. The ModeShape registry is persisted from session to session.

2.2. ModeShape User Roles

Before publishing files to a ModeShape repository, you must be sure that the ModeShape server has at least one user which has the connect and readwrite roles or the connect and admin roles. At the time of installation, a default user modeshapeUser with roles admin and connect is added to the ApplicationRealm. You can add multiple modeshape users using ./add-user.sh script.
The roles specific to ModeShape are as follows:
  • connect - required to access any of the ModeShape WAR applications in JBoss Data Virtualization (REST service, WebDAV service, CMIS service and Repository Explorer) and required to connect to ModeShape using the remote JDBC driver (which is the case for JBDS)
  • admin - allows all repository operations, for example, read/write nodes, register/unregister node types, create/delete workspaces, backup/restore, reindex workspaces and unlock any locked nodes.
  • readwrite - allows reading/writing nodes but does not allow any of the other operations mentioned for admin role.
  • readonly - allows only the reading of nodes (that is navigating node paths).

Chapter 3. Tasks

3.1. Register Repository on New Server

3.1.1. Register Repository on a New Server

You can register a repository on a new server through the ModeShape view.
  1. Open ModeShape View

    1. To open the ModeShape view navigate to Window -> Show View -> Other.
    2. From the Show View dialog, select the ModeShape folder followed by the ModeShape view and click OK.
      Selecting the ModeShape view

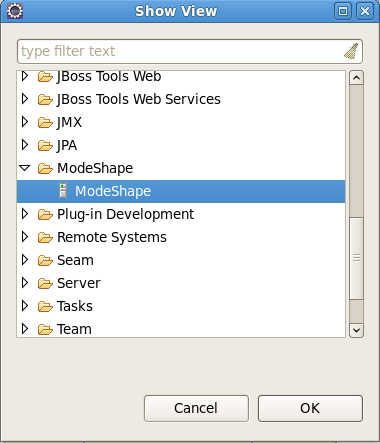
      Figure 3.1. Selecting the ModeShape view

  2. Add ModeShape Repository

    1. To add a ModeShape repository, click the Create a new server icon that appears in the ModeShape view. This view is located in the lower section of your interface, along with other views such as Servers and Console.
      Adding a new server for ModeShape repositories

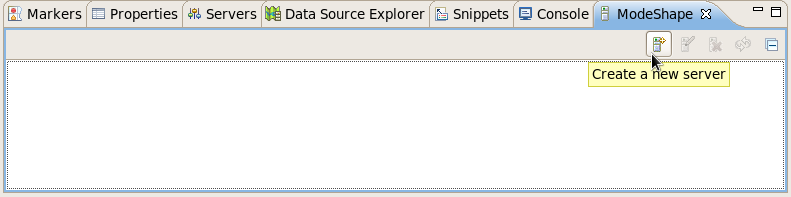
      Figure 3.2. Adding a new server for ModeShape repositories

    2. The New Server dialog will appear. Enter the URL of the server to connect and your authentication information in the New Server dialog. You can test your connection to the server by clicking the Test button.
      The New Server dialog

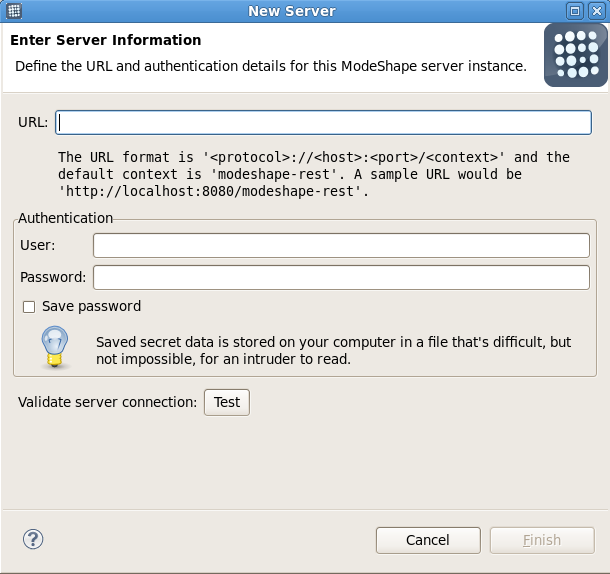
      Figure 3.3. The New Server dialog

    3. Click the Finish button to add the server to the ModeShape view.

    Note

    Upon testing the connection, if a connection cannot be established, the ModeShape server can still be created. Use the Reconnect button on the ModeShape View's toolbar to try and connect again at a later time.
Result

Once the server with the ModeShape repository has been added three new options become available within the ModeShape view.

3.1.2. ModeShape Repository Options

After the repository is added to the new server as described in Section 3.1.1, “Register Repository on a New Server”, three new options appear within the ModeShape view. These options allow you to:
  • edit server properties,
  • delete a server from the server registry, and
  • reconnect to the selected server.
To perform one of these actions either right-click on a server and select from the presented menu of actions, or use the buttons beside the Create a new server icon.

Note

It is possible for a ModeShape server instance to have numerous ModeShape repositories stored on it. Once you have registered a connection to the server you will have access to all ModeShape repositories on the server. You do not need to register a new connection for each repository on the same server.

3.2. Publish or Unpublish a Resource

3.2.1. Publish or Unpublish a Resource

Having registered your ModeShape server instances in Section 3.1.1, “Register Repository on a New Server”, you can now publish files to the repositories on these servers and you can also unpublish these files. You can achieve this by using the ModeShape Publishing wizard.
If you wish to prevent certain folders or file types from being published or unpublished, this requirement can be set through the ModeShape Preferences dialog explained in Section 3.3.2, “Ignored Resources”.

3.2.2. Publish a Resource

You can publish the files to the repositories on the server by using the ModeShape Publishing wizard.

Procedure 3.1. Publish files to a repository

  1. Open ModeShape Publishing Wizard.

    1. Right-click one or more projects, folders, or files in your Eclipse workspace to view the context menu for those files. The Context menu now includes a ModeShape submenu that allows you to publish or unpublish the resources to your ModeShape repository.
      ModeShape context submenu

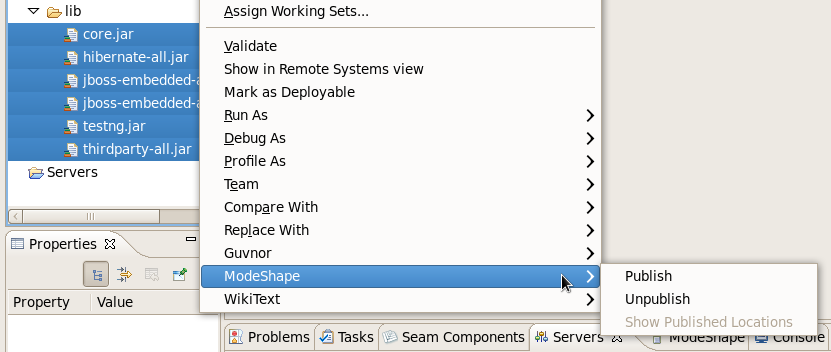
      Figure 3.4. ModeShape context submenu

      Note

      When only one resource is selected you can also view the locations where that resource has been published. The published locations of a resource can be viewed by right-clicking an individual resource and navigating the ModeShape context submenu to the Show Published Locations option.
    2. Select Publish to open the ModeShape Publishing Wizard.
      ModeShape publishing wizard

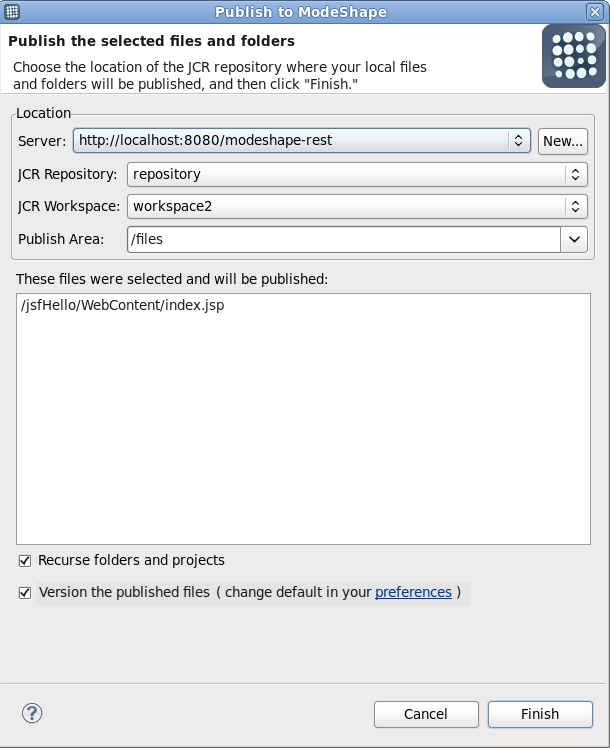
      Figure 3.5. ModeShape publishing wizard

  2. Choose ModeShape repository

    The publishing wizard allows you to choose which ModeShape Java Content Repositories (JCR) type repository to interact with and displays the selected files the operation will be performed on. When a project or folder is selected, all their included files are acted upon.
  3. Choose Publish Area.

    Publishing to a Publish Area will automatically sequence your files to extract useful information and make it available to our repository users. Extracted information depends upon the type of file and the configuration of the ModeShape repository. The location where files will be published is constructed by appending the server URL, the names of the JCR repository and workspace, the path to the publish area, and the path of the files and folders within your Eclipse workspace.
  4. Version the published files.

    As ModeShape now allows for the versioning of published files, you will notice a checkbox labelled Version the published files (change default in your preferences). If you have selected to allow file versioning in your ModeShape preferences, then this checkbox will be checked automatically.
    If your server instance does not permit the versioning of files, regardless of the settings you choose in the Preferences dialog for ModeShape, the checkbox labelled Version the published files (change default in your preferences) will be inactive.
  5. Publish the files.

    Choose any other options as appropriate and then select Finish to publish the files.

Warning

When performing a publish operation, if you publish a file to a ModeShape repository where a version of the same file has previously been published (by you or someone else), the publishing action will overwrite the file currently in the repository.
Result

When a file is published, a blue arrow will appear next to the file in the tree view.

3.2.3. Unpublish a Resource

Procedure 3.2. Unpublish files to a repository

  1. View the context menu.

    To unpublish the files, right-click one or more projects, folders, or files in your Eclipse workspace to view the context menu for those files. The Context menu includes a ModeShape submenu that allows you to unpublish the resources to your ModeShape repository.
  2. Unpublish the files.

    Select Unpublish to unpublish the files.

Warning

When performing an unpublish operation, make sure you are aware of the following:
  • If you are interacting with a multi-user repository, the version of the file you are unpublishing may have been updated by someone else after you.
  • It is important to be sure that a file is no longer necessary when unpublishing, as the file in question will be deleted from the repository with this operation.
Result

When a file is unpublished, the blue arrow next to the file in the tree view will be removed.

3.2.4. Viewing, Publishing or Unpublishing Output in Console View

You can view publish/unpublish operation output in the Console view. You can view:
  • the repository where the operation took place,
  • how long the operation took,
  • the outcome for each file included in the operation,
  • a hyperlink that allows you to open the file in an Eclipse editor, and
  • a ModeShape repository workspace URL.
Console output

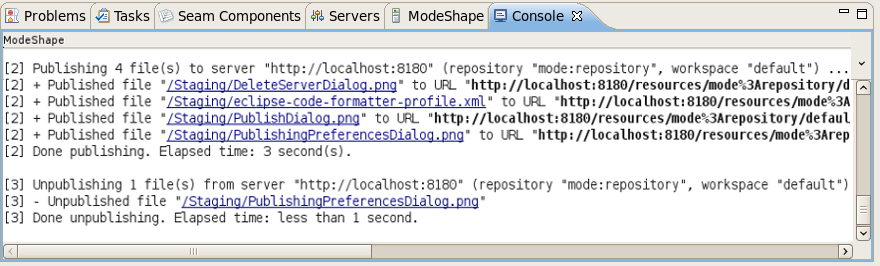
Figure 3.6. Console output

3.3. Setting Preferences

3.3.1. Setting Preferences

The ModeShape Preferences dialog allows for resource versioning to be set along with specific file types and folders that you never wish to have published to or unpublished from a ModeShape repository.

Procedure 3.3. Setting preferences

  1. Open ModeShape Preferences dialog.

    The ModeShape Preferences dialog is accessed by navigating to Window -> Preferences -> ModeShape. This dialog allows you to set whether resource versioning will be used for your ModeShape repository or not.
    ModeShape preferences dialog

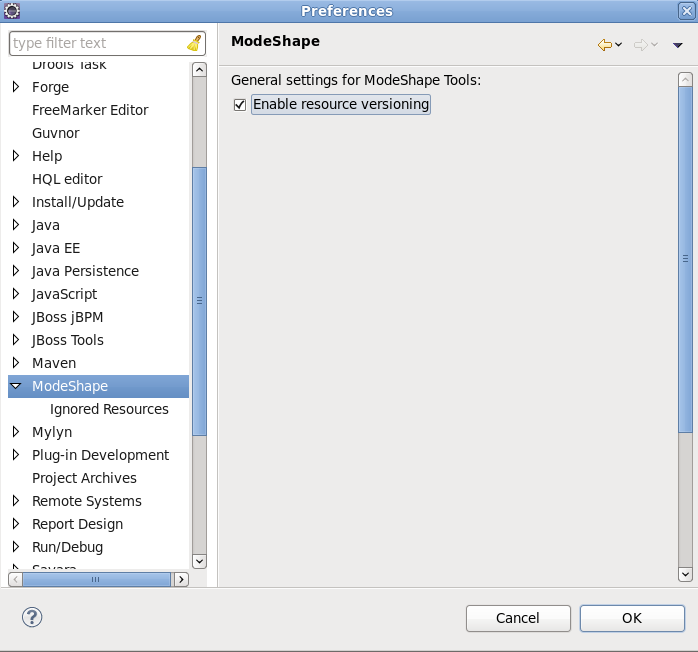
    Figure 3.7. ModeShape preferences dialog

  2. Activate resource versioning.

    Click the Enable resource versioning checkbox to activate resource versioning.

3.3.2. Ignored Resources

You can manage the resources to be published using the Ignored Resources menu.

Procedure 3.4. Manage Ignored Resources

  1. Open Ignored Resources Preferences dialog.

    Click the Ignored Resources menu item under ModeShape on the Preferences dialog. On this screen you can manage the resources that will not be published to your ModeShape repository.
    The current excluded file types and folders are presented as the list of checkbox items that appear under the Ignored Resources heading.
    ModeShape: Ignored Resources preferences dialog

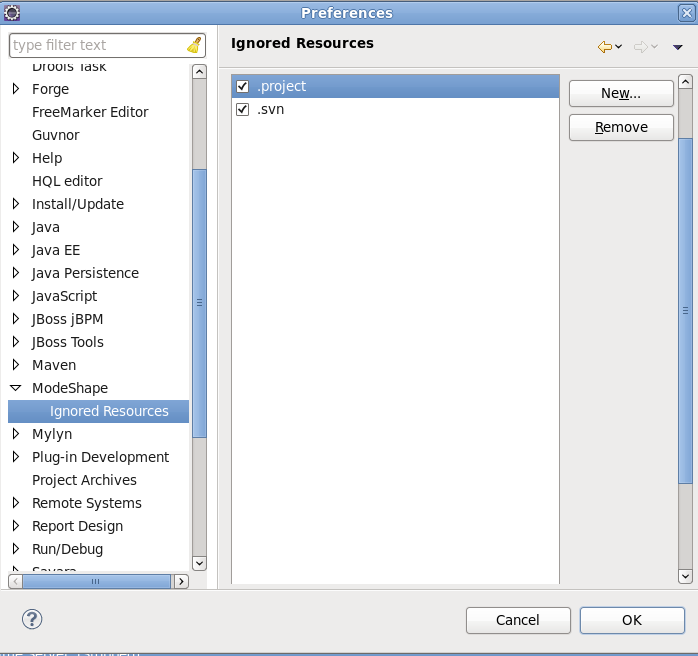
    Figure 3.8. ModeShape: Ignored Resources preferences dialog

  2. Add a new resource to the Ignored Resources list.

    To add a new file extension type or folder name to be filtered from publishing, click the New button, enter the details and click the Apply button so that your preference changes are saved.
    ModeShape: Ignored Resources preferences dialog

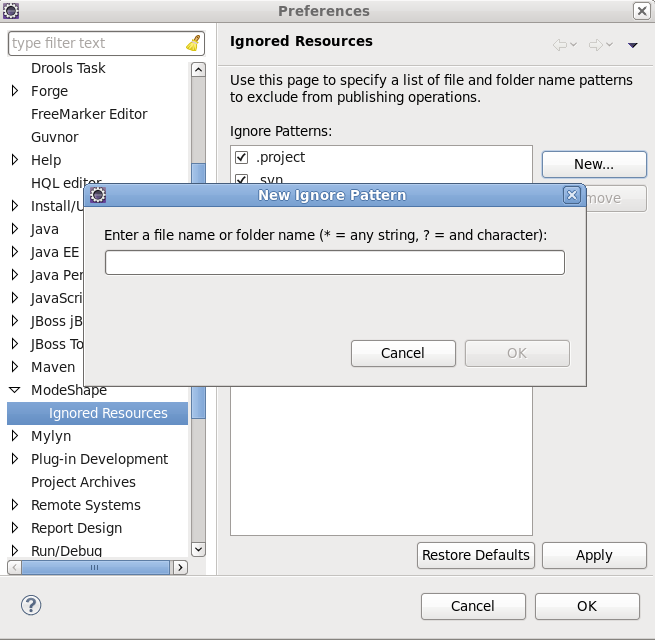
    Figure 3.9. ModeShape: Ignored Resources preferences dialog

  3. Remove a resource from the Ignored Resources list.

    To remove an entry, select an entry from the list in the Preferences dialog and click the Remove button. Ensure that you click the Apply button so that your preference changes are saved.

Note

If you decide to ignore a resource that has been published in the past, ensure that all instances are unpublished before ignoring it, otherwise you will not be able to unpublish the resource either. That said, this can be an effective way of ensuring a resource cannot be unpublished by accident. Remember though that, since preference settings are only local to your working environment, in a multi-user ModeShape repository someone else could unpublish it.

Chapter 4. Compact Node Definition (CND) Editor

4.1. Compact Node Definition (CND) Editor

The ModeShape Tools Java Content Repository (JCR) Compact Node Type Definition (CND) Editor is a 2-page editor for *.cnd files. The first page is a form-based view of the CND file and the second page is a read-only source view.

Note

The CND Editor can be used to edit CND files for any JCR 2.0 implementation and is not limited to ModeShape users. It even can be installed separately from the ModeShape-specific features.
The CND Editor's form page consists of the following sections:
  • a header section, which displays error messages and a link to open the CND preference page,
  • a namespaces section, which displays and allows editing of the namespace mappings defined in the CND, and
  • a node types section, which displays and allows editing of the node type definitions defined in the CND.

4.2. Header Section

The Header section contains a hyperlink that, when activated, opens the CND Notation Preference page. Also, if the CND being edited has validation errors, the header section will have another hyperlink that identifies the total number of validation errors found. Clicking the errors hyperlink will open a dialog that lists the specific validation errors and provides a way to export those validation messages to a file.

4.3. Namespaces Section

The Namespaces section is a collapsible area used to create and maintain the namespace mappings declared in the CND file. A namespace mapping consists of a unique prefix, a unique URI, and an optional comment. You can copy and paste Namespace mappings within the same CND editor or between different CND editors.
Namespace mappings are edited using the Namespace Editor.

4.4. Node Types Section

The Node Types section is used to create and maintain the node type definitions declared in the CND file. The node types section consists of a table containing all the declared node type definitions, and a node type name filter box which allows you to limit the number of node type definitions being displayed. The Node Type table can be used to delete a selected node type. You can copy node type definitions and paste within the same CND editor or between different CND editors.
The right hand side of the Node Types section consists of a Details area, as well as, collapseable areas for property and child node definitions. When a Node Type Definition is selected, its corresponding information is used to populate the details, properties, and child nodes areas. The Details area is used to edit namespace, name, supertypes, attributes of a node type. You can also add comments for the selected node type .
A Node Type Definition can contain zero or more property definitions. When the properties area is expanded, the table will show the declared property definitions for the selected node type definition.
The properties table can be used to delete a selected property definition and can optionally show inherited properties. You can copy Property definitions and paste within the same CND editor or between different CND editors. You can create a new property definition or edit existing definition using the Property Definition Editor.
A node type definition can contain zero or more child node definitions. When the child nodes area is expanded, the table will show the declared child node definitions for the selected node type definition.
You can delete a selected child node definition using the child nodes table. The Child Nodes table optionally shows inherited child nodes. Child node definitions can be copied and pasted within the same CND editor or between different CND editors. A child node definition can be created or edited using the Child Node Definition Editor.

4.5. CND Preference Page

The CND Preference Page allows you to save CND files using the various CND notations available. The notation type determines the size and readability of the output.

Appendix A. Revision History

Revision History
Revision 6.2.0-4Fri Nov 20 2015David Le Sage
Updates for 6.2

Legal Notice

Copyright © 2017 Red Hat, Inc.
This document is licensed by Red Hat under the Creative Commons Attribution-ShareAlike 3.0 Unported License. If you distribute this document, or a modified version of it, you must provide attribution to Red Hat, Inc. and provide a link to the original. If the document is modified, all Red Hat trademarks must be removed.
Red Hat, as the licensor of this document, waives the right to enforce, and agrees not to assert, Section 4d of CC-BY-SA to the fullest extent permitted by applicable law.
Red Hat, Red Hat Enterprise Linux, the Shadowman logo, JBoss, OpenShift, Fedora, the Infinity logo, and RHCE are trademarks of Red Hat, Inc., registered in the United States and other countries.
Linux® is the registered trademark of Linus Torvalds in the United States and other countries.
Java® is a registered trademark of Oracle and/or its affiliates.
XFS® is a trademark of Silicon Graphics International Corp. or its subsidiaries in the United States and/or other countries.
MySQL® is a registered trademark of MySQL AB in the United States, the European Union and other countries.
Node.js® is an official trademark of Joyent. Red Hat Software Collections is not formally related to or endorsed by the official Joyent Node.js open source or commercial project.
The OpenStack® Word Mark and OpenStack logo are either registered trademarks/service marks or trademarks/service marks of the OpenStack Foundation, in the United States and other countries and are used with the OpenStack Foundation's permission. We are not affiliated with, endorsed or sponsored by the OpenStack Foundation, or the OpenStack community.
All other trademarks are the property of their respective owners.