
Getting Started Guide
The Getting Started Guide for Red Hat JBoss BRMS.
Abstract
Chapter 1. Quick Start with Red Hat JBoss BRMS
This section describes how to download, install, and run Red Hat JBoss BRMS. For more detailed steps and alternative methods of installation, see the Red Hat JBoss BRMS Installation Guide.
Prerequisites
- A supported Java version installed on your system. See the Red Hat JBoss BPM Suite 6 Supported Configurations section of the Red Hat Customer Portal for a list of supported Java versions.
- A Red Hat JBoss EAP server installation, version 6.4 or higher. If you are using the installer file, you must have Red Hat JBoss EAP 6 version 6.4.7 or higher.
It may be necessary for you to update your Red Hat JBoss EAP server. If the installer informs you of such need, download the newest patch from the Red Hat Customer Portal and follow the instructions for updating in the Red Hat JBoss EAP Installation Guide.
Procedure: Red Hat JBoss BRMS Quick Start
- Download the installer from the Software Downloads section of the Red Hat Customer Portal.
Run installer by executing the following command:
java -jar jboss-brms-VERSION-installer.jar
- Finish the installation process. Note the user name and password for accessing the Red Hat JBoss BRMS application after installation.
- After successful installation, in a command prompt, change into the EAP_HOME directory where you have installed Red Hat JBoss BRMS.
Start the server:
bin/standalone.sh
-
Open a web browser and enter
http://localhost:8080/business-central/. Log in using the user name and password for accessing the Red Hat JBoss BRMS application that you created at installation time.
You have successfully installed and run Red Hat JBoss BRMS.
Next Steps
- Learn more about roles in Section 2.3, “Defining Roles”.
- Create additional users in Section 2.4, “Creating Users”.
- Create a Hello World Rule in Chapter 4, Hello World Rule Example.
If you want more details about installation on both Red Hat JBoss EAP and other containers, see Red Hat JBoss BRMS Installation Guide.
Chapter 2. Installation
This section describes installation of Red Hat JBoss BRMS on an already installed instance of Red Hat JBoss EAP 6.4 or later. If you use a different container, see the Red Hat JBoss BRMS Installation Guide.
If you followed Chapter 1, Quick Start with Red Hat JBoss BRMS, you have already installed Red Hat JBoss BRMS using the JAR installer. See Next Steps for further instructions.
Red Hat JBoss BRMS is designed to work with UTF-8 encoding. If your JVM uses a different encoding system, unexpected errors may occur. To ensure UTF-8 is used by the JVM, use the following system property "-Dfile.encoding=UTF-8".
2.1. Downloading Red Hat JBoss BRMS for Red Hat JBoss EAP
- Open the DOWNLOADS section of the Red Hat Customer Portal in your browser.
- In the Product Downloads page that opens, click Red Hat JBoss BRMS and log in.
- From the Version drop-down menu, select version 6.4.
- Select Red Hat JBoss BRMS 6.4.0 Deployable for EAP 6 and click Download. If you use Red Hat JBoss EAP 7.0, select Red Hat JBoss BRMS 6.4.0 Deployable for EAP 7.
2.2. Installing Red Hat JBoss BRMS on Red Hat JBoss Enterprise Application Platform
2.2.1. Installation on a New Red Hat JBoss EAP Instance
To install the deployable package for a Red Hat JBoss Enterprise Application Platform:
-
Move the ZIP archive you downloaded in Section 2.1, “Downloading Red Hat JBoss BRMS for Red Hat JBoss EAP” to the parent directory of the Red Hat JBoss Enterprise Application Platform home directory (referred to as
EAP_HOME; thejboss-eap-6.4directory). Unzip the downloaded ZIP archive and ensure it is merged into the
EAP_HOMEdirectory (jboss-eap-6.4).WarningPerform this step with the same user account that was used to install Red Hat JBoss EAP. This account must not be a superuser account.
-
When prompted, overwrite the files that already exist in the
EAP_HOMEdirectory with with files from the downloaded ZIP archive.
2.2.2. Installation on an Existing Red Hat JBoss EAP Configuration
These instructions are for installing, and not for updating an existing Red Hat JBoss BRMS instance. Make sure that there is no existing Red Hat JBoss BRMS install in the target EAP.
To install the deployable package on a previously configured Red Hat JBoss EAP:
- Extract the ZIP package deployable for Red Hat JBoss EAP you downloaded in Section 2.1, “Downloading Red Hat JBoss BRMS for Red Hat JBoss EAP”.
Unzip the downloaded ZIP archive; however, do not overwrite all of the files. Manually merge the following files into the
EAP_HOMEdirectory (jboss-eap-6.4):-
jboss-eap-6.4/domain/configuration/*Be aware that Red Hat JBoss BRMS requires JMS, so JMS is added by default into all profiles indomain.xmlprovided by the Red Hat JBoss BRMS distribution. -
jboss-eap-6.4/standalone/configuration/*Be aware that Red Hat JBoss BRMS requires JMS, so JMS is added by default into all profiles configuration files, includingstandalone.xmlandstandalone-ha.xml, provided by the Red Hat JBoss BRMS distribution.
WarningMake sure this step is performed by the same user account that was used to install EAP. This account must not be a superuser account.
-
Copy the folder
jboss-eap-6.4/standalone/deploymentsinto theEAP_HOMEdirectory from the Red Hat JBoss BRMS distribution.NoteIf you already have deployments on your Red Hat JBoss EAP, ensure that your current deployments do not have colliding names with Red Hat JBoss BRMS deployments.
2.3. Defining Roles
Before starting the server and logging into Business Central, you need to create some user accounts. This section describes the different user roles that are used in Red Hat JBoss BRMS:
-
admin: The users with admin role are the administrators of the application. Administrators can manage users, manage the repositories (create and clone) and have full access to make the required changes in the application. Admins have access to all areas within the system. -
analyst: An analyst role has access to all features to model projects. However, Authoring → Administration access is unavailable to users with the analyst role. Certain lower-level features targeted towards developers, like the Deployment → Artifact Repository view, are not accessible for this role. However, the Build & Deploy button is available for the analyst role while using the Project Editor.
For further information about roles, see section Access Control of the Red Hat JBoss Administration and Configuration Guide. For further information about roles and task interactions, see section User Task of Red Hat JBoss BPM Suite User Guide.
Other roles you can encounter:
- REST API access control roles. For further information, see section Control of REST API of the Red Hat JBoss BPM Suite Development Guide.
-
The Intelligent Process Server
kie-serverrole. For further information, see chapter Intelligent Process Server and Realtime Decision Server of the Red Hat JBoss BPM Suite Development Guide. -
The
kiemgmtrole for the managed repository feature. See section Managing Assets of the Red Hat JBoss BRMS Administration and Configuration Guide.
Enter the above mentioned roles during the user creation process.
2.4. Creating Users
To start adding new users, you will need to run the add-user.sh script on a Unix system or the add-user.bat file on a Windows system from the EAP bin directory.
Procedure: Creating New Users
- Change into the EAP_HOME directory.
On a Unix system, run the following command:
bin/add-user.sh
On a Windows system, run:
bin\add-user.bat
-
Enter
bto select the application user and press Enter. -
Accept the default realm (
ApplicationRealm) by pressing Enter. At the user name prompt, enter the user name and confirm. For example:
helloworlduser.ImportantMake sure that the selected user name does not conflict with any known title of a role or a group.
For example, if there is a role called
admin, do not create a user with the user nameadmin.Create the user password at the password prompt and reenter the password. For example:
Helloworld@123.NoteThe password should be at least 8 characters in length and should contain upper and lower case alphabetic characters (A-Z, a-z), at least one numerical character (0-9) and at least one special character (for example ~ ! @ # $ % ^ * ( ) - _ + =).
Enter a comma-separated list of roles the user will need at the roles prompt. For more information, see Section 2.3, “Defining Roles”.
Note that Business Central users need to have the
analystor theadminrole assigned.- Confirm that you want to add the user.
-
Enter
yesat the next prompt to enable clustering in the future.
2.5. Starting Server
You can start your server in one of two modes:
-
Standalone, using the
standalone.shscript. -
Standalone-secure, using the
standalone-secure.shscript.
If you are starting the server in the domain mode, the corresponding scripts are domain.sh and domain-secure.sh respectively.
The default starting script is standalone.sh. It is optimized for performance. To run your server in the performance mode:
-
On the command line, change into the
EAP_HOMEdirectory: In a Unix environment run:
bin/standalone.sh
In a Windows environment run:
bin\standalone.bat
The standalone-secure.sh script is optimized for security. This script applies a security policy that protects you against a known security vulnerability.
It is recommended that production environments use the standalone-secure.sh script.
The use of a security manager imposes a significant performance penalty. Consideration your individual circumstances to decide which script to use. For further information, see Section 2.6, “Java Security Manager and Performance Management”.
To start your server in the secure mode:
-
On the command line, move into the
EAP_HOMEdirectory. In a Unix environment run:
bin/standalone-secure.sh
In a Windows environment run:
bin\standalone-secure.bat
If you installed Red Hat JBoss BRMS using the JAR installer, you can choose to apply the security policy during the installation. The installer does not provide a separate standalone-secure.sh script.
2.6. Java Security Manager and Performance Management
Enabling the Java Security Manager (JSM) to sandbox the evaluation of MVEL scripts in Red Hat JBoss BRMS causes a performance hit in high-load environments. When deploying a Red Hat JBoss BRMS application, consider the performance needs in your environment. Use the following guidelines to deploy secure and high performance Red Hat JBoss BRMS applications.
In high-load environments where performance is critical:
- Deploy applications that have been developed on other systems and properly reviewed.
-
Do not create any users with the
analystrole on such systems.
If these safeguards are followed, it is safe to leave JSM disabled on these systems so it does not introduce any performance degradation.
In testing and development environments without high loads, or in environments where rule and process authoring is exposed to external networks:
- Enable JSM in order to achieve security benefits of properly sandboxed evaluation of MVEL.
-
Do not allow users with the
analystrole to log in to the Business Central console with JSM disabled. This practice is not secure and not recommended.
Chapter 3. Logging into Business Central
To log into Business Central:
- Start the server with Red Hat JBoss BRMS.
-
Navigate to
http://localhost:8080/business-centralin a web browser. If the user interface has been configured to run from a domain name, substitutelocalhostfor the domain name. For examplehttp://www.example.com:8080/business-central. -
Log in with the user credentials that were created during installation. For example, user:
helloworlduserand password:Helloworld@123.
Chapter 4. Hello World Rule Example
This chapter demonstrates basic features of Red Hat JBoss BRMS by setting up a Hello World project with a simple business rule.
In this chapter, you will:
- Create a repository.
- Create a project.
- Create a rule.
- Create a knowledge base.
- Build and deploy the project.
4.1. Create Your First Rule Using Business Central
Prerequisite
Ensure that you have successfully installed Red Hat JBoss BRMS and Maven before you run this rule example. Red Hat JBoss BRMS should be started and you should be logged in the Business Central.
Procedure: Create and Execute Your First Rule Using Business Central
- On the main menu of Business Central, click Authoring → Administration and then Organizational Unit → Manage Organizational Units.
- Click Add.
In the displayed Add New Organizational Unit dialog box, define the unit properties. For example:
-
Name:
Hello World -
Owner:
finance-dept@company.org
Click OK.
-
Name:
- On the perspective menu, click Repositories → New repository.
In the displayed New Repository dialog box, define the repository properties. For example:
-
Repository Name:
EmployeeRepo -
In the In Organizational Unit drop-down menu, select
Hello World.
Click Finish.
-
Repository Name:
- Go to Authoring → Project Authoring.
-
In the Project Explorer, under the organizational unit drop-down box, select
Hello World, and in the repository drop-down box selectEmployeeRepo. - On the perspective menu, go to New Item → Project.
In the displayed New Project wizard, provide a name (for example
MyProject) for your project. In the Group Artifact Version part of the wizard, define the Maven properties of the project. For example:-
Group ID:
org.brms -
Artifact ID:
MyProject -
Version ID:
1.0.0
Click Finish.
-
Group ID:
- On the perspective menu, go to New Item → Data Object.
In the displayed Create new Data Object dialog box, provide the values for object name and package. For example:
-
Data Object:
Person -
Package:
org.brms.myproject
Click Ok.
-
Data Object:
In the displayed Person window of the newly created
Persondata object, click add field to open the New field dialogue. Add a variable name in the Id field, select data type for the variable in the Type field, and click Create and continue until you have defined all the necessary variables. For example:Id:
firstNameType:
StringId:
lastNameType:
StringId:
hourlyRateType:
IntegerId:
wageType:
Integer
Click Create for the last variable and then Save.
- On the perspective menu, click New Item → DRL File.
In the Create new dialog box, provide the name and package name of your rule file. For example:
-
DRL file name:
MyRule -
Package:
org.brms.myproject
Click Ok.
-
DRL file name:
In the displayed DRL editor with
MyRule.drl, create the rule:package org.brms.myproject; rule "MyRule" when Person(hourlyRate*wage > 100) Person(name : firstName, surname : lastName) then System.out.println( "Hello" + " " + name + " " + surname + "!" ); System.out.println( "You are rich!" ); end
Click Save.
For more information about rules, see chapter All About Rules of the Red Hat JBoss BPM Suite Development Guide.
Following steps demonstrate how to create your own knowledge base. For more information about knowledge session, see the KIE Sessions chapter from the Red Hat JBoss BPM Suite Development Guide.
- Click Open Project Editor.
- Click Project Settings: Project General Settings → Knowledge Base Settings: Knowledge bases and sessions.
Click Add and enter the name of your knowledge base.
Enter
myBasefor this example.- Click Make Default
- Click Add under Knowledge Sessions.
-
Enter the name of your session. For example
mySession. Check Default and select the stateless state. - Click Save in the top right corner.
Click Open Project Editor and then Build & Deploy.
A green notification appears in the upper part of the screen informing you that the project has been built and deployed successfully to the Execution Server.
NoteIn case a red notification appears, informing you that the build has failed, you will be presented with information about the build failure in the Red Hat JBoss BRMS console. This is crucial information in case of troubleshooting your application. Make sure you have saved all assets before attempting to build your project.
4.2. Configuring Realtime Decision Server
Register a Realtime Decision Server instance to fire your rules through the REST API. This section illustrates:
- How to register the Realtime Decision Server.
- How to add a new container to the Realtime Decision Server.
Procedure: Registering Realtime Decision Server
Create a new user with the role
kie-server:On the command line, change into
EAP_HOME/bin/and execute the following command:~]$ ./add-user.sh -a --user kieserver --password kieserver1! --role kie-server,rest-all
Open
EAP_HOME/standalone/configuration/standalone.xmland add the following properties into thesystem-propertiestag:<property name="org.kie.server.user" value="kieserver"></property> <property name="org.kie.server.pwd" value="kieserver1!"></property> <property name="org.kie.server.location" value="http://localhost:8080/kie-server/services/rest/server"></property> <property name="org.kie.server.controller" value="http://localhost:8080/business-central/rest/controller"></property> <property name="org.kie.server.controller.user" value="kieserver"></property> <property name="org.kie.server.controller.pwd" value="kieserver1!"></property> <property name="org.kie.server.id" value="local-server-123"></property>Change into
EAP_HOME/bin/and execute the following command:~]$ ./standalone.sh
In the Business Central, click Deploy → Execution Servers.
In the displayed window, you will see
local-server-123. Click Add Container under KIE CONTAINERS.The New Container dialog opens. Enter the following:
-
Name:
myContainer -
Click Search and click Select next to
MyProject-1.0.0.jar. - Click Finish to create the container.
-
Name:
-
Select
myContainerand click Start to start the container.
4.3. Firing Rules Using KIE Server Java Client API
To fire the rules, you need to send a request to the Realtime Decision Server. This section demonstrates how to use the KIE Server Java Client API to send requests using REST API. You can use any client to send requests to the server.
Make sure you have configured your Maven installation to use Red Hat JBoss BRMS online repositories. For more information about Maven configuration, see the Configuring Maven to Use Online Repositories section from the Red Hat JBoss BPM Suite Installation Guide.
Change into a directory of your choice and execute the following command:
~]$ mvn archetype:generate -DgroupId=com.MyProject.app -DartifactId=my-app -DarchetypeArtifactId=maven-archetype-quickstart -DinteractiveMode=false
This creates a directory called
my-appwith the following structure:my-app |-- pom.xml `-- src |-- main | `-- java | `-- com | `-- MyProject | `-- app | `-- App.java `-- test `-- java `-- com `-- MyProject `-- app `-- AppTest.javaDeclare libraries your Maven project will use. Edit
my-app/pom.xmlto set the Red Hat JBoss BRMS dependencies. For more information about Bill of Material (BOM) and dependency management, see chapter Dependency Management of the Red Hat JBoss BPM Suite Development Guide.<!-- Declaration of BOM --> <dependencyManagement> <dependencies> <dependency> <groupId>org.jboss.bom.brms</groupId> <artifactId>jboss-brms-bpmsuite-platform-bom</artifactId> <version>6.4.0.GA-redhat-2</version> <type>pom</type> <scope>import</scope> </dependency> </dependencies> </dependencyManagement> <dependencies> <dependency> <groupId>junit</groupId> <artifactId>junit</artifactId> <scope>test</scope> </dependency> <!-- Realtime Decision Server dependencies --> <dependency> <groupId>org.kie.server</groupId> <artifactId>kie-server-client</artifactId> </dependency> <dependency> <groupId>org.kie.server</groupId> <artifactId>kie-server-api</artifactId> </dependency> <!-- Red Hat JBoss BRMS dependency. --> <dependency> <groupId>org.drools</groupId> <artifactId>drools-core</artifactId> </dependency> <dependency> <groupId>org.slf4j</groupId> <artifactId>slf4j-simple</artifactId> </dependency> <!-- Your project --> <dependency> <groupId>org.brms</groupId> <artifactId>MyProject</artifactId> <version>1.0.0</version> </dependency> </dependencies>NoteThe last dependency is the project you have built in Red Hat JBoss BRMS. The model class (
org.brms.myproject.Personin this example) in the client code, that is your Maven application, needs to match your server side, that is the Red Hat JBoss BRMS. Otherwise, the rules will not match when sending a request. The easiest way to achieve this is to share the model class between both sides. You achieve this by adding it as a Maven dependency.Therefore, make sure that the following attributes match what you had entered while creating a new project in the Business Central:
-
groupId -
artifactId -
version
-
-
Locate the
my-app/src/test/java/com/MyProject/app/AppTest.javaJava class. Maven creates this class by default. Edit
AppTest.java. Add the following imports:import org.kie.api.command.BatchExecutionCommand; import org.kie.server.api.model.ServiceResponse; import org.kie.server.client.KieServicesClient; import org.kie.server.client.KieServicesConfiguration; import org.kie.server.client.KieServicesFactory; import org.kie.server.client.RuleServicesClient; import org.kie.api.KieServices; import org.kie.api.command.Command; import java.util.ArrayList; import java.util.HashSet; import java.util.List; import java.util.Set; import org.brms.myproject.Person; import org.drools.core.command.impl.GenericCommand;
Locate the
testApp()method, load the knowledge base and fire your rule by adding the following code:Person p1 = new Person(); p1.setFirstName("Anton"); p1.setLastName("RedHat"); p1.setHourlyRate(11); p1.setWage(20); String url = "http://localhost:8080/kie-server/services/rest/server"; String username = "kieserver"; String password = "kieserver1!"; String container = "myContainer"; String session = "mySession"; KieServicesConfiguration config = KieServicesFactory .newRestConfiguration(url, username, password); Set<Class<?>> allClasses = new HashSet<Class<?>>(); allClasses.add(Person.class); config.addExtraClasses(allClasses); KieServicesClient client = KieServicesFactory.newKieServicesClient(config); RuleServicesClient ruleClient = client.getServicesClient(RuleServicesClient.class); List<GenericCommand<?>> commands = new ArrayList<GenericCommand<?>>(); commands.add((GenericCommand<?>) KieServices.Factory .get().getCommands().newInsert(p1,"Person Insert ID")); commands.add((GenericCommand<?>) KieServices.Factory .get().getCommands().newFireAllRules("fire-identifier")); BatchExecutionCommand batchCommand = KieServices.Factory .get().getCommands().newBatchExecution(commands,session); ServiceResponse<String> response = ruleClient.executeCommands(container, batchCommand); System.out.println(response.getResult());Note that the default marshaller is JAXB, unless set differently. That means you must set its context with any custom classes you plan to use. In this example, that is
Person.class. Since the example uses astatelesssession, the kie session is disposed of once a single command is executed. That is why you need to wrap multiple commands in theBatchCommandobject.To change the marshaller type, enter one of the following commands:
config.setMarshallingFormat(MarshallingFormat.JSON);
config.setMarshallingFormat(MarshallingFormat.XSTREAM);
And add the following import:
import org.kie.server.api.marshalling.MarshallingFormat;
Navigate to
my-appand execute the following command from the command line:~]$ mvn clean install
Note that there is the Maven output and the Red Hat JBoss BRMS output. The expected output in the Red Hat JBoss BRMS console is:
16:26:56,119 INFO  [stdout] (http-/127.0.0.1:8080-5) Hello Anton RedHat!
16:26:56,119 INFO  [stdout] (http-/127.0.0.1:8080-5) You are rich!
Chapter 5. Red Hat JBoss Developer Studio
Red Hat JBoss Developer Studio is the JBoss Integrated Development Environment (IDE) based on Eclipse. Get the latest Red Hat JBoss Developer Studio from the DOWNLOADS section of the Red Hat Customer Portal. Red Hat JBoss Developer Studio provides plug-ins with tools and interfaces for Red Hat JBoss BRMS and Red Hat JBoss BPM Suite. These plugins are based on the community version of these products. The Red Hat JBoss BRMS plug-in is called the Drools plug-in and the Red Hat JBoss BPM Suite plug-in is called the jBPM plug-in.
See the Red Hat JBoss Developer Studio documentation for the Red Hat JBoss Developer Studio installation and setup instructions.
Because of an issue in the way multi-byte rule names are handled, you must ensure that the instance of Red Hat JBoss Developer Studio is started with the file encoding set to UTF-8. You can do this by editing the $JBDS_HOME/studio/jbdevstudio.ini file and adding the following property: "-Dfile.encoding=UTF-8".
5.1. Installing Red Hat JBoss Developer Studio Plug-ins
The Drools plug-in for Red Hat JBoss Developer Studio is available through the update site.
Procedure: Installing Drools Red Hat JBoss Developer Studio Plug-in
- Start Red Hat JBoss Developer Studio.
- Click Help → Install New Software.
- Click Add to enter the Add Repository menu.
-
Give the software site a name next to Name field and add the following URL in the Location field:
https://devstudio.jboss.com/10.0/stable/updates/integration-stack/. - Click OK.
- Select the JBoss Business Process and Rule Development feature from the available options and click Next and then Next again.
- Read the license, accept it by selecting the appropriate radio button, and click Finish.
- After the installation completes, restart Red Hat JBoss Developer Studio.
5.2. Setting Drools Runtime
In order to use the Red Hat JBoss BRMS plug-in with Red Hat JBoss Developer Studio, it is necessary to set up the runtime.
A runtime is a collection of JAR files that represents a specific release of the software and provides libraries needed for compilation and running of your business assets.
Procedure: Configuring Red Hat JBoss BRMS Runtime
- Open the DOWNLOADS section of the Red Hat Customer Portal.
- Click Red Hat JBoss BRMS and log in.
- Download the Red Hat JBoss BRMS 6.4.0 Core Engine archive.
-
Extract the runtime JAR files located in the
jboss-brms-VERSION-engine.zip. - From the Red Hat JBoss Developer Studio menu, click Window → Preferences.
- Click Drools → Installed Drools Runtimes.
- Click Add…; provide a name for the new runtime, and click Browse to navigate to the directory where you extracted the runtime files. Click OK to register the selected runtime in Red Hat JBoss Developer Studio.
- Mark the runtime you have created as the default Drools runtime by clicking on the check box next to it.
- Click OK. If you have existing projects, a dialog box will indicate that you have to restart Red Hat JBoss Developer Studio to update the Runtime.
5.3. Configuring Red Hat JBoss BRMS Server
Red Hat JBoss Developer Studio can be configured to run the Red Hat JBoss BRMS Server.
Procedure: Configuring Server
- Open the Drools view by clicking Window → Perspective → Open Perspective → Other, then Drools, and click OK.
- Add the Server view by clicking Window → Show View → Other… and then Server → Servers.
- Open the server menu by right clicking the Servers panel and select New → Server.
- Define the server by selecting JBoss Enterprise Middleware → JBoss Enterprise Application Platform 6.1+ and clicking Next.
- Click JBoss EAP 6.4 Runtime and select Create new runtime (next page). Click Next.
- Set the home directory by clicking Browse. Navigate to and select the installation directory for Red Hat JBoss EAP 6.4 which has Red Hat JBoss BRMS installed.
- Provide a name for the server in the Name field, ensure that the configuration file is set, and click Finish.
5.4. Kie Navigator
Kie Navigator enables you to browse, change, and deploy the content of your Red Hat JBoss BRMS server. Thus, you can seemlessly integrate Red Hat JBoss Developer Studio with Red Hat JBoss BRMS.
Configuring Kie Navigator
- In Red Hat JBoss Developer Studio, click Window → Show View → Other….
-
Type
Kie Navigatorand select the Kie Navigator option. - If you have no server with Red Hat JBoss BRMS configured in your Red Hat JBoss Developer Studio, you will be asked to configure a server first. See Section 5.3, “Configuring Red Hat JBoss BRMS Server” for more information.
- Right click your server name you want to use and select Properties.
-
Enter username and pasword that has a kie role, for example
kie-server. Enter the following:
-
KIE Application Name:
business-central -
HTTP Port:
8080 Git Port:
8001NoteThe values above are the default values. If you changed the default values of Git or Business Central ports, use your values.
-
KIE Application Name:
- Check Use default Git Repository Path and click Apply.
- Start your server in the Servers tab and wait until the server has started.
- In the Kie Navigator tab, right click your server name and click Refresh. You will see the contents of the Red Hat JBoss BRMS git repository. Double click a project to import it into your Red Hat JBoss Developer Studio.
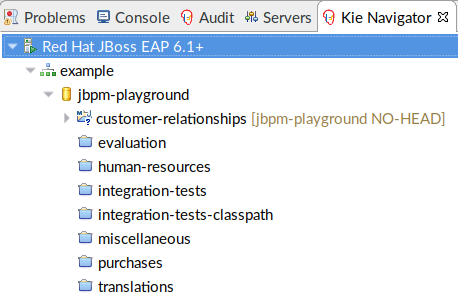
Kie Navigator Features
In the Kie Navigator tree, you can see four levels:
-
Server (
 )
)
-
Organizational Unit (
 )
)
-
Repository (
 )
)
-
Project (
 )
)
Kie Navigator Server Level
Right clicking
gives you the following options:
- Refresh
- Makes a REST call to update the entire tree.
- Create Organization
- Enables you to create a new Organizational Unit.
- Properties
- Displays the server properties.
Kie Navigator Organizational Unit Level
Right clicking
gives you the following options:
- Add Repository…
- Enables you to add a repository that is not associated with another Organizational Unit.
- Create Repository…
- Enables you to create a repository.
- Delete Organization…
- Enables you to delete selected Organizational Unit.
- Properties
- Displays properties of selected Organziational Unit.
Kie Navigator Repository Level
Right clicking
gives you the following options:
- Import Repository
- Clones the Repository and makes it available in the Git Repository View. This menu action is available if the Repository has not already been cloned.
- Create Project…
- Enables you to create a project.
- Remove Repository…
- Enables you to remove selected repository.
- Show in Git Repository View
- Opens the Git Repositories View and highlights selected Repository.
- Properties
- Displays properties of selected repository.
Kie Navigator Project Level
Right clicking
gives you the following options:
- Import Project
- Imports the project into your Red Hat JBoss Developer Studio.
- Delete Project…
- Enables you to deletes selected Project.
- Properties
- Displays project properties.
5.5. Importing Projects from Git Repository into Red Hat JBoss Developer Studio
This is an additional feature not required for working with Red Hat JBoss Developer Studio.
You can configure Red Hat JBoss Developer Studio to connect to a central Git asset repository. The repository stores rules, models, functions, and processes.
You can either clone a remote Git repository or import a local Git repository.
Procedure: Cloning Remote Git Repository
- Start the Red Hat JBoss BRMS server by selecting the server from the Server tab and clicking the start icon.
Start the Secure Shell server, if not running already, by using the following command. The command is specific to Linux and Mac environments. If
sshdhas already been started, this command fails. In that case, you may safely ignore this step./sbin/service sshd start
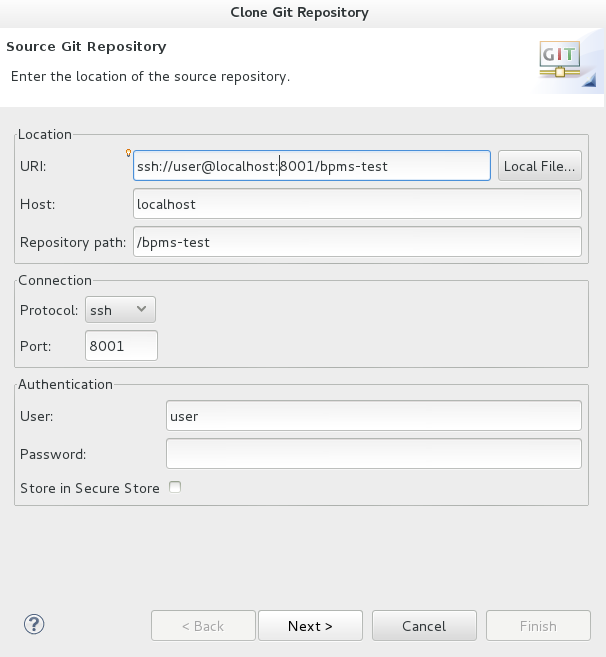
- In Red Hat JBoss Developer Studio , click File → Import… and navigate to the Git folder. Open the Git folder to select Projects from Git and click Next.
- Select the repository source as Clone URI and click Next.
Enter the details of the Git repository in the next window and click Next.
Figure 5.1. Git Repository Details
- Select the branch you wish to import in the following window and click Next.
- To define the local storage for this project, enter (or select) a non-empty directory, make any configuration changes and click Next.
- Import the project as a general project in the following window and click Next. Name the project and click Finish.
Procedure: Importing Local Git Repository
- Start the Red Hat JBoss BRMS server by selecting the server from the Server tab and click the start icon.
- In Red Hat JBoss Developer Studio, click File → Import… and navigate to the Git folder. Open the Git folder to select Projects from Git and click Next.
Select the repository source as Existing local repository and click Next.
Figure 5.2. Git Repository Details
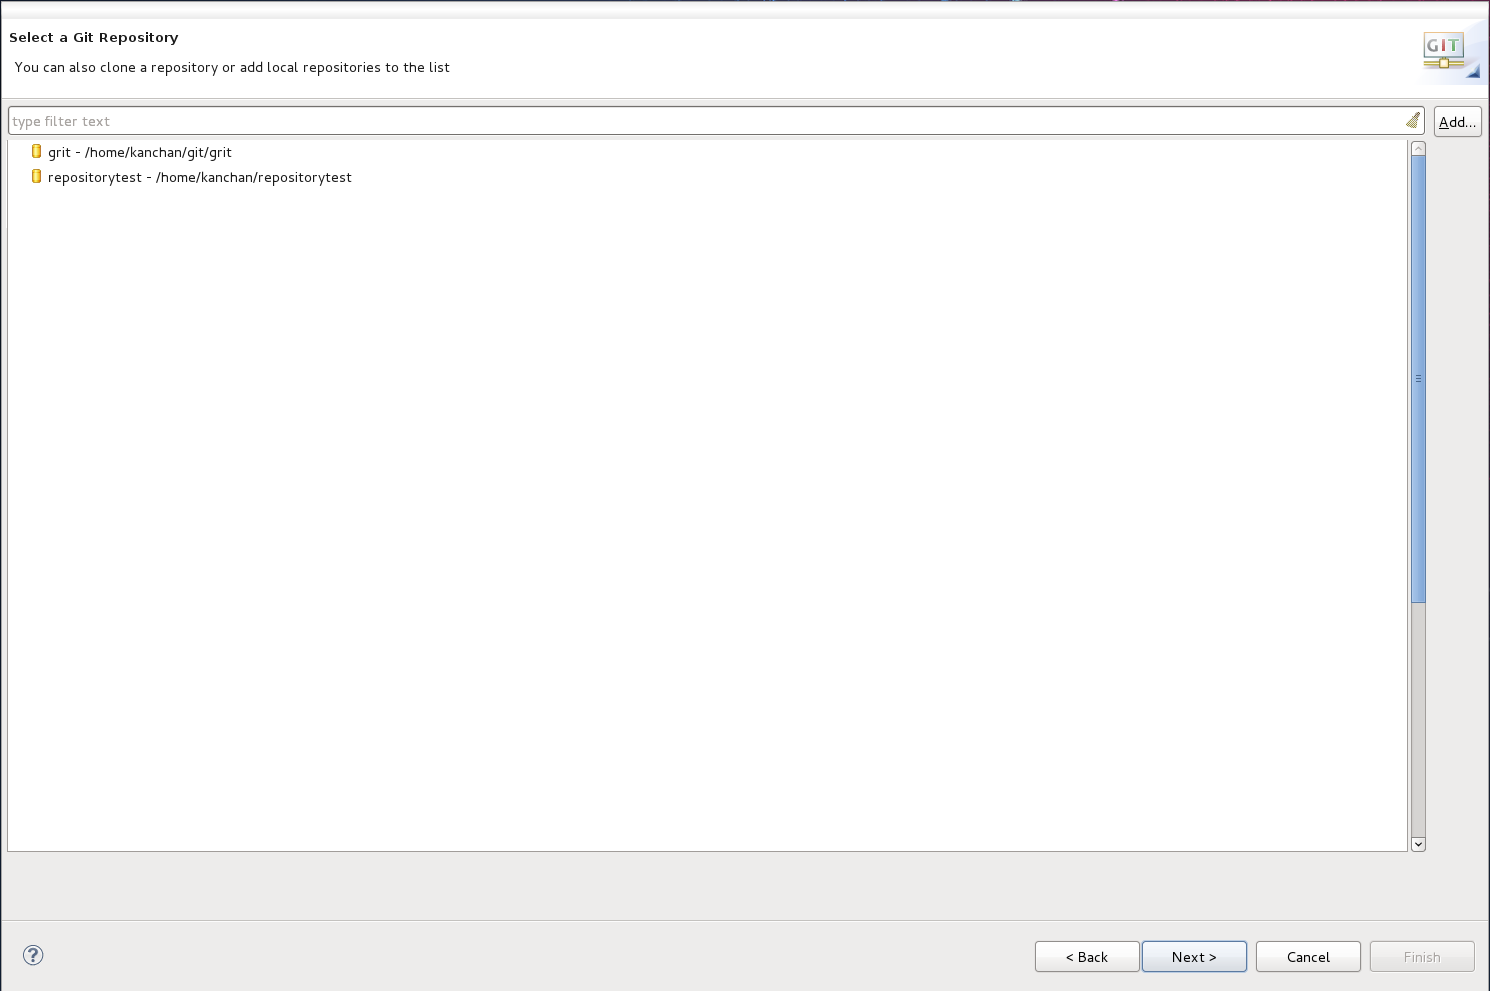
- Select the repository that is to be configured from the list of available repositories and click Next.
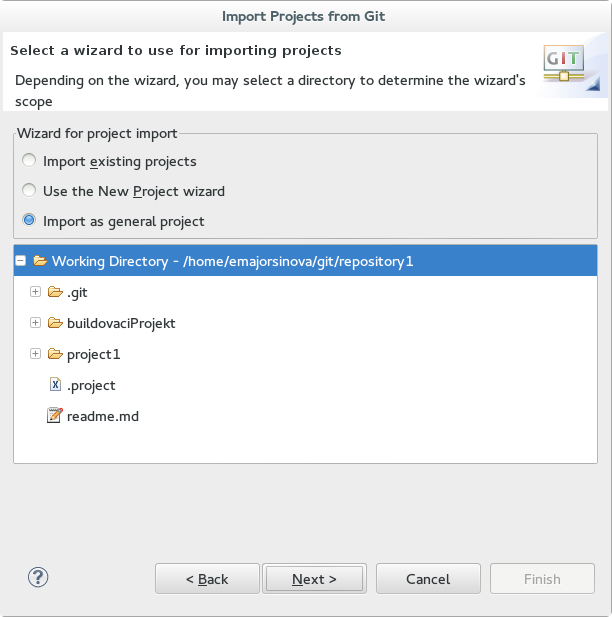
In the dialog that opens, select the radio button Import as general project from the Wizard for project import group and click Next. Name the project and click Finish.
Figure 5.3. Wizard for Project Import
5.6. Creating Drools Project
Procedure: Creating New Red Hat JBoss Developer Studio Project
- From the main menu, click File → New → Project.
- Click Drools → Drools Project and click Next.
- For now, choose the second option. Red Hat JBoss Developer Studio creates a project with a Red Hat JBoss BRMS example. Click Next.
- Enter a name for the project into the Project name: text box and click Finish.
To test the project:
-
Navigate to the
src/main/javadirectory and expand thecom.samplepackage. Right click a Java class and select Run As → Java Application.
The output will be displayed on the console tab.
Chapter 6. Business Resource Planner
Business Resource Planner is a lightweight, embeddable planning engine that optimizes planning problems. It helps Java™ developers solve planning problems efficiently. It combines optimization heuristics and metaheuristics with very efficient score calculations.
The planner helps to solve various use cases, for example:
- Employee/Patient Rosters: the planner helps to create timetables for nurses and keeps track of patient bed management.
- Educational Timetables: the planner helps to schedule lessons, courses, exams, and conference presentations.
- Shop Schedules: the planner tracks car assembly lines, machine queue planning, and workforce task planning.
- Cutting Stock: the planner minimizes waste by reducing the consumption of resources such as paper and steel.
6.1. Installing Business Resource Planner
- Open the DOWNLOADS section of the Red Hat Customer Portal.
- Click Red Hat JBoss BRMS and log in.
- From the Version drop-down menu, select version 6.4.
- Select Red Hat JBoss BRMS 6.4.0 Business Resource Planner and click Download.
6.2. Running Business Resource Planner Examples
-
On the command line, change into the
examples/directory. In a Unix environment, execute:
./runExamples.sh
In a Windows environment, execute:
runExamples.bat
- Pick an example from the Examples GUI application that opens and run it in your favorite IDE.
Appendix A. Versioning information
Documentation last updated on: Monday, May 13, 2019.