
Service Registry User Guide
Using Service Registry 2.3
Abstract
Preface
Making open source more inclusive
Red Hat is committed to replacing problematic language in our code, documentation, and web properties. We are beginning with these four terms: master, slave, blacklist, and whitelist. Because of the enormity of this endeavor, these changes will be implemented gradually over several upcoming releases. For more details, see our CTO Chris Wright’s message.
Chapter 1. Introduction to Service Registry
This chapter introduces Service Registry concepts and features and provides details on the supported artifact types that are stored in the registry:
- Section 1.1, “What is Service Registry?”
- Section 1.2, “Schema and API artifacts in Service Registry”
- Section 1.3, “Manage content using the Service Registry web console”
- Section 1.4, “Service Registry REST API for clients”
- Section 1.5, “Service Registry storage options”
- Section 1.6, “Validate Kafka messages using schemas and Java client serializers/deserializers”
- Section 1.7, “Stream data to external systems with Kafka Connect converters”
- Section 1.8, “Service Registry demonstration examples”
- Section 1.9, “Service Registry available distributions”
1.1. What is Service Registry?
Service Registry is a datastore for sharing standard event schemas and API designs across event-driven and API architectures. You can use Service Registry to decouple the structure of your data from your client applications, and to share and manage your data types and API descriptions at runtime using a REST interface.
Client applications can dynamically push or pull the latest schema updates to or from Service Registry at runtime without needing to redeploy. Developer teams can query Service Registry for existing schemas required for services already deployed in production, and can register new schemas required for new services in development.
You can enable client applications to use schemas and API designs stored in Service Registry by specifying the Service Registry URL in your client application code. Service Registry can store schemas used to serialize and deserialize messages, which are referenced from your client applications to ensure that the messages that they send and receive are compatible with those schemas.
Using Service Registry to decouple your data structure from your applications reduces costs by decreasing overall message size, and creates efficiencies by increasing consistent reuse of schemas and API designs across your organization. Service Registry provides a web console to make it easy for developers and administrators to manage registry content.
You can configure optional rules to govern the evolution of your Service Registry content. These include rules to ensure that uploaded content is valid, or is compatible with other versions. Any configured rules must pass before new versions can be uploaded to Service Registry, which ensures that time is not wasted on invalid or incompatible schemas or API designs.
Service Registry is based on the Apicurio Registry open source community project. For details, see https://github.com/apicurio/apicurio-registry.
Service Registry capabilities
- Multiple payload formats for standard event schema and API specifications such as Apache Avro, JSON Schema, Google Protobuf, AsyncAPI, OpenAPI, and more.
- Pluggable Service Registry storage options in AMQ Streams or PostgreSQL database.
- Rules for content validation and version compatibility to govern how Service Registry content evolves over time.
- Service Registry content management using web console, REST API, command line, Maven plug-in, or Java client.
- Full Apache Kafka schema registry support, including integration with Kafka Connect for external systems.
- Kafka client serializers/deserializers (SerDes) to validate message types at runtime.
- Compatibility with existing Confluent schema registry client applications.
- Cloud-native Quarkus Java runtime for low memory footprint and fast deployment times.
- Operator-based installation of Service Registry on OpenShift.
- OpenID Connect (OIDC) authentication using Red Hat Single Sign-On.
1.2. Schema and API artifacts in Service Registry
The items stored in Service Registry, such as event schemas and API designs, are known as registry artifacts. The following shows an example of an Apache Avro schema artifact in JSON format for a simple share price application:
Example Avro schema
{
   "type": "record",
   "name": "price",
   "namespace": "com.example",
   "fields": [
       {
           "name": "symbol",
           "type": "string"
       },
       {
           "name": "price",
           "type": "string"
       }
   ]
}
When a schema or API design is added as an artifact in Service Registry, client applications can then use that schema or API design to validate that the client messages conform to the correct data structure at runtime.
Groups of schemas and APIs
An artifact group is an optional named collection of schema or API artifacts. Each group contains a logically related set of schemas or API designs, typically managed by a single entity, belonging to a particular application or organization.
You can create optional artifact groups when adding your schemas and API designs to organize them in Service Registry. For example, you could create groups to match your development and production application environments, or your sales and engineering organizations.
Schema and API groups can contain multiple artifact types. For example, you could have Protobuf, Avro, JSON Schema, OpenAPI, or AsyncAPI artifacts all in the same group.
You can create schema and API artifacts and groups using the Service Registry web console, REST API, command line, Maven plug-in, or Java client application. The following simple example shows using the Core Registry REST API:
$ curl -X POST -H "Content-type: application/json; artifactType=AVRO" \
  -H "X-Registry-ArtifactId: share-price" \
  --data '{"type":"record","name":"price","namespace":"com.example", \
   "fields":[{"name":"symbol","type":"string"},{"name":"price","type":"string"}]}' \
  https://my-registry.example.com/apis/registry/v2/groups/my-group/artifacts
This example creates an artifact group named my-group and adds an Avro schema with an artifact ID of share-price.
Specifying a group is optional when using the Service Registry web console, and a default group is created automatically. When using the REST API or Maven plug-in, specify the default group in the API path if you do not want to create a unique group.
Additional resources
- For more details on the Core Registry API, see the Apicurio Registry REST API documentation.
References to other schemas and APIs
Some Service Registry artifact types can include artifact references from one artifact file to another. You can create efficiencies by defining reusable schema or API components, and then referencing them from multiple locations. For example, you can specify a reference in JSON Schema or OpenAPI using a $ref statement, or in Google Protobuf using an import statement, or in Apache Avro using a nested namespace.
The following example shows a simple Avro schema named TradeKey that includes a reference to another schema named Exchange using a nested namespace:
Tradekey schema with nested Exchange schema
{
 "namespace": "com.kubetrade.schema.trade",
 "type": "record",
 "name": "TradeKey",
 "fields": [
   {
     "name": "exchange",
     "type": "com.kubetrade.schema.common.Exchange"
   },
   {
     "name": "key",
     "type": "string"
   }
 ]
}
Exchange schema
{
 "namespace": "com.kubetrade.schema.common",
 "type": "enum",
 "name": "Exchange",
 "symbols" : ["GEMINI"]
}
An artifact reference is stored in Service Registry as a collection of artifact metadata that maps from an artifact type-specific reference to an internal Service Registry reference. Each artifact reference in Service Registry is composed of the following:
- Group ID
- Artifact ID
- Artifact version
- Artifact reference name
You can manage artifact references using the Service Registry core REST API, Maven plug-in, and Java serializers/deserializers (SerDes). Service Registry stores the artifact references along with the artifact content. Service Registry also maintains a collection of all artifact references so you can search them or list all references for a specific artifact.
Supported artifact types
Service Registry currently supports artifact references for the following artifact types only:
- Avro
- Protobuf
- JSON Schema
Additional resources
For details on managing artifact references, see:
- For a Java example, see the Apicurio Registry SerDes with references demonstration.
1.3. Manage content using the Service Registry web console
You can use the Service Registry web console to browse and search the schema and API artifacts and optional groups stored in the registry, and to add new schema and API artifacts, groups, and versions. You can search for artifacts by label, name, group, and description. You can view an artifact’s content or its available versions, or download an artifact file locally.
You can also configure optional rules for registry content, both globally and for each schema and API artifact. These optional rules for content validation and compatibility are applied when new schema and API artifacts or versions are uploaded to the registry.
For more details, see Chapter 9, Service Registry artifact and rule reference.
Figure 1.1. Service Registry web console
The Service Registry web console is available from http://MY_REGISTRY_URL/ui.
Additional resources
1.4. Service Registry REST API for clients
Client applications can use the Core Registry API v2 to manage the schema and API artifacts in Service Registry. This API provides operations for the following features:
- Admin
-
Export or import Service Registry data in a
.zipfile, and manage logging levels for the Service Registry instance at runtime. - Artifacts
- Manage schema and API artifacts stored in Service Registry. You can also manage the lifecycle state of an artifact: enabled, disabled, or deprecated.
- Artifact metadata
- Manage details about a schema or API artifact. You can edit details such as artifact name, description, or labels. Details such as artifact group, and when the artifact was created or modified are read-only.
- Artifact rules
- Configure rules to govern the content evolution of a specific schema or API artifact to prevent invalid or incompatible content from being added to Service Registry. Artifact rules override any global rules configured.
- Artifact versions
- Manage versions that are created when a schema or API artifact is updated. You can also manage the lifecycle state of an artifact version: enabled, disabled, or deprecated.
- Global rules
- Configure rules to govern the content evolution of all schema and API artifacts to prevent invalid or incompatible content from being added to Service Registry. Global rules are applied only if an artifact does not have its own specific artifact rules configured.
- Search
- Browse or search for schema and API artifacts and versions, for example, by name, group, description, or label.
- System
- Get the Service Registry version and the limits on resources for the Service Registry instance.
- Users
- Get the current Service Registry user.
Compatibility with other schema registry REST APIs
Service Registry provides compatibility with the following schema registries by including implementations of their respective REST APIs:
- Service Registry Core Registry API v1
- Confluent Schema Registry API v6
- CNCF CloudEvents Schema Registry API v0
Applications using Confluent client libraries can use Service Registry as a drop-in replacement. For more details, see Replacing Confluent Schema Registry.
Additional resources
- For more information on the Core Registry API v2, see the Apicurio Registry REST API documentation.
-
For API documentation on the Core Registry API v2 and all compatible APIs, browse to the
/apisendpoint of your Service Registry instance, for example,http://MY-REGISTRY-URL/apis.
1.5. Service Registry storage options
Service Registry provides the following options for the underlying storage of registry data:
Table 1.1. Service Registry data storage options
| Storage option | Description |
|---|---|
| PostgreSQL database | PostgreSQL is the recommended data storage option for performance, stability, and data management (backup/restore, and so on) in a production environment. |
| AMQ Streams | Kafka storage is provided for production environments where database management expertise is not available, or where storage in Kafka is a specific requirement. |
Additional resources
- For more details on storage options, see Installing and deploying Service Registry on OpenShift.
1.6. Validate Kafka messages using schemas and Java client serializers/deserializers
Kafka producer applications can use serializers to encode messages that conform to a specific event schema. Kafka consumer applications can then use deserializers to validate that messages have been serialized using the correct schema, based on a specific schema ID.
Figure 1.2. Service Registry and Kafka client SerDes architecture
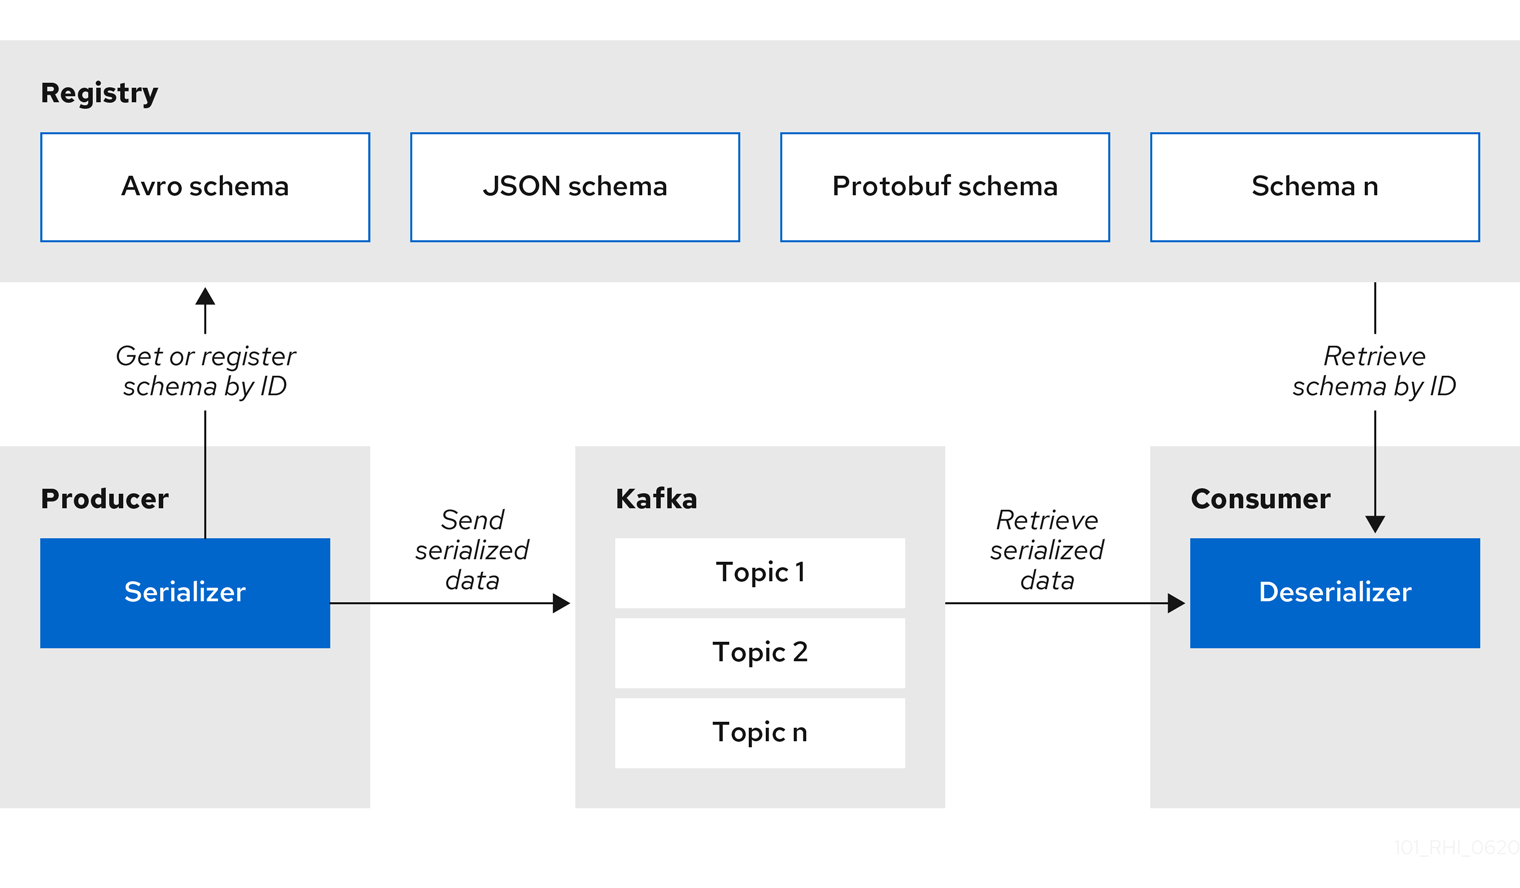
Service Registry provides Kafka client serializers/deserializers (SerDes) to validate the following message types at runtime:
- Apache Avro
- Google Protobuf
- JSON Schema
The Service Registry Maven repository and source code distributions include the Kafka SerDes implementations for these message types, which Kafka client application developers can use to integrate with Service Registry.
These implementations include custom Java classes for each supported message type, for example, io.apicurio.registry.serde.avro, which client applications can use to pull schemas from Service Registry at runtime for validation.
Additional resources
1.7. Stream data to external systems with Kafka Connect converters
You can use Service Registry with Apache Kafka Connect to stream data between Kafka and external systems. Using Kafka Connect, you can define connectors for different systems to move large volumes of data into and out of Kafka-based systems.
Figure 1.3. Service Registry and Kafka Connect architecture

Service Registry provides the following features for Kafka Connect:
- Storage for Kafka Connect schemas
- Kafka Connect converters for Apache Avro and JSON Schema
- Core Registry API to manage schemas
You can use the Avro and JSON Schema converters to map Kafka Connect schemas into Avro or JSON schemas. Those schemas can then serialize message keys and values into the compact Avro binary format or human-readable JSON format. The converted JSON is also less verbose because the messages do not contain the schema information, only the schema ID.
Service Registry can manage and track the Avro and JSON schemas used in the Kafka topics. Because the schemas are stored in Service Registry and decoupled from the message content, each message must only include a tiny schema identifier. For an I/O bound system like Kafka, this means more total throughput for producers and consumers.
The Avro and JSON Schema serializers and deserializers (SerDes) provided by Service Registry are also used by Kafka producers and consumers in this use case. Kafka consumer applications that you write to consume change events can use the Avro or JSON SerDes to deserialize these change events. You can install these SerDes into any Kafka-based system and use them along with Kafka Connect, or with Kafka Connect-based systems such as Debezium and Camel Kafka Connector.
1.8. Service Registry demonstration examples
Service Registry provides open source example applications that demonstrate how to use Service Registry in different use case scenarios. For example, these include storing schemas used by Kafka serializer and deserializer (SerDes) Java classes. These classes fetch the schema from Service Registry for use when producing or consuming operations to serialize, deserialize, or validate the Kafka message payload.
These applications demonstrate use cases such as the following examples:
- Apache Avro Kafka SerDes
- Apache Avro Maven plug-in
- Apache Camel Quarkus and Kafka
- Cloud Events
- Confluent Kafka SerDes
- Custom ID strategy
- Google Protobuf Kafka SerDes
- JSON Schema Kafka SerDes
- REST clients
Additional resources
- For more details, see https://github.com/Apicurio/apicurio-registry-examples
1.9. Service Registry available distributions
Service Registry provides the following distribution options.
Table 1.2. Service Registry Operator and images
| Distribution | Location | Release category |
|---|---|---|
| Service Registry Operator | OpenShift web console under Operators → OperatorHub | General Availability |
| Container image for Service Registry Operator | General Availability | |
| Container image for Kafka storage in AMQ Streams | General Availability | |
| Container image for database storage in PostgreSQL | General Availability |
Table 1.3. Service Registry zip downloads
| Distribution | Location | Release category |
|---|---|---|
| Example custom resource definitions for installation | General Availability | |
| Service Registry v1 to v2 migration tool | General Availability | |
| Maven repository | General Availability | |
| Source code | General Availability | |
| Kafka Connect converters | General Availability |
You must have a subscription for Red Hat Integration and be logged into the Red Hat Customer Portal to access the available Service Registry distributions.
Chapter 2. Service Registry content rules
This chapter introduces the optional rules used to govern Service Registry content and provides details on the available rule configuration:
2.1. Govern Service Registry content using rules
To govern the evolution of artifact content added to Service Registry, you can configure optional rules. All configured global rules or artifact rules must pass before a new artifact version can be uploaded to Service Registry. Configured artifact rules override any configured global rules.
The goal of these rules is to prevent invalid content from being added to Service Registry. For example, content can be invalid for the following reasons:
-
Invalid syntax for a given artifact type (for example,
AVROorPROTOBUF) - Valid syntax, but semantics violate a specification
- Incompatibility, when new content includes breaking changes relative to the current artifact version
You can enable optional content rules using the Service Registry web console, REST API commands, or a Java client application.
2.1.1. When rules are applied
Rules are applied only when content is added to Service Registry. This includes the following REST operations:
- Adding an artifact
- Updating an artifact
- Adding an artifact version
If a rule is violated, Service Registry returns an HTTP error. The response body includes the violated rule and a message showing what went wrong.
2.1.2. Rule precedence
You can configure Service Registry content rules at a global level and at an artifact level. The order of precedence is as follows:
- If you enable an artifact rule and the equivalent global rule, the artifact rule overrides the global rule.
- If you disable an artifact rule, and enable the equivalent global rule, the global rule applies.
- If you disable a rule at the artifact level and at the global level, you disable the rule for all artifacts.
-
If you set a rule value to
NONEat the artifact level, you override the enabled global rule. In this case, the artifact rule valueNONEtakes precedence for this artifact, but the enabled global rule continues to apply to any other artifacts that have the rule disabled at the artifact level.
2.1.3. How rules work
Each rule has a name and configuration information. Service Registry maintains the list of rules for each artifact and the list of global rules. Each rule in the list consists of a name and configuration for the rule implementation.
A rule is provided with the content of the current version of the artifact (if one exists) and the new version of the artifact being added. The rule implementation returns true or false depending on whether the artifact passes the rule. If not, Service Registry reports the reason why in an HTTP error response. Some rules might not use the previous version of the content. For example, compatibility rules use previous versions, but syntax or semantic validity rules do not.
Additional resources
For more details, see Chapter 9, Service Registry artifact and rule reference.
2.1.4. Content rule configuration
You can configure rules individually for each artifact, as well as globally. Service Registry applies the rules configured for the specific artifact. If no rules are configured at that level, Service Registry applies the globally configured rules. If no global rules are configured, no rules are applied.
Configure artifact rules
You can configure artifact rules using the Service Registry web console or REST API. For details, see the following:
Configure global rules
You can configure global rules in several ways:
-
Use the
/rulesoperations in the REST API - Use the Service Registry web console
- Set default global rules using Service Registry application properties
Configure default global rules
You can configure Service Registry at the application level to enable or disable global rules. You can configure default global rules at installation time without post-install configuration using the following application property format:
registry.rules.global.<ruleName>
The following rule names are currently supported:
-
compatibility -
validity
The value of the application property must be a valid configuration option that is specific to the rule being configured.
You can configure these application properties as Java system properties or include them in the Quarkus application.properties file. For more details, see the Quarkus documentation.
Chapter 3. Managing Service Registry content using the web console
This chapter explains how to manage schema and API artifacts stored in Service Registry by using the Service Registry web console. This includes uploading and browsing Service Registry content, and configuring optional rules:
- Section 3.1, “Viewing artifacts using the Service Registry web console”
- Section 3.2, “Adding artifacts using the Service Registry web console”
- Section 3.3, “Configuring content rules using the Service Registry web console”
- Section 3.4, “Configuring Service Registry instance settings using the web console”
- Section 3.5, “Changing an artifact owner using the Service Registry web console”
- Section 3.6, “Exporting and importing data using the Service Registry web console”
3.1. Viewing artifacts using the Service Registry web console
You can use the Service Registry web console to browse the event schema and API artifacts stored in Service Registry. This section shows a simple example of viewing Service Registry artifacts, groups, versions, and artifact rules.
Prerequisites
- Service Registry is installed and running in your environment.
You are logged in to the Service Registry web console:
http://MY_REGISTRY_URL/ui- Artifacts have been added to Service Registry using the web console, command line, Maven plug-in, or a Java client application.
Procedure
On the Artifacts tab, browse the list of artifacts stored in Service Registry, or enter a search string to find an artifact. You can select from the list to search by specific criteria such as name, group, labels, or global ID.
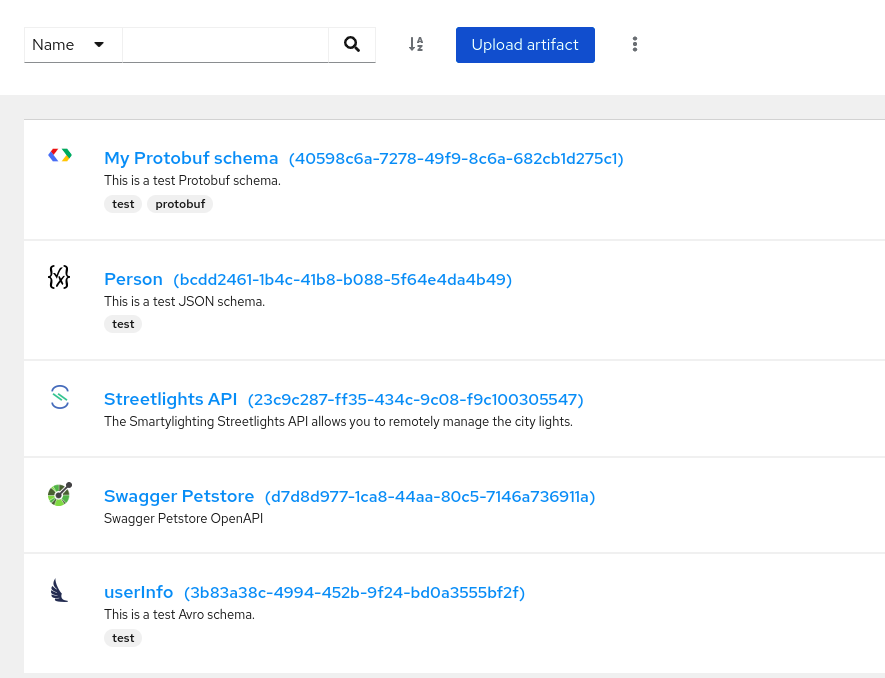
Figure 3.1. Artifacts in Service Registry web console
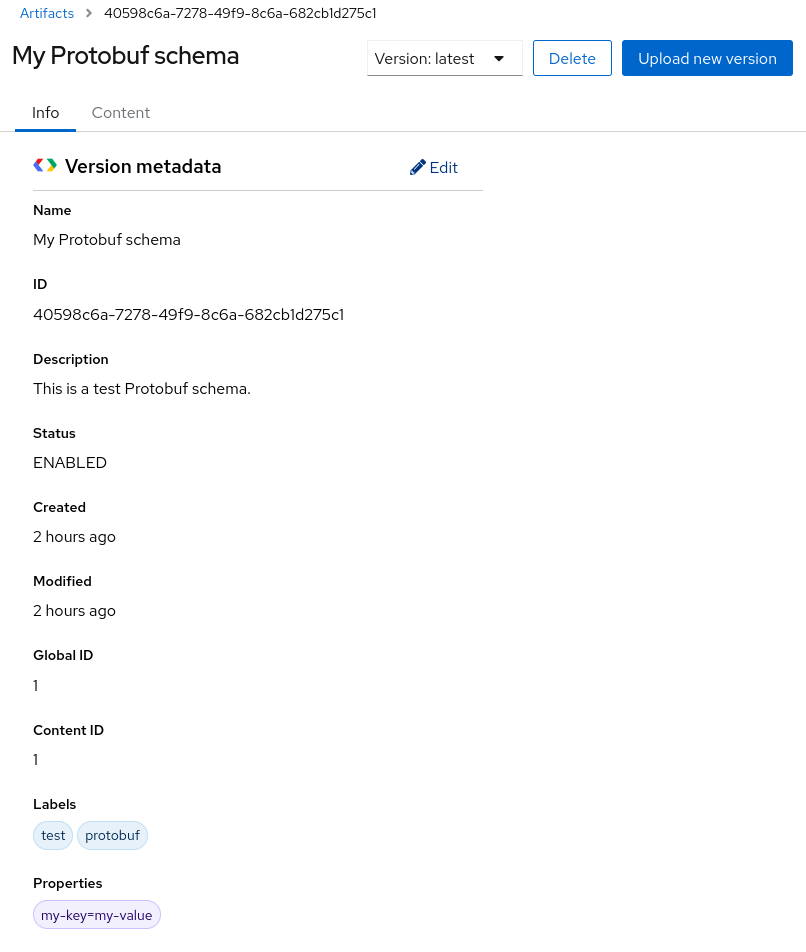
Click an artifact to view the following details:
- Overview: Displays artifact version metadata such as artifact name, artifact ID, global ID, content ID, labels, properties, and so on. Also displays rules for validity and compatibility that you can configure for artifact content.
- Documentation (OpenAPI and AsyncAPI only): Displays automatically-generated REST API documentation.
- Content: Displays a read-only view of the full artifact content. For JSON content, you can click JSON or YAML to display your preferred format.
- If additional versions of this artifact have been added, you can select them from the Version list in page header.
-
To save the artifact contents to a local file, for example,
my-protobuf-schema.proto, click Download at the end of the page.
3.2. Adding artifacts using the Service Registry web console
You can use the Service Registry web console to upload event schema and API artifacts to Service Registry. This section shows simple examples of uploading Service Registry artifacts and adding new artifact versions.
Prerequisites
- Service Registry is installed and running in your environment.
You are logged in to the Service Registry web console:
http://MY_REGISTRY_URL/ui
Procedure
On the Artifacts tab, click Upload artifact, and specify the following details:
-
Group & ID: Use the default empty settings to automatically generate an artifact ID and add the artifact to the
defaultartifact group. Alternatively, you can enter an optional artifact group name or ID. - Type: Use the default Auto-Detect setting to automatically detect the artifact type, or select the artifact type from the list, for example, Avro Schema or OpenAPI. You must manually select the Kafka Connect Schema artifact type, which cannot be automatically detected.
Artifact: Specify the artifact location using either of the following options:
-
From file: Click Browse, and select a file, or drag and drop a file. For example,
my-openapi.jsonormy-schema.proto. Alternatively, you can enter the file contents in the text box. -
From URL: Enter a valid and accessible URL, and click Fetch. For example:
https://petstore3.swagger.io/api/v3/openapi.json.
-
From file: Click Browse, and select a file, or drag and drop a file. For example,
-
Group & ID: Use the default empty settings to automatically generate an artifact ID and add the artifact to the
Click Upload and view the artifact details:
- Overview: Displays artifact version metadata such as artifact name, artifact ID, global ID, content ID, labels, properties, and so on. Also displays rules for validity and compatibility that you can configure for artifact content.
- Documentation (OpenAPI and AsyncAPI only): Displays automatically-generated REST API documentation.
Content: Displays a read-only view of the full artifact content. For JSON content, you can click JSON or YAML to display your preferred format.
The following example shows an example Protobuf schema artifact:
Figure 3.2. Artifact details in Service Registry web console
On the Overview tab, click the Edit pencil icon to edit artifact metadata such as name or description.
You can also enter an optional comma-separated list of labels for searching, or add key-value pairs of arbitrary properties associated with the artifact. To add properties, perform the following steps:
- Click Add property.
- Enter the key name and the value.
- Repeat the first two steps to add multiple properties.
- Click Save.
-
To save the artifact contents to a local file, for example,
my-protobuf-schema.proto, click Download at the end of the page. -
To add a new artifact version, click Upload new version in the page header, and drag and drop or click Browse to upload the file, for example,
my-avro-schema.jsonormy-openapi.json. To delete an artifact, click Delete in the page header.
WarningDeleting an artifact deletes the artifact and all of its versions, and cannot be undone.
3.3. Configuring content rules using the Service Registry web console
You can use the Service Registry web console to configure optional rules to prevent invalid content from being added to Service Registry. All configured artifact rules or global rules must pass before a new artifact version can be uploaded to Service Registry. Configured artifact rules override any configured global rules. This section shows a simple example of configuring global and artifact rules.
Prerequisites
- Service Registry is installed and running in your environment.
You are logged in to the Service Registry web console:
http://MY_REGISTRY_URL/ui- Artifacts have been added to Service Registry using the web console, command line, Maven plug-in, or a Java client application.
Procedure
- On the Artifacts tab, browse the list of artifacts in Service Registry, or enter a search string to find an artifact. You can select from the list to search by specific criteria such as artifact name, group, labels, or global ID.
- Click an artifact to view its version details and content rules.
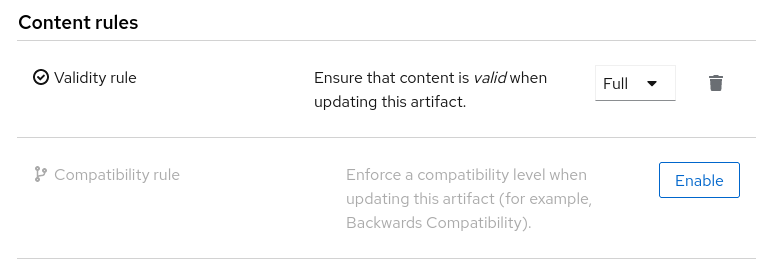
In Content rules, click Enable to configure a validity rule or compatibility rule for artifact content, and select the appropriate rule configuration from the list, for example, Full for the validity rule.
Figure 3.3. Artifact content rules in Service Registry web console
- To access global rules, click the Service Registry instance, and click the Global rules tab. Click Enable to configure a global validity rule or compatibility rule for all artifact content, and select the appropriate rule configuration from the list.
- To disable an artifact rule or global rule, click the trash icon next to the rule.
3.4. Configuring Service Registry instance settings using the web console
As an administrator, you can use the Service Registry web console to configure dynamic settings for Service Registry instances at runtime. You can manage configuration options for features such as authentication, authorization, and API compatibility.
Authentication and authorization settings are only displayed in the web console if authentication was already enabled when the Service Registry instance was deployed. For more details, see the Installing and deploying Service Registry on OpenShift.
Prerequisites
- The Service Registry instance is already deployed.
You are logged in to the Service Registry web console with administrator access:
http://MY_REGISTRY_URL/ui
Procedure
- In the Service Registry web console, click the Settings tab.
Select the settings that you want to configure for this Service Registry instance:
Table 3.1. Authentication settings
Setting Description HTTP basic authentication
Displayed only when authentication is already enabled. When selected, Service Registry users can authenticate using HTTP basic authentication, in addition to OAuth. Not selected by default.
Table 3.2. Authorization settings
Setting Description Anonymous read access
Displayed only when authentication is already selected. When selected, Service Registry grants read-only access to requests from anonymous users without any credentials. This setting is useful if you want to use this instance to publish schemas or APIs externally. Not selected by default.
Artifact owner-only authorization
Displayed only when authentication is already enabled. When selected, only the user who created an artifact can modify that artifact. Not selected by default.
Artifact group owner-only authorization
Displayed only when authentication is already enabled and Artifact owner-only authorization is selected. When selected, only the user who created an artifact group has write access to that artifact group, for example, to add or remove artifacts in that group. Not selected by default.
Authenticated read access
Displayed only when authentication is already enabled. When selected, Service Registry grants at least read-only access to requests from any authenticated user regardless of their user role. Not selected by default.
Table 3.3. Compatibility settings
Setting Description Legacy ID mode (compatibility API)
When selected, the Confluent Schema Registry compatibility API uses
globalIdinstead ofcontentIdas an artifact identifier. This setting is useful when migrating from legacy Service Registry instances based on the v1 Core Registry API. Not selected by default.Table 3.4. Web console settings
Setting Description Download link expiry
The number of seconds that a generated link to a
.zipdownload file is active before expiring for security reasons, for example, when exporting artifact data from the instance. Defaults to 30 seconds.UI read-only mode
When selected, the Service Registry web console is set to read-only, preventing create, read, update, or delete operations. Changes made using the Core Registry API are not affected by this setting. Not selected by default.
Additional resources
3.5. Changing an artifact owner using the Service Registry web console
As an administrator or as an owner of a schema or API artifact, you can use the Service Registry web console to change the artifact owner to another user account.
For example, this feature is useful if the Artifact owner-only authorization option is set for the Service Registry instance on the Settings tab so that only owners or administrators can modify artifacts. You might need to change owner if the owner user leaves the organization or the owner account is deleted.
The Artifact owner-only authorization setting and the artifact Owner field are displayed only if authentication was enabled when the Service Registry instance was deployed. For more details, see Installing and deploying Service Registry on OpenShift.
Prerequisites
- The Service Registry instance is deployed and the artifact is created.
You are logged in to the Service Registry web console as the artifact’s current owner or as an administrator:
http://MY_REGISTRY_URL/ui
Procedure
- On the Artifacts tab, browse the list of artifacts stored in Service Registry, or enter a search string to find the artifact. You can select from the list to search by criteria such as name, group, labels, or global ID.
- Click the artifact that you want to reassign.
- In the Version metadata section, click the pencil icon next to the Owner field.
- In the New owner field, select or enter an account name.
- Click Change owner.
Additional resources
3.6. Exporting and importing data using the Service Registry web console
As an administrator, you can use the Service Registry web console to export data from one Service Registry instance, and import this data into another Service Registry instance. You can use this feature to easily migrate data between different instances.
The following example shows how to export and import existing data in a .zip file from one Service Registry instance to another instance. All of the artifact data contained in the Service Registry instance is exported in the .zip file.
You can import only Service Registry data that has been exported from another Service Registry instance.
Prerequisites
Service Registry instances have been created as follows:
- The source instance that you are exporting from contains at least one schema or API artifact
- The target instance that you are importing into is empty to preserve unique IDs
You are logged into the Service Registry web console with administrator access:
http://MY_REGISTRY_URL/ui
Procedure
- In the web console for the source Service Registry instance, view the Artifacts tab.
-
Click the options icon (three vertical dots) next to Upload artifact, and select Download all artifacts (.zip file) to export the data for this Service Registry instance to a
.zipdownload file. - In the the web console for the target Service Registry instance, view the Artifacts tab.
- Click the options icon next to Upload artifact, and select Upload multiple artifacts.
-
Drag and drop or browse to the
.zipdownload file that you exported earlier. - Click Upload and wait for the data to be imported.
Chapter 4. Managing Service Registry content using the REST API
Client applications can use Service Registry REST API operations to manage schema and API artifacts in Service Registry, for example, in a CI/CD pipeline deployed in production. The Core Registry API v2 provides operations for artifacts, versions, metadata, and rules stored in Service Registry. For detailed information, see the Apicurio Registry REST API documentation.
This chapter shows examples of how to use the Core Registry API v2 to perform the following tasks:
- Section 4.1, “Managing schema and API artifacts using Service Registry REST API commands”
- Section 4.2, “Managing schema and API artifact versions using Service Registry REST API commands”
- Section 4.3, “Managing schema and API artifact references using Service Registry REST API commands”
- Section 4.4, “Exporting and importing registry data using Service Registry REST API commands”
Prerequisites
Additional resources
4.1. Managing schema and API artifacts using Service Registry REST API commands
This section shows a simple curl-based example of using the Core Registry API v2 to add and retrieve a simple schema artifact in Service Registry.
Prerequisites
- Service Registry is installed and running in your environment.
Procedure
Add an artifact to Service Registry using the
/groups/{group}/artifactsoperation. The following examplecurlcommand adds a simple schema artifact for a share price application:$ curl -X POST -H "Content-Type: application/json; artifactType=AVRO" \ -H "X-Registry-ArtifactId: share-price" \ -H "Authorization: Bearer $ACCESS_TOKEN" \ --data '{"type":"record","name":"price","namespace":"com.example", \ "fields":[{"name":"symbol","type":"string"},{"name":"price","type":"string"}]}' \ MY-REGISTRY-URL/apis/registry/v2/groups/my-group/artifacts-
This example adds an Apache Avro schema artifact with an artifact ID of
share-price. If you do not specify a unique artifact ID, Service Registry generates one automatically as a UUID. -
MY-REGISTRY-URLis the host name on which Service Registry is deployed. For example:my-cluster-service-registry-myproject.example.com. -
This example specifies a group ID of
my-groupin the API path. If you do not specify a unique group ID, you must specify../groups/defaultin the API path.
-
This example adds an Apache Avro schema artifact with an artifact ID of
Verify that the response includes the expected JSON body to confirm that the artifact was added. For example:
{"createdBy":"","createdOn":"2021-04-16T09:07:51+0000","modifiedBy":"", "modifiedOn":"2021-04-16T09:07:51+0000","id":"share-price","version":"1", "type":"AVRO","globalId":2,"state":"ENABLED","groupId":"my-group","contentId":2}-
No version was specified when adding the artifact, so the default version
1is created automatically. -
This was the second artifact added to Service Registry, so the global ID and content ID have a value of
2.
-
No version was specified when adding the artifact, so the default version
Retrieve the artifact content from Service Registry using its artifact ID in the API path. In this example, the specified ID is
share-price:$ curl -H "Authorization: Bearer $ACCESS_TOKEN" \ MY-REGISTRY-URL/apis/registry/v2/groups/my-group/artifacts/share-price {"type":"record","name":"price","namespace":"com.example", "fields":[{"name":"symbol","type":"string"},{"name":"price","type":"string"}]}
Additional resources
- For more details, see the Apicurio Registry REST API documentation.
4.2. Managing schema and API artifact versions using Service Registry REST API commands
If you do not specify an artifact version when adding schema and API artifacts using the Core Registry API v2, Service Registry generates a version automatically. The default version when creating a new artifact is 1.
Service Registry also supports custom versioning where you can specify a version using the X-Registry-Version HTTP request header as a string. Specifying a custom version value overrides the default version normally assigned when creating or updating an artifact. You can then use this version value when executing REST API operations that require a version.
This section shows a simple curl-based example of using the Core Registry API v2 to add and retrieve a custom Apache Avro schema version in Service Registry. You can specify custom versions to add or update artifacts, or to add artifact versions.
Prerequisites
- Service Registry is installed and running in your environment.
Procedure
Add an artifact version in the registry using the
/groups/{group}/artifactsoperation. The following examplecurlcommand adds a simple artifact for a share price application:$ curl -X POST -H "Content-Type: application/json; artifactType=AVRO" \ -H "X-Registry-ArtifactId: my-share-price" -H "X-Registry-Version: 1.1.1" \ -H "Authorization: Bearer $ACCESS_TOKEN" \ --data '{"type":"record","name":" p","namespace":"com.example", \ "fields":[{"name":"symbol","type":"string"},{"name":"price","type":"string"}]}' \ MY-REGISTRY-URL/apis/registry/v2/groups/my-group/artifacts-
This example adds an Avro schema artifact with an artifact ID of
my-share-priceand version of1.1.1. If you do not specify a version, Service Registry automatically generates a default version of1. -
MY-REGISTRY-URLis the host name on which Service Registry is deployed. For example:my-cluster-service-registry-myproject.example.com. -
This example specifies a group ID of
my-groupin the API path. If you do not specify a unique group ID, you must specify../groups/defaultin the API path.
-
This example adds an Avro schema artifact with an artifact ID of
Verify that the response includes the expected JSON body to confirm that the custom artifact version was added. For example:
{"createdBy":"","createdOn":"2021-04-16T10:51:43+0000","modifiedBy":"", "modifiedOn":"2021-04-16T10:51:43+0000","id":"my-share-price","version":"1.1.1", "type":"AVRO","globalId":3,"state":"ENABLED","groupId":"my-group","contentId":3}-
A custom version of
1.1.1was specified when adding the artifact. -
This was the third artifact added to the registry, so the global ID and content ID have a value of
3.
-
A custom version of
Retrieve the artifact content from the registry using its artifact ID and version in the API path. In this example, the specified ID is
my-share-priceand the version is1.1.1:$ curl -H "Authorization: Bearer $ACCESS_TOKEN" \ MY-REGISTRY-URL/apis/registry/v2/groups/my-group/artifacts/my-share-price/versions/1.1.1 {"type":"record","name":"price","namespace":"com.example", "fields":[{"name":"symbol","type":"string"},{"name":"price","type":"string"}]}
Additional resources
- For more details, see the Apicurio Registry REST API documentation.
4.3. Managing schema and API artifact references using Service Registry REST API commands
Service Registry artifact types such as Apache Avro, Protobuf, and JSON Schema can include artifact references from one artifact file to another. You can create efficiencies by defining reusable schema and API artifacts, and then referencing them from multiple locations.
This section shows a simple curl-based example of using the Core Registry API v2 to add and retrieve an artifact reference to a simple Avro schema artifact in Service Registry.
This example first creates a schema artifact named ItemId:
ItemId schema
{
    "namespace":"com.example.common",
    "name":"ItemId",
    "type":"record",
    "fields":[
        {
            "name":"id",
            "type":"int"
        }
    ]
}
This example then creates a schema artifact named Item, which includes a reference to the nested ItemId artifact.
Item schema with nested ItemId schema
{
    "namespace":"com.example.common",
    "name":"Item",
    "type":"record",
    "fields":[
        {
            "name":"itemId",
            "type":"com.example.common.ItemId"
        },
    ]
}
Prerequisites
- Service Registry is installed and running in your environment.
Procedure
Add the
ItemIdschema artifact that you want to create the nested artifact reference to using the/groups/{group}/artifactsoperation:$ curl -X POST MY-REGISTRY-URL/apis/registry/v2/groups/my-group/artifacts \ -H "Content-Type: application/json; artifactType=AVRO" \ -H "X-Registry-ArtifactId: ItemId" \ -H "Authorization: Bearer $ACCESS_TOKEN" \ --data '{"namespace": "com.example.common", "type": "record", "name": "ItemId", "fields":[{"name":"id", "type":"int"}]}'-
This example adds an Avro schema artifact with an artifact ID of
ItemId. If you do not specify a unique artifact ID, Service Registry generates one automatically as a UUID. -
MY-REGISTRY-URLis the host name on which Service Registry is deployed. For example:my-cluster-service-registry-myproject.example.com. -
This example specifies a group ID of
my-groupin the API path. If you do not specify a unique group ID, you must specify../groups/defaultin the API path.
-
This example adds an Avro schema artifact with an artifact ID of
Verify that the response includes the expected JSON body to confirm that the artifact was added. For example:
{"name":"ItemId","createdBy":"","createdOn":"2022-04-14T10:50:09+0000","modifiedBy":"","modifiedOn":"2022-04-14T10:50:09+0000","id":"ItemId","version":"1","type":"AVRO","globalId":1,"state":"ENABLED","groupId":"my-group","contentId":1,"references":[]}Add the
Itemschema artifact that includes the artifact reference to theItemIdschema using the/groups/{group}/artifactsoperation:$ curl -X POST MY-REGISTRY-URL/apis/registry/v2/groups/my-group/artifacts \ -H 'Content-Type: application/create.extended+json' \ -H "X-Registry-ArtifactId: Item" \ -H 'X-Registry-ArtifactType: AVRO' \ -H "Authorization: Bearer $ACCESS_TOKEN" \ --data-raw '{ "content": "{\r\n \"namespace\":\"com.example.common\",\r\n \"name\":\"Item\",\r\n \"type\":\"record\",\r\n \"fields\":[\r\n {\r\n \"name\":\"itemId\",\r\n \"type\":\"com.example.common.ItemId\"\r\n }\r\n ]\r\n}", "references": [ { "groupId": "my-group", "artifactId": "ItemId", "name": "com.example.common.ItemId", "version": "1" } ] }'-
For artifact references, you must specify the custom content type of
application/create.extended+json, which extends theapplication/jsoncontent type.
-
For artifact references, you must specify the custom content type of
Verify that the response includes the expected JSON body to confirm that the artifact was created with the reference. For example:
{"name":"Item","createdBy":"","createdOn":"2022-04-14T11:52:15+0000","modifiedBy":"","modifiedOn":"2022-04-14T11:52:15+0000","id":"Item","version":"1","type":"AVRO","globalId":2,"state":"ENABLED","groupId":"my-group","contentId":2, "references":[{"artifactId":"ItemId","groupId":"my-group","name":"ItemId","version":"1"}] }Retrieve the artifact reference from Service Registry by specifying the global ID of the artifact that includes the reference. In this example, the specified global ID is
2:$ curl -H "Authorization: Bearer $ACCESS_TOKEN" MY-REGISTRY-URL/apis/registry/v2/ids/globalIds/2/references
Verify that the response includes the expected JSON body for this artifact reference. For example:
[{"groupId":"my-group","artifactId":"ItemId","version":"1","name":"com.example.common.ItemId"}]
Additional resources
- For more details, see the Apicurio Registry REST API documentation.
- For more examples of artifact references, see the section on configuring each artifact type in Chapter 8, Configuring Kafka serializers/deserializers in Java clients.
4.4. Exporting and importing registry data using Service Registry REST API commands
As an administrator, you can use the Core Registry API v2 to export data from one Service Registry instance and import into another Service Registry instance, so you can migrate data between different instances.
This section shows a simple curl-based example of using the Core Registry API v2 to export and import existing data in .zip format from one Service Registry instance to another. All of the artifact data contained in the Service Registry instance is exported in the .zip file.
You can import only Service Registry data that has been exported from another Service Registry instance.
Prerequisites
- Service Registry is installed and running in your environment.
Service Registry instances have been created:
- The source instance that you want to export data from contains at least one schema or API artifact.
- The target instance that you want to import data into is empty to preserve unique IDs.
Procedure
Export the Service Registry data from your existing source Service Registry instance:
$ curl MY-REGISTRY-URL/apis/registry/v2/admin/export \
  -H "Authorization: Bearer $ACCESS_TOKEN" \
  --output my-registry-data.zip
MY-REGISTRY-URLis the host name on which the source Service Registry is deployed. For example:my-cluster-source-registry-myproject.example.com.Import the registry data into your target Service Registry instance:
$ curl -X POST "MY-REGISTRY-URL/apis/registry/v2/admin/import" \
  -H "Content-Type: application/zip" -H "Authorization: Bearer $ACCESS_TOKEN" \
  --data-binary @my-registry-data.zip
MY-REGISTRY-URLis the host name on which the target Service Registry is deployed. For example:my-cluster-target-registry-myproject.example.com.
Additional resources
-
For more details, see the
adminendpoint in the Apicurio Registry REST API documentation. - For details on export tools for migrating from Service Registry version 1.x to 2.x, see Apicurio Registry export utility for 1.x versions.
Chapter 5. Managing Service Registry content using the Maven plug-in
You can use the Service Registry Maven plug-in to manage schema and API artifacts stored in Service Registry when developing client applications:
- Section 5.1, “Adding schema and API artifacts using the Maven plug-in”
- Section 5.2, “Downloading schema and API artifacts using the Maven plug-in”
- Section 5.3, “Adding artifact references using the Service Registry Maven plug-in”
- Section 5.4, “Testing schema and API artifacts using the Maven plug-in”
Prerequisites
- Service Registry is installed and running in your environment.
- Apache Maven is installed and configured in your environment.
5.1. Adding schema and API artifacts using the Maven plug-in
The most common use case for the Maven plug-in is adding artifacts during a build of your client application. You can accomplish this by using the register execution goal.
Prerequisites
- You have created a Maven project for your client application. For more details, see the Apache Maven documentation.
Procedure
Update your Maven
pom.xmlfile to use theapicurio-registry-maven-pluginto register an artifact. The following example shows registering Apache Avro and GraphQL schemas:<plugin> <groupId>io.apicurio</groupId> <artifactId>apicurio-registry-maven-plugin</artifactId> <version>${apicurio.version}</version> <executions> <execution> <phase>generate-sources</phase> <goals> <goal>register</goal> 1 </goals> <configuration> <registryUrl>MY-REGISTRY-URL/apis/registry/v2</registryUrl> 2 <authServerUrl>MY-AUTH-SERVER</authServerUrl> <clientId>MY-CLIENT-ID</clientId> <clientSecret>MY-CLIENT-SECRET</clientSecret> 3 <artifacts> <artifact> <groupId>TestGroup</groupId> 4 <artifactId>FullNameRecord</artifactId> <file>${project.basedir}/src/main/resources/schemas/record.avsc</file> <ifExists>FAIL</ifExists> </artifact> <artifact> <groupId>TestGroup</groupId> <artifactId>ExampleAPI</artifactId> 5 <type>GRAPHQL</type> <file>${project.basedir}/src/main/resources/apis/example.graphql</file> <ifExists>RETURN_OR_UPDATE</ifExists> <canonicalize>true</canonicalize> </artifact> </artifacts> </configuration> </execution> </executions> </plugin>-
Specify
registeras the execution goal to upload the schema artifact to Service Registry. -
Specify the Service Registry URL with the
../apis/registry/v2endpoint. - If authentication is required, you can specify your authentication server and client credentials.
-
Specify the Service Registry artifact group ID. You can specify the
defaultgroup if you do not want to use a unique group ID. - You can register multiple artifacts using the specified group ID, artifact ID, and location.
-
Specify
-
Build your Maven project, for example, by using the
mvn packagecommand.
Additional resources
- For more details on using Apache Maven, see the Apache Maven documentation.
- For open source examples of using the Service Registry Maven plug-in, see the Apicurio Registry demonstration examples.
5.2. Downloading schema and API artifacts using the Maven plug-in
You can use the Maven plug-in to download artifacts from Service Registry. This is often useful, for example, when generating code from a registered schema.
Prerequisites
- You have created a Maven project for your client application. For more details, see the Apache Maven documentation.
Procedure
Update your Maven
pom.xmlfile to use theapicurio-registry-maven-pluginto download an artifact. The following example shows downloading Apache Avro and GraphQL schemas.<plugin> <groupId>io.apicurio</groupId> <artifactId>apicurio-registry-maven-plugin</artifactId> <version>${apicurio.version}</version> <executions> <execution> <phase>generate-sources</phase> <goals> <goal>download</goal> 1 </goals> <configuration> <registryUrl>MY-REGISTRY-URL/apis/registry/v2</registryUrl> 2 <authServerUrl>MY-AUTH-SERVER</authServerUrl> <clientId>MY-CLIENT-ID</clientId> <clientSecret>MY-CLIENT-SECRET</clientSecret> 3 <artifacts> <artifact> <groupId>TestGroup</groupId> 4 <artifactId>FullNameRecord</artifactId> 5 <file>${project.build.directory}/classes/record.avsc</file> <overwrite>true</overwrite> </artifact> <artifact> <groupId>TestGroup</groupId> <artifactId>ExampleAPI</artifactId> <version>1</version> <file>${project.build.directory}/classes/example.graphql</file> <overwrite>true</overwrite> </artifact> </artifacts> </configuration> </execution> </executions> </plugin>-
Specify
downloadas the execution goal. -
Specify the Service Registry URL with the
../apis/registry/v2endpoint. - If authentication is required, you can specify your authentication server and client credentials.
-
Specify the Service Registry artifact group ID. You can specify the
defaultgroup if you do not want to use a unique group. - You can download multiple artifacts to a specified directory using the artifact ID.
-
Specify
-
Build your Maven project, for example, by using the
mvn packagecommand.
Additional resources
- For more details on using Apache Maven, see the Apache Maven documentation.
- For open source examples of using the Service Registry Maven plug-in, see the Apicurio Registry demonstration examples.
5.3. Adding artifact references using the Service Registry Maven plug-in
Service Registry artifact types such as Apache Avro, Google Protobuf, and JSON Schema can include artifact references from one artifact file to another. You can create efficiencies by defining reusable schema or API artifacts, and then referencing them from multiple locations in artifact references.
This section shows a simple example of using the Service Registry Maven plug-in to register an artifact reference to a simple Avro schema artifact stored in Service Registry. This example assumes that the following Exchange schema artifact has already been created in Service Registry:
Exchange schema
{
  "namespace": "com.kubetrade.schema.common",
  "type": "enum",
  "name": "Exchange",
  "symbols" : ["GEMINI"]
}
This example then creates a TradeKey schema artifact, which includes a reference to the nested Exchange schema artifact:
TradeKey schema with nested Exchange schema
{
  "namespace": "com.kubetrade.schema.trade",
  "type": "record",
  "name": "TradeKey",
  "fields": [
    {
      "name": "exchange",
      "type": "com.kubetrade.schema.common.Exchange"
    },
    {
      "name": "key",
      "type": "string"
    }
  ]
}
Prerequisites
- You have created a Maven project for your client application. For more details, see the Apache Maven documentation.
-
The
Exchangeschema artifact is already created in Service Registry.
Procedure
Update your Maven
pom.xmlfile to use theapicurio-registry-maven-pluginto register theTradeKeyschema, which includes a nested reference to theExchangeschema as follows:<plugin> <groupId>io.apicurio</groupId> <artifactId>apicurio-registry-maven-plugin</artifactId> <version>${apicurio-registry.version}</version> <executions> <execution> <phase>generate-sources</phase> <goals> <goal>register</goal> 1 </goals> <configuration> <registryUrl>MY-REGISTRY-URL/apis/registry/v2</registryUrl> 2 <authServerUrl>MY-AUTH-SERVER</authServerUrl> <clientId>MY-CLIENT-ID</clientId> <clientSecret>MY-CLIENT-SECRET</clientSecret> 3 <artifacts> <artifact> <groupId>test-group</groupId> 4 <artifactId>TradeKey</artifactId> <version>2.0</version> <type>AVRO</type> <file> ${project.basedir}/src/main/resources/schemas/TradeKey.avsc </file> <ifExists>RETURN_OR_UPDATE</ifExists> <canonicalize>true</canonicalize> <references> <reference> 5 <name>com.kubetrade.schema.common.Exchange</name> <groupId>test-group</groupId> <artifactId>Exchange</artifactId> <version>2.0</version> <type>AVRO</type> <file> ${project.basedir}/src/main/resources/schemas/Exchange.avsc </file> <ifExists>RETURN_OR_UPDATE</ifExists> <canonicalize>true</canonicalize> </reference> </references> </artifact> </artifacts> </configuration> </execution> </executions> </plugin>-
Specify
registeras the execution goal to upload the schema artifact to the registry. -
Specify the Service Registry URL with the
../apis/registry/v2endpoint. - If authentication is required, you can specify your authentication server and client credentials.
-
Specify the Service Registry artifact group ID. You can specify the
defaultgroup if you do not want to use a unique group ID. - Specify the Service Registry artifact reference using its group ID, artifact ID, version, type, and location. You can register multiple artifact references in this way.
-
Specify
-
Build your Maven project, for example, by using the
mvn packagecommand.
Additional resources
- For more details on using Apache Maven, see the Apache Maven documentation.
- For open source examples of using the Service Registry Maven plug-in, see the Apicurio Registry demonstration examples.
- For more examples of artifact references, see the section on configuring each artifact type in Chapter 8, Configuring Kafka serializers/deserializers in Java clients.
5.4. Testing schema and API artifacts using the Maven plug-in
You might want to verify that an artifact can be registered without actually making any changes. This is often useful when rules are configured in Service Registry. Testing the artifact results in a failure if the artifact content violates any of the configured rules.
When testing artifacts using the Maven plug-in, even if the artifact passes the test, no content is added to Service Registry.
Prerequisites
- You have created a Maven project for your client application. For more details, see the Apache Maven documentation.
Procedure
Update your Maven
pom.xmlfile to use theapicurio-registry-maven-pluginto test an artifact. The following example shows testing an Apache Avro schema:<plugin> <groupId>io.apicurio</groupId> <artifactId>apicurio-registry-maven-plugin</artifactId> <version>${apicurio.version}</version> <executions> <execution> <phase>generate-sources</phase> <goals> <goal>test-update</goal> 1 </goals> <configuration> <registryUrl>MY-REGISTRY-URL/apis/registry/v2</registryUrl> 2 <authServerUrl>MY-AUTH-SERVER</authServerUrl> <clientId>MY-CLIENT-ID</clientId> <clientSecret>MY-CLIENT-SECRET</clientSecret> 3 <artifacts> <artifact> <groupId>TestGroup</groupId> 4 <artifactId>FullNameRecord</artifactId> <file>${project.basedir}/src/main/resources/schemas/record.avsc</file> 5 </artifact> </artifacts> </configuration> </execution> </executions> </plugin>-
Specify
test-updateas the execution goal to test the schema artifact. -
Specify the Service Registry URL with the
../apis/registry/v2endpoint. - If authentication is required, you can specify your authentication server and client credentials.
-
Specify the Service Registry artifact group ID. You can specify the
defaultgroup if you do not want to use a unique group. - You can test multiple artifacts from a specified directory using the artifact ID.
-
Specify
-
Build your Maven project, for example, by using the
mvn packagecommand.
Additional resources
- For more details on using Apache Maven, see the Apache Maven documentation.
- For open source examples of using the Service Registry Maven plug-in, see the Apicurio Registry demonstration examples.
Chapter 6. Managing Service Registry content using a Java client
This chapter explains how to use the Service Registry Java client:
6.1. Service Registry Java client
You can manage artifacts stored in Service Registry by using a Java client application. You can create, read, update, or delete artifacts by using the Service Registry Java client classes. You can also use the Service Registry Java client to perform administrator functions, such as managing global rules or importing and exporting Service Registry data.
You can access the Service Registry Java client by adding the correct dependency to your Apache Maven project. For more details, see Section 6.2, “Writing Service Registry Java client applications”.
The Service Registry client is implemented by using the HTTP client provided by the JDK, which you can customize as needed. For example, you can add custom headers or enable configuration options for Transport Layer Security (TLS) authentication. For more details, see Section 6.3, “Service Registry Java client configuration”.
6.2. Writing Service Registry Java client applications
You can write a Java client application to manage artifacts stored in Service Registry by using the Service Registry Java client classes.
Prerequisites
- Service Registry is installed and running in your environment.
- You have created a Maven project for your Java client application. For more details, see Apache Maven.
Procedure
Add the following dependency to your Maven project:
<dependency>
    <groupId>io.apicurio</groupId>
    <artifactId>apicurio-registry-client</artifactId>
    <version>${apicurio-registry.version}</version>
</dependency>
Create the Service Registry client as follows:
public class ClientExample { public static void main(String[] args) throws Exception { // Create a registry client String registryUrl = "https://my-registry.my-domain.com/apis/registry/v2"; RegistryClient client = RegistryClientFactory.create(registryUrl); } }-
If you specify an example Service Registry URL of
https://my-registry.my-domain.com, the client will automatically append/apis/registry/v2. - For more options when creating a Service Registry client, see the Java client configuration in the next section.
-
If you specify an example Service Registry URL of
When the client is created, you can use all of the operations available in the Service Registry REST API in the client. For more details, see the Apicurio Registry REST API documentation.
Additional resources
- For an open source example of how to use and customize the Service Registry client, see the Apicurio Registry REST client demonstration.
- For details on how to use the Service Registry Kafka client serializers/deserializers (SerDes) in producer and consumer applications, see Chapter 7, Validating Kafka messages using serializers/deserializers in Java clients.
6.3. Service Registry Java client configuration
The Service Registry Java client includes the following configuration options, based on the client factory:
Table 6.1. Service Registry Java client configuration options
| Option | Description | Arguments |
|---|---|---|
| Plain client | Basic REST client used to interact with a running Service Registry instance. |
|
| Client with custom configuration | Service Registry client using the configuration provided by the user. |
|
| Client with custom configuration and authentication | Service Registry client that accepts a map containing custom configuration. For example, this is useful to add custom headers to the calls. You must also provide an authentication server to authenticate the requests. |
|
Custom header configuration
To configure custom headers, you must add the apicurio.registry.request.headers prefix to the configs map key. For example, a configs map key of apicurio.registry.request.headers.Authorization with a value of Basic: YWxhZGRpbjpvcGVuc2VzYW1 sets the Authorization header with the same value.
TLS configuration options
You can configure Transport Layer Security (TLS) authentication for the Service Registry Java client using the following properties:
-
apicurio.registry.request.ssl.truststore.location -
apicurio.registry.request.ssl.truststore.password -
apicurio.registry.request.ssl.truststore.type -
apicurio.registry.request.ssl.keystore.location -
apicurio.registry.request.ssl.keystore.password -
apicurio.registry.request.ssl.keystore.type -
apicurio.registry.request.ssl.key.password
Additional resources
- For details on how to configure authentication for Service Registry Kafka client serializers/deserializers (SerDes), see Chapter 7, Validating Kafka messages using serializers/deserializers in Java clients.
Chapter 7. Validating Kafka messages using serializers/deserializers in Java clients
Service Registry provides client serializers/deserializers (SerDes) for Kafka producer and consumer applications written in Java. Kafka producer applications use serializers to encode messages that conform to a specific event schema. Kafka consumer applications use deserializers to validate that messages have been serialized using the correct schema, based on a specific schema ID. This ensures consistent schema use and helps to prevent data errors at runtime.
This chapter explains how to use Kafka client SerDes in your producer and consumer client applications:
- Section 7.1, “Kafka client applications and Service Registry”
- Section 7.2, “Strategies to look up a schema in Service Registry”
- Section 7.3, “Registering a schema in Service Registry”
- Section 7.4, “Using a schema from a Kafka consumer client”
- Section 7.5, “Using a schema from a Kafka producer client”
- Section 7.6, “Using a schema from a Kafka Streams application”
Prerequisites
- You have read Chapter 1, Introduction to Service Registry.
- You have installed Service Registry.
You have created Kafka producer and consumer client applications.
For more details on Kafka client applications, see Deploying and Upgrading AMQ Streams on OpenShift.
7.1. Kafka client applications and Service Registry
Service Registry decouples schema management from client application configuration. You can enable a Java client application to use a schema from Service Registry by specifying its URL in your client code.
You can store the schemas in Service Registry to serialize and deserialize messages, which are referenced from your client applications to ensure that the messages that they send and receive are compatible with those schemas. Kafka client applications can push or pull their schemas from Service Registry at runtime.
Schemas can evolve, so you can define rules in Service Registry, for example, to ensure that schema changes are valid and do not break previous versions used by applications. Service Registry checks for compatibility by comparing a modified schema with previous schema versions.
Service Registry schema technologies
Service Registry provides schema registry support for schema technologies such as:
- Avro
- Protobuf
- JSON Schema
These schema technologies can be used by client applications through the Kafka client serializer/deserializer (SerDes) services provided by Service Registry. The maturity and usage of the SerDes classes provided by Service Registry might vary. The sections that follow provide more details about each schema type.
Producer schema configuration
A producer client application uses a serializer to put the messages that it sends to a specific broker topic into the correct data format.
To enable a producer to use Service Registry for serialization:
- Define and register your schema with Service Registry (if it does not already exist).
Configure your producer client code with the following:
- URL of Service Registry
- Service Registry serializer to use with messages
- Strategy to map the Kafka message to a schema artifact in Service Registry
- Strategy to look up or register the schema used for serialization in Service Registry
After registering your schema, when you start Kafka and Service Registry, you can access the schema to format messages sent to the Kafka broker topic by the producer. Alternatively, depending on configuration, the producer can automatically register the schema on first use.
If a schema already exists, you can create a new version using the registry REST API based on compatibility rules defined in Service Registry. Versions are used for compatibility checking as a schema evolves. A group ID, artifact ID, and version represents a unique tuple that identifies a schema.
Consumer schema configuration
A consumer client application uses a deserializer to get the messages that it consumes from a specific broker topic into the correct data format.
To enable a consumer to use Service Registry for deserialization:
- Define and register your schema with Service Registry (if it does not already exist)
Configure the consumer client code with the following:
- URL of Service Registry
- Service Registry deserializer to use with the messages
- Input data stream for deserialization
Retrieve schemas using a global ID
By default, the schema is retrieved from Service Registry by the deserializer using a global ID, which is specified in the message being consumed. The schema global ID can be located in the message headers or in the message payload, depending on the configuration of the producer application.
When locating the global ID in the message payload, the format of the data begins with a magic byte, used as a signal to consumers, followed by the global ID, and the message data as normal. For example:
# ...
[MAGIC_BYTE]
[GLOBAL_ID]
[MESSAGE DATA]
Then when you start Kafka and Service Registry, you can access the schema to format messages received from the Kafka broker topic.
Retrieve schemas using a content ID
Alternatively, you can configure to retrieve schemas from Service Registry based on the content ID, which is the unique ID of the artifact content. While the global ID is the unique ID of an artifact version.
The content ID does not uniquely identify a version, but uniquely identifies the version content only. If multiple versions share the exact same content, they have a different global ID but the same content ID. Confluent Schema Registry uses content ID by default.
7.2. Strategies to look up a schema in Service Registry
The Kafka client serializer uses lookup strategies to determine the artifact ID and global ID under which the message schema is registered in Service Registry. For a given topic and message, you can use different implementations of the ArtifactReferenceResolverStrategy Java interface to return a reference to an artifact in the registry.
The classes for each strategy are in the io.apicurio.registry.serde.strategy package. Specific strategy classes for Avro SerDes are in the io.apicurio.registry.serde.avro.strategy package. The default strategy is the TopicIdStrategy, which looks for Service Registry artifacts with the same name as the Kafka topic receiving messages.
Example
public ArtifactReference artifactReference(String topic, boolean isKey, T schema) {
        return ArtifactReference.builder()
                .groupId(null)
                .artifactId(String.format("%s-%s", topic, isKey ? "key" : "value"))
                .build();
-
The
topicparameter is the name of the Kafka topic receiving the message. -
The
isKeyparameter istruewhen the message key is serialized, andfalsewhen the message value is serialized. -
The
schemaparameter is the schema of the message serialized or deserialized. -
The
ArtifactReferencereturned contains the artifact ID under which the schema is registered.
Which lookup strategy you use depends on how and where you store your schema. For example, you might use a strategy that uses a record ID if you have different Kafka topics with the same Avro message type.
Artifact resolver strategy
The artifact resolver strategy provides a way to map the Kafka topic and message information to an artifact in Service Registry. The common convention for the mapping is to combine the Kafka topic name with the key or value, depending on whether the serializer is used for the Kafka message key or value.
However, you can use alternative conventions for the mapping by using a strategy provided by Service Registry, or by creating a custom Java class that implements io.apicurio.registry.serde.strategy.ArtifactReferenceResolverStrategy.
Strategies to return a reference to an artifact
Service Registry provides the following strategies to return a reference to an artifact based on an implementation of ArtifactReferenceResolverStrategy:
RecordIdStrategy- Avro-specific strategy that uses the full name of the schema.
TopicRecordIdStrategy- Avro-specific strategy that uses the topic name and the full name of the schema.
TopicIdStrategy-
Default strategy that uses the topic name and
keyorvaluesuffix. SimpleTopicIdStrategy- Simple strategy that only uses the topic name.
DefaultSchemaResolver interface
The default schema resolver locates and identifies the specific version of the schema registered under the artifact reference provided by the artifact resolver strategy. Every version of every artifact has a single globally unique identifier that can be used to retrieve the content of that artifact. This global ID is included in every Kafka message so that a deserializer can properly fetch the schema from Apicurio Registry.
The default schema resolver can look up an existing artifact version, or it can register one if not found, depending on which strategy is used. You can also provide your own strategy by creating a custom Java class that implements io.apicurio.registry.resolver.SchemaResolver. However, it is recommended to use the DefaultSchemaResolver and specify configuration properties instead.
Configuration for registry lookup options
When using the DefaultSchemaResolver, you can configure its behavior using application properties. The following table shows some commonly used examples:
Table 7.1. Service Registry lookup configuration options
| Property | Type | Description | Default |
|---|---|---|---|
|
|
| Specify whether the serializer tries to find the latest artifact in the registry for the corresponding group ID and artifact ID. |
|
|
|
| Instructs the serializer to write the specified ID to Kafka and instructs the deserializer to use this ID to find the schema. | None |
|
|
| Specify whether the serializer tries to create an artifact in the registry. The JSON Schema serializer does not support this. |
|
|
|
| Specify how long to cache the global ID in milliseconds. If not configured, the global ID is fetched every time. | None |
7.3. Registering a schema in Service Registry
After you have defined a schema in the appropriate format, such as Apache Avro, you can add the schema to Service Registry.
You can add the schema using the following approaches:
- Service Registry web console
- curl command using the Service Registry REST API
- Maven plug-in supplied with Service Registry
- Schema configuration added to your client code
Client applications cannot use Service Registry until you have registered your schemas.
Service Registry web console
When Service Registry is installed, you can connect to the web console from the ui endpoint:
http://MY-REGISTRY-URL/ui
From the console, you can add, view and configure schemas. You can also create the rules that prevent invalid content being added to the registry.
Curl command example
 curl -X POST -H "Content-type: application/json; artifactType=AVRO" \
   -H "X-Registry-ArtifactId: share-price" \ 1
   --data '{
     "type":"record",
     "name":"price",
     "namespace":"com.example",
     "fields":[{"name":"symbol","type":"string"},
     {"name":"price","type":"string"}]}'
   https://my-cluster-my-registry-my-project.example.com/apis/registry/v2/groups/my-group/artifacts -s 2
- Simple Avro schema artifact.
- OpenShift route name that exposes Service Registry.
Maven plug-in example
<plugin>
  <groupId>io.apicurio</groupId>
  <artifactId>apicurio-registry-maven-plugin</artifactId>
  <version>${apicurio.version}</version>
  <executions>
      <execution>
        <phase>generate-sources</phase>
        <goals>
            <goal>register</goal>  1
        </goals>
        <configuration>
            <registryUrl>http://REGISTRY-URL/apis/registry/v2</registryUrl> 2
            <artifacts>
                <artifact>
                    <groupId>TestGroup</groupId> 3
                    <artifactId>FullNameRecord</artifactId>
                    <file>${project.basedir}/src/main/resources/schemas/record.avsc</file>
                    <ifExists>FAIL</ifExists>
                </artifact>
                <artifact>
                    <groupId>TestGroup</groupId>
                    <artifactId>ExampleAPI</artifactId> 4
                    <type>GRAPHQL</type>
                    <file>${project.basedir}/src/main/resources/apis/example.graphql</file>
                    <ifExists>RETURN_OR_UPDATE</ifExists>
                    <canonicalize>true</canonicalize>
                </artifact>
            </artifacts>
        </configuration>
    </execution>
  </executions>
</plugin>-
Specify
registeras the execution goal to upload the schema artifact to the registry. -
Specify the Service Registry URL with the
../apis/registry/v2endpoint. - Specify the Service Registry artifact group ID.
- You can upload multiple artifacts using the specified group ID, artifact ID, and location.
Configuration using a producer client example
String registryUrl_node1 = PropertiesUtil.property(clientProperties, "registry.url.node1",
    "https://my-cluster-service-registry-myproject.example.com/apis/registry/v2"); 1
try (RegistryService service = RegistryClient.create(registryUrl_node1)) {
    String artifactId = ApplicationImpl.INPUT_TOPIC + "-value";
    try {
        service.getArtifactMetaData(artifactId); 2
    } catch (WebApplicationException e) {
        CompletionStage <ArtifactMetaData> csa = service.createArtifact(
            "AVRO",
            artifactId,
            new ByteArrayInputStream(LogInput.SCHEMA$.toString().getBytes())
        );
        csa.toCompletableFuture().get();
    }
}- You can register properties against more than one URL node.
- Check to see if the schema already exists based on the artifact ID.
7.4. Using a schema from a Kafka consumer client
This procedure describes how to configure a Kafka consumer client written in Java to use a schema from Service Registry.
Prerequisites
- Service Registry is installed
- The schema is registered with Service Registry
Procedure
Configure the client with the URL of Service Registry. For example:
String registryUrl = "https://registry.example.com/apis/registry/v2";
Properties props = new Properties();
props.putIfAbsent(SerdeConfig.REGISTRY_URL, registryUrl);
Configure the client with the Service Registry deserializer. For example:
// Configure Kafka settings props.putIfAbsent(ProducerConfig.BOOTSTRAP_SERVERS_CONFIG, SERVERS); props.putIfAbsent(ConsumerConfig.GROUP_ID_CONFIG, "Consumer-" + TOPIC_NAME); props.putIfAbsent(ConsumerConfig.ENABLE_AUTO_COMMIT_CONFIG, "true"); props.putIfAbsent(ConsumerConfig.AUTO_COMMIT_INTERVAL_MS_CONFIG, "1000"); props.putIfAbsent(ConsumerConfig.AUTO_OFFSET_RESET_CONFIG, "earliest"); // Configure deserializer settings props.putIfAbsent(ConsumerConfig.KEY_DESERIALIZER_CLASS_CONFIG, AvroKafkaDeserializer.class.getName()); 1 props.putIfAbsent(ConsumerConfig.VALUE_DESERIALIZER_CLASS_CONFIG, AvroKafkaDeserializer.class.getName()); 2- 1. The deserializer provided by Service Registry.
- 2. The deserialization is in Apache Avro JSON format.
7.5. Using a schema from a Kafka producer client
This procedure describes how to configure a Kafka producer client written in Java to use a schema from Service Registry.
Prerequisites
- Service Registry is installed
- The schema is registered with Service Registry
Procedure
Configure the client with the URL of Service Registry. For example:
String registryUrl = "https://registry.example.com/apis/registry/v2";
Properties props = new Properties();
props.putIfAbsent(SerdeConfig.REGISTRY_URL, registryUrl);
Configure the client with the serializer, and the strategy to look up the schema in Service Registry. For example:
props.put(CommonClientConfigs.BOOTSTRAP_SERVERS_CONFIG, "my-cluster-kafka-bootstrap:9092");
props.put(ProducerConfig.KEY_SERIALIZER_CLASS_CONFIG, AvroKafkaSerializer.class.getName()); 1
props.put(ProducerConfig.VALUE_SERIALIZER_CLASS_CONFIG, AvroKafkaSerializer.class.getName()); 2
props.put(SerdeConfig.FIND_LATEST_ARTIFACT, Boolean.TRUE); 3
- 1. The serializer for the message key provided by Service Registry.
- 2. The serializer for the message value provided by Service Registry.
- 3. The lookup strategy to find the global ID for the schema.
7.6. Using a schema from a Kafka Streams application
This procedure describes how to configure a Kafka Streams client written in Java to use an Apache Avro schema from Service Registry.
Prerequisites
- Service Registry is installed
- The schema is registered with Service Registry
Procedure
Create and configure a Java client with the Service Registry URL:
String registryUrl = "https://registry.example.com/apis/registry/v2";

RegistryService client = RegistryClient.cached(registryUrl);
Configure the serializer and deserializer:
Serializer<LogInput> serializer = new AvroKafkaSerializer<LogInput>(); 1

Deserializer<LogInput> deserializer = new AvroKafkaDeserializer <LogInput>(); 2

Serde<LogInput> logSerde = Serdes.serdeFrom(
    serializer,
    deserializer
);

Map<String, Object> config = new HashMap<>();
config.put(SerdeConfig.REGISTRY_URL, registryUrl);
config.put(AvroKafkaSerdeConfig.USE_SPECIFIC_AVRO_READER, true);
logSerde.configure(config, false); 3
- 1. The Avro serializer provided by Service Registry.
- 2. The Avro deserializer provided by Service Registry.
- 3. Configures the Service Registry URL and the Avro reader for deserialization in Avro format.
Create the Kafka Streams client:
KStream<String, LogInput> input = builder.stream(
    INPUT_TOPIC,
    Consumed.with(Serdes.String(), logSerde)
);
Chapter 8. Configuring Kafka serializers/deserializers in Java clients
This chapter provides detailed information on how to configure Kafka SerDes in your producer and consumer Java client applications:
- Section 8.1, “Service Registry serializer/deserializer configuration in client applications”
- Section 8.2, “Service Registry serializer/deserializer configuration properties”
- Section 8.3, “How to configure different client serializer/deserializer types”
- Section 8.3.1, “Configure Avro SerDes with Service Registry”
- Section 8.3.2, “Configure JSON Schema SerDes with Service Registry”
- Section 8.3.3, “Configure Protobuf SerDes with Service Registry”
Prerequisites
8.1. Service Registry serializer/deserializer configuration in client applications
You can configure specific client serializer/deserializer (SerDe) services and schema lookup strategies directly in a client application using the example constants shown in this section. Alternatively, you can configure the corresponding Service Registry application properties in a file or an instance.
The following sections show examples of commonly used SerDe constants and configuration options.
Configuration for SerDe services
public class SerdeConfig {

   public static final String REGISTRY_URL = "apicurio.registry.url"; 1
   public static final String ID_HANDLER = "apicurio.registry.id-handler"; 2
public static final String ENABLE_CONFLUENT_ID_HANDLER = "apicurio.registry.as-confluent"; 3- The required URL of Service Registry.
-
Extends ID handling to support other ID formats and make them compatible with Service Registry SerDe services. For example, changing the default ID format from
LongtoIntegersupports the Confluent ID format. -
Simplifies the handling of Confluent IDs. If set to
true, anIntegeris used for the global ID lookup. The setting should not be used with theID_HANDLERoption.
Additional resources
- For more details on configuration options, see Section 8.2, “Service Registry serializer/deserializer configuration properties”
Configuration for SerDe lookup strategies
public class SerdeConfig {

   public static final String ARTIFACT_RESOLVER_STRATEGY = "apicurio.registry.artifact-resolver-strategy"; 1
   public static final String SCHEMA_RESOLVER = "apicurio.registry.schema-resolver"; 2
...- Java class that implements the artifact resolver strategy and maps between the Kafka SerDe and artifact ID. Defaults to the topic ID strategy. This is only used by the serializer class.
-
Java class that implements the schema resolver. Defaults to
DefaultSchemaResolver. This is used by the serializer and deserializer classes.
Additional resources
- For more details on look up strategies, see Chapter 7, Validating Kafka messages using serializers/deserializers in Java clients
- For more details on configuration options, see Section 8.2, “Service Registry serializer/deserializer configuration properties”
Configuration for Kafka converters
public class SerdeBasedConverter<S, T> extends SchemaResolverConfigurer<S, T> implements Converter, Closeable {

   public static final String REGISTRY_CONVERTER_SERIALIZER_PARAM = "apicurio.registry.converter.serializer"; 1
public static final String REGISTRY_CONVERTER_DESERIALIZER_PARAM = "apicurio.registry.converter.deserializer"; 2- The required serializer to use with the Service Registry Kafka converter.
- The required deserializer to use with the Service Registry Kafka converter.
Additional resources
- For more details, see the SerdeBasedConverter Java class
Configuration for different schema types
For details on how to configure SerDe for different schema technologies, see the following:
8.2. Service Registry serializer/deserializer configuration properties
This section provides reference information on Java configuration properties for Service Registry Kafka serializers/deserializers (SerDes).
SchemaResolver interface
Service Registry SerDes are based on the SchemaResolver interface, which abstracts access to the registry and applies the same lookup logic for the SerDes classes of all supported formats.
Table 8.1. Configuration property for SchemaResolver interface
| Constant | Property | Description | Type | Default |
|---|---|---|---|---|
|
|
|
Used by serializers and deserializers. Fully-qualified Java classname that implements | String |
|
The DefaultSchemaResolver is recommended and provides useful features for most use cases. For some advanced use cases, you might use a custom implementation of SchemaResolver.
DefaultSchemaResolver class
You can use the DefaultSchemaResolver to configure features such as:
- Access to the registry API
- How to look up artifacts in the registry
- How to write and read artifact information to and from Kafka
- Fall-back options for deserializers
Configuration for registry API access options
The DefaultSchemaResolver provides the following properties to configure access to the core registry API:
Table 8.2. Configuration properties for access to registry API
| Constant | Property | Description | Type | Default |
|---|---|---|---|---|
|
|
| Used by serializers and deserializers. URL to access the registry API. |
| None |
|
|
| Used by serializers and deserializers. URL of the authentication service. Required when accessing a secure registry using the OAuth client credentials flow. |
| None |
|
|
|
Used by serializers and deserializers. URL of the token endpoint. Required when accessing a secure registry and |
| None |
|
|
| Used by serializers and deserializers. Realm to access the authentication service. Required when accessing a secure registry using the OAuth client credentials flow. |
| None |
|
|
| Used by serializers and deserializers. Client ID to access the authentication service. Required when accessing a secure registry using the OAuth client credentials flow. |
| None |
|
|
| Used by serializers and deserializers. Client secret to access the authentication service. Required when accessing a secure registry using the OAuth client credentials flow. |
| None |
|
|
| Used by serializers and deserializers. Username to access the registry. Required when accessing a secure registry using HTTP basic authentication. |
| None |
|
|
| Used by serializers and deserializers. Password to access the registry. Required when accessing a secure registry using HTTP basic authentication. |
| None |
Configuration for registry lookup options
The DefaultSchemaResolver uses the following properties to configure how to look up artifacts in Service Registry.
Table 8.3. Configuration properties for registry artifact lookup
| Constant | Property | Description | Type | Default |
|---|---|---|---|---|
|
|
|
Used by serializers only. Fully-qualified Java classname that implements |
|
|
|
|
|
Used by serializers only. Sets the |
| None |
|
|
|
Used by serializers only. Sets the |
| None |
|
|
|
Used by serializers only. Sets the artifact version used for querying or creating an artifact. Overrides the version returned by the |
| None |
|
|
| Used by serializers only. Specifies whether the serializer tries to find the latest artifact in the registry for the corresponding group ID and artifact ID. |
|
|
|
|
| Used by serializers only. Specifies whether the serializer tries to create an artifact in the registry. The JSON Schema serializer does not support this feature. |
|
|
|
|
|
Used by serializers only. Configures the behavior of the client when there is a conflict creating an artifact because the artifact already exists. Available values are |
|
|
|
|
| Used by serializers and deserializers. Specifies how long to cache artifacts before auto-eviction (milliseconds). If set to zero, artifacts are fetched every time. |
|
|
|
|
| Used by serializers and deserializers. If a schema can not be be retrieved from the Registry, it may retry a number of times. This configuration option controls the delay between the retry attempts (milliseconds). |
|
|
|
|
| Used by serializers and deserializers. If a schema can not be be retrieved from the Registry, it may retry a number of times. This configuration option controls the number of retry attempts. |
|
|
|
|
|
Used by serializers and deserializers. Configures to use the specified |
|
|
Configuration to read/write registry artifacts in Kafka
The DefaultSchemaResolver uses the following properties to configure how artifact information is written to and read from Kafka.
Table 8.4. Configuration properties to read/write artifact information in Kafka
| Constant | Property | Description | Type | Default |
|---|---|---|---|---|
|
|
| Used by serializers and deserializers. Configures to read/write the artifact identifier to Kafka message headers instead of in the message payload. |
|
|
|
|
|
Used by serializers and deserializers. Fully-qualified Java classname that implements |
|
|
|
|
|
Used by serializers and deserializers. Fully-qualified Java classname of a class that implements |
|
|
|
|
|
Used by serializers and deserializers. Shortcut for enabling the legacy Confluent-compatible implementation of |
|
|
Configuration for deserializer fall-back options
The DefaultSchemaResolver uses the following property to configure a fall-back provider for all deserializers.
Table 8.5. Configuration property for deserializer fall-back provider
| Constant | Property | Description | Type | Default |
|---|---|---|---|---|
|
|
|
Only used by deserializers. Sets a custom implementation of |
|
|
The DefaultFallbackArtifactProvider uses the following properties to configure deserializer fall-back options:
Table 8.6. Configuration properties for deserializer fall-back options
| Constant | Property | Description | Type | Default |
|---|---|---|---|---|
|
|
|
Used by deserializers only. Sets the |
| None |
|
|
|
Used by deserializers only. Sets the |
| None |
|
|
| Used by deserializers only. Sets the version used as fallback for resolving the artifact used for deserialization. |
| None |
Additional resources
- For more details, see the SerdeConfig Java class.
-
You can configure application properties as Java system properties or include them in the Quarkus
application.propertiesfile. For more details, see the Quarkus documentation.
8.3. How to configure different client serializer/deserializer types
When using schemas in your Kafka client applications, you must choose which specific schema type to use, depending on your use case. Service Registry provides SerDe Java classes for Apache Avro, JSON Schema, and Google Protobuf. The following sections explain how to configure Kafka applications to use each type.
You can also use Kafka to implement custom serializer and deserializer classes, and leverage Service Registry functionality using the Service Registry REST Java client.
Kafka application configuration for serializers/deserializers
Using the SerDe classes provided by Service Registry in your Kafka application involves setting the correct configuration properties. The following simple Avro examples show how to configure a serializer in a Kafka producer application and how to configure a deserializer in a Kafka consumer application.
Example serializer configuration in a Kafka producer
// Create the Kafka producer
private static Producer<Object, Object> createKafkaProducer() {
    Properties props = new Properties();

    // Configure standard Kafka settings
    props.putIfAbsent(ProducerConfig.BOOTSTRAP_SERVERS_CONFIG, SERVERS);
    props.putIfAbsent(ProducerConfig.CLIENT_ID_CONFIG, "Producer-" + TOPIC_NAME);
    props.putIfAbsent(ProducerConfig.ACKS_CONFIG, "all");

    // Use Service Registry-provided Kafka serializer for Avro
    props.putIfAbsent(ProducerConfig.KEY_SERIALIZER_CLASS_CONFIG, StringSerializer.class.getName());
    props.putIfAbsent(ProducerConfig.VALUE_SERIALIZER_CLASS_CONFIG, AvroKafkaSerializer.class.getName());

    // Configure the Service Registry location
    props.putIfAbsent(SerdeConfig.REGISTRY_URL, REGISTRY_URL);

    // Register the schema artifact if not found in the registry.
    props.putIfAbsent(SerdeConfig.AUTO_REGISTER_ARTIFACT, Boolean.TRUE);

    // Create the Kafka producer
    Producer<Object, Object> producer = new KafkaProducer<>(props);
    return producer;
}
Example deserializer configuration in a Kafka consumer
// Create the Kafka consumer
private static KafkaConsumer<Long, GenericRecord> createKafkaConsumer() {
    Properties props = new Properties();

    // Configure standard Kafka settings
    props.putIfAbsent(ProducerConfig.BOOTSTRAP_SERVERS_CONFIG, SERVERS);
    props.putIfAbsent(ConsumerConfig.GROUP_ID_CONFIG, "Consumer-" + TOPIC_NAME);
    props.putIfAbsent(ConsumerConfig.ENABLE_AUTO_COMMIT_CONFIG, "true");
    props.putIfAbsent(ConsumerConfig.AUTO_COMMIT_INTERVAL_MS_CONFIG, "1000");
    props.putIfAbsent(ConsumerConfig.AUTO_OFFSET_RESET_CONFIG, "earliest");

    // Use Service Registry-provided Kafka deserializer for Avro
    props.putIfAbsent(ConsumerConfig.KEY_DESERIALIZER_CLASS_CONFIG, StringDeserializer.class.getName());
    props.putIfAbsent(ConsumerConfig.VALUE_DESERIALIZER_CLASS_CONFIG, AvroKafkaDeserializer.class.getName());

    // Configure the Service Registry location
    props.putIfAbsent(SerdeConfig.REGISTRY_URL, REGISTRY_URL);

    // No other configuration needed because the schema globalId the deserializer uses is sent
    // in the payload. The deserializer extracts the globalId and uses it to look up the schema
    // from the registry.

    // Create the Kafka consumer
    KafkaConsumer<Long, GenericRecord> consumer = new KafkaConsumer<>(props);
    return consumer;
}
Additional resources
- For an example application, see the Simple Avro example
8.3.1. Configure Avro SerDes with Service Registry
This topic explains how to use the Kafka client serializer and deserializer (SerDes) classes for Apache Avro.
Service Registry provides the following Kafka client SerDes classes for Avro:
-
io.apicurio.registry.serde.avro.AvroKafkaSerializer -
io.apicurio.registry.serde.avro.AvroKafkaDeserializer
Configure the Avro serializer
You can configure the Avro serializer class with the following:
- Service Registry URL
- Artifact resolver strategy
- ID location
- ID encoding
- Avro datum provider
- Avro encoding
ID location
The serializer passes the unique ID of the schema as part of the Kafka message so that consumers can use the correct schema for deserialization. The ID can be in the message payload or in the message headers. The default location is the message payload. To send the ID in the message headers, set the following configuration property:
props.putIfAbsent(SerdeConfig.ENABLE_HEADERS, "true")
The property name is apicurio.registry.headers.enabled.
ID encoding
You can customize how the schema ID is encoded when passing it in the Kafka message body. Set the apicurio.registry.id-handler configuration property to a class that implements the io.apicurio.registry.serde.IdHandler interface. Service Registry provides the following implementations:
-
io.apicurio.registry.serde.DefaultIdHandler: Stores the ID as an 8-byte long -
io.apicurio.registry.serde.Legacy4ByteIdHandler: Stores the ID as an 4-byte integer
Service Registry represents the schema ID as a long, but for legacy reasons, or for compatibility with other registries or SerDe classes, you might want to use 4 bytes when sending the ID.
Avro datum provider
Avro provides different datum writers and readers to write and read data. Service Registry supports three different types:
- Generic
- Specific
- Reflect
The Service Registry AvroDatumProvider is the abstraction of which type is used, where DefaultAvroDatumProvider is used by default.
You can set the following configuration options:
-
apicurio.registry.avro-datum-provider: Specifies a fully-qualified Java class name of theAvroDatumProviderimplementation, for exampleio.apicurio.registry.serde.avro.ReflectAvroDatumProvider -
apicurio.registry.use-specific-avro-reader: Set totrueto use a specific type when usingDefaultAvroDatumProvider
Avro encoding
When using Avro to serialize data, you can use the Avro binary encoding format to ensure the data is encoded in as efficient a format as possible. Avro also supports encoding the data as JSON, which makes it easier to inspect the payload of each message, for example, for logging or debugging.
You can set the Avro encoding by configuring the apicurio.registry.avro.encoding property with a value of JSON or BINARY. The default is BINARY.
Configure the Avro deserializer
You must configure the Avro deserializer class to match the following configuration settings of the serializer:
- Service Registry URL
- ID encoding
- Avro datum provider
- Avro encoding
See the serializer section for these configuration options. The property names and values are the same.
The following options are not required when configuring the deserializer:
- Artifact resolver strategy
- ID location
The deserializer class can determine the values for these options from the message. The strategy is not required because the serializer is responsible for sending the ID as part of the message.
The ID location is determined by checking for the magic byte at the start of the message payload. If that byte is found, the ID is read from the message payload using the configured handler. If the magic byte is not found, the ID is read from the message headers.
Avro SerDes and artifact references
When working with Avro messages and a schema with nested records, a new artifact is registered per nested record. For example, the following TradeKey schema includes a nested Exchange schema:
TradeKey schema with nested Exchange schema
{
  "namespace": "com.kubetrade.schema.trade",
  "type": "record",
  "name": "TradeKey",
  "fields": [
    {
      "name": "exchange",
      "type": "com.kubetrade.schema.common.Exchange"
    },
    {
      "name": "key",
      "type": "string"
    }
  ]
}
Exchange schema
{
  "namespace": "com.kubetrade.schema.common",
  "type": "enum",
  "name": "Exchange",
  "symbols" : ["GEMINI"]
}
When using these schemas with Avro SerDes, two artifacts are created in Service Registry, one for the TradeKey schema and one for the Exchange schema. Whenever a message using the TradeKey schema is serialized or deserialized, both schemas are retrieved, allowing you to split your definitions into different files.
Additional resources
- For more details on Avro configuration, see the AvroKafkaSerdeConfig Java class
For Java example applications, see:
8.3.2. Configure JSON Schema SerDes with Service Registry
This topic explains how to use the Kafka client serializer and deserializer (SerDes) classes for JSON Schema.
Service Registry provides the following Kafka client SerDes classes for JSON Schema:
-
io.apicurio.registry.serde.jsonschema.JsonSchemaKafkaSerializer -
io.apicurio.registry.serde.jsonschema.JsonSchemaKafkaDeserializer
Unlike Apache Avro, JSON Schema is not a serialization technology, but is instead a validation technology. As a result, configuration options for JSON Schema are quite different. For example, there is no encoding option, because data is always encoded as JSON.
Configure the JSON Schema serializer
You can configure the JSON Schema serializer class as follows:
- Service Registry URL
- Artifact resolver strategy
- Schema validation
The only non-standard configuration property is JSON Schema validation, which is enabled by default. You can disable this by setting apicurio.registry.serde.validation-enabled to "false". For example:
props.putIfAbsent(SerdeConfig.VALIDATION_ENABLED, Boolean.FALSE)
Configure the JSON Schema deserializer
You can configure the JSON Schema deserializer class as follows:
- Service Registry URL
- Schema validation
- Class for deserializing data
You must provide the location of Service Registry so that the schema can be loaded. The other configuration is optional.
Deserializer validation only works if the serializer passes the global ID in the Kafka message, which will only happen when validation is enabled in the serializer.
JSON Schema SerDes and artifact references
The JSON Schema SerDes cannot discover the schema from the message payload, so the schema artifact must be registered beforehand, and this also applies artifact references.
Depending on the content of the schema, if the $ref value is a URL, the SerDes try to resolve the referenced schema using that URL, and then validation works as usual, validating the data against the main schema, and validating the nested value against the nested schema. Support for referencing artifacts in Service Registry has also been implemented.
For example, the following citizen.json schema references the city.json schema:
citizen.json schema with reference to city.json schema
{
 "$id": "https://example.com/citizen.schema.json",
 "$schema": "http://json-schema.org/draft-07/schema#",
 "title": "Citizen",
 "type": "object",
 "properties": {
   "firstName": {
     "type": "string",
     "description": "The citizen's first name."
   },
   "lastName": {
     "type": "string",
     "description": "The citizen's last name."
   },
   "age": {
     "description": "Age in years which must be equal to or greater than zero.",
     "type": "integer",
     "minimum": 0
   },
   "city": {
     "$ref": "city.json"
   }
 }
}
city.json schema
{
 "$id": "https://example.com/city.schema.json",
 "$schema": "http://json-schema.org/draft-07/schema#",
 "title": "City",
 "type": "object",
 "properties": {
   "name": {
     "type": "string",
     "description": "The city's name."
   },
   "zipCode": {
     "type": "integer",
     "description": "The zip code.",
     "minimum": 0
   }
 }
}
In this example, a given citizen has a city. In Service Registry, a citizen artifact with a reference to the city artifact is created using the name city.json. In the SerDes, when the citizen schema is fetched, the city schema is also fetched because it is referenced from the citizen schema. When serializing/deserializing data, the reference name is used to resolve the nested schema, allowing validation against the citizen schema and the nested city schema.
Additional resources
- For more details, see the JsonSchemaKafkaDeserializerConfig Java class
For Java example applications, see:
8.3.3. Configure Protobuf SerDes with Service Registry
This topic explains how to use the Kafka client serializer and deserializer (SerDes) classes for Google Protobuf.
Service Registry provides the following Kafka client SerDes classes for Protobuf:
-
io.apicurio.registry.serde.protobuf.ProtobufKafkaSerializer -
io.apicurio.registry.serde.protobuf.ProtobufKafkaDeserializer
Configure the Protobuf serializer
You can configure the Protobuf serializer class as follows:
- Service Registry URL
- Artifact resolver strategy
- ID location
- ID encoding
- Schema validation
For details on these configuration options, see the following sections:
Configure the Protobuf deserializer
You must configure the Protobuf deserializer class to match the following configuration settings in the serializer:
- Service Registry URL
- ID encoding
The configuration property names and values are the same as for the serializer.
The following options are not required when configuring the deserializer:
- Artifact resolver strategy
- ID location
The deserializer class can determine the values for these options from the message. The strategy is not required because the serializer is responsible for sending the ID as part of the message.
The ID location is determined by checking for the magic byte at the start of the message payload. If that byte is found, the ID is read from the message payload using the configured handler. If the magic byte is not found, the ID is read from the message headers.
The Protobuf deserializer does not deserialize to your exact Protobuf Message implementation, but rather to a DynamicMessage instance. There is no appropriate API to do otherwise.
Protobuf SerDes and artifact references
When a complex Protobuf message with an import statement is used, the imported Protobuf messages are stored in Service Registry as separate artifacts. Then when Service Registry gets the main schema to check a Protobuf message, the referenced schemes are also retrieved so the full message schema can be checked and serialized.
For example, the following table_info.proto schema file includes the imported mode.proto schema file:
table_info.proto file with imported .mode.proto file
syntax = "proto3";
package sample;
option java_package = "io.api.sample";
option java_multiple_files = true;

import "sample/mode.proto";

message TableInfo {

 int32 winIndex = 1;
 Mode mode = 2;
 int32 min = 3;
 int32 max = 4;
 string id = 5;
 string dataAdapter = 6;
 string schema = 7;
 string selector = 8;
 string subscription_id = 9;
}
mode.proto file
syntax = "proto3";
package sample;
option java_package = "io.api.sample";
option java_multiple_files = true;

enum Mode {

MODE_UNKNOWN = 0;
RAW = 1;
MERGE = 2;
DISTINCT = 3;
COMMAND = 4;
}
In this example, two Protobuf artifacts are stored in Service Registry, one for TableInfo and one for Mode. However, because Mode is part of TableInfo, whenever TableInfo is fetched to check a message in the SerDes, Mode is also returned as an artifact referenced by TableInfo.
Additional resources
For Java example applications, see:
Chapter 9. Service Registry artifact and rule reference
This chapter provides details on the supported artifact types, states, metadata, and content rules that are stored in Service Registry.
- Section 9.1, “Service Registry artifact types”
- Section 9.2, “Service Registry artifact states”
- Section 9.3, “Service Registry artifact metadata”
- Section 9.4, “Service Registry content rule types”
- Section 9.5, “Service Registry content rule maturity”
- Section 9.6, “Service Registry content rule precedence”
Additional resources
- For more detailed information, see the Apicurio Registry REST API documentation.
9.1. Service Registry artifact types
You can store and manage a wide range of schema and API artifact types in Service Registry.
Table 9.1. Service Registry artifact types
| Type | Description |
|---|---|
|
| AsyncAPI specification |
|
| Apache Avro schema |
|
| GraphQL schema |
|
| JSON Schema |
|
| Apache Kafka Connect schema |
|
| OpenAPI specification |
|
| Google protocol buffers schema |
|
| Web Services Definition Language |
|
| Extensible Markup Language |
|
| XML Schema Definition |
9.2. Service Registry artifact states
The valid artifact states in Service Registry are ENABLED, DISABLED, and DEPRECATED.
Table 9.2. Service Registry artifact states
| State | Description |
|---|---|
|
| Basic state, all the operations are available. |
|
| The artifact and its metadata is viewable and searchable using the Service Registry web console, but its content cannot be fetched by any client. |
|
| The artifact is fully usable but a header is added to the REST API response whenever the artifact content is fetched. The Service Registry Rest Client will also log a warning whenever it sees deprecated content. |
9.3. Service Registry artifact metadata
When an artifact is added to Service Registry, a set of metadata properties is stored along with the artifact content. This metadata consists of a set of generated read-only properties, along with some properties that you can set.
Table 9.3. Service Registry read-only metadata
| Property | Type |
|---|---|
|
| integer |
|
| string |
|
| date |
|
| integer |
|
| string |
|
| string |
|
| string |
|
| date |
|
| array of ArtifactReference |
|
| ArtifactType |
|
| integer |
Table 9.4. Service Registry editable metadata
| Property | Type |
|---|---|
|
| string |
|
| array of string |
|
| string |
|
| map |
|
| ArtifactState |
Updating artifact metadata
- You can use the Service Registry REST API to update the set of editable properties using the metadata endpoints.
-
You can edit the
stateproperty only by using the state transition API. For example, you can mark an artifact asdeprecatedordisabled.
Additional resources
For more details, see the /artifacts/{artifactId}/meta sections in the Apicurio Registry REST API documentation.
9.4. Service Registry content rule types
You can specify VALIDITY and COMPATIBILITY rule types to govern content evolution in Service Registry.
Table 9.5. Service Registry content rule types
| Type | Description |
|---|---|
|
| Validate data before adding it to the registry. The possible configuration values for this rule are:
|
|
| Ensure that newly added artifacts are compatible with previously added versions. The possible configuration values for this rule are:
|
9.5. Service Registry content rule maturity
Not all content rules are fully implemented for every artifact type supported by Service Registry. The following table shows the current maturity level for each rule and artifact type:
Table 9.6. Service Registry content rule maturity matrix
| Artifact type | Validity rule | Compatibility rule |
|---|---|---|
| Avro | Full | Full |
| Protobuf | Full | Full |
| JSON Schema | Full | Full |
| OpenAPI | Full | None |
| AsyncAPI | Syntax Only | None |
| GraphQL | Syntax Only | None |
| Kafka Connect | Syntax Only | None |
| WSDL | Full | None |
| XML | Full | None |
| XSD | Full | None |
9.6. Service Registry content rule precedence
When you add or update an artifact, Service Registry applies rules to check the validity and compatibility of the artifact content. Configured artifact rules override the equivalent configured global rules, as shown in the following table.
Table 9.7. Service Registry content rule precedence
| Artifact rule | Global rule | Rule applied to this artifact | Global rule available for other artifacts? |
|---|---|---|---|
| Enabled | Enabled | Artifact | Yes |
| Disabled | Enabled | Global | Yes |
| Disabled | Disabled | None | No |
| Enabled, set to None | Enabled | None | Yes |
| Disabled | Enabled, set to None | None | No |
Appendix A. Using your subscription
Service Registry is provided through a software subscription. To manage your subscriptions, access your account at the Red Hat Customer Portal.
Accessing your account
- Go to access.redhat.com.
- If you do not already have an account, create one.
- Log in to your account.
Activating a subscription
- Go to access.redhat.com.
- Navigate to My Subscriptions.
- Navigate to Activate a subscription and enter your 16-digit activation number.
Downloading ZIP and TAR files
To access ZIP or TAR files, use the customer portal to find the relevant files for download. If you are using RPM packages, this step is not required.
- Open a browser and log in to the Red Hat Customer Portal Product Downloads page at access.redhat.com/downloads.
- Locate the Red Hat Integration entries in the Integration and Automation category.
- Select the desired Service Registry product. The Software Downloads page opens.
- Click the Download link for your component.
Registering your system for packages
To install RPM packages on Red Hat Enterprise Linux, your system must be registered. If you are using ZIP or TAR files, this step is not required.
- Go to access.redhat.com.
- Navigate to Registration Assistant.
- Select your OS version and continue to the next page.
- Use the listed command in your system terminal to complete the registration.
To learn more see How to Register and Subscribe a System to the Red Hat Customer Portal.