
Chapter 1. Overview of Kamelets
Kamelets are high-level connectors that can serve as building blocks in an event driven architecture solution. They are custom resources that you can install on an OpenShift cluster and use in Camel K integrations. Kamelets accelerate your development efforts. They simplify how you connect data sources (that emit events) and data sinks (that consume events). Because you configure Kamelet parameters rather than writing code, you do not need to be familiar with the Camel DSL to use Kamelets.
You can use Kamelets to connect applications and services directly to each other or to:
- Kafka topics, as described in Connecting to Kafka with Kamelets.
- Knative destinations (channels or brokers), as described in Connecting to Knative with Kamelets.
- Specific Camel URIs, as described in Connecting to an explicit Camel URI.
1.1. About Kamelets
Kamelets are route components (encapsulated code) that work as connectors in a Camel integration. You can think of Kamelets as templates that define where to consume data from (a source) and where to send data to (a sink) - allowing you to assemble data pipelines. Kamelets can also filter, mask, and perform simple calculation logic on data.
There are three different types of Kamelets:
- source - A route that produces data. You use a source Kamelet to retrieve data from a component.
- sink - A route that consumes data. You use a sink Kamelet to send data to a component.
- action - A route that performs an action on data. You can use an action Kamelet to manipulate data when it passes from a source Kamelet to a sink Kamelet.
1.1.1. Why use Kamelets?
In a microservices and event-driven architecture solution, Kamelets can serve as building blocks for sources that emit events and sinks which consume events.
Kamelets provide abstraction (they hide the complexity of connecting to external systems) and reusability (they are a simple way to reuse code and apply it to different use cases).
Here are some example use cases:
- You want your application to consume events from Telegram, you can use Kamelets to bind the Telegram source to a channel of events. Later, you can connect your application to that channel so that it reacts to those events.
- You want your application to connect Salesforce directly to Slack.
Kamelets allow you, and your integration development team, to be more efficient. You can reuse Kamelets and share them with your team members who can configure instances for their specific needs. The underlying Camel K operator does the hard work: it compiles, builds, packages and deploys the integration defined by the Kamelet.
1.1.2. Who uses Kamelets?
Because Kamelets allow you to reduce the amount of coding you need to do in your Camel integration, they are ideal for developers who are not familiar with the Camel DSL. Kamelets can help smooth the learning curve for a non-Camel developer. There is no need for you to learn another framework or language to get Camel running.
Kamelets are also useful for experienced Camel developers who want to encapsulate complex Camel integration logic into a reusable Kamelet, and then share it with other users.
1.1.3. What are the prerequisites for using Kamelets?
To use Kamelets, you need the following environment setup:
- You can access an OpenShift 4.6 (or later) cluster with the correct access level, the ability to create projects and install operators, and the ability to install the OpenShift and Camel K CLI tools on your local system.
- You installed the Camel K operator in your namespace or cluster-wide as described in Installing Camel K
-
You installed the OpenShift command line (
oc) interface tool. Optionally, you installed VS code or another development tool with the Camel K plugin. The Camel-based tooling extensions include features such as automatic completion of Camel URIs based on the embedded Kamelet Catalog. For more information, see the Camel K development tooling section in Getting Started with Camel K.
Note: Visual Studio (VS) Code Tooling extensions are community only.
1.1.4. How do you use Kamelets?
Using a Kamelet typically involves two components: the Kamelet itself, which defines a reusable route snippet, and a Kamelet Binding, in which you reference and bind together one or more Kamelets. A Kamelet Binding is an OpenShift resource (KameletBinding).
Within the Kamelet Binding resource, you can:
- Connect a sink or a source Kamelet to a channel of events: a Kafka topic or a Knative destination (channel or broker).
- Connect a sink Kamelet directly to a Camel Uniform Resource Identifier (URI). You can also connect a source Kamelet to a Camel URI, although connecting a URI and a sink Kamelet is the most common use case.
- Connect a sink and a source Kamelet directly to each other, without using a channel of events as a middle-layer.
- Reference the same Kamelet multiple times in the same Kamelet Binding.
- Add action Kamelets to manipulate data when it passes from a source Kamelet to a sink Kamelet.
- Define an error handling strategy to specify what Camel K should do if there is a failure when sending or receiving event data.
At runtime, the Camel K operator uses the Kamelet Binding to generate and run a Camel K integration.
Note: While Camel DSL developers can use Kamelets directly in Camel K integrations, the simpler way to implement Kamelets is by specifying a Kamelet Binding resource to build a high-level event flow.
1.2. Connecting sources and sinks
Use Kamelets when you want to connect two or more components (external applications or services). Each Kamelet is basically a route template with configuration properties. You need to know which component you want to get data from (a source) and which component you want to send data to (a sink). You connect the source and sink components by adding Kamelets in a Kamelet Binding as illustrated in Figure 1.1.
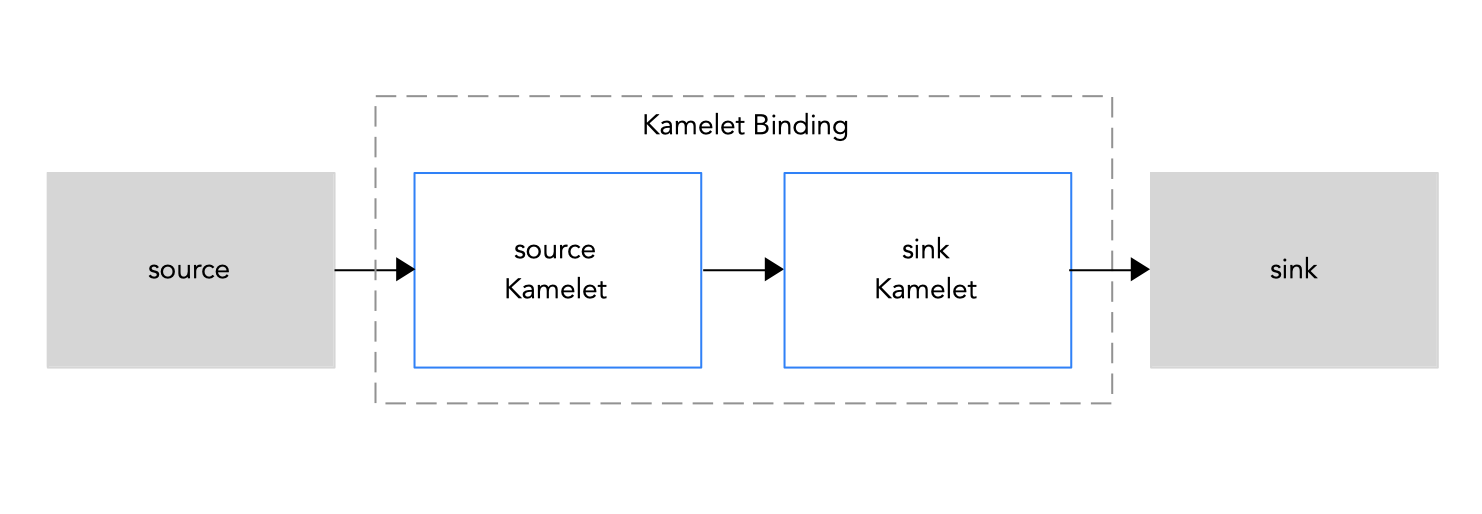
Figure 1.1: Kamelet Binding source to sink
Here is an overview of the steps for using Kamelets in a Kamelet Binding:
- Install the Camel K operator. It includes a catalog of Kamelets as resources in your OpenShift project.
- Create a Kamelet Binding. Determine which services or applications you want to connect within the Kamelet Binding.
- View the Kamelet Catalog to find the Kamelets for the source and sink components that you want to use.
- For each Kamelet that you want to include in the Kamelet Binding, determine the configuration properties that you need to set.
- In the Kamelet Binding code, add a reference to each Kamelet and configure the required properties.
- Apply the Kamelet Binding as a resource in your OpenShift project.
The Camel K operator uses the Kamelet Binding to generate and run an integration.
1.2.1. Installing Camel K
You can install the Red Hat Integration - Camel K Operator on your OpenShift cluster from the OperatorHub. The OperatorHub is available from the OpenShift Container Platform web console and provides an interface for cluster administrators to discover and install Operators.
After you install the Camel K Operator, you can install the Camel K CLI tool for command line access to all Camel K features.
Prerequisites
You have access to an OpenShift 4.6 (or later) cluster with the correct access level, the ability to create projects and install operators, and the ability to install CLI tools on your local system.
NoteYou do not need to create a pull secret when installing Camel K from the OpenShift OperatorHub. The Camel K Operator automatically reuses the OpenShift cluster-level authentication to pull the Camel K image from
registry.redhat.io.-
You installed the OpenShift CLI tool (
oc) so that you can interact with the OpenShift cluster at the command line. For details on how to install the OpenShift CLI, see Installing the OpenShift CLI.
Procedure
- In the OpenShift Container Platform web console, log in by using an account with cluster administrator privileges.
Create a new OpenShift project:
- In the left navigation menu, click Home > Project > Create Project.
-
Enter a project name, for example,
my-camel-k-project, and then click Create.
- In the left navigation menu, click Operators > OperatorHub.
-
In the Filter by keyword text box, type
Camel Kand then click the Red Hat Integration - Camel K Operator card. - Read the information about the operator and then click Install. The Operator installation page opens.
Select the following subscription settings:
- Update Channel > 1.6.x
- Installation Mode > A specific namespace on the cluster > my-camel-k-project
Approval Strategy > Automatic
NoteThe Installation mode > All namespaces on the cluster and Approval Strategy > Manual settings are also available if required by your environment.
- Click Install, and then wait a few moments until the Camel K Operator is ready for use.
Download and install the Camel K CLI tool:
- From the Help menu (?) at the top of the OpenShift web console, select Command line tools.
- Scroll down to the kamel - Red Hat Integration - Camel K - Command Line Interface section.
- Click the link to download the binary for your local operating system (Linux, Mac, Windows).
- Unzip and install the CLI in your system path.
To verify that you can access the Kamel K CLI, open a command window and then type the following:
kamel --helpThis command shows information about Camel K CLI commands.
Next step
(optional) Specifying Camel K resource limits
1.2.2. Viewing the Kamelet Catalog
When you install the Camel K operator, it includes a catalog of Kamelets that you can use in your Camel K integrations.
Prerequisite
You installed the Camel K operator in your working namespace or cluster-wide as described in Installing Camel K.
Procedure
To view a list of Kamelets installed with the Camel K operator:
- In a Terminal window, login to your OpenShift cluster.
Viewing the list of available Kamelets depends on how the Camel K operator was installed (in a specific namespace or cluster-mode):
If the Camel K operator is installed in cluster-mode, use this command to view the available Kamelets:
oc get kamelet -n openshift-operatorsIf the Camel K operator is installed in a specific namespace:
Open a project in which the Camel K operator is installed.
oc project <camelk-project>For example, if the Camel K operator is installed in the
my-camel-k-projectproject:oc project my-camel-k-projectRun the following command:
oc get kamelets
For a list of the Kamelets that are supported by Red Hat, see the Red Hat Integration Release Notes .
1.2.2.1. Adding a custom Kamelet to your Kamelet Catalog
If you don’t see a Kamelet in the catalog that suits your requirements, a Camel DSL developer can create a custom Kamelet as described in the Apache Camel Kamelets Developers Guide (community documentation). A Kamelet is coded in YAML format and, by convention, has a .kamelet.yaml file extension.
Prerequisites
- A Camel DSL developer has provided you with a custom Kamelet file.
- The Kamelet name must be unique to the OpenShift namespace in which the Camel K operator is installed.
Procedure
To make a custom Kamelet available as a resource in your OpenShift namespace:
-
Download the Kamelet
YAMLfile (for example,custom-sink.kamelet.yaml) to a local folder. - Login to your OpenShift cluster.
In a Terminal window, open the project in which the Camel K operator is installed, for example
my-camel-k-project:oc project my-camel-k-projectRun the
oc applycommand to add the custom Kamelet as a resource to the namespace:oc apply -f <custom-kamelet-filename>For example, use the following command to add the
custom-sink.kamelet.yamlfile that is located in the current directory:oc apply -f custom-sink.kamelet.yamlTo verify that the Kamelet is available as a resource, use the following command to view an alphabetical list of all Kamelets in the current namespace and then look for your custom Kamelet:
oc get kamelets
1.2.2.2. Determining a Kamelet’s configuration parameters
In a Kamelet Binding, when you add a reference to a Kamelet, you specify the name of the Kamelet and you configure the Kamelet’s parameters.
Prerequisite
- You installed the Camel K operator in your working namespace or cluster-wide.
Procedure
To determine a Kamelet’s name and parameters:
- In a terminal window, login to your OpenShift cluster.
Open the Kamelet’s YAML file::
oc describe kamelets/<kamelet-name>For example, to view the
ftp-sourceKamelet’s code, if the Camel K operator is installed in the current namespace, use this command:oc describe kamelets/ftp-sourceIf the Camel K operator is installed in cluster-mode, use this command:
oc describe -n openshift-operators kamelets/ftp-sourceIn the YAML file, scroll down to the
spec.definitionsection (which is written in JSON-schema format) to see the list of the Kamelet’s properties. At the end of the section, the required field lists the properties that you must configure when you reference the Kamelet.For example, the following code is an excerpt from the
spec.definitionsection of theftp-sourceKamelet. This section provides details for all of the Kamelet’s configuration properties. The required properties for this Kamelet areconnectionHost,connectionPort,username,password, anddirectoryName:spec: definition: title: "FTP Source" description: |- Receive data from an FTP Server. required: - connectionHost - connectionPort - username - password - directoryName type: object properties: connectionHost: title: Connection Host description: Hostname of the FTP server type: string connectionPort: title: Connection Port description: Port of the FTP server type: string default: 21 username: title: Username description: The username to access the FTP server type: string password: title: Password description: The password to access the FTP server type: string format: password x-descriptors: - urn:alm:descriptor:com.tectonic.ui:password directoryName: title: Directory Name description: The starting directory type: string passiveMode: title: Passive Mode description: Sets passive mode connection type: boolean default: false x-descriptors: - 'urn:alm:descriptor:com.tectonic.ui:checkbox' recursive: title: Recursive description: If a directory, will look for files in all the sub-directories as well. type: boolean default: false x-descriptors: - 'urn:alm:descriptor:com.tectonic.ui:checkbox' idempotent: title: Idempotency description: Skip already processed files. type: boolean default: true x-descriptors: - 'urn:alm:descriptor:com.tectonic.ui:checkbox'
1.2.3. Connecting source and sink components in a Kamelet Binding
Within a Kamelet Binding, you connect source and sink components.
The example in this procedure uses the following Kamelets as shown in Figure 1.2:
-
The example source Kamelet is named
coffee-source. This simple Kamelet retrieves randomly-generated data about types of coffee from a web site catalog. It has one parameter (period- anintegervalue) that determines how frequently (in seconds) to retrieve the coffee data. The parameter is not required since there is a default value (1000 seconds). -
The example sink Kamelet is named
log-sink. It retrieves data and outputs it to a log file. Thelog-sinkKamelet is provided in the Kamelet Catalog.
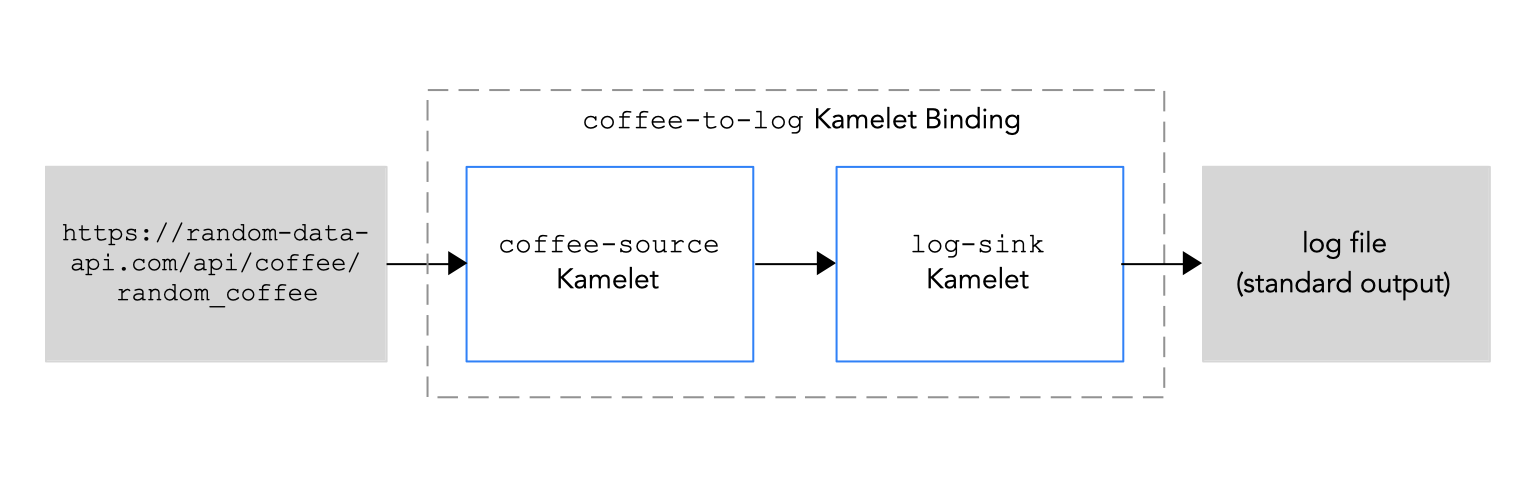
Figure 1.2: Example Kamelet Binding
Prerequisites
- You know how to create and edit a Camel K integration.
- The Red Hat Integration - Camel K operator is installed on your OpenShift namespace or cluster and you have downloaded the Red Hat Integration Camel K CLI tool as described in Installing Camel K.
- You know which Kamelets you want to add to your Camel K integration and their required instance parameters.
The Kamelets that you want to use are available in the Kamelet Catalog.
For this example, the
log-sinkKamelet is provided in the Kamelet Catalog. If you want to use the source Kamelet in this example, copy and save thecoffee-sourcecode to a local file namedcoffee-source.kamelet.yamland then run the following command to add it to your Kamelet Catalog:oc apply -f coffee-source.kamelet.yaml
Procedure
- Login to your OpenShift cluster.
Open your working project where the Camel K operator is installed. If you installed the Camel K operator in cluster-mode, it is available to any project on the cluster.
For example, to open an existing project named
my-camel-k-project:oc project my-camel-k-projectCreate a new Kamelet Binding by using one of the following options:
-
Use the
kamel bindcommand to create and run a Kamelet Binding (this option is useful for simple Kamelet Bindings that are conducive for a command line definition) Create a YAML file to define a Kamelet Binding and then use the
oc applycommand to run it (this option is useful when the Kamelet Binding configuration is more complicated).Create a new Kamelet Binding by using the kamel bind command
Specify the source and sink Kamelets and any configuration parameters by using the following
kamel bindsyntax:kamel bind <kamelet-source> -p “<property>=<property-value>” <kamelet-sink> -p “<property>=<property-value>”
For example:
kamel bind coffee-source -p “source.period=5000” log-sink -p "sink.showStreams=true"
The Camel K operator generates a
KameletBindingresource and runs a corresponding Camel K integration.Create a new Kamelet Binding by using a YAML file
In an editor of your choice, create a YAML file with the following structure:
apiVersion: camel.apache.org/v1alpha1
kind: KameletBinding
metadata:
  name:
spec:
  source:
  sink:
Add a name for the Kamelet Binding.
For this example, the name is
coffee-to-logbecause the binding connects thecoffee-sourceKamelet to thelog-sinkKamelet.apiVersion: camel.apache.org/v1alpha1 kind: KameletBinding metadata: name: coffee-to-log spec: source: sink:Specify the source Kamelet (for example,
coffee-source) and configure any parameters for the Kamelet.Note: For this example, the parameter is defined within the Kamelet Binding’s YAML file. Alternatively, you can configure a Kamelet’s parameters in a property file, ConfigMap, or Secret as described in Configuring Kamelet instance parameters.
apiVersion: camel.apache.org/v1alpha1
kind: KameletBinding
metadata:
  name: coffee-to-log
spec:
  source:
    ref
      kind: Kamelet
      apiVersion: camel.apache.org/v1alpha1
      name: coffee-source
    properties:
      period: 5000
  sink:
Specify the sink Kamelet (for example,
log-sink) and configure any parameters for the Kamelet. Use the optionalshowStreamsparameter for thelog-sinkKamelet to show the message body.apiVersion: camel.apache.org/v1alpha1 kind: KameletBinding metadata: name: coffee-to-log spec: source: ref: kind: Kamelet apiVersion: camel.apache.org/v1alpha1 name: coffee-source properties: period: 5000 sink: ref: kind: Kamelet apiVersion: camel.apache.org/v1alpha1 name: log-sink properties: showStreams: true-
Save the YAML file (for example,
coffee-to-log.yaml). Add the
KameletBindingas a resource to your OpenShift namespace:oc apply -f <kamelet-binding>.yamlFor example:
oc apply -f coffee-to-log.yamlThe Camel K operator generates and runs a Camel K integration by using the
KameletBindingresource.
-
Use the
To see the status of the Kamelet Binding:
oc get kameletbindings-
To see the status of the corresponding integration:
oc get integrations To view the output:
To view the logs from the command line, open a Terminal window and then type the following command:
kamel log <integration-name>For example, if the integration name is
coffee-to-log, use this command:kamel log coffee-to-logTo view the logs from OpenShift web console:
- Select Workloads > Pods.
Click the name of the Camel K integration’s pod, and then click Logs.
You should see a list of coffee events similar to the following example:
INFO [log-sink-E80C5C904418150-0000000000000001] (Camel (camel-1) thread #0 - timer://tick) {"id":7259,"uid":"a4ecb7c2-05b8-4a49-b0d2-d1e8db5bc5e2","blend_name":"Postmodern Symphony","origin":"Huila, Colombia","variety":"Kona","notes":"delicate, chewy, black currant, red apple, star fruit","intensifier":"balanced"}
To stop the integration, delete the Kamelet Binding:
oc delete kameletbindings/<kameletbinding-name>For example:
oc delete kameletbindings/coffee-to-log
Next steps
Optionally:
- Add action Kamelets as intermediary steps, as described in Adding an operation to a Kamelet Binding.
- Add error handling to the Kamelet Binding, as described in Adding an error handler policy to a Kamelet Binding.
1.2.4. Configuring Kamelet instance parameters
When you reference a Kamelet, you have the following options for defining the Kamelet’s instance parameters:
Directly in a Kamelet Binding where you specify the Kamelet URI. In the following example, the bot authorization token provided by the Telegram BotFather. is
123456:from("kamelet:telegram-source?authorizationToken=123456")Globally configure a Kamelet property (so that you don’t have to provide the value in the URI) by using the following format:
"camel.kamelet.<kamelet-name>.<property-name>=<value>”As described in the Configuring Camel K integrations chapter in Developing and Managing Integrations Using Camel K, you can configure Kamelet parameters by:
- Defining them as properties
- Defining them in a property file
- Defining them in an OpenShift ConfigMap or Secret
1.2.5. Connecting to a channel of events
The most common use case for Kamelets is to use a Kamelet Binding to connect them to a channel of events: a Kafka topic or a Knative destination (channel or broker). The advantage of doing so is that the data source and sink are independent and “unaware” of each other. This decoupling allows the components in your business scenario to be developed and managed separately. If you have multiple data sinks and sources as part of your business scenario, it becomes even more important to decouple the various components. For example, if an event sink needs to be shut down, the event source is not impacted. And, if other sinks use the same source, they are not impacted.
Figure 1.3 illustrates the flow of connecting source and sink Kamelets to a channel of events.
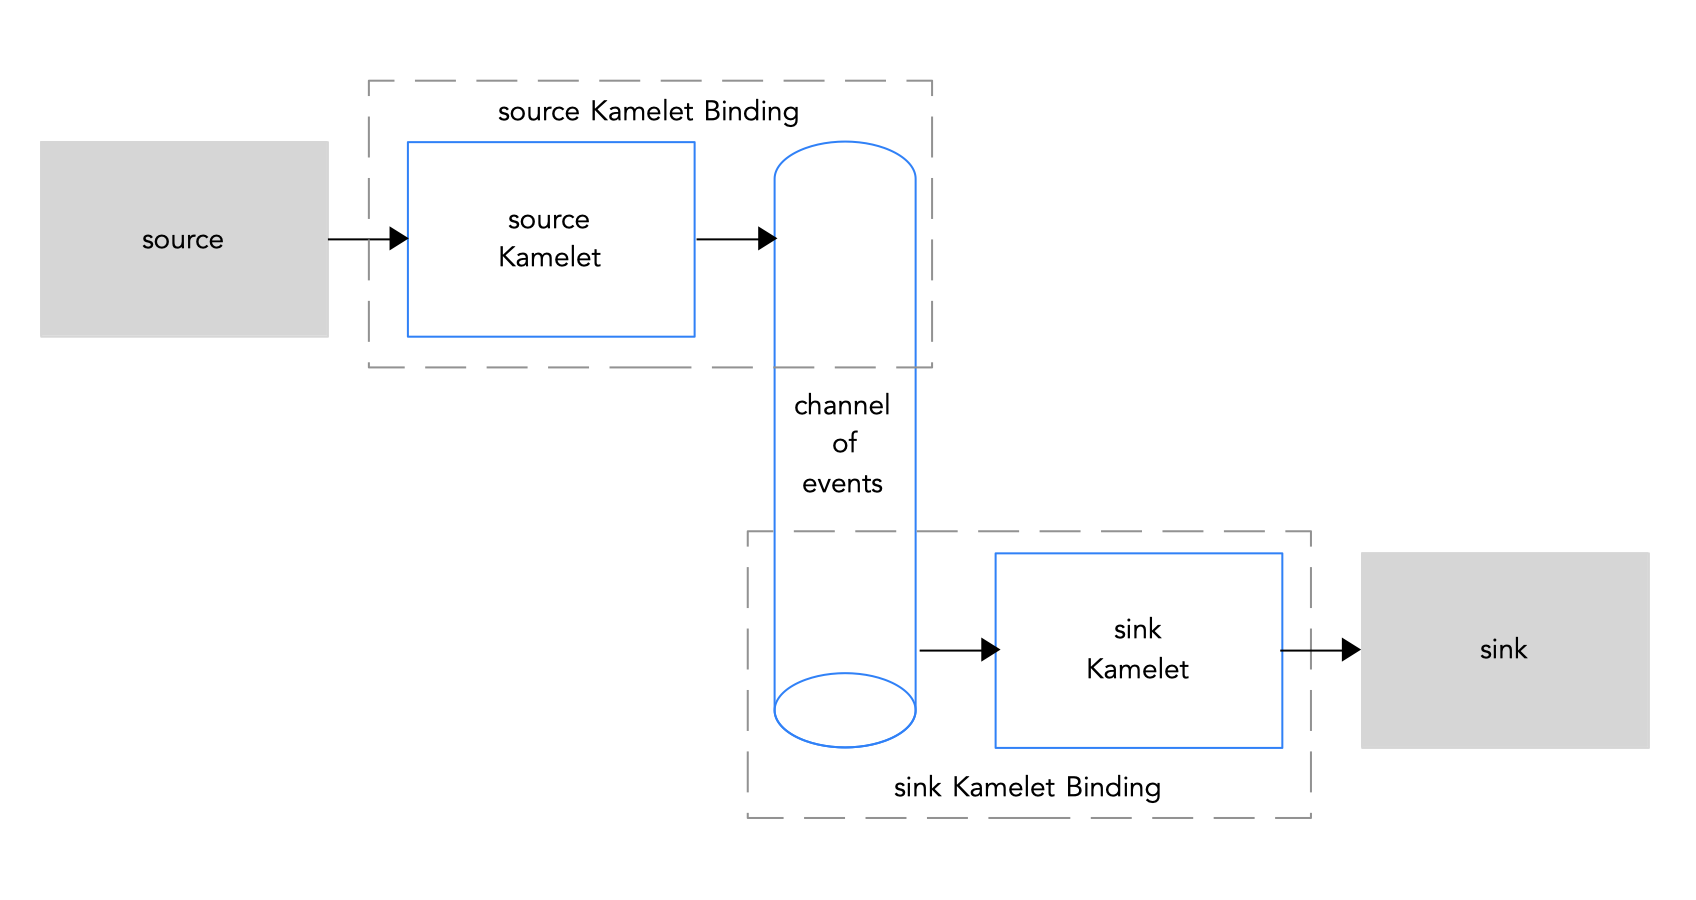
Figure 1.3: Connecting source and sink Kamelets to a channel of events
If you use the Apache Kafka stream-processing framework, for details on how to connect to a Kafka topic, see Connecting to Kafka with Kamelets.
If you use the Knative serverless framework, for details on how to connect to a Knative destination (channel or broker), see Connecting to Knative with Kamelets.
1.2.6. Connecting to an explicit Camel URI
You can create a Kamelet Binding in which a Kamelet sends events to—or receives events from—an explicit Camel URI. Typically, you bind a source Kamelet to a URI that can receive events (that is, you specify the URI as the sink in a Kamelet Binding). Examples of Camel URIs that receive events are HTTP or HTTPS endpoints.
It is also possible, but not as common, to specify a URI as the source in a Kamelet Binding. Examples of Camel URIs that send events are timer, mail, or FTP endpoints.
To connect a Kamelet to a Camel URI, follow the steps in Connecting source and sink components in a Kamelet Binding and for the sink.uri field, instead of a Kamelet, specify an explicit Camel URI.
In the following example, the URI for the sink is a fictional URI (https://mycompany.com/event-service):
apiVersion: camel.apache.org/v1alpha1
kind: KameletBinding
metadata:
  name: coffee-to-event-service
spec:
  source:
    ref:
      kind: Kamelet
      apiVersion: camel.apache.org/v1alpha1
      name: coffee-source
    properties:
      period: 5000
  sink:
    uri: https://mycompany.com/event-service
1.3. Applying operations to data within a connection
If you want to perform an operation on the data that passes between a Kamelet and an event channel, use action Kamelets as intermediary steps within a Kamelet Binding. For example, you can use an action Kamelet to serialize or deserialize data, filter the data, or insert a field or a message header.
Manipulation operations, such as filtering or adding fields, work only with JSON data (that is, when the Content-Type header is set to application/json). If the event data uses a format other than JSON (for example, Avro or Protocol Buffers), you must convert the format of the data by adding a deserialize step (for example, that references the protobuf-deserialize-action or avro-deserialize-action Kamelet) before the manipulating action and a serialize step (for example, that references the protobuf-serialize-action or avro-serialize-action Kamelet) after it. For more information about converting the format of data in a connection, see Data conversion Kamelets.
Action Kamelets include:
1.3.1. Adding an operation to a Kamelet Binding
To implement an action Kamelet, in the Kamelet Binding file’s spec section, add a steps section in between the source and sink sections.
Prerequisites
- You have created a Kamelet Binding as described in Connecting source and sink components in a Kamelet Binding.
You know which action Kamelet you want to add to the Kamelet Binding and the action Kamelet’s required parameters.
For the example in this procedure, the parameter for the
predicate-filter-actionKamelet is astringtype, expression, that provides the JSON Path Expression that filters coffee data to only log coffees that have a “deep” taste intensity. Note that thepredicate-filter-actionKamelet requires that you set a Builder trait configuration property in the Kamelet Binding.The example also includes deserialize and serialize actions which are optional in this case because the event data format is JSON.
Procedure
Open a
KameletBindingfile in an editor.For example, here are the contents of the
coffee-to-log.yamlfile:apiVersion: camel.apache.org/v1alpha1 kind: KameletBinding metadata: name: coffee-to-log spec: source: ref: kind: Kamelet apiVersion: camel.apache.org/v1alpha1 name: coffee-source properties: period: 5000 sink: ref: kind: Kamelet apiVersion: camel.apache.org/v1alpha1 name: log-sinkAdd an
integrationsection above thesourcesection and provide the following Builder trait configuration property (as required by thepredicate-filter-actionKamelet):apiVersion: camel.apache.org/v1alpha1 kind: KameletBinding metadata: name: coffee-to-log spec: integration: traits: builder: configuration: properties: - "quarkus.arc.unremovable- types=com.fasterxml.jackson.databind.ObjectMapper" source: ref: kind: Kamelet apiVersion: camel.apache.org/v1alpha1 name: coffee-source properties: period: 5000 sink: ref: kind: Kamelet apiVersion: camel.apache.org/v1alpha1 name: log-sink
Add a
stepssection, between thesourceandsinksections and define the action Kamelet. For example:apiVersion: camel.apache.org/v1alpha1 kind: KameletBinding metadata: name: coffee-to-log spec: integration: traits: builder: configuration: properties: - "quarkus.arc.unremovable-types=com.fasterxml.jackson.databind.ObjectMapper" source: ref: kind: Kamelet apiVersion: camel.apache.org/v1alpha1 name: coffee-source properties: period: 5000 steps: - ref: kind: Kamelet apiVersion: camel.apache.org/v1alpha1 name: json-deserialize-action - ref: kind: Kamelet apiVersion: camel.apache.org/v1alpha1 name: predicate-filter-action properties: expression: "@.intensifier =~ /.*deep/" - ref: kind: Kamelet apiVersion: camel.apache.org/v1alpha1 name: json-serialize-action sink: ref: kind: Kamelet apiVersion: camel.apache.org/v1alpha1 name: log-sink- Save your changes.
Use the
oc applycommand to update theKameletBindingresource, for example:oc apply -f coffee-to-log.yamlThe Camel K operator re-generates and runs the CamelK integration that it generates based upon the updated
KameletBindingresource.To see the status of the Kamelet Binding:
oc get kameletbindingsTo see the status of its corresponding integration:
oc get integrationsTo view the log file output for the integration:
kamel logs <integration-name>For example, if the integration name is
coffee-to-log:kamel logs coffee-to-logTo stop the integration, delete the Kamelet Binding:
oc delete kameletbindings/<kameletbinding-name>For example:
oc delete kameletbindings/coffee-to-log
1.3.2. Action kamelets
1.3.2.1. Data filtering Kamelets
You can filter the data that passes between source and sink components, for example, to prevent leaking sensitive data or to avoid generating unnecessary networking charges.
You can filter data based on the following criteria:
-
Kafka topic name - Filter events for a Kafka topic with a name that matches the given Java regular expression by configuring the Topic Name Matches Filter Action Kamelet (
topic-name-matches-filter-action). For more information, see Filtering event data for a specific Kafka topic. -
Header key - Filter events that have a given message header by configuring the Header Filter Action Kamelet (
has-header-filter-action). -
Null value - Filters tombstone events (events with a null payload) by configuring the Tombstone Filter Action Kamelet (
is-tombstone-filter-action). Predicate - Filter events based on the given JSON path expression by configuring the Predicate Filter Action Kamelet (
predicate-filter-action). Thepredicate-filter-actionKamelet requires that you set the following Builder trait configuration property in the Kamelet Binding:spec: integration: traits: builder: configuration: properties: - "quarkus.arc.unremovable-types=com.fasterxml. jackson.databind.ObjectMapper"
Data filtering Kamelets work out-of-the-box with JSON data (that is, when the Content-Type header is set to application/json). If the event data uses a format other than JSON, you must convert the format of the data by adding a deserialize step (for example, protobuf-deserialize-action or avro-deserialize-action) before the manipulating action and a serialize step (for example, protobuf-serialize-action or avro-serialize-action) after it. For more information about converting the format of data in a connection, see Data conversion Kamelets.
1.3.2.2. Data conversion Kamelets
With the following data conversion Kamelets, you can serialize and deserialize the format of data that passes between source and sink components. The data conversion applies to the payload of event data (not the key or the header).
Avro - An open source project that provides data serialization and data exchange services for Apache Hadoop.
-
Avro Deserialize Action Kamelet (
avro-deserialize-action) -
Avro Serialize Action Kamelet (
avro-serialize-action)
-
Avro Deserialize Action Kamelet (
Protocol Buffers - A high-performance, compact binary wire format invented by Google who use it internally so they can communicate with their internal network services.
-
Protobuf Deserialize Action Kamelet (
protobuf-deserialize-action) -
Protobuf Serialize Action Kamelet (
protobuf-serialize-action)
-
Protobuf Deserialize Action Kamelet (
JSON (JavaScript Object Notation) - A data-interchange format that is based on a subset of the JavaScript Programming Language. JSON is a text format that is completely language independent.
-
JSON Deserialize Action Kamelet (
json-deserialize-action) -
JSON Serialize Action Kamelet (
json-serialize-action)
-
JSON Deserialize Action Kamelet (
You must specify the schema (as a single-line, using JSON format) in the Avro and Protobuf serialize/deserialize Kamelets. You do not need to do so for JSON serialize/deserialize Kamelets.
1.3.2.3. Data transformation Kamelets
With the following data transformation Kamelets, you can perform simple manipulations on the data that passes between the source and sink components:
-
Extract Field - Use the
extract-field-actionKamelet to pull a field out of a body of data and replace the entire body of data with the extracted field. -
Hoist Field - Use the
hoist-field-actionKamelet to wrap the data body into a single field. -
Insert Header - Use the
insert-header-actionKamelet to add a header field by using either static data or record metadata. -
Insert Field - Use the
insert-field-actionKamelet to add a field value by using either static data or record metadata. Mask Field - Use the
mask-field-actionKamelet to replace a field value with a valid null value for the field type (such as 0 or an empty string) or with a given replacement (the replacement must be a non-empty string or a numeric value).For example, if you want to capture data from a relational database to send to Kafka and the data includes protected (PCI / PII) information, you must mask the protected information if your Kafka cluster is not certified yet.
-
Replace Field - Use the
replace-field-actionKamelet to filter or rename fields. You can specify fields to rename, to disable (exclude), or to enable (include). -
Value To Key - (for Kafka) Use the
value-to-key-actionKamelet to replace the record key with a new key formed from a subset of fields in the payload. You can set the event key to a value that is based on the event information before the data is written to Kafka. For example, when reading records from a database table, you can partition the records in Kafka based on the customer ID.
1.4. Handling errors within a connection
To specify what the Camel K operator should do if a running integration encounters a failure when sending or receiving event data, you can optionally add one of the following error handling policies to the Kamelet Binding:
- No error handler - Ignores any failure happening in your integration.
- Log error handler - Sends a log message to standard output.
- Dead letter channel error handler - Redirects a failing event to another component, such as a third-party URI, a queue, or another Kamelet which can perform certain logic with the failing event. Also supports attempting to redeliver the message exchange a number of times before sending it to a dead letter endpoint.
- Bean error handler - Specifies to use a custom bean for handling errors.
- Ref error handler - Specifies to use a bean for handling errors. The bean must be available in the Camel registry at runtime.
1.4.1. Adding an error handler policy to a Kamelet Binding
To handle errors when sending or receiving event data between a source and a sink connection, add an error handler policy to the Kamelet Binding.
Prerequisites
- You know which type of error handler policy you want to use.
-
You have an existing
KameletBindingYAML file.
Procedure
To implement error handling in a Kamelet Binding:
-
Open a
KameletBindingYAML file in an editor. Add an error handler section to the
specsection, after thesinkdefinition:apiVersion: camel.apache.org/v1alpha1 kind: KameletBinding metadata: name: example-kamelet-binding spec: source: ... sink: ... errorHandler: ...For example, in the
coffee-to-logKamelet Binding, specify the maximum number of times an error is sent to the log file by adding a log error handler:apiVersion: camel.apache.org/v1alpha1 kind: KameletBinding metadata: name: coffee-to-log spec: source: ref: kind: Kamelet apiVersion: camel.apache.org/v1alpha1 name: coffee-source properties: period: 5000 sink: ref: kind: Kamelet apiVersion: camel.apache.org/v1alpha1 name: log-sink errorHandler: log: parameters: maximumRedeliveries: 3- Save your file.
1.4.2. Error handlers
1.4.2.1. No error handler
If you want to ignore any failure happening in your integration, you can either not include an errorHandler section in the Kamelet Binding or set it to none as shown in the following example:
apiVersion: camel.apache.org/v1alpha1
kind: KameletBinding
metadata:
  name: my-kamelet-binding
spec:
  source:
...
  sink:
...
  errorHandler:
    none:
1.4.2.2. Log error handler
The default behavior for handling any failure is to send a log message to standard output. Optionally, you can use the log error handler to specify other behaviors, such as a redelivery or delay policy, as shown in the following example:
apiVersion: camel.apache.org/v1alpha1
kind: KameletBinding
metadata:
  name: my-kamelet-binding
spec:
  source:
...
  sink:
...
  errorHandler:
    log:
      parameters:
        maximumRedeliveries: 3
        redeliveryDelay: 2000
1.4.2.3. Dead letter channel error handler
The Dead Letter Channel allows you to redirect any failing event to any other component (such as a third party URI, a queue, or another Kamelet) that can define how to handle a failing event, as shown in the following example:
apiVersion: camel.apache.org/v1alpha1
kind: KameletBinding
metadata:
  name: my-kamelet-binding
spec:
  source:
  ...
  sink:
  ...
  errorHandler:
    dead-letter-channel:
      endpoint:
        ref: 1
          kind: Kamelet
          apiVersion: camel.apache.org/v1alpha1
          name: error-handler
        properties: 2
          message: "ERROR!"
          ...
      parameters: 3
maximumRedeliveries: 1-
For the endpoint, you can use
reforuri. The Camel K operator interpretsrefaccording to thekind,apiVersionandnamevalues. You can use any Kamelet, Kafka Topic channel, or Knative destination. -
Properties that belong to the endpoint (in this example, to a Kamelet named
error-handler). - Parameters that belong to the dead-letter-channel error handler type.
1.4.2.4. Bean error handler
With the Bean error handler you can extend the functionality of the Error Handler by providing a custom bean that handles errors. For type, specify the fully-qualified name of the ErrorHandlerBuilder. For properties, configure the properties expected by the ErrorHandlerBuilder that you specified in type.
apiVersion: camel.apache.org/v1alpha1
kind: KameletBinding
metadata:
  name: my-kamelet-binding
spec:
  source:
...
  sink:
...
  errorHandler:
    bean:
      type: "org.apache.camel.builder.DeadLetterChannelBuilder"
      properties:
        deadLetterUri: log:error
1.4.2.5. Ref error handler
With the Ref error handler, you can use any bean that you expect to be available in the Camel registry at runtime. In the following example, my-custom-builder is the name of the bean to look up at runtime.
apiVersion: camel.apache.org/v1alpha1
kind: KameletBinding
metadata:
  name: my-kamelet-binding
spec:
  source:
   ...
  sink:
   ...
  errorHandler:
    ref: my-custom-builder