
Chapter 3. Connecting to Knative with Kamelets
You can connect kamelets to Knative destinations (channels or brokers). Red Hat OpenShift Serverless is based on the open source Knative project, which provides portability and consistency across hybrid and multi-cloud environments by enabling an enterprise-grade serverless platform. OpenShift Serverless includes support for the Knative Eventing and Knative Serving components.
Red Hat OpenShift Serverless, Knative Eventing, and Knative Serving enable you to use an event-driven architecture with serverless applications, decoupling the relationship between event producers and consumers by using a publish-subscribe or event-streaming model. Knative Eventing uses standard HTTP POST requests to send and receive events between event producers and consumers. These events conform to the CloudEvents specifications, which enables creating, parsing, sending, and receiving events in any programming language.
You can use kamelets to send CloudEvents to Knative and send them from Knative to event consumers. Kamelets can translate messages to CloudEvents and you can use them to apply any pre-processing and post-processing of the data within CloudEvents.
3.1. Overview of connecting to Knative with kamelets
If you use a Knative stream-processing framework, you can use kamelets to connect services and applications to a Knative destination (channel or broker).
Figure 3.1 illustrates the flow of connecting source and sink kamelets to a Knative destination.
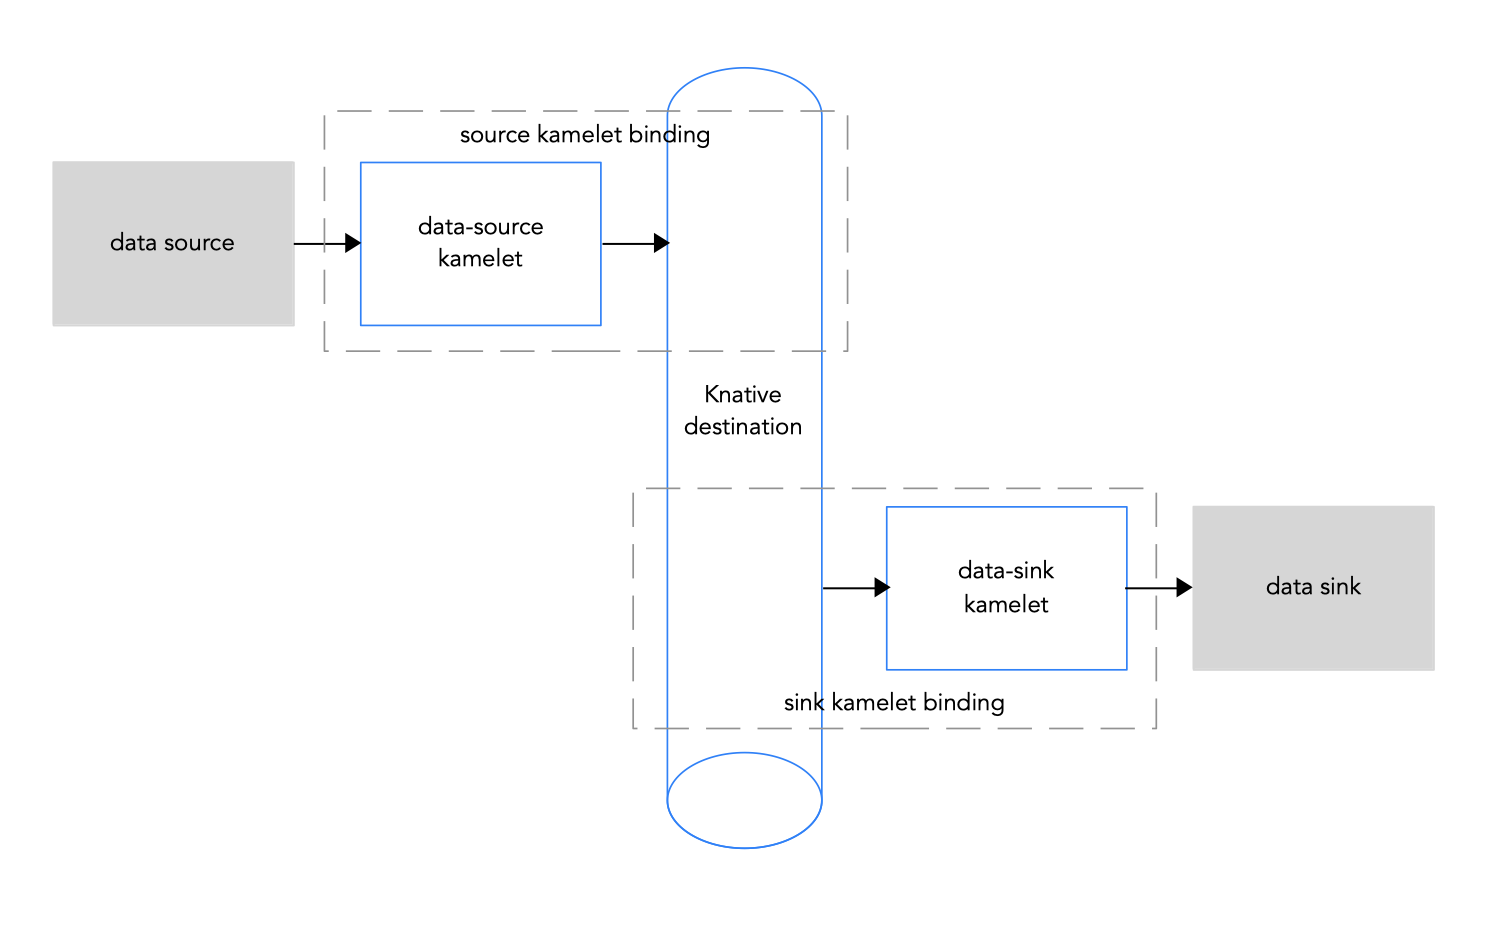
Figure 3.1: Data flow with kamelets and a Knative channel
Here is an overview of the basic steps for using kamelets and kamelet bindings to connect applications and services to a Knative destination:
Set up Knative:
- Prepare your OpenShift cluster by installing the Camel K and OpenShift Serverless operators.
- Install the required Knative Serving and Eventing components.
- Create a Knative channel or broker.
- Determine which services or applications you want to connect to your Knative channel or broker.
- View the Kamelet Catalog to find the kamelets for the source and sink components that you want to add to your integration. Also, determine the required configuration parameters for each kamelet that you want to use.
Create kamelet bindings:
- Create a kamelet binding that connects a source kamelet to a Knative channel (or broker).
- Create a kamelet binding that connects the Knative channel (or broker) to a sink kamelet.
- Optionally, manipulate the data that is passing between the Knative channel (or broker) and the data source or sink by adding one or more action kamelets as intermediary steps within a kamelet binding.
- Optionally, define how to handle errors within a kamelet binding.
- Apply the kamelet bindings as resources to the project.
The Camel K operator generates a separate Camel integration for each kamelet binding.
When you configure a kamelet binding to use a Knative channel or a broker as the source of events, the Camel K operator materializes the corresponding integration as a Knative Serving service, to leverage the auto-scaling capabilities offered by Knative.
3.2. Setting up Knative
Setting up Knative involves installing the required OpenShift operators and creating a Knative channel.
3.2.1. Preparing your OpenShift cluster
To use kamelets and OpenShift Serverless, install the following operators, components, and CLI tools:
Red Hat Integration - Camel K operator and CLI tool - The operator installs and manages Camel K - a lightweight integration framework that runs natively in the cloud on OpenShift. The
kamelCLI tool allows you to access all Camel K features.See the installation instructions in Installing Camel K.
-
OpenShift Serverless operator - Provides a collection of APIs that enables containers, microservices, and functions to run "serverless". Serverless applications can scale up and down (to zero) on demand and be triggered by a number of event sources. When you install the OpenShift Serverless operator, it automatically creates the
knative-servingnamespace (for installing the Knative Serving component) and theknative-eventingnamespace (required for installing the Knative Eventing component). - Knative Eventing component
- Knative Serving component
-
Knative CLI tool (
kn) - Allows you to create Knative resources from the command line or from within Shell scripts.
3.2.1.1. Installing OpenShift Serverless
You can install the OpenShift Serverless Operator on your OpenShift cluster from the OperatorHub. The OperatorHub is available from the OpenShift Container Platform web console and provides an interface for cluster administrators to discover and install Operators.
The OpenShift Serverless Operator supports both Knative Serving and Knative Eventing features. For more details, see Getting started with OpenShift Serverless.
Prerequisites
- You have cluster administrator access to an OpenShift project in which the Camel K Operator is installed.
-
You installed the OpenShift CLI tool (
oc) so that you can interact with the OpenShift cluster at the command line. For details on how to install the OpenShift CLI, see Installing the OpenShift CLI.
Procedure
- In the OpenShift Container Platform web console, log in by using an account with cluster administrator privileges.
- In the left navigation menu, click Operators > OperatorHub.
-
In the Filter by keyword text box, enter
Serverlessto find the OpenShift Serverless Operator. - Read the information about the Operator and then click Install to display the Operator subscription page.
Select the default subscription settings:
- Update Channel > Select the channel that matches your OpenShift version, for example, 4.7
- Installation Mode > All namespaces on the cluster
Approval Strategy > Automatic
NoteThe Approval Strategy > Manual setting is also available if required by your environment.
- Click Install, and wait a few moments until the Operator is ready for use.
Install the required Knative components using the steps in the OpenShift documentation:
(Optional) Download and install the OpenShift Serverless CLI tool:
- From the Help menu (?) at the top of the OpenShift web console, select Command line tools.
- Scroll down to the kn - OpenShift Serverless - Command Line Interface section.
- Click the link to download the binary for your local operating system (Linux, Mac, Windows)
- Unzip and install the CLI in your system path.
To verify that you can access the
knCLI, open a command window and then type the following:kn --helpThis command shows information about OpenShift Serverless CLI commands.
For more details, see the OpenShift Serverless CLI documentation.
Additional resources
- Installing OpenShift Serverless in the OpenShift documentation
3.2.2. Creating a Knative channel
A Knative channel is a custom resource that forwards events. After events have been sent to a channel from an event source or producer, these events can be sent to multiple Knative services, or other sinks, by using a subscription.
This example uses an InMemoryChannel channel, which you use with OpenShift Serverless for development purposes. Note that InMemoryChannel type channels have the following limitations:
- No event persistence is available. If a pod goes down, events on that pod are lost.
-
InMemoryChannelchannels do not implement event ordering, so two events that are received in the channel at the same time can be delivered to a subscriber in any order. - If a subscriber rejects an event, there are no re-delivery attempts by default. You can configure re-delivery attempts by modifying the delivery spec in the Subscription object.
Prerequisites
- The OpenShift Serverless operator, Knative Eventing, and Knative Serving components are installed on your OpenShift Container Platform cluster.
-
You have installed the OpenShift Serverless CLI (
kn). - You have created a project or have access to a project with the appropriate roles and permissions to create applications and other workloads in OpenShift Container Platform.
Procedure
- Log in to your OpenShift cluster.
Open the project in which you want to create your integration application. For example:
oc project camel-k-knativeCreate a channel by using the Knative (
kn) CLI commandkn channel create <channel_name> --type <channel_type>For example, to create a channel named
mychannel:kn channel create mychannel --type messaging.knative.dev:v1:InMemoryChannelTo confirm that the channel now exists, type the following command to list all existing channels:
kn channel listYou should see your channel in the list.
3.2.3. Creating a Knative broker
A Knative broker is a custom resource that defines an event mesh for collecting a pool of CloudEvents. OpenShift Serverless provides a default Knative broker that you can create by using the kn CLI.
You can use a broker in a kamelet binding, for example, when your application handles multiple event types and you do not want to create a channel for each event type.
Prerequisites
- The OpenShift Serverless operator, Knative Eventing, and Knative Serving components are installed on your OpenShift Container Platform cluster.
-
You have installed the OpenShift Serverless CLI (
kn). - You have created a project or have access to a project with the appropriate roles and permissions to create applications and other workloads in OpenShift Container Platform.
Procedure
- Log in to your OpenShift cluster.
Open the project in which you want to create your integration application. For example:
oc project camel-k-knativeCreate the broker by using this Knative (
kn) CLI command:kn broker create defaultTo confirm that the broker now exists, type the following command to list all existing brokers:
kn broker list
You should see the default broker in the list.
3.3. Connecting a data source to a Knative destination in a kamelet binding
To connect a data source to a Knative destination (channel or broker), you create a kamelet binding as illustrated in Figure 3.2.
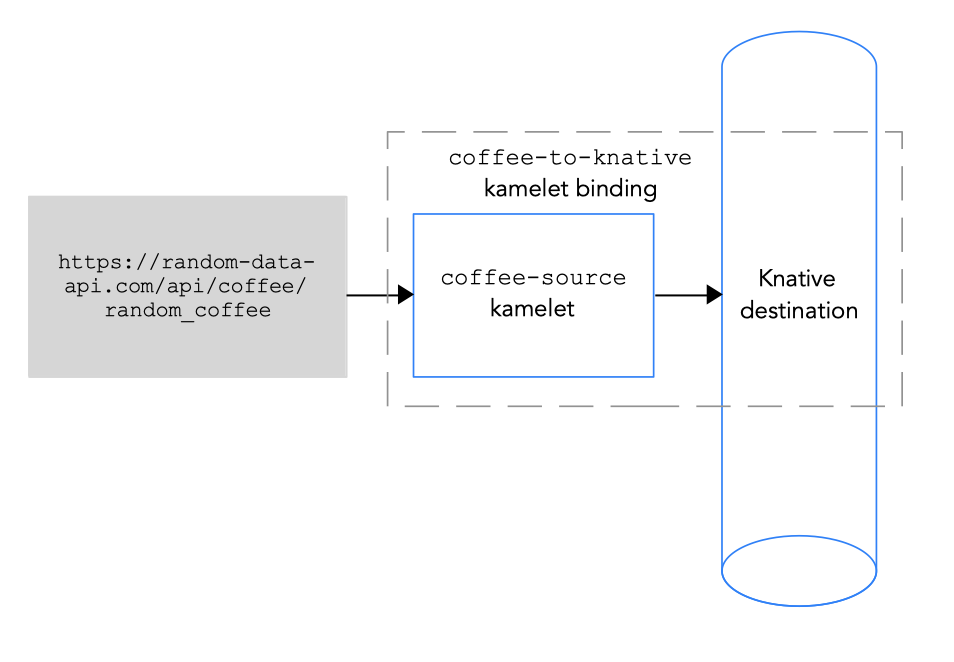
Figure 3.2 Connecting a data source to a Knative destination
The Knative destination can be a Knative channel or a Knative broker.
When you send data to a channel, there is only one event type for the channel. You do not need to specify any property values for the channel in a kamelet binding.
When you send data to a broker, because the broker can handle more than one event type, you must specify a value for the type property when you reference the broker in a kamelet binding.
Prerequisites
You know the name and type of the Knative channel or broker to which you want to send events.
The example in this procedure uses the
InMemoryChannelchannel namedmychannelor the broker nameddefault. For the broker example, thetypeproperty value iscoffeefor coffee events.You know which kamelet you want to add to your Camel integration and the required instance parameters.
The example kamelet for this procedure is the
coffee-sourcekamelet. It has an optional parameter,period, that specifies how often to send each event. You can copy the code from Example source kamelet to a file namedcoffee-source.kamelet.yamlfile and then run the following command to add it as a resource to your namespace:oc apply -f coffee-source.kamelet.yaml
Procedure
To connect a data source to a Knative destination, create a kamelet binding:
In an editor of your choice, create a YAML file with the following basic structure:
apiVersion: camel.apache.org/v1alpha1
kind: KameletBinding
metadata:
  name:
spec:
  source:
  sink:
Add a name for the kamelet binding. For this example, the name is
coffees-to-knativebecause the binding connects thecoffee-sourcekamelet to a Knative destination.apiVersion: camel.apache.org/v1alpha1 kind: KameletBinding metadata: name: coffees-to-knative spec: source: sink:For the kamelet binding’s source, specify a data source kamelet (for example, the
coffee-sourcekamelet produces events that contain data about coffee) and configure any parameters for the kamelet.apiVersion: camel.apache.org/v1alpha1 kind: KameletBinding metadata: name: coffees-to-knative spec: source: ref: kind: Kamelet apiVersion: camel.apache.org/v1alpha1 name: coffee-source properties: period: 5000 sink:For the kamelet binding’s sink specify the Knative channel or broker and the required parameters.
This example specifies a Knative channel as the sink:
apiVersion: camel.apache.org/v1alpha1 kind: KameletBinding metadata: name: coffees-to-knative spec: source: ref: kind: Kamelet apiVersion: camel.apache.org/v1alpha1 name: coffee-source properties: period: 5000 sink: ref: apiVersion: messaging.knative.dev/v1 kind: InMemoryChannel name: mychannelThis example specifies a Knative broker as the sink:
apiVersion: camel.apache.org/v1alpha1 kind: KameletBinding metadata: name: coffees-to-knative spec: source: ref: kind: Kamelet apiVersion: camel.apache.org/v1alpha1 name: coffee-source properties: period: 5000 sink: ref: kind: Broker apiVersion: eventing.knative.dev/v1 name: default properties: type: coffee-
Save the YAML file (for example,
coffees-to-knative.yaml). - Log into your OpenShift project.
Add the kamelet binding as a resource to your OpenShift namespace:
oc apply -f <kamelet binding filename>For example:
oc apply -f coffees-to-knative.yamlThe Camel K operator generates and runs a Camel K integration by using the
KameletBindingresource. It might take a few minutes to build.To see the status of the
KameletBinding:oc get kameletbindingsTo see the status of their integrations:
oc get integrationsTo view the integration’s log:
kamel logs <integration> -n <project>For example:
kamel logs coffees-to-knative -n my-camel-knativeThe result is similar to the following output:
...
[1] INFO  [io.quarkus] (main) camel-k-integration 1.4.0 on JVM (powered by Quarkus 1.13.0.Final) started in 2.790s.
3.4. Connecting a Knative destination to a data sink in a kamelet binding
To connect a Knative destination to a data sink, you create a kamelet binding as illustrated in Figure 3.3.
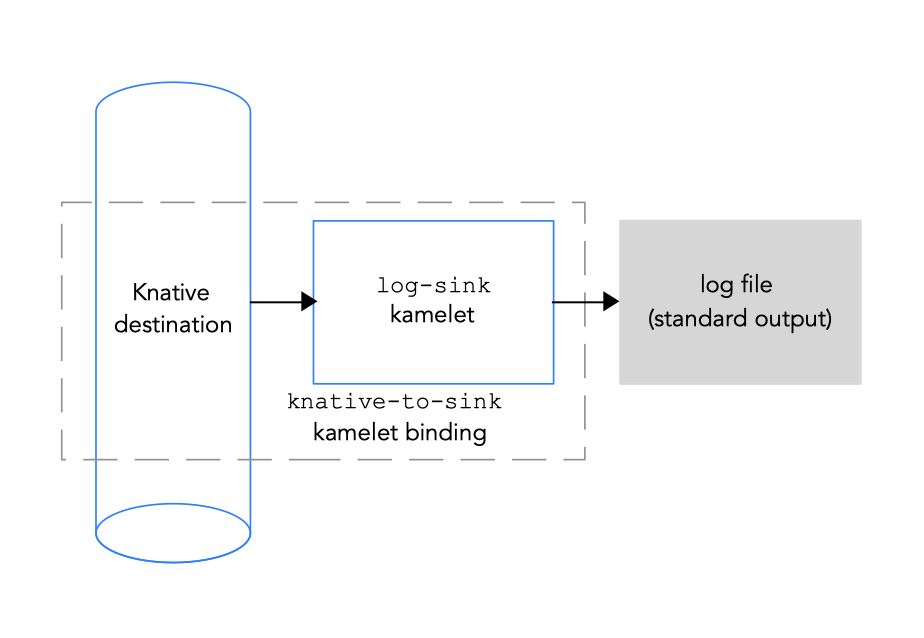
Figure 3.3 Connecting a Knative destination to a data sink
The Knative destination can be a Knative channel or a Knative broker.
When you send data from a channel, there is only one event type for the channel. You do not need to specify any property values for the channel in a kamelet binding.
When you send data from a broker, because the broker can handle more than one event type, you must specify a value for the type property when you reference the broker in a kamelet binding.
Prerequisites
You know the name and type of the Knative channel or the name of the broker from which you want to receive events. For a broker, you also know the type of events that you want to receive.
The example in this procedure uses the InMemoryChannel channel named mychannel or the broker named mybroker and coffee events (for the type property). These are the same example destinations that are used to receive events from the coffee source in Connecting a data source to a Knative channel in a kamelet binding.
You know which kamelet you want to add to your Camel integration and the required instance parameters.
The example kamelet for this procedure is the
log-sinkkamelet. You can copy the code from the Example sink kamelet to a file namedlog-sink.kamelet.yamlfile and then run the following command to add it as a resource to your namespace:oc apply -f log-sink.kamelet.yaml
Procedure
To connect a Knative channel to a data sink, create a kamelet binding:
In an editor of your choice, create a YAML file with the following basic structure:
apiVersion: camel.apache.org/v1alpha1
kind: KameletBinding
metadata:
  name:
spec:
  source:
  sink:
Add a name for the kamelet binding. For this example, the name is
knative-to-logbecause the binding connects the Knative destination to thelog-sinkkamelet.apiVersion: camel.apache.org/v1alpha1 kind: KameletBinding metadata: name: knative-to-log spec: source: sink:For the kamelet binding’s source, specify the Knative channel or broker and the required parameters.
This example specifies a Knative channel as the source:
apiVersion: camel.apache.org/v1alpha1
kind: KameletBinding
metadata:
  name: knative-to-log
spec:
  source:
    ref:
            apiVersion: messaging.knative.dev/v1
            kind: InMemoryChannel
            name: mychannel
  sink:
This example specifies a Knative broker as the source:
apiVersion: camel.apache.org/v1alpha1
kind: KameletBinding
metadata:
  name: knative-to-log
spec:
  source:
    ref:
          kind: Broker
          apiVersion: eventing.knative.dev/v1
          name: default
         properties:
         type: coffee
sink:
For the kamelet binding’s sink, specify the data consumer kamelet (for example, the log-sink kamelet) and configure any parameters for the kamelet, for example:
apiVersion: camel.apache.org/v1alpha1 kind: KameletBinding metadata: name: knative-to-log spec: source: ref: apiVersion: messaging.knative.dev/v1 kind: InMemoryChannel name: mychannel sink: ref: apiVersion: camel.apache.org/v1alpha1 kind: Kamelet name: log-sink-
Save the YAML file (for example,
knative-to-log.yaml). - Log into your OpenShift project.
Add the kamelet binding as a resource to your OpenShift namespace:
oc apply -f <kamelet binding filename>For example:
oc apply -f knative-to-log.yamlThe Camel K operator generates and runs a Camel K integration by using the
KameletBindingresource. It might take a few minutes to build.To see the status of the
KameletBinding:oc get kameletbindingsTo see the status of the integration:
oc get integrationsTo view the integration’s log:
kamel logs <integration> -n <project>For example:
kamel logs knative-to-log -n my-camel-knativeIn the output, you should see coffee events, for example:
[1] 2021-07-23 13:06:38,111 INFO [sink] (vert.x-worker-thread-1) {"id":254,"uid":"8e180ef7-8924-4fc7-ab81-d6058618cc42","blend_name":"Good-morning Star","origin":"Santander, Colombia","variety":"Kaffa","notes":"delicate, creamy, lemongrass, granola, soil","intensifier":"sharp"}
[1] 2021-07-23 13:06:43,273 INFO [sink] (vert.x-worker-thread-2) {"id":8169,"uid":"3733c3a5-4ad9-43a3-9acc-d4cd43de6f3d","blend_name":"Caf? Java","origin":"Nayarit, Mexico","variety":"Red Bourbon","notes":"unbalanced, full, granola, bittersweet chocolate, nougat","intensifier":"delicate"}
To stop a running integration, delete the associated kamelet binding resource:
oc delete kameletbindings/<kameletbinding-name>For example:
oc delete kameletbindings/knative-to-log