
Data Virtualization Tutorial
TECHNOLOGY PREVIEW - Data Virtualization Tutorial
Abstract
Chapter 1. Overview of the data virtualization tutorial
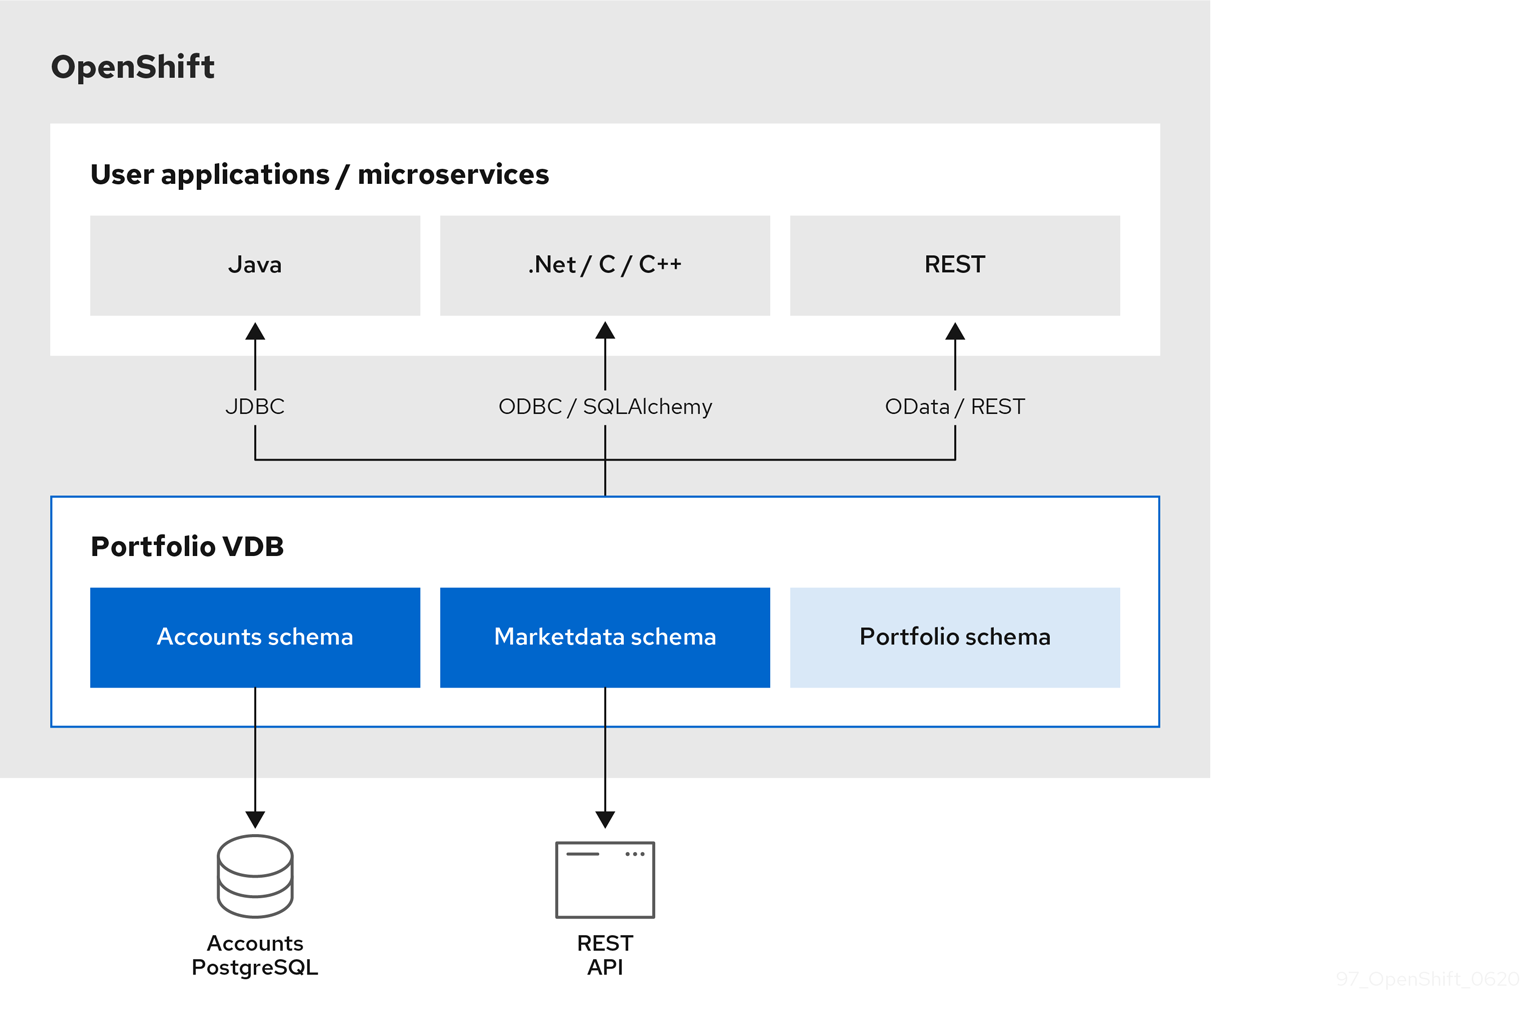
This tutorial demonstrates how to use Red Hat Integration data virtualization to create a customer portfolio virtual database. The virtual database that you create integrates data from the following two sources:
- A postgreSQL accounts database
- Stores customer account information, and data about the stock holdings for each customer.
- A web-based REST service
- Provides live stock market price data.
By integrating data from these two sources, the Portfolio database calculates the value of individual customer portfolios based on current stock prices. After we deploy the virtual database, we’ll submit queries to it to demonstrate how data from both of sources is combined.
Figure 1.1. Architecture of the Portfolio virtual database in this tutorial
Chapter 2. Getting started with data virtualization
In this tutorial we demonstrate how to create and use a "Portfolio" virtual database by completing the following tasks:
- Setting up our environment.
- Adding a Data Virtualization Operator to OpenShift.
- Creating a postgreSQL accounts database with a simple sample database to serve as our data source.
- Creating a custom resource (CR) that defines a Portfolio virtual database. The CR specifies how to integrate data from our postgreSQL database and a REST service.
- Running the Operator to deploy the virtual database.
Demonstrating how JDBC and OData clients can access and query the virtual database.
NoteODBC access is also available, but information about how to enable ODBC access is beyond the scope of this tutorial.
- Time
- 30 minutes to 1 hour
- Skill
- Beginner
Data virtualization is a Technology Preview feature only. Technology Preview features are not supported with Red Hat production service level agreements (SLAs) and might not be functionally complete. Red Hat does not recommend using them in production. These features provide early access to upcoming product features, enabling customers to test functionality and provide feedback during the development process. For more information about the support scope of Red Hat Technology Preview features, see https://access.redhat.com/support/offerings/techpreview/.
Prerequisites
Before you can use data virtualization to create a virtual database, you must have:
-
Access to an OpenShift 4.4 cluster with
cluster-adminprivileges. This can be an enterprise deployment of OpenShift (OpenShift Container Platform, OpenShift Dedicated, or OpenShift Online), or a local installation that uses Red Hat Code Ready Containers (CRC). For more information about CRC, see the article on Red Hat Developer. -
A version of the OpenShift CLI (
oc) binary that matches the version of the OpenShift server. - Working knowledge of SQL.
- Working knowledge of Openshift and the OpenShift Operator model.
- Working knowledge of git and GitHub.
Chapter 3. Introduction to data virtualization
A virtual database enables you to aggregate data from one or more external data sources and apply a custom schema to the data. By applying a customized logical schema to the aggregated source data, you can curate the data in a way that makes it easy for your applications to consume. The virtual view exposes just the data that you want from each data source, down to the level of specific tables, columns or procedures. Query processing logic in the virtual database enables users to access and join data in different formats from across data sources.
The virtual database provides an abstraction layer that shields client applications from the details of the physical data sources. Data consumers don’t have figure out how to connect to the host sources. They also don’t have to worry about how a view combines data from various sources, or how to configure translators to normalize data into a usable format.
Data and access where you want it
Data virtualization acts as a logical data warehouse, one that relies on metadata to make data available to client applications. Unlike data marts or physical data warehouses, data virtualization never moves or copies data from its original source. All data remains hosted in the original external data sources, and is retrieved directly, in real time from the source systems. So there’s no additional storage costs, and no overhead related to copying data. Because data is not duplicated or mirrored, there is never a concern about data currency or a need to reconcile conflicting snapshots.
The virtual database provides the single point of access to all of the configured data sources. Applications connect over standard protocols to communicate with the virtual database, and interact with it as though it were any relational database. You can use standard SQL to retrieve and manipulate data in the data sources, even when a data source does not offer native SQL support. SQL queries that you run against a virtual view span the data sources in the view so that all of the data is available to your applications.
Apply consistent, secure data access policies
Typically, data access policies can vary across multiple data sources. Users who want to fetch data from across those sources might require specific permissions to access each one, greatly complicating efforts to formulate queries that span the data set.
By virtualizing multiple sources into a single service, you simplify access management. A virtual database restricts access to your critical primary data sources to a single trusted service. Only the virtual database makes a direct connection to your configured data sources, reducing unwanted access to sensitive information. At the same time, through the data that you expose through virtual views, users obtain "pass-through" access to the information that they need to do their jobs.
For more information about data virtualization, see Using Data Virtualization and the Data Virtualization Reference.
Chapter 4. Setting up the environment
Before we can install the Data Virtualization Operator and create a virtual database, we must set up our environment. In this section we’ll complete the following tasks:
- Download or clone resources from the Teiid OpenShift examples GitHub repository. This tutorial requires local copies of some resources that are available in the examples repository.
- Create the postgreSQL database that will serve as one of the data sources for our virtual database.
4.1. Cloning the tutorial resources
To complete the steps in this tutorial we’ll need local copies of some resources that are available in the Teiid OpenShift examples GitHub repository. Teiid is the open source community project that serves as the basis for data virtualization.
We could complete the tutorial by creating all of the necessary files from scratch. But we’ll simplify our lives by downloading or cloning existing resources from the repository.
So let’s grab the files that we need.
Procedure
- From a terminal window, change to the directory where you want to save the repository content.
Type the following command to clone the repository:
$ git clone https://github.com/teiid/teiid-openshift-examples.git
The next step is to create the postgreSQL database that will function as the source database for our virtual database.
4.2. Creating the source database
After you install the Operator and it is running, you can create the postgreSQL database and populate it with sample data.
-
From a terminal window, change to the
01-base-examplefolder of the Teiid repository that you cloned, for example/home/username/git/teiid-openshift-examples/examples/01-base-example Type the following command to create a sample postgreSQL database from the template in the
01-base-example folder.oc new-app -f postgresql-ephemeral-template.json \ -p DATABASE_SERVICE_NAME=accounts \ -p POSTGRESQL_USER=user \ -p POSTGRESQL_PASSWORD=changeit \ -p POSTGRESQL_DATABASE=accounts
A database with the name accounts is created.
Type the following command to retrieve the list of pods from OpenShift:
oc get pods | grep accounts
The command returns the status of the database deployment process and of the created accounts database, for example:
accounts-1-deploy   0/1     Completed   0          10m
accounts-1-fcd92    1/1     Running     0          10m
You can also click Workloads > Pods from the OpenShift console to check the status of the accounts database pod.
Using the name that OpenShift assigns to the accounts postgreSQL database, type the following command to copy contents of the local folder, including the schema file
accounts-schema.sql, to the remote pod directory:oc rsync . __accounts-x-xxxxx__:/tmp
For example,
oc rsync . accounts-1-fcd92:/tmp
NoteThe command might return the following error:
rsync: failed to set permissions on "/tmp/.": Operation not permitted (1)
rsync error: some files/attrs were not transferred (see previous errors) (code 23) at main.c(1179) [sender=3.1.2]
error: exit status 23
You can ignore the error and continue with the next step.
From a terminal window, establish a remote shell connection to the postgreSQL database and then use psql to populate the database with the tables of sample data. Type the following command:
oc rsh accounts-x-xxxxx psql -U user -d accounts -f /tmp/accounts-schema.sql
The command returns the following output:
psql:/tmp/accounts-schema.sql:1: NOTICE:  table "customer" does not exist, skipping
DROP TABLE
psql:/tmp/accounts-schema.sql:2: NOTICE:  table "account" does not exist, skipping
DROP TABLE
psql:/tmp/accounts-schema.sql:3: NOTICE:  table "product" does not exist, skipping
DROP TABLE
psql:/tmp/accounts-schema.sql:4: NOTICE:  table "holdings" does not exist, skipping
DROP TABLE
CREATE TABLE
CREATE TABLE
CREATE TABLE
CREATE TABLE
INSERT 0 1
 .
 .
 .
INSERT 0 1
Your accounts postgreSQL database is now populated with sample data and is ready for you to configure it as a data source.
The next step is to add the Data Virtualization Operator to our project.
Chapter 5. Adding the Data Virtualization Operator to the project
Virtual databases are built and deployed by an OpenShift Operator. Before we can proceed, we must add the Data Virtualization Operator to our OpenShift project.
In this section we’ll complete the following tasks:
- Add our credentials to a pull secret so that we can access certified container images from Red Hat.
- Install the Data Virtualization Operator.
- Link the pull secret the Operator service account.
Prerequisites
- You cloned or downloaded local copies of the resources in the tutorial repository as described in Section 4.1, “Cloning the tutorial resources”.
- You have access to an OpenShift Container Platform cluster using an account with cluster-admin permissions.
Additional resources
For more information about Operators, see the OpenShift documentation.
5.1. Creating a docker-registry pull secret
The Data Virtualization Operator that we’ll use to create our virtual database is available in the OpenShift OperatorHub. Before we can access software in the OperatorHub, we must first create a pull secret of type docker-registry in our OpenShift project. Adding our credentials to the secret enables us to retrieve the latest Data Virtualization Operator image from Red Hat.
Procedure
Use the OpenShift CLI to sign into your OpenShift environment with administrator privileges.
For example, from a terminal window, type the following OpenShift CLI command:
oc login -u system:admin https://openshift.cluster-xyz.example.com:6443
Create the project where you want to add your data virtualization.
For example, to create a project with the name
dv-tutorial, type the following command:oc new-project dv-tutorial
Create a docker-registry secret to enable you to retrieve secured container images from Red Hat.
NoteInstead of using your Red Hat account username and password to create the secret, you use a registry service account to create an authentication token.
Type the following command:
oc create secret docker-registry dv-pull-secret
  --docker-server=registry.redhat.io \
  --docker-username=_CUSTOMER_PORTAL_USERNAME_ \
  --docker-password=_CUSTOMER_PORTAL_PASSWORD_ \
  --docker-email=_EMAIL_ADDRESS_
For example,
oc create secret docker-registry dv-pull-secret --docker-server=registry.redhat.io --docker-username=yourname@example.com --docker-password='xxxxxxxxxx' --docker-email=yourname@example.com
NoteYou must create a docker-registry secret in every project namespace where the image streams reside and which use registry.redhat.io.
We’re now ready to install the Data Virtualization Operator.
5.2. Installing the Data Virtualization Operator in your project
The Data Virtualization Operator automates tasks related to deploying a virtual database. We’ll install the Data Virtualization Operator into the OpenShift project that we set up for the tutorial. After it’s installed, the Operators is available only in this project namespace, so we won’t be able to use it from other projects in the cluster.
If we want to create virtual databases in other projects, we’ll have to install the Operator in each one of them. For more information about Operators, see the OpenShift documentation.
We’ll install the Operator from the OpenShift console.
Prerequisites
- Access to an OpenShift Container Platform cluster using an account with cluster-admin permissions.
- You created a registry pull secret as described in Section 5.1, “Creating a docker-registry pull secret”.
Procedure
- Sign in to the OpenShift console.
- Click Operators > OperatorHub to open the OperatorHub.
From the Projects drop-down menu, click the name of the project where you added the docker-registry secret, for example dv-tutorial.
ImportantYou must install the Operator in the project where you previously created the secret.
Locate the Operator with the name Red Hat Integration - Data Virtualization
TipIn the Filter by keyword field, type
dvto show the available Data Virtualization Operators.Click Red Hat Integration - Data Virtualization.
Should there be multiple versions of the Operator, read the Operator description to decide which version is best for your environment.
- Click Install to open the Create Operator Subscription page.
- Click Subscribe to install the Operator. The Installed Operators page shows the status of the installation.
- After the status of the Operator installation changes to Succeeded, you are ready to link the pull secret to the Operator service account.
5.3. Linking the pull secret to the Data Virtualization Operator service account
Before we can create a virtual database, we must link the pull secret that we created earlier to the Operator service account.
Prerequisites
- You created a pull secret as described in Section 5.1, “Creating a docker-registry pull secret”.
- You installed the Data Virtualization Operator as described in Section 5.2, “Installing the Data Virtualization Operator in your project”.
Procedure
- Sign in to the OpenShift console.
- Click Workloads > Pods to check the status of the Operator pod.
When the status of the pod reports that it is Running, open a terminal window, and type the following command:
oc secrets link dv-operator dv-pull-secret --for=pull
Be sure that the name of the Operator (
dv-operatorin the preceding command) matches the name of the Operator that you installed.The command does not return any output, unless it fails. If the command fails, verify that you added the Operator to the same project where you created the secret, for example, dv-tutorial.
We are now ready to create a virtual database instance.
Chapter 6. Building the virtual database
We now have a working postgreSQL database with some sample data in it. The next step is to define a virtual database that can read and write from the postgreSQL data source. We’ll also configure the REST data source that we mentioned earlier, an online live stock quote service.
The design of a virtual database is defined in a custom resource (CR) file. The CR is written as a YAML file, which contains a section of embedded DDL. After the CR YAML file is ready, you provide it as input to the Data Virtualization Operator, and the Operator deploys a virtual database based on the specification.
This tutorial uses a sample CR file, portfolio.yaml, that is available from the Teiid OpenShift examples repository that you cloned earlier. If you want to get started right away, you can use the sample file as-is, and run the Operator. Just skip to Chapter 7, Deploying the virtual database to try it out.
Afterwards you can return here to review the next few sections to learn about how the CR is constructed.
6.1. Virtual database custom resources
To specify the provisioning instructions for a virtual database, you create a custom resource (CR) file that describes how to build the virtual database. The CR is a YAML file that defines the following elements of the virtual database:
- The configuration of the data sources.
- The SQL DDL specifies the structure of the database schema.
6.1.1. Data source configuration
For this tutorial the CR defines the following data sources:
accountdb- Represents the postgreSQL database that you created earlier.
quotesvc- Represents a REST API for retrieving stock quotes from the online quote service at https://finnhub.io/api/v1/
You must use lowercase letters to specify data source names.
The following CR excerpt specifies the data sources for the virtual database:
apiVersion: teiid.io/v1alpha1
kind: VirtualDatabase
metadata:
  name: portfolio 1
spec:
  replicas: 1
  datasources:
    - name: accountdb 2
      type: postgresql
      properties:
        - name: username
          value: user
        - name: password
          value: changeit
        - name: jdbc-url
          value: jdbc:postgresql://accounts/accounts
    - name: quotesvc 3
      type: rest
      properties:
        - name: endpoint
          value: https://finnhub.io/api/v1/
- 1
- Defines the resource name for the virtual database when it is deployed to OpenShift.
- 2
- Represents the postgreSQL database and assigns to it the name
accountdb. - 3
- Represents a REST connection to the online stock quote service at https://finnhub.io/api/v1/, and assigns to it the name
quotesvc.
The stock quote service that serves as a data source in this tutorial is intended to help demonstrate how virtual databases can integrate data from REST services. The service is not a component of Red Hat Integration data virtualization and is not affiliated with Red Hat in any way.
To use the stock quote service, visit the web site to request a free API key. After you obtain your key, add its value to the portfolio.yaml to the CR file that you obtain from the Teiid OpenShift Examples repository. Add your API key in place of the STOCK_QUOTE_API_KEY variable in the file.
6.1.2. DDL for defining the virtual database
We embed SQL DDL in our CR to define the structure of the virtual database. For example, the DDL specifies the following properties:
- The translators to use for standardizing the format of the source data.
- The source schema to use for representing data elements in the data sources.
- The metadata (tables, procedures, and so forth) that we want to import from the data source.
- The virtual schema to use to map elements in the data sources to elements in the virtual database.
The next few sections provide more detail about how and where to define these properties in the DDL. After reviewing the individual sections of the file we’ll look at how they are assembled in the final CR.
After the DDL is complete, we insert it into a section of the CR, as shown in the following example:
spec:
  build:
    source:
      ddl: |
       PLACEHOLDER_FOR_VIRTUAL_DATABASE_DDL
6.1.2.1. Virtual database creation
The CREATE DATABASE and USE DATABASE statements specify the name of the virtual database and indicate that subsequent SQL operations in the DDL apply to this database.
The DDL in our CR uses the following statements to indicate that we’ll create and use a database called Portfolio for our virtual database.
CREATE DATABASE Portfolio OPTIONS (ANNOTATION 'The Portfolio VDB');
USE DATABASE Portfolio;
In this case, the CREATE DATABASE statement assigns a database name (Portfolio) that matches the name portfolio that we assigned to the metadata:name property in the CR:
  apiVersion: teiid.io/v1alpha1
  kind: VirtualDatabase
  metadata:
    name: portfolio
While it is not required that the two names match, using the same name makes it easier to understand that the two entities are related.
The annotation in the CREATE DATABASE statement assigns a metadata description to the database. The metadata is purely descriptive and it could be used as a label in a user interface. It is not directly used during the virtual database build or deployment process.
6.1.2.2. Translator definition
A virtual database uses adapters, known as translators or data wrappers, to convert the data that it receives from different types of external data sources into a standard format. Data virtualization uses a wide range of data wrappers. The DDL for our virtual database uses the following SQL statements to define data wrappers for the postgreSQL and REST data sources that we’re using in this tutorial:
CREATE FOREIGN DATA WRAPPER rest;
CREATE FOREIGN DATA WRAPPER postgresql;
6.1.2.3. External data source definitions
Our virtual database connects to external two data sources to retrieve data. In the preceding sections, we defined the translators and the connection properties for these data sources. Now we’ll add the DDL to define two SERVER elements to represent the connections to the data sources. The names that we assign to the SERVER objects tie them to the datasource properties that we specified earlier.
The SQL in this section also defines a FOREIGN DATA WRAPPER (FDW) for each connection. We add these foreign data wrappers to enable the virtual database to manage the data that is stored on these external servers. By defining these FDWs for the virtual database we enable it to query the postgreSQL and REST data sources as if they were local tables.
CREATE SERVER "accountdb" FOREIGN DATA WRAPPER postgresql;
CREATE SERVER "quotesvc" FOREIGN DATA WRAPPER rest;
6.1.2.4. Schema creation
A virtual database is a collection of multiple schemas. These schemas can be physical, representing a foreign data source such as our postgreSQL database, or they can be virtual as with the schema that provides in the data virtualization layer.
CREATE SCHEMA marketdata SERVER "quotesvc";
CREATE SCHEMA accounts SERVER "accountdb";

CREATE VIRTUAL SCHEMA Portfolio;
Physical schema such as the marketdata and accounts schema that we define here, represent data elements in the external data sources. The physical schema definitions in the preceding DDL excerpt refer to the SERVER objects that we defined for those external data sources in Section 6.1.2.3, “External data source definitions”. The final statement in the preceding excerpt establishes a virtual schema for our Portfolio virtual database.
6.1.2.5. Metadata import
In Section 6.1.2.3, “External data source definitions” we defined the foreign schema and associated them with their corresponding SERVER objects. However, we have not provided the data virtualization service with the information that it needs to work with the schema in the foreign data sources. To provide that information, we add the following statements to our DDL:
SET SCHEMA marketdata;
IMPORT FROM SERVER "quotesvc" INTO marketdata;

SET SCHEMA accounts;
IMPORT FROM SERVER "accountdb" INTO accounts OPTIONS (
        "importer.useFullSchemaName" 'false',
        "importer.tableTypes" 'TABLE,VIEW');
In the preceding DDL excerpt we import metadata from our data sources into the schema that we created in Section 6.1.2.4, “Schema creation”.
-
The metadata from the
quotesvcdata source server is imported into themarketdataforeign schema. -
The metadata from the
accountdbdata source server is imported into theaccountsforeign schema.
You can specify the full metadata for tables, procedures, and so forth. However, for the purposes of this tutorial, we will dynamically import that information.
6.1.2.6. Virtual schema definition
The final section of the DDL defines the data abstraction layer of the virtual database. Here we define a schema that uses the elements of the metadata that we defined in the preceding PHYSICAL schema. This virtual schema is where the heavy lifting occurs. It defines the logic for combining information from our source tables.
You can define any number of virtual schema layers, but for simplicity, in this example we create a single layer.
In this final portion of the DDL, we create the following virtual views:
StockPrice-
This view retrieves stock prices from the
quotessvc, our REST service that provides real-time stock quotes. AccountValues-
This view uses the value obtained from the
StockPriceview to calculate the portfolio values of the customers listed in theAccountspostgreSQL database. CustomerHolding- This view shows the value of individual customer accounts based on their stock holdings.
SET SCHEMA Portfolio;

      CREATE VIEW StockPrice (
          symbol string PRIMARY KEY,
          price double,
          CONSTRAINT ACS ACCESSPATTERN (symbol)
      ) AS
          SELECT p.symbol, y.price
          FROM accounts.PRODUCT as p, TABLE(call invokeHttp(action=>'GET', endpoint=>QUERYSTRING('quote', p.symbol as "symbol", `STOCK_QUOTE_API_KEY` as "token"), headers=>jsonObject('application/json' as "Content-Type"))) as x,
          JSONTABLE(JSONPARSE(x.result,true), '$' COLUMNS price double path '@.c') as y

      CREATE VIEW AccountValues (
          LastName string PRIMARY KEY,
          FirstName string,
          StockValue double
      ) AS
          SELECT c.lastname as LastName, c.firstname as FirstName, sum((h.shares_count*sp.price)) as StockValue
          FROM Customer c JOIN Account a on c.SSN=a.SSN
          JOIN Holdings h on a.account_id = h.account_id
          JOIN product p on h.product_id=p.id
          JOIN StockPrice sp on sp.symbol = p.symbol
          WHERE a.type='Active'
          GROUP BY c.lastname, c.firstname;

      CREATE VIEW CustomerHoldings (
          LastName string PRIMARY KEY,
          FirstName string,
          symbol string,
          ShareCount integer,
          StockValue double,
          CONSTRAINT ACS ACCESSPATTERN (LastName)
      ) AS
          SELECT c.lastname as LastName, c.firstname as FirstName, p.symbol as symbol, h.shares_count as ShareCount, (h.shares_count*sp.price) as StockValue
          FROM Customer c JOIN Account a on c.SSN=a.SSN
          JOIN Holdings h on a.account_id = h.account_id
          JOIN product p on h.product_id=p.id
          JOIN StockPrice sp on sp.symbol = p.symbol
          WHERE a.type='Active';
That completes our tour of the virtual database CR. See Section 6.2, “Completed virtual database custom resource file” to review the CR in its entirety.
6.2. Completed virtual database custom resource file
Bringing together the individual sections of the custom resource file that we reviewed in the preceding sections, we can now review the complete portfolio.yaml CR file:
portfolio.yaml
apiVersion: teiid.io/v1alpha1
kind: VirtualDatabase
metadata:
  name: portfolio
spec:
  replicas: 1
  datasources:
    - name: accountdb
      type: postgresql
      properties:
        - name: username
          value: user
        - name: password
          value: password
        - name: jdbc-url
          value: jdbc:postgresql://accounts/accounts
    - name: quotesvc
      type: rest
      properties:
        - name: endpoint
          value: https://finnhub.io/api/v1/
  build:
    source:
      ddl: |
        CREATE DATABASE Portfolio OPTIONS (ANNOTATION 'The Portfolio VDB');
        USE DATABASE Portfolio;

        -- translators
        CREATE FOREIGN DATA WRAPPER rest;
        CREATE FOREIGN DATA WRAPPER postgresql;

        -- Servers
        CREATE SERVER "accountdb" FOREIGN DATA WRAPPER postgresql;
        CREATE SERVER "quotesvc" FOREIGN DATA WRAPPER rest;

        -- Schemas
        CREATE SCHEMA marketdata SERVER "quotesvc";
        CREATE SCHEMA accounts SERVER "accountdb";

        CREATE VIRTUAL SCHEMA Portfolio;

        -- Schema:marketdata
        SET SCHEMA marketdata;

        IMPORT FROM SERVER "quotesvc" INTO marketdata;

        -- Schema:accounts
        SET SCHEMA accounts;

        IMPORT FROM SERVER "accountdb" INTO accounts OPTIONS (
                "importer.useFullSchemaName" 'false',
                "importer.tableTypes" 'TABLE,VIEW');

        -- Schema:Portfolio
        SET SCHEMA Portfolio;

        CREATE VIEW StockPrice (
            symbol string,
            price double,
            CONSTRAINT ACS ACCESSPATTERN (symbol)
        ) AS
            SELECT p.symbol, y.price
            FROM accounts.PRODUCT as p, TABLE(call invokeHttp(action=>'GET', endpoint=>QUERYSTRING('quote', p.symbol as "symbol", `STOCK_QUOTE_API_KEY` as "token"), headers=>jsonObject('application/json' as "Content-Type"))) as x,
            JSONTABLE(JSONPARSE(x.result,true), '$' COLUMNS price double path '@.c') as y

        CREATE VIEW AccountValues (
            LastName string PRIMARY KEY,
            FirstName string,
            StockValue double
        ) AS
            SELECT c.lastname as LastName, c.firstname as FirstName, sum((h.shares_count*sp.price)) as StockValue
            FROM Customer c JOIN Account a on c.SSN=a.SSN
            JOIN Holdings h on a.account_id = h.account_id
            JOIN product p on h.product_id=p.id
            JOIN StockPrice sp on sp.symbol = p.symbol
            WHERE a.type='Active'
            GROUP BY c.lastname, c.firstname;
We can now provide the CR to the Data Virtualization Operator to build and deploy the virtual database.
Chapter 7. Deploying the virtual database
After you assemble your CR, the next step is to feed it to the Data Virtualization Operator to build and deploy the virtual database.
Prerequisites
Before you can use deploy the virtual database, you must have:
- Set up your environment as described in Chapter 4, Setting up the environment.
Procedure
-
Open a terminal window to the
01-base-exampledirectory in your local Teiid-Openshift-Examples respository, which contains theporfolio.yamlfiles. -
If you have not yet done so, open the file in a text editor and add the API key for the stock quote service in the
Schema:Portfoliosection. For more information, see the example in Section 6.1.2.6, “Virtual schema definition” Type the following command:
oc create -f portfolio.yaml
The command returns the following response:
virtualdatabase.teiid.io/portfolio created
At this stage, the virtual database is created, but it’s not yet running.
The initial deployment can take five or more minutes. The first time that you use the Operator to deploy a virtual database in a project, the Operator must build a base image, which takes extra time. Subsequent deployments take less time, because the base image that you create is reused.
Run the following command to check the build status:
oc get vdb portfolio -o yaml | grep phase
The build process runs through several phases. When you check the status, you might see any of the following responses:
phase: Ready For S2I

phase: Building Base Builder Image

phase: Building Service Image

phase: Deploying

phase: Running
While you’re waiting, if you skipped the section that describes how to create the virtual database CR, now is a good time to go back and review it. When you run the preceding command again, if the build status reports that the phase is Running, you’re ready to move on to the next step.
Chapter 8. Connecting clients to the virtual database
After you deploy the virtual database, you can make it available to clients. You can provide access through the following interfaces:
- JDBC. You can separately enable access from internal and external JDBC clients.
- OData/REST API.
ODBC access is also available, but a description of how to enable ODBC access is beyond the scope of the present tutorial.
JDBC access
By default, after you deploy a virtual database, internal services, that is, services in the same OpenShift cluster, can access the database via JDBC. No further configuration needed. Remote clients are a different story, but we’ll get to them in a minute.
- JDBC clients within the cluster
- Clients in the same OpenShift cluster as the virtual database automatically have access to it over JDBC. We’ll install a simple command-line SQL client to the cluster to demonstrate how easy it is.
- External JDBC clients
- Clients outside of the OpenShift cluster don’t automatically have access to the virtual database server. To enable access, you must either set up an OpenShift load balancer service, or configure port forwarding. We’ll use the SQuirreL SQL client to connect to the service from outside the cluster.
OData access
After you create the virtual database service, an OData route is generated automatically. You can provide the OData route to HTTP/REST clients, which can then submit OData queries to the virtual database. We’ll submit some simple queries from a standard browser to demonstrate.
8.1. Connecting an internal JDBC client
To test internal JDBC access, you can use the SQLLine tool. The SQLLine tool is a command line utility that can serve as a simple SQL client for connecting to relational databases and running SQL commands. You can install the SQLLine tool on your OpenShift cluster and use it to access the virtual database.
SQLLine is not part of Red Hat Integration. References in this tutorial to using SQLLine are provided as a convenience to customers who want to test connectivity to a virtual database from an internal JDBC client.
8.1.1. Installing SQLLine
To install SQLLine to your OpenShift cluster, open a terminal window and run the following command:
oc run -it --restart=Never --attach --rm --image quay.io/teiid/sqlline:latest sqlline
The command installs the SQLLine client image to the OpenShift cluster, and opens a SQL command line:
sqlline>
You are now ready to connect the SQLLine tool to the virtual database.
8.1.2. Connecting SQLLine to the Portfolio virtual database
After you install SQLLine, you can run standard SQL queries from the SQLLine command prompt. SQLLine also provides control commands for interacting with the database and managing the behavior of the tool. The following table lists some common SQLLine commands.
Table 8.1. SQLLine commands
| Command name | Description | Command format |
|---|---|---|
| dbinfo | Retrieves information about the database. |
|
| tables | Lists all of the tables in the database. |
|
| help | Displays information about SQLLine commands. |
|
| quit | Exits SQLLine. |
|
For a complete list of SQLLine commands, see the SQLLine Manual.
Procedure
From the
sqllineprompt, type the following command to connect to the Portfolio database that you created earlier.!connect jdbc:teiid:portfolio@mm://portfolio:31000;
When prompted type a user name and password to log in:
Enter username for jdbc:teiid:portfolio@mm://portfolio:31000;: ANY_USER_NAME
Enter password for jdbc:teiid:portfolio@mm://portfolio:31000;: ANY_PASSWORD
The credentials that you supply at this point are only dummy values. You can type any value.
The command responds with the following output:
Transaction isolation level TRANSACTION_REPEATABLE_READ is not supported. Default (TRANSACTION_READ_COMMITTED) will be used instead.
0: jdbc:teiid:portfolio@mm://portfolio:31000>
You are now connected to the virtual database service. You can submit SQL queries at prompt.
For information about some sample queries that you can try, see Sample queries.
Type
!quitto end the SQLLine session.The SQLLine pod is deleted.
You must re-run the installation command to run SQLLine again.
8.2. Connecting to the virtual database from an external JDBC client
By default, JDBC clients have access to a virtual database only if they share the same OpenShift cluster.
To provide access to external clients, you must create an OpenShift LoadBalancer service. LoadBalancer services open an external port to allow access to clients outside the cluster.
8.2.1. Configuring an OpenShift load balancer service to enable external JDBC clients to access the virtual database
To configure a load balancer for the virtual database, you define an attribute in the custom resource. When you run the Data Virtualization Operator to build and deploy the virtual database, the Operator creates the load balancer service automatically.
When the Operator deploys the virtual database, it automatically exposes the JDBC route to the virtual database service. Although OpenShift typically requires you to create a route to the service that you want to expose, you do not have to create routes for virtual database services that you deploy with the Data Virtualization Operator.
Prerequisites
- You have access to an OpenShift cluster that permits you to add a LoadBalancer Ingress Service.
- You have a custom resource (CR) to which you can add the attribute to enable the load balancer service.
Some environments prohibit configuring an external load balancer. If your OpenShift cluster does not permit you to add a load balancer, you can enable access for external clients by enabling port forwarding. For more information, see Section 8.2.2, “Enabling external JDBC client access through port forwarding”.
Procedure
Add a load balancer service for the virtual database by setting the value of
spec.exposein your virtual database CR toLoadBalancer.To provide flexibility in exposing other resources in the future, precede the value with a hyphen (
-) to indicate that it is an element in an array, as in the following example:apiVersion: teiid.io/v1alpha1 kind: VirtualDatabase metadata: name: portfolio spec: replicas: 1 expose: - LoadBalancer ....After you deploy the virtual database, you can run the following command from a terminal window to identify the exposed host and port:
oc get svc portfolio-external
The command returns network information for the service, including the cluster IP address, external host name, and port number and type. For example:
NAME               TYPE          CLUSTER-IP     EXTERNAL-IP                            PORT(S)         AGE
portfolio-external  LoadBalancer  172.30.22.226  ad42f5d8b303045-487804948.example.com  3306:30357/TCP  15m
Additional resources
- For information about deploying the virtual database, see Chapter 7, Deploying the virtual database.
- For more information about configuring an OpenShift load balancer service, see the OpenShift documentation.
8.2.2. Enabling external JDBC client access through port forwarding
In environments where you do not have permission to configure an external load balancer, you can use the workaround of enabling port forwarding. Port forwarding maps the OpenShift cluster address and port to a local port on your computer.
Port forwarding enables you to test external JDBC clients from a single local computer in the absence of a load balancer. Port forwarding cannot provide stable long-term access in a production environment.
From a terminal window, type the following command to obtain the name of the portfolio pod:
oc get pods
The command returns the list of available pods. For example:
NAME                              READY   STATUS      RESTARTS    AGE
accounts-1-deploy                 0/1     Completed   0           21h
accounts-1-q5z6m                  1/1     Running     0           21h
portfolio-1-build                 0/1     Completed   0           21h
portfolio-6bbf99fb8d-hgh9d        1/1     Running     0           21h
teiid-operator-598874685b-c8m9q   1/1     Running     0           21h
virtualdatabase-builder-1-build   0/1     Completed   0           21h
Using the name of the virtual database pod, type the following command to forward the cluster port to your local computer:
oc port-forward <dv-pod-name> 31000:31000
For example:
oc port-forward portfolio-6bbf99fb8d-hgh9d 31000:31000
The command returns the following response:
Forwarding from 127.0.0.1:31000 -> 31000
Forwarding from [::1]:31000 -> 31000
You can now access the pod from applications running on your computer. Install and run the SQuirreL SQL client to test it out.
Additional resources
For more information about port forwarding on OpenShift, see https:docs.openshift.com/container-platform/4.4/nodes/containers/nodes-containers-port-forwarding.html[the OpenShift documentation].
8.2.3. Installing the SQuirreL JDBC client
To test JDBC access to the virtual database from an external client, we need to install a local JDBC client. In this tutorial we’ll use SQuirreL, a free open source Java SQL client, but you can use any JDBC client. SQuirreL provides tools to view the structure of the virtual database, browse its views, and run SQL commands.
SQuirreL is not part of Red Hat Integration. References in this tutorial to using SQuirreL are provided as a convenience to customers who want to test connectivity to a virtual database from an external JDBC client.
Because SQuirreL is installed outside the cluster, it does not have access to the portfolio database by default.
Prerequisites
You have completed the following tasks:
- Enabled access to the virtual database from an external JDBC client.
For testing purposes, this tutorial uses an unsecured connection on port 31000, the default unsecured port.
For production deployments, always use a secure port that encrypts network traffic.
Procedure
- Download the SQuirreL installation JAR from the following page: http://squirrel-sql.sourceforge.net/#installation.
To install SQuirreL, open a terminal window to the directory that contains the downloaded file, and type the following command:
java -jar squirrel-sql-<version>-install.jar
- Follow the prompts in the installation wizard to complete the installation process.
8.2.4. Configuring SQuirreL to connect to the Portfolio virtual database
After you install the SQuirreL client, download the Teiid JDBC driver and configure the client to access the virtual database.
Procedure
If you enabled external client access by adding a load balancer to the OpenShift cluster, retrieve the connection information for the virtual database by running the following command, otherwise skip to Step 2.
oc get service portfolio
The command returns the cluster IP address, and the available ports, for example:
NAME       TYPE       CLUSTER-IP    EXTERNAL-IP  PORT(S)                                                              AGE
portfolio  ClusterIP  172.30.25.27  <none>       8080/TCP,8778/TCP,9779/TCP,31000/TCP,35432/TCP,31443/TCP,35443/TCP   8m23s
Download the Teiid Java driver from the following page: http://teiid.io/teiid_wildfly/downloads/
For more information about using a JDBC driver to connect external Java programs to virtual databases on OpenShift, see https://github.com/teiid/teiid-openshift-examples/blob/master/jdbc.adoc.
Open SquirreL, and add the Teiid driver.
- From the menu, click Drivers > New Driver.
- In the Add Driver dialog box, type Teiid in Name field.
In the Example URL field, type:
jdbc:teiid:<vdb-name>@mms://<host>:<port>
NotePort 31000 is a non-secure port. If you connect to the virtual database on port 31000, type
mminstead ofmmsin the Example URL field.In the Website URL field, type:
`http://teiid.org`
- Click Extra Class Path and then click Add.
- Navigate to the directory where you downloaded the Teiid driver, click the driver JAR file, and then click Open.
-
Click List Drivers. The Class Name field displays
org.teiid.jdbc.TeiidDriver. - Click OK.
Add an Alias for the connection.
- Click the Aliases tab, and from the menu click Aliases > New Alias.
-
In the Name field, type
portfolio. -
In the Driver field, select
Teiid In the URL field, type
jdbc:teiid:portfolio.1@mm://IPADDRESS:PORT_NUMBERin place of the example URL.For example, if you used port forwarding to provide external access, type the following localhost URL:
jdbc:teiid:portfolio.1@mm://127.0.0.1:31000
In the User Name field, type any value.
NoteThe user name, and the password that you provide in the next step, are dummy values. Although you must supply a user name and password to create the alias, the values that you provide are not used in authenticating with the virtual database.
- In the Password field, type any value.
- To test your connection, click Test, and then click Connect.
- Click OK to confirm that the test was successful, and then click OK again to save the alias.
8.2.5. Querying the Portfolio virtual database from the SQuirreL SQL client
Procedure
- From the Aliases tab, right-click the alias that you created, and then click Connect to connect to the virtual database.
- After the connection is established, click the SQL tab.
- Type a SQL query and and press Ctrl+Enter to see the results.
For information about some sample queries that you can try, see Sample queries.
8.3. Sample queries
You can query the virtual database from internal or external JDBC clients. Here are a few sample queries that you can use to test how the clients interacts with the virtual database.
- Example: Retrieve IBM stock price
SELECT * FROM STOCKPRICE WHERE symbol = 'IBM';
- Retrieve the full account value for customer with last name 'Dragon'
SELECT * FROM AccountValues WHERE LastName = 'Dragon';
8.4. Access the virtual database through the OData API
You can use the data virtualization OData API to query the virtual database service. You append your OData query to the HTTP route to the service. You retrieve the HTTP route by querying the OpenShift server.
Query the OpenShift server for the route that is created for the service. For example:
oc get route
The server returns the HTTP route to the server. For example:
NAME        HOST/PORT PATH                                      SERVICES    PORT   TERMINATION   WILDCARD
portfolio   portfolio-dv-tutorial.apps.cluster-xyz.example.com  portfolio   8080   edge          None
To test OData access from a browser, type the host string in the address bar, and append an OData query URL.
Example: OData query requesting data in JSON format
https://portfolio-dv-tutorial.apps.cluster-xyz.example.com/odata/portfolio/AccountValues('Dragon')?$format=jsonReplace the host value in the preceding URI with the HTTP route to your service. The server returns a result similar to the following:
{
   "@odata.context":"https://HOST/odata/portfolio/$metadata#AccountValues/$entity",
   "LastName":"Dragon",
   "FirstName":"Bonnie",
   "StockValue":30299.04
}
Example: OData query requesting data in XML format
https://portfolio-dv-tutorial.apps.cluster-xyz.example.com/odata/portfolio/StockPrice('IBM')?$format=xmlThe server returns a result similar to the following:
<a:entry xmlns:a="http://www.w3.org/2005/Atom" xmlns:m="http://docs.oasis-open.org/odata/ns/metadata" xmlns:d="http://docs.oasis-open.org/odata/ns/data" m:context="https://portfolio-dv-tutorial.apps.cluster-xyz.example.com:443/odata/portfolio/$metadata#StockPrice/$entity">
<a:id>
  https://portfolio-dv-tutorial.apps.cluster-xyz.example.com:443/odata/portfolio/StockPrice('IBM')
</a:id>
<a:title/>
<a:summary/>
<a:updated>2020-05-27T01:40:35Z</a:updated>
<a:author>
  <a:name/>
</a:author>
<a:link rel="edit" href="https://portfolio-dv-tutorial.apps.cluster-xyz.example.com:443/odata/portfolio/StockPrice('IBM')"/>
<a:category scheme="http://docs.oasis-open.org/odata/ns/scheme" term="\#Portfolio.1.Portfolio.StockPrice"/>
 <a:content type="application/xml">
  <m:properties>
    <d:symbol>IBM</d:symbol>
    <d:price m:type="Double">121.76</d:price>
  </m:properties>
 </a:content>
</a:entry>