
Developing and Deploying APIs with Red Hat Integration
Developing and Deploying APIs with Red Hat Integration
Abstract
Preface
Define and deploy REST APIs using Red Hat Fuse Online, Apicurito, and 3scale API Management.
Chapter 1. Overview of Developing and Deploying APIs with Red Hat Integration
An application programming interface (API) is a set of tools, definitions, and protocols for building application software. An API lets products or services communicate with other products and services without having to know how they are implemented.
As a business user who wants to share data between different applications and services, you can use the Red Hat Integration distributed integration platform to:
- Develop and connect to REST APIs.
- Create applications that consume the data or functionality exposed by REST APIs.
- Connect to products and services, including legacy systems and the Internet of Things (IoT).
- Open up access to your resources while maintaining security and control. How you open access and to whom is up to you.
Red Hat Integration is a set of agile and flexible integration and messaging technologies that are designed to provide API connectivity, data transformation, service composition and orchestration, real-time messaging, cross-datacenter message streaming, and API management to connect applications across hybrid cloud architectures and enable API-centric business services.
Red Hat Integration includes the following products:
- Fuse Online
- Red Hat Fuse is a distributed, cloud-native integration platform. Fuse Online is Red Hat’s web-based Fuse distribution. It is provided pre-installed on the OpenShift Online Professional tier (and also available for installing on an on premise OpenShift cluster). Fuse Online is for business users who prefer low code development.
- Apicurito
- Red Hat provides a lightweight version of the Apicurio Studio API designer, enabling you to create API definitions in OpenAPI (Swagger) format. Apicurtio is accessible within the Fuse Online API provider.
- 3scale API Management
- With Red Hat 3scale API Management, API security, performance, control and monetization are managed for you.
Prerequisites
You should have working knowledge of the following:
- Fuse Online concepts
- REST API concepts
- 3scale API Management concepts
Overview of steps
In Fuse Online, create an integration that is triggered by an API call.
Start the integration with a REST API service. Specify an existing REST API definition or create a new one in the Apicurito web-based designer.
Fuse Online creates an execution path, referred to as an integration flow, for each REST API operation.
- Create the operation flows for the Fuse Online integration. Add connections and steps to each integration flow. Each REST API client call triggers execution of one integration flow.
- Publish the Fuse Online integration as an API service to make it available on OpenShift Container Platform.
- In 3scale API Management, discover the published API service. You can then secure the API, configure access policies, and launch it.
Chapter 2. Configuration requirements
Your OpenShift Container Platform (OCP) on premise administrator must deploy Fuse Online and 3scale API Management on the same cluster.
In addition, the following configurations are required:
For Fuse Online, the default behavior is that APIs are not exposed for automatic discovery in 3scale. The OpenShift administrator must configure Fuse Online to enable 3scale discovery of APIs.
NoteWhen Fuse Online is configured to enable 3scale discovery, it does not provide URLs for testing APIs that you publish. You might want the administrator to configure this setting after you have tested your APIs in Fuse Online.
- The 3scale API Management administrator must configure 3scale for service discovery. For example, the administrator must ensure that users have proper permissions to view cluster projects that contain discoverable services.
2.1. Configuring Fuse Online to enable 3scale discovery of APIs
If you create an API provider integration, you might want to enable discovery of the API for that integration in 3scale. For Fuse Online environments that are installed on OCP, a user with cluster administration permissions can enable 3scale discovery of APIs by setting a Fuse Online server configuration environment variable.
The default behavior is that APIs are not exposed for automatic discovery in 3scale. Turning on 3scale service discovery applies to all API provider integrations in your Fuse Online environment. You cannot choose which APIs are discoverable.
When 3scale service discovery is turned on:
- Fuse Online does not provide an external URL for an API provider integration that is running.
- The API is accessible only through 3scale. Configuration in 3scale is required to expose the endpoint. For details, see Red Hat 3scale API Management, Service Discovery.
Prerequisites
- Fuse Online is installed on OCP on premise.
- You have cluster administration permissions.
Procedure
Edit the syndesis-server DeploymentConfig object to set the CONTROLLERS_EXPOSE_VIA3SCALE environment variable to true. To do this, enter the following command on one line:
$ oc patch dc syndesis-server -p '{"spec":{"template":{"spec":{"containers":[{"name":"syndesis-server","env":[{"name":"CONTROLLERS_EXPOSE_VIA3SCALE","value":"true"}]}]}}}}'
After the administrator enables 3scale discovery for Fuse Online, you must republish any running APIs before they can be discoverable by 3scale.
2.2. Configuring Service Discovery
As a 3scale administrator, you can configure Service Discovery with or without Red Hat Single Sign-On (RH SSO).
Prerequisites
- You must deploy 3scale 2.5 to an OpenShift cluster (version 3.11 or later).
- To deploy 3scale to OpenShift, you need to use 3scale-amp-openshift-templates.
- 3scale users that want to use Service Discovery 3scale must have access to the OpenShift cluster.
2.2.1. Configuring with RH SSO
When you configure 3scale Service Discovery with Red Hat Single Sign-On (RH SSO), the 3scale users follow this procedure when they sign in to 3scale:
- The user is redirected to the OAuth Server.
- A user who is not already logged in to the OAuth Server is prompted to log in.
- If it is the first time that a user implements 3scale Service Discovery with SSO, the OAuth server prompts for authorization to perform the relevant actions.
- The user is redirected back to 3scale.
To configure Service Discovery with RH SSO, you have the following options:
2.2.1.1. Using OpenShift OAuth server
As a 3scale system administrator, you can allow users to individually authenticate and authorize 3scale to discover APIs by using OpenShift built-in OAuth server.
Create an OpenShift OAuth client for 3scale. For more details about OpenShift authentication, see OAuth Clients.
    $ oc project default
    $ cat <<-EOF | oc create -f -
    kind: OAuthClient
    apiVersion: v1
    metadata:
     name: 3scale
    secret: "<choose-a-client-secret>"
    redirectURIs:
     - "<3scale-master-domain-route>"
    grantMethod: prompt
    EOF
Open the 3scale Service Discovery settings file:
    $ oc project <3scale-project>
    $ oc edit configmap system
Configure the following settings:
    service_discovery.yml:
      production:
        enabled: true
        authentication_method: oauth
        oauth_server_type: builtin
        client_id: '3scale'
        client_secret: '<choose-a-client-secret>'
Ensure that users have proper permissions to view cluster projects containing discoverable services.
For example, to give
<user>view permission for the<namespace>project, use this command:oc adm policy add-role-to-user view <user> -n <namespace>
After modifying
configmap, you need to redeploy thesystem-appandsystem-sidekiqpods to apply the changes.oc rollout latest dc/system-app oc rollout latest dc/system-sidekiq
Additional note
By default, OpenShift OAuth session tokens expire after 24 hours, as indicated in OpenShift Token Options.
2.2.1.2. Using RH SSO server (Keycloak)
As a system administrator, you can allow users to individually authenticate and authorize 3scale to discover services using Red Hat SSO for OpenShift.
Create an OAuth client for 3scale in Red Hat OAuth server (Keycloak).
IMPORTANT: In the client configuration, verify that the user's username maps to `preferred_username`, so that OpenShift can link accounts.
Edit 3scale Service Discovery settings.
    $ oc project <3scale-project>
    $ oc edit configmap system
Verify that these settings are configured.
    service_discovery.yml:
      production:
        enabled: true
        authentication_method: oauth
        oauth_server_type: rh_sso
        client_id: '3scale'
        client_secret: '<choose-a-client-secret>'
Make sure users have proper permissions to view cluster projects containing discoverable services.
For example, to give
<user>view permission for the<namespace>project, use this command:oc adm policy add-role-to-user view <user> -n <namespace>
Additional notes:
-
After modifying
configmap, you need to redeploy thesystem-appandsystem-sidekiqpods to apply the changes. - Token lifespan: By default, session tokens expire after 1 minute, as indicated in Keycloak - Session and Token Timeouts. However, it is recommended to set the timeout to an acceptable value of one day.
2.2.2. Configuring without RH SSO
To configure the 3scale Service Discovery without SSO, you can use 3scale Single Service Account to authenticate to OpenShift API service. 3scale Single Service Account provides a seamless authentication to the cluster for the Service Discovery without an authorization layer at the user level. All 3scale tenant administration users have the same access level to the cluster while discovering API services through 3scale.
Procedure
Verify that the 3scale project is the current project.
$ oc project <3scale-project>
Open the 3scale Service Discovery settings in an editor.
$ oc edit configmap system
Verify that the following settings are configured.
service_discovery.yml:
   production:
      enabled: <%= cluster_token_file_exists = File.exists?(cluster_token_file_path = '/var/run/secrets/kubernetes.io/serviceaccount/token') %>
      bearer_token: "<%= File.read(cluster_token_file_path) if cluster_token_file_exists %>"
      authentication_method: service_account
Grant the 3scale deployment
defaultservice account withviewcluster level permission.oc adm policy add-cluster-role-to-user view system:serviceaccount:<3scale-project>:default
Additional resources
If you want to apply a more restrictive policy, see OpenShift - Service Accounts.
Chapter 3. Creating a Fuse Online integration that is triggered by an API call
To trigger execution of an integration on demand, start the integration with a REST API service that you provide. Integrations that start this way are referred to as API provider integrations. An API provider integration allows REST API clients to invoke commands that trigger execution of the integration.
When Fuse Online publishes an API provider integration, any client with network access to the integration endpoints can trigger execution of the integration.
If you are running Fuse Online on OpenShift Container Platform on-site, you can configure the Fuse Online server to enable Red Hat 3scale discovery of API provider integration APIs. By default, Fuse Online annotates an API provider integration’s API service definition for use with 3scale but does not expose those APIs for automatic 3scale discovery. Without 3scale discovery, there is no access control. With 3scale discovery, you can set access policies, centralize control, and provide high availability for your API provider integration APIs. For more information, see the API Gateway documentation that is available from the Red Hat 3scale documentation page.
See also: Configuring Fuse Online to enable 3scale discovery of APIs.
The following topics provide information and instructions for creating API provider integrations:
3.1. Benefit, overview, and workflow for creating API provider integrations
An API provider integration starts with a REST API service. This REST API service is defined by an OpenAPI 2.0 document that you provide when you create an API provider integration. After you publish an API provider integration, Fuse Online deploys the REST API service on OpenShift. The benefit of an API provider integration is that REST API clients can invoke calls that trigger execution of the integration.
Multiple execution flows
An API provider integration has multiple execution paths, referred to as flows. Each operation that the OpenAPI document defines has its own flow. In Fuse Online, for each operation that the OpenAPI document defines, you add connections and other steps to the execution flow for that operation. These steps process the data as required for the particular operation.
Example execution flow
For example, consider a human resources application that calls a REST API service that Fuse Online has made available. Suppose the call invokes the operation that adds a new employee. The operation flow that handles this call could:
- Connect to an application that creates an expense report for new employee equipment.
- Connect to a SQL database to add an internal ticket for setting up new equipment.
- Connect to Google mail to send a message to the new employee that provides orientation information.
Ways to trigger execution
There are many ways to call the REST APIs that trigger integration execution, including:
- A web browser page that takes data input and generates the call.
-
An application that explicitly calls the REST APIs, such as the
curlutility. - Other APIs that call the REST API, for example, a webhook.
Ways to edit a flow
For each operation, you can edit its flow by:
- Adding connections to the applications that need to process the data.
- Adding steps between connections, including split, aggregate, and data mapping steps.
- Altering the return code in the HTTP response that finishes the flow. The response goes to the application that invoked the call that triggered execution of the integration.
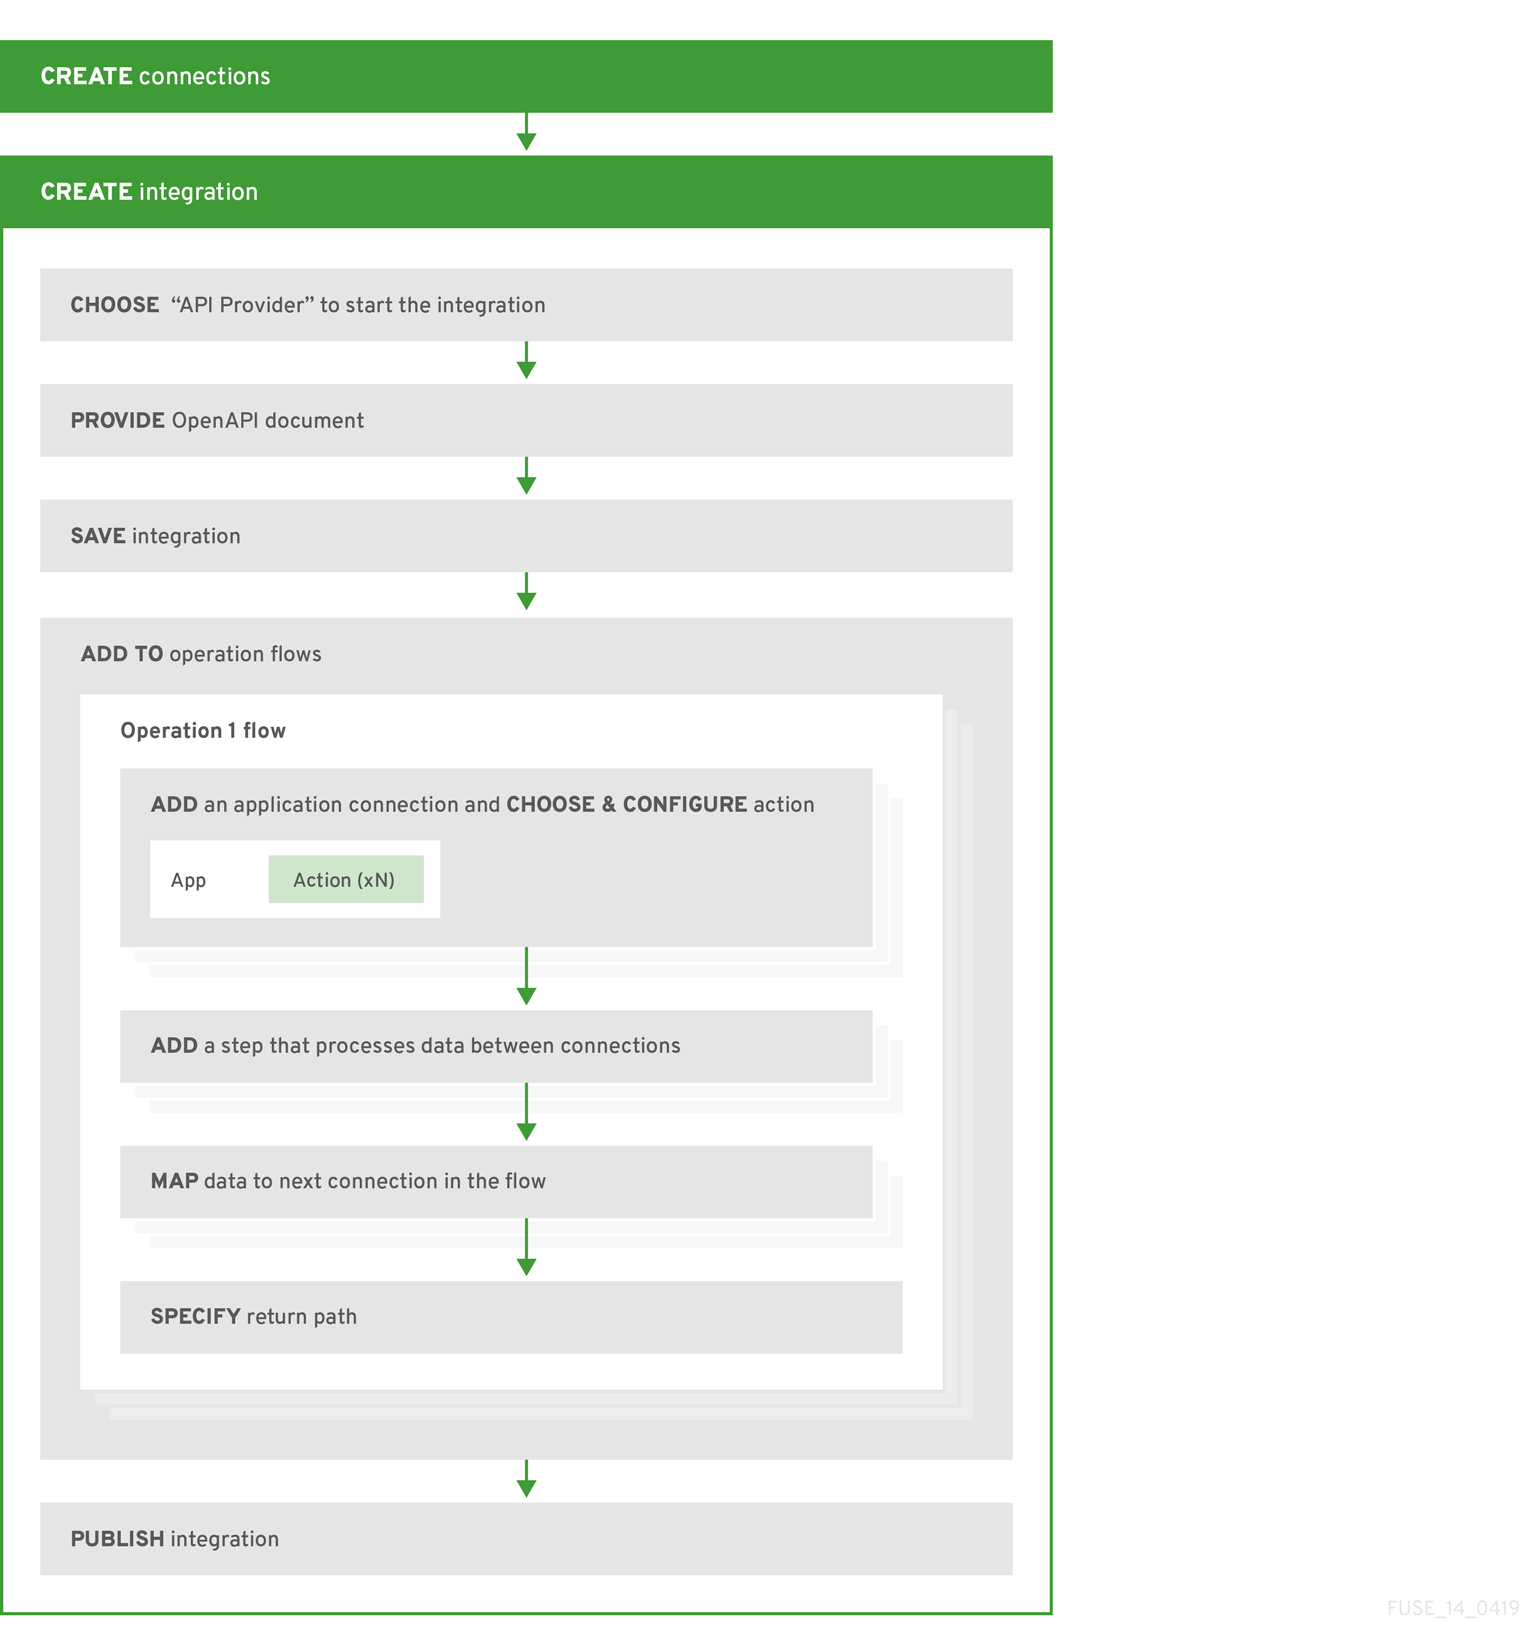
Workflow for creating an API provider integration
The general workflow for creating an API provider integration is shown in the following diagram:
Publishing an API provider integration
After you publish an API provider integration, in the integration’s summary page, Fuse Online displays the external URL for your REST API service. This external URL is the base URL that clients use to call your REST API services.
Testing an API provider integration
To test an API provider integration’s flows, you can use the curl utility. For example, suppose that the following curl command triggers execution of the flow for the Get Task by ID operation. The HTTP GET command is the default request so there is no requirement to specify GET. The last part of the URL specifies the ID of the task to get:
curl -k https://i-task-api-proj319352.6a63.fuse-ignite.openshiftapps.com/api/todo/1
3.2. How OpenAPI operations relate to API provider integration flows
An API provider integration’s OpenAPI document defines the operations that REST API clients can call. Each OpenAPI operation has its own API provider integration flow. Consequently, each operation can also have its own REST API service URL. Each URL is defined by the API service’s base URL and optionally by a subpath. REST API calls specify an operation’s URL to trigger execution of the flow for that operation.
Your OpenAPI document determines which HTTP verbs (such as GET, POST, DELETE and so on) you can specify in calls to your REST API service URLs. Examples of calls to API provider URLs are in the instructions for trying out the API provider quickstart example.
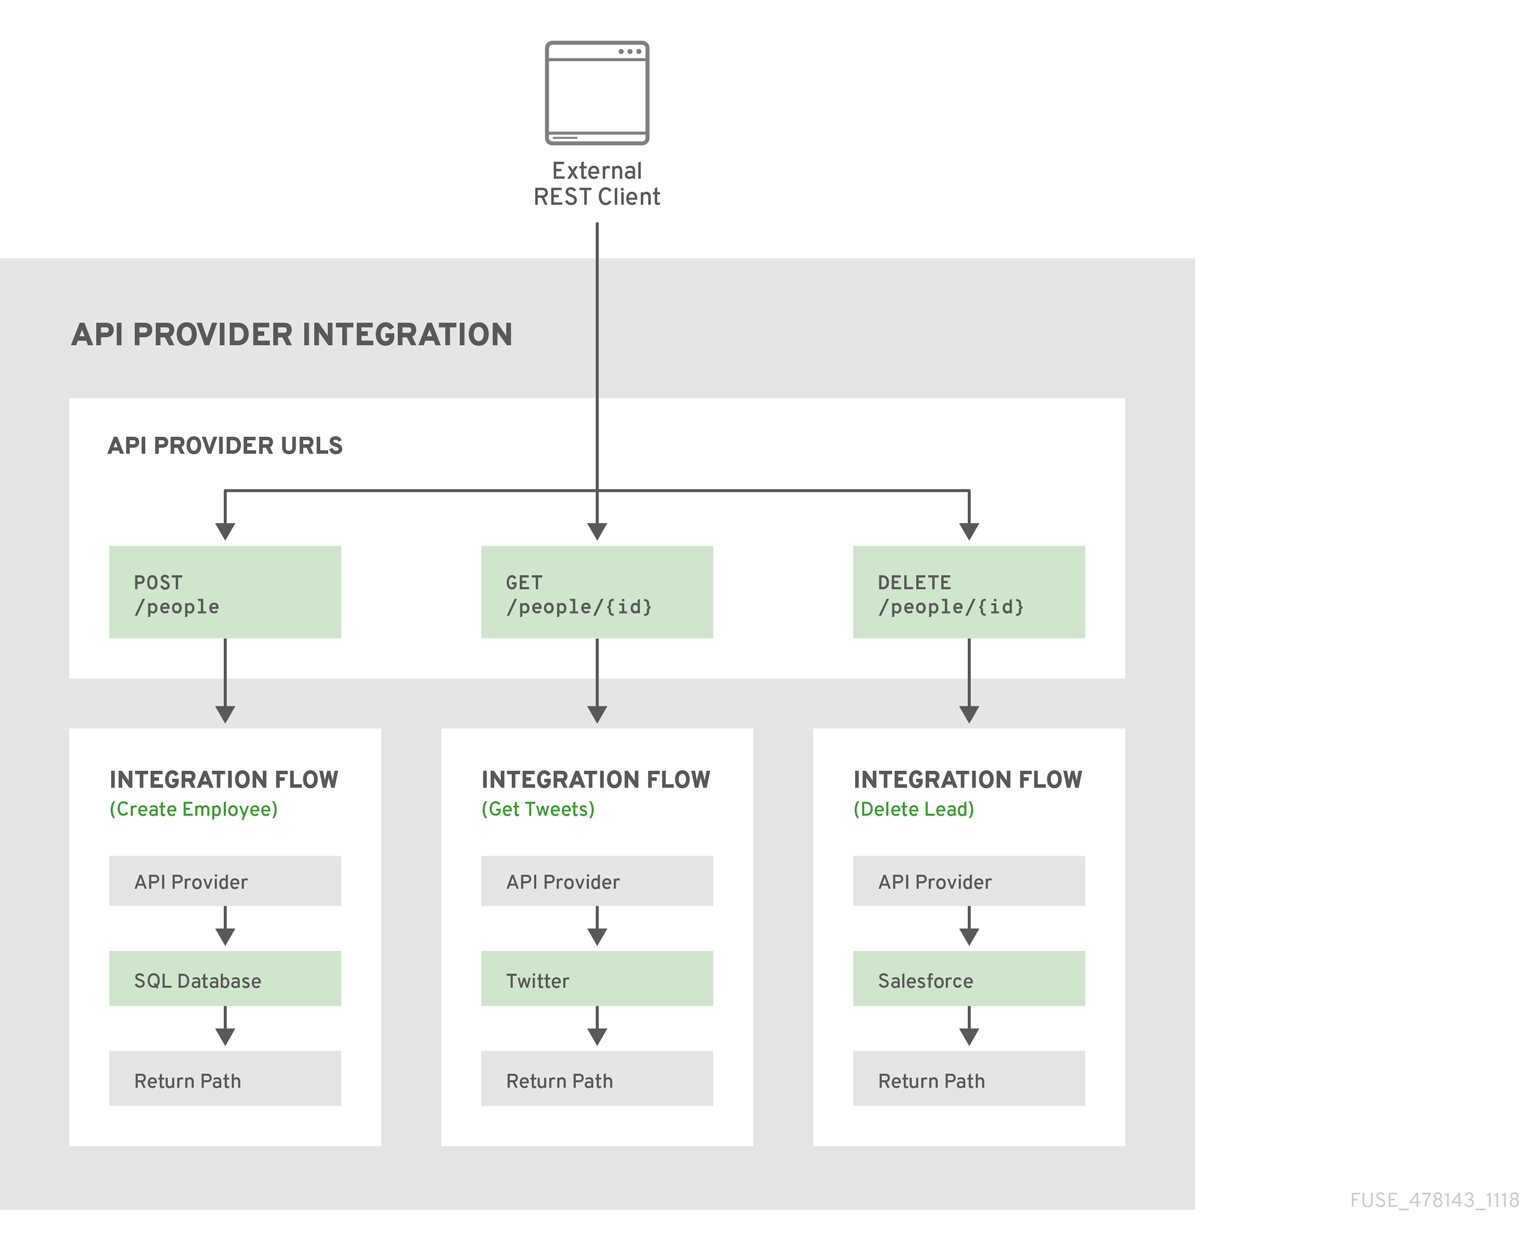
Illustration of an API provider integration example
The following diagram shows an API provider integration that processes data about people. An external REST API client invokes the REST API URLs that are deployed by the API provider integration. Invocation of a URL triggers execution of the flow for one REST operation. This API provider integration has 3 flows. Each flow can use any connection or step that is available in Fuse Online. The REST API along with its flows is one Fuse Online API provider integration, which is deployed in one OpenShift pod.
Editing the OpenAPI document while creating an API provider integration
After you specify an OpenAPI 2.0 document for your API provider integration, you can update the document as needed while you define the execution flows for the API operations. To do this, click View/Edit API Definition in the upper right of a page in which you are editing the API provider integration. This displays your OpenAPI document in the Apicurito editor. Edit and save the document to make changes that are reflected in Fuse Online.
Considerations while editing the OpenAPI document:
operationIdproperties for synchronizationSynchronization between the versions of the OpenAPI document in the Apicurito editor and in the Fuse Online integration editor depend on a unique
operationIdproperty that is assigned to each operation that is defined in the document. You can assign a specificoperationIdproperty value to each operation, or use the one that Fuse Online generates automatically.Request and response definitions
In each operation’s definition, you can supply a JSON schema that defines the operation’s request and response. Fuse Online uses the JSON schema:
- As the basis for the operation’s input and output data shapes
- To display operation fields in the data mapper
No cyclic schema references
A JSON schema for an API provider integration operation cannot have cyclic schema references. For example, a JSON schema that specifies a request or response body cannot reference itself as a whole nor reference any part of itself through intermediate JSON schemas.
3.3. Creating an API provider integration
To create an API provider integration, provide an OpenAPI document (.json, .yaml, or .yml file) that defines the operations that the integration can perform. Fuse Online creates an execution flow for each operation. Edit the flow for each operation to add connections and steps that process integration data according to the requirements for that operation.
Prerequisites
You are able to provide or define an OpenAPI document for the REST API operations that you want the integration to perform.
To experiment, download the
task-api.jsonfile, which is an OpenAPI document for an API provider quickstart. You can upload this file when Fuse Online prompts you to provide an OpenAPI document.- You have a plan for the flow for each OpenAPI operation.
- You created a connection for each application or service that you want to add to an operation’s flow.
Procedure
- In Fuse Online, in the left navigation panel, click Integrations.
- In the upper right, click Create Integration.
- On the Choose a Start Connection page, click API Provider.
On the Start integration with an API call page:
- If you have an OpenAPI 2.0 document that defines the REST API operations, upload the OpenAPI document.
- If you need to define the OpenAPI 2.0 document, select Create from scratch.
Click Next.
If you uploaded a document, review or edit it:
- Click Review/Edit to open the Apicurito editor.
- Review and edit as needed.
- In the upper right, click Save or Cancel to close the editor.
- Click Next and go to step 6 in this procedure.
If you are creating a document, then in the Apicurito editor that Fuse Online opens:
- Define the OpenAPI document.
- In the upper right, click Save, which closes the editor.
- Click Next.
For information about using the Apicurito editor, see Designing and developing an API definition with Apicurito.
- Enter a name and description for your integration and click Save and continue. You are ready to define a flow for each operation.
3.3.1. Design and develop an API definition with Apicurito
You can use Apicurito to design and develop a REST API definition that complies with the OpenAPI 2.0 specification.
Prerequisites
- You created an OpenShift project.
- You added the Apicurito service to your OpenShift project.
3.3.1.1. Creating a REST API definition
The following steps describe how to create a REST API definition.
- You can access the Apicurito user interface from Fuse Online or Fuse on OpenShift.
- For Fuse on OpenShift only, Apicurito is stateless which means that it does not save your work between OpenShift sessions. You need to save the API to your local file system between sessions.
About the example
The Task Management API example simulates a simple API that sales consultants might use to track the tasks that they need to do when interacting with customer contacts. Example "to-do" tasks might be "create an account for a new contact" or "place an order for an existing contact". To implement the Task Management API example, you create two paths - one for tasks and one for a specific task. You then define operations to create a task, retrieve a task by its ID, and delete a task by its ID.
Prerequisites
-
You know the endpoints for the API that you want to create. For the Task Management API example, there are two endpoints:
/todoand/todo/{id}. - For Fuse on OpenShift only, you created an OpenShift project and you added the Apicurito service to your OpenShift project.
Procedure
If you are using Fuse Online, skip to step 2.
If you are using Fuse on OpenShift:
- Log in to your OpenShift web console and then open the project that contains Apicurito.
In the list of applications, click the URL for Apicurito, for example
https://apicurito-myproject.192.168.64.43.nip.io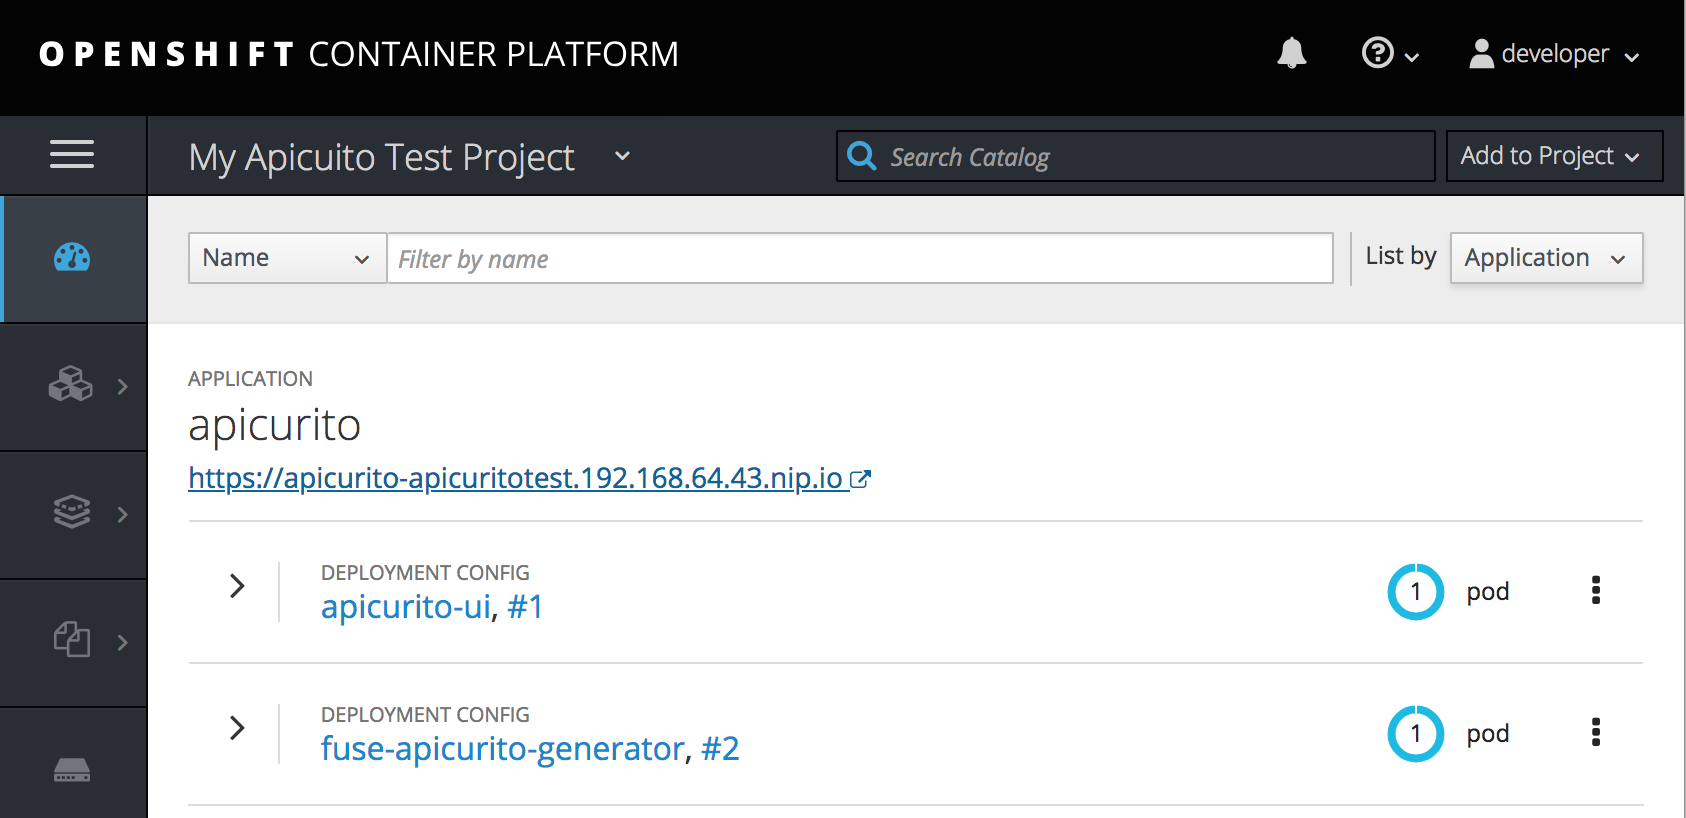
A new browser window or tab opens for Apicurito:
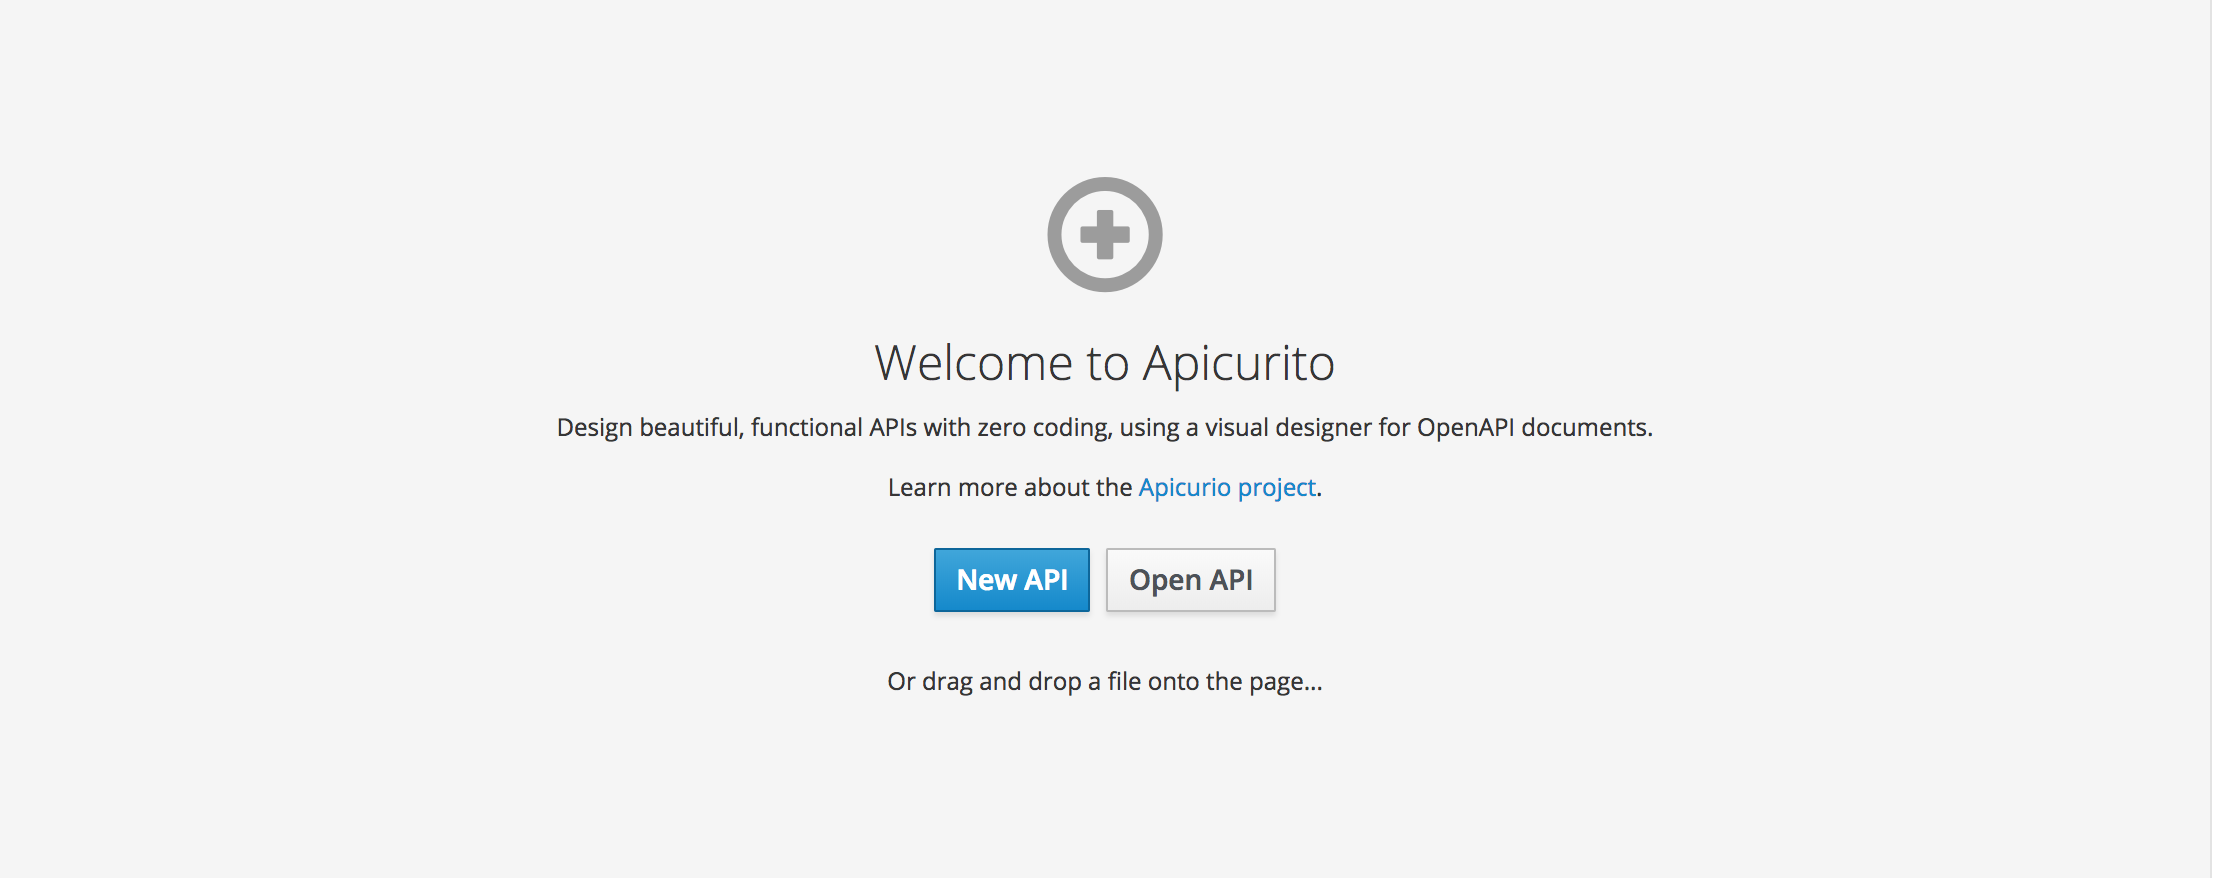 Note
NoteBecause Apicurito is a “light” version of the Apicurio Studio open source project, "Apicurio" shows in the Apicurito interface.
- Click New API. A new API page opens.
To change the API name:
-
Hover the cursor over the name and then click the edit icon (
 ) that appears.
- Edit the name. For example, type Task API.
- Confirm the name change.
-
Hover the cursor over the name and then click the edit icon (
Optionally:
- Add your contact information (name, email address, and URL).
- Select a license.
- Define tags.
- Define a security scheme.
- Specify security requirements.
Define a relative path to each individual endpoint of the API. The field name must begin with a slash (/).
For the Task Management API example, create two paths:
-
A path for tasks:
/todo A path for a specific task by ID:
/todo/{id}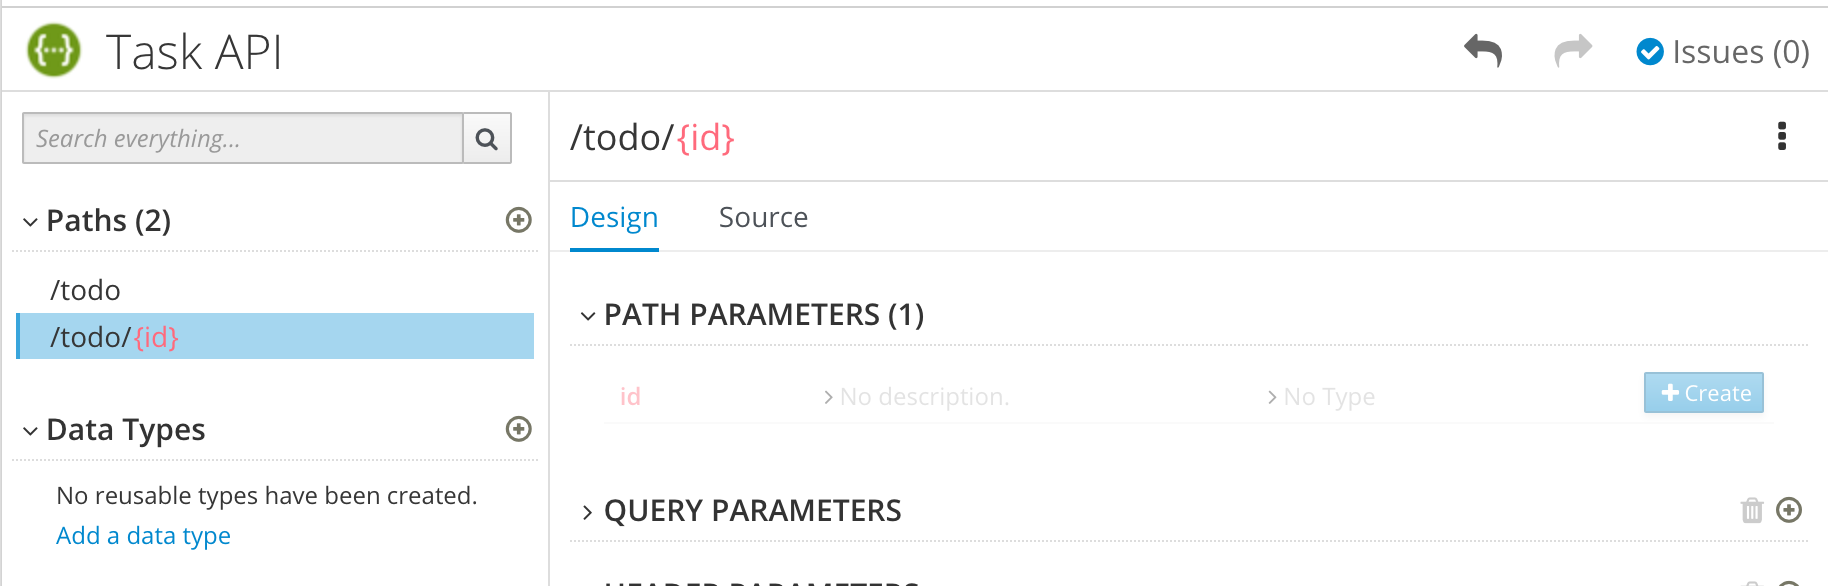
-
A path for tasks:
Specify the type of any path parameters.
For the example
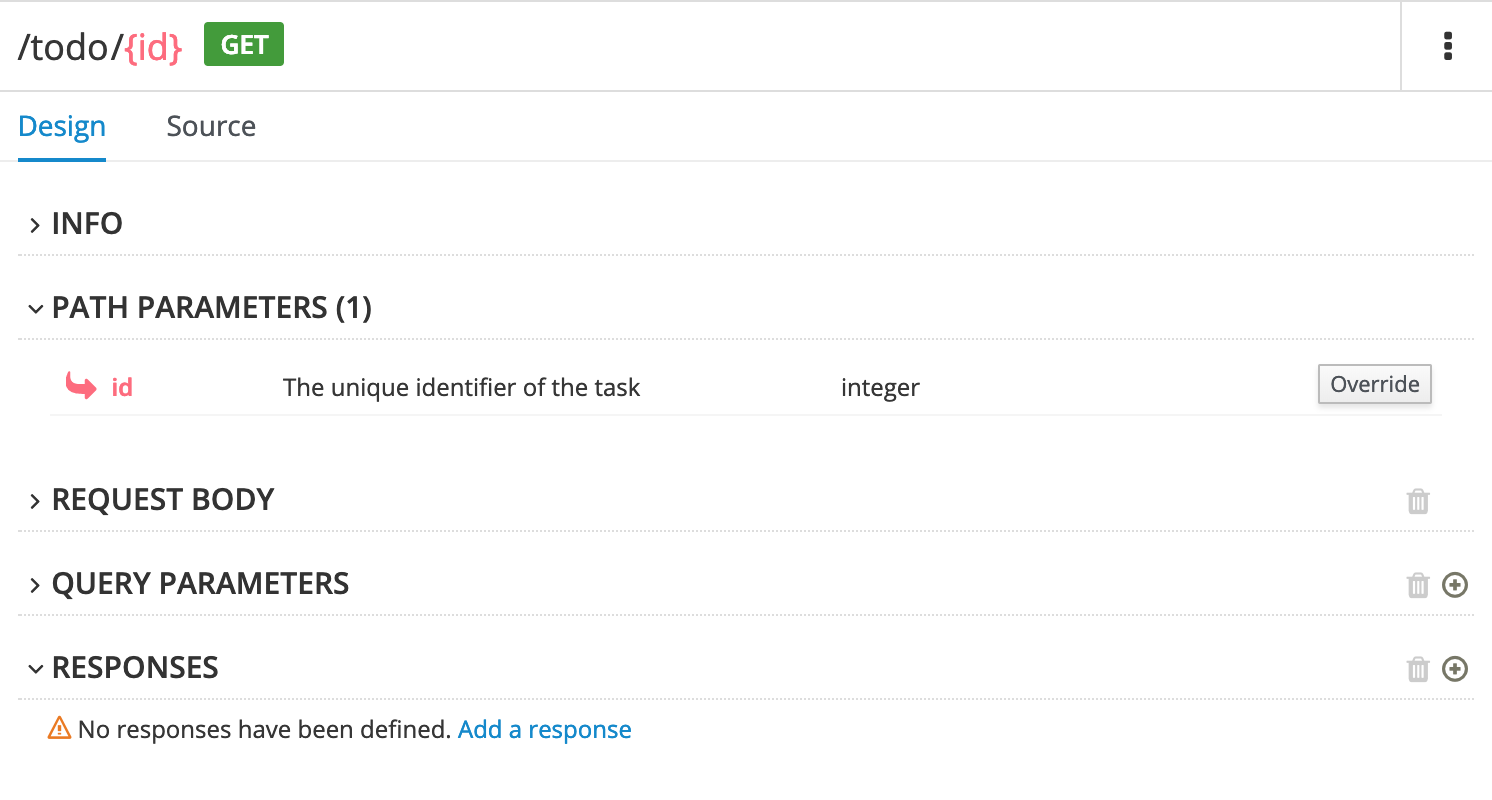
idparameter:In the Paths list, click
/todo/{id}.The id parameter appears in the PATH PARAMETERS section.
- Click Create.
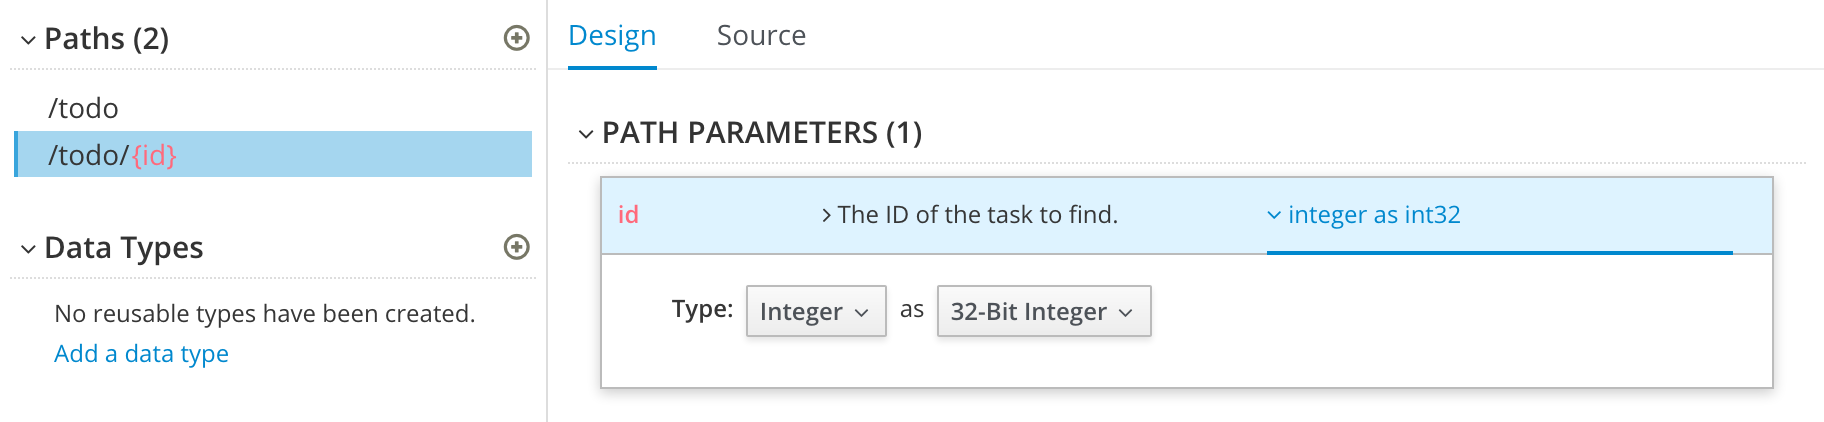
- For the description, type: The ID of the task to find.
For the type, select integer as 32-Bit integer.
In the Data Types section, define reusable types for the API.
- Click Add a data type.
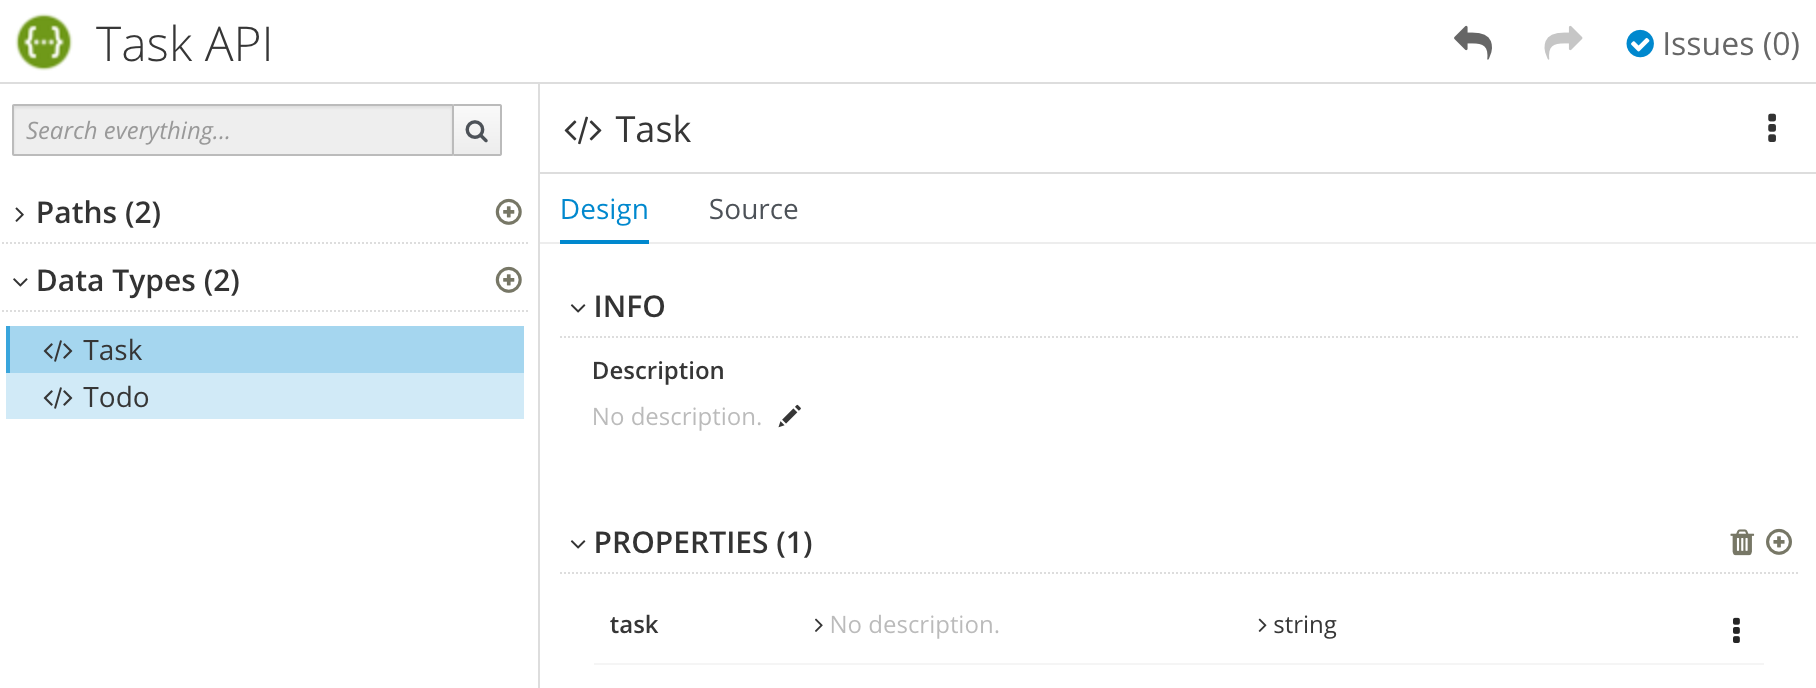
- In the Add Data Type dialog, type a name. For the Task Management API example, type Todo.
Optionally, you can provide an example from which Apicurito creates the data type’s schema. You can then edit the generated schema.
For the Task Management API example, start with the following JSON example:
{ "id": 1, "task": "my task", "completed": false }- Optionally, you can choose to create a REST Resource with the data type.
Click Save. If you provided an example, Apicurito generates a schema from the example:

- Optionally, you can add edit the schema properties and add new ones.
For the Task Management API example, create another data type named Task with one property named task of type string.
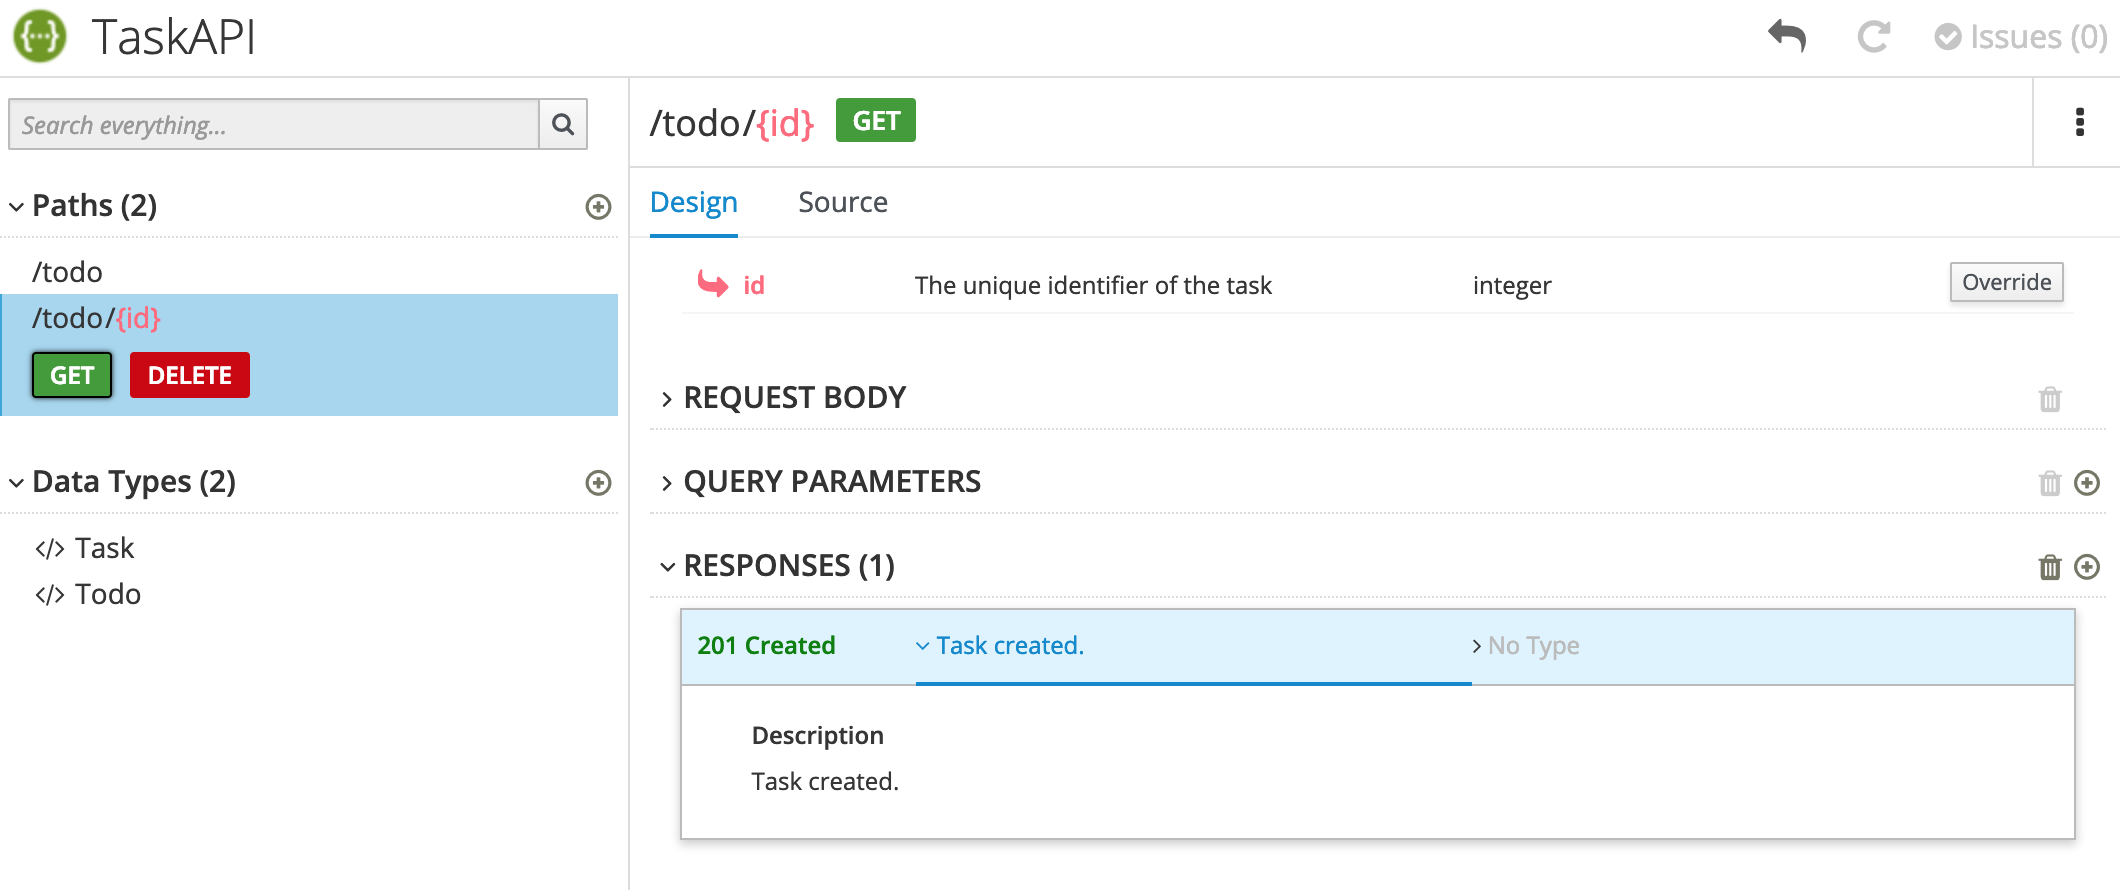
For each path, define operations (GET, PUT, POST, DELETE, OPTIONS, HEAD, or PATCH).
For the Task Management API example, define the operations as described in the following table:
Table 3.1. Task Management API oeprations
Path Operation Description Request Response /todoPOST
Create a new task.
Request Body type: Task
Status Code: 201
Description: Task created
Response Body: Todo type
/todo/{id}GET
Get a task by ID.
Not applicable
Status Code: 200
Description: Task found for ID
Response Body: Todo type
/todo/{id}DELETE
Delete a task by ID.
Not applicable
Status Code: 200
Description: Task deleted
Status Code: 400
Description: Task not deleted
- Resolve any issues, as described in Section 3.3.1.2, “Resolving issues in Apicurito”.
For Fuse on OpenShift only, save your API specification by clicking Save As and then select JSON or YAML format.
The JSON or YAML file is downloaded to your local download folder. The default filename is
openapi-specwith the appropriate file extension.
Additional resources
- For information about the OpenAPI 2.0 Specification, go to: https://github.com/OAI/OpenAPI-Specification/blob/master/versions/2.0.md
3.3.1.2. Resolving issues in Apicurito
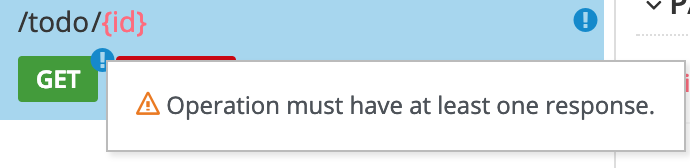
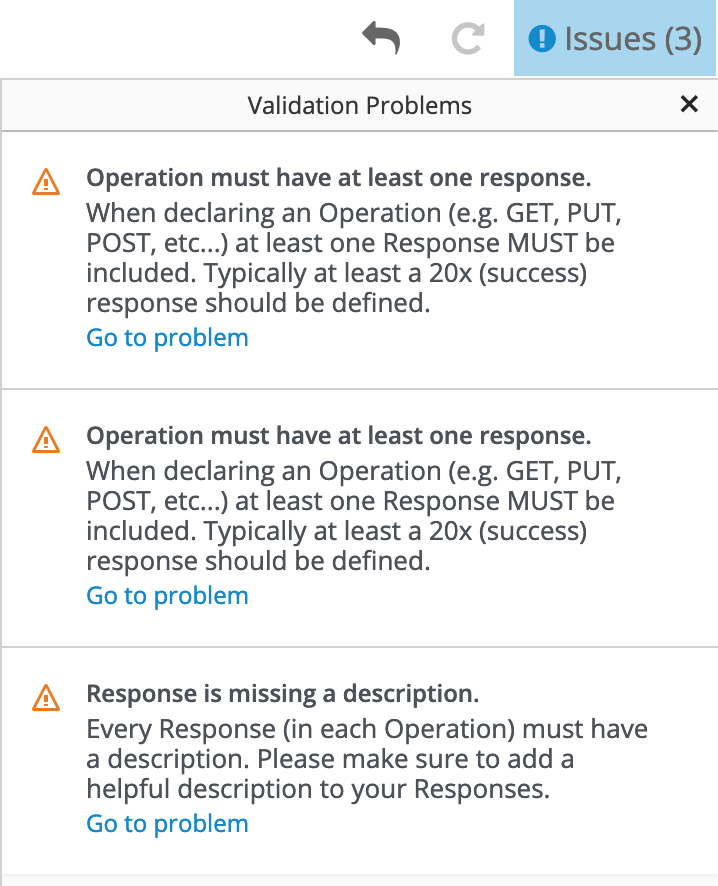
When you create and edit an API, Apicurito identifies issues that you must resolve with an exclamation (!) icon.
Prerequisites
- Open an API in Apicurito.
Procedure
Find an issue indicated by an exclamation (!) icon. For example:

Click the exclamation icon to view a description of the issue. For example:
Based on the information provided by the issue description, navigate to the location of the issue and fix it.
For example, open the GET operation and then add a response.
After you add a description, the issue is resolved and the exclamation icon disappears:
For a summary of all issues:
Click the Issues link in the upper right corner.

Click Go to a problem for a specific issue to go to the location of the issue so that you can resolve it.
3.4. Creating the operation flows for an API provider integration
The OpenAPI document that defines your REST API service defines the operations that the service can perform. After you create an API provider integration, you can edit the flow for each operation.
Each operation has exactly one flow. In an operation flow, you can add connections to other applications and services, as well as steps that operate on data between connections.
As you add to operation flows, you might find that you need to update the OpenAPI document that the API provider integration is based on. To do this, click View/Edit API Definition in the upper right of a page in which you are editing your API provider integration. This displays your document in the Apicurito editor. In your OpenAPI definition, as long as each operation has a unique operationId property, you can save your updates in Apicurito and Fuse Online can synchronize the API provider integration’s flow definitions to have your updates.
Prerequisites
- You created an API provider integration, gave it a name, and saved it.
- You created a connection to each application or service that you want an operation flow to connect to. For details, see the information about creating connections.
- Fuse Online is displaying the list of operations that the API defines.
Procedure
- In the Operations list page, click the entry for an operation whose flow you want to edit.
Add all desired connections to this flow. For each connection that you want to add:
- In the flow visualization panel on the left, click the plus sign where you want to add a connection.
- On the Choose a Step page, click the connection that you want to add to this flow.
- Click the action that you want this connection to perform.
- Configure the action by entering data in the labeled fields.
- Click Done.
- In the upper right, click Save.
For each connection that you want to add to this flow, repeat this subset of instructions. Add all desired connections to the flow before you continue.
In this operation flow, to process data between connections:
- In the flow visualization panel on the left, click the plus sign where you want to add a step.
- On the Choose a Step page, click the step that you want to add.
- Configure the step by entering data in the labeled fields.
- Click Done.
In the upper right, click Save.
For help, see Adding steps between connections.
Repeat this subset of instructions to add another step that processes data between connections.
-
In the flow visualization panel on the left, check for data type mismatch
 icons, which indicate that the connection cannot process the incoming data. You need to add a data mapper step here. Go back to the previous subset of instructions. On the Choose a Step page, click Data Mapper, and define the needed mappings. For help, see Mapping integration data to fields in the next connection.
In the flow visualization panel on the left, at the bottom, hover over the
 icon to see that it is the Provided API Return Path.
Every API provider integration finishes each operation flow by sending a response to the REST API caller that triggered execution of the operation flow. The response contains the return code that is specified here.
In this release, whenever an API call triggers execution of this flow, the return code is the code that is specified in this step. Error handling is expected to be supported in a future release.
Accept the flow’s default return code, 200 OK, or specify another return code as follows:
-
Click the
icon.
- Click in the Return Code input field, which displays a list of possible return codes.
- Scroll to the return code that you want and click it.
- Click Next.
-
Click the
When this flow has all needed connections and steps, do one of the following:
- Publish - To start running the integration, in the upper right, click Publish. This builds the integration, deploys the REST API service to OpenShift, and makes the integration available to be executed. You can publish the integration each time that you complete the creation of an operation’s flow or each time that you edit an operation’s flow.
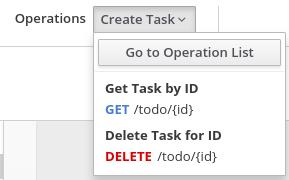
Edit another flow - To edit the flow for another operation, select it from the Operations drop-down list, which is at the top of the page, and looks something like this:
Repeat this procedure to edit another operation’s flow.
Next steps
When an API provider integration is running in Fuse Online on OpenShift Online or on OpenShift Dedicated, you can use the curl utility to confirm that it is working as expected. For examples of doing this, see the description of the API provider quickstart.
When an API provider integration is running in Fuse Online on OpenShift Container Platform, an administrator might have set the CONTROLLERS_EXPOSE_VIA3SCALE environment variable to true, which makes the integration’s API discoverable in Red Hat 3scale. When this environment variable is set to true, Fuse Online does not provide an external URL for an API provider integration. To test the integration, ask a 3scale administrator for guidance.
Chapter 4. Discovering the API in 3Scale
With Red Hat 3scale API Management’s service discovery feature, you can import services from OpenShift.
4.1. About Service Discovery
Using Service Discovery, you can scan for discoverable API services that are running in the same OpenShift cluster and automatically import the associated API definitions into 3scale.
You can also update the API integration and the Open API Specification at any time and then resynchronize them with the cluster.
Service Discovery offers the following features:
- Uses the cluster API to query for services that are properly annotated for discovery.
- Configures 3scale to access the service using an internal endpoint inside the cluster.
- Imports Open API Specification (Swagger) up to version 2.0 as 3scale ActiveDocs.
- Supports OpenShift and Red Hat Single Sign-On (RH SSO) authorization flows.
- Works with Red Hat Fuse, starting with Fuse version 7.2.
4.1.1. Criteria for a discoverable service
An API service must meet the following criteria in order for 3scale Service Discovery to find it:
The API specification’s
Content-Typeheader must be one of the following values:-
application/swagger+json -
application/vnd.oai.openapi+json -
application/json
-
The OpenShift Service Object YAML definition includes the following metadata:
-
The
discovery.3scale.netlabel: (required) Set to "true". 3scale uses this label when it executes the selector definition to find all services that need discovery. The following annotations:
discovery.3scale.net/discovery-version: (optional) The version of the 3scale discovery process.discovery.3scale.net/scheme: (required) The scheme part of the URL where the service is hosted. Possible values are "http" or "https".discovery.3scale.net/port: (required) The port number of the service within the cluster.discovery.3scale.net/path: (optional) The relative base path of the URL where the service is hosted. You can omit this annotation when the path is at root, "/".discovery.3scale.net/description-path: The path to the OpenAPI service description document for the service.For example:
    metadata:
      annotations:
        discovery.3scale.net/scheme: "https"
        discovery.3scale.net/port: '8081'
        discovery.3scale.net/path: "/api"
        discovery.3scale.net/description-path: "/api/openapi/json"
     labels:
        discovery.3scale.net: "true"
     name: i-task-api
     namespace: fuse
-
The
If you are an OpenShift user with administration privileges, you can view the API service’s YAML file in the OpenShift Console:
- Select Applications> Services.
-
Select the service, for example
i-task-api, to open its Details page. - Select Actions> Edit YAML to open the YAML file.
- When you have finished viewing it, select Cancel.
When you create an API provider integration in Fuse Online, the API automatically includes these required annotations.
4.2. Discovering services
You can discover a new API service corresponding to an OpenAPI Specification (OAS, also known as Swagger specification), if applicable; which is discovered from the cluster, for management with 3scale.
Prerequisites
-
The OpenShift administrator has configured Service Discovery for the OpenShift cluster. For example, for Fuse Online APIs, the OpenShift administrator must set the Fuse Online service’s
CONTROLLERS_EXPOSE_VIA3SCALEenvironment variable totrue. - The 3scale administrator has configured the 3scale deployment for Service Discovery as described in Section 4.1, “About Service Discovery”.
- You know the API’s service name and its namespace (OpenShift project).
- The 3scale administrator has granted your 3scale user or service account (depending on the configured authentication mode) the necessary privileges to view the API service and its namespace.
- The API service is deployed on the same OpenShift cluster where 3scale is installed.
- The API has the correct annotations that enable Service Discovery, as described in Section 4.1, “About Service Discovery”.
Procedure
- Log in to the 3scale Administration Portal.
- From the Admin Portal’s Dashboard, click New API.
- Choose Import from OpenShift.
-
In the Namespace field, specify or select the OpenShift project that contains the API, for example
fuse. -
In the Name field, type or select the name of an OpenShift service within that namespace, for example
i-task-api. - Click Create Service.
-
Wait for the new API service to be asynchronously imported into 3scale. A message appears in the upper right section of the Admin Portal:
The service will be imported shortly. You will receive a notification when it is done.
Next steps
See the Red Hat 3scale API Management documentation for information about managing the API.