
Red Hat Insights Remediations Guide
Fixing issues on RHEL systems with remediation playbooks
Abstract
Chapter 1. Remediations overview
After identifying the highest remediation priorities in your Red Hat Enterprise Linux (RHEL) infrastructure, you can create, and then execute, remediation playbooks to fix those issues.
Subscription requirements
- Red Hat Insights for Red Hat Enterprise Linux is included with every RHEL subscription. No additional subscriptions are required to use Insights remediation features.
User requirements
- Access remediation capabilities in the Insights for Red Hat Enterprise Linux application on the Red Hat Hybrid Cloud Console (Hybrid Cloud Console).
- Access Red Hat Satellite-managed systems in the Console or in the Satellite application UI.
- All Insights users will automatically have access to read, create, and manage remediation playbooks.
- The ability to execute playbooks on remote systems requires the Remediations administrator predefined User Access role, granted by an Organization Administrator in Identity & Access Management settings on the Hybrid Cloud Console.
1.1. User Access considerations
An Organization Administrator on your account configures settings in User Access to control access to Red Hat Insights for Red Hat Enterprise Linux features. All users on your account have access to most of the data in Insights for Red Hat Enterprise Linux. However, performing some actions requires users to have elevated access.
Access is granted in User Access in the Red Hat Hybrid Cloud Console. To grant or change access, an Organization Administrator or User Access administrator must add you to a User Access group with the required roles in Red Hat Hybrid Cloud Console > the Settings icon (⚙) > Identity & Access Management > User Access > Users.
In this documentation, prerequisites for procedures declare whether you need elevated access to perform the procedure.
Important predefined groups and roles relevant to understanding User Access are:
- Default access group
- Default admin access group
- Organization Administrator role
Brief overview about some predefined groups and roles
The following predefined groups and roles are relevant to access:
- Default access group. All users on the account are members of the Default access group. Members of the Default access group have read-only access, which allows you to view most information in Insights for Red Hat Enterprise Linux.
- Default admin access group. All users on the account who are Organization Administrators are members of this group. Users cannot modify the roles in the Red Hat-managed Default admin access group. Members of the Default admin access group have read-write access, which allows you to view and perform other actions in Insights for Red Hat Enterprise Linux.
- Organization Administrator role. All users on the account who are Organization Administrators can create and modify User Access groups and grant access to other account users. To find out whether you are an Organization Administrator, click your name in the Red Hat Hybrid Cloud Console header, in the upper right of your screen, and see whether the words “Org. Administrator” show under your username.
Requesting elevated access If you do not have access to features that you need, you can:
Contact Customer Service to get Organization Administrator details for your account.
- Provide your account number when you send the request.
Contact the Organization Administrator and ask for access, providing the following information:
- The name of the role you need access to, for example, Remediations administrator
- A link to full User Access documentation, to help inform the Organization Administrator about how to give you access.
1.1.1. User Access roles for remediations users
The following roles enable standard or enhanced access to remediations features in Insights for Red Hat Enterprise Linux:
- Remediations viewer. The Remediations viewer role is included in the Default access group. The Remediation viewer role permits access to view existing playbooks for the account and to create new playbooks. Remediations viewers cannot execute playbooks on systems.
- Remediations administrator. The Remediations administrator role permits access to all remediations capabilities, including remotely executing playbooks on systems.
Chapter 2. Enabling host communication with Insights
Before you can execute playbooks on remote systems from Red Hat Insights for Red Hat Enterprise Linux, your systems have to be able to communicate with Red Hat Insights.
- For Red Hat Enterprise Linux systems that are not managed by Red Hat Satellite, you should follow the procedure below to enable the rhc client on those systems.
- For systems that are managed by Satellite, you will configure Cloud Connector on the host servers for those systems. :context: host-communication-with-insights
2.1. Enabling the rhc client on systems directly managed by Insights
To be able to execute remediation playbooks from Insights for Red Hat Enterprise Linux, the rhc client must be enabled on the systems in your infrastructure. The rhc connect command does this by registering (RHEL8.6 and later, and 9.0 and later) systems with Red Hat Subscription Manager and Red Hat Insights, and enabling remote host configuration (rhc) features in Insights for Red Hat Enterprise Linux.
Prerequisites
- Sudo access on the Red Hat Enterprise Linux host system
Connect rhc on RHEL8.5 systems
Remote host configuration on RHEL 8.5 has dependencies of ansible and rhc-worker-playbook. To install the dependencies, you must first register with Subscription Manager.
Use the following commands to enable rhc on RHEL 8.5 systems.
[root]# subscription-manager repos --enable ansible-2.9-for-rhel-8-x86_64-rpms
[root]# dnf -y install ansible rhc-worker-playbook-0.1.5-3.el8_4
[root]# rhc connect
Connect rhc on RHEL8.6 and later systems
Use the following commands to enable rhc on RHEL8.6 and later systems.
[root]# dnf -y update rhc
[root]# dnf -y install rhc-worker-playbook
[root]# rhc connect
Connect rhc on RHEL9.0 and later systems
Use the following commands to enable rhc on RHEL9.0 and later systems.
[root]# dnf -y install rhc rhc-worker-playbook
[root]# rhc connect
Additional resources
- After enabling rhc, you can manage the configuration at Red Hat Hybrid Cloud Console > Red Hat Insights > Inventory > System Configuration > Remote Host Configuration (RHC).
- For complete rhc documentation, see Remote Host Configuration and Management.
2.2. Enabling Cloud Connector on hosts managed by Satellite
Before you can remediate issues in your Satellite infrastructure, you must connect your hosts to Insights for Red Hat Enterprise Linux and configure Cloud Connector on Satellite Server.
If you want to manage and execute host remediations completely from Satellite, then you do not need to enable Cloud Connector. Cloud Connector enables the remediation of Satellite-managed hosts remotely, from Insights for Red Hat Enterprise Linux.
The following prerequisites are comprehensive for Satellite configuration:
Prerequisites
- Satellite must be version 6.9 or later.
- Import a Subscription Manifest into Satellite. Only hosts in organizations with a valid Red Hat certificate can be connected to Red Hat Hybrid Cloud Console. For more information, see Importing a Subscription Manifest into Satellite Server in the Red Hat Satellite Content Management Guide.
- Register your hosts to Satellite using an activation key to attach Red Hat subscriptions. For more information, see Registering Hosts in the Red Hat Satellite Managing Hosts guide.
- Enable remote execution on your hosts so that Satellite can run remediation playbooks on them. For more information, see Distributing SSH Keys for Remote Execution in the Red Hat Satellite Managing Hosts guide.
- Ensure Enable auto upload is checked on the Configure > Inventory upload page
Ensure that Sync automatically is checked on the Configure > Insights page.
NoteThis step also shows recommendation counts on Satellite’s hosts list page and the recommendations tab on the host details page.
2.2.1. Uploading your host inventory from Satellite to Insights
Use this procedure to upload your host inventory from Red Hat Satellite to Red Hat Insights for Red Hat Enterprise Linux.
Prerequisites
- Register your hosts to Satellite using an activation key to attach Red Hat subscriptions.
- You have root access to the Satellite service.
Procedure
On Satellite Server, enable the remote-execution plugin by entering one of the following commands, based on your version of Satellite Server.
On Satellite Server 6.12 and newer
[root]# satellite-installer --foreman-proxy-plugin-remote-execution-script-install-key true
On Satellite Server 6.9 - 6.11
[root]# satellite-installer --foreman-proxy-plugin-remote-execution-ssh-install-key true
- In the Satellite web UI, navigate to Configure > Inventory Upload. The Automatic Inventory Upload switch is ON by default.
- Click Configure Cloud Connector. A Notice dialog box warns you that your inventory will be automatically uploaded. Click Confirm.
- Navigate to Configure > Inventory Upload and select your organization.
Click Restart to upload your host inventory to Red Hat Insights for Red Hat Enterprise Linux.
Repeat this step for each organization from which you want to upload a host inventory.
Optional: Toggle the Obfuscate host names switch to the ON position to hide host names that Satellite reports to the Red Hat Hybrid Cloud Console. The Obfuscate host names setting only affects rh_cloud reports. If you want to obfuscate hostnames and IP addresses, you should set obfuscation in the
insights-clientconfiguration. Satellite knows how to read this configuration, and will follow along.Auto upload and Obfuscate host names are global settings. They affect hosts that belong to all organizations.
Verification
To verify that the upload was successful, log into Red Hat Hybrid Cloud Console > Red Hat Enterprise Linux > Red Hat Insights > Inventory and search for the satellite_id tag for your hosts.
Optionally, push the Sync inventory status button and wait for the task to finish. It will show you the amounts of Satellite hosts recognized also on the cloud side.
2.2.2. Installing the Insights client on hosts managed by Satellite
The Insights client comes preinstalled on most versions of Red Hat Enterprise Linux; however, if you have to install it, use this procedure to install the Insights client on each system.
Prerequisites
Register your hosts to Satellite
If you already have Red Hat Enterprise Linux hosts, you can use the Global Registration Template to register them to Satellite. For more information, see Registering hosts to Satellite.
Procedure
Install the Insights for Red Hat Enterprise Linux client:
# yum install insights-client
Register the host to Insights for Red Hat Enterprise Linux:
# insights-client --register
- Repeat these steps on each host.
Alternatively, you can use the RedHatInsights.insights-client Ansible role to install the Insights client and register the hosts. For more information, see Using Red Hat Insights with Hosts in Satellite in the Red Hat Satellite Managing Hosts guide.
2.2.3. Configuring Cloud Connector on Satellite Server
Before you can remotely run remediation playbooks on your Satellite-managed infrastructure, you must install and configure the Cloud Connector on Satellite Server. Perform the following tasks to install, configure, and verify the configuration of Cloud Connector.
2.2.3.1. Creating the Cloud Connector configuration playbook
A Satellite administrator can install and configure the Cloud Connector by activating the Configure Cloud Connector button. This automatically creates the service user that the Cloud Connector will use to trigger remediation jobs on Satellite, then runs the Cloud Connector installation playbook using the service-user credentials.
2.2.3.2. Enabling Cloud Connector operation on Satellite
To ensure that the Cloud Connector operates, verify that Automatic Inventory Upload (Configure > Inventory Upload) and Sync Automatically (Configure > Insights) are turned ON.
For more information about running remediations from Satellite, see section, Creating an Insights Plan for Hosts, in Managing Hosts Red Hat Satellite 6.12.
2.2.3.3. Verifying Satellite and Insights communication
Perform these tasks manually to verify the system functions. Refer to the following steps:
- By uploading the report: Select the required organization from the inventory page, and click Restart. This step is asynchronous and it might take time process in the cloud.
- By syncing Insights information: Select the three dots menu from the Insights page, and click Sync Recommendations.
-
Optionally, verify the status of the new source record: The source record would look similar to
Satellite <UUID> organization <org_name>under Red Hat Hybrid Cloud Console > the Settings icon (⚙) > Settings > Integrations. The source should indicate "Available" before the remediations are able to run.
2.2.3.4. Enabling Auto Sync and perform initial manual sync
Click Sync Inventory Status and enable Auto Sync for the organization.
Make sure to sync manually for the first time before it starts.
It is normal that while syncing the inventory, you might get a notification indicating the number of hosts that are in disconnected status or not uploaded to your Hybrid Cloud Console inventory. At this stage, you must re-sync the inventory. In some cases, the host processing at Hybrid Cloud Console can take some time to remediate.
2.2.3.5. Disabling direct remediations on a host
By default the parameter is not set on each host. It is True for the hostgroup to allow the execution of playbooks by default on the Cloud Connector. Note that all the hosts that are present in that particular organization inherit the same parameters.
When the Satellite receives the remediation playbook run request from Cloud Connector, that request has a list of hosts where it should execute.
To ensure the playbook run does not get invoked from the cloud on a single host, set the enable_cloud_remediations parameter to False on that host.
2.2.3.6. Disabling direct remediation on a host group
By default the parameter is not set in the system. It is True for the host group to allow the execution of playbooks by default with the Cloud Connector.
All the hosts that are present in that particular organization will inherit the same parameters.
Optionally, an Organization Administrator can disable the cloud remediations for the whole organization or host group. To disable remediations, change the Global Parameter in the Red Hat Satellite User Interface. Use the following steps to make this edit.
Procedure
- Navigate to the Satellite Dashboard.
- Click Configure on the left navigation.
- Click Global Parameters.
- Click Create Parameter.
-
In the Name field, enter
enable_cloud_remediations. -
In the Value field, enter
false. - Click Submit.
Verification step
Find your new parameter listed in the Global Parameters table.
2.2.3.7. Configuring inventory uploads
- In the Satellite web UI, navigate to Configure > Inventory Upload.
- Click on the Configure Cloud Connector button.
2.2.3.8. Verifying successful configuration
To verify that the playbook was successful, log in to Red Hat Hybrid Cloud Console > the Settings icon (⚙) > Settings > Integrations and search for your Satellite Server.
2.2.4. Configuring Cloud Connector after upgrading Satellite Server 6.10 to 6.11
This only applies to upgrades from Satellite version 6.10 to 6.11. Refer to the Upgrading and Updating Red Hat Satellite guide for more information.
To configure Cloud Connector after upgrading the Satellite Server, click Configure Cloud Connector button from Configure > RH Cloud - Inventory Upload to enable it on the new version of Satellite Server. Simultaneously, you are required to remove the previous source from the cloud manually on the Red Hat Hybrid Cloud Console after upgrading your Satellite Server.
Once the Cloud Connector is configured, it will remove the receptor bits and install the RHC bits. At the same time, the Cloud Connector announces all the organizations in the Satellite to the source and is ready to receive the connections.
2.2.5. Configuring Insights recommendations on Satellite
You can use Red Hat Satellite synchronization to provide Insights for Red Hat Enterprise Linux recommendations for Satellite-managed hosts. Use this procedure to configure Insights synchronization on Red Hat Satellite.
Procedure
-
Navigate to Configure > Insights to manually synchronize Insights for Red Hat Enterprise Linux recommendations. Click the more options icon
 and choose Sync recommendations.
- Optionally, toggle the Synchronize Automatically switch to the ON position to enable Satellite to download Insights recommendations from the Hybrid Cloud Console automatically, once a day.
You have now configured Red Hat Insights for Red Hat Enterprise Linux Synchronization on Satellite.
In the Satellite web UI, navigate to Hosts > All Hosts to see Insights for Red Hat Enterprise Linux recommendations for each Satellite-managed host.
Chapter 3. Creating and managing remediation playbooks in Insights
The workflow to create playbooks is similar in each of the services in Insights for Red Hat Enterprise Linux. In general, you will fix one or more issues on a system or group of systems.
Playbooks focus on issues identified by Insights services. A recommended practice for playbooks is to include systems of the same RHEL major/minor versions because the resolutions will be compatible.
3.1. Creating a playbook to remediate a CVE vulnerability on RHEL systems
Create a remediation playbook in the Red Hat Insights vulnerability service. The workflow to create a playbook is similar for other services in Insights for Red Hat Enterprise Linux.
Prerequisites
- You are logged into the Red Hat Hybrid Cloud Console.
No enhanced User Access permissions are required to create remediation playbooks.
Procedure
- Navigate to the Security > Vulnerability > CVEs page.
- Set filters as needed and click on a CVE.
- Scroll down to view affected systems.
Select systems to include in a remediation playbook by clicking the box to the left of the system ID.
NoteInclude systems of the same RHEL major/minor version, which you can do by filtering the list of affected systems.
- Click the Remediate button.
Select whether to add the remediations to an existing or new playbook and take the following action:
- Click Add to existing playbook and select the desired playbook from the dropdown list, OR
- Click Create new playbook and add a playbook name.
- Click Next.
- Review the systems to include in the playbook, then click Next.
Review the information in the Remediation review summary.
- By default, autoreboot is enabled. You can disable this option by clicking Turn off autoreboot.
- Click Submit.
Verification step
- Navigate to Automation Toolkit > Remediations.
- Search for your playbook. You should see your playbook.
3.1.1. Creating playbooks to remediate CVEs with security rules when recommended and alternate resolution options exist
Most CVEs in Red Hat Insights for RHEL will have one remediation option for you to use to resolve an issue. Remediating a CVE with security rules might include more than one resolution a recommended and one or more alternate resolutions. The workflow to create playbooks for CVEs that have one or more resolution options is similar to the remediation steps in the advisor service.
For more information about security rules, see Security rules, and Filtering lists of systems exposed to security rules in Assessing and Monitoring Security Vulnerabilities on RHEL Systems.
Prerequisites
- You are logged into the Red Hat Hybrid Cloud Console.
You do not need enhanced User Access permissions to create remediation playbooks.
Procedure
- Navigate to Security > Vulnerability > CVEs.
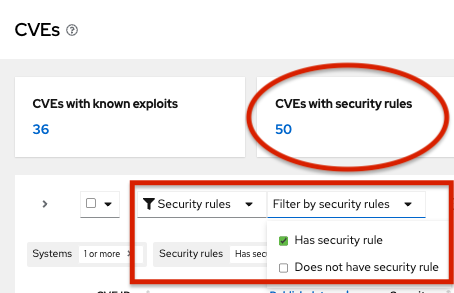
Set filters if needed (for example, filter to see CVEs with security rules to focus on issues that have elevated risk associated with them). Or, click the CVEs with security rules tile on the dashbar. Both options show in the example image.
-
Click a CVE in the list.

Scroll to view affected systems, and select systems you want to include in a remediation playbook by clicking the box to the left of the system ID on the Review systems page. (Selecting one or more systems activates the Remediate button.)
NoteRecommended: Include systems of the same RHEL major or minor version by filtering the list of affected systems.
- Click Remediate.
Decide whether to add the remediations to an existing or new playbook by taking one of the following actions:
- Choose Add to existing playbook and select the desired playbook from the dropdown list, OR
- Choose Create new playbook, and add a playbook name. For this example, HCCDOC-392.
- Click Next. A list of systems shows on the screen.
- Review the systems to include in the playbook (deselect any systems that you do not want to include).
Click Next to see the Review and edit actions page, which shows you options to remediate the CVE. The number of items to remediate can vary. You will also see additional information (that you can expand and collapse) about the CVE, such as:
- Action: Shows the CVE ID.
- Resolution: Displays the recommended resolution for the CVE. Shows if you have alternate resolution options.
- Reboot required: Shows whether you must reboot your systems.
- Systems: Shows the number of systems you are remediating.
On the Review and edit actions page, choose one of two options to finish creating your playbook:
Option 1: To review all of the recommended and alternative remediation options available (and choose one of those options):
-
Select Review and/or change the resolution steps for this 1 action or similar based on your actual options.
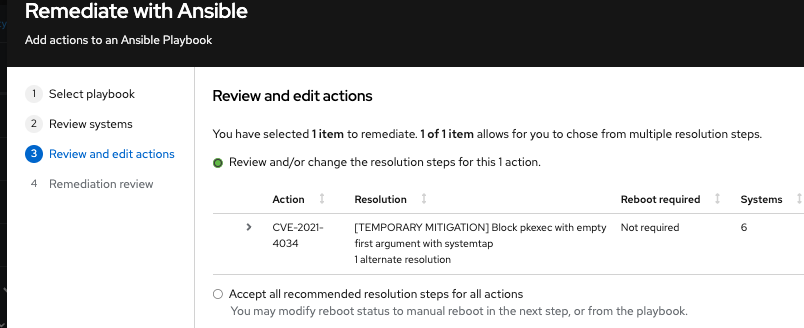
- Click Next.
On the Choose action: <CVE information> page, click a tile to select your preferred remediation option. The bottom edge of the tile highlights when you select it. The recommended solution is highlighted by default.
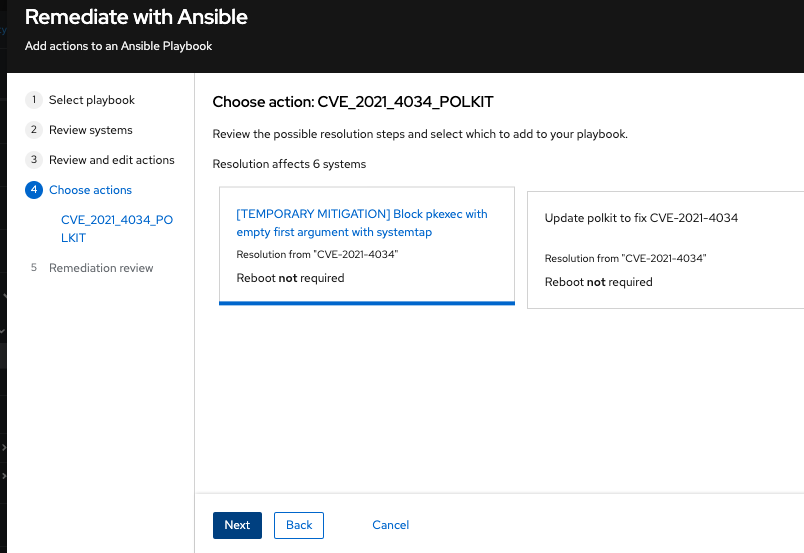
- Click Next.
-
Select Review and/or change the resolution steps for this 1 action or similar based on your actual options.
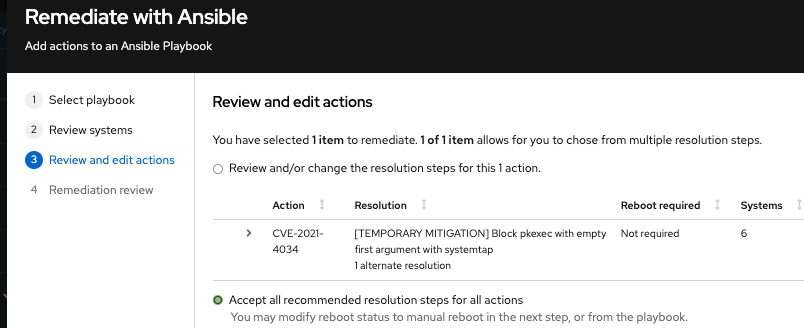
Option 2: To accept all recommended remediations:
Choose Accept all recommended resolutions steps for all actions.
Review information about your selections and change options for autoreboot of systems on the Remediations review page. The page shows you the:
- Issues you are adding to your playbook.
- Options for changing system autoreboot requirements.
-
Summary about CVEs and resolution options that to fix them.
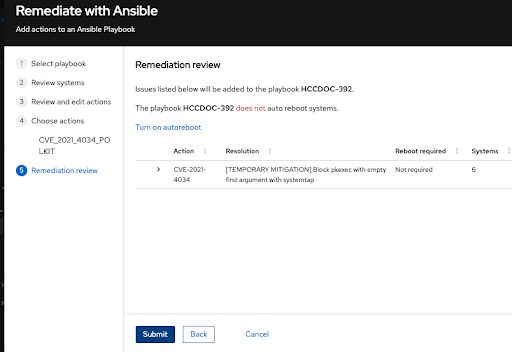
- Optional. Change autoreboot options on the Remediation review page, if needed. (Autoreboot is enabled by default, but your settings might vary based on your remediation options.)
- Click Submit. A notification displays that shows the number of remediation actions added to your playbook, and other information about your playbook.
Verification step
- Navigate to Automation Toolkit > Remediations.
- Search for your playbook.
- To run (execute) your playbook, see Executing remediation playbooks from Insights for Red Hat Enterprise Linux.
3.2. Managing remediation playbooks in Insights for Red Hat Enterprise Linux
You can download, archive, and delete existing remediation playbooks for your organization. The following procedures describe how to perform common playbook-management tasks.
Prerequisites
- You are logged into the Red Hat Hybrid Cloud Console.
No enhanced permissions are required to view, edit, or download information about existing playbooks.
3.2.1. Downloading a remediation playbook
Use the following procedure to download a remediation playbook from the Insights for Red Hat Enterprise Linux application.
Procedure
- Navigate to Automation Toolkit > Remediations.
- Locate the playbook you want to manage and click on the name of the playbook. The playbook details are visible.
- Click the Download playbook button to download the playbook YAML file to your local drive.
3.2.2. Archiving a remediation playbook
You can archive a remediation playbook that is no longer needed, but the details of which you want to preserve.
Procedure
- Navigate to Automation Toolkit > Remediations.
- Locate the playbook you want to archive.
- Click on the options icon (⋮) and select Archive playbook. The playbook is archived.
3.2.3. Viewing archived remediation playbooks
You can view archived remediation playbooks in Insights for Red Hat Enterprise Linux.
Procedure
- Navigate to Automation Toolkit > Remediations.
-
Click the More options icon
that is to the right of the Download playbook button and select Show archived playbooks.
3.2.4. Deleting a remediation playbook
You can delete a playbooks that is no longer needed.
Procedure
- Navigate to Automation Toolkit > Remediations.
- Locate and click on the name of the playbook you want to delete.
-
On the playbook details page, click the More options icon
and select Delete.
3.2.5. Monitoring remediation status
You can view the remediation status for each playbook that you execute from the Insights for Red Hat Enterprise Linux remediations service. The status information tells you the results of the latest activity and provides a summary of all activity for playbook execution. You can also view log information for playbook execution.
Prerequisites
- You are logged into the Red Hat Hybrid Cloud Console.
Procedure
- Navigate to Automation Toolkit > Remediations. The page displays a list of remediation playbooks.
- Click on the name of a playbook.
- From the Actions tab, click any item in the Status column to view a pop-up box with the status of the resolution.
To monitor the status of a playbook in the Satellite web UI, see Monitoring Remote Jobs in the Red Hat Satellite Managing Hosts guide.
Chapter 4. Executing remediation playbooks
After you create a remediation playbook, you can download and run the playbook using your organization’s Ansible workflow, or execute the playbook on remote systems from the Insights for Red Hat Enterprise Linux application.
4.1. Executing remediation playbooks from the Insights User Interface
After installing the rhc client on systems in your infrastructure, you can execute remediation playbooks on remote RHEL systems, directly from the Insights for Red Hat Enterprise Linux application.
Prerequisites
- You must be logged in to the Red Hat Hybrid Cloud Console.
- You must be a member of a User Access group with the Remediations administrator role.
Procedure
- Navigate to Automation Toolkit > Remediations.
- Select a remediation playbook to run and click on the playbook name.
- Click the Execute playbook button.
- On the popup, click on the Execute playbook on systems button. The playbook runs on those systems.
4.2. Executing remediations from the Satellite User Interface
You can also remediate using the Satellite User Interface.
Prerequisites
- You are a Sources Administrator.
- You are a Remediations Administrator.
- You have completed Host registration using the Insights client.
For specific instructions, see Creating an Insights Remediation Plan for Hosts in the Satellite Managing Hosts documentation.
When you introduce a new host into your Satellite inventory, by means of provisioning or registration, two automatic background tasks will initiate. It will take 24 hours for these tasks to complete. This is a typical time frame for the automatic synchronization.
If you identify security issues or another scenario that warrants not waiting 24 hours for the automatic sync, you can manually synchronize by clicking the sync button in the UI. This manual sync will complete in a few minutes.
To see the procedures for enabling automatic and manual synchronization, see the Configuring Synchronization of Insights Recommendations for Hosts in the Satellite documentation.
Chapter 5. Using patch templates for remediations
The Red Hat Insights patch application supports scheduled patching cycles.
Patch templates do not affect yum/dnf operations on the host, but they allow you to refine your patch status reporting in Red Hat Insights. You can use the templates to create remediation playbooks for simple patch cycles.
5.1. Using patch templates with remediations
Patch templates can include one or more remediations that you want to apply to multiple systems. You can create a patch template to update a group of systems in a test environment, and use the same patch template to update systems in a production environment on a different day.
For more information about creating and using patch templates with remediations, refer to System Patching Using Ansible Playbooks via Remediations.
After you apply a patch template to the systems you assign, you will not see more recently published advisories that apply to those systems. Use Red Hat Hybrid Cloud Console notifications to ensure that you remain aware of newly published advisories that might affect your infrastructure.
For more information about notifications in the Red Hat Hybrid Cloud Console, see Configuring notifications on the Red Hat Hybrid Cloud Console.
Providing feedback on Red Hat documentation
We appreciate and prioritize your feedback regarding our documentation. Provide as much detail as possible, so that your request can be quickly addressed.
Prerequisites
- You are logged in to the Red Hat Customer Portal.
Procedure
To provide feedback, perform the following steps:
- Click the following link: Create Issue
- Describe the issue or enhancement in the Summary text box.
- Provide details about the issue or requested enhancement in the Description text box.
- Type your name in the Reporter text box.
- Click the Create button.
This action creates a documentation ticket and routes it to the appropriate documentation team. Thank you for taking the time to provide feedback.