
Assessing RHEL Configuration Issues Using the Red Hat Insights Advisor Service
Assess and monitor the configuration issues impacting your RHEL systems
Abstract
Chapter 1. Overview of Insights for Red Hat Enterprise Linux advisor service assessment and monitoring
Use the advisor service to assess and monitor the health of your Red Hat Enterprise Linux (RHEL) infrastructure. Whether you are concerned with individual or groups of systems, or with your whole infrastructure, be aware of the exposure of your systems to configuration issues that can affect availability, stability, performance, and security.
After installing and registering the Insights for Red Hat Enterprise Linux client, the client runs daily to check systems against a database of Recommendations, which are sets of conditions that can leave your RHEL systems at risk. Your data is then uploaded to the Operations > Advisor > Recommendations page where you can perform the following actions:
- See all of the recommendations for your entire RHEL infrastructure.
- Use robust filtering capabilities to refine your results to those recommendations, systems, groups, or workloads that are of greatest concern to you, including SAP workloads, Satellite host collections, and custom tags.
- Learn more about individual recommendations, details about the risks they present, and get resolutions tailored to your individual systems.
- Share results with other stakeholders. For more information, see Generating Advisor Service Reports.
- Create and manage remediation playbooks to fix issues right from the Insights for Red Hat Enterprise Linux application. For more information, see Red Hat Insights Remediations Guide.
1.1. User Access considerations
An Organization Administrator on your account configures settings in User Access to control access to Red Hat Insights for Red Hat Enterprise Linux features. All users on your account have access to most of the data in Insights for Red Hat Enterprise Linux. However, performing some actions requires users to have elevated access.
Access is granted in User Access in the Red Hat Hybrid Cloud Console. To grant or change access, an Organization Administrator or User Access administrator must add you to a User Access group with the required roles in Red Hat Hybrid Cloud Console > the Settings icon (⚙) > Identity & Access Management > User Access > Users.
In this documentation, prerequisites for procedures declare whether you need elevated access to perform the procedure.
Important predefined groups and roles relevant to understanding User Access are:
- Default access group
- Default admin access group
- Organization Administrator role
Brief overview about some predefined groups and roles
The following predefined groups and roles are relevant to access:
- Default access group. All users on the account are members of the Default access group. Members of the Default access group have read-only access, which allows you to view most information in Insights for Red Hat Enterprise Linux.
- Default admin access group. All users on the account who are Organization Administrators are members of this group. Users cannot modify the roles in the Red Hat-managed Default admin access group. Members of the Default admin access group have read-write access, which allows you to view and perform other actions in Insights for Red Hat Enterprise Linux.
- Organization Administrator role. All users on the account who are Organization Administrators can create and modify User Access groups and grant access to other account users. To find out whether you are an Organization Administrator, click your name in the Red Hat Hybrid Cloud Console header, in the upper right of your screen, and see whether the words “Org. Administrator” show under your username.
Requesting elevated access If you do not have access to features that you need, you can:
Contact Customer Service to get Organization Administrator details for your account.
- Provide your account number when you send the request.
Contact the Organization Administrator and ask for access, providing the following information:
- The name of the role you need access to, for example, Remediations administrator
- A link to full User Access documentation, to help inform the Organization Administrator about how to give you access.
1.1.1. User Access roles for advisor service users
The following roles enable standard or enhanced access to remediations features in Insights for Red Hat Enterprise Linux:
- RHEL Advisor administrator. Perform any available operation against any Insights for Red Hat Enterprise Linux advisor-service resource.
Chapter 2. Advisor-service recommendations overview
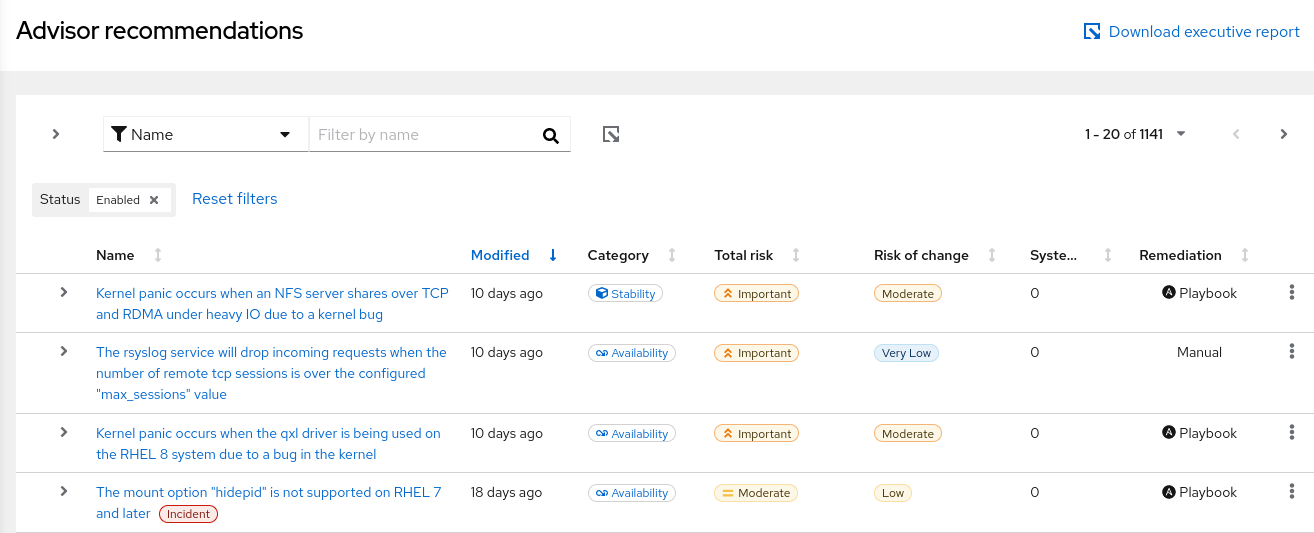
The advisor service bundles information about known configuration issues that might negatively affect the availability, stability, performance, or security of your RHEL systems. This information bundle is used to create recommendations about how you can fix or remediate issues on your systems. (A recommendation was formerly called a rule in Red Hat Insights for Red Hat Enterprise Linux.) Recommendations are published to the advisor service database, and can be accessed through the advisor recommendations page.
When you navigate to the recommendations page you can use various sort and filter methods to access information such as:
- Modified. Shows the date or time frame when a recommendation was last modified (or published) to the advisor service database.
- Category. Shows the type of issue or what the issue affects—whether the issue has the potential to negatively affect the availability, stability, performance, or security of RHEL systems.
- Impact. Shows the impact (Low, Medium, High or Critical) on system operations if an incident related to the recommendation were to happen.
- Incidents. Shows the issue has been classified as an incident and is an issue that is already affecting your systems.
- Likelihood. Shows the likelihood (Low, Medium, High or Critical) that the issue will negatively affect your infrastructure.
- Name. Shows a brief description of the issue, including how it affects RHEL systems.
- Reboot Required. Shows whether a system reboot is required (Required or Not Required) as part of remediation steps.
- Remediation. Shows if the fix or remediation requires manual steps or has an automated playbook.
- Risk of change. Shows the risk of change (Very Low, Low, Moderate, or Important) for systems if a remediation is executed.
Status. Describes a recommendation’s status. (All, Enabled, Disabled, or Red Hat disabled).
- All. Shows results for all status options.
- Enabled and Disabled. Show business-critical recommendations that are visible, or not visible. A disabled recommendation indicates that someone in your organization turned the visibility of a recommendation off.
- Red Hat disabled. Shows recommendations that Red Hat makes available for you to enable when you are performing specific actions, like upgrading Red Hat Enterprise Linux major versions.
- Systems or Systems impacted. Shows the number of systems (1 or more or None) on which a recommendation is detected. 1 or more systems shows one or more systems that have recommendations. None Shows systems that do not have recommendations.
- Total risk. Describes total risk level (Low, Moderate, Important, or Critical), which is determined by the likelihood that the issue will negatively affect your infrastructure, and the impact on system operations if that were to happen.
The default advisor service recommendations view shows a smaller subset of information. The information is filtered to show recommendation information for one or more systems. These recommendations have a status of Enabled. For information about using filters, see Filtering advisor-service recommendations.
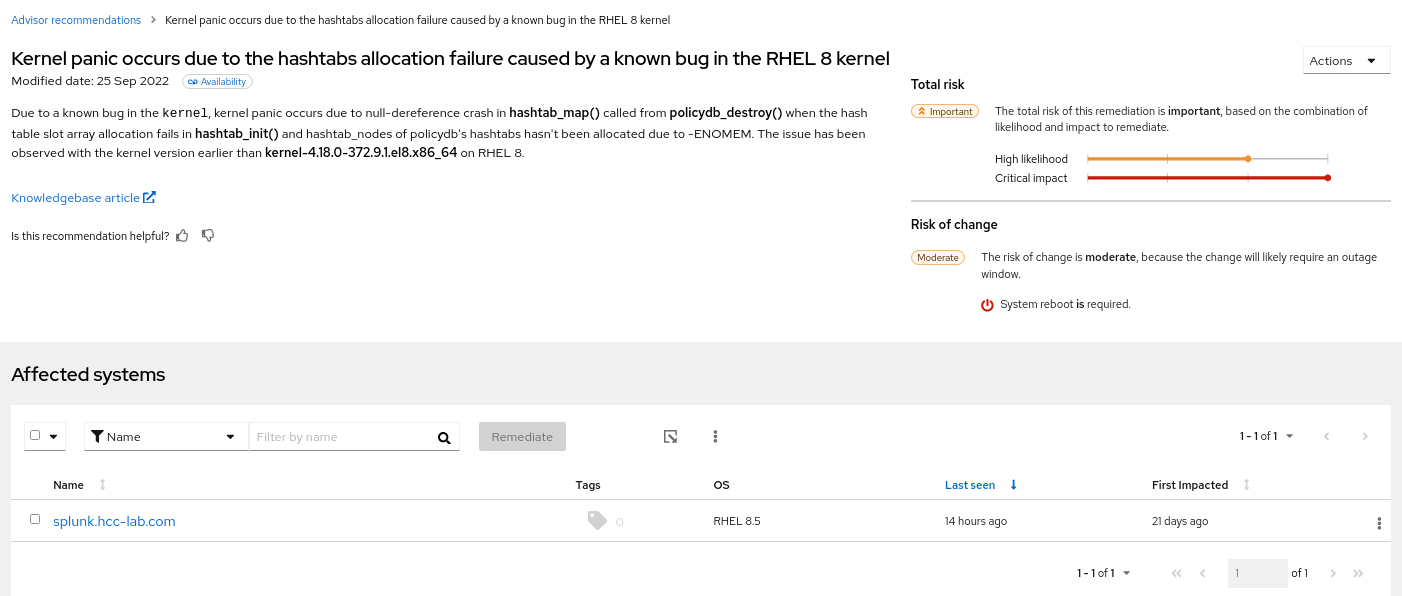
2.1. System and recommendation pairing
When a recommendation exists on a system, the advisor service identifies whether, and how, the system has been impacted and provides specific mitigation or resolution instructions. This information is visible when viewing a recommendation and then selecting an affected system.
After selecting an affected system, view all recommendations available for the system along with the following information:
- Detected issues. Specific information about the fault on that system
- Steps to resolve. Steps to resolve the issue on that system
- Related knowledgebase articles. KB articles or solutions about the general issue
- Additional info. Other support articles on the issue or solutions for resolution
- Ansible. Playbook remediation availability
2.2. Recommendation impact date
A system is said to be impacted by a recommendation when the conditions described in that recommendation exist on the system. The advisor service informs users of when a system first became impacted by a recommendation.
You can apply the Systems impacted primary filter to the list of recommendations, and select the 1 or more secondary filter to show only recommendations impacting systems. By clicking on a recommendation from the filtered list, you can see when that recommendation first impacted each of the systems on the list.
This information can be viewed in the First impacted column on the following pages in the advisor service web console:
- On the Recommendations list for a single system, for each recommendation where applicable.
- In the details view of a single recommendation, Affected systems list, for each system impacted by that recommendation.
Chapter 3. Refining advisor service recommendations
The advisor service puts a lot of information at your fingertips, especially when Red Hat Insights for Red Hat Enterprise Linux is deployed on a large Red Hat Enterprise Linux infrastructure. There are several ways to refine advisor recommendations to help you focus on the issues and systems that matter the most. This section describes the multiple options for filtering, sorting, and excluding specific recommendations from your advisor results.
3.1. Viewing all advisor-service recommendations
When you first enter the advisor service recommendations view, you see the default view and results of Systems Impacted (set to 1 or more systems) and Status (set to Enabled) filters being applied. To get a comprehensive view of all recommendations, including those not impacting your systems and those in the advisor database, use the following procedure:
Prerequisites
*You must be logged into the Red Hat Hybrid Cloud Console.
Procedure
- Navigate to the Operations > Advisor > Recommendations page.
-
Click the close icon
 next to the Systems Impacted and Status filters. You can now browse through all of the potential recommendations for your systems.
- Optionally, return to the default recommendations view that shows 1 or more of Systems impacted and the Status set to Enabled, by clicking Reset filters.
3.2. Filtering advisor-service recommendations
Select from the following filters to refine your recommendations list:
- Name. In the subfilter field, start typing the recommendation description or a keyword and select from the options presented.
- Total risk. In the subfilter field, select from one or more: Critical, Important, Moderate, or Low.
- Risk of change. In the subfilter field, select from High, Moderate, Low, or Very low.
- Impact. In the subfilter field, select from Critical, Important, Moderate, or Low.
- Likelihood. In the subfilter field, select from Critical, Important, Moderate, or Low.
- Category. In the subfilter field, select from Availability, Performance, Stability, or Security.
- Incidents. In the subfilter field, select to show recommendations with or without incidents having occurred.
- Remediation. In the subfilter field, select Ansible playbook or Manual for the remediation method.
- Reboot required. In the subfilter field, select either Required or Not required.
- Ansible support. In the subfilter field, select to show recommendations with or without Ansible Playbook support.
- Status. In the subfilter field, select from All, Enabled, Disabled, Red Hat disabled.
- Systems impacted. In the subfilter field, select either 1 or more or None.
To set filters, complete the following steps.
Procedure
- Navigate to the Operations > Advisor > Recommendations page and log in if necessary.
Click the filter icon and select a filter category from the dropdown list.
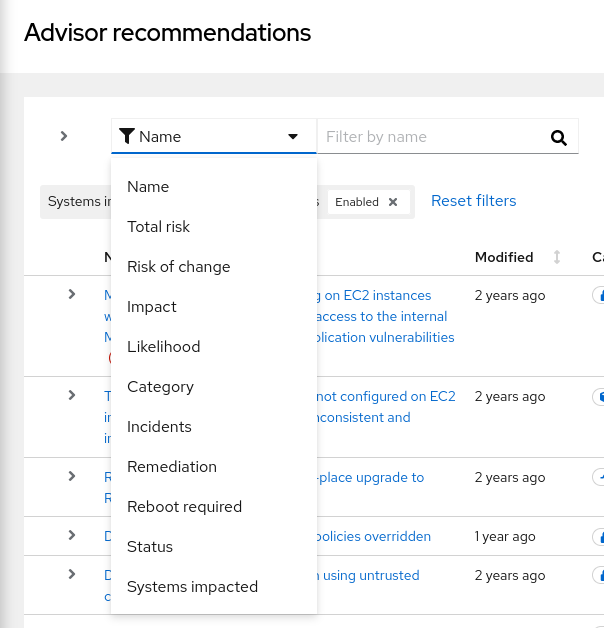
Click the dropdown arrow in the subfilter menu and check a box (or boxes) to activate a subfilter or, in the case of Description, begin typing the name or description of a recommendation.

3.3. Recommendations table columns and sorting
Sort columns in the advisor recommendations table using the following parameters:
- Name. Alphabetize by A to Z or Z to A.
- Modified. Order by number of days since the recommendation was last modified or published, from newest or oldest.
- Total risk. View in order of criticality.
- Systems. View by the number of your systems that are impacted.
- Remediation. Sort by recommendations that have or do not have Ansible Playbook support.
3.4. Disabling an advisor-service recommendation
Disable specific recommendations impacting your systems so that they no longer appear in your results. To disable a recommendation, complete the following steps:
Procedure
- Navigate to the Operations > Advisor > Recommendations page and log in if necessary.
- Locate the recommendation to disable.
-
Click the More-options icon (
 ) at the right end of the row and then click Disable recommendation.
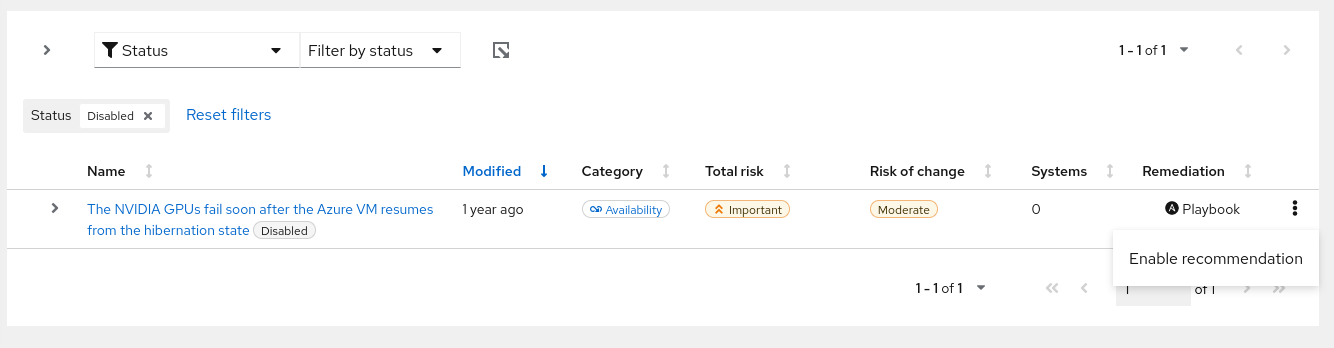
3.4.1. Viewing and enabling a previously disabled recommendation
When a recommendation is disabled, you will no longer see the recommendation in your advisor results. To reverse this action, complete the following steps:
Procedure
- Navigate to the Operations > Advisor > Recommendations page and log in if necessary.
- Click the Filter dropdown and select Status.
In the subfilter dropdown list, select Disabled.

- Locate the recommendation to enable.
Click the more-actions icon,
, on the right side of the row, and click Enable recommendation.
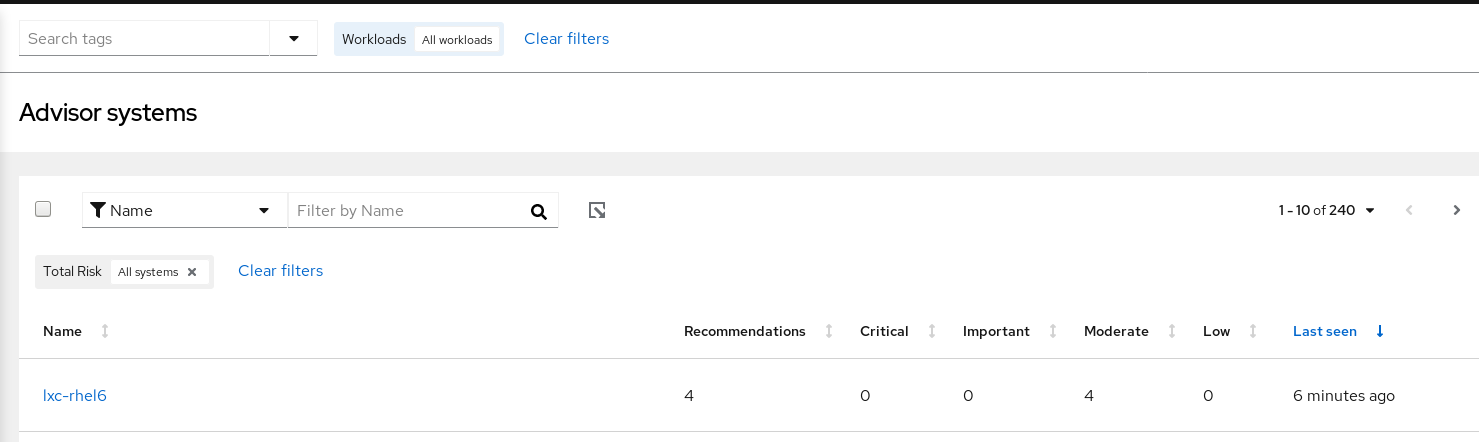
Chapter 4. Refining your view of systems in the advisor service
The Systems view shows all of your systems that have the Insights client installed and reporting advisor data. The Systems list can be refined in the following ways.
4.1. Filter by name
Search for the host or system name.
4.2. Sorting options
Use the sorting arrows above the following columns to order your systems table:
- Name. Alphabetize by A to Z or Z to A.
- Number of recommendations. Order by the number of recommendations impacting each system.
- Last seen. Order by the number of minutes, hours, or days since an archive was last uploaded from the system to the advisor service.
4.3. Filtering systems by tags, SAP workloads, and groups in the advisor service
Filter results in the advisor service UI by custom group tags, SAP workloads, and Satellite groups to quickly locate and view the systems you want to focus on. In the advisor service, access tag, workload, and group filters using the Filter results box, located in the upper left corner of the page in the Red Hat Insights for Red Hat Enterprise Linux application. The filter dropdown menu shows all of the tags associated with the account, allowing you to click one or more parameters by which to filter. To filter by tags in the advisor service, complete the following steps:
Procedure
- Navigate to the Operations > Advisor > Systems page and log in if necessary. The Filter results box is in most views in the Red Hat Insights for Red Hat Enterprise Linux application and these procedures work anywhere you access Filter results.
- Click the arrow on the Filter results box and scroll to see the tags available for systems on this account.
- Select one or more tags to filter by SAP workloads, Satellite host group, or a custom group. Applied tags are visible next to the Filter results box.
- View the filtered results throughout the advisor service.
- To remove the tag, click Clear filters.
Additional resources
- To learn more about system-group tags in Insights for Red Hat Enterprise Linux, see chapter, System tags and groups.
Chapter 5. System tags and groups
Red Hat Insights for Red Hat Enterprise Linux enables administrators to filter groups of systems in inventory and in individual services using group tags. Groups are identified by the method of system data ingestion to Insights for Red Hat Enterprise Linux. Insights for Red Hat Enterprise Linux enables filtering groups of systems by those running SAP workloads, by Satellite host group, by Microsoft SQL Server workload, and by custom tags that are defined by system administrators with root access to configure the Insights client on the system.
As of Spring 2022, inventory, advisor, compliance, vulnerability, patch, drift, and policies enable filtering by groups and tags. Other services will follow.
Unlike the other services that enable tagging, the compliance service sets tags within lists of systems in the compliance service UI. For more information, see the following section Group and tag filters in the compliance service.
Use the global, Filter results box to filter by SAP workloads, Satellite host groups, MS SQL Server workloads, or by custom tags added to the Insights client configuration file.
Prerequisites
The following prerequisites and conditions must be met to use the tagging features in Red Hat Insights for Red Hat Enterprise Linux:
- The Red Hat Insights client is installed and registered on each system.
-
You must have root permissions, or their equivalent, to create custom tags or change the
/etc/insights-client/tags.yamlfile.
5.1. Group and tag filters in the compliance service
The compliance service enables users to apply tag and group filters to systems reporting compliance data; however, they are not set using the Filter by status dropdown. Unlike most of the other services in the Insights for Red Hat Enterprise Linux application, the compliance service only shows data for systems under the following conditions:
- The system is associated with a compliance service security policy.
-
The system is reporting compliance data to insights using the
insights-client --compliancecommand.
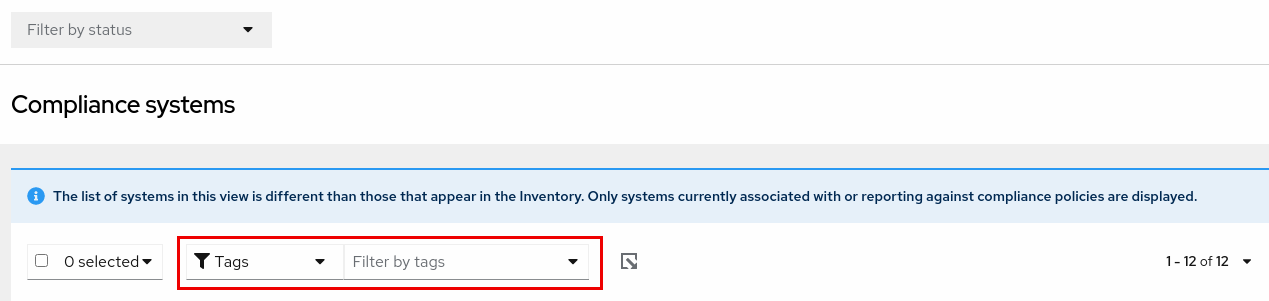
Because of those conditions, compliance-service users have to set tag and group filters using the primary and secondary filters located above lists of systems in the compliance service UI.
Tag and group filters above systems list in the compliance service
5.2. SAP workloads
As Linux becomes the mandatory operating system for SAP ERP workloads in 2025, Red Hat Enterprise Linux and Red Hat Insights for Red Hat Enterprise Linux are working to make Insights for Red Hat Enterprise Linux the management tool of choice for SAP administrators.
As part of this ongoing effort, Insights for Red Hat Enterprise Linux automatically tags systems running SAP workloads and by SAP ID (SID), without any customization needed by administrators. Users can easily filter those workloads throughout the Insights for Red Hat Enterprise Linux application by using the global Filter by tags drop-down menu.
5.3. Satellite host groups
Satellite host groups are configured in Satellite and recognized automatically by Insights for Red Hat Enterprise Linux.
5.4. Microsoft SQL Server workloads
Using the global Filter by tags feature, Red Hat Insights for Red Hat Enterprise Linux users can select groups of systems running Microsoft SQL Server workloads.
In May of 2019, the Red Hat Insights team introduced a new set of Insights for Red Hat Enterprise Linux recommendations for Microsoft SQL Server running on Red Hat Enterprise Linux (RHEL). These rules alert administrators to operating system level configurations that do not conform to the documented recommendations from Microsoft and Red Hat.
A limitation of these rules was that they primarily analyzed the operating system and not the database itself. The latest release of Insights for Red Hat Enterprise Linux and RHEL 8.5, introduces Microsoft SQL Assessment API. The SQL Assessment API provides a mechanism to evaluate the database configuration of MS SQL Server for best practices. The API is delivered with a rule set containing best practice rules suggested by the Microsoft SQL Server Team. While this rule set is enhanced with the release of new versions, the API is built with the intent to give a highly customizable and extensible solution, which enables users to tune the default rules and create their own.
The SQL Assessment API is supported by PowerShell for Linux (available from Microsoft), and Microsoft has developed a PowerShell script that can be used to call the API and store its results as a JSON formatted file. With RHEL 8.5, the Insights client now uploads this JSON file and presents the results in an easy-to-understand format in the Insights for Red Hat Enterprise Linux UI.
For more information about SQL Server assessment in Insights for Red Hat Enterprise Linux, see SQL Server database best practices now available through Red Hat Insights.
5.4.1. Setting up SQL Server assessments
To configure the Microsoft SQL Assessment API to provide information to Red Hat Insights, the database administrator needs to take the following steps.
Procedure
In the database you wish to assess, create a login for SQL Server assessments using SQL Authentication. The following Transact-SQL creates a login. Replace <*PASSWORD*> with a strong password:
USE [master]
GO
CREATE LOGIN [assessmentLogin] with PASSWORD= N'<*PASSWORD*>’
ALTER SERVER ROLE [sysadmin] ADD MEMBER [assessmentLogin]
GO
Store the credentials for login on the system as follows, again replacing <*PASSWORD*> with the password you used in step 1.
# echo "assessmentLogin" > /var/opt/mssql/secrets/assessment
# echo "<*PASSWORD*>" >> /var/opt/mssql/secrets/assessment
Secure the credentials used by the assessment tool by ensuring that only the mssql user can access the credentials.
# chmod 0600 /var/opt/mssql/secrets/assessment
# chown mssql:mssql /var/opt/mssql/secrets/assessment
Download PowerShell from the microsoft-tools repository. This is the same repository you configured when you installed the
mssql-toolsandmssqlodbc17packages as part of SQL Server installation.# yum -y install powershell
Install the SQLServer module for PowerShell. This module includes the assessment API.
# su mssql -c "/usr/bin/pwsh -Command Install-Module SqlServer"
Download the runassessment script from the Microsoft examples GitHub repository. Ensure it is owned and executable by mssql.
# /bin/curl -LJ0 -o /opt/mssql/bin/runassessment.ps1 https://raw.githubusercontent.com/microsoft/sql-server-samples/master/samples/manage/sql-assessment-api/RHEL/runassessment.ps1
# chown mssql:mssql /opt/mssql/bin/runassessment.ps1
# chmod 0700 /opt/mssql/bin/runassessment.ps1
Create the directory that will store the log file used by Red Hat Insights. Again, make sure it is owned and executable by mssql.
# mkdir /var/opt/mssql/log/assessments/
# chown mssql:mssql /var/opt/mssql/log/assessments/
# chmod 0700 /var/opt/mssql/log/assessments/
You can now create your first assessment, but be sure to do so as the user mssql so that subsequent assessments can be run automatically via cron or systemd more securely as the mssql user.
# su mssql -c "pwsh -File /opt/mssql/bin/runassessment.ps1"
Insights for Red Hat Enterprise Linux will automatically include the assessment next time it runs, or you can initiate Insights client by running this command:
# insights-client
5.4.1.1. Setting up the SQL Assessment on a timer
Because SQL Server Assessments can take 10 minutes or more to complete, it may or may not make sense for you to run the assessment process automatically every day. If you would like to run them automatically, the Red Hat SQL Server community has created systemd service and timer files to use with the assessment tool.
Procedure
Download the following files from Red Hat public SQL Server Community of Practice GitHub site.
-
mssql-runassessment.service -
mssql-runassessment.timer
-
Install both files in the directory
/etc/systemd/system/:# cp mssql-runassessment.service /etc/systemd/system/ # cp mssql-runassessment.timer /etc/systemd/system/ # chmod 644 /etc/systemd/system/
Enable the timer with:
# systemctl enable --now mssql-runassessment.timer
5.5. Custom system tagging
By applying custom grouping and tagging to your systems, you can add contextual markers to individual systems, filter by those tags in the Insights for Red Hat Enterprise Linux application, and more easily focus on related systems. This functionality can be especially valuable when deploying Insights for Red Hat Enterprise Linux at scale, with many hundreds or thousands of systems under management.
In addition to the ability to add custom tags to several Insights for Red Hat Enterprise Linux services, you can add predefined tags. The advisor service can use those tags to create targeted recommendations for your systems that might require more attention, such as those systems that require a higher level of security.
To create custom and predefined tags, you must have root permissions, or their equivalent, to add to, or change the /etc/insights-client/tags.yaml file.
5.5.1. Tag structure
Tags use a namespace/key=value paired structure.
-
Namespace. The namespace is the name of the ingestion point, insights-client, and cannot be changed. The
tags.yamlfile is abstracted from the namespace, which is injected by the Insights client before upload. - Key. The key can be a user-chosen key or a predefined key from the system. You can use a mix of capitalization, letters, numbers, symbols and whitespace.
- Value. Define your own descriptive string value. You can use a mix of capitalization, letters, numbers, symbols and whitespace.
The advisor service includes Red Hat-supported predefined tags.
5.5.2. Creating a tags.yaml file and adding a custom group
Create and add tags to /etc/insights-client/tags.yaml simply by using insights-client --group=<name-you-choose>, which performs the following actions:
-
Creates the
etc/insights-client/tags.yamlfile -
Adds the
group=key and<name-you-choose>value totags.yaml - Uploads a fresh archive from the system to the Insights for Red Hat Enterprise Linux application so the new tag is immediately visible along with your latest results
After creating the initial group tag, add additional tags as needed by editing the /etc/insights-client/tags.yaml file.
The following procedure shows how to create the /etc/insights-client/tags.yaml file and the initial group, then verify the tag exists in the Insights for Red Hat Enterprise Linux inventory.
Procedure to create new group
Run the following command as root, adding your custom group name after
--group=:[root@server ~]# insights-client --group=<name-you-choose>
Example of tags.yaml format
The following example of a tags.yaml file shows an example of file format and additional tags added for the new group:
# tags
---
group: eastern-sap
name: Jane Example
contact: jexample@corporate.com
Zone: eastern time zone
Location:
- gray_rack
- basement
Application: SAP
Procedure to verify your custom group was created
- Navigate to Red Hat Insights > RHEL > Inventory and log in if necessary.
- Click the Filter results dropdown menu.
- Scroll through the list or use the search function to locate the tag.
- Click the tag to filter by it.
- Verify that your system is among the results on the advisor systems list.
Procedure to verify that the system is tagged
- Navigate to Red Hat Insights > RHEL > Inventory and log in if necessary.
- Activate the Name filter and begin typing the system name until you see your system, then select it.
- Verify that, next to the system name, the tag symbol is darkened and shows a number representing the correct number of tags applied.
5.5.3. Editing tags.yaml to add or change tags
After creating the group filter, edit the contents of /etc/insights-client/tags.yaml as needed to add or modify tags.
Procedure
Using the command line, open the tag configuration file for editing.
[root@server ~]# vi /etc/insights-client/tags.yamlEdit content or add additional values as needed. The following example shows how you can organize
tags.yamlwhen adding multiple tags to a system.# tags --- group: eastern-sap location: Boston description: - RHEL8 - SAP key 4: value
NoteAdd as many key=value pairs as you need. Use a mix of capitalization, letters, numbers, symbols, and whitespace.
- Save your changes and close the editor.
Optionally, generate an upload to Insights for Red Hat Enterprise Linux.
# insights-client
5.5.4. Using predefined system tags to get more accurate Red Hat Insights advisor service recommendations and enhanced security
Red Hat Insights advisor service recommendations treat every system equally. However, some systems might require more security than others, or require different networking performance levels. In addition to the ability to add custom tags, Red Hat Insights for Red Hat Enterprise Linux provides predefined tags that the advisor service can use to create targeted recommendations for your systems that might require more attention.
To opt in and get the extended security hardening and enhanced detection and remediation capabilities offered by predefined tags, you need to configure the tags. After configuration, the advisor service provides recommendations based on tailored severity levels, and preferred network performance that apply to your systems.
To configure the tags, use the /etc/insights-client/tags.yaml file to tag systems with predefined tags in a similar way that you might use it to tag systems in the inventory service. The predefined tags are configured using the same key=value structure used to create custom tags. Details about the Red Hat-predefined tags are in the following table.
Table 5.1. List of Supported Predefined Tags
| Key | Value | Note |
|---|---|---|
| security |
|
With the |
|
|
| The preferred network performance (either latency or throughput according to your business requirement) would affect the severity of an advisor service recommendation to a system. |
The predefined tag keys names are reserved. If you already use the key security, with a value that differs from one of the predefined values, you will not see a change in your recommendations. You will only see a change in recommendations if your existing key=value is the same as one of the predefined keys. For example, if you have a key=value of security: high, your recommendations will not change because of the Red Hat-predefined tags. If you currently have a key=value pair of security: strict, you will see a change in the recommendations for your systems.
5.5.5. Configuring predefined tags
You can use the Red Hat Insights for Red Hat Enterprise Linux advisor service’s predefined tags to adjust the behavior of recommendations for your systems to gain extended security hardening and enhanced detection and remediation capabilities. You can configure the predefined tags by following this procedure.
Prerequisites
- You have root-level access to your system
- You have Insights client installed
- You have systems registered within the Insights client
-
You have already created the
tags.yamlfile. See Creating a tags.yaml file and adding a custom group
Procedure
Using the command line, and your preferred editor, open
/etc/insights-client/tags.yaml. (The following example uses Vim.)[root@server ~]# vi /etc/insights-client/tags.yaml
Edit the
/etc/insights-client/tags.yamlfile to add the predefinedkey=valuepair for the tags. This example shows how to addsecurity: strictandnetwork_performance: latencytags.# cat /etc/insights-client/tags.yaml group: redhat location: Brisbane/Australia description: - RHEL8 - SAP security: strict network_performance: latency
- Save your changes.
- Close the editor.
Optional: Run the
insights-clientcommand to generate an upload to Red Hat Insights for Red Hat Enterprise Linux, or wait until the next scheduled Red Hat Insights upload.[root@server ~]# insights-client
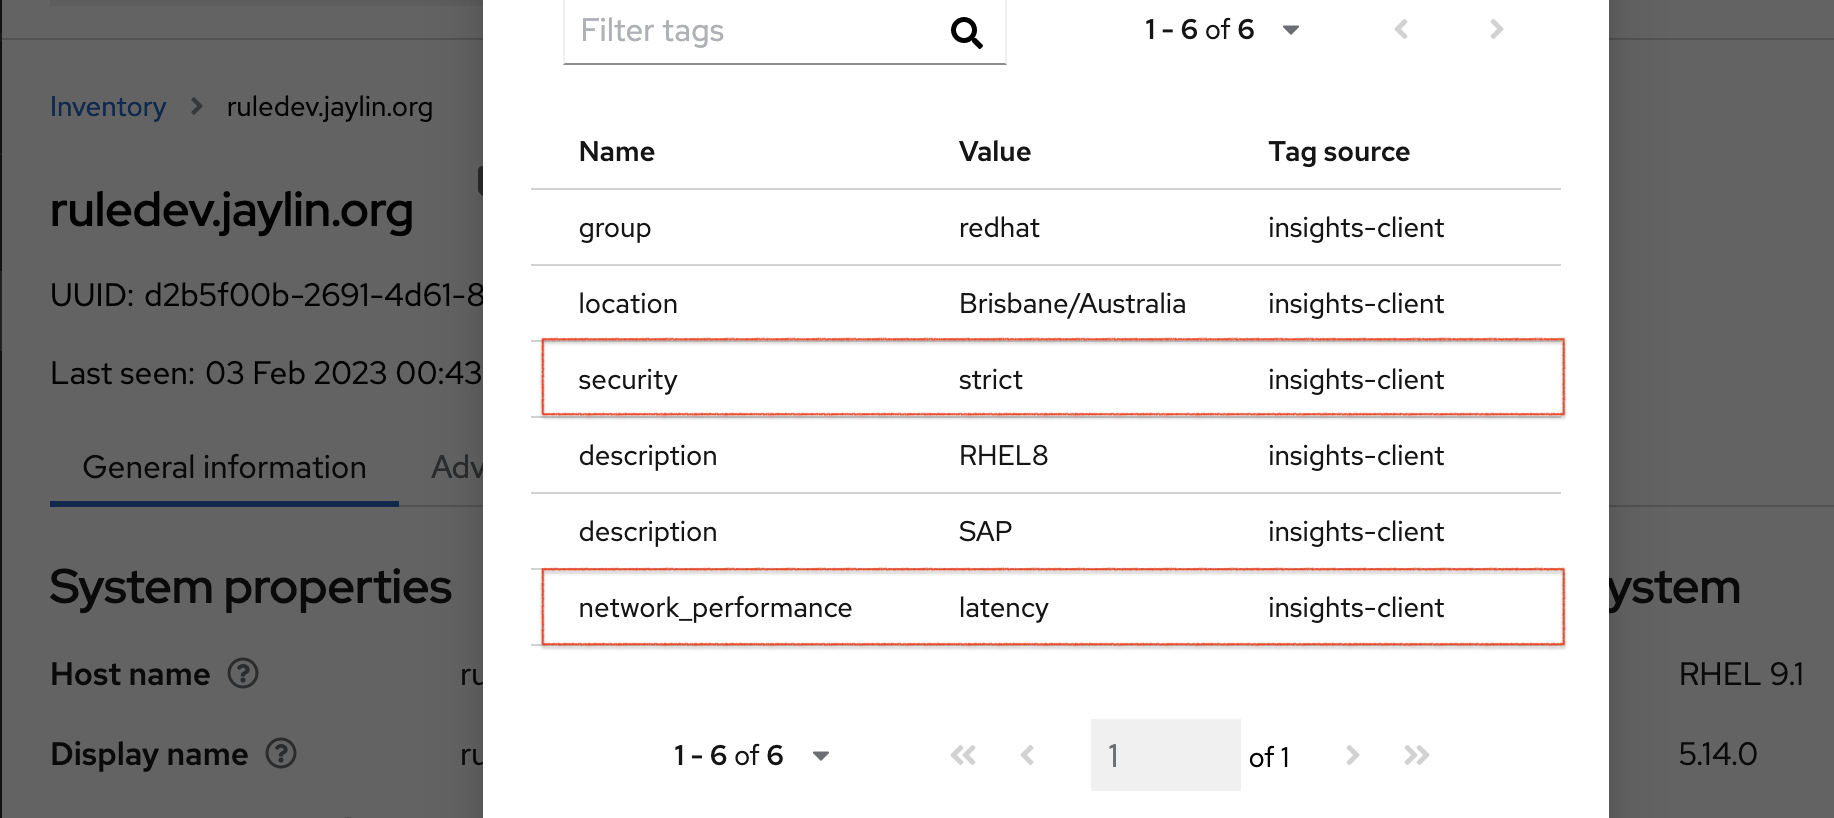
Confirming that predefined tags are in your production area
After generating an upload to Red Hat Insights (or waiting for the next scheduled Insights upload), you can find out whether the tags are in the production environment by accessing Red Hat Insights > RHEL > Inventory. Find your system and look for the newly created tags. You see a table that shows:
- Name
- Value
- Tag Source (for example, insights-client).
The following image shows an example of what you see in inventory after creating the tag.
Example of recommendations after applying a predefined tag
The following image of the advisor service shows a system with the network_performance: latency tag configured.
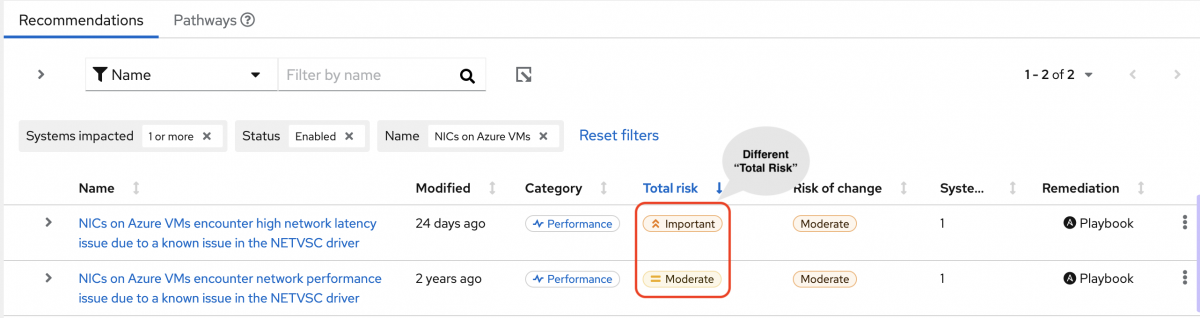
The system shows a recommendation with a higher Total Risk level of Important. The system without the network_performance: latency tag has a Total Risk of Moderate. You can make decisions about prioritizing the system with higher Total Risk.
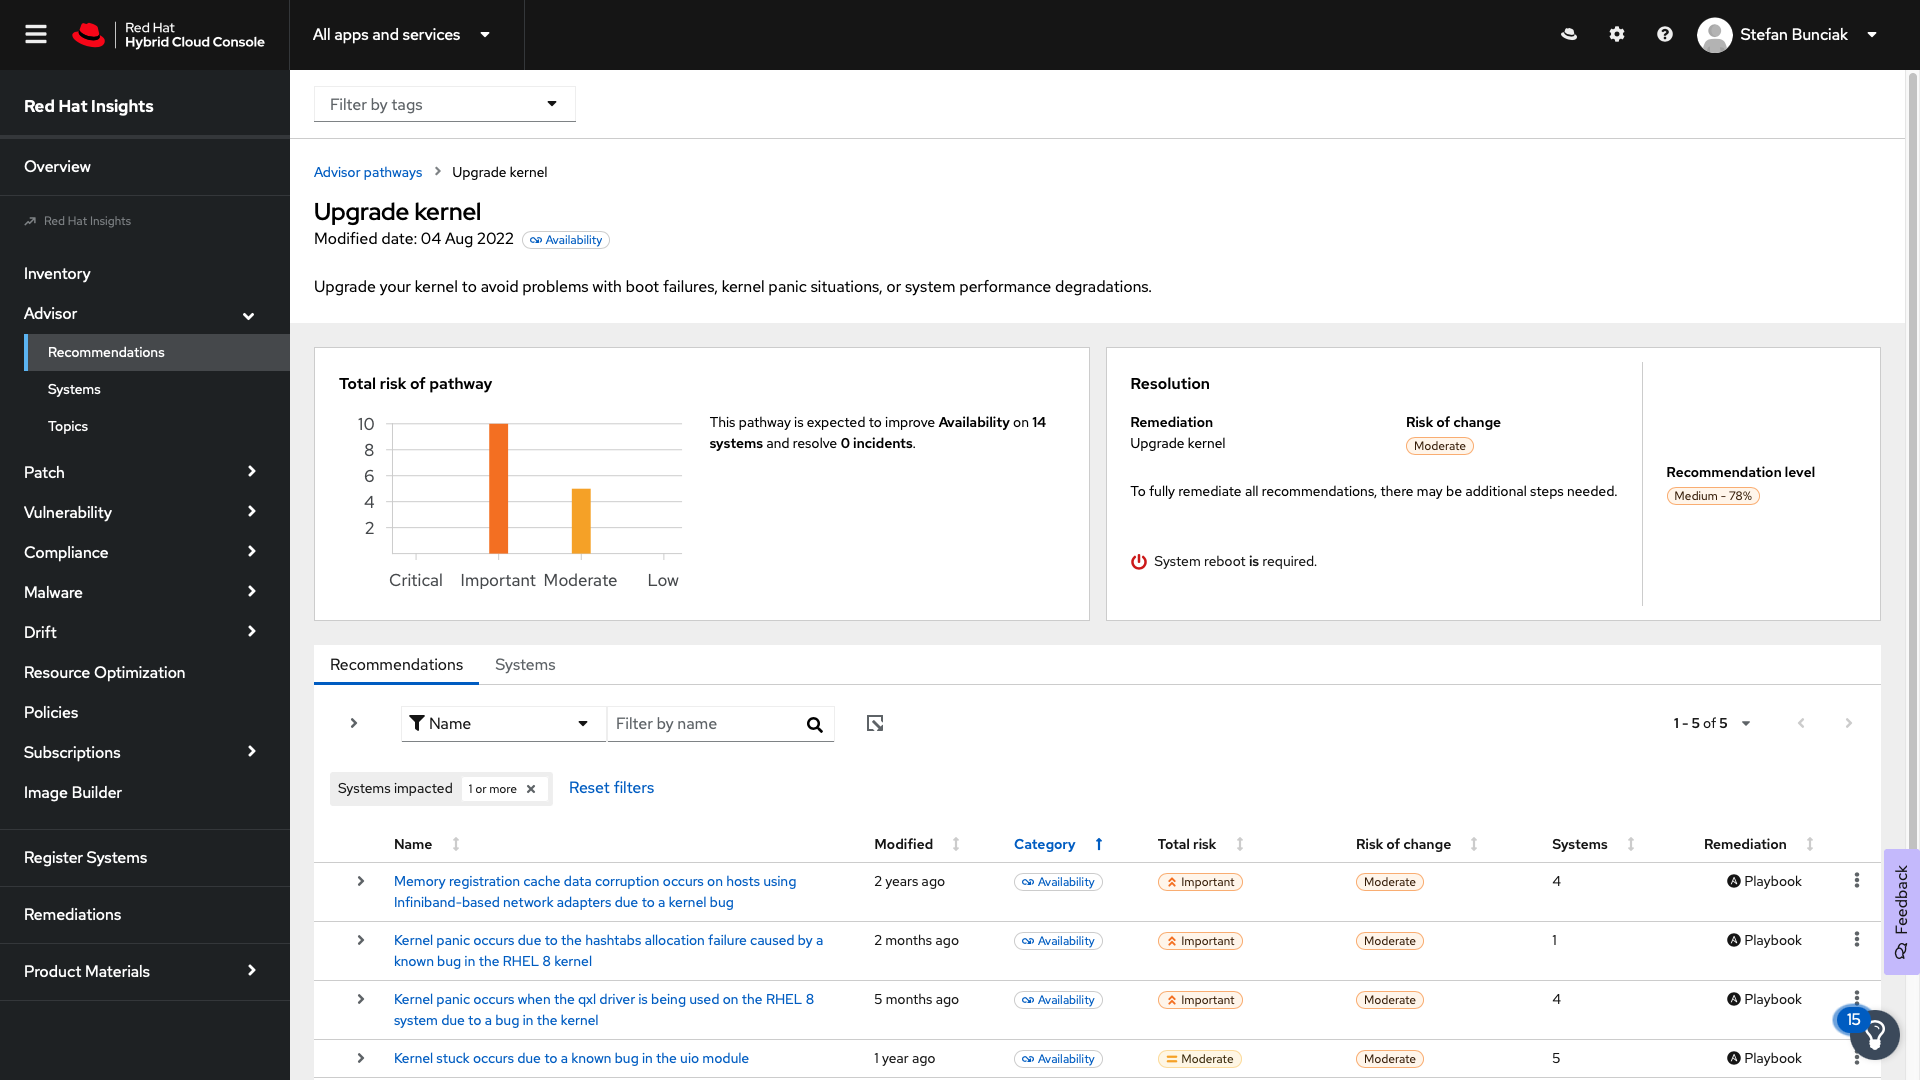
Chapter 6. Using pathways to resolve multiple advisor-service recommendations
A pathway is a group of advisor-service recommendations that share a common resolution. By following the remediation steps in a pathway, you can view and address multiple recommendations in one configuration change. This enables you to see all of the systems that the remediation affects without having to investigate every action within every recommendation. Pathways present clear paths to follow to maintain your systems more efficiently.
The specific recommendations that appear in a pathway depend on the issues that affect your infrastructure at a given time. Insights for Red Hat Enterprise Linux dynamically calculates remediation levels based on the most significant recommendations in your environment. The calculation includes the following factors:
- number of systems impacted by individual recommendations
- total risk of individual recommendations
- whether there is an incident detected
Issues grouped into pathways must share the same common resolution type, such as a package update, configuration update, product upgrade, and so on. In addition, the issues must share a common resolution target. Each system must require the same package update or configuration file change.
Insights for Red Hat Enterprise Linux names each pathway after its core remediation, so you can immediately see and understand the configuration change.
Additional resources
- For more information about recommendations, see Advisor service recommendations.
- For more information about remediations, see the Red Hat Insights Remediations Guide.
6.1. Viewing and assessing advisor pathways
Prerequisites
- Login access to console.redhat.com.
Procedure
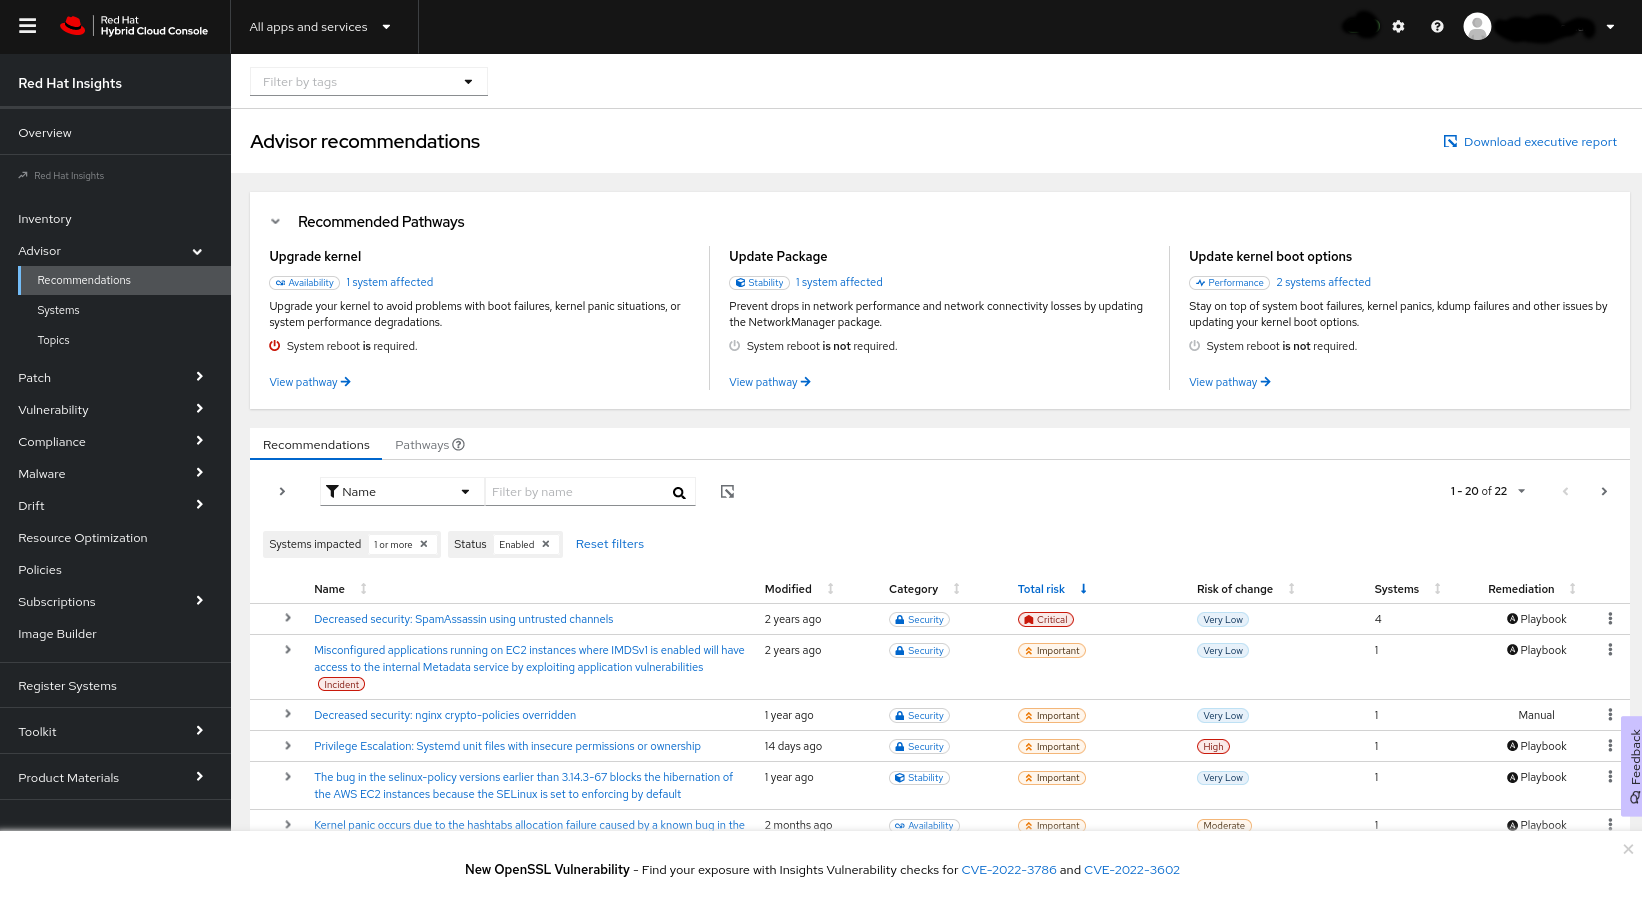
Navigate to Operations > Advisor > Recommendations. The Recommended Pathways panel appears at the top of the page, and includes up to three of the most significant pathways for your systems.
To view details for a pathway, click View Pathway, or click Pathways in the list of recommendations and then click the pathway from the list. The information for the pathway appears.
To view the systems that the issue affects (and which are included in the list of systems that the pathway remediates), click Systems.
6.2. Remediating pathways
Prerequisites
- Root-level access to your systems.
- Organization Administrator-level access to Insights.
- If you are using Ansible playbooks for remediations, you need user access to Ansible.
Procedure
- Navigate to Operations > Advisor > Recommendations.
- Locate the pathway you want to remediate and click View Pathway.
- Select a recommendation to remediate, or click Systems to see a list of all of the affected systems.
- To view more information about each recommendation, expand the table row for the recommendation, or click the recommendation title and navigate to the Recommendation Details page.
Select the systems you want to remediate, and then click Remediate.
- If the remediation requires an Ansible playbook, follow the steps in the Remediate with Ansible dialog box to create or select a playbook and select the systems to remediate.
- If the remediation requires manual remediation, follow the Steps to resolve procedure to perform the remediation on each of the selected systems.
If the remediation shows System reboot is required, Ansible automatically reboots the affected system (or systems) after the remediation is complete.
Additional resources
6.3. Configuring notifications for advisor-service recommendations
You can receive notifications of new available recommendations through the notifications service.
You can receive notifications for individual recommendations in a pathway, but not for the pathway itself. To view the pathway associated with a recommendation, log in to the console.
Prerequisites
- Root-level access to your systems.
- Organization Administrator-level access to Insights.
Procedure
- Navigate to Settings > Notifications > Red Hat Enterprise Linux. The available behavior groups appear.
- Select an existing behavior group or create a new one.
- Click the Options menu icon (vertical dots) for the behavior group and select Edit. The Edit behavior group wizard appears.
- Review the behavior group name and click Next. The Actions and recipients page appears.
- Review the actions and recipients and click Next. The Associate event types page appears.
- Select New recommendation to add it to the behavior group. Click Next.
- Review the updated settings for the behavior group and click Finish.
Additional resources
Chapter 7. Deleting a system from Insights inventory
You can delete a system from the Red Hat Hybrid Cloud Console inventory so that the system is no longer visible in the Red Hat Insights for Red Hat Enterprise Linux Inventory or advisor service Systems list. The Insights client will be unregistered on the system and no longer report data to Red Hat Insights for Red Hat Enterprise Linux. To delete a system, complete the steps in the procedure below that is most relevant to your use case.
Procedure 1: Delete using the Insights client
Enter the following command on the system command line:
[root@server ~]# insights-client --unregister
Procedure 2: Delete from the Red Hat Satellite 6 UI
- Log in to the Satellite web UI.
- Navigate to Insights > Inventory.
- Select the system profile to be unregistered.
- Click Actions > Unregister.
Procedure 3: Delete using the cloud.redhat.com API
Use this option only when the actual system is destroyed/re-installed. If you use the DELETE API without unregistering the client, hosts will reappear the next time the client uploads data.
Get the list of system profiles from inventory.
# curl -k --user PORTALUSERNAME https://cloud.redhat.com/api/inventory/v1/hosts | json_pp > hosts.json
If the
json_ppcommand does not exist on the system then install theperl-JSON-PPpackage.# yum install perl-JSON-PP
Get the ID of the system from the
hosts.jsonfile and confirm system details; for example, "id" : "f59716a6-5d64-4901-b65f-788b1aee25cc".# curl -k --user PORTALUSERNAME https://cloud.redhat.com/api/inventory/v1/hosts/f59716a6-5d64-4901-b65f-788b1aee25cc
Delete the system profile using the following command:
# curl -k --user PORTALUSERNAME -X "DELETE" https://cloud.redhat.com/api/inventory/v1/hosts/f59716a6-5d64-4901-b65f-788b1aee25cc
Chapter 8. Reference materials
To learn more about Red Hat Insights for Red Hat Enterprise Linux, the following resources might also be of interest:
Providing feedback on Red Hat documentation
We appreciate and prioritize your feedback regarding our documentation. Provide as much detail as possible, so that your request can be quickly addressed.
Prerequisites
- You are logged in to the Red Hat Customer Portal.
Procedure
To provide feedback, perform the following steps:
- Click the following link: Create Issue
- Describe the issue or enhancement in the Summary text box.
- Provide details about the issue or requested enhancement in the Description text box.
- Type your name in the Reporter text box.
- Click the Create button.
This action creates a documentation ticket and routes it to the appropriate documentation team. Thank you for taking the time to provide feedback.