
Assessing and Monitoring Security Policy Compliance of RHEL Systems
Understanding the Security Compliance Status of your Red Hat Enterprise Linux Infrastructure
Abstract
Chapter 1. Red Hat Insights compliance service overview
The Red Hat Insights for Red Hat Enterprise Linux compliance service enables IT security and compliance administrators to assess, monitor, and report on the security-policy compliance of RHEL systems.
The compliance service provides a simple but powerful user interface, enabling the creation, configuration, and management of SCAP security policies. With the filtering and context-adding features built in, IT security administrators can easily identify and manage security compliance issues in the RHEL infrastructure.
This documentation describes some of the functionality of the compliance service, to help users understand reporting, manage issues, and get the maximum value from the service.
You can also create Ansible Playbooks to resolve security compliance issues and share reports with stakeholders to communicate compliance status.
Additional Resources
1.1. Requirements and prerequisites
The compliance service is part of Red Hat Insights for Red Hat Enterprise Linux, which is included with your Red Hat Enterprise Linux (RHEL) subscription and can be used with all versions of RHEL currently supported by Red Hat. You do not need additional Red Hat subscriptions to use Insights for Red Hat Enterprise Linux and the compliance service.
1.2. Supported configurations
Red Hat supports specific versions of the SCAP Security Guide (SSG) for each minor version of Red Hat Enterprise Linux (RHEL). The rules and policies in an SSG version are only accurate for one RHEL minor version. In order to receive accurate compliance reporting, the system must have the supported SSG version installed.
Red Hat Enterprise Linux minor versions ship and upgrade with the supported SSG version included. However, some organizations may decide to continue using an earlier version temporarily, prior to upgrading.
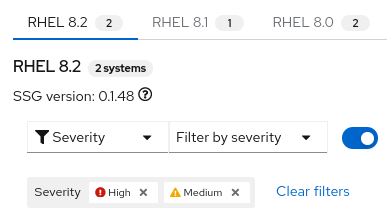
If a policy includes systems using unsupported SSG versions, an unsupported warning, preceded by the number of affected systems, is visible next to the policy in Security > Compliance > Reports.
For more information about which versions of the SCAP Security Guide are supported in RHEL, refer to Insights Compliance - Supported configurations.
Example of a compliance policy with a system running an unsupported version of SSG

1.2.1. Frequently asked questions about the compliance service
How do I interpret the SSG package name?
Packages names look like this: scap-security-guide-0.1.43-13.el7. The SSG version in this case is 0.1.43; the release is 13 and architecture is el7. The release number can differ from the version number shown in the table; however, the version number must match as indicated below for it to be a supported configuration.
What if Red Hat supports more than one SSG for my RHEL minor version?
When more than one SSG version is supported for a RHELminor version, as is the case with RHEL 7.9 and RHEL 8.1, the compliance service will use the latest available version.
Why is my old policy no longer supported by SSG?
As RHEL minor versions get older, fewer SCAP profiles are supported. To view which SCAP profiles are supported, refer to Insights Compliance - Supported configurations.
More about limitations of unsupported configurations
The following conditions apply to the results for unsupported configurations:
These results are a “best-guess” effort because using any SSG version other than what is supported by Red Hat can lead to inaccurate results.
ImportantAlthough you can still see results for a system with an unsupported version of SSG installed, those results may be considered inaccurate for compliance reporting purposes.
- Results for systems using an unsupported version of SSG are not included in the overall compliance assessment for the policy.
- Remediations are not available for rules on systems with an unsupported version of SSG installed.
1.3. Best practices
To benefit from the best user experience and receive the most accurate results in the compliance service, Red Hat recommends that you follow some best practices.
Ensure that the RHEL OS system minor version is visible to the Insights client
If the compliance service cannot see your RHEL OS minor version, then the supported SCAP Security Guide version cannot be validated and your reporting may not be accurate. The Insights client allows users to redact certain data, including Red Hat Enterprise Linux OS minor version, from the data payload that is uploaded to Red Hat Insights for Red Hat Enterprise Linux. This will prohibit accurate compliance service reporting.
To learn more about data redaction, see the following documentation: Red Hat Insights client data redaction.
Create security policies within the compliance service
Creating your organization’s security policies within the compliance service allows you to:
- Associate many systems with the policy.
- Use the supported SCAP Security Guide for your RHEL minor version.
- Edit which rules are included, based on your organization’s requirements.
1.4. User Access considerations
An Organization Administrator on your account configures settings in User Access to control access to Red Hat Insights for Red Hat Enterprise Linux features. All users on your account have access to most of the data in Insights for Red Hat Enterprise Linux. However, performing some actions requires users to have elevated access.
Access is granted in User Access in the Red Hat Hybrid Cloud Console. To grant or change access, an Organization Administrator or User Access administrator must add you to a User Access group with the required roles in Red Hat Hybrid Cloud Console > the Settings icon (⚙) > Identity & Access Management > User Access > Users.
In this documentation, prerequisites for procedures declare whether you need elevated access to perform the procedure.
Important predefined groups and roles relevant to understanding User Access are:
- Default access group
- Default admin access group
- Organization Administrator role
Brief overview about some predefined groups and roles
The following predefined groups and roles are relevant to access:
- Default access group. All users on the account are members of the Default access group. Members of the Default access group have read-only access, which allows you to view most information in Insights for Red Hat Enterprise Linux.
- Default admin access group. All users on the account who are Organization Administrators are members of this group. Users cannot modify the roles in the Red Hat-managed Default admin access group. Members of the Default admin access group have read-write access, which allows you to view and perform other actions in Insights for Red Hat Enterprise Linux.
- Organization Administrator role. All users on the account who are Organization Administrators can create and modify User Access groups and grant access to other account users. To find out whether you are an Organization Administrator, click your name in the Red Hat Hybrid Cloud Console header, in the upper right of your screen, and see whether the words “Org. Administrator” show under your username.
Requesting elevated access If you do not have access to features that you need, you can:
Contact Customer Service to get Organization Administrator details for your account.
- Provide your account number when you send the request.
Contact the Organization Administrator and ask for access, providing the following information:
- The name of the role you need access to, for example, Remediations administrator
- A link to full User Access documentation, to help inform the Organization Administrator about how to give you access.
1.4.1. User Access roles for compliance-service users
The following roles enable standard or enhanced access to remediations features in Insights for Red Hat Enterprise Linux:
- Compliance viewer. A compliance-service role that grants read access to any compliance resource.
- Compliance administrator. A compliance-service role that grants full access to any compliance resource. If a procedure requires that you be granted the Compliance administrator role or other enhanced permissions, it will be noted in the Prerequisites for that procedure.
Chapter 2. Getting started using the compliance service
This section describes how to configure your RHEL systems to report compliance data to the Insights for RHEL application. This installs necessary additional components such as the SCAP Security Guide (SSG), which is used to perform the compliance scan.
Prerequisites
- The Insights client is deployed on the system.
- You must have root privileges on the system.
Procedure
Check the version of RHEL on the system:
[user@insights]$ cat /etc/redhat-release
Review the Insights Compliance - Supported configurations article and make note of the supported SSG version for the RHEL minor version on the system.
NoteSome minor versions of RHEL support more than one version of SSG. The Insights compliance service will always show results for the latest supported version.
Check if the supported version of the SSG package is installed on the system:
Example - for RHEL 8.4 run:
[root@insights]# dnf info scap-security-guide-0.1.57-3.el8_4
If it isn’t already installed, install the supported version of SSG on the system.
Example - for RHEL 8.4 run:
[root@insights]# dnf install scap-security-guide-0.1.57-3.el8_4
In the compliance service UI, Security > Compliance > SCAP policies, add the system to a policy.
- Click Create new policy to add the system to a new security policy.
- Or, select an existing policy and click Edit policy to add the system to it.
After adding each system to the desired security policy, return to the system and run the compliance scan using:
[root@insights]# insights-client --compliance
NoteThe scan can take 1-5 minutes to complete.
- Navigate to Generating Compliance Service Reports to view results.
- Optionally, schedule the compliance jobs to run with cron.
Additional Resources
To learn which versions of the SCAP Security Guide are supported for Red Hat Enterprise Linux minor versions, see Insights Compliance - Supported configurations.
Chapter 3. Managing SCAP security policies in the Insights for RHEL compliance service
Create and manage your SCAP security policies entirely within the compliance service UI. Define new policies and select the rules and systems you want to associate with them, and edit existing policies as your requirements change.
Unlike most other Red Hat Insights for Red Hat Enterprise Linux services, the compliance service does not run automatically on a default schedule. In order to upload OpenSCAP data to the Insights for Red Hat Enterprise Linux application, you must run insights-client --compliance, either on-demand or on a scheduled job that you set.
Additional resources
3.1. Creating new SCAP policies
You must add each Insights for Red Hat Enterprise Linux-registered system to one or more security policies before you can perform a scan or see results for that scan in the compliance service UI. To create a new policy, and include specific systems and rules, complete the following steps:
If your RHEL servers span across multiple major releases of RHEL, you must create a separate policy for each major release. For example, all of your RHEL 7 servers would be on one Standard System Security Profile for RHEL policy and all of your RHEL 8 servers will be on another.
Procedure
- Navigate to the Security > Compliance > SCAP Policies page.
- Click the Create new policy button.
On the Create SCAP policy page of the wizard, select the RHEL major version of the systems you will include in the policy.
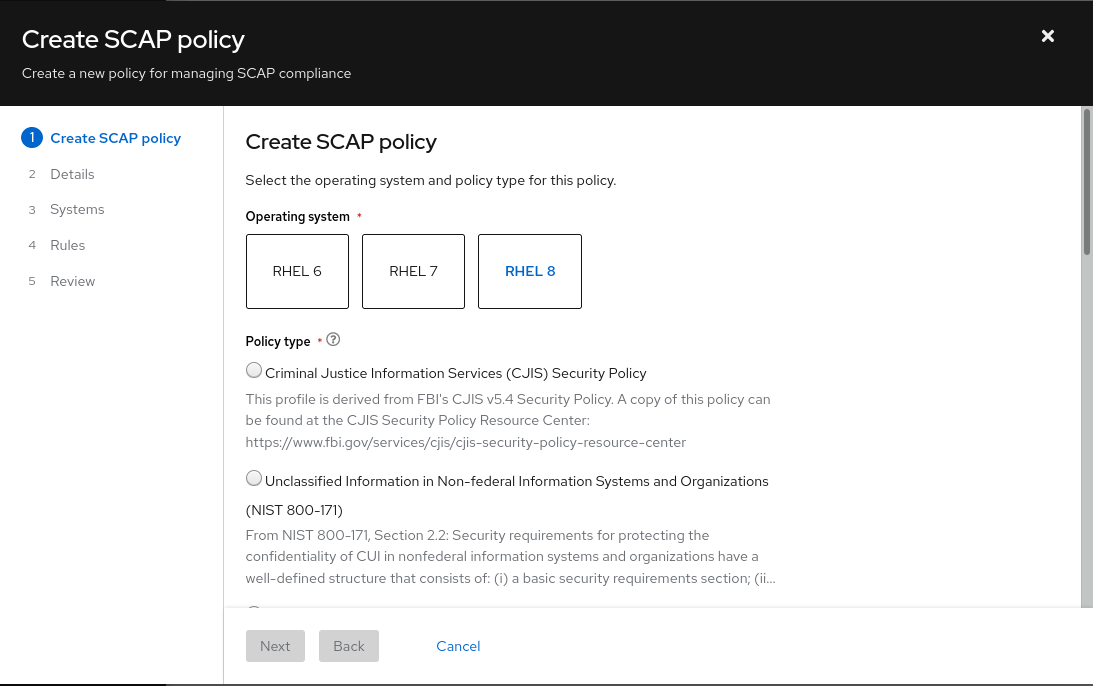
- Select one of the policy types available for that RHEL major version, then click Next.
- On the Details page, accept the name and description already provided or provide your own more meaningful entries.
- Optionally, add a Business objective to give context, for example, “CISO mandate.”
- Define a compliance threshold acceptable for your requirements and click Next.
- Select the Systems to include on this policy and click Next. Your selection of a RHEL major version in the first step automatically determines which systems can be added to this policy.
Select which Rules to include with each policy. Because each minor version of RHEL supports the use of a specific SCAP Security Guide (SSG) version (sometimes more than one, in which case we use the latest), the rule set for each RHEL minor version is slightly different and must be selected separately.

Optionally, use the filtering and search capabilities to refine the list of rules.
For example, to show only the highest severity rules, click the primary filter dropdown and select Severity. In the secondary filter, check the boxes for High and Medium.
- The rules shown by default are those designated for that policy type and that version of SSG. By default, the Selected only toggle next to the filter boxes is enabled. You may remove this toggle if so desired.
- Repeat this process as needed for each RHEL minor version tab.
- After you select rules for each Red Hat Enterprise Linux minor version SSG, click Next.
- On the Review page, verify that the information shown is correct, then click Finish.
- Give the app a minute to create the policy, then click the Return to application button to view your new policy.
You have to go to the system and run the compliance scan before results will be shown in the compliance service UI.
3.2. Editing compliance policies
After creating a compliance policy, you can later edit the policy to change the policy details, or which rules or systems are included.
Use the following procedures to edit a policy to suit the needs of your organization.
User Access Note
Editing the included rules and systems in a policy requires that a user be a member of a User Access Group with the Compliance adminstrator role. The Compliance admistrator role includes enhanced permissions that are not granted by default to all Insights for Red Hat Enterprise Linux users.
3.2.1. Editing policy details
Prerequisites
- You are logged in to the Red Hat Hybrid Cloud Console.
Procedure
- Navigate to the Security > Compliance > SCAP policies page.
- Locate the policy you want to edit.
- Click on the policy name. This opens the policy details view.
Wherever you see a pencil icon, you can click on the icon to edit the details in that field. Editable fields include
- Compliance threshold
- Business objective
- Policy description
- After you edit a field, click the blue checkmark to the right of the field to save your input.
3.2.2. Editing included rules
Prerequisites
- You are logged in to the Red Hat Hybrid Cloud Console.
- You have Compliance administrator User Access permissions.
Procedure
- Navigate to the Security > Compliance > SCAP policies page.
- Locate the policy you want to edit.
-
On the right side of the policy row, click the More actions icon,
 , and click Edit policy.
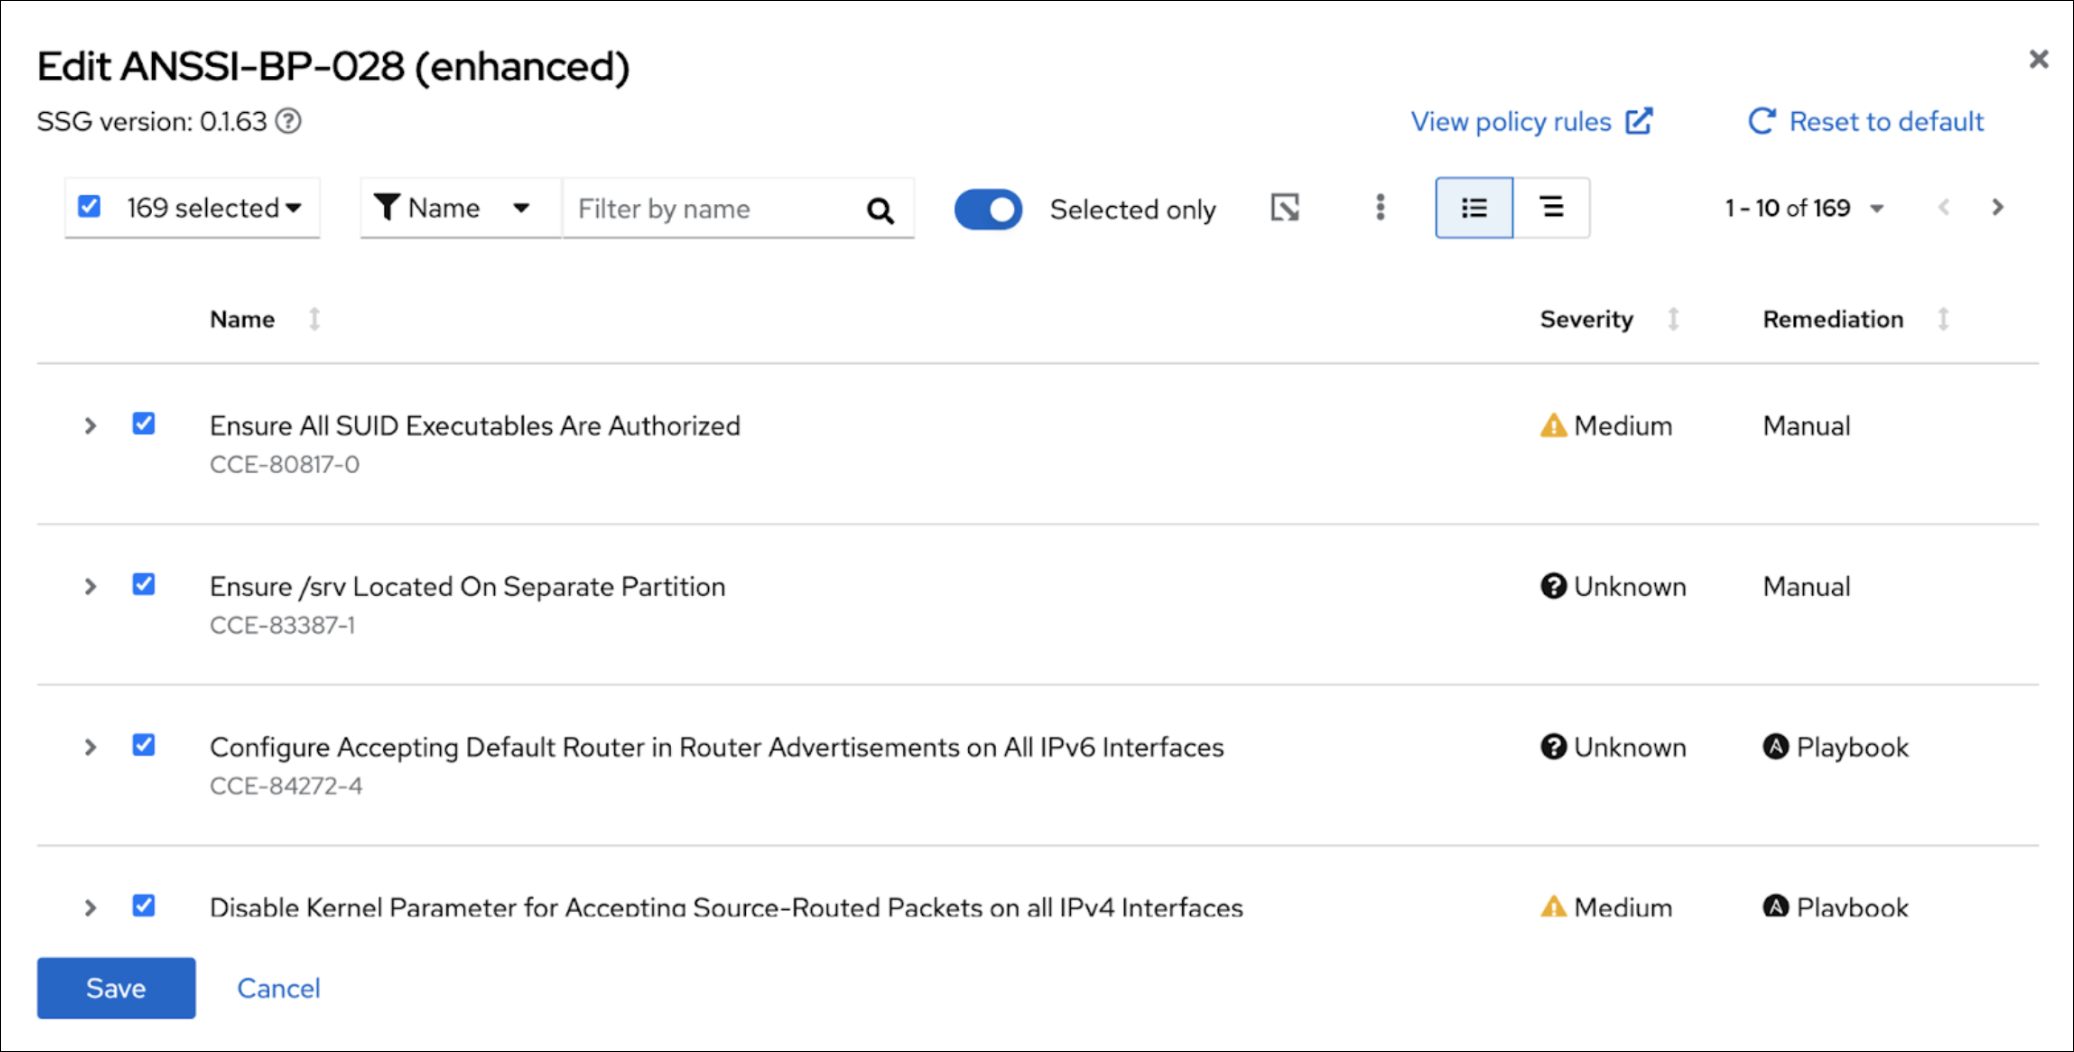
- In the Edit popup, click the Rules tab.
Click on a RHEL minor version.
ImportantBecause a different SCAP Style Guide (SSG) version exists for each minor version of RHEL, you must edit the rules for each minor version of RHEL separately.
Use the Name filter and search function to locate the rules to remove.
NoteWith the Name primary filter selected, you can search by the rule name or its identifier.
Uncheck the box next to any rule you want to remove.
Or, check the box next to any rule you want to add.
- Repeat these steps for each RHEL minor version tab.
- Click Save.
Verification
- Navigate to the Security > Compliance > SCAP policies page and locate the edited policy.
- Click on the policy and verify that the included rules are consistent with the edits you made.
3.2.3. Editing included systems
- Navigate to the Security > Compliance > SCAP policies page.
- Locate the policy you want to edit.
-
On the right side of the policy row, click the More actions icon,
, and click Edit policy.
In the Edit popup, click the Systems tab.
A list of all available systems is displayed.
Systems that are already included in the policy have a checkmark in the box to the left side of the system name.
Systems without a checkmark next to the system name are not included in this policy.
Search for a system by name. To include that system in the policy, check the box next to the system name.
Or, to remove the system from the policy, uncheck the box next to the system name.
- Click Save to save your changes.
Verification
- Navigate to the Security > Compliance > SCAP policies page and locate the edited policy.
- Click on the policy and verify that the included systems are consistent with the edits you made.
3.3. Viewing policy rules
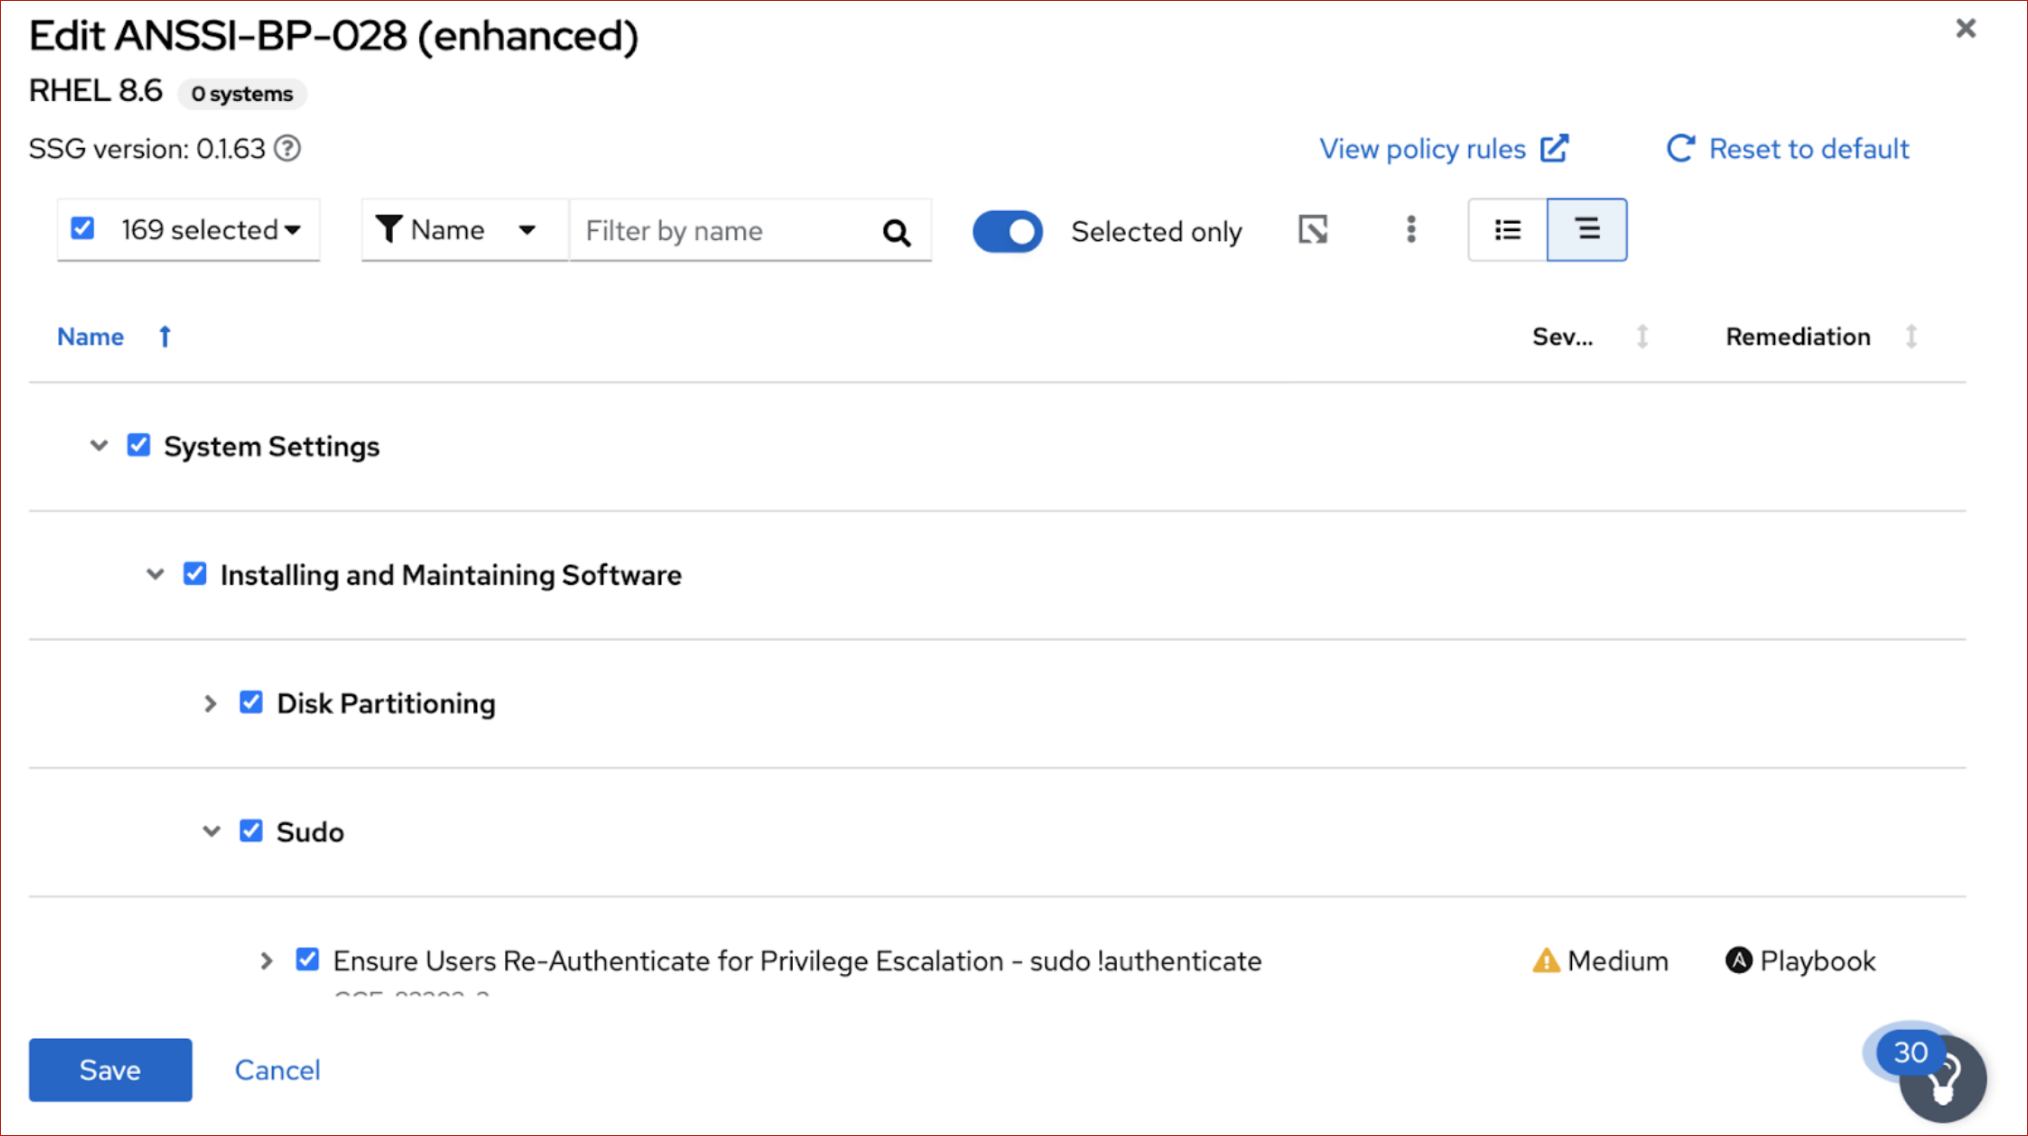
Insights Compliance displays rules in categorized groups, so that similar rules are close together. You can see rules grouped according to category or classification for the compliance checks that will take place for a policy. The nested group structure (or tree view) is the default view. The tree view provides additional contextual information that allows you to see categories of rules, and at times, multiple rules for a policy. The tree view also allows you to see rules that have editable values (for more information about editable rule values, see “Editing values for policy rules”).
You can view rules in the tree view or the classic view. In the classic view, rules appear in a linear list.
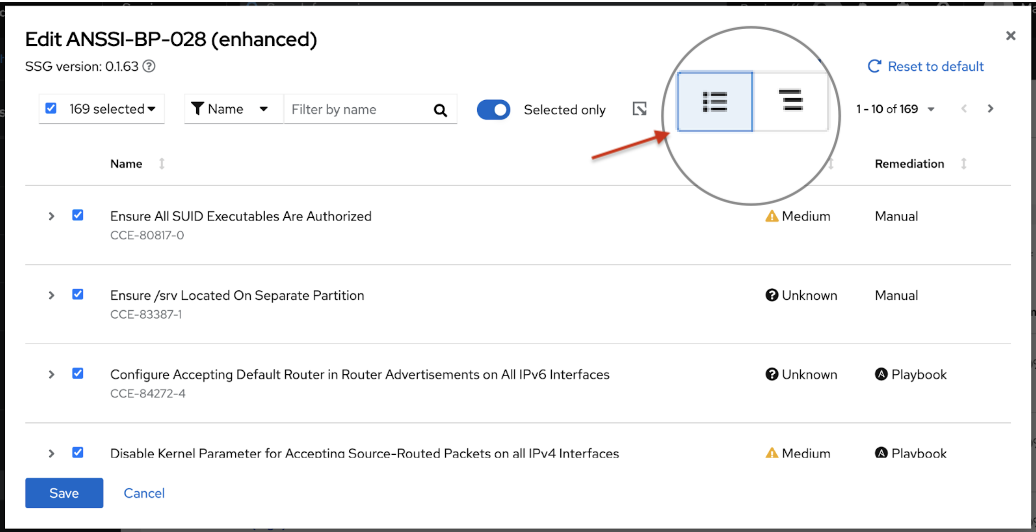
You can switch from the tree view to the classic view by toggling between the two buttons under View policy rules.
To see rules listed in tree view format, click the tree view icon (
![]() ).
).
To see rules listed in the classic view format, click the classic view icon (
![]() ).
).
- When you use the filter feature to search for a specific rule, the view automatically switches to the classic view.
- After you expand a rule to show additional information, it will stay in the expanded view, even if you switch to a different view.
You can switch views when you are:
- Editing existing policies
- Creating new SCAP policies
- Generating Compliance Service Reports (see "Exporting reports" topics)
3.4. Editing values for policy rules
Organizations sometimes need a level of customization for their regulatory compliance policies based on their security requirements. One level of customization is adding or removing the rules that do not apply to your organization’s needs. You can customize your SCAP policies in the compliance service by editing the value of rules within a policy. Editing specific values provides more granular control, allowing accurate tracking to meet organizational security needs. By editing policies to meet your specific needs, you can create a compliance framework that is relevant and meaningful to your security posture.
Understanding Rule Values
A rule can appear more than one time for a given SCAP Security Guide (SSG) version, so it is possible to use the same value for more than one rule within the same SSG version. In such a case, when you update the value of a rule for a given policy in the SSG version, this will not update the rule in other policies. It will only update the rule for the current policy and SSG version you are updating.
Additionally, rules can and will be different from one minor version of RHEL to another. For example, if you have RHEL 8.5 and RHEL 8.7, changing the value of a rule for the RHEL 8.5 rules will not automatically edit the value in RHEL 8.7. You must change values individually for each listed RHEL version, as needed. You will also find that rules in one version are not the same in another version.
Use the following procedure to edit a rule’s values.
Prerequisites
- You are logged in to the Red Hat Hybrid Cloud Console.
- You are logged in with the role of Compliance administrator or a user with “edit policy” permissions. For more information about insights Compliance role-based access controls (RBAC), see User Access roles for compliance service users.
Procedure
- Navigate to Security > Compliance > SCAP policies.
- Locate the policy you want to edit.
- Click on a policy that has a rule that you want to edit.
-
Click the Rules tab. In the Filter by name field, enter the first few letters of the rule that you want to edit. For this example, enter
ANSSI. - Locate the rule that you want to edit, and click the caret beside the rule to expand the content.
-
Locate the Depends on values field within the expanded text, and click the edit value icon (
 ) to change the value. (If you do not see Depends on values, the value is not editable.)
-
Edit the value. To change back to the default value, click the revert icon (
 ). Check your edit carefully because edited values are not check or validate the entered values. For example, if you enter a symbol in the value field where numeric characters are expected, you will not get an error message.
-
Click the save icon (
 ) to save the new value. You will see an alert on your screen indicating Rule value updated.
-
(Optional) To change an edited value back to the default value, click the revert icon (
). You will see an alert message: Rule values reset to default. You can revert back to the default value while an edit is in progress or after saving the edit. The presence of the revert icon indicates the value is different from the default value.
Currently, the compliance service does not support rule values that have more than 50 characters or rules that have more than one value.
You can only edit rule values for rules in the SCAP policies section of the compliance service. You can see your edits in Security > Compliance > Reports section, but will not be able to edit them in the reporting section.
Chapter 4. Analyzing and triaging your compliance reports
The compliance service displays data for each policy and system registered (and reporting data) to the service. This can be a lot of data, most of which might not be relevant to your immediate goals.
The following sections discuss ways to refine the bulk of compliance service data—in Reports, SCAP policies, and Systems—to focus on the systems or policies that matter the most to you.
The compliance service enables users to set filters on lists of systems, rules, and policies. Like other Insights for Red Hat Enterprise Linux services, the compliance service also enables filtering by system-group tags. However, because compliance-registered systems use a different reporting mechanism, the tag filters must be set directly in lists of systems in the compliance UI views, rather than from the global, Filter by status dropdown used elsewhere in the Insights application.
To see accurate data for your systems, always run insights-client --compliance on each system prior to viewing the results in the UI.
4.1. Compliance reports
From Security > Compliance > Reports, use the following primary and secondary filters to focus on a specific or narrow set of reports:
- Policy name. Search for a policy by name.
- Policy type. Select from the policy types configured for your infrastructure in the compliance service.
- Operating system. Select one or more RHEL OS major versions.
- Systems meeting compliance. Show policies for which a percentage (range) of included systems are compliant.
4.2. SCAP policies
From Security > Compliance > SCAP policies, use the Filter by name search box to locate a specific policy by name. Then click on the policy name to see the policy card, which includes the following information:
- Details. View details such as compliance threshold, business objective, OS, and SSG version.
- Rules. View and filter the rules included in the specific SSG version of the policy by Name, Severity and Remediation available. Then sort the results by Rule name, Severity or Ansible Playbook support.
- Systems. Search by system name to locate a specific system associated with the policy then click the system name to see more information about that system and issues that may affect it.
4.3. Systems
The default functionality on Security > Compliance > Systems is to search by system name.
- Tags. Search by system group or tag name.
- Name. Search by system name.
- Policy. Search by policy name and see the systems included in that policy.
- Operating system. Search by RHEL OS major versions to see only RHEL 7 or RHEL 8 systems.
4.4. Searching
The search function in the compliance service works in the context of the page you are viewing.
- SCAP Policies. Search for a specific policy by name.
- Systems. Search by system name, policy, or Red Hat Enterprise Linux operating system major version.
- Rules list (single system). The rules list search function allows you to search by the rule name or identifier. Identifiers are shown directly below the rule name.
Chapter 5. System tags and groups
Red Hat Insights for Red Hat Enterprise Linux enables administrators to filter groups of systems in inventory and in individual services using group tags. Groups are identified by the method of system data ingestion to Insights for Red Hat Enterprise Linux. Insights for Red Hat Enterprise Linux enables filtering groups of systems by those running SAP workloads, by Satellite host group, by Microsoft SQL Server workload, and by custom tags that are defined by system administrators with root access to configure the Insights client on the system.
As of Spring 2022, inventory, advisor, compliance, vulnerability, patch, drift, and policies enable filtering by groups and tags. Other services will follow.
Unlike the other services that enable tagging, the compliance service sets tags within lists of systems in the compliance service UI. For more information, see the following section Group and tag filters in the compliance service.
Use the global, Filter results box to filter by SAP workloads, Satellite host groups, MS SQL Server workloads, or by custom tags added to the Insights client configuration file.
Prerequisites
The following prerequisites and conditions must be met to use the tagging features in Red Hat Insights for Red Hat Enterprise Linux:
- The Red Hat Insights client is installed and registered on each system.
-
You must have root permissions, or their equivalent, to create custom tags or change the
/etc/insights-client/tags.yamlfile.
5.1. Group and tag filters in the compliance service
The compliance service enables users to apply tag and group filters to systems reporting compliance data; however, they are not set using the Filter by status dropdown. Unlike most of the other services in the Insights for Red Hat Enterprise Linux application, the compliance service only shows data for systems under the following conditions:
- The system is associated with a compliance service security policy.
-
The system is reporting compliance data to insights using the
insights-client --compliancecommand.
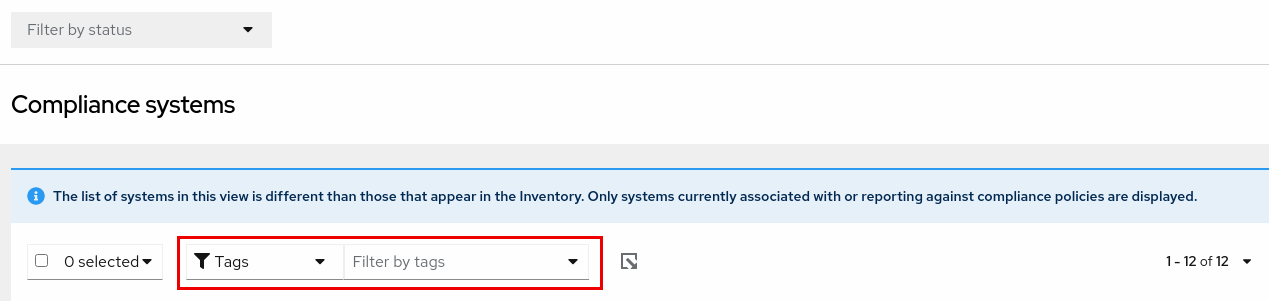
Because of those conditions, compliance-service users have to set tag and group filters using the primary and secondary filters located above lists of systems in the compliance service UI.
Tag and group filters above systems list in the compliance service
5.2. SAP workloads
As Linux becomes the mandatory operating system for SAP ERP workloads in 2025, Red Hat Enterprise Linux and Red Hat Insights for Red Hat Enterprise Linux are working to make Insights for Red Hat Enterprise Linux the management tool of choice for SAP administrators.
As part of this ongoing effort, Insights for Red Hat Enterprise Linux automatically tags systems running SAP workloads and by SAP ID (SID), without any customization needed by administrators. Users can easily filter those workloads throughout the Insights for Red Hat Enterprise Linux application by using the global Filter by tags drop-down menu.
5.3. Satellite host groups
Satellite host groups are configured in Satellite and recognized automatically by Insights for Red Hat Enterprise Linux.
5.4. Microsoft SQL Server workloads
Using the global Filter by tags feature, Red Hat Insights for Red Hat Enterprise Linux users can select groups of systems running Microsoft SQL Server workloads.
In May of 2019, the Red Hat Insights team introduced a new set of Insights for Red Hat Enterprise Linux recommendations for Microsoft SQL Server running on Red Hat Enterprise Linux (RHEL). These rules alert administrators to operating system level configurations that do not conform to the documented recommendations from Microsoft and Red Hat.
A limitation of these rules was that they primarily analyzed the operating system and not the database itself. The latest release of Insights for Red Hat Enterprise Linux and RHEL 8.5, introduces Microsoft SQL Assessment API. The SQL Assessment API provides a mechanism to evaluate the database configuration of MS SQL Server for best practices. The API is delivered with a rule set containing best practice rules suggested by the Microsoft SQL Server Team. While this rule set is enhanced with the release of new versions, the API is built with the intent to give a highly customizable and extensible solution, which enables users to tune the default rules and create their own.
The SQL Assessment API is supported by PowerShell for Linux (available from Microsoft), and Microsoft has developed a PowerShell script that can be used to call the API and store its results as a JSON formatted file. With RHEL 8.5, the Insights client now uploads this JSON file and presents the results in an easy-to-understand format in the Insights for Red Hat Enterprise Linux UI.
For more information about SQL Server assessment in Insights for Red Hat Enterprise Linux, see SQL Server database best practices now available through Red Hat Insights.
5.4.1. Setting up SQL Server assessments
To configure the Microsoft SQL Assessment API to provide information to Red Hat Insights, the database administrator needs to take the following steps.
Procedure
In the database you wish to assess, create a login for SQL Server assessments using SQL Authentication. The following Transact-SQL creates a login. Replace <*PASSWORD*> with a strong password:
USE [master]
GO
CREATE LOGIN [assessmentLogin] with PASSWORD= N'<*PASSWORD*>’
ALTER SERVER ROLE [sysadmin] ADD MEMBER [assessmentLogin]
GO
Store the credentials for login on the system as follows, again replacing <*PASSWORD*> with the password you used in step 1.
# echo "assessmentLogin" > /var/opt/mssql/secrets/assessment
# echo "<*PASSWORD*>" >> /var/opt/mssql/secrets/assessment
Secure the credentials used by the assessment tool by ensuring that only the mssql user can access the credentials.
# chmod 0600 /var/opt/mssql/secrets/assessment
# chown mssql:mssql /var/opt/mssql/secrets/assessment
Download PowerShell from the microsoft-tools repository. This is the same repository you configured when you installed the
mssql-toolsandmssqlodbc17packages as part of SQL Server installation.# yum -y install powershell
Install the SQLServer module for PowerShell. This module includes the assessment API.
# su mssql -c "/usr/bin/pwsh -Command Install-Module SqlServer"
Download the runassessment script from the Microsoft examples GitHub repository. Ensure it is owned and executable by mssql.
# /bin/curl -LJ0 -o /opt/mssql/bin/runassessment.ps1 https://raw.githubusercontent.com/microsoft/sql-server-samples/master/samples/manage/sql-assessment-api/RHEL/runassessment.ps1
# chown mssql:mssql /opt/mssql/bin/runassessment.ps1
# chmod 0700 /opt/mssql/bin/runassessment.ps1
Create the directory that will store the log file used by Red Hat Insights. Again, make sure it is owned and executable by mssql.
# mkdir /var/opt/mssql/log/assessments/
# chown mssql:mssql /var/opt/mssql/log/assessments/
# chmod 0700 /var/opt/mssql/log/assessments/
You can now create your first assessment, but be sure to do so as the user mssql so that subsequent assessments can be run automatically via cron or systemd more securely as the mssql user.
# su mssql -c "pwsh -File /opt/mssql/bin/runassessment.ps1"
Insights for Red Hat Enterprise Linux will automatically include the assessment next time it runs, or you can initiate Insights client by running this command:
# insights-client
5.4.1.1. Setting up the SQL Assessment on a timer
Because SQL Server Assessments can take 10 minutes or more to complete, it may or may not make sense for you to run the assessment process automatically every day. If you would like to run them automatically, the Red Hat SQL Server community has created systemd service and timer files to use with the assessment tool.
Procedure
Download the following files from Red Hat public SQL Server Community of Practice GitHub site.
-
mssql-runassessment.service -
mssql-runassessment.timer
-
Install both files in the directory
/etc/systemd/system/:# cp mssql-runassessment.service /etc/systemd/system/ # cp mssql-runassessment.timer /etc/systemd/system/ # chmod 644 /etc/systemd/system/
Enable the timer with:
# systemctl enable --now mssql-runassessment.timer
5.5. Custom system tagging
By applying custom grouping and tagging to your systems, you can add contextual markers to individual systems, filter by those tags in the Insights for Red Hat Enterprise Linux application, and more easily focus on related systems. This functionality can be especially valuable when deploying Insights for Red Hat Enterprise Linux at scale, with many hundreds or thousands of systems under management.
In addition to the ability to add custom tags to several Insights for Red Hat Enterprise Linux services, you can add predefined tags. The advisor service can use those tags to create targeted recommendations for your systems that might require more attention, such as those systems that require a higher level of security.
To create custom and predefined tags, you must have root permissions, or their equivalent, to add to, or change the /etc/insights-client/tags.yaml file.
5.5.1. Tag structure
Tags use a namespace/key=value paired structure.
-
Namespace. The namespace is the name of the ingestion point, insights-client, and cannot be changed. The
tags.yamlfile is abstracted from the namespace, which is injected by the Insights client before upload. - Key. The key can be a user-chosen key or a predefined key from the system. You can use a mix of capitalization, letters, numbers, symbols and whitespace.
- Value. Define your own descriptive string value. You can use a mix of capitalization, letters, numbers, symbols and whitespace.
The advisor service includes Red Hat-supported predefined tags.
5.5.2. Creating a tags.yaml file and adding a custom group
Create and add tags to /etc/insights-client/tags.yaml simply by using insights-client --group=<name-you-choose>, which performs the following actions:
-
Creates the
etc/insights-client/tags.yamlfile -
Adds the
group=key and<name-you-choose>value totags.yaml - Uploads a fresh archive from the system to the Insights for Red Hat Enterprise Linux application so the new tag is immediately visible along with your latest results
After creating the initial group tag, add additional tags as needed by editing the /etc/insights-client/tags.yaml file.
The following procedure shows how to create the /etc/insights-client/tags.yaml file and the initial group, then verify the tag exists in the Insights for Red Hat Enterprise Linux inventory.
Procedure to create new group
Run the following command as root, adding your custom group name after
--group=:[root@server ~]# insights-client --group=<name-you-choose>
Example of tags.yaml format
The following example of a tags.yaml file shows an example of file format and additional tags added for the new group:
# tags
---
group: eastern-sap
name: Jane Example
contact: jexample@corporate.com
Zone: eastern time zone
Location:
- gray_rack
- basement
Application: SAP
Procedure to verify your custom group was created
- Navigate to Red Hat Insights > RHEL > Inventory and log in if necessary.
- Click the Filter results dropdown menu.
- Scroll through the list or use the search function to locate the tag.
- Click the tag to filter by it.
- Verify that your system is among the results on the advisor systems list.
Procedure to verify that the system is tagged
- Navigate to Red Hat Insights > RHEL > Inventory and log in if necessary.
- Activate the Name filter and begin typing the system name until you see your system, then select it.
- Verify that, next to the system name, the tag symbol is darkened and shows a number representing the correct number of tags applied.
5.5.3. Editing tags.yaml to add or change tags
After creating the group filter, edit the contents of /etc/insights-client/tags.yaml as needed to add or modify tags.
Procedure
Using the command line, open the tag configuration file for editing.
[root@server ~]# vi /etc/insights-client/tags.yamlEdit content or add additional values as needed. The following example shows how you can organize
tags.yamlwhen adding multiple tags to a system.# tags --- group: eastern-sap location: Boston description: - RHEL8 - SAP key 4: value
NoteAdd as many key=value pairs as you need. Use a mix of capitalization, letters, numbers, symbols, and whitespace.
- Save your changes and close the editor.
Optionally, generate an upload to Insights for Red Hat Enterprise Linux.
# insights-client
5.5.4. Using predefined system tags to get more accurate Red Hat Insights advisor service recommendations and enhanced security
Red Hat Insights advisor service recommendations treat every system equally. However, some systems might require more security than others, or require different networking performance levels. In addition to the ability to add custom tags, Red Hat Insights for Red Hat Enterprise Linux provides predefined tags that the advisor service can use to create targeted recommendations for your systems that might require more attention.
To opt in and get the extended security hardening and enhanced detection and remediation capabilities offered by predefined tags, you need to configure the tags. After configuration, the advisor service provides recommendations based on tailored severity levels, and preferred network performance that apply to your systems.
To configure the tags, use the /etc/insights-client/tags.yaml file to tag systems with predefined tags in a similar way that you might use it to tag systems in the inventory service. The predefined tags are configured using the same key=value structure used to create custom tags. Details about the Red Hat-predefined tags are in the following table.
Table 5.1. List of Supported Predefined Tags
| Key | Value | Note |
|---|---|---|
| security |
|
With the |
|
|
| The preferred network performance (either latency or throughput according to your business requirement) would affect the severity of an advisor service recommendation to a system. |
The predefined tag keys names are reserved. If you already use the key security, with a value that differs from one of the predefined values, you will not see a change in your recommendations. You will only see a change in recommendations if your existing key=value is the same as one of the predefined keys. For example, if you have a key=value of security: high, your recommendations will not change because of the Red Hat-predefined tags. If you currently have a key=value pair of security: strict, you will see a change in the recommendations for your systems.
5.5.5. Configuring predefined tags
You can use the Red Hat Insights for Red Hat Enterprise Linux advisor service’s predefined tags to adjust the behavior of recommendations for your systems to gain extended security hardening and enhanced detection and remediation capabilities. You can configure the predefined tags by following this procedure.
Prerequisites
- You have root-level access to your system
- You have Insights client installed
- You have systems registered within the Insights client
-
You have already created the
tags.yamlfile. See Creating a tags.yaml file and adding a custom group
Procedure
Using the command line, and your preferred editor, open
/etc/insights-client/tags.yaml. (The following example uses Vim.)[root@server ~]# vi /etc/insights-client/tags.yaml
Edit the
/etc/insights-client/tags.yamlfile to add the predefinedkey=valuepair for the tags. This example shows how to addsecurity: strictandnetwork_performance: latencytags.# cat /etc/insights-client/tags.yaml group: redhat location: Brisbane/Australia description: - RHEL8 - SAP security: strict network_performance: latency
- Save your changes.
- Close the editor.
Optional: Run the
insights-clientcommand to generate an upload to Red Hat Insights for Red Hat Enterprise Linux, or wait until the next scheduled Red Hat Insights upload.[root@server ~]# insights-client
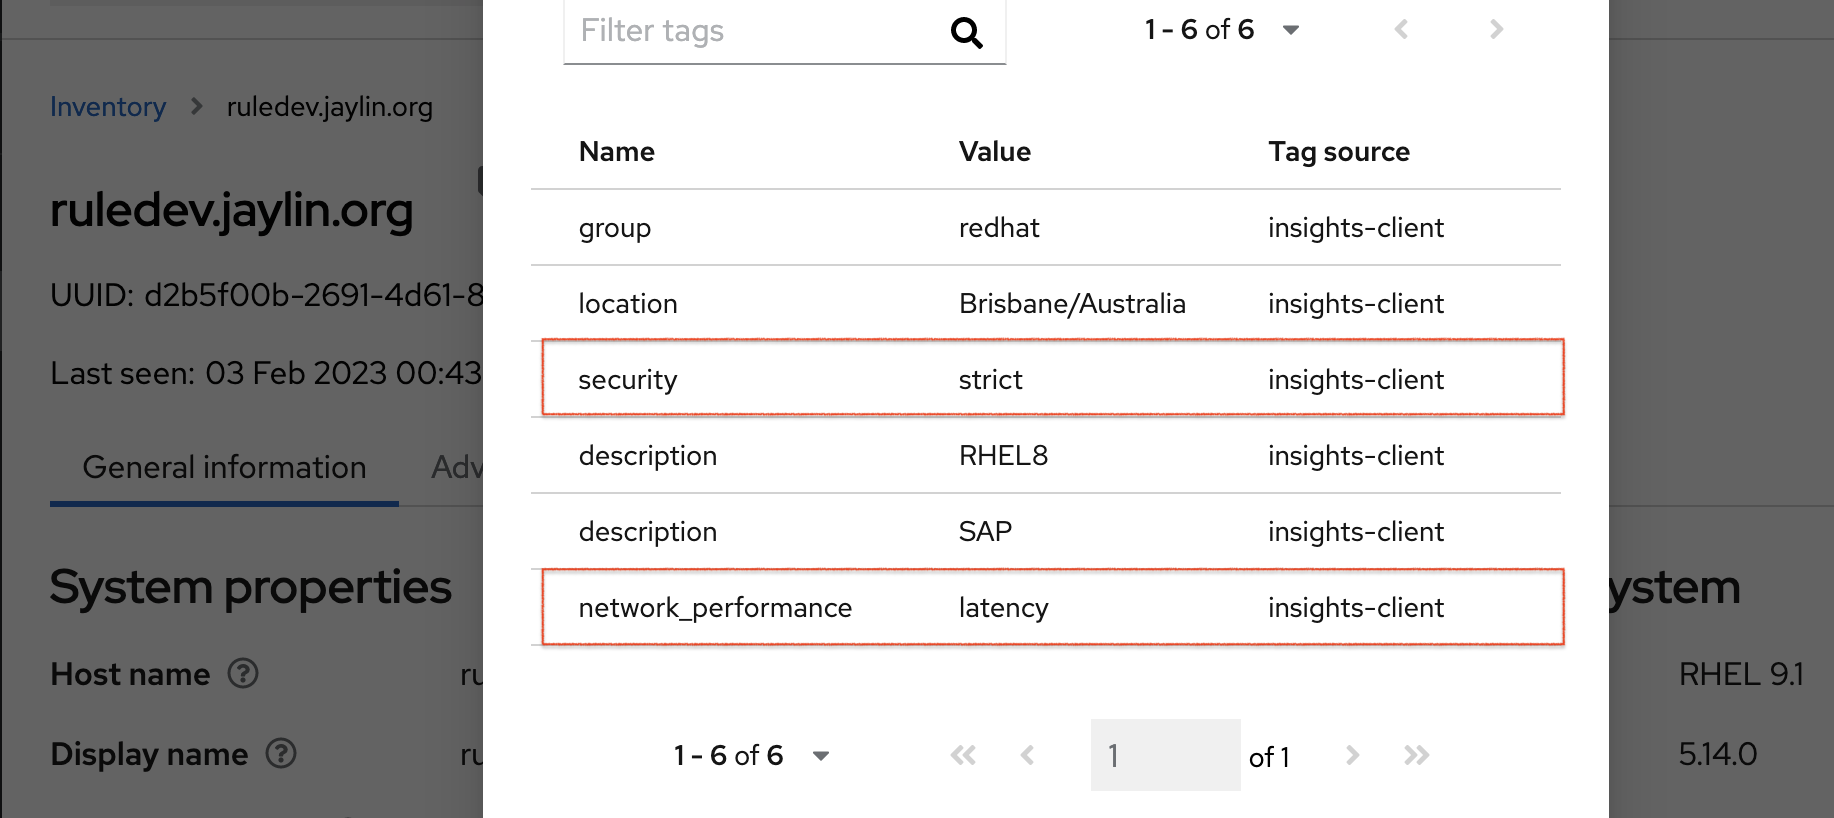
Confirming that predefined tags are in your production area
After generating an upload to Red Hat Insights (or waiting for the next scheduled Insights upload), you can find out whether the tags are in the production environment by accessing Red Hat Insights > RHEL > Inventory. Find your system and look for the newly created tags. You see a table that shows:
- Name
- Value
- Tag Source (for example, insights-client).
The following image shows an example of what you see in inventory after creating the tag.
Example of recommendations after applying a predefined tag
The following image of the advisor service shows a system with the network_performance: latency tag configured.
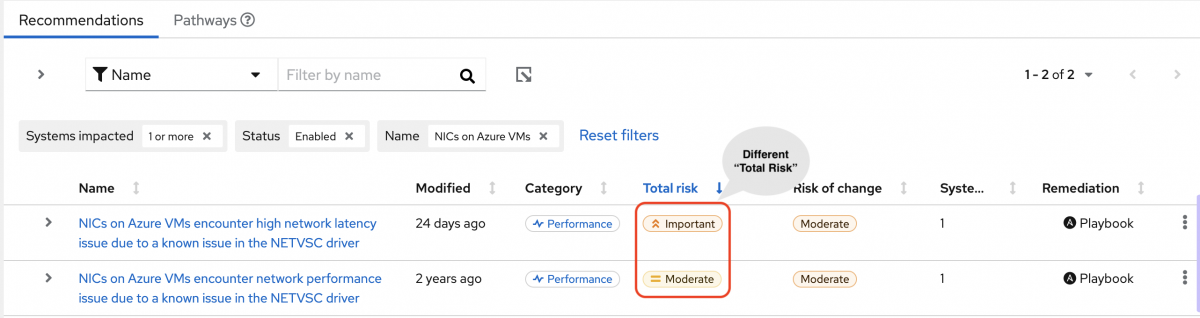
The system shows a recommendation with a higher Total Risk level of Important. The system without the network_performance: latency tag has a Total Risk of Moderate. You can make decisions about prioritizing the system with higher Total Risk.
Chapter 6. Reference materials
To learn more about the compliance service, see the following resources:
Providing feedback on Red Hat documentation
We appreciate and prioritize your feedback regarding our documentation. Provide as much detail as possible, so that your request can be quickly addressed.
Prerequisites
- You are logged in to the Red Hat Customer Portal.
Procedure
To provide feedback, perform the following steps:
- Click the following link: Create Issue
- Describe the issue or enhancement in the Summary text box.
- Provide details about the issue or requested enhancement in the Description text box.
- Type your name in the Reporter text box.
- Click the Create button.
This action creates a documentation ticket and routes it to the appropriate documentation team. Thank you for taking the time to provide feedback.