
Automating RHHI for Virtualization deployment
Use Ansible to deploy your hyperconverged solution without manual intervention
Abstract
Making open source more inclusive
Red Hat is committed to replacing problematic language in our code, documentation, and web properties. We are beginning with these four terms: master, slave, blacklist, and whitelist. Because of the enormity of this endeavor, these changes will be implemented gradually over several upcoming releases. For more details, see our CTO Chris Wright’s message.
Chapter 1. Ansible based deployment workflow
You can use Ansible to deploy Red Hat Hyperconverged Infrastructure for Virtualization on a single node or on 3 to 12 nodes.
The preparation of the inventory file based on the user requirements is a one time process and is created with the help of the example inventory files available.
The workflow for deploying RHHI for Virtualization using Ansible is as follows:
Check requirements.
Verify that your planned deployment meets support requirements: Requirements, and fill in the installation checklist so that you can refer to it during the deployment process.
Install operating systems.
- Install an operating system on each physical machine that will act as a hyperconverged host: Installing hyperconverged hosts.
- (Optional) Install an operating system on each physical or virtual machine that will act as an Network-Bound Disk Encryption (NBDE) key server: Installing NBDE key servers.
Modify firewall rules for additional software.
- (Optional) Modify firewall rules for disk encryption: Section 5.1, “Modifying firewall rules for disk encryption”.
Configure authentication between hyperconverged hosts.
Configure key-based SSH authentication without a password to enable automated configuration of the hosts: Configure key-based SSH authentication.
(Optional) Configure disk encryption.
- Define the details of your environment in inventory and playbook files: Defining deployment details
- Execute the Ansible playbook to deploy RHHI for Virtualization: Executing the deployment playbook
- Verify your deployment.
Chapter 2. Support requirements
Review this section to ensure that your planned deployment meets the requirements for support by Red Hat.
2.1. Operating system
Red Hat Hyperconverged Infrastructure for Virtualization (RHHI for Virtualization) uses Red Hat Virtualization Host 4.4 as a base for all other configuration. Red Hat Enterprise Linux hosts are not supported.
See Requirements in the Red Hat Virtualization Planning and Prerequisites Guide for details on requirements of Red Hat Virtualization.
2.1.1. Browser requirements
Support for the web console and Red Hat Virtualization Administrator Portal varies based on the web browser you are using to access them.
Generally, use the most recent possible version of Mozilla Firefox, Google Chrome, or Microsoft Edge.
For details on browser support for the web console, see Logging in to the web console.
For details on browser support for the Administrator Portal, see Browser requirements for Red Hat Virtualization.
2.2. Physical machines
Red Hat Hyperconverged Infrastructure for Virtualization (RHHI for Virtualization) requires at least 3 physical machines. Scaling to 6, 9, or 12 physical machines is also supported; see Scaling for more detailed requirements.
Each physical machine must have the following capabilities:
- at least 2 NICs (Network Interface Controllers) per physical machine, for separation of data and management traffic (see Section 2.5, “Networking” for details)
for small deployments:
- at least 12 cores
- at least 64GB RAM
- at most 48TB storage
for medium deployments:
- at least 12 cores
- at least 128GB RAM
- at most 64TB storage
for large deployments:
- at least 16 cores
- at least 256GB RAM
- at most 80TB storage
2.3. Virtual machines
The number of virtual machines that you are able to run on your hyperconverged deployment depends greatly on what those virtual machines do, and what load they are under. Test your workload’s CPU, memory, and throughput requirements and provision your hyperconverged environment accordingly.
See Virtualization limits for Red Hat Virtualization for information about maximum numbers of virtual machines and virtual CPUs, and use the RHHI for Virtualization Sizing Tool for assistance planning your deployment.
OpenShift Container Storage on top of Red Hat Hyperconverged Infrastructure for Virtualization (hyperconverged nodes that host virtual machines installed with Red Hat OpenShift Container Platform) is not a supported configuration.
2.4. Hosted Engine virtual machine
The Hosted Engine virtual machine requires at least the following:
- 1 dual core CPU (1 quad core or multiple dual core CPUs recommended)
- 4GB RAM that is not shared with other processes (16GB recommended)
- 25GB of local, writable disk space (50GB recommended)
- 1 NIC with at least 1Gbps bandwidth
For more information, see Requirements in the Red Hat Virtualization 4.4 Planning and Prerequisites Guide.
2.5. Networking
Fully-qualified domain names that are forward and reverse resolvable by DNS are required for all hyperconverged hosts and for the Hosted Engine virtual machine.
If external DNS is not available, for example in an isolated environment, ensure that the /etc/hosts file on each node contains the front and back end addresses of all hosts and the Hosted Engine node.
IPv6 is supported in IPv6-only environments (including DNS and gateway addresses). Environments with both IPv4 and IPv6 addresses are not supported.
Red Hat recommends usage of separate networks: a front-end management network for virtual machine traffic and a back-end storage network for gluster traffic and virtual machine migration.
Figure 2.1. Network diagram

Red Hat recommends each node to have two Ethernet ports, one for each network. This ensures optimal performance. For high availability, place each network on a separate network switch. For improved fault tolerance, provide a separate power supply for each switch.
- Front-end management network
- Used by Red Hat Virtualization and virtual machines.
- Requires at least one 1Gbps Ethernet connection.
- IP addresses assigned to this network must be on the same subnet as each other, and on a different subnet to the back-end storage network.
- IP addresses on this network can be selected by the administrator.
- Back-end storage network
- Used by storage and migration traffic between hyperconverged nodes.
- Requires at least one 10Gbps Ethernet connection.
- Requires maximum latency of 5 milliseconds between peers.
Network fencing devices that use Intelligent Platform Management Interfaces (IPMI) require a separate network.
If you want to use DHCP network configuration for the Hosted Engine virtual machine, then you must have a DHCP server configured prior to configuring Red Hat Hyperconverged Infrastructure for Virtualization.
If you want to configure disaster recovery by using geo-replication to store copies of data, ensure that you configure a reliable time source.
Before you begin the deployment process, determine the following details:
- IP address for a gateway to the hyperconverged host. This address must respond to ping requests.
- IP address of the front-end management network.
- Fully-qualified domain name (FQDN) for the Hosted Engine virtual machine.
- MAC address that resolves to the static FQDN and IP address of the Hosted Engine.
2.6. Storage
A hyperconverged host stores configuration, logs and kernel dumps, and uses its storage as swap space. This section lists the minimum directory sizes for hyperconverged hosts. Red Hat recommends using the default allocations, which use more storage space than these minimums.
-
/(root) - 6GB -
/home- 1GB -
/tmp- 1GB -
/boot- 1GB -
/var- 15GB -
/var/crash- 10GB /var/log- 8GBImportantRed Hat recommends increasing the size of
/var/logto at least 15GB to provide sufficient space for the additional logging requirements of Red Hat Gluster Storage.Follow the instructions in Growing a logical volume using the Web Console to increase the size of this partition after installing the operating system.
-
/var/log/audit- 2GB -
swap- 1GB (see Recommended swap size for details) - Anaconda reserves 20% of the thin pool size within the volume group for future metadata expansion. This is to prevent an out-of-the-box configuration from running out of space under normal usage conditions. Overprovisioning of thin pools during installation is also not supported.
- Minimum Total - 64GB
2.6.1. Disks
Red Hat recommends Solid State Disks (SSDs) for best performance. If you use Hard Drive Disks (HDDs), you should also configure a smaller, faster SSD as an LVM cache volume. The cache device must use the same block size as the other volumes.
Do not host the bricks of a Gluster volume across disks that have different block sizes. Ensure that you verify the block size of any VDO devices used to host bricks before creating a volume, as the default block size for a VDO device changed from 512 bytes in version 1.6 to 4 KB in version 1.7. Check the block size (in bytes) of a disk by running the following command:
# blockdev --getss <disk_path>
2.6.2. RAID
RAID5 and RAID6 configurations are supported. However, RAID configuration limits depend on the technology in use.
- SAS/SATA 7k disks are supported with RAID6 (at most 10+2)
SAS 10k and 15k disks are supported with the following:
- RAID5 (at most 7+1)
- RAID6 (at most 10+2)
RAID cards must use flash backed write cache.
Red Hat further recommends providing at least one hot spare drive local to each server.
If you plan to use RAID hardware in the layer below VDO, Red Hat strongly recommends using SSD/NVMe disks to avoid performance issues. If there is no use of the RAID hardware layer below VDO, spinning disks can be used.
2.6.3. JBOD
As of Red Hat Hyperconverged Infrastructure for Virtualization 1.6, JBOD configurations are fully supported and no longer require architecture review.
2.6.4. Logical volumes
The logical volumes that comprise the engine gluster volume must be thick provisioned. This protects the Hosted Engine from out of space conditions, disruptive volume configuration changes, I/O overhead, and migration activity.
The logical volumes that comprise the vmstore and optional data gluster volumes must be thin provisioned. This allows greater flexibility in underlying volume configuration.
If your thin provisioned volumes are on Hard Drive Disks (HDDs), configure a smaller, faster Solid State Disk (SSD) as an lvmcache for improved performance. The cache device must use the same block size as the other volumes.
2.6.5. Red Hat Gluster Storage volumes
Red Hat Hyperconverged Infrastructure for Virtualization is expected to have 3–4 Red Hat Gluster Storage volumes.
- 1 engine volume for the Hosted Engine
- 1 vmstore volume for virtual machine operating system disk images
- 1 data volume for other virtual machine disk images
- 1 shared_storage volume for geo-replication metadata
Separate vmstore and data volumes are recommended to minimize backup storage requirements. Storing virtual machine data separate from operating system images means that only the data volume needs to be backed up when storage space is at a premium, since operating system images on the vmstore volume can be more easily rebuilt.
2.6.6. Volume types
Red Hat Hyperconverged Infrastructure for Virtualization (RHHI for Virtualization) supports only the following volume types at deployment time:
- Replicated volumes (3 copies of the same data on 3 bricks, across 3 nodes).
- Arbitrated replicated volumes (2 full copies of the same data on 2 bricks and 1 arbiter brick that contains metadata, across three nodes).
Distributed volume with a single brick (1 copy of the data, no replication to other bricks).
NoteDistributed volume with a single brick is supported only for single node deployment of Red Hat Hyperconverged Infrastructure for Virtualization.
You can create distributed replicate or distributed arbitrated replicate volumes during the deployment of Red Hat Hyperconverged Infrastructure for Virtualization using Ansible playbooks as mentioned in the guide Automating RHHI for Virtualization deployment.
Note that arbiter bricks store only file names, structure, and metadata. This means that a three-way arbitrated replicated volume requires about 75% of the storage space that a three-way replicated volume would require to achieve the same level of consistency. However, because the arbiter brick stores only metadata, a three-way arbitrated replicated volume only provides the availability of a two-way replicated volume.
For more information on laying out arbitrated replicated volumes, see Creating multiple arbitrated replicated volumes across fewer total nodes in the Red Hat Gluster Storage Administration Guide.
2.7. Disk encryption
Disk encryption is supported as of Red Hat Hyperconverged Infrastructure for Virtualization 1.8.
The supported method is Network-Bound Disk Encryption (NBDE), which uses a key server to provide decryption keys to encrypted clients at boot time, avoiding the need to enter the decryption password manually.
NBDE support requires at least 1 additional server (physical or virtual) to act as the NBDE key server. For fault tolerance, Red Hat recommends 2 NBDE key servers.
NBDE key servers must not be part of the Red Hat Hyperconverged Infrastructure for Virtualization cluster.
NBDE key servers can use either of the following operating systems:
- Red Hat Enterprise Linux 7.8 and higher
- Red Hat Enterprise Linux 8.2 and higher
Disk encryption generally involves a small reduction in performance. Test this configuration thoroughly before putting it into production to ensure that it meets the performance requirements of your use case, particularly if you are using disk encryption with other technology that creates a slight reduction in speed, such as deduplication and compression using Virtual Disk Optimization.
2.8. Virtual Data Optimizer (VDO)
A Virtual Data Optimizer (VDO) layer is supported as of Red Hat Hyperconverged Infrastructure for Virtualization 1.6.
VDO support is limited to new deployments only; do not attempt to add a VDO layer to an existing deployment.
Be aware that the default block size for a VDO device changed from 512 bytes in version 1.6 to 4 KB in version 1.7. Do not host the bricks of a Gluster volume across disks that have different block sizes.
Because reducing data has additional processing costs, enabling compression and deduplication reduces write performance. As a result, VDO is not recommended for performance sensitive workloads. Red Hat strongly recommends that you test and verify that your workload achieves the required level of performance with VDO enabled before deploying VDO in production, especially if you are using it in combination with other technology that reduces performance, such as disk encryption.
2.9. Scaling
The number of nodes you can have in an initial deployment depends on your deployment method.
When you use the web console, you can deploy either 1 or 3 hyperconverged nodes.
In this case, you cannot create a volume that spans more than 3 nodes at creation time; you must create a 3-node volume first and then expand it across more nodes after deployment.
- When you use Ansible automation, you can deploy up to the maximum of 12 hyperconverged nodes, and span volumes across the required number of nodes at deployment time.
1 node deployments cannot be scaled.
Other deployments can be scaled from a minimum of 3 nodes to 6, 9, or 12 nodes.
You can scale your deployment by adding disks and expanding Gluster volumes. Add disks on new or existing nodes and use them to either create new Gluster volumes or expand existing Gluster volumes.
2.10. Existing Red Hat Gluster Storage configurations
Red Hat Hyperconverged Infrastructure for Virtualization is supported only when deployed as specified in this document. Existing Red Hat Gluster Storage configurations cannot be used in a hyperconverged configuration. If you want to use an existing Red Hat Gluster Storage configuration, refer to the traditional configuration documented in Configuring Red Hat Virtualization with Red Hat Gluster Storage.
2.11. Disaster recovery
Red Hat strongly recommends configuring a disaster recovery solution. For details on configuring geo-replication as a disaster recovery solution, see Maintaining Red Hat Hyperconverged Infrastructure for Virtualization: https://access.redhat.com/documentation/en-us/red_hat_hyperconverged_infrastructure_for_virtualization/1.8/html/maintaining_red_hat_hyperconverged_infrastructure_for_virtualization/config-backup-recovery.
2.11.1. Prerequisites for geo-replication
Be aware of the following requirements and limitations when configuring geo-replication:
- Two different managers required
- The source and destination volumes for geo-replication must be managed by different instances of Red Hat Virtualization Manager.
2.11.2. Prerequisites for failover and failback configuration
- Versions must match between environments
- Ensure that the primary and secondary environments have the same version of Red Hat Virtualization Manager, with identical data center compatibility versions, cluster compatibility versions, and PostgreSQL versions.
- No virtual machine disks in the hosted engine storage domain
- The storage domain used by the hosted engine virtual machine is not failed over, so any virtual machine disks in this storage domain will be lost.
- Execute Ansible playbooks manually from a separate machine
Generate and execute Ansible playbooks manually from a separate machine that acts as an Ansible controller node. This node must have the
ovirt-ansible-collectionpackage, which provides all required disaster recovery Ansible roles.NoteThe
ovirt-ansible-collectionpackage is installed with the Hosted Engine virtual machine by default. However, during a disaster that affects the primary site, this virtual machine may be down. It is safe to use a machine that is outside the primary site to run this playbook, but for testing purposes these playbooks can be triggered from the Hosted Engine virtual machine.
2.12. Additional requirements for single node deployments
Red Hat Hyperconverged Infrastructure for Virtualization is supported for deployment on a single node provided that all Support Requirements are met, with the following additions and exceptions.
A single node deployment requires a physical machine with:
- 1 Network Interface Controller
- at least 12 cores
- at least 64GB RAM
Single node deployments cannot be scaled, and are not highly available. This deployment type is lower cost, but removes the option of availability.
Chapter 3. Installing operating systems
3.1. Installing hyperconverged hosts
The supported operating system for hyperconverged hosts is the latest version of Red Hat Virtualization 4.
3.1.1. Installing a hyperconverged host with Red Hat Virtualization 4
3.1.1.1. Downloading the Red Hat Virtualization 4 operating system
- Navigate to the Red Hat Customer Portal.
- Click Downloads to get a list of product downloads.
- Click Red Hat Virtualization.
- Click Download latest.
-
In the Product Software tab, click the Download button beside the latest Hypervisor Image, for example,
Hypervisor Image for RHV 4.4. When the file has downloaded, verify its SHA-256 checksum matches the one on the page.
$ sha256sum image.isoUse the downloaded image to create an installation media device.
See Creating installation media in the Red Hat Enterprise Linux 8 documentation.
3.1.1.2. Installing the Red Hat Virtualization 4 operating system on hyperconverged hosts
Prerequisites
- Be aware that this operating system is only supported for hyperconverged hosts. Do not install an Network-Bound Disk Encryption (NBDE) key server with this operating system.
- Be aware of additional server requirements when enabling disk encryption on hyperconverged hosts. See Disk encryption requirements for details.
Procedure
- Start the machine and boot from the prepared installation media.
- From the boot menu, select Install Red Hat Virtualization 4 and press Enter.
- Select a language and click Continue.
- Accept the default Localization options.
Click Installation destination.
Deselect any disks you do not want to use as installation locations, for example, any disks that will be used for storage domains.
WarningDisks with a check mark will be formatted and all their data will be lost. If you are reinstalling this host, ensure that disks with data that you want to retain do not show a check mark.
-
Select the
Automatic partitioningoption. (Optional) If you want to use disk encryption, select Encrypt my data and specify a password.
WarningRemember this password, as your machine will not boot without it.
This password is used as the
rootpassphrasefor this host during Network-Bound Disk Encryption setup.- Click Done.
Click Network and Host Name.
-
Toggle the Ethernet switch to
ON. Select the network interface and click Configure
- On the General tab, check the Connect automatically with priority checkbox.
(Optional) To use IPv6 networking instead of IPv4, specify network details on the IPv6 settings tab.
For static network configurations, ensure that you provide the static IPv6 address, prefix, and gateway, as well as IPv6 DNS servers and additional search domains.
ImportantYou must use either IPv4 or IPv6; mixed networks are not supported.
- Click Save.
- Click Done.
-
Toggle the Ethernet switch to
- (Optional) Configure Security policy.
Click Begin installation.
Set a root password.
WarningRed Hat recommends not creating additional users on hyperconverged hosts, as this can lead to exploitation of local security vulnerabilities.
- Click Reboot to complete installation.
Increase the size of the
/var/logpartition.You need at least 15 GB of free space for Red Hat Gluster Storage logging requirements. Follow the instructions in Growing a logical volume using the Web Console to increase the size of this partition.
3.2. Installing Network-Bound Disk Encryption key servers
If you want to use Network-Bound Disk Encryption to encrypt the contents of your disks in Red Hat Hyperconverged Infrastructure for Virtualization, you need to install at least one key server.
The supported operating systems for Network-Bound Disk Encryption (NBDE) key servers are the latest versions of Red Hat Enterprise Linux 7 and 8.
3.2.1. Installing an NBDE key server with Red Hat Enterprise Linux 8
3.2.1.1. Downloading the Red Hat Enterprise Linux 8 operating system
- Navigate to the Red Hat Customer Portal.
- Click Downloads to get a list of product downloads.
- Click Red Hat Enterprise Linux 8.
-
In the Product Software tab, click Download beside the latest binary DVD image, for example,
Red Hat Enterprise Linux 8.2 Binary DVD. When the file has downloaded, verify its SHA-256 checksum matches the one on the page.
$ sha256sum image.isoUse the image to create an installation media device.
See Creating installation media in the Red Hat Enterprise Linux 8 documentation for details.
3.2.1.2. Installing the Red Hat Enterprise Linux 8 operating system on Network-Bound Disk Encryption key servers
Procedure
- Start the machine and boot from the prepared installation media.
- From the boot menu, select Install Red Hat Enterprise Linux 8 and press Enter.
- Select a language and click Continue.
- Accept the default Localization and Software options.
Click Installation destination.
Select the disk that you want to install the operating system on.
WarningDisks with a check mark will be formatted and all their data will be lost. If you are reinstalling this host, ensure that disks with data that you want to retain do not show a check mark.
(Optional) If you want to use disk encryption, select Encrypt my data and specify a password.
WarningRemember this password, as your machine will not boot without it.
- Click Done.
Click Network and Host Name.
-
Toggle the Ethernet switch to
ON. Select the network interface and click Configure
- On the General tab, check the Connect automatically with priority checkbox.
(Optional) To use IPv6 networking instead of IPv4, specify network details on the IPv6 settings tab.
For static network configurations, ensure that you provide the static IPv6 address, prefix, and gateway, as well as IPv6 DNS servers and additional search domains.
ImportantYou must use either IPv4 or IPv6; mixed networks are not supported.
- Click Save.
- Click Done.
-
Toggle the Ethernet switch to
- (Optional) Configure Security policy.
Click Begin installation.
- Set a root password.
- Click Reboot to complete installation.
- From the Initial Setup window, accept the licensing agreement and register your system.
3.2.2. Installing an NBDE key server with Red Hat Enterprise Linux 7
3.2.2.1. Downloading the Red Hat Enterprise Linux 7 operating system
- Navigate to the Red Hat Customer Portal.
- Click Downloads to get a list of product downloads.
- Click Versions 7 and below.
-
In the Product Software tab, click Download beside the latest binary DVD image, for example,
Red Hat Enterprise Linux 7.8 Binary DVD. When the file has downloaded, verify its SHA-256 checksum matches the one on the page.
$ sha256sum image.isoUse the image to create an installation media device.
See Creating installation media in the Red Hat Enterprise Linux 8 documentation for details.
3.2.2.2. Installing the Red Hat Enterprise Linux 7 operating system on Network-Bound Disk Encryption key servers
Prerequisites
- Be aware that this operating system is only supported for Network-Bound Disk Encryption (NBDE) key servers. Do not install a hyperconverged host with this operating system.
Procedure
- Start the machine and boot from the prepared installation media.
- From the boot menu, select Install Red Hat Enterprise Linux 7 and press Enter.
- Select a language and click Continue.
Click Date & Time.
- Select a time zone.
- Click Done.
Click Keyboard.
- Select a keyboard layout.
- Click Done.
Click Installation destination.
- Deselect any disks you do not want to use as an installation location.
If you want to use disk encryption, select Encrypt my data and specify a password.
WarningRemember this password, as your machine will not boot without it.
- Click Done.
Click Network and Host Name.
- Click Configure… → General.
- Check the Automatically connect to this network when it is available check box.
- Click Done.
- Optionally, configure language support, security policy, and kdump.
Click Begin installation.
- Set a root password.
- Click Reboot to complete installation.
- From the Initial Setup window, accept the licensing agreement and register your system.
Chapter 4. Install additional software
You need to perform some additional configuration for access to software and updates.
- Ensure you have access to software updates: Configure software repository access using the web console.
- If your hyperconverged hosts use disk encryption, Install disk encryption software.
4.1. Configuring software access
4.1.1. Configuring software repository access using the Web Console
Prerequisites
- This process is for hyperconverged hosts based on Red Hat Virtualization 4.
Procedure
On each hyperconverged host:
Log in to the Web Console.
Use the management FQDN and port 9090, for example,
https://server1.example.com:9090/.- Click Subscriptions.
Click Register System.
- Enter your Customer Portal user name and password.
Click Done.
The Red Hat Virtualization Host subscription is automatically attached to the system.
Enable the Red Hat Virtualization 4 repository to allow later updates to the Red Hat Virtualization Host:
# subscription-manager repos \
--enable=rhvh-4-for-rhel-8-x86_64-rpms
(Optional) If you use disk encryption, execute the following on each Network-Bound Disk Encryption (NBDE) key server:
- Log in to the NBDE key server.
Register the NBDE key server with Red Hat.
# subscription-manager register --username=username --password=password
Attach the subscription pool:
# subscription-manager attach --pool=pool_idEnable the repositories required for disk encryption software:
For NBDE key servers based on Red Hat Enterprise Linux 8:
# subscription-manager repos \
--enable="rhel-8-for-x86_64-baseos-rpms" \
--enable="rhel-8-for-x86_64-appstream-rpms"
For NBDE key servers based on Red Hat Enterprise Linux 7:
# subscription-manager repos --enable="rhel-7-server-rpms"
4.2. Installing software
4.2.1. Installing disk encryption software
The Network-Bound Disk Encryption key server requires an additional package to support disk encryption.
Prerequisites
Procedure
On each Network-Bound Disk Encryption (NBDE) key server, install the server-side packages.
# yum install tang -y
Chapter 5. Modifying firewall rules
5.1. Modifying firewall rules for disk encryption
On Network-Bound Disk Encryption (NBDE) key servers, you need to open ports so that encryption keys can be served.
Procedure
On each NBDE key server:
Open ports required to serve encryption keys.
NoteThe default port is
80/tcp. To use a custom port, see Deploying a tang server with SELinux in enforcing mode in the Red Hat Enterprise Linux 8 documentation.# firewall-cmd --add-port=80/tcp # firewall-cmd --add-port=80/tcp --permanent
Verify that the port appears in the output of the following command.
# firewall-cmd --list-ports | grep '80/tcp'
Chapter 6. Configure Public Key based SSH Authentication without a password
Configure public key based SSH authentication without a password for the root user on the first hyperconverged host to all hosts, including itself. Do this for all storage and management interfaces, and for both IP addresses and FQDNs.
6.1. Generating SSH key pairs without a password
Generating a public/private key pair lets you use key-based SSH authentication. Generating a key pair that does not use a password makes it simpler to use Ansible to automate deployment and configuration processes.
Procedure
- Log in to the first hyperconverged host as the root user.
Generate an SSH key that does not use a password.
Start the key generation process.
# ssh-keygen -t rsa
Generating public/private rsa key pair.
Enter a location for the key.
The default location, shown in parentheses, is used if no other input is provided.
Enter file in which to save the key (/home/username/.ssh/id_rsa): <location>/<keyname>
Specify and confirm an empty passphrase by pressing
Entertwice.Enter passphrase (empty for no passphrase): Enter same passphrase again:
The private key is saved in
<location>/<keyname>. The public key is saved in<location>/<keyname>.pub.Your identification has been saved in <location>/<keyname>. Your public key has been saved in <location>/<keyname>.pub. The key fingerprint is SHA256:8BhZageKrLXM99z5f/AM9aPo/KAUd8ZZFPcPFWqK6+M root@server1.example.com The key's randomart image is: +---[ECDSA 256]---+ | . . +=| | . . . = o.o| | + . * . o...| | = . . * . + +..| |. + . . So o * ..| | . o . .+ = ..| | o oo ..=. .| | ooo...+ | | .E++oo | +----[SHA256]-----+
WarningYour identificationin this output is your private key. Never share your private key. Possession of your private key allows someone else to impersonate you on any system that has your public key.
6.2. Copying SSH keys
To access a host using your private key, that host needs a copy of your public key.
Prerequisites
- Generate a public/private key pair with no password.
Procedure
- Log in to the first host as the root user.
Copy your public key to each host that you want to access, including the host on which you execute the command, using both the front-end and the back-end FQDNs.
# ssh-copy-id -i <location>/<keyname>.pub <user>@<hostname>
Enter the password for
<user>@<hostname>when prompted.WarningMake sure that you use the file that ends in
.pub. Never share your private key. Possession of your private key allows someone else to impersonate you on any system that has your public key.For example, if you are logged in as the root user on
server1.example.com, you would run the following commands for a three node deployment:# ssh-copy-id -i <location>/<keyname>.pub root@server1front.example.com # ssh-copy-id -i <location>/<keyname>.pub root@server2front.example.com # ssh-copy-id -i <location>/<keyname>.pub root@server3front.example.com # ssh-copy-id -i <location>/<keyname>.pub root@server1back.example.com # ssh-copy-id -i <location>/<keyname>.pub root@server2back.example.com # ssh-copy-id -i <location>/<keyname>.pub root@server3back.example.com
Chapter 7. Configure disk encryption
7.1. Configuring Network-Bound Disk Encryption key servers
Prerequisites
- You must have installed a Network-Bound Disk Encryption key server (Installing Network-Bound Disk Encryption key servers).
Procedure
Start and enable the tangd service:
Run the following command on each Network-Bound Disk Encryption (NBDE) key server.
# systemctl enable tangd.socket --now
Verify that hyperconverged hosts have access to the key server.
- Log in to a hyperconverged host.
Request a decryption key from the key server.
# curl key-server.example.com/advIf you see output like the following, the key server is accessible and advertising keys correctly.
{"payload":"eyJrZXlzIjpbeyJhbGciOiJFQ01SIiwiY3J2IjoiUC01MjEiLCJrZXlfb3BzIjpbImRlcml2ZUtleSJdLCJrdHkiOiJFQyIsIngiOiJBQ2ZjNVFwVmlhal9wNWcwUlE4VW52dmdNN1AyRTRqa21XUEpSM3VRUkFsVWp0eWlfZ0Y5WEV3WmU5TmhIdHhDaG53OXhMSkphajRieVk1ZVFGNGxhcXQ2IiwieSI6IkFOMmhpcmNpU2tnWG5HV2VHeGN1Nzk3N3B3empCTzZjZWt5TFJZdlh4SkNvb3BfNmdZdnR2bEpJUk4wS211Y1g3WHUwMlNVWlpqTVVxU3EtdGwyeEQ1SGcifSx7ImFsZyI6IkVTNTEyIiwiY3J2IjoiUC01MjEiLCJrZXlfb3BzIjpbInZlcmlmeSJdLCJrdHkiOiJFQyIsIngiOiJBQXlXeU8zTTFEWEdIaS1PZ04tRFhHU29yNl9BcUlJdzQ5OHhRTzdMam1kMnJ5bDN2WUFXTUVyR1l2MVhKdzdvbEhxdEdDQnhqV0I4RzZZV09vLWRpTUxwIiwieSI6IkFVWkNXUTAxd3lVMXlYR2R0SUMtOHJhVUVadWM5V3JyekFVbUIyQVF5VTRsWDcxd1RUWTJEeDlMMzliQU9tVk5oRGstS2lQNFZfYUlsZDFqVl9zdHRuVGoifV19","protected":"eyJhbGciOiJFUzUxMiIsImN0eSI6Imp3ay1zZXQranNvbiJ9","signature":"ARiMIYnCj7-1C-ZAQ_CKee676s_vYpi9J94WBibroou5MRsO6ZhRohqh_SCbW1jWWJr8btymTfQgBF_RwzVNCnllAXt_D5KSu8UDc4LnKU-egiV-02b61aiWB0udiEfYkF66krIajzA9y5j7qTdZpWsBObYVvuoJvlRo_jpzXJv0qEMi"}
7.2. Configuring hyperconverged hosts as Network-Bound Disk Encryption clients
7.2.1. Defining disk encryption configuration details
- Log in to the first hyperconverged host.
Change into the
hc-ansible-deploymentdirectory:# cd /etc/ansible/roles/gluster.ansible/playbooks/hc-ansible-deployment
Make a copy of the
luks_tang_inventory.ymlfile for future reference.cp luks_tang_inventory.yml luks_tang_inventory.yml.backup
Define your configuration in the luks_tang_inventory.yml file.
Use the example
luks_tang_inventory.ymlfile to define the details of disk encryption on each host. A complete outline of this file is available in Understanding the luks_tang_inventory.yml file.Encrypt the
luks_tang_inventory.ymlfile and specify a password usingansible-vault.The required variables in
luks_tang_inventory.ymlinclude password values, so it is important to encrypt the file to protect the password values.# ansible-vault encrypt luks_tang_inventory.yml
Enter and confirm a new vault password when prompted.
7.2.2. Executing the disk encryption configuration playbook
Prerequisites
-
Define configuration in the
luks_tang_inventory.ymlplaybook: Section 7.2.1, “Defining disk encryption configuration details”. - Hyperconverged hosts must have encrypted boot disks.
Procedure
- Log in to the first hyperconverged host.
Change into the hc-ansible-deployment directory.
# cd /etc/ansible/roles/gluster.ansible/playbooks/hc-ansible-deployment
Run the following command as the root user to start the configuration process.
# ansible-playbook -i luks_tang_inventory.yml tasks/luks_tang_setup.yml --tags=blacklistdevices,luksencrypt,bindtang --ask-vault-pass
Enter the vault password for this file when prompted to start disk encryption configuration.
Verify
- Reboot each host and verify that they are able to boot to a login prompt without requiring manual entry of the decryption passphrase.
-
Note that the devices that use disk encryption have a path of
/dev/mapper/luks_sdXwhen you continue with Red Hat Hyperconverged Infrastructure for Virtualization setup.
Troubleshooting
The given boot device
/dev/sda2is not encrypted.TASK [Check if root device is encrypted] fatal: [server1.example.com]: FAILED! => {"changed": false, "msg": "The given boot device /dev/sda2 is not encrypted."}
Solution: Reinstall the hyperconverged hosts using the process outlined in Section 3.1, “Installing hyperconverged hosts”, ensuring that you select Encrypt my data during the installation process and follow all directives related to disk encryption.
The output has been hidden due to the fact that no_log: true was specified for this result.
TASK [gluster.infra/roles/backend_setup : Encrypt devices using key file]
failed: [host1.example.com] (item=None) => {"censored": "the output has been hidden due to the fact that no_log: true was specified for this result", "changed": true}
This output has been censored in order to not expose a passphrase. If you see this output for the
Encrypt devices using key filetask, the device failed to encrypt. You may have provided the incorrect disk in the inventory file.Solution: Clean up the deployment attempt using Cleaning up Network-Bound Disk Encryption after a failed deployment. Then correct the disk names in the inventory file.
Non-zero return code from Tang server
TASK [gluster.infra/roles/backend_setup : Download the advertisement from tang server for IPv4] * failed: [host1.example.com] (item={url: http://tang-server.example.com}) => {"ansible_index_var": "index", "ansible_loop_var": "item", "changed": true, "cmd": "curl -sfg \"http://tang-server.example.com/adv\" -o /etc/adv0.jws", "delta": "0:02:08.703711", "end": "2020-06-10 18:18:09.853701", "index": 0, "item": {"url": "http://tang-server.example.com"}, "msg": "non-zero return code*", "rc": 7, "start": "2020-06-10 18:16:01.149990", "stderr": "", "stderr_lines": [], "stdout": "", "stdout_lines": []}
This error indicates that the server cannot access the
urlprovided, either because the FQDN provided is incorrect or because it cannot be found from the host.Solution: Correct the
urlvalue provided for the NBDE key server or ensure that theurlvalue is accessible from the host. Then run the playbook again with thebindtangtag:# ansible-playbook -i luks_tang_inventory.yml tasks/luks_tang_setup.yml --ask-vault-pass --tags=bindtang- For any other playbook failures, use the instructions in Cleaning up Network-Bound Disk Encryption after a failed deployment to clean up your deployment. Review the playbook and inventory files for incorrect values and test access to all servers before executing the configuration playbook again.
Chapter 8. Defining deployment details
To automate the deployment of Red Hat Hyperconverged Infrastructure for Virtualization using Ansible, you need to define your deployment in the following configuration files.
These files are created on the hyperconverged node and establish SSH public key authentication with itself and other nodes in the cluster.
gluster_inventory.yml- An inventory file that defines the storage volumes and their layout as Gluster volumes.
single_node_gluster_inventory.yml- An inventory file for single node deployment that defines the storage volumes and their layout as Gluster volumes.
he_gluster_vars.json- A variable file that defines a number of required values for deployment.
Procedure
Create backup copies of the example configuration files.
For 3 to 12 nodes deployment, use the following commands to create the backup copies:
# cd /etc/ansible/roles/gluster.ansible/playbooks/hc-ansible-deployment
# cp gluster_inventory.yml gluster_inventory.yml.backup
# cp he_gluster_vars.json he_gluster_vars.json.backup
For single node deployment, use the following commands to create the backup copies:
#cd/etc/ansible/roles/gluster.ansible/playbooks/hc-ansible-deployment
#cp single_node_gluster_inventory.yml single_node_gluster_inventory.yml.backup
# cp he_gluster_vars.json he_gluster_vars.json.backup
Define your deployment in a
gluster_inventory.ymlfor a 3 to 12 nodes deployment or insingle_node_gluster_inventory.ymlfile for a single node deployment.Use the example
gluster_inventory.ymlfile to define your deployment. A complete outline of this file is available in Understanding thegluster_inventory.ymlfileDefine deployment variables in a
he_gluster_vars.jsonfile.Use the example
he_gluster_vars.jsonfile to define the required variables. A complete outline of this file is available in Understanding thehe_gluster_vars.jsonfileEncrypt the
he_gluster_vars.jsonfile and specify a password.The required variables in
he_gluster_vars.jsoninclude password values, so it is important to encrypt the file to protect the password values.# ansible-vault encrypt he_gluster_vars.json
Enter and confirm a new vault password when prompted.
This password is required when you deploy Red Hat Hyperconverged Infrastructure for Virtualization using the process in Executing the deployment playbook.
See Working with files encrypted using Ansible Vault for more information.
Chapter 9. Executing the deployment playbook
Change into the
hc-ansible-deploymentdirectory on the first node:# cd /etc/ansible/roles/gluster.ansible/playbooks/hc-ansible-deployment
Run the following command as the root user to start the deployment process:
# ansible-playbook -i gluster_inventory.yml hc_deployment.yml --extra-vars='@he_gluster_vars.json' --ask-vault-pass
Enter the vault password when prompted to start deployment.
ImportantIf you are using Red Hat Virtualization Host (RHVH) 4.4 SP1 based on Red Hat Enterprise Linux 8.6 (RHEL 8.6), add the
-e 'ansible_python_interpreter=/usr/bin/python3.6'parameter:# ansible-playbook -e 'ansible_python_interpreter=/usr/bin/python3.6' -i gluster_inventory.yml hc_deployment.yml --extra-vars='@he_gluster_vars.json' --ask-vault-pass
Chapter 10. Verify your deployment
After deployment is complete, verify that your deployment has completed successfully.
Browse to the Administration Portal, for example, http://engine.example.com/ovirt-engine.
Administration Console Login
Log in using the administrative credentials added during hosted engine deployment.
When login is successful, the Dashboard appears.
Administration Console Dashboard
Verify that your cluster is available.
Administration Console Dashboard - Clusters

Verify that at least one host is available.
If you provided additional host details during Hosted Engine deployment, 3 hosts are visible here, as shown.
Administration Console Dashboard - Hosts

- Click Compute → Hosts.
Verify that all hosts are listed with a Status of
Up.Administration Console - Hosts

Verify that all storage domains are available.
- Click Storage → Domains.
Verify that the
Activeicon is shown in the first column.Administration Console - Storage Domains

Part I. Troubleshoot
Chapter 11. Log file locations
During the deployment process, progress information is displayed in the web browser. This information is also stored on the local file system so that the information logged can be archived or reviewed at a later date, for example, if the web browser stops responding or is closed before the information has been reviewed.
The log file for the Web Console based deployment process is stored in the /var/log/cockpit/ovirt-dashboard/gluster-deployment.log file by default.
The log files for the Hosted Engine setup portion of the deployment process are stored in the /var/log/ovirt-hosted-engine-setup directory, with file names of the form ovirt-hosted-engine-setup-<date>.log.
Chapter 12. Deployment errors
12.1. Order of cleanup operations
Depending on where deployment fails, you may need to perform a number of cleanup operations.
Always perform cleanup for tasks in reverse order to the order of the tasks themselves. For example, during deployment, we perform the following tasks in order:
- Configure Network-Bound Disk Encryption using Ansible.
- Configure Red Hat Gluster Storage using the Web Console.
- Configure the Hosted Engine using the Web Console.
If deployment fails at step 2, perform cleanup for step 2. Then, if necessary, perform cleanup for step 1.
12.2. Failed to deploy storage
If an error occurs during storage deployment, the deployment process halts and Deployment failed is displayed.
Deploying storage failed
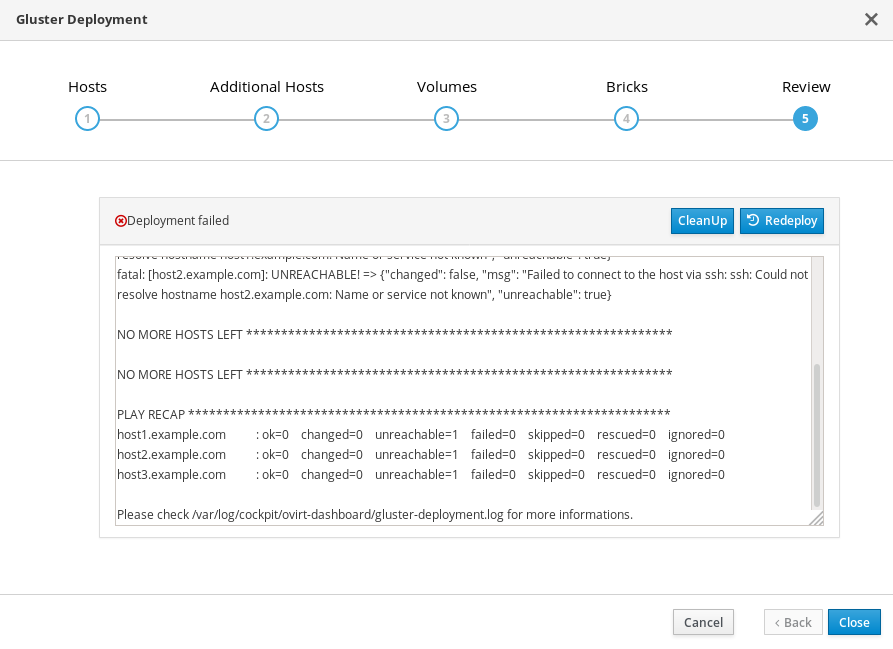
- Review the Web Console output for error information.
- Click Clean up to remove any potentially incorrect changes to the system. If your deployment uses Network-Bound Disk Encryption, you must then follow the process in Cleaning up Network-Bound Disk Encryption after a failed deployment.
- Click Redeploy and correct any entered values that may have caused errors. If you need help resolving errors, contact Red Hat Support with details.
- Return to storage deployment to try again.
12.2.1. Cleaning up Network-Bound Disk Encryption after a failed deployment
If you are using Network-Bound Disk Encryption and deployment fails, you cannot just click the Cleanup button in order to try again. You must also run the luks_device_cleanup.yml playbook to complete the cleaning process before you start again.
Run this playbook as shown, providing the same luks_tang_inventory.yml file that you provided during setup.
# ansible-playbook -i luks_tang_inventory.yml /etc/ansible/roles/gluster.ansible/playbooks/hc-ansible-deployment/tasks/luks_device_cleanup.yml --ask-vault-pass
12.2.2. Error: VDO signature detected on device
During storage deployment, the Create VDO with specified size task may fail with the VDO signature detected on device error.
TASK [gluster.infra/roles/backend_setup : Create VDO with specified size]
task path: /etc/ansible/roles/gluster.infra/roles/backend_setup/tasks/vdo_create.yml:9
failed: [host1.example.com] (item={u'writepolicy': u'auto', u'name': u'vdo_sdb', u'readcachesize': u'20M', u'readcache': u'enabled', u'emulate512': u'off', u'logicalsize': u'11000G', u'device': u'/dev/sdb', u'slabsize': u'32G', u'blockmapcachesize': u'128M'}) => {"ansible_loop_var": "item", "changed": false, "err": "vdo: ERROR - vdo signature detected on /dev/sdb at offset 0; use --force to override\n", "item": {"blockmapcachesize": "128M", "device": "/dev/sdb", "emulate512": "off", "logicalsize": "11000G", "name": "vdo_sdb", "readcache": "enabled", "readcachesize": "20M", "slabsize": "32G", "writepolicy": "auto"}, "msg": "Creating VDO vdo_sdb failed.", "rc": 5}
This error occurs when the specified device is already a VDO device, or when the device was previously configured as a VDO device and was not cleaned up correctly.
- If you specified a VDO device accidentally, return to storage configuration and specify a different non-VDO device.
If you specified a device that has been used as a VDO device previously:
Check the device type.
# blkid -p /dev/sdb
/dev/sdb: UUID="fee52367-c2ca-4fab-a6e9-58267895fe3f" TYPE="vdo" USAGE="other"
If you see
TYPE="vdo"in the output, this device was not cleaned correctly.- Follow the steps in Manually cleaning up a VDO device to use this device. Then return to storage deployment to try again.
Avoid this error by specifying clean devices, and by using the Clean up button in the storage deployment window to clean up any failed deployments.
12.2.3. Manually cleaning up a VDO device
Follow this process to manually clean up a VDO device that has caused a deployment failure.
This is a destructive process. You will lose all data on the device that you clean up.
Procedure
Clean the device using wipefs.
# wipefs -a /dev/sdX
Verify
Confirm that the device does not have
TYPE="vdo"set any more.# blkid -p /dev/sdb /dev/sdb: UUID="fee52367-c2ca-4fab-a6e9-58267895fe3f" TYPE="vdo" USAGE="other"
Next steps
- Return to storage deployment to try again.
12.3. Failed to prepare virtual machine
If an error occurs while preparing the virtual machine in deployment, deployment pauses, and you see a screen similar to the following:
Preparing virtual machine failed
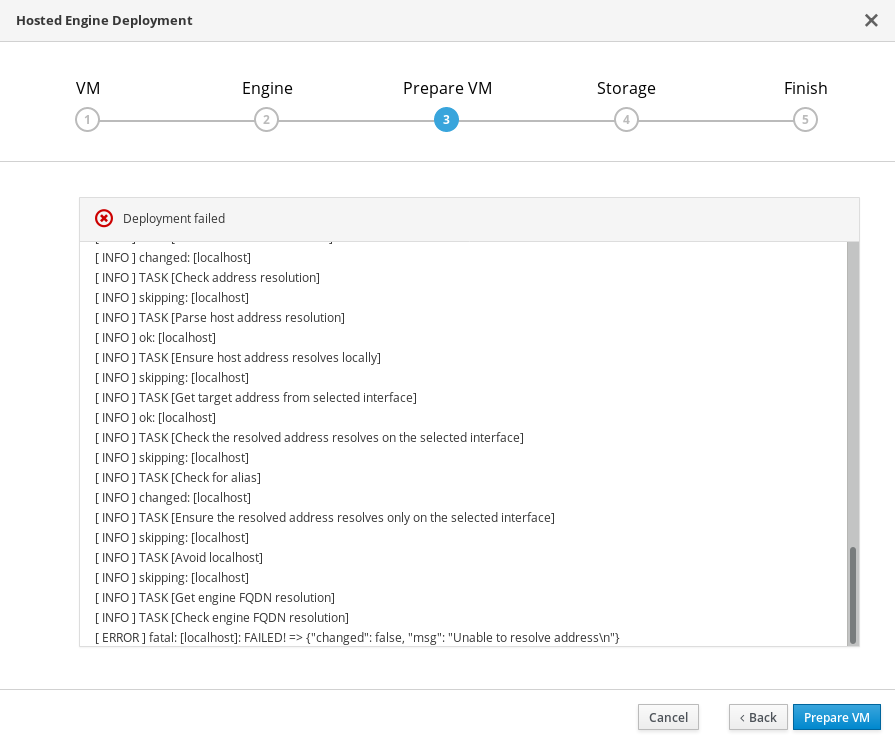
- Review the Web Console output for error information.
- Click Back and correct any entered values that may have caused errors. Ensure proper values for network configurations are provided in VM tab. If you need help resolving errors, contact Red Hat Support with details.
Ensure that the
rhvm-appliancepackage is available on the first hyperconverged host.# yum install rhvm-appliance
Return to Hosted Engine deployment to try again.
If you closed the deployment wizard while you resolved errors, you can select Use existing configuration when you retry the deployment process.
12.4. Failed to deploy hosted engine
If an error occurs during hosted engine deployment, deployment pauses and Deployment failed is displayed.
Hosted engine deployment failed
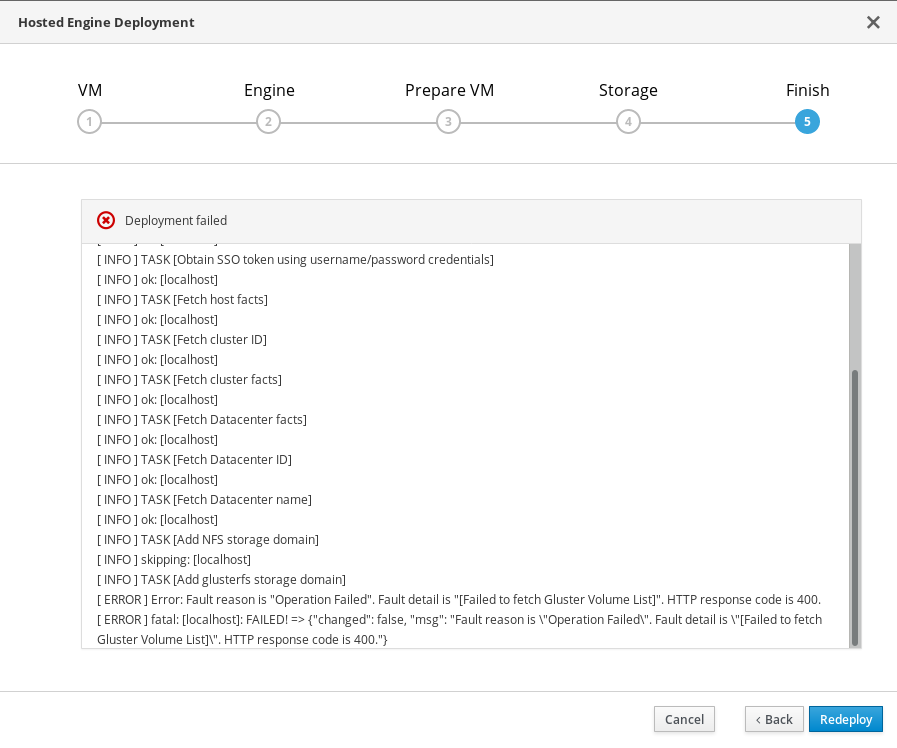
- Review the Web Console output for error information.
Remove the contents of the
enginevolume.Mount the
enginevolume.# mount -t glusterfs <server1>:/engine /mnt/test
Remove the contents of the volume.
# rm -rf /mnt/test/*
Unmount the
enginevolume.# umount /mnt/test
- Click Redeploy and correct any entered values that may have caused errors.
If the deployment fails after performing the above steps a, b and c. Perform these steps again and this time clean the Hosted Engine:
# ovirt-hosted-engine-cleanup
Return to deployment to try again.
If you closed the deployment wizard while you resolved errors, you can select Use existing configuration when you retry the deployment process.
If you need help resolving errors, contact Red Hat Support with details.
Part II. Reference material
Appendix A. Working with files encrypted using Ansible Vault
Red Hat recommends encrypting the contents of deployment and management files that contain passwords and other sensitive information. Ansible Vault is one method of encrypting these files. More information about Ansible Vault is available in the Ansible documentation.
A.1. Encrypting files
You can create an encrypted file by using the ansible-vault create command, or encrypt an existing file by using the ansible-vault encrypt command.
When you create an encrypted file or encrypt an existing file, you are prompted to provide a password. This password is used to decrypt the file after encryption. You must provide this password whenever you work directly with information in this file or run a playbook that relies on the file’s contents.
Creating an encrypted file
$ ansible-vault create variables.yml
New Vault password:
Confirm New Vault password:
The ansible-vault create command prompts for a password for the new file, then opens the new file in the default text editor (defined as $EDITOR in your shell environment) so that you can populate the file before saving it.
If you have already created a file and you want to encrypt it, use the ansible-vault encrypt command.
Encrypting an existing file
$ ansible-vault encrypt existing-variables.yml
New Vault password:
Confirm New Vault password:
Encryption successful
A.2. Editing encrypted files
You can edit an encrypted file using the ansible-vault edit command and providing the Vault password for that file.
Editing an encrypted file
$ ansible-vault edit variables.yml
New Vault password:
Confirm New Vault password:
The ansible-vault edit command prompts for a password for the file, then opens the file in the default text editor (defined as $EDITOR in your shell environment) so that you can edit and save the file contents.
A.3. Rekeying encrypted files to a new password
You can change the password used to decrypt a file by using the ansible-vault rekey command.
$ ansible-vault rekey variables.yml
Vault password:
New Vault password:
Confirm New Vault password:
Rekey successful
The ansible-vault rekey command prompts for the current Vault password, and then prompts you to set and confirm a new Vault password.
Appendix B. Understanding the example configuration files
B.1. Understanding the luks_tang_inventory.yml file
B.1.1. Configuration parameters for disk encryption
- hc_nodes (required)
A list of hyperconverged hosts that uses the back-end FQDN of the host, and the configuration details of those hosts. Configuration that is specific to a host is defined under that host’s back-end FQDN. Configuration that is common to all hosts is defined in the vars: section.
hc_nodes: hosts: host1backend.example.com: [configuration specific to this host] host2backend.example.com: host3backend.example.com: host4backend.example.com: host5backend.example.com: host6backend.example.com: vars: [configuration common to all hosts]- blacklist_mpath_devices (optional)
By default, Red Hat Virtualization Host enables multipath configuration, which provides unique multipath names and worldwide identifiers for all disks, even when disks do not have underlying multipath configuration. Include this section if you do not have multipath configuration so that the multipath device names are not used for listed devices. Disks that are not listed here are assumed to have multipath configuration available, and require the path format
/dev/mapper/<WWID>instead of/dev/sdxwhen defined in subsequent sections of the inventory file.On a server with four devices (sda, sdb, sdc and sdd), the following configuration blacklists only two devices. The path format /dev/mapper/<WWID> is expected for devices not in this list.
hc_nodes: hosts: host1backend.example.com: blacklist_mpath_devices: - sdb - sdc- gluster_infra_luks_devices (required)
A list of devices to encrypt and the encryption passphrase to use for each device.
hc_nodes: hosts: host1backend.example.com: gluster_infra_luks_devices: - devicename: /dev/sdb passphrase: Str0ngPa55#- devicename
-
The name of the device in the format
/dev/sdx. - passphrase
- The password to use for this device when configuring encryption. After disk encryption with Network-Bound Disk Encryption (NBDE) is configured, a new random key is generated, providing greater security.
- rootpassphrase (required)
The password that you used when you selected Encrypt my data during operating system installation on this host.
hc_nodes: hosts: host1backend.example.com: rootpassphrase: h1-Str0ngPa55#- rootdevice (required)
The root device that was encrypted when you selected Encrypt my data during operating system installation on this host.
hc_nodes: hosts: host1backend.example.com: rootdevice: /dev/sda2- networkinterface (required)
The network interface this host uses to reach the NBDE key server.
hc_nodes: hosts: host1backend.example.com: networkinterface: ens3s0f0- ip_version (required)
Whether to use IPv4 or IPv6 networking. Valid values are
IPv4andIPv6. There is no default value. Mixed networks are not supported.hc_nodes: vars: ip_version: IPv4- ip_config_method (required)
Whether to use DHCP or static networking. Valid values are
dhcpandstatic. There is no default value.hc_nodes: vars: ip_config_method: dhcpThe other valid value for this option is
static, which requires the following additional parameters and is defined individually for each host:hc_nodes: hosts: host1backend.example.com: ip_config_method: static host_ip_addr: 192.168.1.101 host_ip_prefix: 24 host_net_gateway: 192.168.1.100 host2backend.example.com: ip_config_method: static host_ip_addr: 192.168.1.102 host_ip_prefix: 24 host_net_gateway: 192.168.1.100 host3backend.example.com: ip_config_method: static host_ip_addr: 192.168.1.102 host_ip_prefix: 24 host_net_gateway: 192.168.1.100- gluster_infra_tangservers
The address of your NBDE key server or servers, including
http://. If your servers use a port other than the default (80), specify a port by appending:_port_to the end of the URL.hc_nodes: vars: gluster_infra_tangservers: - url: http://key-server1.example.com - url: http://key-server2.example.com:80
B.1.2. Example luks_tang_inventory.yml
Dynamically allocated IP addresses
hc_nodes:
  hosts:
    host1-backend.example.com:
      blacklist_mpath_devices:
        - sda
        - sdb
        - sdc
      gluster_infra_luks_devices:
        - devicename: /dev/sdb
          passphrase: dev-sdb-encrypt-passphrase
        - devicename: /dev/sdc
          passphrase: dev-sdc-encrypt-passphrase
      rootpassphrase: host1-root-passphrase
      rootdevice: /dev/sda2
      networkinterface: eth0
    host2-backend.example.com:
      blacklist_mpath_devices:
        - sda
        - sdb
        - sdc
      gluster_infra_luks_devices:
        - devicename: /dev/sdb
          passphrase: dev-sdb-encrypt-passphrase
        - devicename: /dev/sdc
          passphrase: dev-sdc-encrypt-passphrase
      rootpassphrase: host2-root-passphrase
      rootdevice: /dev/sda2
      networkinterface: eth0
    host3-backend.example.com:
      blacklist_mpath_devices:
        - sda
        - sdb
        - sdc
      gluster_infra_luks_devices:
        - devicename: /dev/sdb
          passphrase: dev-sdb-encrypt-passphrase
        - devicename: /dev/sdc
          passphrase: dev-sdc-encrypt-passphrase
      rootpassphrase: host3-root-passphrase
      rootdevice: /dev/sda2
      networkinterface: eth0
  vars:
    ip_version: IPv4
    ip_config_method: dhcp
    gluster_infra_tangservers:
      - url: http://key-server1.example.com:80
      - url: http://key-server2.example.com:80
Static IP addresses
hc_nodes:
  hosts:
    host1-backend.example.com:
      blacklist_mpath_devices:
        - sda
        - sdb
        - sdc
      gluster_infra_luks_devices:
        - devicename: /dev/sdb
          passphrase: dev-sdb-encrypt-passphrase
        - devicename: /dev/sdc
          passphrase: dev-sdc-encrypt-passphrase
      rootpassphrase: host1-root-passphrase
      rootdevice: /dev/sda2
      networkinterface: eth0
      host_ip_addr: host1-static-ip
      host_ip_prefix: network-prefix
      host_net_gateway: default-network-gateway
    host2-backend.example.com:
      blacklist_mpath_devices:
        - sda
        - sdb
        - sdc
      gluster_infra_luks_devices:
        - devicename: /dev/sdb
          passphrase: dev-sdb-encrypt-passphrase
        - devicename: /dev/sdc
          passphrase: dev-sdc-encrypt-passphrase
      rootpassphrase: host2-root-passphrase
      rootdevice: /dev/sda2
      networkinterface: eth0
      host_ip_addr: host1-static-ip
      host_ip_prefix: network-prefix
      host_net_gateway: default-network-gateway
    host3-backend.example.com:
      blacklist_mpath_devices:
        - sda
        - sdb
        - sdc
      gluster_infra_luks_devices:
        - devicename: /dev/sdb
          passphrase: dev-sdb-encrypt-passphrase
        - devicename: /dev/sdc
          passphrase: dev-sdc-encrypt-passphrase
      rootpassphrase: host3-root-passphrase
      rootdevice: /dev/sda2
      networkinterface: eth0
      host_ip_addr: host1-static-ip
      host_ip_prefix: network-prefix
      host_net_gateway: default-network-gateway
  vars:
    ip_version: IPv4
    ip_config_method: static
    gluster_infra_tangservers:
      - url: http://key-server1.example.com:80
      - url: http://key-server2.example.com:80
B.2. Understanding the gluster_inventory.yml file
The gluster_inventory.yml file is an example Ansible inventory file that you can use to automate the deployment of Red Hat Hyperconverged Infrastructure for Virtualization using Ansible.
The single_node_gluster_inventory.yml is the same as the gluster_inventory.yml file. The only change is in the hosts section as there is only 1 host for a single node deployment.
You can find this file at /etc/ansible/roles/gluster.ansible/playbooks/hc-ansible-deployment/gluster_inventory.yml on any hyperconverged host.
B.2.1. Default host groups
The gluster_inventory.yml example file defines two host groups and their configuration in the YAML format. You can use these host groups directly if you want all nodes to host all storage domains.
- hc_nodes
A list of hyperconverged hosts that uses the back-end FQDN of the host, and the configuration details of those hosts. Configuration that is specific to a host is defined under that host’s back-end FQDN. Configuration that is common to all hosts is defined in the
vars:section.hc_nodes: hosts: host1backend.example.com: [configuration specific to this host] host2backend.example.com: host3backend.example.com: host4backend.example.com: host5backend.example.com: host6backend.example.com: vars: [configuration common to all hosts]- gluster
A list of hosts that uses the front-end FQDN of the host. These hosts serve as additional storage domain access points, so this list of nodes does not include the first host.
If you want all nodes to host all storage domains, place
storage_domains:and all storage domain definitions under thevars:section.gluster: hosts: host2frontend.example.com: host3frontend.example.com: host4frontend.example.com: host5frontend.example.com: host6frontend.example.com: vars: storage_domains: [storage domain definitions common to all hosts]
B.2.2. Configuration parameters for hyperconverged nodes
B.2.2.1. Multipath devices
blacklist_mpath_devices(optional)By default, Red Hat Virtualization Host enables multipath configuration, which provides unique multipath names and worldwide identifiers for all disks, even when disks do not have underlying multipath configuration. Include this section if you do not have multipath configuration so that the multipath device names are not used for listed devices. Disks that are not listed here are assumed to have multipath configuration available, and require the path format
/dev/mapper/<WWID>instead of/dev/sdxwhen defined in subsequent sections of the inventory file.On a server with four devices (
sda,sdb,sdcandsdd), the following configuration blacklists only two devices. The path format/dev/mapper/<WWID>is expected for devices not in this list.hc_nodes: hosts: host1backend.example.com: blacklist_mpath_devices: - sdb - sdcImportantDo not list encrypted devices (
luks_*devices) inblacklist_mpath_devices, as they require multipath configuration to work.
B.2.2.2. Deduplication and compression
gluster_infra_vdo(optional)Include this section to define a list of devices to use deduplication and compression. These devices require the
/dev/mapper/<name>path format when you define them as volume groups ingluster_infra_volume_groups. Each device listed must have the following information:name-
A short name for the VDO device, for example
vdo_sdc. device-
The device to use, for example,
/dev/sdc. logicalsize-
The logical size of the VDO volume. Set this to ten times the size of the physical disk, for example, if you have a 500 GB disk, set
logicalsize: '5000G'. emulate512-
If you use devices with a 4 KB block size, set this to
on. slabsize-
If the logical size of the volume is 1000 GB or larger, set this to
32G. If the logical size is smaller than 1000 GB, set this to2G. blockmapcachesize-
Set this to
128M. writepolicy-
Set this to
auto.
For example:
hc_nodes:
  hosts:
    host1backend.example.com:
      gluster_infra_vdo:
      - { name: 'vdo_sdc', device: '/dev/sdc', logicalsize: '5000G',
        emulate512: 'off', slabsize: '32G', blockmapcachesize: '128M',
        writepolicy: 'auto' }
      - { name: 'vdo_sdd', device: '/dev/sdd', logicalsize: '500G',
        emulate512: 'off', slabsize: '2G', blockmapcachesize: '128M',
        writepolicy: 'auto' }
B.2.2.3. Cluster definition
cluster_nodes(required)Defines the list of nodes that are part of the cluster, using the back-end FQDN for each node and creates the cluster.
hc_nodes: vars: cluster_nodes: - host1backend.example.com - host2backend.example.com - host3backend.example.comgluster_features_hci_cluster(required)Identifies
cluster_nodesas part of a hyperconverged cluster.hc_nodes: vars: gluster_features_hci_cluster: "{{ cluster_nodes }}"gluster_features_hci_volumes(required)Defines the layout of the Gluster volumes across the hyperconverged nodes.
volname- The name of the Gluster volume to create.
brick- The location at which to create the brick.
arbiter-
Set to
1for arbitrated volumes and0for a fully replicated volume. serversThe list of back-end FQDN addresses for the hosts on which to create bricks for this volume.
There are two format options for this parameter. Only one of these formats is supported per deployment.
Format 1: Creates bricks for the specified volumes across all hosts
hc_nodes:
  vars:
    gluster_features_hci_volumes:
      - volname: engine
        brick: /gluster_bricks/engine/engine
        arbiter: 0
      - volname: data
        brick: /gluster_bricks/data1/data1,/gluster_bricks/data2/data2
        arbiter: 0
      - volname: vmstore
        brick: /gluster_bricks/vmstore/vmstore
        arbiter: 0
Format 2: Creates bricks for the specified volumes on specified hosts
hc_nodes:
  vars:
    gluster_features_hci_volumes:
      - volname: data
        brick: /gluster_bricks/data/data
        arbiter: 0
        servers:
          - host4backend.example.com
          - host5backend.example.com
          - host6backend.example.com
          - host7backend.example.com
          - host8backend.example.com
          - host9backend.example.com
      - volname: vmstore
        brick: /gluster_bricks/vmstore/vmstore
        arbiter: 0
        servers:
          - host1backend.example.com
          - host2backend.example.com
          - host3backend.example.com
B.2.2.4. Storage infrastructure
gluster_infra_volume_groups(required)This section creates the volume groups that contain the logical volumes.
hc_nodes: hosts: host1backend.example.com: gluster_infra_volume_groups: - vgname: gluster_vg_sdb pvname: /dev/sdb - vgname: gluster_vg_sdc pvname: /dev/mapper/vdo_sdcgluster_infra_mount_devices(required)This section creates the logical volumes that form Gluster bricks.
hc_nodes: hosts: host1backend.example.com: gluster_infra_mount_devices: - path: /gluster_bricks/engine lvname: gluster_lv_engine vgname: gluster_vg_sdb - path: /gluster_bricks/data lvname: gluster_lv_data vgname: gluster_vg_sdc - path: /gluster_bricks/vmstore lvname: gluster_lv_vmstore vgname: gluster_vg_sddgluster_infra_thinpools(optional)This section defines logical thin pools for use by thinly provisioned volumes. Thin pools are not suitable for the
enginevolume, but can be used for thevmstoreanddatavolume bricks.vgname- The name of the volume group that contains this thin pool.
thinpoolname-
A name for the thin pool, for example,
gluster_thinpool_sdc. thinpoolsize- The sum of the sizes of all logical volumes to be created in this volume group.
poolmetadatasize-
Set to
16G; this is the recommended size for supported deployments.
hc_nodes: hosts: host1backend.example.com: gluster_infra_thinpools: - {vgname: 'gluster_vg_sdc', thinpoolname: 'gluster_thinpool_sdc', thinpoolsize: '500G', poolmetadatasize: '16G'} - {vgname: 'gluster_vg_sdd', thinpoolname: 'gluster_thinpool_sdd', thinpoolsize: '500G', poolmetadatasize: '16G'}gluster_infra_cache_vars(optional)This section defines cache logical volumes to improve performance for slow devices. A fast cache device is attached to a thin pool, and requires
gluster_infra_thinpoolto be defined.vgname- The name of a volume group with a slow device that requires a fast external cache.
cachedisk-
The paths of the slow and fast devices, separated with a comma, for example, to use a cache device
sdewith the slow devicesdb, specify/dev/sdb,/dev/sde. cachelvname- A name for this cache logical volume.
cachethinpoolname- The thin pool to which the fast cache volume is attached.
cachelvsize- The size of the cache logical volume. Around 0.01% of this size is used for cache metadata.
cachemode-
The cache mode. Valid values are
writethroughandwriteback.
hc_nodes: hosts: host1backend.example.com: gluster_infra_cache_vars: - vgname: gluster_vg_sdb cachedisk: /dev/sdb,/dev/sde cachelvname: cachelv_thinpool_sdb cachethinpoolname: gluster_thinpool_sdb cachelvsize: '250G' cachemode: writethroughgluster_infra_thick_lvs(required)The thickly provisioned logical volumes that are used to create bricks. Bricks for the
enginevolume must be thickly provisioned.vgname- The name of the volume group that contains the logical volume.
lvname- The name of the logical volume.
size-
The size of the logical volume. The
enginelogical volume requires100G.
hc_nodes: hosts: host1backend.example.com: gluster_infra_thick_lvs: - vgname: gluster_vg_sdb lvname: gluster_lv_engine size: 100Ggluster_infra_lv_logicalvols(required)The thinly provisioned logical volumes that are used to create bricks.
vgname- The name of the volume group that contains the logical volume.
thinpool- The thin pool that contains the logical volume, if this volume is thinly provisioned.
lvname- The name of the logical volume.
size-
The size of the logical volume. The
enginelogical volume requires100G.
hc_nodes: hosts: host1backend.example.com: gluster_infra_lv_logicalvols: - vgname: gluster_vg_sdc thinpool: gluster_thinpool_sdc lvname: gluster_lv_data lvsize: 200G - vgname: gluster_vg_sdd thinpool: gluster_thinpool_sdd lvname: gluster_lv_vmstore lvsize: 200Ggluster_infra_disktype(required)Specifies the underlying hardware configuration of the disks. Set this to the value that matches your hardware:
RAID6,RAID5, orJBOD.hc_nodes: vars: gluster_infra_disktype: RAID6gluster_infra_diskcount(required)Specifies the number of data disks in the RAID set. For a
JBODdisk type, set this to1.hc_nodes: vars: gluster_infra_diskcount: 10gluster_infra_stripe_unit_size(required)The stripe size of the RAID set in megabytes.
hc_nodes: vars: gluster_infra_stripe_unit_size: 256gluster_features_force_varlogsizecheck(required)Set this to
trueif you want to verify that your/var/logpartition has sufficient free space during the deployment process. It is important to have sufficient space for logs, but it is not required to verify space requirements at deployment time if you plan to monitor space requirements carefully.hc_nodes: vars: gluster_features_force_varlogsizecheck: falsegluster_set_selinux_labels(required)Ensures that volumes can be accessed when SELinux is enabled. Set this to
trueif SELinux is enabled on this host.hc_nodes: vars: gluster_set_selinux_labels: trueRecommendation for LV sizeLogical volume for engine brick must be a thick LV of size 100GB, other bricks created as thin LV reserving 16GB for thinpool metadata and 16GB reserved for spare metadata.
Example:
If the host has a disk of size 1TB, then
engine brick size= 100GB ( thick LV )
Pool metadata size= 16GB
Spare metadata size= 16GB
Available space for thinpool= 1TB - ( 100GB + 16GB + 16GB ) = 868 GB
Other bricks for volumes can be created with the available thinpool storage space of 868GB, for example, vmstore brick with 200GB and data brick with 668GB.
B.2.2.5. Firewall and network infrastructure
gluster_infra_fw_ports(required)A list of ports to open between all nodes, in the format
<port>/<protocol>.hc_nodes: vars: gluster_infra_fw_ports: - 2049/tcp - 54321/tcp - 5900-6923/tcp - 16514/tcp - 5666/tcp - 16514/tcpgluster_infra_fw_permanent(required)Ensures the ports listed in
gluster_infra_fw_portsare open after nodes are rebooted. Set this totruefor production use cases.hc_nodes: vars: gluster_infra_fw_permanent: true
gluster_infra_fw_state(required)Enables the firewall. Set this to
enabledfor production use cases.hc_nodes: vars: gluster_infra_fw_state: enabledgluster_infra_fw_zone(required)Specifies the firewall zone to which these
gluster_infra_fw_\*parameters are applied.hc_nodes: vars: gluster_infra_fw_zone: publicgluster_infra_fw_services(required)A list of services to allow through the firewall. Ensure
glusterfsis defined here.hc_nodes: vars: gluster_infra_fw_services: - glusterfs
B.2.2.6. Storage domains
storage_domains(required)Creates the specified storage domains.
name- The name of the storage domain to create.
host- The front-end FQDN of the first host. Do not use the IP address.
address- The back-end FQDN address of the first host. Do not use the IP address.
path- The path of the Gluster volume that provides the storage domain.
function-
Set this to
data; this is the only supported type of storage domain. mount_options-
Specifies additional mount options. The
backup-volfile-serversoption is required to specify the other hosts that provide the volume. Thexlator-option='transport.address-family=inet6'option is required for IPv6 configurations.
IPv4 configuration
gluster:
 vars:
  storage_domains:
    - {"name":"data","host":"host1-frontend-network-FQDN","address":"host1-backend-network-FQDN","path":"/data","function":"data","mount_options":"backup-volfile-servers=host2-backend-network-FQDN:host3-backend-network-FQDN"}
    - {"name":"vmstore","host":"host1-frontend-network-FQDN","address":"host1-backend-network-FQDN","path":"/vmstore","function":"data","mount_options":"backup-volfile-servers=host2-backend-network-FQDN:host3-backend-network-FQDN"}
IPv6 configuration
gluster:
 vars:
  storage_domains:
    - {"name":"data","host":"host1-frontend-network-FQDN","address":"host1-backend-network-FQDN","path":"/data","function":"data","mount_options":"backup-volfile-servers=host2-backend-network-FQDN:host3-backend-network-FQDN,xlator-option='transport.address-family=inet6'"}
    - {"name":"vmstore","host":"host1-frontend-network-FQDN","address":"host1-backend-network-FQDN","path":"/vmstore","function":"data","mount_options":"backup-volfile-servers=host2-backend-network-FQDN:host3-backend-network-FQDN,xlator-option='transport.address-family=inet6'"}
B.2.3. Example gluster_inventory.yml file
hc_nodes:
  hosts:
     # Host1
    <host1-backend-network-FQDN>:

      # Blacklist multipath devices which are used for gluster bricks
      # If you omit blacklist_mpath_devices it means all device will be whitelisted.
      # If the disks are not blacklisted, and then its taken that multipath configuration
      # exists in the server and one should provide /dev/mapper/<WWID> instead of /dev/sdx
      blacklist_mpath_devices:
        - sdb
        - sdc

      # Enable this section 'gluster_infra_vdo', if dedupe & compression is
      # required on that storage volume.
      # The variables refers to:
      # name        - VDO volume name to be used
      # device      - Disk name on which VDO volume to created
      # logicalsize - Logical size of the VDO volume.This value is 10 times
      #               the size of the physical disk
      # emulate512  - VDO device is made as 4KB block sized storage volume(4KN)
      # slabsize    - VDO slab size. If VDO logical size >= 1000G then
      #               slabsize is 32G else slabsize is 2G
      #
      # Following VDO values are as per recommendation and treated as constants:
      # blockmapcachesize - 128M
      # writepolicy       - auto
      #
      # gluster_infra_vdo:
      #   - { name: 'vdo_sdc', device: '/dev/sdc', logicalsize: '5000G', emulate512: 'off', slabsize: '32G',
      #       blockmapcachesize:  '128M', writepolicy: 'auto' }
      #   - { name: 'vdo_sdd', device: '/dev/sdd', logicalsize: '3000G', emulate512: 'off', slabsize: '32G',
      #       blockmapcachesize:  '128M', writepolicy: 'auto' }

      # When dedupe and compression is enabled on the device,
      # use pvname for that device as '/dev/mapper/<vdo_device_name>
      #
      # The variables refers to:
      # vgname - VG to be created on the disk
      # pvname - Physical disk (/dev/sdc) or VDO volume (/dev/mapper/vdo_sdc)
      gluster_infra_volume_groups:
        - vgname: gluster_vg_sdb
          pvname: /dev/sdb
        - vgname: gluster_vg_sdc
          pvname: /dev/mapper/vdo_sdc
        - vgname: gluster_vg_sdd
          pvname: /dev/mapper/vdo_sdd

      gluster_infra_mount_devices:
        - path: /gluster_bricks/engine
          lvname: gluster_lv_engine
          vgname: gluster_vg_sdb
        - path: /gluster_bricks/data
          lvname: gluster_lv_data
          vgname: gluster_vg_sdc
        - path: /gluster_bricks/vmstore
          lvname: gluster_lv_vmstore
          vgname: gluster_vg_sdd

      # 'thinpoolsize' is the sum of sizes of all LVs to be created on that VG
      # In the case of VDO enabled, 'thinpoolsize' is 10 times the sum of sizes
      # of all LVs to be created on that VG. Recommended values for
      # 'poolmetadatasize' is 16GB and that should be considered exclusive of
      # 'thinpoolsize'
      gluster_infra_thinpools:
        - {vgname: 'gluster_vg_sdc', thinpoolname: 'gluster_thinpool_sdc', thinpoolsize: '500G', poolmetadatasize: '16G'}
        - {vgname: 'gluster_vg_sdd', thinpoolname: 'gluster_thinpool_sdd', thinpoolsize: '500G', poolmetadatasize: '16G'}

      # Enable the following section if LVM cache is to enabled
      # Following are the variables:
      # vgname            - VG with the slow HDD device that needs caching
      # cachedisk         - Comma separated value of slow HDD and fast SSD
      #                     In this example, /dev/sdb is the slow HDD, /dev/sde is fast SSD
      # cachelvname       - LV cache name
      # cachethinpoolname - Thinpool to which the fast SSD to be attached
      # cachelvsize       - Size of cache data LV. This is the SSD_size - (1/1000) of SSD_size
      #                     1/1000th of SSD space will be used by cache LV meta
      # cachemode         - writethrough or writeback
      # gluster_infra_cache_vars:
      #  - vgname: gluster_vg_sdb
      #    cachedisk: /dev/sdb,/dev/sde
      #    cachelvname: cachelv_thinpool_sdb
      #    cachethinpoolname: gluster_thinpool_sdb
      #    cachelvsize: '250G'
      #    cachemode: writethrough

      # Only the engine brick needs to be thickly provisioned
      # Engine brick requires 100GB of disk space
      gluster_infra_thick_lvs:
        - vgname: gluster_vg_sdb
          lvname: gluster_lv_engine
          size: 100G

      gluster_infra_lv_logicalvols:
        - vgname: gluster_vg_sdc
          thinpool: gluster_thinpool_sdc
          lvname: gluster_lv_data
          lvsize: 200G
        - vgname: gluster_vg_sdd
          thinpool: gluster_thinpool_sdd
          lvname: gluster_lv_vmstore
          lvsize: 200G

    #Host2
    <host2-backend-network-FQDN>:

      # Blacklist multipath devices which are used for gluster bricks
      # If you omit blacklist_mpath_devices it means all device will be whitelisted.
      # If the disks are not blacklisted, and then its taken that multipath configuration
      # exists in the server and one should provide /dev/mapper/<WWID> instead of /dev/sdx
      blacklist_mpath_devices:
        - sdb
        - sdc

      # Enable this section 'gluster_infra_vdo', if dedupe & compression is
      # required on that storage volume.
      # The variables refers to:
      # name        - VDO volume name to be used
      # device      - Disk name on which VDO volume to created
      # logicalsize - Logical size of the VDO volume.This value is 10 times
      #               the size of the physical disk
      # emulate512  - VDO device is made as 4KB block sized storage volume(4KN)
      # slabsize    - VDO slab size. If VDO logical size >= 1000G then
      #               slabsize is 32G else slabsize is 2G
      #
      # Following VDO values are as per recommendation and treated as constants:
      # blockmapcachesize - 128M
      # writepolicy       - auto
      #
      # gluster_infra_vdo:
      #   - { name: 'vdo_sdc', device: '/dev/sdc', logicalsize: '5000G', emulate512: 'off', slabsize: '32G',
      #       blockmapcachesize:  '128M', writepolicy: 'auto' }
      #   - { name: 'vdo_sdd', device: '/dev/sdd', logicalsize: '3000G', emulate512: 'off', slabsize: '32G',
      #       blockmapcachesize:  '128M', writepolicy: 'auto' }

      # When dedupe and compression is enabled on the device,
      # use pvname for that device as '/dev/mapper/<vdo_device_name>
      #
      # The variables refers to:
      # vgname - VG to be created on the disk
      # pvname - Physical disk (/dev/sdc) or VDO volume (/dev/mapper/vdo_sdc)
      gluster_infra_volume_groups:
        - vgname: gluster_vg_sdb
          pvname: /dev/sdb
        - vgname: gluster_vg_sdc
          pvname: /dev/mapper/vdo_sdc
        - vgname: gluster_vg_sdd
          pvname: /dev/mapper/vdo_sdd

      gluster_infra_mount_devices:
        - path: /gluster_bricks/engine
          lvname: gluster_lv_engine
          vgname: gluster_vg_sdb
        - path: /gluster_bricks/data
          lvname: gluster_lv_data
          vgname: gluster_vg_sdc
        - path: /gluster_bricks/vmstore
          lvname: gluster_lv_vmstore
          vgname: gluster_vg_sdd

      # 'thinpoolsize' is the sum of sizes of all LVs to be created on that VG
      # In the case of VDO enabled, 'thinpoolsize' is 10 times the sum of sizes
      # of all LVs to be created on that VG. Recommended values for
      # 'poolmetadatasize' is 16GB and that should be considered exclusive of
      # 'thinpoolsize'
      gluster_infra_thinpools:
        - {vgname: 'gluster_vg_sdc', thinpoolname: 'gluster_thinpool_sdc', thinpoolsize: '500G', poolmetadatasize: '16G'}
        - {vgname: 'gluster_vg_sdd', thinpoolname: 'gluster_thinpool_sdd', thinpoolsize: '500G', poolmetadatasize: '16G'}

      # Enable the following section if LVM cache is to enabled
      # Following are the variables:
      # vgname            - VG with the slow HDD device that needs caching
      # cachedisk         - Comma separated value of slow HDD and fast SSD
      #                     In this example, /dev/sdb is the slow HDD, /dev/sde is fast SSD
      # cachelvname       - LV cache name
      # cachethinpoolname - Thinpool to which the fast SSD to be attached
      # cachelvsize       - Size of cache data LV. This is the SSD_size - (1/1000) of SSD_size
      #                     1/1000th of SSD space will be used by cache LV meta
      # cachemode         - writethrough or writeback
      # gluster_infra_cache_vars:
      #  - vgname: gluster_vg_sdb
      #    cachedisk: /dev/sdb,/dev/sde
      #    cachelvname: cachelv_thinpool_sdb
      #    cachethinpoolname: gluster_thinpool_sdb
      #    cachelvsize: '250G'
      #    cachemode: writethrough

      # Only the engine brick needs to be thickly provisioned
      # Engine brick requires 100GB of disk space
      gluster_infra_thick_lvs:
        - vgname: gluster_vg_sdb
          lvname: gluster_lv_engine
          size: 100G

      gluster_infra_lv_logicalvols:
        - vgname: gluster_vg_sdc
          thinpool: gluster_thinpool_sdc
          lvname: gluster_lv_data
          lvsize: 200G
        - vgname: gluster_vg_sdd
          thinpool: gluster_thinpool_sdd
          lvname: gluster_lv_vmstore
          lvsize: 200G

    #Host3
    <host3-backend-network-FQDN>:

      # Blacklist multipath devices which are used for gluster bricks
      # If you omit blacklist_mpath_devices it means all device will be whitelisted.
      # If the disks are not blacklisted, and then its taken that multipath configuration
      # exists in the server and one should provide /dev/mapper/<WWID> instead of /dev/sdx
      blacklist_mpath_devices:
        - sdb
        - sdd

      # Enable this section 'gluster_infra_vdo', if dedupe & compression is
      # required on that storage volume.
      # The variables refers to:
      # name        - VDO volume name to be used
      # device      - Disk name on which VDO volume to created
      # logicalsize - Logical size of the VDO volume.This value is 10 times
      #               the size of the physical disk
      # emulate512  - VDO device is made as 4KB block sized storage volume(4KN)
      # slabsize    - VDO slab size. If VDO logical size >= 1000G then
      #               slabsize is 32G else slabsize is 2G
      #
      # Following VDO values are as per recommendation and treated as constants:
      # blockmapcachesize - 128M
      # writepolicy       - auto
      #
      # gluster_infra_vdo:
      #   - { name: 'vdo_sdc', device: '/dev/sdc', logicalsize: '5000G', emulate512: 'off', slabsize: '32G',
      #       blockmapcachesize:  '128M', writepolicy: 'auto' }
      #   - { name: 'vdo_sdd', device: '/dev/sdd', logicalsize: '3000G', emulate512: 'off', slabsize: '32G',
      #       blockmapcachesize:  '128M', writepolicy: 'auto' }

      # When dedupe and compression is enabled on the device,
      # use pvname for that device as '/dev/mapper/<vdo_device_name>
      #
      # The variables refers to:
      # vgname - VG to be created on the disk
      # pvname - Physical disk (/dev/sdc) or VDO volume (/dev/mapper/vdo_sdc)
      gluster_infra_volume_groups:
        - vgname: gluster_vg_sdb
          pvname: /dev/sdb
        - vgname: gluster_vg_sdc
          pvname: /dev/mapper/vdo_sdc
        - vgname: gluster_vg_sdd
          pvname: /dev/mapper/vdo_sdd

      gluster_infra_mount_devices:
        - path: /gluster_bricks/engine
          lvname: gluster_lv_engine
          vgname: gluster_vg_sdb
        - path: /gluster_bricks/data
          lvname: gluster_lv_data
          vgname: gluster_vg_sdc
        - path: /gluster_bricks/vmstore
          lvname: gluster_lv_vmstore
          vgname: gluster_vg_sdd

      # 'thinpoolsize' is the sum of sizes of all LVs to be created on that VG
      # In the case of VDO enabled, 'thinpoolsize' is 10 times the sum of sizes
      # of all LVs to be created on that VG. Recommended values for
      # 'poolmetadatasize' is 16GB and that should be considered exclusive of
      # 'thinpoolsize'
      gluster_infra_thinpools:
        - {vgname: 'gluster_vg_sdc', thinpoolname: 'gluster_thinpool_sdc', thinpoolsize: '500G', poolmetadatasize: '16G'}
        - {vgname: 'gluster_vg_sdd', thinpoolname: 'gluster_thinpool_sdd', thinpoolsize: '500G', poolmetadatasize: '16G'}

      # Enable the following section if LVM cache is to enabled
      # Following are the variables:
      # vgname            - VG with the slow HDD device that needs caching
      # cachedisk         - Comma separated value of slow HDD and fast SSD
      #                     In this example, /dev/sdb is the slow HDD, /dev/sde is fast SSD
      # cachelvname       - LV cache name
      # cachethinpoolname - Thinpool to which the fast SSD to be attached
      # cachelvsize       - Size of cache data LV. This is the SSD_size - (1/1000) of SSD_size
      #                     1/1000th of SSD space will be used by cache LV meta
      # cachemode         - writethrough or writeback
      # gluster_infra_cache_vars:
      #  - vgname: gluster_vg_sdb
      #    cachedisk: /dev/sdb,/dev/sde
      #    cachelvname: cachelv_thinpool_sdb
      #    cachethinpoolname: gluster_thinpool_sdb
      #    cachelvsize: '250G'
      #    cachemode: writethrough

      # Only the engine brick needs to be thickly provisioned
      # Engine brick requires 100GB of disk space
      gluster_infra_thick_lvs:
        - vgname: gluster_vg_sdb
          lvname: gluster_lv_engine
          size: 100G

      gluster_infra_lv_logicalvols:
        - vgname: gluster_vg_sdc
          thinpool: gluster_thinpool_sdc
          lvname: gluster_lv_data
          lvsize: 200G
        - vgname: gluster_vg_sdd
          thinpool: gluster_thinpool_sdd
          lvname: gluster_lv_vmstore
          lvsize: 200G

  # Common configurations
  vars:
    # In case of IPv6 based deployment "gluster_features_enable_ipv6" needs to be enabled,below line needs to be uncommented, like:
    # gluster_features_enable_ipv6: true

    # Add the required hosts in the cluster. It can be 3,6,9 or 12 hosts
    cluster_nodes:
       - <host1-backend-network-FQDN>
       - <host2-backend-network-FQDN>
       - <host3-backend-network-FQDN>

    gluster_features_hci_cluster: "{{ cluster_nodes }}"

    # Create Gluster volumes for hyperconverged setup in 2 formats
    # format-1: Create bricks for gluster 1x3 replica volumes by default
    #           on the first 3 hosts
    # format-2: Create bricks on the specified hosts, and it can create
    #           nx3 distributed-replicated or distributed arbitrated
    #           replicate volumes
    # Note: format-1 and format-2 are mutually exclusive (ie) either
    #       format-1 or format-2 to be used. Don't mix the formats for
    #       different volumes

    # Format-1 - Creates gluster 1x3 replicate or arbitrated replicate volume
    # - engine, vmstore, data with bricks on first 3 hosts
    gluster_features_hci_volumes:
      - volname: engine
        brick: /gluster_bricks/engine/engine
        arbiter: 0
      - volname: data
        brick: /gluster_bricks/data/data
        arbiter: 0
      - volname: vmstore
        brick: /gluster_bricks/vmstore/vmstore
        arbiter: 0

    # Format-2 - Allows to create nx3 volumes, with bricks on specified host
    #gluster_features_hci_volumes:
    #  - volname: engine
    #    brick: /gluster_bricks/engine/engine
    #    arbiter: 0
    #    servers:
    #      - host1
    #      - host2
    #      - host3
    #
    # # Following creates 2x3 'Data' gluster volume with bricks on host4,
    # # host5, host6, host7, host8, host9
    #  - volname: data
    #    brick: /gluster_bricks/data/data
    #    arbiter: 0
    #    servers:
    #      - host4
    #      - host5
    #      - host6
    #      - host7
    #      - host8
    #      - host9
    #
    # # Following creates 2x3 'vmstore' gluster volume with 2 bricks for
    # # each host
    #  - volname: vmstore
    #    brick: /gluster_bricks/vmstore1/vmstore1,/gluster_bricks/vmstore2/vmstore2
    #    arbiter: 0
    #    servers:
    #      - host1
    #      - host2
    #      - host3

    # Firewall setup
    gluster_infra_fw_ports:
       - 2049/tcp
       - 54321/tcp
       - 5900-6923/tcp
       - 16514/tcp
       - 5666/tcp
       - 16514/tcp
    gluster_infra_fw_permanent: true
    gluster_infra_fw_state: enabled
    gluster_infra_fw_zone: public
    gluster_infra_fw_services:
       - glusterfs
    # Allowed values for 'gluster_infra_disktype' - RAID6, RAID5, JBOD
    gluster_infra_disktype: RAID6

    # 'gluster_infra_diskcount' is the number of data disks in the RAID set.
    #  Note for JBOD its 1
    gluster_infra_diskcount: 10

    gluster_infra_stripe_unit_size: 256
    gluster_features_force_varlogsizecheck: false
    gluster_set_selinux_labels: true

## Auto add hosts vars
gluster:
 hosts:
  <host2-frontend-network-FQDN>:
  <host3-frontend-network-FQDN>:
 vars:
  storage_domains:
    - {"name":"data","host":"host1-frontend-network-FQDN","address":"host1-backend-network-FQDN","path":"/data","function":"data","mount_options":"backup-volfile-servers=host2-backend-network-FQDN:host3-backend-network-FQDN"}
    - {"name":"vmstore","host":"host1-frontend-network-FQDN","address":"host1-backend-network-FQDN","path":"/vmstore","function":"data","mount_options":"backup-volfile-servers=host2-backend-network-FQDN:host3-backend-network-FQDN"}

# In case of IPv6 based deployment there is additional mount option required i.e. xlator-option="transport.address-family=inet6", below needs to be replaced with above one.
# Ex:
#storage_domains:
  #- {"name":"data","host":"host1-frontend-network-FQDN","address":"host1-backend-network-FQDN","path":"/data","function":"data","mount_options":"backup-volfile-servers=host2-backend-network-FQDN:host3-backend-network-FQDN,xlator-option="transport.address-family=inet6""}
  #- {"name":"vmstore","host":"host1-frontend-network-FQDN","address":"host1-backend-network-FQDN","path":"/vmstore","function":"data","mount_options":"backup-volfile-servers=host2-backend-network-FQDN:host3-backend-network-FQDN,xlator-option="transport.address-family=inet6""}
B.3. Understanding the he_gluster_vars.json file
The he_gluster_vars.json file is an example Ansible variable file. The variables in this file need to be defined in order to deploy Red Hat Hyperconverged Infrastructure for Virtualization.
You can find an example file at /etc/ansible/roles/gluster.ansible/playbooks/hc-ansible-deployment/he_gluster_vars.json on any hyperconverged host.
Example he_gluster_vars.json file
{
  "he_appliance_password": "encrypt-password-using-ansible-vault",
  "he_admin_password": "UI-password-for-login",
  "he_domain_type": "glusterfs",
  "he_fqdn": "FQDN-for-Hosted-Engine",
  "he_vm_mac_addr": "Valid MAC address",
  "he_default_gateway": "Valid Gateway",
  "he_mgmt_network": "ovirtmgmt",
  "he_storage_domain_name": "HostedEngine",
  "he_storage_domain_path": "/engine",
  "he_storage_domain_addr": "host1-backend-network-FQDN",
  "he_mount_options": "backup-volfile-servers=host2-backend-network-FQDN:host3-backend-network-FQDN",
  "he_bridge_if": "interface name for bridge creation",
  "he_enable_hc_gluster_service": true,
  "he_mem_size_MB": "16384",
  "he_cluster": "Default",
  "he_vcpus": "4"
}
Red Hat recommends encrypting this file. See Working with files encrypted using Ansible Vault for more information.
B.3.1. Required variables
he_appliance_password- The password for the hosted engine. For a production cluster, use an encrypted value created with Ansible Vault.
he_admin_password-
The password for the
adminaccount of the hosted engine. For a production cluster, use an encrypted value created with Ansible Vault. he_domain_type-
The type of storage domain. Set to
glusterfs. he_fqdn- The FQDN for the hosted engine virtual machine.
he_vm_mac_addr- The MAC address for the appropriate network device of the hosted engine virtual machine. You can skip this option for hosted deployment with static IP configuration as in such cases the MAC address for Hosted Engine is automatically generated.
he_default_gateway- The FQDN of the gateway to be used.
he_mgmt_network-
The name of the management network. Set to
ovirtmgmt. he_storage_domain_name-
The name of the storage domain to create for the hosted engine. Set to
HostedEngine. he_storage_domain_path-
The path of the Gluster volume that provides the storage domain. Set to
/engine. he_storage_domain_addr-
The back-end FQDN of the first host providing the
enginedomain. he_mount_optionsSpecifies additional mount options.
For a three node deployment with IPv4 configurations, set:
"he_mount_options":"backup-volfile-servers=host2-backend-network-FQDN:host3-backend-network-FQDN"
The
he_mount_optionis not required for IPv4 based single node deployment of Red Hat Hyperconverged Infrastructure for Virtualization.For a three node deployment with IPv6 configurations, set:
"he_mount_options":"backup-volfile-servers=host2-backend-network-FQDN:host3-backend-network-FQDN",xlator-option='transport.address-family=inet6'"
For a single node deployment with IPv6 configurations, set:
"he_mount_options":"xlator-option='transport.address-family=inet6'"
he_bridge_if- The name of the interface to use for bridge creation.
he_enable_hc_gluster_service-
Enables Gluster services. Set to
true. he_mem_size_MB- The amount of memory allocated to the hosted engine virtual machine in megabytes.
he_cluster- The name of the cluster in which the hyperconverged hosts are placed.
he_vcpus- The amount of CPUs used on the engine VM. By default 4 VCPUs are allocated for Hosted Engine Virtual Machine.
B.3.2. Required variables for static network configurations
DHCP configuration is used on the Hosted Engine VM by default. However, if you want to use static IP or FQDN, define the following variables:
he_vm_ip_addr- Static IP address for Hosted Engine VM (IPv4 or IPv6).
he_vm_ip_prefix- IP prefix for Hosted Engine VM (IPv4 or IPv6).
he_dns_addr- DNS server for Hosted Engine VM (IPv4 or IPv6).
he_default_gateway- Default gateway for Hosted Engine VM (IPv4 or IPv6).
he_vm_etc_hosts-
Specifies Hosted Engine VM IP address and FQDN to
/etc/hostson the host, boolean value.
Example he_gluster_vars.json file with static Hosted Engine configuration
{
  "he_appliance_password": "mybadappliancepassword",
  "he_admin_password": "mybadadminpassword",
  "he_domain_type": "glusterfs",
  "he_fqdn": "engine.example.com",
  "he_vm_mac_addr": "00:01:02:03:04:05",
  "he_default_gateway": "gateway.example.com",
  "he_mgmt_network": "ovirtmgmt",
  "he_storage_domain_name": "HostedEngine",
  "he_storage_domain_path": "/engine",
  "he_storage_domain_addr": "host1-backend.example.com",
  "he_mount_options": "backup-volfile-servers=host2-backend.example.com:host3-backend.example.com",
  "he_bridge_if": "interface name for bridge creation",
  "he_enable_hc_gluster_service": true,
  "he_mem_size_MB": "16384",
  "he_cluster": "Default",
  "he_vm_ip_addr": "10.70.34.43",
  "he_vm_ip_prefix": "24",
  "he_dns_addr": "10.70.34.6",
  "he_default_gateway": "10.70.34.255",
  "he_vm_etc_hosts": "false",
  "he_network_test": "ping"
}
If DNS is not available, use ping for he_network_test instead of dns.
Example: "he_network_test": "ping"
Appendix C. Example deployment using 3 hyperconverged nodes
This section contains example files for a 3 node deployment of Red Hat Hyperconverged Infrastructure for Virtualization.
These example files have the following assumptions:
All nodes have the same disks and are configured identically.
-
Each node has 5 devices: a boot device (
sda), three storage devices (sdb,sdc, andsdd) and a fast cache device (sde). -
The
enginevolume uses thesdbdevice on all nodes. This device is thickly provisioned. -
The
datavolume uses thesdcdevice on all nodes. This device is thinly provisioned and has a fast cache devicesdeattached to improve performance. -
The
vmstorevolume uses thesdddevice on all nodes. This device uses multipath configuration, is thinly provisioned, and has deduplication and compression enabled.
-
Each node has 5 devices: a boot device (
- This cluster uses IPv6 networking.
Example he_gluster_vars.json file
{
  "he_appliance_password": "mybadappliancepassword",
  "he_admin_password": "mybadadminpassword",
  "he_domain_type": "glusterfs",
  "he_fqdn": "engine.example.com",
  "he_vm_mac_addr": "00:01:02:03:04:05",
  "he_default_gateway": "gateway.example.com",
  "he_mgmt_network": "ovirtmgmt",
  "he_storage_domain_name": "HostedEngine",
  "he_storage_domain_path": "/engine",
  "he_storage_domain_addr": "host1-backend.example.com",
  "he_mount_options": "backup-volfile-servers=host2-backend.example.com:host3-backend.example.com",
  "he_bridge_if": "interface name for bridge creation",
  "he_enable_hc_gluster_service": true,
  "he_mem_size_MB": "16384",
  "he_cluster": "Default"
}
Example gluster_inventory.yml file
hc_nodes:
  hosts:
    host1-backend.example.com:
    host2-backend.example.com:
    host3-backend.example.com:
  vars:
    blacklist_mpath_devices:
      - sdb
      - sdc
    gluster_infra_vdo:
      - { name: 'vdo_sdd', device: '/dev/sdd', logicalsize: '5000G', emulate512: 'off', slabsize: '32G', blockmapcachesize:  '128M', writepolicy: 'auto' }
    gluster_infra_volume_groups:
      - vgname: gluster_vg_sdb
        pvname: /dev/sdb
      - vgname: gluster_vg_sdc
        pvname: /dev/sdc
      - vgname: gluster_vg_sdd
        pvname: /dev/mapper/vdo_sdd
    gluster_infra_mount_devices:
      - path: /gluster_bricks/engine
        lvname: gluster_lv_engine
        vgname: gluster_vg_sdb
      - path: /gluster_bricks/data
        lvname: gluster_lv_data
        vgname: gluster_vg_sdc
      - path: /gluster_bricks/vmstore
        lvname: gluster_lv_vmstore
        vgname: gluster_vg_sdd
    gluster_infra_thinpools:
      - {vgname: 'gluster_vg_sdc', thinpoolname: 'gluster_thinpool_sdc', thinpoolsize: '500G', poolmetadatasize: '16G'}
      - {vgname: 'gluster_vg_sdd', thinpoolname: 'gluster_thinpool_sdd', thinpoolsize: '500G', poolmetadatasize: '16G'}
    gluster_infra_cache_vars:
      - vgname: gluster_vg_sdb
        cachedisk: /dev/sdb,/dev/sde
        cachelvname: cachelv_thinpool_sdb
        cachethinpoolname: gluster_thinpool_sdb
        cachelvsize: '250G'
        cachemode: writethrough
    gluster_infra_thick_lvs:
      - vgname: gluster_vg_sdb
        lvname: gluster_lv_engine
        size: 100G
    gluster_infra_lv_logicalvols:
      - vgname: gluster_vg_sdc
        thinpool: gluster_thinpool_sdc
        lvname: gluster_lv_data
        lvsize: 200G
      - vgname: gluster_vg_sdd
        thinpool: gluster_thinpool_sdd
        lvname: gluster_lv_vmstore
        lvsize: 200G
    gluster_features_enable_ipv6: true
    cluster_nodes:
      - host1-backend.example.com
      - host2-backend.example.com
      - host3-backend.example.com
    gluster_features_hci_cluster: "{{ cluster_nodes }}"
    gluster_features_hci_volumes:
      - volname: engine
        brick: /gluster_bricks/engine/engine
        arbiter: 0
      - volname: data
        brick: /gluster_bricks/data/data
        arbiter: 0
      - volname: vmstore
        brick: /gluster_bricks/vmstore/vmstore
        arbiter: 0
    gluster_infra_fw_ports:
      - 2049/tcp
      - 54321/tcp
      - 5900-6923/tcp
      - 16514/tcp
      - 5666/tcp
      - 16514/tcp
    gluster_infra_fw_permanent: true
    gluster_infra_fw_state: enabled
    gluster_infra_fw_zone: public
    gluster_infra_fw_services:
      - glusterfs
    gluster_infra_disktype: RAID6
    gluster_infra_diskcount: 10
    gluster_infra_stripe_unit_size: 256
    gluster_features_force_varlogsizecheck: false
    gluster_set_selinux_labels: true

gluster:
  hosts:
    host2-frontend.example.com:
    host3-frontend.example.com:
  vars:
    storage_domains:
      - {"name":"data","host":"host1-frontend.example.com","address":"host1-backend.example.com","path":"/data","function":"data","mount_options":"backup-volfile-servers=host2-backend.example.com:host3-backend.example.com,xlator-option=transport.address-family=inet6"}
      - {"name":"vmstore","host":"host1-frontend.example.com","address":"host1-backend.example.com","path":"/vmstore","function":"data","mount_options":"backup-volfile-servers=host2-backend.example.com:host3-backend.example.com,xlator-option=transport.address-family=inet6"}
Appendix D. Example deployment using 6 hyperconverged nodes
This section contains example files for a 6 node deployment of Red Hat Hyperconverged Infrastructure for Virtualization.
These example files have the following assumptions:
All nodes have the same disks and are configured identically.
-
Each node has 5 devices: a boot device (
sda), three storage devices (sdb,sdc, andsdd) and a fast cache device (sde). -
The
enginevolume uses thesdbdevice on all nodes. This device is thickly provisioned. -
The
datavolume uses thesdcdevice on all nodes. This device is thinly provisioned and has a fast cache devicesdeattached to improve performance. -
The
vmstorevolume uses thesdddevice on all nodes. This device uses multipath configuration, is thinly provisioned, and has deduplication and compression enabled.
-
Each node has 5 devices: a boot device (
- This cluster uses IPv6 networking.
Example he_gluster_vars.json file
{
  "he_appliance_password": "mybadappliancepassword",
  "he_admin_password": "mybadadminpassword",
  "he_domain_type": "glusterfs",
  "he_fqdn": "engine.example.com",
  "he_vm_mac_addr": "00:01:02:03:04:05",
  "he_default_gateway": "gateway.example.com",
  "he_mgmt_network": "ovirtmgmt",
  "he_storage_domain_name": "HostedEngine",
  "he_storage_domain_path": "/engine",
  "he_storage_domain_addr": "host1-backend.example.com",
  "he_mount_options": "backup-volfile-servers=host2-backend.example.com:host3-backend.example.com",
  "he_bridge_if": "interface name for bridge creation",
  "he_enable_hc_gluster_service": true,
  "he_mem_size_MB": "16384",
  "he_cluster": "Default"
}
Example gluster_inventory.yml file
hc_nodes:
  hosts:
    host1-backend.example.com:
      blacklist_mpath_devices:
        - sdc
      gluster_infra_volume_groups:
        - vgname: gluster_vg_sdb
          pvname: /dev/sdb
      gluster_infra_mount_devices:
        - path: /gluster_bricks/engine
          lvname: gluster_lv_engine
          vgname: gluster_vg_sdb
      gluster_infra_thick_lvs:
        - vgname: gluster_vg_sdb
          lvname: gluster_lv_engine
          size: 100G
      gluster_features_hci_volumes:
        - volname: engine
          brick: /gluster_bricks/engine/engine
          arbiter: 0
    host2-backend.example.com:
      blacklist_mpath_devices:
        - sdc
      gluster_infra_volume_groups:
        - vgname: gluster_vg_sdb
          pvname: /dev/sdb
      gluster_infra_mount_devices:
        - path: /gluster_bricks/engine
          lvname: gluster_lv_engine
          vgname: gluster_vg_sdb
      gluster_infra_thick_lvs:
        - vgname: gluster_vg_sdb
          lvname: gluster_lv_engine
          size: 100G
      gluster_features_hci_volumes:
        - volname: engine
          brick: /gluster_bricks/engine/engine
          arbiter: 0
    host3-backend.example.com:
      blacklist_mpath_devices:
        - sdc
      gluster_infra_volume_groups:
        - vgname: gluster_vg_sdb
          pvname: /dev/sdb
      gluster_infra_mount_devices:
        - path: /gluster_bricks/engine
          lvname: gluster_lv_engine
          vgname: gluster_vg_sdb
      gluster_infra_thick_lvs:
        - vgname: gluster_vg_sdb
          lvname: gluster_lv_engine
          size: 100G
      gluster_features_hci_volumes:
        - volname: engine
          brick: /gluster_bricks/engine/engine
          arbiter: 0
    host4-backend.example.com:
      blacklist_mpath_devices:
        - sdc
      gluster_infra_vdo:
        - { name: 'vdo_sdd', device: '/dev/sdd', logicalsize: '5000G', emulate512: 'off', slabsize: '32G', blockmapcachesize:  '128M', writepolicy: 'auto' }
      gluster_infra_volume_groups:
        - vgname: gluster_vg_sdc
          pvname: /dev/sdc
        - vgname: gluster_vg_sdd
          pvname: /dev/mapper/vdo_sdd
      gluster_infra_mount_devices:
        - path: /gluster_bricks/data
          lvname: gluster_lv_data
          vgname: gluster_vg_sdc
        - path: /gluster_bricks/vmstore
          lvname: gluster_lv_vmstore
          vgname: gluster_vg_sdd
      gluster_infra_thinpools:
        - {vgname: 'gluster_vg_sdc', thinpoolname: 'gluster_thinpool_sdc', thinpoolsize: '500G', poolmetadatasize: '16G'}
        - {vgname: 'gluster_vg_sdd', thinpoolname: 'gluster_thinpool_sdd', thinpoolsize: '500G', poolmetadatasize: '16G'}
      gluster_infra_cache_vars:
        - vgname: gluster_vg_sdc
          cachedisk: /dev/sdc,/dev/sde
          cachelvname: cachelv_thinpool_sdc
          cachethinpoolname: gluster_thinpool_sdc
          cachelvsize: '250G'
          cachemode: writethrough
      gluster_infra_lv_logicalvols:
        - vgname: gluster_vg_sdc
          thinpool: gluster_thinpool_sdc
          lvname: gluster_lv_data
          lvsize: 200G
        - vgname: gluster_vg_sdd
          thinpool: gluster_thinpool_sdd
          lvname: gluster_lv_vmstore
          lvsize: 200G
    host5-backend.example.com:
      blacklist_mpath_devices:
        - sdc
      gluster_infra_vdo:
        - { name: 'vdo_sdd', device: '/dev/sdd', logicalsize: '5000G', emulate512: 'off', slabsize: '32G', blockmapcachesize:  '128M', writepolicy: 'auto' }
      gluster_infra_volume_groups:
        - vgname: gluster_vg_sdc
          pvname: /dev/sdc
        - vgname: gluster_vg_sdd
          pvname: /dev/mapper/vdo_sdd
      gluster_infra_mount_devices:
        - path: /gluster_bricks/data
          lvname: gluster_lv_data
          vgname: gluster_vg_sdc
        - path: /gluster_bricks/vmstore
          lvname: gluster_lv_vmstore
          vgname: gluster_vg_sdd
      gluster_infra_thinpools:
        - {vgname: 'gluster_vg_sdc', thinpoolname: 'gluster_thinpool_sdc', thinpoolsize: '500G', poolmetadatasize: '16G'}
        - {vgname: 'gluster_vg_sdd', thinpoolname: 'gluster_thinpool_sdd', thinpoolsize: '500G', poolmetadatasize: '16G'}
      gluster_infra_cache_vars:
        - vgname: gluster_vg_sdc
          cachedisk: /dev/sdc,/dev/sde
          cachelvname: cachelv_thinpool_sdc
          cachethinpoolname: gluster_thinpool_sdc
          cachelvsize: '250G'
          cachemode: writethrough
      gluster_infra_lv_logicalvols:
        - vgname: gluster_vg_sdc
          thinpool: gluster_thinpool_sdc
          lvname: gluster_lv_data
          lvsize: 200G
        - vgname: gluster_vg_sdd
          thinpool: gluster_thinpool_sdd
          lvname: gluster_lv_vmstore
          lvsize: 200G
    host6-backend.example.com:
      blacklist_mpath_devices:
        - sdc
      gluster_infra_vdo:
        - { name: 'vdo_sdd', device: '/dev/sdd', logicalsize: '5000G', emulate512: 'off', slabsize: '32G', blockmapcachesize:  '128M', writepolicy: 'auto' }
      gluster_infra_volume_groups:
        - vgname: gluster_vg_sdc
          pvname: /dev/sdc
        - vgname: gluster_vg_sdd
          pvname: /dev/mapper/vdo_sdd
      gluster_infra_mount_devices:
        - path: /gluster_bricks/data
          lvname: gluster_lv_data
          vgname: gluster_vg_sdc
        - path: /gluster_bricks/vmstore
          lvname: gluster_lv_vmstore
          vgname: gluster_vg_sdd
      gluster_infra_thinpools:
        - {vgname: 'gluster_vg_sdc', thinpoolname: 'gluster_thinpool_sdc', thinpoolsize: '500G', poolmetadatasize: '16G'}
        - {vgname: 'gluster_vg_sdd', thinpoolname: 'gluster_thinpool_sdd', thinpoolsize: '500G', poolmetadatasize: '16G'}
      gluster_infra_cache_vars:
        - vgname: gluster_vg_sdc
          cachedisk: /dev/sdc,/dev/sde
          cachelvname: cachelv_thinpool_sdc
          cachethinpoolname: gluster_thinpool_sdc
          cachelvsize: '250G'
          cachemode: writethrough
      gluster_infra_lv_logicalvols:
        - vgname: gluster_vg_sdc
          thinpool: gluster_thinpool_sdc
          lvname: gluster_lv_data
          lvsize: 200G
        - vgname: gluster_vg_sdd
          thinpool: gluster_thinpool_sdd
          lvname: gluster_lv_vmstore
          lvsize: 200G
  vars:
    gluster_features_enable_ipv6: true
    cluster_nodes:
      - host1-backend.example.com
      - host2-backend.example.com
      - host3-backend.example.com
      - host4-backend.example.com
      - host5-backend.example.com
      - host6-backend.example.com
    gluster_features_hci_cluster: "{{ cluster_nodes }}"
    gluster_features_hci_volumes:
      - volname: engine
        brick: /gluster_bricks/engine/engine
        arbiter: 0
        servers:
          - host1
          - host2
          - host3
      - volname: data
        brick: /gluster_bricks/data/data
        arbiter: 0
        servers:
          - host4
          - host5
          - host6
      - volname: vmstore
        brick: /gluster_bricks/vmstore/vmstore
        arbiter: 0
        servers:
          - host4
          - host5
          - host6
    gluster_infra_fw_ports:
       - 2049/tcp
       - 54321/tcp
       - 5900-6923/tcp
       - 16514/tcp
       - 5666/tcp
       - 16514/tcp
    gluster_infra_fw_permanent: true
    gluster_infra_fw_state: enabled
    gluster_infra_fw_zone: public
    gluster_infra_fw_services:
       - glusterfs
    gluster_infra_disktype: RAID6
    gluster_infra_diskcount: 10
    gluster_infra_stripe_unit_size: 256
    gluster_features_force_varlogsizecheck: false
    gluster_set_selinux_labels: true

gluster:
  hosts:
    host4-frontend.example.com:
    host5-frontend.example.com:
    host6-frontend.example.com:
  vars:
    storage_domains:
      - {"name":"data","host":"host4-frontend.example.com","address":"host4-backend.example.com","path":"/data","function":"data","mount_options":"backup-volfile-servers=host5-backend.example.com:host6-backend.example.com,xlator-option=transport.address-family=inet6"}
      - {"name":"vmstore","host":"host4-frontend.example.com","address":"host4-backend.example.com","path":"/vmstore","function":"data","mount_options":"backup-volfile-servers=host5-backend.example.com:host6-backend.example.com,xlator-option=transport.address-family=inet6"}