
Deploying Red Hat Hyperconverged Infrastructure for Virtualization on a single node
Create a hyperconverged configuration with a single server
Abstract
Chapter 1. Workflow for deploying a single hyperconverged host
- Verify that your planned deployment meets Support Requirements, with exceptions described in Chapter 2, Additional requirements for single node deployments.
- Install the hyperconverged host machine.
- Configure key-based SSH without a password from the node to itself.
- Browse to the Web Console and deploy a single hyperconverged node.
- Browse to the Red Hat Virtualization Administration Console and configure Red Hat Gluster Storage as a Red Hat Virtualization storage domain.
Chapter 2. Additional requirements for single node deployments
Red Hat Hyperconverged Infrastructure for Virtualization is supported for deployment on a single node provided that all Support Requirements are met, with the following additions and exceptions.
A single node deployment requires a physical machine with:
- 1 Network Interface Controller
- at least 12 cores
- at least 64GB RAM
- at most 48TB storage
Single node deployments cannot be scaled, and are not highly available.
Chapter 3. Install host physical machine
Your physical machine needs an operating system and access to the appropriate software repositories in order to be used as a hyperconverged host.
3.1. Installing Red Hat Virtualization Host
Red Hat Virtualization Host is a minimal operating system designed for setting up a physical machine that acts as a hypervisor in Red Hat Virtualization, or a hyperconverged host in Red Hat Hyperconverged Infrastructure.
Prerequisites
- Ensure that your physical machine meets the requirements outlined in Physical machines.
Procedure
Download the Red Hat Virtualization Host ISO image from the Customer Portal:
- Log in to the Customer Portal at https://access.redhat.com.
- Click Downloads in the menu bar.
- Click Red Hat Virtualization. Scroll up and click Download Latest to access the product download page.
- Go to Hypervisor Image for RHV 4.3 and and click Download Now.
- Create a bootable media device. See Making Media in the Red Hat Enterprise Linux Installation Guide for more information.
- Start the machine on which you are installing Red Hat Virtualization Host, and boot from the prepared installation media.
From the boot menu, select Install RHVH 4.3 and press Enter.
NoteYou can also press the Tab key to edit the kernel parameters. Kernel parameters must be separated by a space, and you can boot the system using the specified kernel parameters by pressing the Enter key. Press the Esc key to clear any changes to the kernel parameters and return to the boot menu.
- Select a language, and click Continue.
Select a time zone from the Date & Time screen and click Done.
ImportantRed Hat recommends using Coordinated Universal Time (UTC) on all hosts. This helps ensure that data collection and connectivity are not impacted by variation in local time, such as during daylight savings time.
- Select a keyboard layout from the Keyboard screen and click Done.
Specify the installation location from the Installation Destination screen.
Important- Red Hat strongly recommends using the Automatically configure partitioning option.
- All disks are selected by default, so deselect disks that you do not want to use as installation locations.
- At-rest encryption is not supported. Do not enable encryption.
Red Hat recommends increasing the size of
/var/logto at least 15GB to provide sufficient space for the additional logging requirements of Red Hat Gluster Storage.Follow the instructions in Growing a logical volume using the Web Console to increase the size of this partition after installing the operating system.
Click Done.
Select the Ethernet network from the Network & Host Name screen.
- Click Configure… → General and select the Automatically connect to this network when it is available check box.
- Optionally configure Language Support, Security Policy, and Kdump. See Installing Using Anaconda in the Red Hat Enterprise Linux 7 Installation Guide for more information on each of the sections in the Installation Summary screen.
- Click Begin Installation.
Set a root password and, optionally, create an additional user while Red Hat Virtualization Host installs.
WarningRed Hat strongly recommends not creating untrusted users on Red Hat Virtualization Host, as this can lead to exploitation of local security vulnerabilities.
Click Reboot to complete the installation.
NoteWhen Red Hat Virtualization Host restarts,
nodectl checkperforms a health check on the host and displays the result when you log in on the command line. The messagenode status: OKornode status: DEGRADEDindicates the health status. Runnodectl checkto get more information. The service is enabled by default.
3.2. Enabling software repositories
Log in to the Web Console.
Use the management FQDN and port
9090, for example,https://server1.example.com:9090/.Navigate to Subscriptions, click Register System, and enter your Customer Portal user name and password.
The Red Hat Virtualization Host subscription is automatically attached to the system.
- Click Terminal.
Enable the
Red Hat Virtualization Host 7repository to allow later updates to the Red Hat Virtualization Host:# subscription-manager repos --enable=rhel-7-server-rhvh-4-rpms
Chapter 4. Configure key based SSH authentication without a password
Configure key-based SSH authentication without a password for the root user from the host, to the FQDNs of both storage and management interfaces on the same host.
4.1. Adding known hosts to the first host
When you use SSH to log in to a host from a system that is not already known to the host, you are prompted to add that system as a known host.
- Log in to the first hyperconverged host as the root user.
Perform the following steps for each host in the cluster, including the first host.
Use SSH to log in to a host as the root user.
[root@server1]# ssh root@server1.example.com
Enter
yesto continue connecting.[root@server1]# ssh root@server2.example.com The authenticity of host 'server2.example.com (192.51.100.28)' can't be established. ECDSA key fingerprint is SHA256:Td8KqgVIPXdTIasdfa2xRwn3/asdBasdpnaGM. Are you sure you want to continue connecting (yes/no)?
This automatically adds the host key of the first host to the
known_hostsfile on the target host.Are you sure you want to continue connecting (yes/no)? yes Warning: Permanently added '192.51.100.28' (ECDSA) to the list of known hosts.
Enter the password for the root user on the target host to complete the login process.
root@server2.example.com's password: ***************
Last login: Mon May 27 10:04:49 2019
[root@server2]#
Log out of the host.
[root@server2]# exit
[root@server1]#
NoteWhen you log out of the SSH session from the first host to itself, the user and server in the command line prompt stay the same; it is only the session that changes.
[root@server1]# exit
[root@server1]#
4.2. Generating SSH key pairs without a password
Generating a public/private key pair lets you use key-based SSH authentication. Generating a key pair that does not use a password makes it simpler to use Ansible to automate deployment and configuration processes.
Procedure
- Log in to the first hyperconverged host as the root user.
Generate an SSH key that does not use a password.
Start the key generation process.
# ssh-keygen -t rsa
Generating public/private rsa key pair.
Enter a location for the key.
The default location, shown in parentheses, is used if no other input is provided.
Enter file in which to save the key (/home/username/.ssh/id_rsa): <location>/<keyname>
Specify and confirm an empty passphrase by pressing
Entertwice.Enter passphrase (empty for no passphrase): Enter same passphrase again:
The private key is saved in
<location>/<keyname>. The public key is saved in<location>/<keyname>.pub.Your identification has been saved in <location>/<keyname>. Your public key has been saved in <location>/<keyname>.pub. The key fingerprint is SHA256:8BhZageKrLXM99z5f/AM9aPo/KAUd8ZZFPcPFWqK6+M root@server1.example.com The key's randomart image is: +---[ECDSA 256]---+ | . . +=| | . . . = o.o| | + . * . o...| | = . . * . + +..| |. + . . So o * ..| | . o . .+ = ..| | o oo ..=. .| | ooo...+ | | .E++oo | +----[SHA256]-----+
WarningYour identificationin this output is your private key. Never share your private key. Possession of your private key allows someone else to impersonate you on any system that has your public key.
4.3. Copying SSH keys
To access a host using your private key, that host needs a copy of your public key.
Prerequisites
- Generate a public/private key pair.
- SSH access from the root user on the host to all storage and management interfaces on the same host, using both IP addresses and FQDNs.
Procedure
- Log in to the first host as the root user.
Copy your public key to the host that you want to access.
# ssh-copy-id -i <location>/<keyname>.pub <user>@<hostname>
Enter the password for
<user>@<hostname>if prompted.WarningMake sure that you use the file that ends in
.pub. Never share your private key. Possession of your private key allows someone else to impersonate you on any system that has your public key.
Chapter 5. Configuring a single node RHHI for Virtualization deployment
5.1. Configuring Red Hat Gluster Storage on a single node
Ensure that disks specified as part of this deployment process do not have any partitions or labels.
Log into the Web Console
Browse to the the Web Console management interface of the first hyperconverged host, for example, https://node1.example.com:9090/, and log in with the credentials you created in the previous section.
Start the deployment wizard
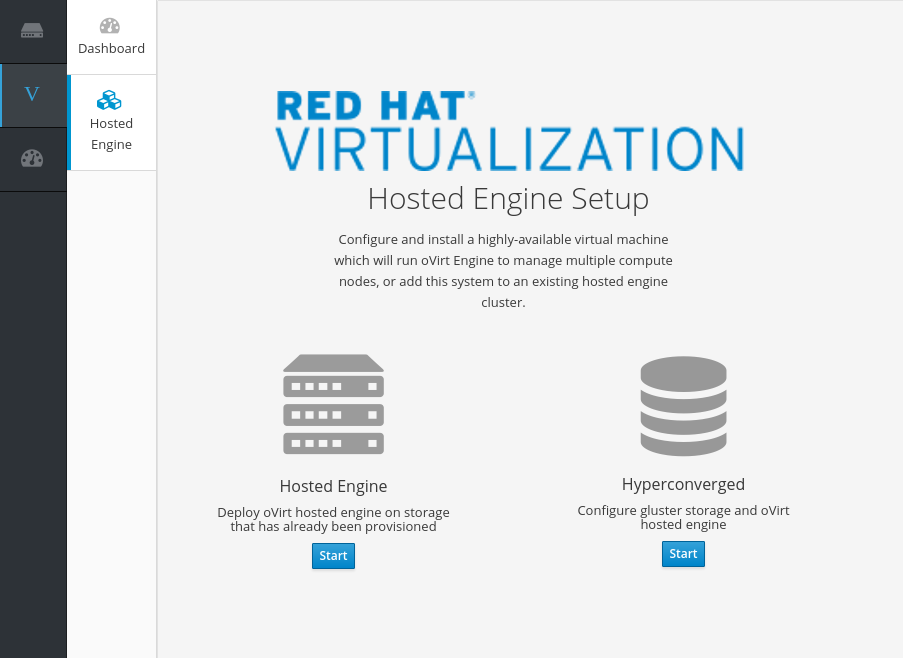
Click Virtualization → Hosted Engine and click Start underneath Hyperconverged.
The Gluster Configuration window opens.
Click the Run Gluster Wizard for Single Node button.
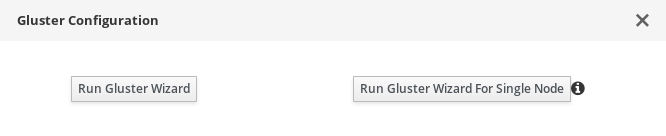
The Gluster Deployment window opens in single node mode.
Specify hyperconverged host
Specify the back-end FQDN on the storage network of the hyperconverged host and click Next.

Specify volumes
Specify the volumes to create.
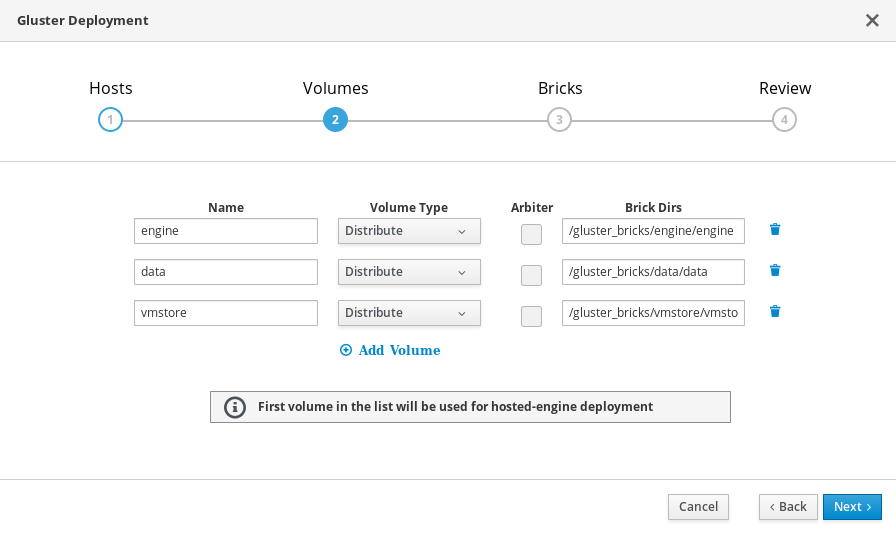
- Name
- Specify the name of the volume to be created.
- Volume Type
- Specify a Distribute volume type. Only distributed volumes are supported for single node deployments.
- Brick Dirs
- The directory that contains this volume’s bricks.
Specify bricks
Specify the bricks to create.
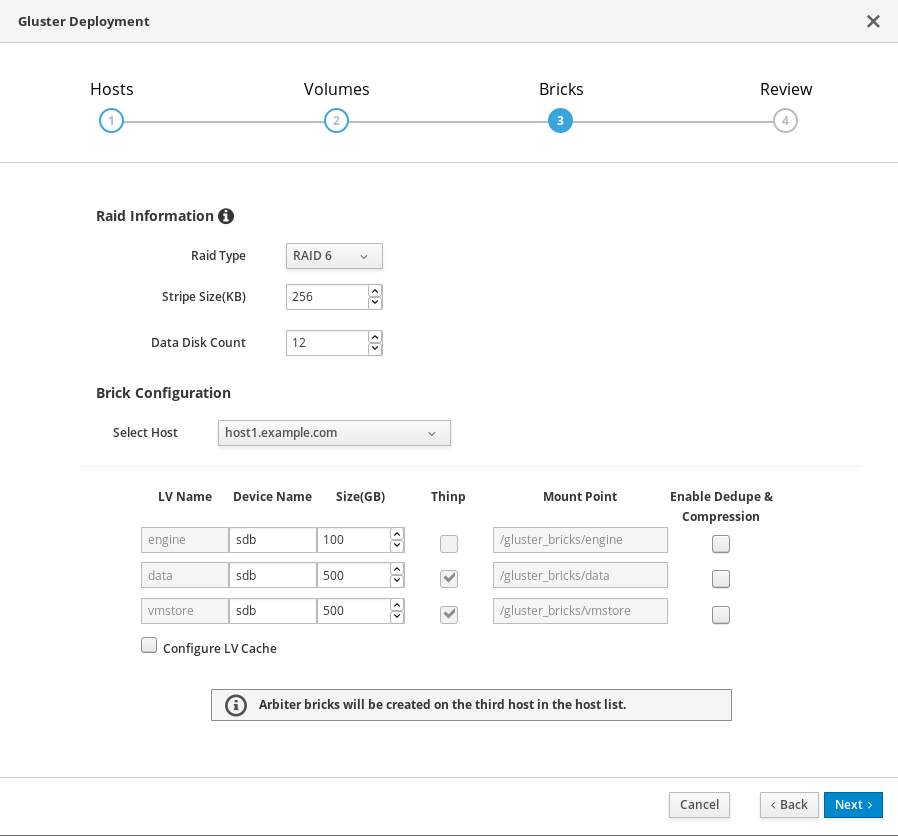
- RAID
- Specify the RAID configuration to use. This should match the RAID configuration of your host. Supported values are raid5, raid6, and jbod. Setting this option ensures that your storage is correctly tuned for your RAID configuration.
- Stripe Size
- Specify the RAID stripe size in KB. Do not enter units, only the number. This can be ignored for jbod configurations.
- Disk Count
- Specify the number of data disks in a RAID volume. This can be ignored for jbod configurations.
- LV Name
- The name of the logical volume to be created. This is pre-filled with the name that you specified on the previous page of the wizard.
- Device
Specify the raw device you want to use. Red Hat recommends an unpartitioned device.
With multipath devices
If the environment has multipath devices for the Gluster deployment from the cockpit, use multipath WWIDs.
For example:/dev/mapper/3600508b1001caab032303683327a6a2e instead of /dev/sdb
Without the multipath devices
If there are no multipath devices in the environment. Blacklist these devices.
NoteBlacklist: Listing of specific devices that will not be considered for multipath.
There are different ways to blacklist the device. For more information, refer to RHEL 7 DM Multipath, chapter 4.2.
To blacklist the device /dev/sdb
- Create a directory: /etc/multipath/conf.d/
Create a file under this directory with the following content: blacklist {
devnodes "<device>"
}
For example:[root@ ~]# cat /etc/multipath/conf.d/99-custom-multipath.conf blacklist { devnodes "sdb" }ImportantLocal disks should not have multipath names. Use lsblk command to check for multipath names.
If there are multipath names on the disks, after blacklisting the disks,reboot the hosts.
- Size
- Specify the size of the logical volume to create in GB. Do not enter units, only the number. This number should be the same for all bricks in a replicated set. Arbiter bricks can be smaller than other bricks in their replication set.
- Mount Point
- The mount point for the logical volume. This is pre-filled with the brick directory that you specified on the previous page of the wizard.
- Thinp
-
This option is enabled and volumes are thinly provisioned by default, except for the
enginevolume, which must be thickly provisioned. - Enable Dedupe & Compression
- Specify whether to provision the volume using VDO for compression and deduplication at deployment time.
- Logical Size (GB)
- Specify the logical size of the VDO volume. This can be up to 10 times the size of the physical volume, with an absolute maximum logical size of 4 PB.
- Configure LV Cache
Optionally, check this checkbox to configure a small, fast SSD device as a logical volume cache for a larger, slower logical volume. Add the device path to the SSD field, the size to the LV Size (GB) field, and set the Cache Mode used by the device.
WarningTo avoid data loss when using write-back mode, Red Hat recommends using two separate SSD/NVMe devices. Configuring the two devices in a RAID-1 configuration (via software or hardware), significantly reduces the potential of data loss from lost writes.
For further information about lvmcache configuration, see Red Hat Enterprise Linux 7 LVM Administration.
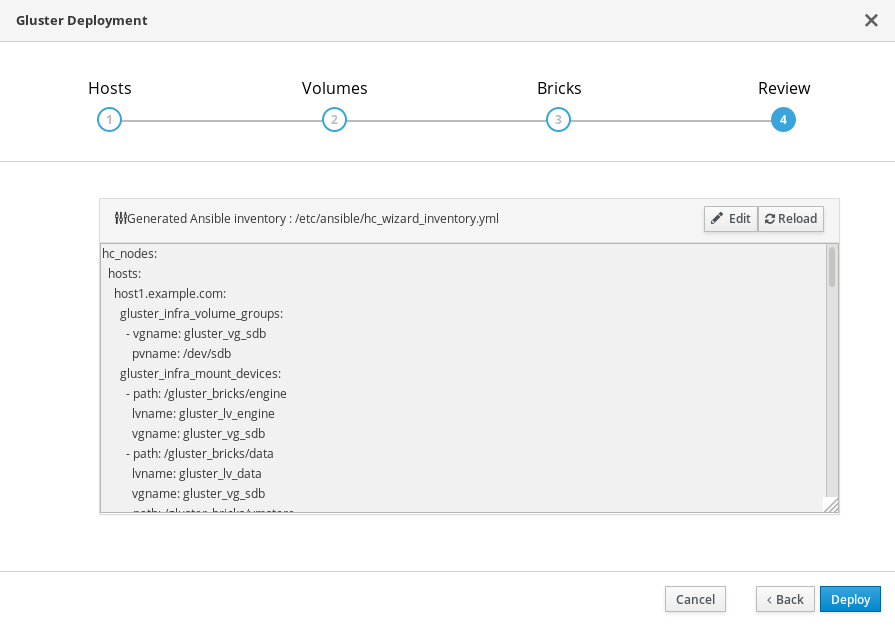
Review and edit configuration
Review the contents of the generated configuration file and click Edit to modify the file, and Save to keep your changes.
Click Deploy when you are satisfied with the configuration file.
Wait for deployment to complete
You can watch the deployment process in the text field.
The window displays Successfully deployed gluster when complete.
Click Continue to Hosted Engine Deployment and continue the deployment process with the instructions in Section 5.2, “Deploy the Hosted Engine on a single node using the Web Console”.
If deployment fails, click the Redeploy button. This returns you to the Review and edit configuration tab so that you can correct any issues in the generated configuration file before reattempting deployment.
If you want to start over again from scratch, run the following command to clean up the attempted deployment.
# ansible-playbook -i /etc/ansible/hc_wizard_inventory.yml /etc/ansible/roles/gluster.ansible/playbooks/hc-ansible-deployment/tasks/gluster_cleanup.yml
5.2. Deploy the Hosted Engine on a single node using the Web Console
This section shows you how to deploy the Hosted Engine on a single node using the Web Console. Following this process results in Red Hat Virtualization Manager running in a virtual machine on your node, and managing that virtual machine. It also configures a Default cluster consisting only of that node, and enables Red Hat Gluster Storage functionality and the virtual-host tuned performance profile for the cluster of one.
Prerequisites
- Configure Red Hat Gluster Storage on a single node
Gather the information you need for Hosted Engine deployment
Have the following information ready before you start the deployment process.
- IP address for a pingable gateway to the hyperconverged host
- IP address of the front-end management network
- Fully-qualified domain name (FQDN) for the Hosted Engine virtual machine
- MAC address that resolves to the static FQDN and IP address of the Hosted Engine
Procedure
Open the Hosted Engine Deployment wizard
If you continued directly from the end of Configure Red Hat Gluster Storage on a single node, the wizard is already open.
Otherwise:
- Click Virtualization → Hosted Engine.
- Click Start underneath Hyperconverged.
Click Use existing configuration.
ImportantIf the previous deployment attempt failed, click Clean up instead of Use existing configuration to discard the previous attempt and start from scratch.
Specify virtual machine details

Enter the following details:
- Engine VM FQDN
-
The fully qualified domain name to be used for the Hosted Engine virtual machine, for example,
engine.example.com. - MAC Address
The MAC address associated with the Engine VM FQDN.
ImportantThe pre-populated MAC address must be replaced.
- Root password
- The root password to be used for the Hosted Engine virtual machine.
- Click Next. Your FQDNs are validated before the next screen appears.
Specify virtualization management details
Enter the password to be used by the
adminaccount in the Administration Portal. You can also specify notification behaviour here.
- Click Next.
Review virtual machine configuration
Ensure that the details listed on this tab are correct. Click Back to correct any incorrect information.

- Click Prepare VM.
Wait for virtual machine preparation to complete.

If preparation does not occur successfully, see Viewing Hosted Engine deployment errors.
- Click Next.
Specify storage for the Hosted Engine virtual machine
Specify the back-end address and location of the
enginevolume.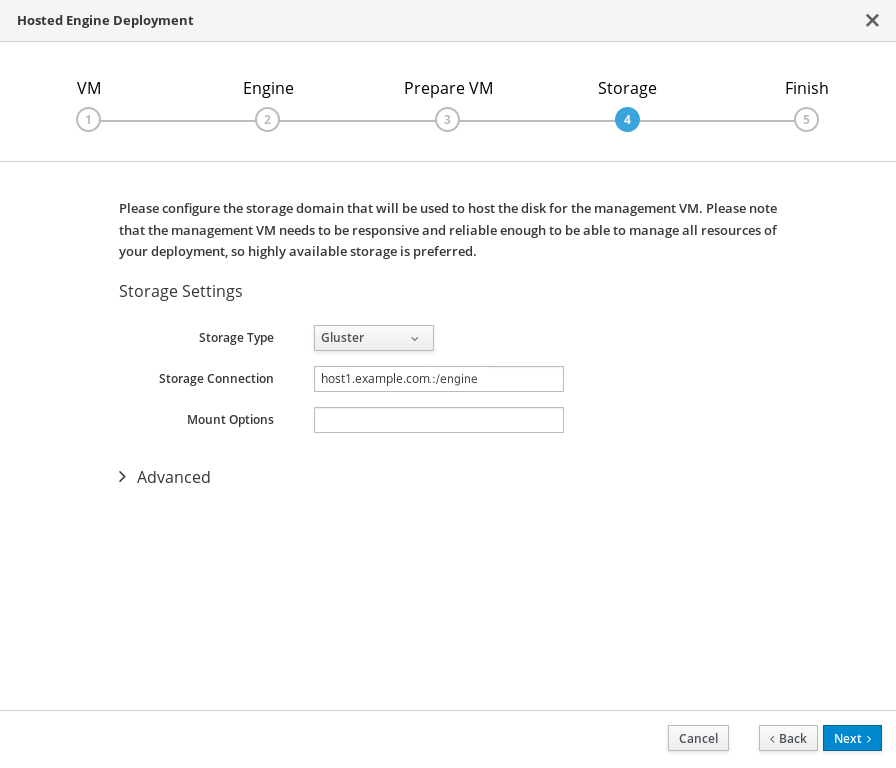
- Click Next.
Finalize Hosted Engine deployment
Review your deployment details and verify that they are correct.
NoteThe responses you provided during configuration are saved to an answer file to help you reinstall the hosted engine if necessary. The answer file is created at
/etc/ovirt-hosted-engine/answers.confby default. This file should not be modified manually without assistance from Red Hat Support.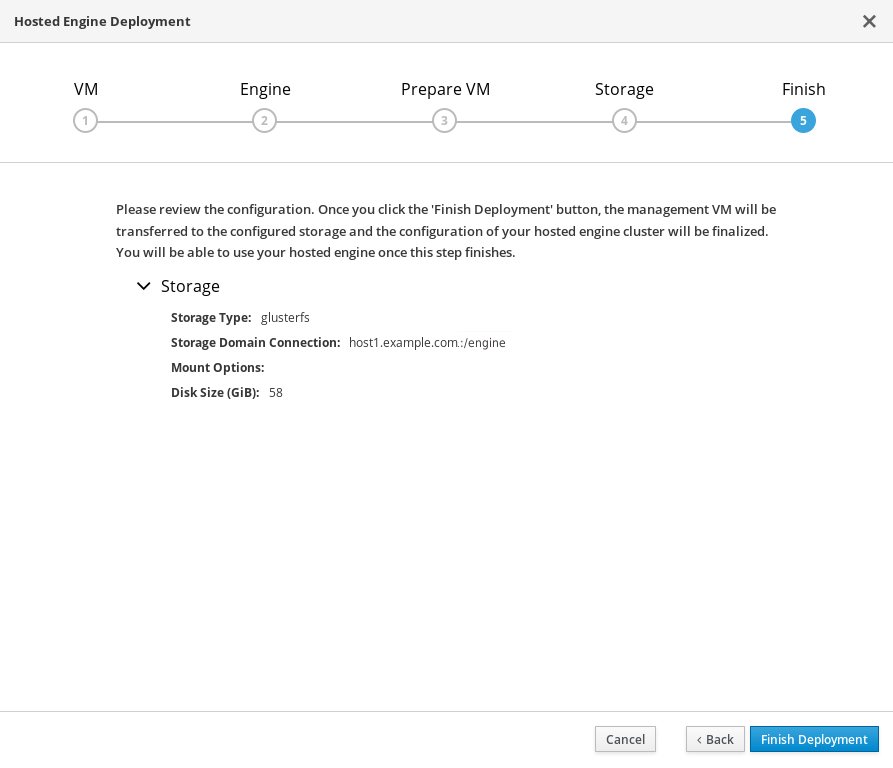
- Click Finish Deployment.
Wait for deployment to complete
This takes up to 30 minutes.
The window displays the following when complete.
 Important
If deployment does not complete successfully, see Viewing Hosted Engine deployment errors.
Click Close.
Verify hosted engine deployment
Browse to the Administration Portal (for example, http://engine.example.com/ovirt-engine) and verify that you can log in using the administrative credentials you configured earlier. Click Dashboard and look for your hosts, storage domains, and virtual machines.

Chapter 6. Configure Red Hat Gluster Storage as a Red Hat Virtualization storage domain
The hosted engine storage domain is imported automatically, but other storage domains must be added to be used.
- Click the Storage tab and then click New Domain.
- Select GlusterFS as the Storage Type and provide a Name for the domain.
- Check the Use managed gluster volume option and select the volume to use.
- Click OK to save.
Chapter 7. Verify your deployment
After deployment is complete, verify that your deployment has completed successfully.
Browse to the Administration Portal, for example, http://engine.example.com/ovirt-engine.
Administration Console Login
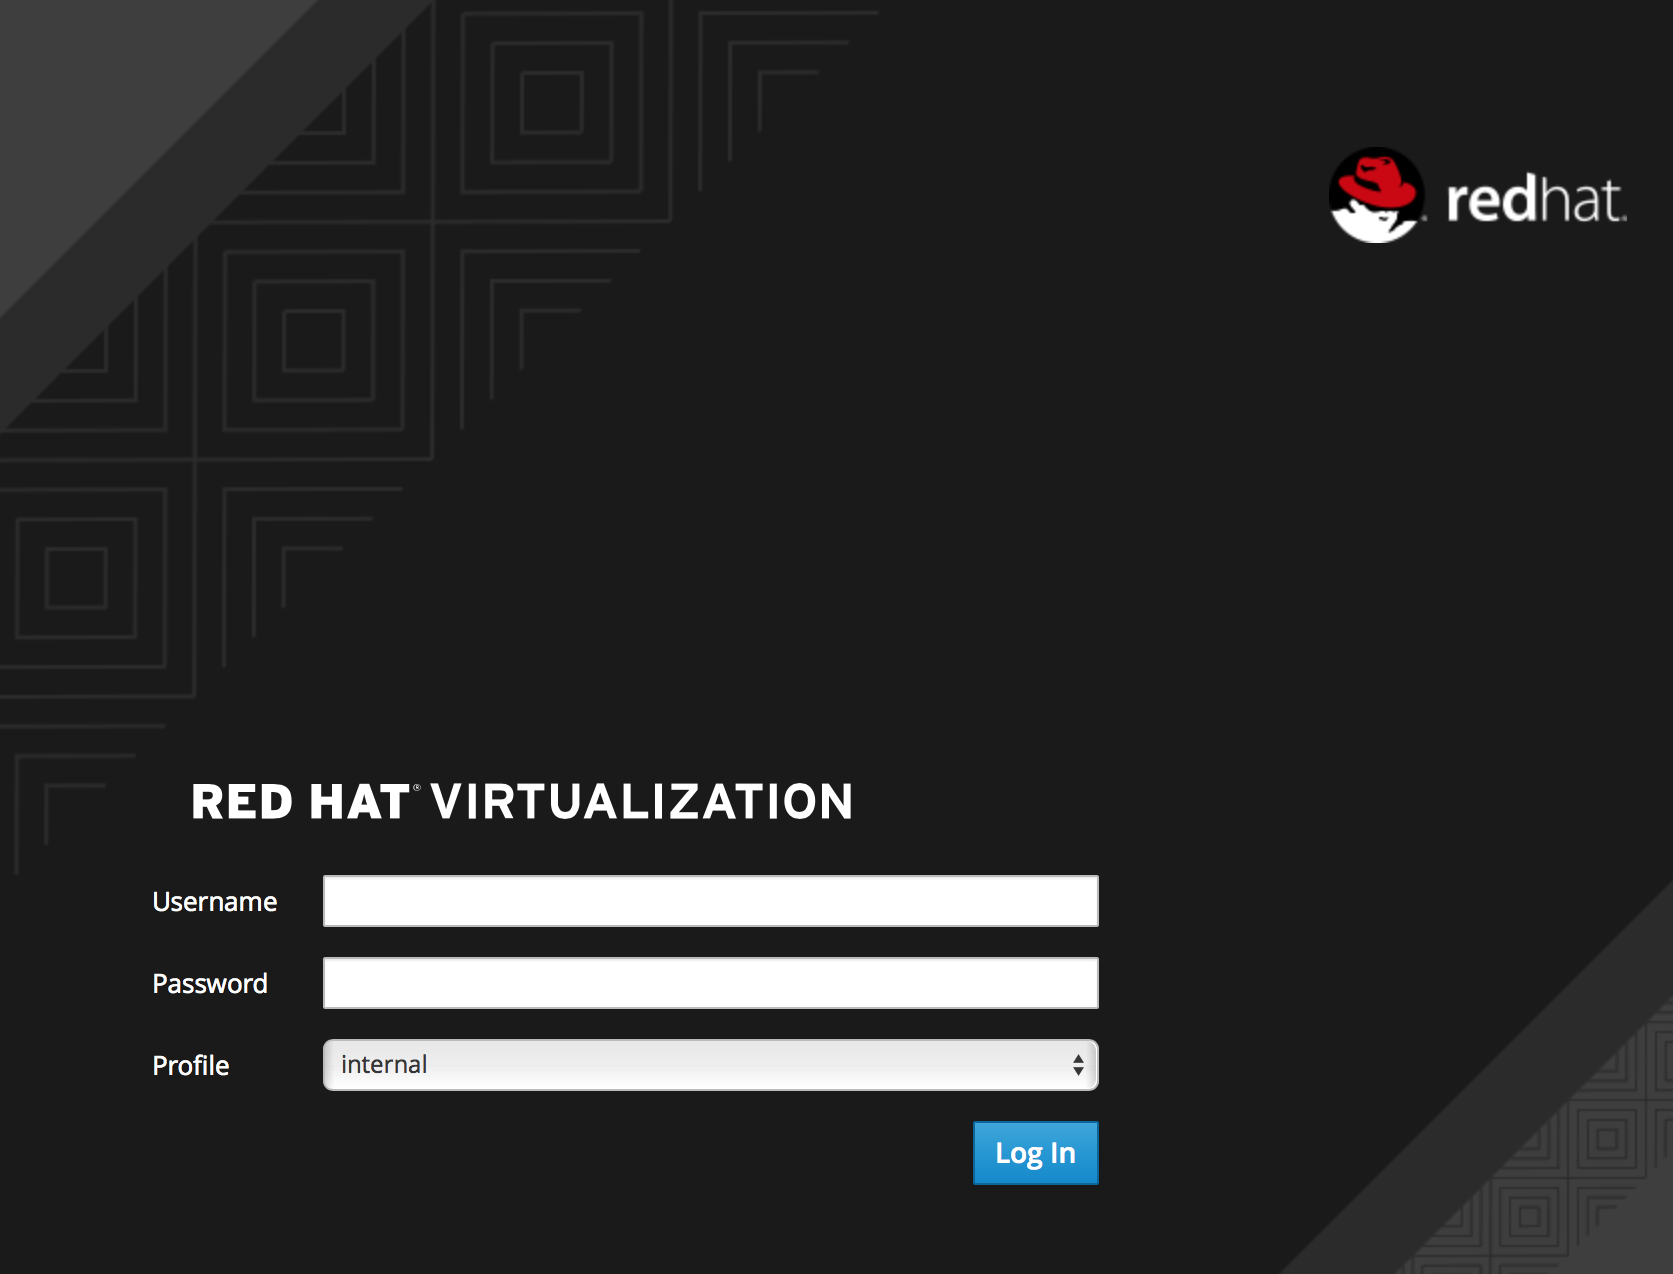
Log in using the administrative credentials added during hosted engine deployment.
When login is successful, the Dashboard appears.
Administration Console Dashboard

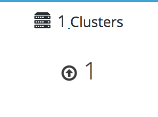
Verify that your cluster is available.
Administration Console Dashboard - Clusters
Verify that one host is available.
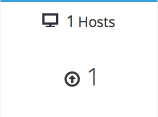
- Click Compute → Hosts.
-
Verify that your host is listed with a Status of
Up.
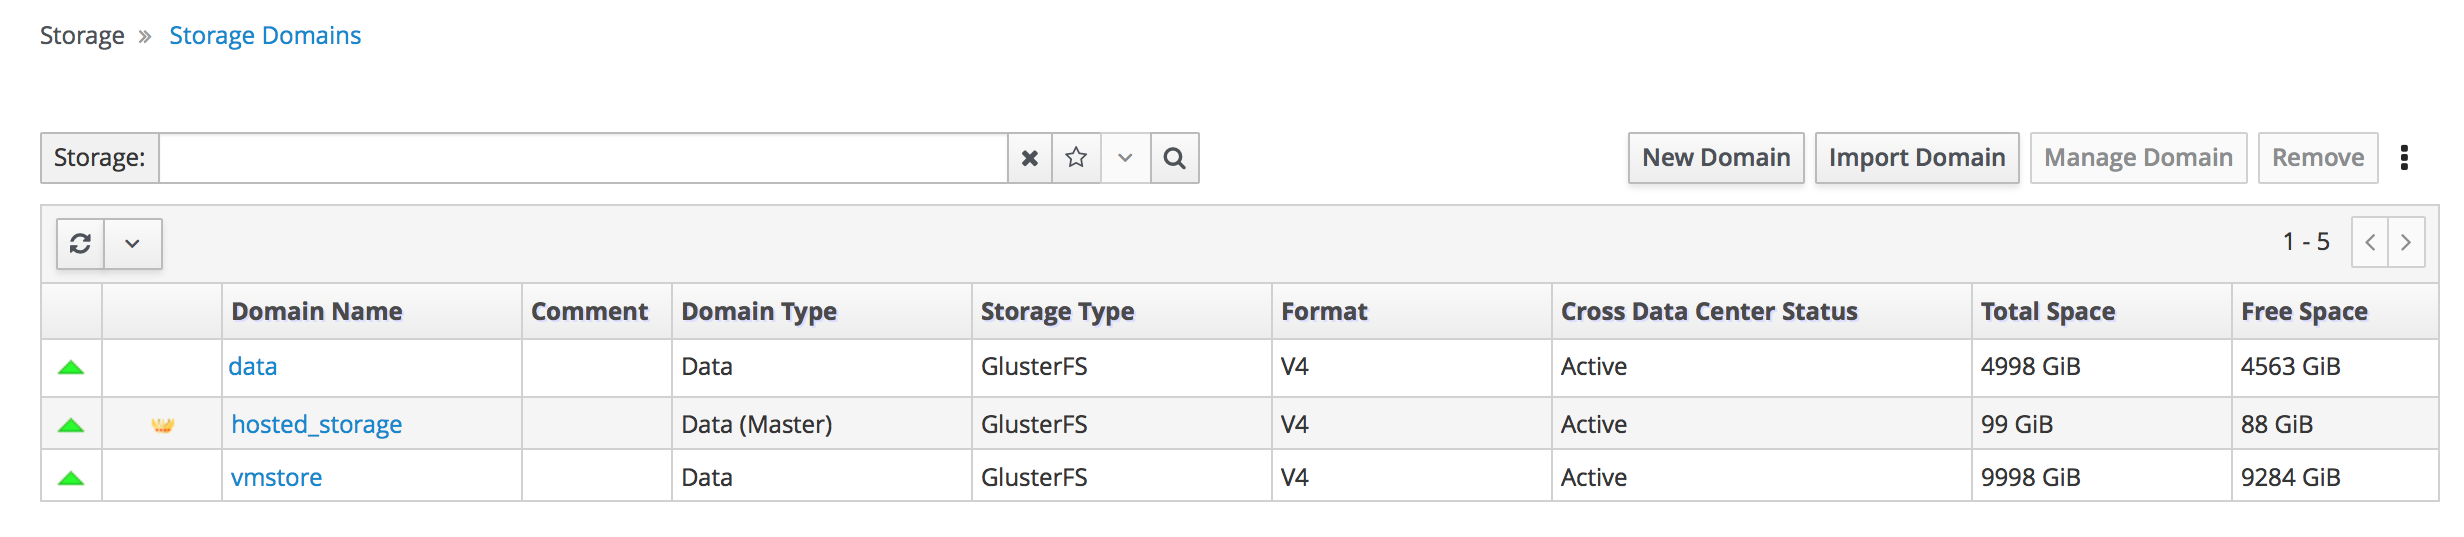
Verify that all storage domains are available.
- Click Storage → Domains.
Verify that the
Activeicon is shown in the first column.Administration Console - Storage Domains
Chapter 8. Next steps
- Learn to create and manage Red Hat Gluster Storage using the Administration Portal in Managing Red Hat Gluster Storage using the RHV Administration Portal.
- Learn to create and manage virtual machines in the Red Hat Virtualization Virtual Machine Management Guide.
- Review the RHHI for Virtualization documentation on the Red Hat Customer Portal.
Part I. Reference material
Appendix A. Glossary of terms
A.1. Virtualization terms
- Administration Portal
- A web user interface provided by Red Hat Virtualization Manager, based on the oVirt engine web user interface. It allows administrators to manage and monitor cluster resources like networks, storage domains, and virtual machine templates.
- Hosted Engine
- The instance of Red Hat Virtualization Manager that manages RHHI for Virtualization.
- Hosted Engine virtual machine
- The virtual machine that acts as Red Hat Virtualization Manager. The Hosted Engine virtual machine runs on a virtualization host that is managed by the instance of Red Hat Virtualization Manager that is running on the Hosted Engine virtual machine.
- Manager node
- A virtualization host that runs Red Hat Virtualization Manager directly, rather than running it in a Hosted Engine virtual machine.
- Red Hat Enterprise Linux host
- A physical machine installed with Red Hat Enterprise Linux plus additional packages to provide the same capabilities as a Red Hat Virtualization host. This type of host is not supported for use with RHHI for Virtualization.
- Red Hat Virtualization
- An operating system and management interface for virtualizing resources, processes, and applications for Linux and Microsoft Windows workloads.
- Red Hat Virtualization host
- A physical machine installed with Red Hat Virtualization that provides the physical resources to support the virtualization of resources, processes, and applications for Linux and Microsoft Windows workloads. This is the only type of host supported with RHHI for Virtualization.
- Red Hat Virtualization Manager
- A server that runs the management and monitoring capabilities of Red Hat Virtualization.
- Self-Hosted Engine node
- A virtualization host that contains the Hosted Engine virtual machine. All hosts in a RHHI for Virtualization deployment are capable of becoming Self-Hosted Engine nodes, but there is only one Self-Hosted Engine node at a time.
- storage domain
- A named collection of images, templates, snapshots, and metadata. A storage domain can be comprised of block devices or file systems. Storage domains are attached to data centers in order to provide access to the collection of images, templates, and so on to hosts in the data center.
- virtualization host
- A physical machine with the ability to virtualize physical resources, processes, and applications for client access.
- VM Portal
- A web user interface provided by Red Hat Virtualization Manager. It allows users to manage and monitor virtual machines.
A.2. Storage terms
- brick
- An exported directory on a server in a trusted storage pool.
- cache logical volume
- A small, fast logical volume used to improve the performance of a large, slow logical volume.
- geo-replication
- One way asynchronous replication of data from a source Gluster volume to a target volume. Geo-replication works across local and wide area networks as well as the Internet. The target volume can be a Gluster volume in a different trusted storage pool, or another type of storage.
- gluster volume
- A logical group of bricks that can be configured to distribute, replicate, or disperse data according to workload requirements.
- logical volume management (LVM)
- A method of combining physical disks into larger virtual partitions. Physical volumes are placed in volume groups to form a pool of storage that can be divided into logical volumes as needed.
- Red Hat Gluster Storage
- An operating system based on Red Hat Enterprise Linux with additional packages that provide support for distributed, software-defined storage.
- source volume
- The Gluster volume that data is being copied from during geo-replication.
- storage host
- A physical machine that provides storage for client access.
- target volume
- The Gluster volume or other storage volume that data is being copied to during geo-replication.
- thin provisioning
- Provisioning storage such that only the space that is required is allocated at creation time, with further space being allocated dynamically according to need over time.
- thick provisioning
- Provisioning storage such that all space is allocated at creation time, regardless of whether that space is required immediately.
- trusted storage pool
- A group of Red Hat Gluster Storage servers that recognise each other as trusted peers.
A.3. Hyperconverged Infrastructure terms
- Red Hat Hyperconverged Infrastructure (RHHI) for Virtualization
- RHHI for Virtualization is a single product that provides both virtual compute and virtual storage resources. Red Hat Virtualization and Red Hat Gluster Storage are installed in a converged configuration, where the services of both products are available on each physical machine in a cluster.
- hyperconverged host
- A physical machine that provides physical storage, which is virtualized and consumed by virtualized processes and applications run on the same host. All hosts installed with RHHI for Virtualization are hyperconverged hosts.
- Web Console
- The web user interface for deploying, managing, and monitoring RHHI for Virtualization. The Web Console is provided by the the Web Console service and plugins for Red Hat Virtualization Manager.