
Deploying Red Hat Hyperconverged Infrastructure for Virtualization
Instructions for deploying Red Hat Hyperconverged Infrastructure for Virtualization
Abstract
Part I. Plan
Chapter 1. Architecture
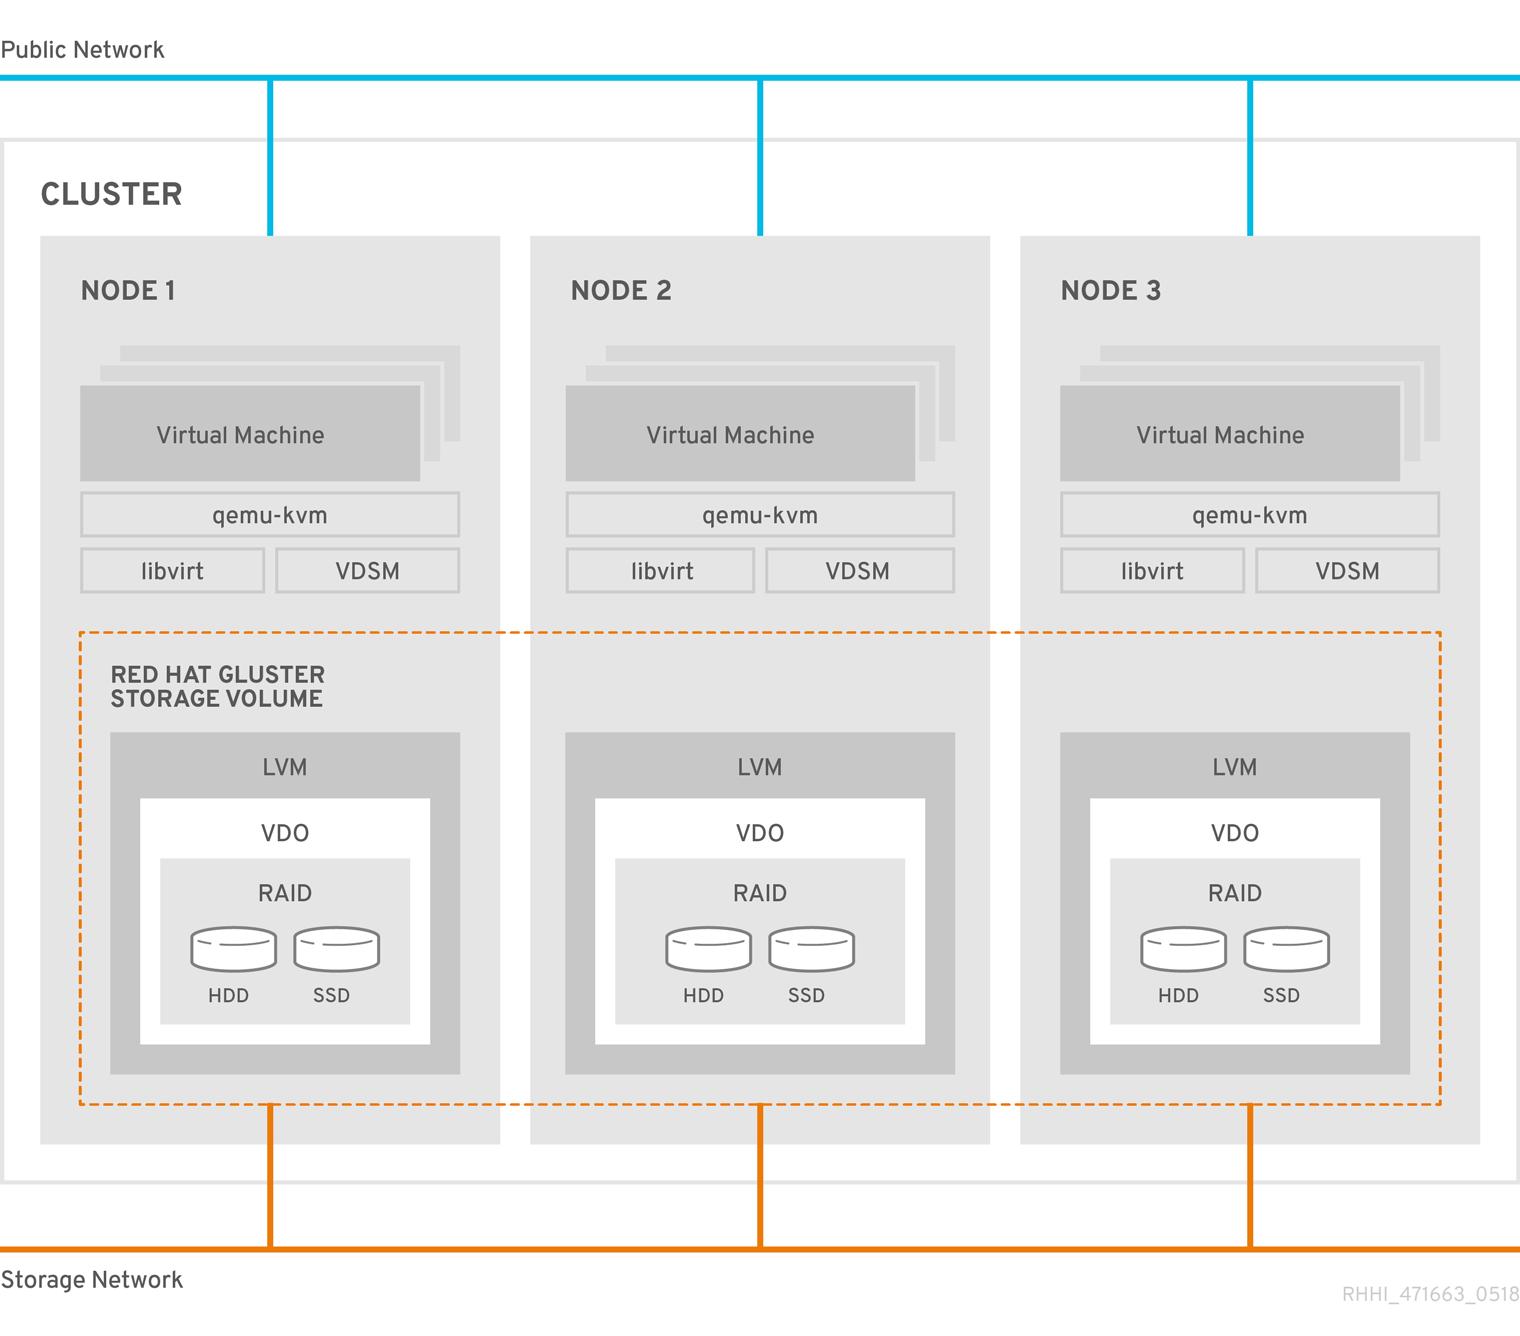
Red Hat Hyperconverged Infrastructure for Virtualization (RHHI for Virtualization) combines compute, storage, networking, and management capabilities in one deployment.
RHHI for Virtualization is deployed across three physical machines to create a discrete cluster or pod using Red Hat Gluster Storage 3.4 and Red Hat Virtualization 4.3.
The dominant use case for this deployment is in remote office branch office (ROBO) environments, where a remote office synchronizes data to a central data center on a regular basis, but does not require connectivity to the central data center to function.
The following diagram shows the basic architecture of a single cluster.
1.1. Understanding VDO
As of Red Hat Hyperconverged Infrastructure for Virtualization 1.6, you can configure a Virtual Data Optimizer (VDO) layer to provide data reduction and deduplication for your storage.
VDO is supported only when enabled on new installations at deployment time, and cannot be enabled on deployments upgraded from earlier versions of RHHI for Virtualization.
VDO performs following types of data reduction to reduce the space required by data.
- Deduplication
- Eliminates zero and duplicate data blocks. VDO finds duplicated data using the UDS (Universal Deduplication Service) Kernel Module. Instead of writing the duplicated data, VDO records it as a reference to the original block. The logical block address is mapped to the physical block address by VDO.
- Compression
- Reduces the size of the data by packing non-duplicate blocks together into fixed length (4 KB) blocks before writing to disk. This helps to speed up the performance for reading data from storage.
At best, data can be reduced to 15% of its original size.
Because reducing data has additional processing costs, enabling compression and deduplication reduces write performance. As a result, VDO is not recommended for performance sensitive workloads. Red Hat strongly recommends that you test and verify that your workload achieves the required level of performance with VDO enabled before deploying VDO in production.
Chapter 2. Support requirements
Review this section to ensure that your planned deployment meets the requirements for support by Red Hat.
2.1. Operating system
Red Hat Hyperconverged Infrastructure for Virtualization (RHHI for Virtualization) uses Red Hat Virtualization Host 4.3 as a base for all other configuration. Red Hat Enterprise Linux hosts are not supported.
The following table shows the the supported versions of each product to use for a supported RHHI for Virtualization deployment.
Table 2.1. Version compatibility
| RHHI version | RHGS version | RHV version |
|---|---|---|
| 1.0 | 3.2 | 4.1.0 to 4.1.7 |
| 1.1 | 3.3.1 | 4.1.8 to 4.2.0 |
| 1.5 | 3.4 Batch 1 Update | 4.2.7 |
| 1.5.1 | 3.4 Batch 2 Update | 4.2.8 |
| 1.6 | 3.4 Batch 4 Update | 4.3 to current |
See Requirements in the Red Hat Virtualization Planning and Prerequisites Guide for details on requirements of Red Hat Virtualization.
2.2. Physical machines
Red Hat Hyperconverged Infrastructure for Virtualization (RHHI for Virtualization) requires at least 3 physical machines. Scaling to 6, 9, or 12 physical machines is also supported; see Scaling for more detailed requirements.
Each physical machine must have the following capabilities:
- at least 2 NICs (Network Interface Controllers) per physical machine, for separation of data and management traffic (see Section 2.5, “Networking” for details)
for small deployments:
- at least 12 cores
- at least 64GB RAM
- at most 48TB storage
for medium deployments:
- at least 12 cores
- at least 128GB RAM
- at most 64TB storage
for large deployments:
- at least 16 cores
- at least 256GB RAM
- at most 80TB storage
2.3. Virtual machines
The number of virtual machines that you are able to run on your hyperconverged deployment depends greatly on what those virtual machines do, and what load they are under. Test your workload’s CPU, memory, and throughput requirements and provision your hyperconverged environment accordingly.
2.4. Hosted Engine virtual machine
The Hosted Engine virtual machine requires at least the following:
- 1 dual core CPU (1 quad core or multiple dual core CPUs recommended)
- 4GB RAM that is not shared with other processes (16GB recommended)
- 25GB of local, writable disk space (50GB recommended)
- 1 NIC with at least 1Gbps bandwidth
For more information, see Requirements in the Red Hat Virtualization 4.3 Planning and Prerequisites Guide.
2.5. Networking
Fully-qualified domain names that are forward and reverse resolvable by DNS are required for all hyperconverged hosts and for the Hosted Engine virtual machine that provides Red Hat Virtualization Manager.
IPv6 is supported as a Technology Preview in IPv6-only environments (including DNS and gateway addresses). Environments with both IPv4 and IPv6 addresses are not supported.
Technology Preview features are provided with a limited support scope, as detailed on the Customer Portal: Technology Preview Features Support Scope.
Client storage traffic and management traffic in the cluster must use separate networks: a front-end management network and a back-end storage network.
Each node requires two Ethernet ports, one for each network. This ensures optimal performance. For high availability, place each network on a separate network switch. For improved fault tolerance, provide a separate power supply for each switch.
- Front-end management network
- Used by Red Hat Virtualization and virtual machines.
- Requires at least one 1Gbps Ethernet connection.
- IP addresses assigned to this network must be on the same subnet as each other, and on a different subnet to the back-end storage network.
- IP addresses on this network can be selected by the administrator.
- Back-end storage network
- Used by storage and migration traffic between hyperconverged nodes.
- Requires at least one 10Gbps Ethernet connection.
- Requires maximum latency of 5 milliseconds between peers.
Network fencing devices that use Intelligent Platform Management Interfaces (IPMI) require a separate network.
If you want to use DHCP network configuration for the Hosted Engine virtual machine, then you must have a DHCP server configured prior to configuring Red Hat Hyperconverged Infrastructure for Virtualization.
If you want to configure disaster recovery by using geo-replication to store copies of data:
- Configure a reliable time source.
Do not use IPv6 addresses.
WarningBug 1688239 currently prevents IPv6 based geo-replication from working correctly. Do not use IPv6 addresses if you require disaster recovery functionality using geo-replication.
Before you begin the deployment process, determine the following details:
- IP address for a gateway to the hyperconverged host. This address must respond to ping requests.
- IP address of the front-end management network.
- Fully-qualified domain name (FQDN) for the Hosted Engine virtual machine.
- MAC address that resolves to the static FQDN and IP address of the Hosted Engine.
2.6. Storage
A hyperconverged host stores configuration, logs and kernel dumps, and uses its storage as swap space. This section lists the minimum directory sizes for hyperconverged hosts. Red Hat recommends using the default allocations, which use more storage space than these minimums.
-
/(root) - 6GB -
/home- 1GB -
/tmp- 1GB -
/boot- 1GB -
/var- 15GB -
/var/crash- 10GB /var/log- 8GBImportantRed Hat recommends increasing the size of
/var/logto at least 15GB to provide sufficient space for the additional logging requirements of Red Hat Gluster Storage.Follow the instructions in Growing a logical volume using the Web Console to increase the size of this partition after installing the operating system.
-
/var/log/audit- 2GB -
swap- 1GB (see Recommended swap size for details) - Anaconda reserves 20% of the thin pool size within the volume group for future metadata expansion. This is to prevent an out-of-the-box configuration from running out of space under normal usage conditions. Overprovisioning of thin pools during installation is also not supported.
- Minimum Total - 55GB
2.6.1. Disks
Red Hat recommends Solid State Disks (SSDs) for best performance. If you use Hard Drive Disks (HDDs), you should also configure a smaller, faster SSD as an LVM cache volume.
4K native devices are not supported with Red Hat Hyperconverged Infrastructure for Virtualization, as Red Hat Virtualization requires 512 byte emulation (512e) support.
2.6.2. RAID
RAID5 and RAID6 configurations are supported. However, RAID configuration limits depend on the technology in use.
- SAS/SATA 7k disks are supported with RAID6 (at most 10+2)
SAS 10k and 15k disks are supported with the following:
- RAID5 (at most 7+1)
- RAID6 (at most 10+2)
RAID cards must use flash backed write cache.
Red Hat further recommends providing at least one hot spare drive local to each server.
2.6.3. JBOD
As of Red Hat Hyperconverged Infrastructure for Virtualization 1.6, JBOD configurations are fully supported and no longer require architecture review.
2.6.4. Logical volumes
The logical volumes that comprise the engine gluster volume must be thick provisioned. This protects the Hosted Engine from out of space conditions, disruptive volume configuration changes, I/O overhead, and migration activity.
The logical volumes that comprise the vmstore and optional data gluster volumes must be thin provisioned. This allows greater flexibility in underlying volume configuration. If your thin provisioned volumes are on Hard Drive Disks (HDDs), configure a smaller, faster Solid State Disk (SSD) as an lvmcache for improved performance.
2.6.5. Red Hat Gluster Storage volumes
Red Hat Hyperconverged Infrastructure for Virtualization is expected to have 3–4 Red Hat Gluster Storage volumes.
- 1 engine volume for the Hosted Engine
- 1 vmstore volume for virtual machine operating system disk images
- 1 optional data volume for other virtual machine disk images
- 1 shared_storage volume for geo-replication metadata
Separate vmstore and data volumes are recommended to minimize backup storage requirements. Storing virtual machine data separate from operating system images means that only the data volume needs to be backed up when storage space is at a premium, since operating system images on the vmstore volume can be more easily rebuilt.
A Red Hat Hyperconverged Infrastructure for Virtualization deployment can contain at most 1 geo-replicated volume.
2.6.6. Volume types
Red Hat Hyperconverged Infrastructure for Virtualization (RHHI for Virtualization) supports only the following volume types at deployment time:
Replicated volumes (3 copies of the same data on 3 bricks, across 3 nodes).
These volumes can be expanded into distributed-replicated volumes after deployment.
Arbitrated replicated volumes (2 full copies of the same data on 2 bricks and 1 arbiter brick that contains metadata, across three nodes).
These volumes can be expanded into arbitrated distributed-replicated volumes after deployment.
- Distributed volumes (1 copy of the data, no replication to other bricks).
Note that arbiter bricks store only file names, structure, and metadata. This means that a three-way arbitrated replicated volume requires about 75% of the storage space that a three-way replicated volume would require to achieve the same level of consistency. However, because the arbiter brick stores only metadata, a three-way arbitrated replicated volume only provides the availability of a two-way replicated volume.
For more information on laying out arbitrated replicated volumes, see Creating multiple arbitrated replicated volumes across fewer total nodes in the Red Hat Gluster Storage Administration Guide.
2.7. Virtual Data Optimizer (VDO)
A Virtual Data Optimizer (VDO) layer is supported as of Red Hat Hyperconverged Infrastructure for Virtualization 1.6.
VDO support is limited to new deployments only; do not attempt to add a VDO layer to an existing deployment.
2.8. Scaling
Initial deployments of Red Hat Hyperconverged Infrastructure for Virtualization are either 1 node or 3 nodes.
1 node deployments cannot be scaled.
3 node deployments can be scaled to 6, 9, or 12 nodes using one of the following methods:
- Add new hyperconverged nodes to the cluster, in sets of three, up to the maximum of 12 hyperconverged nodes.
- Create new Gluster volumes using new disks on new or existing nodes.
- Expand existing Gluster volumes to span 6, 9, or 12 nodes using new disks on new or existing nodes.
You cannot create a volume that spans more than 3 nodes at creation time; you must create a 3-node volume first and then expand it across more nodes as necessary.
2.9. Existing Red Hat Gluster Storage configurations
Red Hat Hyperconverged Infrastructure for Virtualization is supported only when deployed as specified in this document. Existing Red Hat Gluster Storage configurations cannot be used in a hyperconverged configuration. If you want to use an existing Red Hat Gluster Storage configuration, refer to the traditional configuration documented in Configuring Red Hat Virtualization with Red Hat Gluster Storage.
2.10. Disaster recovery
Red Hat strongly recommends configuring a disaster recovery solution. For details on configuring geo-replication as a disaster recovery solution, see Maintaining Red Hat Hyperconverged Infrastructure for Virtualization: https://access.redhat.com/documentation/en-us/red_hat_hyperconverged_infrastructure_for_virtualization/1.6/html/maintaining_red_hat_hyperconverged_infrastructure_for_virtualization/config-backup-recovery.
Bug 1688239 currently prevents IPv6 based geo-replication from working correctly. Do not use IPv6 addresses if you require disaster recovery functionality using geo-replication.
2.10.1. Prerequisites for geo-replication
Be aware of the following requirements and limitations when configuring geo-replication:
- One geo-replicated volume only
- Red Hat Hyperconverged Infrastructure for Virtualization (RHHI for Virtualization) supports only one geo-replicated volume. Red Hat recommends backing up the volume that stores the data of your virtual machines, as this is usually contains the most valuable data.
- Two different managers required
- The source and destination volumes for geo-replication must be managed by different instances of Red Hat Virtualization Manager.
2.10.2. Prerequisites for failover and failback configuration
- Versions must match between environments
- Ensure that the primary and secondary environments have the same version of Red Hat Virtualization Manager, with identical data center compatibility versions, cluster compatibility versions, and PostgreSQL versions.
- No virtual machine disks in the hosted engine storage domain
- The storage domain used by the hosted engine virtual machine is not failed over, so any virtual machine disks in this storage domain will be lost.
- Execute Ansible playbooks manually from a separate master node
- Generate and execute Ansible playbooks manually from a separate machine that acts as an Ansible master node.
2.11. Additional requirements for single node deployments
Red Hat Hyperconverged Infrastructure for Virtualization is supported for deployment on a single node provided that all Support Requirements are met, with the following additions and exceptions.
A single node deployment requires a physical machine with:
- 1 Network Interface Controller
- at least 12 cores
- at least 64GB RAM
- at most 48TB storage
Single node deployments cannot be scaled, and are not highly available.
Chapter 3. Recommendations
The configuration described in this section is not required, but may improve the stability or performance of your deployment.
3.1. General recommendations
- Take a full backup as soon as deployment is complete, and store the backup in a separate location. Take regular backups thereafter. See Configuring backup and recovery options for details.
- Avoid running any service that your deployment depends on as a virtual machine in the same RHHI for Virtualization environment. If you must run a required service in the same deployment, carefully plan your deployment to minimize the downtime of the virtual machine running the required service.
-
Ensure that hyperconverged hosts have sufficient entropy. Failures can occur when the value in
/proc/sys/kernel/random/entropy_availis less than200. To increase entropy, install therng-toolspackage and follow the steps in https://access.redhat.com/solutions/1395493. - Document your environment so that everyone who works with it is aware of its current state and required procedures.
3.2. Security recommendations
- Do not disable any security features (such as HTTPS, SELinux, and the firewall) on the hosts or virtual machines.
- Register all hosts and Red Hat Enterprise Linux virtual machines to either the Red Hat Content Delivery Network or Red Hat Satellite in order to receive the latest security updates and errata.
- Create individual administrator accounts, instead of allowing many people to use the default admin account, for proper activity tracking.
- Limit access to the hosts and create separate logins. Do not create a single root login for everyone to use. See Managing Users and Groups in the Red Hat Enterprise Linux 7 System Administrator’s Guide.
- Do not create untrusted users on hosts.
- Avoid installing additional packages such as analyzers, compilers, or other components that add unnecessary security risk.
3.3. Host recommendations
- Standardize the hosts in the same cluster. This includes having consistent hardware models and firmware versions. Mixing different server hardware within the same cluster can result in inconsistent performance from host to host.
- Configure fencing devices at deployment time. Fencing devices are required for high availability.
- Use separate hardware switches for fencing traffic. If monitoring and fencing go over the same switch, that switch becomes a single point of failure for high availability.
3.4. Networking recommendations
- Bond network interfaces, especially on production hosts. Bonding improves the overall availability of service, as well as network bandwidth. See Network Bonding in the Administration Guide.
- For optimal performance and simplified troubleshooting, use VLANs to separate different traffic types and make the best use of 10 GbE or 40 GbE networks.
-
If the underlying switches support jumbo frames, set the MTU to the maximum size (for example,
9000) that the underlying switches support. This setting enables optimal throughput, with higher bandwidth and reduced CPU usage, for most applications. The default MTU is determined by the minimum size supported by the underlying switches. If you have LLDP enabled, you can see the MTU supported by the peer of each host in the NIC’s tool tip in the Setup Host Networks window. - 1 GbE networks should only be used for management traffic. Use 10 GbE or 40 GbE for virtual machines and Ethernet-based storage.
- If additional physical interfaces are added to a host for storage use, uncheck VM network so that the VLAN is assigned directly to the physical interface.
3.4.1. Recommended practices for configuring host networks
If your network environment is complex, you may need to configure a host network manually before adding the host to Red Hat Virtualization Manager.
Red Hat recommends the following practices for configuring a host network:
- Configure the network with the Web Console. Alternatively, you can use nmtui or nmcli.
- If a network is not required for a self-hosted engine deployment or for adding a host to the Manager, configure the network in the Administration Portal after adding the host to the Manager. See Creating a New Logical Network in a Data Center or Cluster.
Use the following naming conventions:
-
VLAN devices:
VLAN_NAME_TYPE_RAW_PLUS_VID_NO_PAD -
VLAN interfaces:
physical_device.VLAN_ID(for example,eth0.23,eth1.128,enp3s0.50) -
Bond interfaces:
bondnumber(for example,bond0,bond1) -
VLANs on bond interfaces:
bondnumber.VLAN_ID(for example,bond0.50,bond1.128)
-
VLAN devices:
- Use network bonding. Networking teaming is not supported.
Use recommended bonding modes:
-
If the
ovirtmgmtnetwork is not used by virtual machines, the network may use any supported bonding mode. -
If the
ovirtmgmtnetwork is used by virtual machines, see Which bonding modes work when used with a bridge that virtual machine guests or containers connect to?. -
Red Hat Virtualization’s default bonding mode is
(Mode 4) Dynamic Link Aggregation. If your switch does not support Link Aggregation Control Protocol (LACP), use(Mode 1) Active-Backup. See Bonding Modes for details.
-
If the
Configure a VLAN on a physical NIC as in the following example (although
nmcliis used, you can use any tool):# nmcli connection add type vlan con-name vlan50 ifname eth0.50 dev eth0 id 50 # nmcli con mod vlan50 +ipv4.dns 8.8.8.8 +ipv4.addresses 123.123.0.1/24 +ivp4.gateway 123.123.0.254
Configure a VLAN on a bond as in the following example (although
nmcliis used, you can use any tool):# nmcli connection add type bond con-name bond0 ifname bond0 bond.options "mode=active-backup,miimon=100" ipv4.method disabled ipv6.method ignore # nmcli connection add type ethernet con-name eth0 ifname eth0 master bond0 slave-type bond # nmcli connection add type ethernet con-name eth1 ifname eth1 master bond0 slave-type bond # nmcli connection add type vlan con-name vlan50 ifname bond0.50 dev bond0 id 50 # nmcli con mod vlan50 +ipv4.dns 8.8.8.8 +ipv4.addresses 123.123.0.1/24 +ivp4.gateway 123.123.0.254
-
Do not disable
firewalld. - Customize the firewall rules in the Administration Portal after adding the host to the Manager. See Configuring Host Firewall Rules.
When creating a management bridge that uses a static IPv6 address, disable network manager control in its interface configuration (ifcfg) file before adding a host. See https://access.redhat.com/solutions/3981311 for more information.
3.5. Self-hosted engine recommendations
- Create a separate data center and cluster for the Red Hat Virtualization Manager and other infrastructure-level services, if the environment is large enough to allow it. Although the Manager virtual machine can run on hosts in a regular cluster, separation from production virtual machines helps facilitate backup schedules, performance, availability, and security.
- A storage domain dedicated to the Manager virtual machine is created during self-hosted engine deployment. Do not use this storage domain for any other virtual machines.
- All self-hosted engine nodes should have an equal CPU family so that the Manager virtual machine can safely migrate between them. If you intend to have various families, begin the installation with the lowest one.
- If the Manager virtual machine shuts down or needs to be migrated, there must be enough memory on a self-hosted engine node for the Manager virtual machine to restart on or migrate to it.
Part II. Deploy
Chapter 4. Deployment workflow
The workflow for deploying Red Hat Hyperconverged Infrastructure for Virtualization (RHHI for Virtualization) is as follows:
- Verify that your planned deployment meets support requirements: Chapter 2, Support requirements.
- Install the physical machines that will act as hyperconverged hosts: Section 4.1, “Install host physical machines”.
- Configure key-based SSH authentication without a password to enable automated configuration of the hosts: Chapter 5, Configure Public Key based SSH Authentication without a password.
- Configure Red Hat Gluster Storage on the physical hosts using the Web Console: Chapter 6, Configure Red Hat Gluster Storage for Hosted Engine using the Web Console.
- Deploy the Hosted Engine using the Web Console: Chapter 7, Deploy the Hosted Engine using the Web Console.
- Configure the Red Hat Gluster Storage nodes using the Administration Portal: Log in to the Administration Portal to complete configuration.
4.1. Install host physical machines
Your physical machines need an operating system and access to the appropriate software repositories in order to be used as hyperconverged hosts.
- Install Red Hat Virtualization Host on each physical machine.
- Enable the Red Hat Virtualization Host software repository on each physical machine.
4.1.1. Installing Red Hat Virtualization Host
Red Hat Virtualization Host is a minimal operating system designed for setting up a physical machine that acts as a hypervisor in Red Hat Virtualization, or a hyperconverged host in Red Hat Hyperconverged Infrastructure.
Prerequisites
- Ensure that your physical machine meets the requirements outlined in Physical machines.
Procedure
Download the Red Hat Virtualization Host ISO image from the Customer Portal:
- Log in to the Customer Portal at https://access.redhat.com.
- Click Downloads in the menu bar.
- Click Red Hat Virtualization. Scroll up and click Download Latest to access the product download page.
- Go to Hypervisor Image for RHV 4.3 and and click Download Now.
- Create a bootable media device. See Making Media in the Red Hat Enterprise Linux Installation Guide for more information.
- Start the machine on which you are installing Red Hat Virtualization Host, and boot from the prepared installation media.
From the boot menu, select Install RHVH 4.3 and press Enter.
NoteYou can also press the Tab key to edit the kernel parameters. Kernel parameters must be separated by a space, and you can boot the system using the specified kernel parameters by pressing the Enter key. Press the Esc key to clear any changes to the kernel parameters and return to the boot menu.
- Select a language, and click Continue.
Select a time zone from the Date & Time screen and click Done.
ImportantRed Hat recommends using Coordinated Universal Time (UTC) on all hosts. This helps ensure that data collection and connectivity are not impacted by variation in local time, such as during daylight savings time.
- Select a keyboard layout from the Keyboard screen and click Done.
Specify the installation location from the Installation Destination screen.
Important- Red Hat strongly recommends using the Automatically configure partitioning option.
- All disks are selected by default, so deselect disks that you do not want to use as installation locations.
- At-rest encryption is not supported. Do not enable encryption.
Red Hat recommends increasing the size of
/var/logto at least 15GB to provide sufficient space for the additional logging requirements of Red Hat Gluster Storage.Follow the instructions in Growing a logical volume using the Web Console to increase the size of this partition after installing the operating system.
Click Done.
Select the Ethernet network from the Network & Host Name screen.
- Click Configure… → General and select the Automatically connect to this network when it is available check box.
- Optionally configure Language Support, Security Policy, and Kdump. See Installing Using Anaconda in the Red Hat Enterprise Linux 7 Installation Guide for more information on each of the sections in the Installation Summary screen.
- Click Begin Installation.
Set a root password and, optionally, create an additional user while Red Hat Virtualization Host installs.
WarningRed Hat strongly recommends not creating untrusted users on Red Hat Virtualization Host, as this can lead to exploitation of local security vulnerabilities.
Click Reboot to complete the installation.
NoteWhen Red Hat Virtualization Host restarts,
nodectl checkperforms a health check on the host and displays the result when you log in on the command line. The messagenode status: OKornode status: DEGRADEDindicates the health status. Runnodectl checkto get more information. The service is enabled by default.
4.1.2. Enabling software repositories
Log in to the Web Console.
Use the management FQDN and port
9090, for example,https://server1.example.com:9090/.Navigate to Subscriptions, click Register System, and enter your Customer Portal user name and password.
The Red Hat Virtualization Host subscription is automatically attached to the system.
- Click Terminal.
Enable the
Red Hat Virtualization Host 7repository to allow later updates to the Red Hat Virtualization Host:# subscription-manager repos --enable=rhel-7-server-rhvh-4-rpms
Chapter 5. Configure Public Key based SSH Authentication without a password
Configure public key based SSH authentication without a password for the root user on the first hyperconverged host to all hosts, including itself. Do this for all storage and management interfaces, and for both IP addresses and FQDNs.
5.1. Adding known hosts to the first host
When you use SSH to log in to a host from a system that is not already known to the host, you are prompted to add that system as a known host.
- Log in to the first hyperconverged host as the root user.
Perform the following steps for each host in the cluster, including the first host.
Use SSH to log in to a host as the root user.
[root@server1]# ssh root@server1.example.com
Enter
yesto continue connecting.[root@server1]# ssh root@server2.example.com The authenticity of host 'server2.example.com (192.51.100.28)' can't be established. ECDSA key fingerprint is SHA256:Td8KqgVIPXdTIasdfa2xRwn3/asdBasdpnaGM. Are you sure you want to continue connecting (yes/no)?
This automatically adds the host key of the first host to the
known_hostsfile on the target host.Are you sure you want to continue connecting (yes/no)? yes Warning: Permanently added '192.51.100.28' (ECDSA) to the list of known hosts.
Enter the password for the root user on the target host to complete the login process.
root@server2.example.com's password: ***************
Last login: Mon May 27 10:04:49 2019
[root@server2]#
Log out of the host.
[root@server2]# exit
[root@server1]#
NoteWhen you log out of the SSH session from the first host to itself, the user and server in the command line prompt stay the same; it is only the session that changes.
[root@server1]# exit
[root@server1]#
5.2. Generating SSH key pairs without a password
Generating a public/private key pair lets you use key-based SSH authentication. Generating a key pair that does not use a password makes it simpler to use Ansible to automate deployment and configuration processes.
Procedure
- Log in to the first hyperconverged host as the root user.
Generate an SSH key that does not use a password.
Start the key generation process.
# ssh-keygen -t rsa
Generating public/private rsa key pair.
Enter a location for the key.
The default location, shown in parentheses, is used if no other input is provided.
Enter file in which to save the key (/home/username/.ssh/id_rsa): <location>/<keyname>
Specify and confirm an empty passphrase by pressing
Entertwice.Enter passphrase (empty for no passphrase): Enter same passphrase again:
The private key is saved in
<location>/<keyname>. The public key is saved in<location>/<keyname>.pub.Your identification has been saved in <location>/<keyname>. Your public key has been saved in <location>/<keyname>.pub. The key fingerprint is SHA256:8BhZageKrLXM99z5f/AM9aPo/KAUd8ZZFPcPFWqK6+M root@server1.example.com The key's randomart image is: +---[ECDSA 256]---+ | . . +=| | . . . = o.o| | + . * . o...| | = . . * . + +..| |. + . . So o * ..| | . o . .+ = ..| | o oo ..=. .| | ooo...+ | | .E++oo | +----[SHA256]-----+
WarningYour identificationin this output is your private key. Never share your private key. Possession of your private key allows someone else to impersonate you on any system that has your public key.
5.3. Copying SSH keys
To access a host using your private key, that host needs a copy of your public key.
Prerequisites
- Generate a public/private key pair.
- SSH access from the root user on the host to all storage and management interfaces on the same host, using both IP addresses and FQDNs.
Procedure
- Log in to the first host as the root user.
Copy your public key to the host that you want to access.
# ssh-copy-id -i <location>/<keyname>.pub <user>@<hostname>
Enter the password for
<user>@<hostname>if prompted.WarningMake sure that you use the file that ends in
.pub. Never share your private key. Possession of your private key allows someone else to impersonate you on any system that has your public key.
Chapter 6. Configure Red Hat Gluster Storage for Hosted Engine using the Web Console
Ensure that disks specified as part of this deployment process do not have any partitions or labels.
Log into the Web Console
Browse to the the Web Console management interface of the first hyperconverged host, for example, https://node1.example.com:9090/, and log in with the credentials you created in Section 4.1, “Install host physical machines”.
Start the deployment wizard
Click Virtualization → Hosted Engine and click Start underneath Hyperconverged.
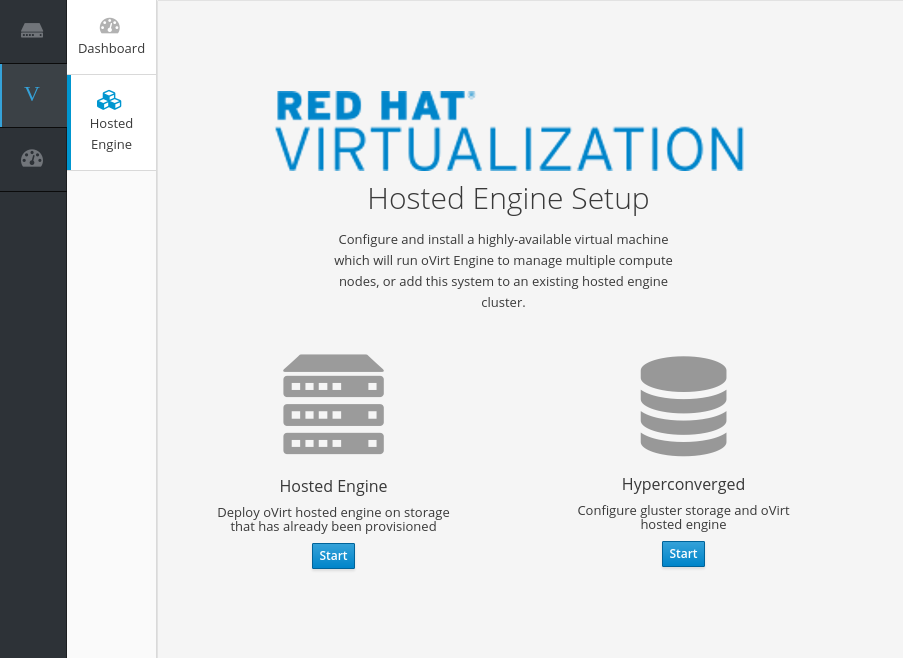
The Gluster Configuration window opens.
Click the Run Gluster Wizard button.

The Gluster Deployment window opens in 3 node mode.
Specify hyperconverged hosts
Specify the back-end Additional Hosts on the storage network (not the management network) of the three hyperconverged hosts. The hyperconverged host that can SSH using key pairs should be listed first, as it is the host that will run deployment tasks and the hosted engine.
NoteIf you plan to create an arbitrated replicated volume, ensure that you specify the host with the arbiter brick as Host3 on this screen.
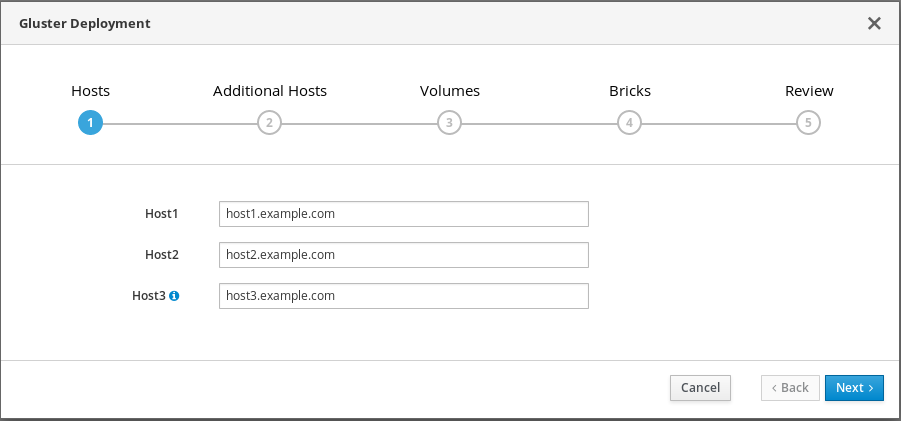
Click Next.
Specify additional hosts
For multi-node deployments, add the front-end Additional Hosts or IP addresses of the other two hyperconverged hosts to have them automatically added to Red Hat Virtualization Manager when deployment is complete.
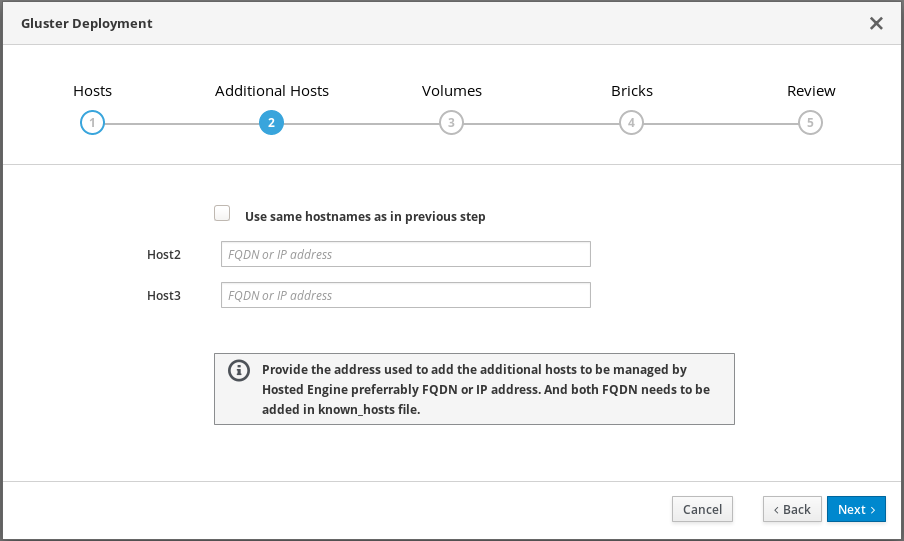 Important
Bug 1688269 means that hosts with IPv6 addresses are not automatically added to Red Hat Virtualization Manager when deployment is complete. You can add them after deployment by following Add additional hyperconverged hosts to the hosted engine.
Specify volumes
Specify the volumes to create.

- Name
- Specify the name of the volume to be created.
- Volume Type
- Specify a Replicate volume type. Only replicated volumes are supported for this release.
- Arbiter
- Specify whether to create the volume with an arbiter brick. If this box is checked, the third disk stores only metadata.
- Brick Dirs
- The directory that contains this volume’s bricks.
The default values are correct for most installations.
Specify bricks
Enter details of the bricks to be created. Use the Select host drop-down menu to change the host being configured.
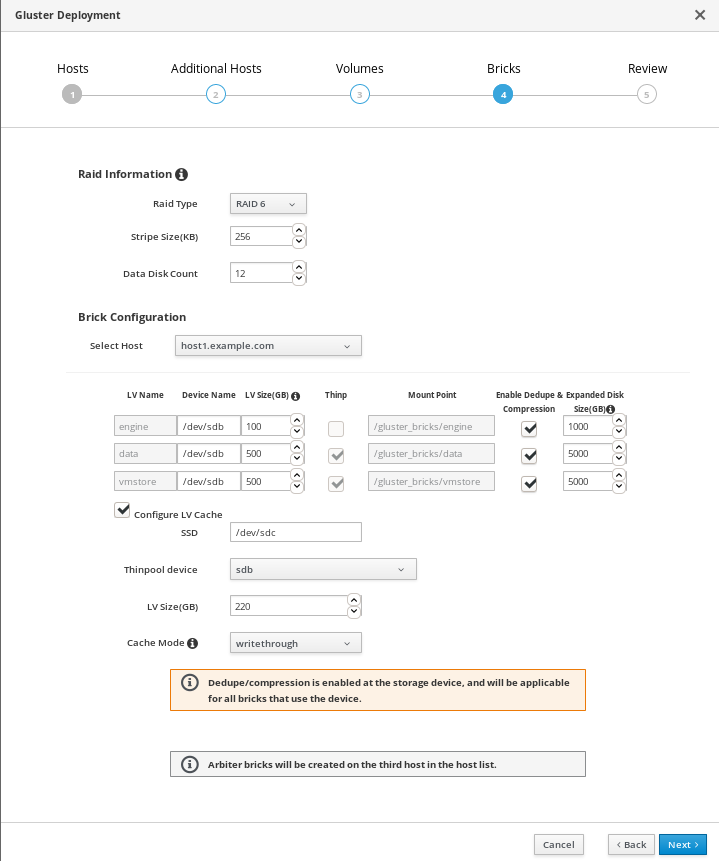
- RAID
- Specify the RAID configuration to use. This should match the RAID configuration of your host. Supported values are raid5, raid6, and jbod. Setting this option ensures that your storage is correctly tuned for your RAID configuration.
- Stripe Size
- Specify the RAID stripe size in KB. Do not enter units, only the number. This can be ignored for jbod configurations.
- Disk Count
- Specify the number of data disks in a RAID volume. This can be ignored for jbod configurations.
- LV Name
- The name of the logical volume to be created. This is pre-filled with the name that you specified on the previous page of the wizard.
- Device
- Specify the raw device you want to use. Red Hat recommends an unpartitioned device.
- Size
- Specify the size of the logical volume to create in GB. Do not enter units, only the number. This number should be the same for all bricks in a replicated set. Arbiter bricks can be smaller than other bricks in their replication set.
- Mount Point
- The mount point for the logical volume. This is pre-filled with the brick directory that you specified on the previous page of the wizard.
- Thinp
-
This option is enabled and volumes are thinly provisioned by default, except for the
enginevolume, which must be thickly provisioned. - Enable Dedupe & Compression
- Specify whether to provision the volume using VDO for compression and deduplication at deployment time.
- Logical Size (GB)
- Specify the logical size of the VDO volume. This can be up to 10 times the size of the physical volume, with an absolute maximum logical size of 4 PB.
- Configure LV Cache
- Optionally, check this checkbox to configure a small, fast SSD device as a logical volume cache for a larger, slower logical volume. Add the device path to the SSD field, the size to the LV Size (GB) field, and set the Cache Mode used by the device.
WarningTo avoid data loss when using write-back mode, Red Hat recommends using two separate SSD/NVMe devices. Configuring the two devices in a RAID-1 configuration (via software or hardware), significantly reduces the potential of data loss from lost writes.
For further information about lvmcache configuration, see Red Hat Enterprise Linux 7 LVM Administration.
(Optional) If your system has multipath devices, additional configuration is required.
To use multipath devices
If you want to use multipath devices in your RHHI for Virtualization deployment, use multipath WWIDs to specify the device. For example, use
/dev/mapper/3600508b1001caab032303683327a6a2einstead of/dev/sdb.To disable multipath device use
If multipath devices exist in your environment, but you do not want to use them for your RHHI for Virtualization deployment, blacklist the devices.
Create a custom multipath configuration file.
# touch /etc/multipath/conf.d/99-custom-multipath.conf
Add the following content to the file, replacing
<device>with the name of the device to blacklist:blacklist { devnodes "<device>" }For example, to blacklist the
/dev/sdbdevice, add the following:blacklist { devnodes "sdb" }Restart multipathd.
# systemctl restart multipathd
Verify that your disks no longer have multipath names by using the
lsblkcommand.If multipath names are still present, reboot hosts.
Review and edit configuration

Click Edit to begin editing the generated deployment configuration file.
Make any changes required and click Save.
Review the configuration file
If all configuration details are correct, click Deploy.
Wait for deployment to complete
You can watch the progress of the deployment in the text field.
The window displays Successfully deployed gluster when complete.
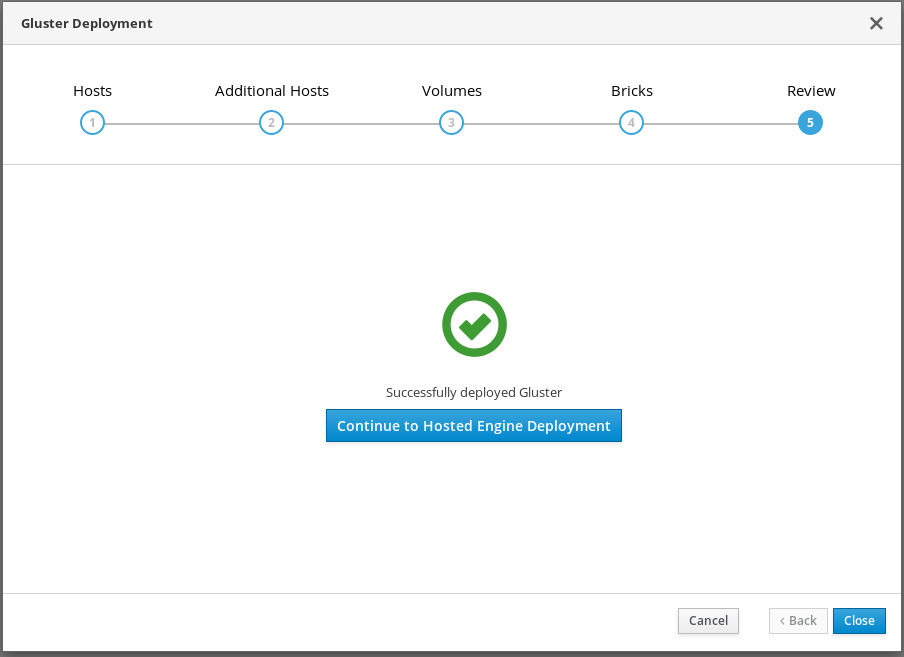
Click Continue to Hosted Engine Deployment and continue the deployment process with the instructions in Chapter 7, Deploy the Hosted Engine using the Web Console.
If deployment fails, click Clean up to remove any potentially incorrect changes to the system.
When cleanup is complete, click Redeploy. This returns you to the Review and edit configuration tab so that you can correct any issues in the generated configuration file before reattempting deployment.
Chapter 7. Deploy the Hosted Engine using the Web Console
This section shows you how to deploy the Hosted Engine using the Web Console. Following this process results in Red Hat Virtualization Manager running as a virtual machine on the first physical machine in your deployment. It also configures a Default cluster comprised of the three physical machines, and enables Red Hat Gluster Storage functionality and the virtual-host tuned performance profile for each machine in the cluster.
Prerequisites
- Configure Red Hat Gluster Storage for Hosted Engine using the Web Console
Gather the information you need for Hosted Engine deployment
Have the following information ready before you start the deployment process.
- IP address for a pingable gateway to the hyperconverged host
- IP address of the front-end management network
- Fully-qualified domain name (FQDN) for the Hosted Engine virtual machine
- MAC address that resolves to the static FQDN and IP address of the Hosted Engine
Procedure
Open the Hosted Engine Deployment wizard
If you continued directly from the end of Configure Red Hat Gluster Storage for Hosted Engine using the Web Console, the wizard is already open.
Otherwise:
- Click Virtualization → Hosted Engine.
- Click Start underneath Hyperconverged.
Click Use existing configuration.
ImportantIf the previous deployment attempt failed, click Clean up instead of Use existing configuration to discard the previous attempt and start from scratch.
Specify virtual machine details

Enter the following details and click Validate for FQDN fields.
- Engine VM FQDN
-
The fully qualified domain name to be used for the Hosted Engine virtual machine, for example,
engine.example.com. - MAC Address
The MAC address associated with the Engine VM FQDN.
ImportantThe pre-populated MAC address must be replaced.
- Root password
- The root password to be used for the Hosted Engine virtual machine.
- Click Next. Your FQDNs are validated before the next screen appears.
Specify virtualization management details
Enter the password to be used by the
adminaccount in the Administration Portal. You can also specify notification behavior here.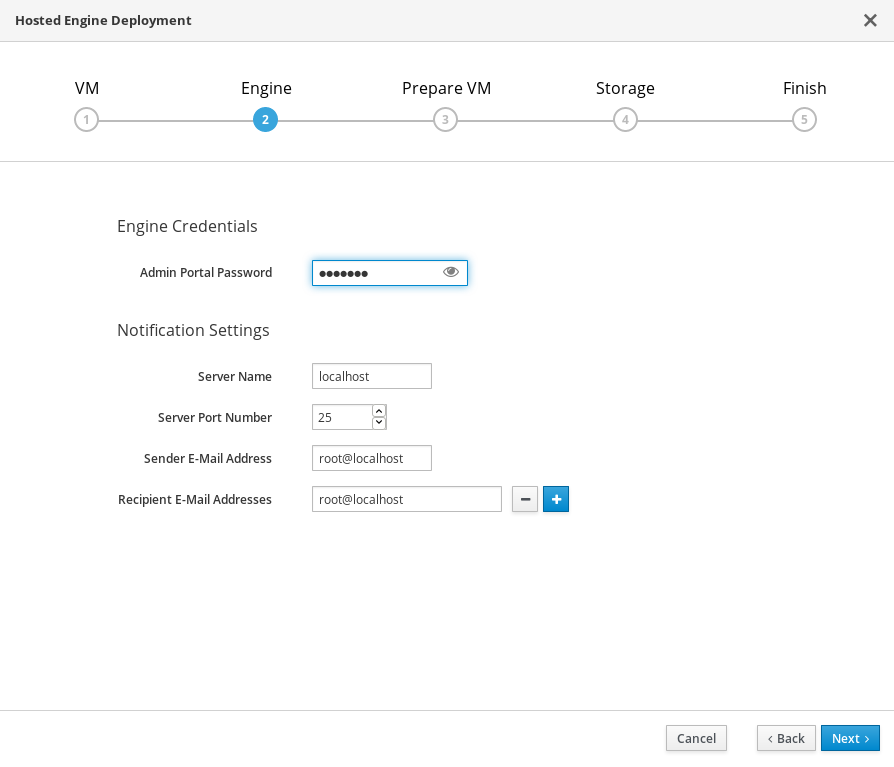
- Click Next.
Review virtual machine configuration
Ensure that the details listed on this tab are correct. Click Back to correct any incorrect information.

- Click Prepare VM.
Wait for virtual machine preparation to complete.
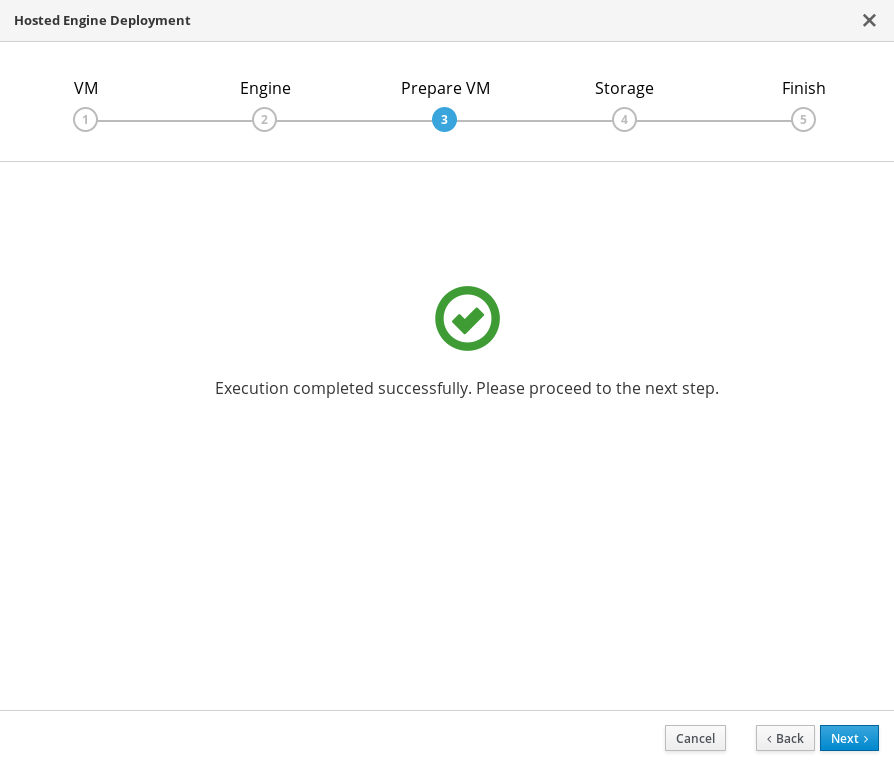
If preparation does not occur successfully, see Viewing Hosted Engine deployment errors.
- Click Next.
Specify storage for the Hosted Engine virtual machine
-
Specify the primary host and the location of the
enginevolume. Ensure that the Mount Options field is populated correctly.
-
Ensure that
backup-volfile-servers=<host2-ip-address>:<host3-ip-address>, with the appropriate IP addresses inserted in place of<host2-ip-address>and<host3-ip-address>. If your environment uses IPv6 addresses, ensure that you add the
xlator-option=transport.address-family=inet6option after thebackup-volfile-serversvalue, like so:backup-volfile-servers=<host2-ip-address>:<host3-ip-address>,xlator-option=transport.address-family=inet6

-
Ensure that
- Click Next.
-
Specify the primary host and the location of the
Finalize Hosted Engine deployment
Review your deployment details and verify that they are correct.
NoteThe responses you provided during configuration are saved to an answer file to help you reinstall the hosted engine if necessary. The answer file is created at
/etc/ovirt-hosted-engine/answers.confby default. This file should not be modified manually without assistance from Red Hat Support.
- Click Finish Deployment.
Wait for deployment to complete
This takes up to 30 minutes.
The window displays the following when complete.
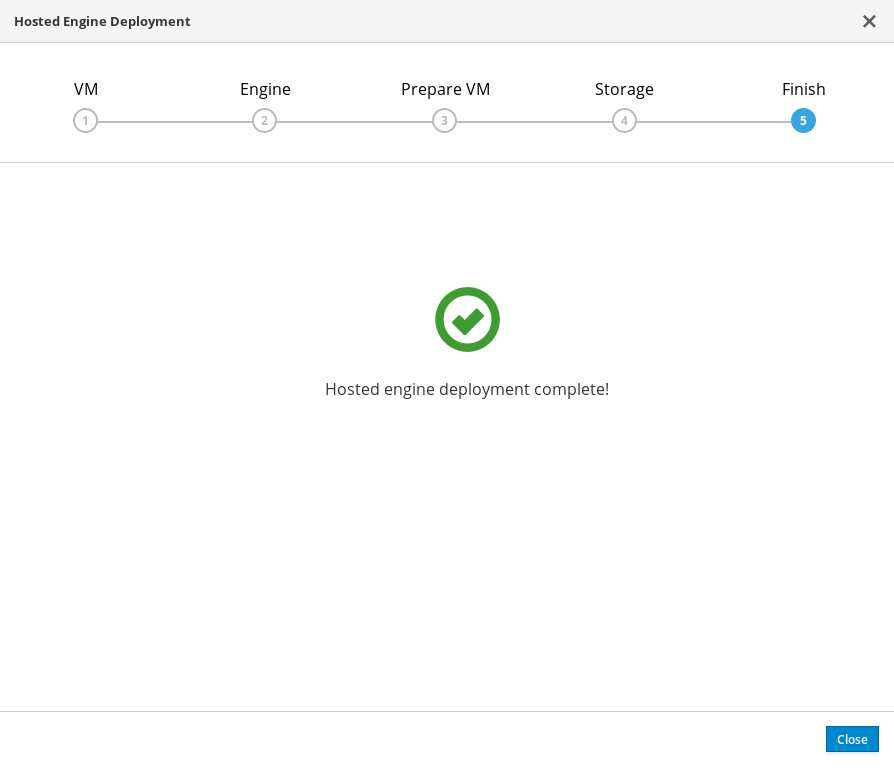 Important
If deployment does not complete successfully, see Viewing Hosted Engine deployment errors.
Click Close.
Verify hosted engine deployment
Browse to the Administration Portal (for example, http://engine.example.com/ovirt-engine) and verify that you can log in using the administrative credentials you configured earlier. Click Dashboard and look for your hosts, storage domains, and virtual machines.

Chapter 8. Configure Red Hat Gluster Storage as a Red Hat Virtualization storage domain
8.1. Create the logical network for gluster traffic
Log in to the Administration Portal
Browse to the Administration Portal (for example, http://engine.example.com/ovirt-engine) and log in using the administrative credentials you configured in Chapter 7, Deploy the Hosted Engine using the Web Console.
Create a logical network for gluster traffic
- Click Network → Networks and then click New. The New Logical Network wizard appears.
- On the General tab of the wizard, provide a Name for the new logical network, and uncheck the VM Network checkbox.
- On the Cluster tab of the wizard, uncheck the Required checkbox.
- Click OK to create the new logical network.
Enable the new logical network for gluster
- Click the Network → Networks and select the new logical network.
- Click the Clusters subtab and then click Manage Network. The Manage Network dialogue appears.
- In the Manage Network dialogue, check the Migration Network and Gluster Network checkboxes.
- Click OK to save.
Attach the gluster network to the host
- Click Compute → Hosts and select the host.
- Click the Network Interfaces subtab and then click Setup Host Networks. The Setup Host Networks window opens.
- Drag and drop the newly created network to the correct interface.
- Ensure that the Verify connectivity between Host and Engine checkbox is checked.
- Ensure that the Save network configuration checkbox is checked.
- Click OK to save.
Verify the health of the network
Click the Network Interfaces tab and check the state of the host’s network. If the network interface enters an "Out of sync" state or does not have an IP Address, click Management → Refresh Capabilities.
8.2. Configure additional hyperconverged hosts
If your environment uses IPv6 addresses, or if you did not specify additional hyperconverged hosts as part of Configure Red Hat Gluster Storage for Hosted Engine using the Web Console, follow these steps in the Administration Portal for each of the other hyperconverged hosts.
- Click Compute → Hosts and then click New to open the New Host window.
- Provide the Name, Hostname, and Password for the host that you want to manage.
- Under Advanced Parameters, uncheck the Automatically configure host firewall checkbox, as firewall rules are already configured by the deployment process.
- In the Hosted Engine tab of the New Host dialog, set the value of Choose hosted engine deployment action to Deploy. This ensures that the hosted engine can run on the new host.
Click OK.
- Attach the gluster network to all remaining hosts
- Click the name of the newly added host to go to the host page.
- Click the Network Interfaces subtab and then click Setup Host Networks.
- Drag and drop the newly created network to the correct interface.
- Ensure that the Verify connectivity checkbox is checked.
- Ensure that the Save network configuration checkbox is checked.
Click OK to save.
In the General subtab for this host, verify that the value of Hosted Engine HA is Active, with a positive integer as a score.
ImportantIf Score is listed as N/A, you may have forgotten to select the deploy action for Choose hosted engine deployment action. Follow the steps in Reinstalling a hyperconverged host in Maintaining Red Hat Hyperconverged Infrastructure for Virtualization to reinstall the host with the deploy action.
Verify the health of the network
Click the Network Interfaces tab and check the state of the host’s network. If the network interface enters an "Out of sync" state or does not have an IP Address, click Management → Refresh Capabilities.
See the Red Hat Virtualization 4.3 Self-Hosted Engine Guide for further details: https://access.redhat.com/documentation/en-us/red_hat_virtualization/4.3/html/self-hosted_engine_guide/chap-installing_additional_hosts_to_a_self-hosted_environment
Part III. Verify
Chapter 9. Verify your deployment
After deployment is complete, verify that your deployment has completed successfully.
Browse to the Administration Portal, for example, http://engine.example.com/ovirt-engine.
Administration Console Login

Log in using the administrative credentials added during hosted engine deployment.
When login is successful, the Dashboard appears.
Administration Console Dashboard

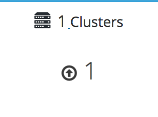
Verify that your cluster is available.
Administration Console Dashboard - Clusters
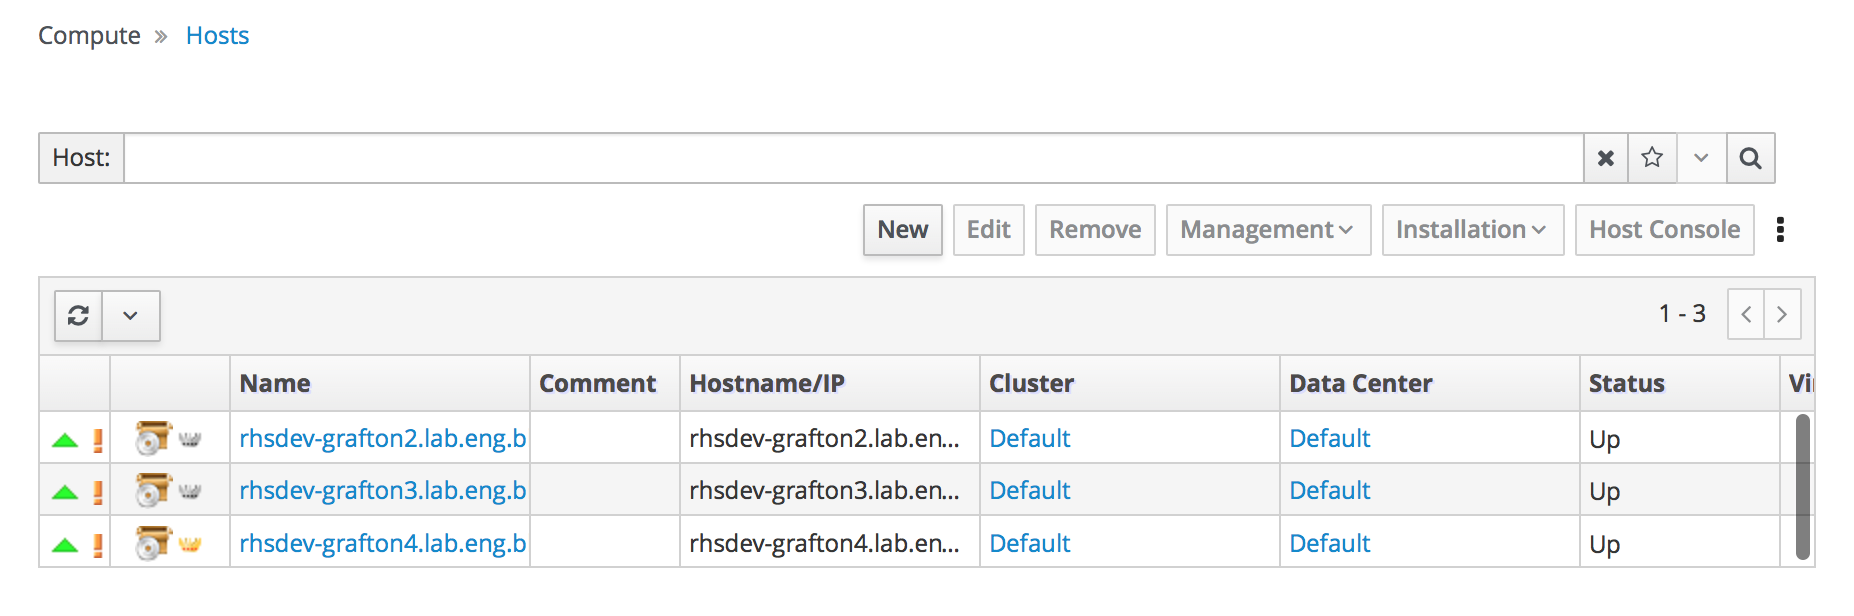
Verify that at least one host is available.
If you provided additional host details during Hosted Engine deployment, 3 hosts are visible here, as shown.
Administration Console Dashboard - Hosts

- Click Compute → Hosts.
Verify that all hosts are listed with a Status of
Up.Administration Console - Hosts
Verify that all storage domains are available.
- Click Storage → Domains.
Verify that the
Activeicon is shown in the first column.Administration Console - Storage Domains

Part IV. Next steps
Chapter 10. Post-deployment configuration suggestions
Depending on your requirements, you may want to perform some additional configuration on your newly deployed Red Hat Hyperconverged Infrastructure for Virtualization. This section contains suggested next steps for additional configuration.
Details on these processes are available in Maintaining Red Hat Hyperconverged Infrastructure for Virtualization.
10.1. Configure fencing for high availability
Fencing allows a cluster to enforce performance and availability policies and react to unexpected host failures by automatically rebooting hyperconverged hosts.
See Configure High Availability using fencing policies for further information.
10.2. Configure backup and recovery options
Red Hat recommends configuring at least basic disaster recovery capabilities on all production deployments.
See Configuring backup and recovery options in Maintaining Red Hat Hyperconverged Infrastructure for Virtualization for more information.
Part V. Troubleshoot
Chapter 11. Log file locations
During the deployment process, progress information is displayed in the web browser. This information is also stored on the local file system so that the information logged can be archived or reviewed at a later date, for example, if the web browser stops responding or is closed before the information has been reviewed.
The log file for the the Web Console based deployment process (documented in Chapter 6, Configure Red Hat Gluster Storage for Hosted Engine using the Web Console) is stored in the /var/log/ansible.log file by default.
The log files for the Hosted Engine setup portion of the deployment process (documented in Chapter 7, Deploy the Hosted Engine using the Web Console) are stored in the /var/log/ovirt-hosted-engine-setup directory, with file names of the form ovirt-hosted-engine-setup-<date>.log.
Chapter 12. Viewing deployment errors
12.1. Failed to deploy storage
If an error occurs during storage deployment, the deployment process halts and ⓧ Deployment failed is displayed.
Deploying storage failed
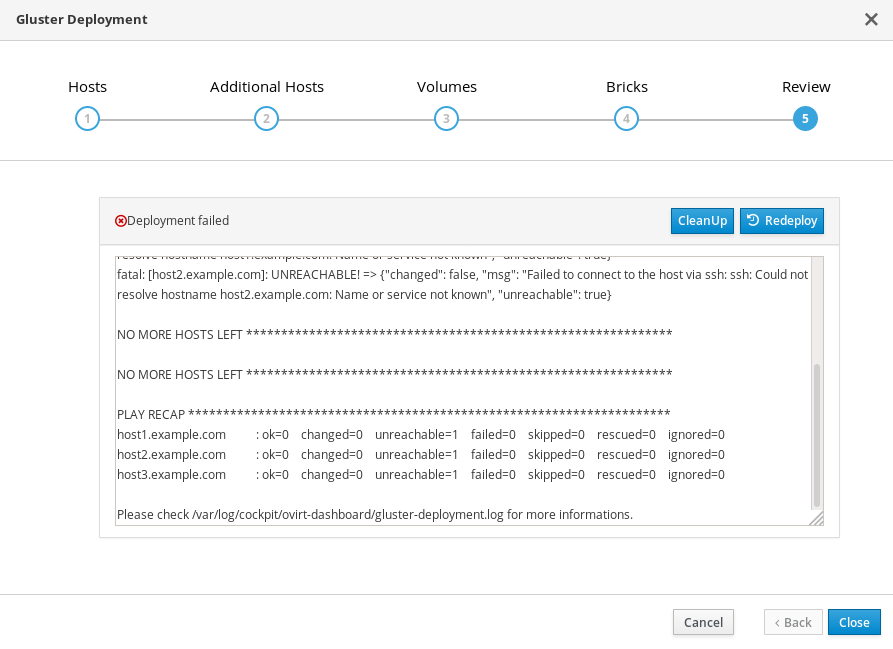
- Review the Web Console output for error information.
- Click Clean up to remove any potentially incorrect changes to the system.
- Click Redeploy and correct any entered values that may have caused errors. If you need help resolving errors, contact Red Hat Support with details.
- Return to storage deployment to try again.
12.2. Failed to prepare virtual machine
If an error occurs while preparing the virtual machine in Hosted Engine deployment, deployment pauses, and you see a screen similar to the following:
Preparing virtual machine failed
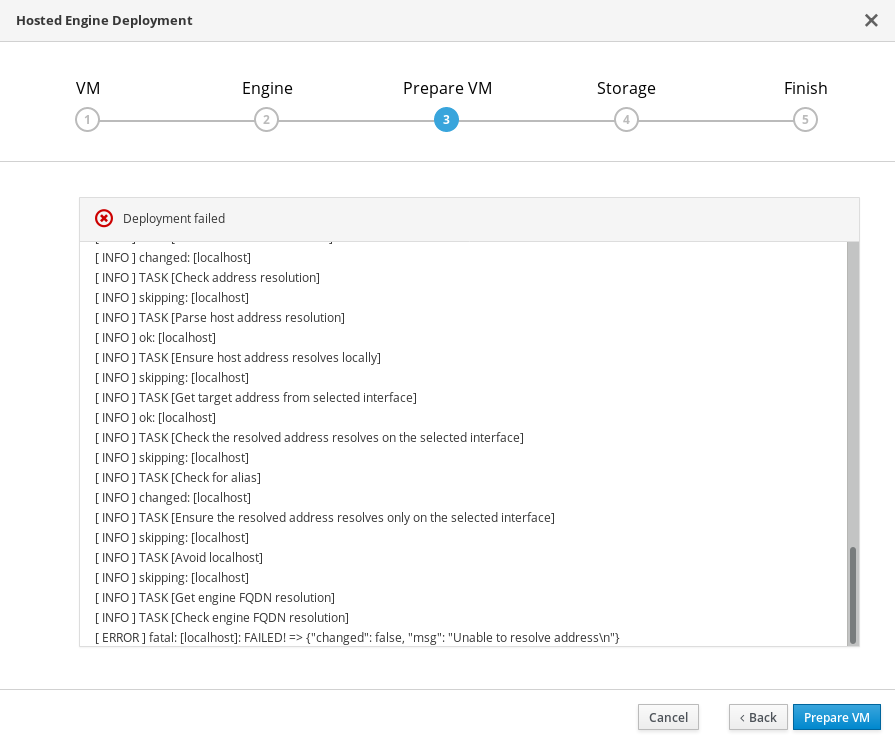
- Review the Web Console output for error information.
- Click Clean up to remove any potentially incorrect changes to the system.
- Click Redeploy and correct any entered values that may have caused errors. If you need help resolving errors, contact Red Hat Support with details.
Ensure that the
rhvm-appliancepackage is available on all hosts.# yum install rhvm-appliance
Return to Hosted Engine deployment to try again.
If you closed the deployment wizard while you resolved errors, you can select Use existing configuration when you retry the deployment process.
12.3. Failed to deploy hosted engine
If an error occurs during hosted engine deployment, deployment pauses, and ⓧ Deployment failed is displayed.
Hosted engine deployment failed
- Review the Web Console output for error information.
Remove the contents of the
enginevolume.Mount the
enginevolume.# mount -t glusterfs <server1>:/engine /mnt/test
Remove the contents of the volume.
# rm -rf /mnt/test/*
Unmount the
enginevolume.# umount /mnt/test
- Click Clean up to remove any potentially incorrect changes to the system.
- Click Redeploy and correct any entered values that may have caused errors. If you need help resolving errors, contact Red Hat Support with details.
Return to Hosted Engine deployment to try again.
If you closed the deployment wizard while you resolved errors, you can select Use existing configuration when you retry the deployment process.
Part VI. Reference material
Appendix A. Glossary of terms
A.1. Virtualization terms
- Administration Portal
- A web user interface provided by Red Hat Virtualization Manager, based on the oVirt engine web user interface. It allows administrators to manage and monitor cluster resources like networks, storage domains, and virtual machine templates.
- Hosted Engine
- The instance of Red Hat Virtualization Manager that manages RHHI for Virtualization.
- Hosted Engine virtual machine
- The virtual machine that acts as Red Hat Virtualization Manager. The Hosted Engine virtual machine runs on a virtualization host that is managed by the instance of Red Hat Virtualization Manager that is running on the Hosted Engine virtual machine.
- Manager node
- A virtualization host that runs Red Hat Virtualization Manager directly, rather than running it in a Hosted Engine virtual machine.
- Red Hat Enterprise Linux host
- A physical machine installed with Red Hat Enterprise Linux plus additional packages to provide the same capabilities as a Red Hat Virtualization host. This type of host is not supported for use with RHHI for Virtualization.
- Red Hat Virtualization
- An operating system and management interface for virtualizing resources, processes, and applications for Linux and Microsoft Windows workloads.
- Red Hat Virtualization host
- A physical machine installed with Red Hat Virtualization that provides the physical resources to support the virtualization of resources, processes, and applications for Linux and Microsoft Windows workloads. This is the only type of host supported with RHHI for Virtualization.
- Red Hat Virtualization Manager
- A server that runs the management and monitoring capabilities of Red Hat Virtualization.
- Self-Hosted Engine node
- A virtualization host that contains the Hosted Engine virtual machine. All hosts in a RHHI for Virtualization deployment are capable of becoming Self-Hosted Engine nodes, but there is only one Self-Hosted Engine node at a time.
- storage domain
- A named collection of images, templates, snapshots, and metadata. A storage domain can be comprised of block devices or file systems. Storage domains are attached to data centers in order to provide access to the collection of images, templates, and so on to hosts in the data center.
- virtualization host
- A physical machine with the ability to virtualize physical resources, processes, and applications for client access.
- VM Portal
- A web user interface provided by Red Hat Virtualization Manager. It allows users to manage and monitor virtual machines.
A.2. Storage terms
- brick
- An exported directory on a server in a trusted storage pool.
- cache logical volume
- A small, fast logical volume used to improve the performance of a large, slow logical volume.
- geo-replication
- One way asynchronous replication of data from a source Gluster volume to a target volume. Geo-replication works across local and wide area networks as well as the Internet. The target volume can be a Gluster volume in a different trusted storage pool, or another type of storage.
- gluster volume
- A logical group of bricks that can be configured to distribute, replicate, or disperse data according to workload requirements.
- logical volume management (LVM)
- A method of combining physical disks into larger virtual partitions. Physical volumes are placed in volume groups to form a pool of storage that can be divided into logical volumes as needed.
- Red Hat Gluster Storage
- An operating system based on Red Hat Enterprise Linux with additional packages that provide support for distributed, software-defined storage.
- source volume
- The Gluster volume that data is being copied from during geo-replication.
- storage host
- A physical machine that provides storage for client access.
- target volume
- The Gluster volume or other storage volume that data is being copied to during geo-replication.
- thin provisioning
- Provisioning storage such that only the space that is required is allocated at creation time, with further space being allocated dynamically according to need over time.
- thick provisioning
- Provisioning storage such that all space is allocated at creation time, regardless of whether that space is required immediately.
- trusted storage pool
- A group of Red Hat Gluster Storage servers that recognise each other as trusted peers.
A.3. Hyperconverged Infrastructure terms
- Red Hat Hyperconverged Infrastructure (RHHI) for Virtualization
- RHHI for Virtualization is a single product that provides both virtual compute and virtual storage resources. Red Hat Virtualization and Red Hat Gluster Storage are installed in a converged configuration, where the services of both products are available on each physical machine in a cluster.
- hyperconverged host
- A physical machine that provides physical storage, which is virtualized and consumed by virtualized processes and applications run on the same host. All hosts installed with RHHI for Virtualization are hyperconverged hosts.
- Web Console
- The web user interface for deploying, managing, and monitoring RHHI for Virtualization. The Web Console is provided by the the Web Console service and plugins for Red Hat Virtualization Manager.