
Converting a virtualization cluster to a hyperconverged cluster
Convert existing hyperconverged hosts to create a hyperconverged cluster
Abstract
Chapter 1. Workflow for converting a virtualization cluster to a hyperconverged cluster
- Verify that your hyperconverged hosts use Red Hat Virtualization 4.3 or higher, and meet Red Hat Hyperconverged Infrastructure for Virtualization Support Requirements.
- Subscribe to software repositories.
- Convert hyperconverged hosts to hyperconverged hosts.
- Create Red Hat Gluster Storage volumes using storage on the converted host.
Chapter 2. Subscribing to software repositories for hyperconverged hosts
Hyperconverged hosts require access to the rhel-7-server-rhv-4-mgmt-agent-rpms repository.
Red Hat Virtualization hosts are subscribed to this repository during installation and setup, so no further action is necessary.
Red Hat Enterprise Linux hosts need to subscribe to the repository by running the following command.
# subscription-manager repos --enable=rhel-7-server-rhv-4-mgmt-agent-rpms
Chapter 3. Converting hyperconverged hosts to hyperconverged hosts
Follow this process to convert hyperconverged hosts to hyperconverged hosts. This lets you use and manage the host’s local storage as Red Hat Gluster Storage volumes.
- Log in to the Administration Portal.
Move all hosts except the self-hosted engine node into maintenance mode.
- Click Compute → Hosts.
For each host except the self-hosted engine node:
- Select the host to move to maintenance.
- Click Management → Maintenance and click OK.
Enable the gluster service in the cluster.
Click Compute → Clusters and select the cluster.
The Edit Cluster window appears.
- Check the Enable Gluster service checkbox.
- Click OK.
Reinstall all hosts except the self-hosted engine node.
- Click Compute → Hosts.
For each host except the self-hosted engine node:
- Select the host to reinstall.
Click Management → Reinstall and click OK.
Wait for the reinstall to complete and for the hosts to become active again.
Move the self-hosted engine node into maintenance mode.
- Select the self-hosted engine node.
Click Management → Maintenance and click OK
The hosted engine migrates to one of the other hyperconverged hosts.
Reinstall the previous self-hosted engine node.
- Select the previous self-hosted engine node.
Click Management → Reinstall and click OK.
Wait for the reinstall to complete and for the host to become active again.
Your hosts are now able to use and manage storage as Red Hat Gluster Storage volumes.
Chapter 4. Creating Red Hat Gluster Storage volumes using the Administration Portal
Prerequisites
- This task assumes you have raw unused storage devices attached to your hyperconverged hosts.
Task
- Log in to the Administration Portal.
Configure your local storage as a Red Hat Gluster Storage brick.
- Click Compute → Hosts and click on the name of the host to use.
- Click the Storage Devices subtab and select the device.
Click Create Brick to open the Create Brick window.
The Create Brick window
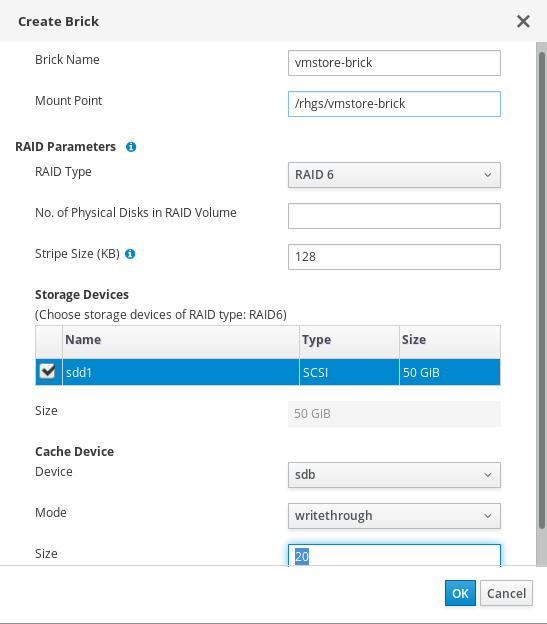
- Enter a Name for the brick.
- Verify or correct the suggested Mount Point.
- If the underlying storage uses RAID, enter the number of physical disks in the RAID device and confirm the RAID type.
- Click OK.
A new thin-provisioned logical volume is created on the specified storage device, with all settings appropriate for use with Red Hat Gluster Storage.
Configure a Red Hat Gluster Storage volume.
- Click Storage → Volumes.
Click New to open the New Volume window.
The New Volume window
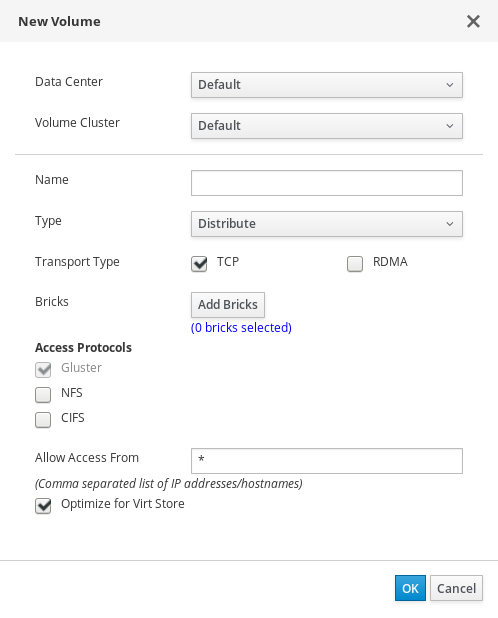
- Select the cluster that contains your bricks.
- Enter a Name for the volume.
Set the Type of volume to create. To use local storage without high availability, choose
Distribute.See Setting Up Storage Volumes in the Red Hat Gluster Storage Administration Guide for more information about volume types.
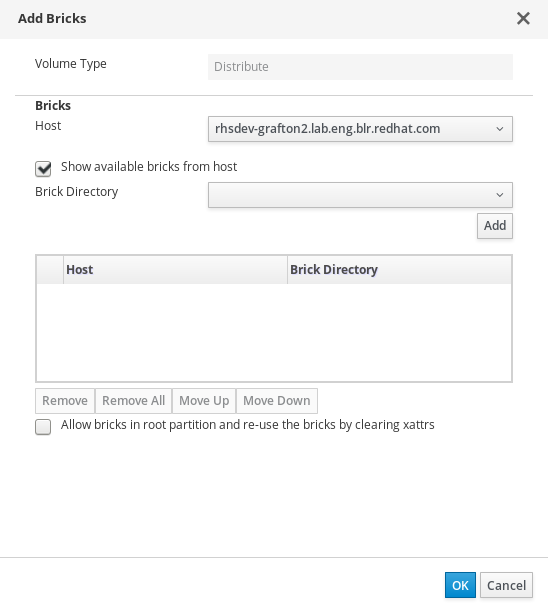
Click Add Bricks and select your existing storage as a brick for this volume.
The Add Bricks window
- Optionally, for enhanced security, specify the IP addresses or hostnames of all hosts in the cluster in the Allow Access From field.
- Check the Optimize for virt store checkbox to configure the volume for storing virtual machine images.
- Click OK.
See the Red Hat Virtualization 4.3 Administration Guide or the Red Hat Gluster Storage 3.4 Administration Guide for more information about managing Red Hat Gluster Storage.