
Red Hat Training
A Red Hat training course is available for Red Hat Gluster Storage
4.2. Hosts Operations
4.2.1. Adding Hosts
You must install hosts and configure them with a name and IP address before you can add them to the Red Hat Storage Console.
Important
If you re-install the Red Hat Storage Console, you must remove all hosts and reconnect them with the correct SSH keys for the new installation of Red Hat Storage Console.
Prerequisites
Before you can add a host to Red Hat Storage, ensure your environment meets the following criteria:
- The host hardware is Red Hat Enterprise Linux certified. See https://hardware.redhat.com/ to confirm that the host has Red Hat certification.
- The host should have a resolvable hostname or static IP address.
Procedure 4.1. To Add a Host
Before adding a host, ensure you have the correct IP and password for the host. The process of adding a new host can take some time; you can follow its progress in the Events pane.
- Click the Hosts tab to list available hosts.
- Click to open the New Host window.
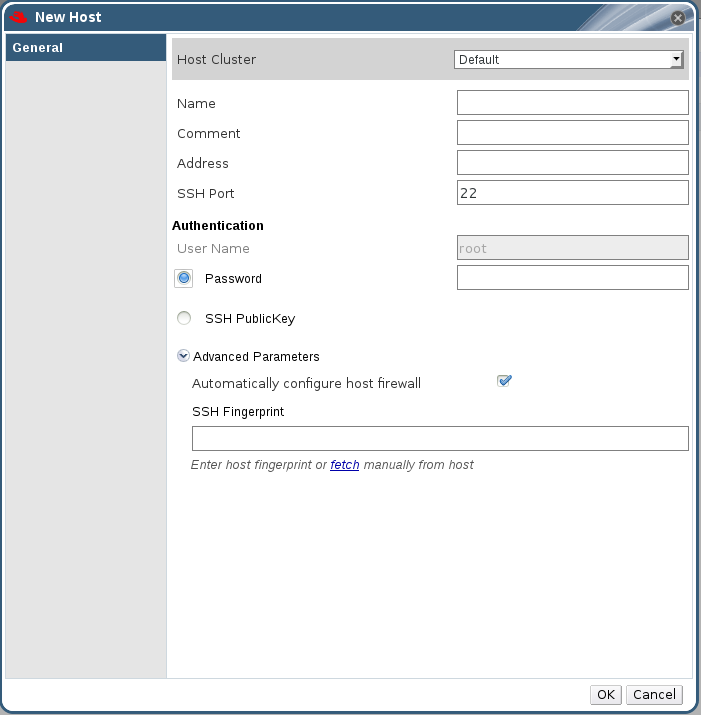
Figure 4.2. New Host Window
- Select the Host Cluster for the new host from the drop-down menu.
Table 4.2. Add Hosts Properties
FieldDescriptionHost ClusterThe cluster to which the host belongs. NameThe name of the host. This text field has a 40-character limit and must be a unique name with any combination of uppercase and lowercase letters, numbers, hyphens, and underscores.If Nagios is enabled, the host name given in Name field of Add Host window should match the host name given while configuring Nagios.AddressThe IP address or resolvable hostname of the host. Root PasswordThe password of the host's root user. This can only be given when you add the host, it cannot be edited afterwards. SSH Public KeyCopy the contents in the text box to the /root/.ssh/authorized_keys file on the host if you'd like to use the Manager's ssh key instead of using a password to authenticate with the host. Automatically configure host firewallWhen adding a new host, the Manager can open the required ports on the host's firewall. This is enabled by default. This is an Advanced Parameter.The required ports are opened if this option is selected.SSH FingerprintYou can fetch the host's ssh fingerprint, and compare it with the fingerprint you expect the host to return, ensuring that they match. This is an Advanced Parameter. - Enter the Name, and Address of the new host.
- Select an authentication method to use with the host:
- Enter the root user's password to use password authentication.
- Copy the key displayed in the SSH PublicKey field to
/root/.ssh/authorized_keyson the host to use public key authentication.
- The mandatory steps for adding a Red Hat Storage host are complete. Click to show the advanced host settings:
- Optionally disable automatic firewall configuration.
- Optionally add a host SSH fingerprint to increase security. You can add it manually, or fetch it automatically.
- Click to add the host and close the window.The new host displays in the list of hosts with a status of "Installing" and then it goes to "Initialization" state and the host comes up.
Note
The host will be in Up status after the status of "Installing" and "Initialization" state. The host will have Non-Operational status when the host is not compatible with the cluster compatibility version. The Non-Responsive status will be displayed if the host is down or is unreachable.You can view the progress of the host installation in the Details pane.
4.2.2. Activating Hosts
After taking down a host for maintenance, you must reactivate it before using it. When you activate a host, the host's networks are checked and the check if the glusterd is operational is also performed.
Procedure 4.2. To Activate a Host
- In the Hosts tab, select the host you want to activate.
- Click . The host status changes to Up.
4.2.3. Managing Host Network Interfaces
The Network Interfaces tab in Details pane of Hosts enables you to attach the management network to a host's physical network interface cards. The management network is defined, by default in the cluster. The administration portal automatically assigns the management network to the network interface which has the host address that was provided while adding a host.
Note
You cannot define new logical networks at the host level, only
ovirtmgmt is supported.
4.2.3.1. Editing Host Network Interfaces
The Network Interfaces tab displays the name, network name, address, MAC address, speed, and link status for each interface. It also provides several options for managing host network interface cards.
Procedure 4.3. To Edit a Host Network Interface
- Click the Hosts tab to display a list of hosts. Select the desired host to display the Details pane.
- Click to open the Setup Host Networks window.

Figure 4.3. Setup Host Networks Window
- Edit the management networks by hovering over an assigned logical network and clicking the pencil icon to open the Edit Management Network window.
- If your logical network definition is not synchronized with the network configuration on the host, select the Sync network check box.
- Select a Boot Protocol:
- None
- DHCP
- Static - provide the IP and Subnet Mask.
- Click .
- Select Verify connectivity between Host and Engine to run a network check.
- Select Save network configuration if you want the network changes to be persistent when you reboot the environment.
- Click to implement the changes and close the window.
4.2.3.2. Editing Management Network Interfaces
The Network Interfaces tab displays the name, network name, address, MAC address, speed, and link status for each interface. In the course of editing the host network interface cards, you may need to check or edit the management network interface.
Important
Clusters and hosts communicate through the management interface. Changing the properties of the management interface can cause the host to become unreachable.
Procedure 4.4. To Edit a Management Network Interface
- Click the Hosts tab to display a list of hosts. Select the desired host to display the Details pane.
- Edit the logical networks by hovering over an assigned logical network and clicking the pencil icon to open the Edit Management Network window.
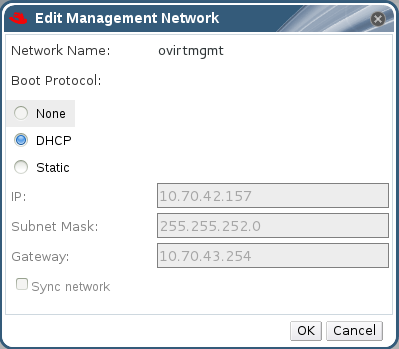
Figure 4.4. Edit Management Network Dialog Box
- If your logical network definition is not synchronized with the network configuration on the host, select the Sync network check box.
- Select a Boot Protocol:
- None
- DHCP
- Static - provide the IP and Subnet Mask.
- Make the required changes to the management network interface:
- To attach the ovirtmgmt management network to a different network interface card, select a different interface from the drop-down list.
- Select the network setting from , or . For the setting, provide the IP, Subnet and Default Gateway information for the host.
- Click to confirm the changes.
- Select Verify connectivity between host and engine if required.
- Select Save network configuration to make the changes persistent when you reboot the environment.
- Click .
- Activate the host. See Section 4.2.2, “Activating Hosts”.
4.2.4. Configuring Network Interfaces
After connecting physical network interface cards to logical networks, you can perform further configuration. For example, you can aggregate links, separate bonded links, or detach network interface cards from the network. Before performing these actions, Red Hat recommends you save the current network configuration.
4.2.4.1. Saving Host Network Configurations
After connecting physical network interface cards to logical networks, you can perform further configurations. Before performing the configurations, Red Hat recommends you save the current network configuration.
After correctly configuring the network, Red Hat recommends you save the network configuration.
Procedure 4.5. To Save a Host Network Configuration
- Click the Hosts tab to display a list of hosts. Select the desired host to display the Details pane.
- Click to place the host into maintenance. Click to confirm the action. The Status field of the host changes to Preparing for Maintenance, followed by Maintenance. The icon changes to indicate that the host is in maintenance mode.
- Click the Network Interfaces tab in the Details pane to display the list of network interface cards in the host, their addresses, and other specifications. Select the network interface card that you want to edit.
- Click to save the host network configuration. The Events pane displays the message:
Network Changes were saved on Host HOSTNAME.
4.2.4.2. Deleting Hosts
You can permanently remove hosts that are not in use. Deleting unused hosts saves system resources, as existing hosts are contacted at regular intervals.
Note
You can not remove hosts if it has volumes in it. Removing a host will detach the host from the cluster.
Procedure 4.6. To Delete a Host
- Click the Hosts tab to display a list of hosts. Select the host you want to remove. If the required host is not visible, perform a search.
- Click to place the host into maintenance. Click to confirm the action. The Status field of the host changes to Preparing for Maintenance, followed by Maintenance. The icon changes to indicate that the host is in maintenance mode.
- Click .
- Click to confirm.
4.2.4.3. Managing Gluster Sync
Gluster Sync periodically fetches the latest cluster configuration from glusterFS and synchronizes it with the engine database. The Red Hat Storage Console continuously monitors storage clusters for the addition and removal of hosts. If a change is detected, an action item displays in the Cluster tab with the option to or the host.
Procedure 4.7. To Import a Host to a Cluster
- Click the Cluster tab and select a cluster to display the General tab with details of the cluster.
- In , click Import to display the Add Hosts window.
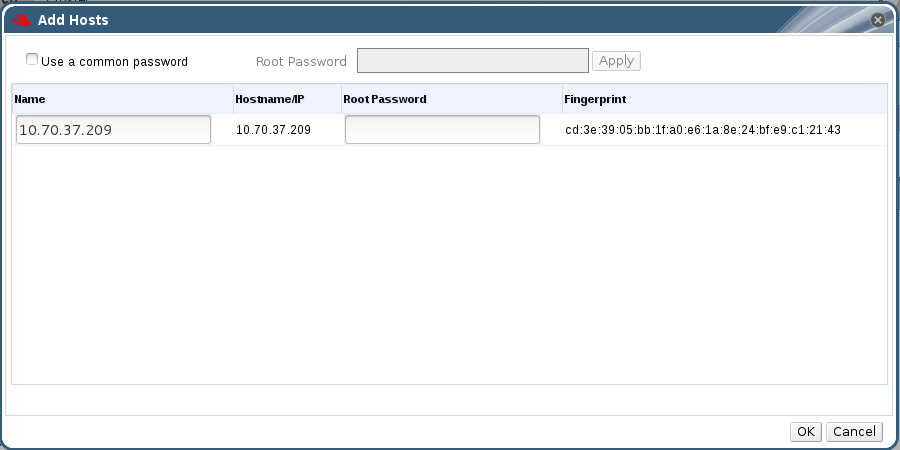
Figure 4.5. Add Hosts Window
- Enter the Name and Root Password. Select Use a common password if you want to use the same password for all hosts.
- Click .
- Click to add the host to the cluster.
Procedure 4.8. To Detach a Host from a Cluster
- Click the Cluster tab and select a cluster to display the General tab with details of the cluster.
- In , click Detach to display the Detach Hosts window.
- Select the host you want to detach and click . Select Force Detach if you want to perform force removal of the host from the cluster.