
Red Hat Training
A Red Hat training course is available for Red Hat Gluster Storage
3.2. Cluster Operations
3.2.1. Creating a New Cluster
You can create a new cluster using the New option in the Clusters tab.
Procedure 3.1. To Create a New Cluster
- Open the Clusters view by expanding the System tab and selecting the Cluster tab in the Tree pane. Alternatively, select Clusters from the Details pane.
- Click to open the New Cluster dialog box.
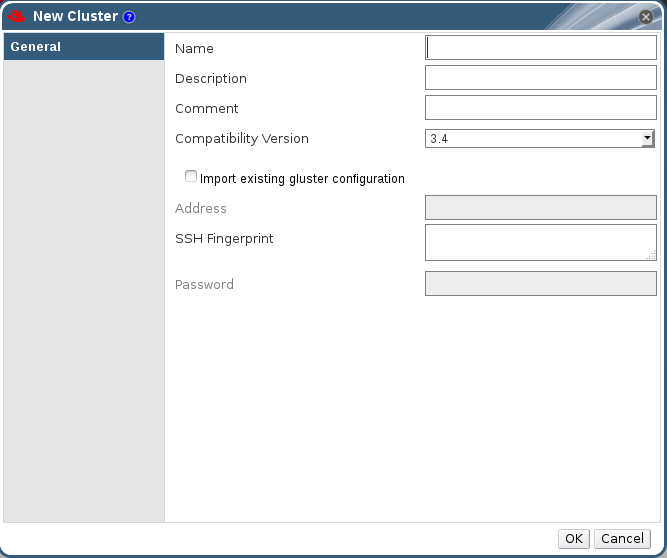
Figure 3.2. New Cluster Dialog Box
- Enter the cluster Name, Description and Compatibility Version. The name cannot include spaces.
- Click to create the cluster. The new cluster displays in the Clusters tab.
- Click to configure the cluster. The Guide Me window lists the entities you need to configure for the cluster. Configure these entities or postpone configuration by clicking . You can resume the configuration process by selecting the cluster and clicking . To import an existing cluster, see Section 3.2.2, “Importing an Existing Cluster”.
3.2.2. Importing an Existing Cluster
You can import a Red Hat Storage cluster and all the hosts belonging to the cluster into the Red Hat Storage Console.
When you provide details such as the IP address or host name and password of any host in the cluster, the gluster
peer status command executes on that host through SSH, then displays a list of hosts that are part of the cluster. You must manually verify the fingerprint of each host and provide passwords for them. If some hosts are not reachable, then import cluster will not add these hosts to the cluster during import.
Procedure 3.2. To Import an Existing Cluster
- In the Tree pane, click System tab, then click the Clusters tab.
- Click to open the New Cluster dialog box.
- Enter the cluster Name, Description and Compatibility Version. The name cannot include spaces.
- Select to import the cluster.
- In the Address field, enter the host name or IP address of a host in the cluster.The host Fingerprint displays to indicate the connection host. If a host in unreachable or if there is a network error, Error in fetching fingerprint displays in the Fingerprint field.
- Enter the Root Password for the host in the Password field and click .
- The Add Hosts window opens, and a list of hosts that are part of the cluster displays.
- For each host, enter the Name and Root Password. If you wish to use the same password for all hosts, check Use a common password and enter a password.
- Click to set the password for all hosts then click to submit the changes.
3.2.3. Editing a Cluster
Procedure 3.3. To Edit a Cluster
- Click the Clusters tab to display the list of host clusters. Select the cluster that you want to edit.
- Click to open the Edit Cluster dialog box.
- Enter a Name and Description for the cluster and select the compatibility version from the Compatibility Version drop down list.
- Click to confirm the changes and display the host cluster details.
3.2.4. Viewing Hosts in a Cluster
Procedure 3.4. To View Hosts in a Cluster
- Click the Clusters tab to display a list of host clusters. Select the desired cluster to display the Details pane.
- Click the tab to display a list of hosts.

Figure 3.3. The Hosts tab on the Cluster Details pane
3.2.5. Removing a Cluster
You can permanently remove clusters that are not in use. Deleting unused clusters saves system resources, as existing hosts are contacted at regular intervals.
Warning
Red Hat recommends that you do not remove the default cluster.
Procedure 3.5. To Remove a Cluster
- Click the Clusters tab to display a list of clusters. If the required cluster is not visible, perform a search.
- Select the cluster to be removed. Ensure that there are no running hosts or volumes.
- Click the button.
- A dialog box lists all the clusters selected for removal. Click to confirm the removal.