
Red Hat Training
A Red Hat training course is available for Red Hat Gluster Storage
Chapter 10. Managing Geo-replication
Geo-replication provides a distributed, continuous, asynchronous, and incremental replication service from one site to another over Local Area Networks (LANs), Wide Area Networks (WANs), and the Internet.
Geo-replication uses a source-destination model, where replication and mirroring occurs between the following partners:
- Source – a Red Hat Gluster Storage volume.
- Destination - a Red Hat Gluster Storage volume.
Note
Red Hat Gluster Storage recommends the usage of meta-volume for geo-replication sessions. For information on meta-volume see Configuring a Meta-Volume section in Red Hat Gluster Storage Administration Guide.
10.1. Geo-replication Operations
You can perform Geo-replication operations and also manage source and destination volumes through Red Hat Gluster Storage Console. The Info column in Volumes tab displays icon which indicates the presence of a Geo-replication session and also if the volume is source or a destination volume. Hovering over the icon also provides information about if the volume is source or destination.
Important
- Manually set the cluster option "cluster.enable-shared-storage" from CLI.
- Set the option use_meta_volume to true.
- For every new node added to the cluster ensure that the cluster option "cluster.enable-shared-storage" is set to the cluster and the meta-volume is mounted.
10.1.1. Creating a Geo-replication session
You can create geo-replication sessions for volumes eligible for geo-replication. You can select “Show volumes eligible for geo-replication” option, to view the list of volumes eligible for geo-replication. If the “Show volumes eligible for geo-replication” option is not selected, all the volumes are displayed. Geo-replication session creation may fail if you select volumes which are not eligible for geo-replication session.
Destination volume eligibility criteria
- Destination and source volumes should not be from same cluster.
- Capacity of destination volume should be greater than or equal to that of source volume.
- Cluster Compatibility version of destination and source volumes should be same.
- Destination volume should not already be a part of another geo replication session.
- Destination volume should be up.
- Destination volume should be empty.
Procedure 10.1. Creating a Geo-replication session
- Click the Volumes tab. The list of volumes in the system is displayed.
- Select the volume for which the geo-replication is to be created and click the Geo-replication option.
- Click New option. The New Geo-Replication Session page is displayed.
Note
- You can also create Geo-Replication session from Geo-Replication sub-tab.
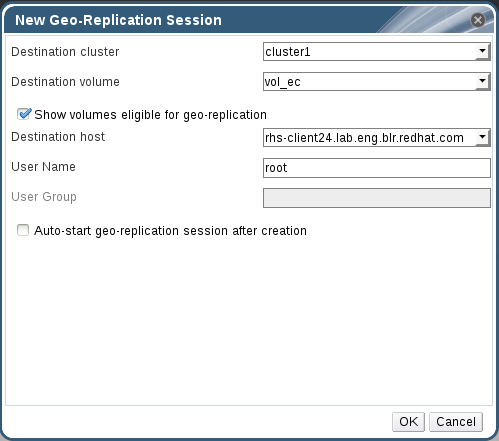
Figure 10.1. New Geo-replication session
- Select the Destination Cluster, Destination Volume, and Destination Host.
- Select Show volumes eligible for geo-replication option to view the list of volumes eligible for geo-replication.
- Enter the User Name. For non-root user, enter the corresponding User roup.
- Select Auto-start geo-replication session after creation option to start the session immediately after creation and click OK.
10.1.2. Viewing Geo-replication session Details
You can view the list of all the individual nodes, their status, Up time, and also the detailed status for each node.
The status of a Geo-replication session can be one of the following:
- Initializing: This is the initial phase of the Geo-replication session; it remains in this state for a minute in order to make sure no abnormalities are present.
- Created: The geo-replication session is created, but not started.
- Active: The gsync daemon in this node is active and syncing the data.
- Passive: A replica pair of the active node. The data synchronization is handled by active node. Hence, this node does not sync any data.
- Faulty: The geo-replication session has experienced a problem, and the issue needs to be investigated further.
- Stopped: The geo-replication session has stopped, but has not been deleted.
- Crawl Status
- Changelog Crawl: The changelog translator has produced the changelog and that is being consumed by gsyncd daemon to sync data.
- Hybrid Crawl: The gsyncd daemon is crawling the glusterFS file system and generating pseudo changelog to sync data.
- Checkpoint Status: Displays the status of the checkpoint, if set. Otherwise, it displays as N/A.
Procedure 10.2. Viewing a Geo-replication session Details
To view the geo-replication session details, follow the steps given below:
- Click the Volumes tab. The list of volumes is displayed.
- Select the desired volume and click Geo-Replication sub-tab.
- Select the session from the Geo-Replication sub-tab.
- Click View Details. The Geo-replication details, Destination Host, Destination Volume, User Name, and Status are displayed.
10.1.3. Starting or Stopping a Geo-replication session
Important
You must create the geo-replication session before starting geo-replication. For more information, see Section 10.1.1, “Creating a Geo-replication session”
Note
Stopping Geo-replication session will fail if:
- any node that is a part of the volume is offline.
- if it is unable to stop the geo-replication session on any particular node.
- if the geo-replication session between the master and slave is not active.
To start geo-replication, follow the steps given below:
Procedure 10.3. Starting and Stopping Geo-replication session
- Click the Volumes tab. The list of volumes is displayed.
- Select the desired volume and click the Geo-Replication sub-tab.
- Select the session from the Geo-Replication sub-tab.
- Click Start or Stop to start or stop the session respectively.
Note
Click Force start session to force the operation on geo-replication session on the nodes that are part of the master volume. If it is unable to successfully perform the operation on any node which is online and part of the master volume, the command will still perform the operation on as many nodes as it can. This command can also be used to re-perform the operation on the nodes where the session has died, or the operation has not been executed.
10.1.4. Pausing or Resuming a Geo-replication session
Procedure 10.4. Pausing or Resuming Geo-replication session
- Click the Volumes tab. The list of volumes is displayed.
- Select the desired volume and click the Geo-Replication sub-tab.
- Select the session from the Geo-Replication sub-tab.
- Click Pause or Resume to pause or resume the Geo-replication session.
10.1.5. Removing a Geo-replication session
Note
You must first stop a geo-replication session before it can be deleted. For more information, see Starting or Stopping Geo-replication session section.
Procedure 10.5. Removing Geo-replication session
To remove/delete a geo-replication session, follow the steps given below:
- Click the Volumes tab. The list of volumes is displayed.
- Select the desired volume and click the Geo-Replication sub-tab.
- Select the session from the Geo-Replication sub-tab.
- Click Remove to remove the Geo-replication session.
10.1.6. Synchronizing a Geo-replication session
Procedure 10.6. Synchronizing a Geo-replication session
To synchronize a geo-replication session, follow the steps given below:
- Click the Volumes tab. The list of volumes is displayed.
- Select the desired volume and click the Geo-Replication sub-tab.
- Select the session from the Geo-Replication sub-tab.
- Click Sync. The geo-replication session is synchronized.
Note
By default:
- New Sessions and Config options for a session are synced every 1 hour.
- Existing sessions status are updated every 5 minutes.
- Session configs are also automatically synchronized whenever a config is set/reset from the Console.
10.1.7. Configuring Options for a Geo-replication
You can change the values of the geo-replication options at any point of time after creating the geo-replication session. The geo-replication session will be restarted automatically if the user changes any configuration.
Procedure 10.7. Configuring Options for a Geo-replication
To configure options for geo-replication, follow the steps given below:
- Click the Volumes tab. The list of volumes is displayed.
- Select the desired volume and click the Geo-Replication sub-tab.
- Select the session from the Geo-Replication sub-tab.
- Click Options. The Geo-Replication Options page is displayed.
- To set the config, modify the Option Value. To reset, select reset check box corresponding to the Option Key.
- Click OK. The Option Keys are modified for the Geo-Replication session.
10.1.8. Non-root Geo-replication
Geo-replication supports access to Red Hat Gluster Storage slaves through SSH using an unprivileged account (user account with non-zero UID). This method is recommended as it is more secure and it reduces the master's capabilities over slave to the minimum. This feature relies on mountbroker, an internal service of glusterd which manages the mounts for unprivileged slave accounts.
Prerequisites
- Ensure to create the geo-replication users and groups using CLI. Currently, creation of users and groups using Red Hat Gluster Storage Console is not supported.
- Ensure the presence of a home directory corresponding to the geo-rep user in every destination node.
- A user with the same user name should always exist under the home directory. If user was created using useradd command through CLI, then that user will automatically get synchronized in Red Hat Gluster Storage Console.
For more information on Geo-replication see the Geo-replication section in Red Hat Gluster Storage Administration Guide.