
Red Hat Training
A Red Hat training course is available for Red Hat Gluster Storage
Deployment Guide for Public Cloud
Deploying Red Hat Gluster Storage on Public Cloud
Abstract
Chapter 1. Red Hat Storage on Public Cloud
1.1. About glusterFS
Chapter 2. Accessing Red Hat Gluster Storage using Amazon Web Services
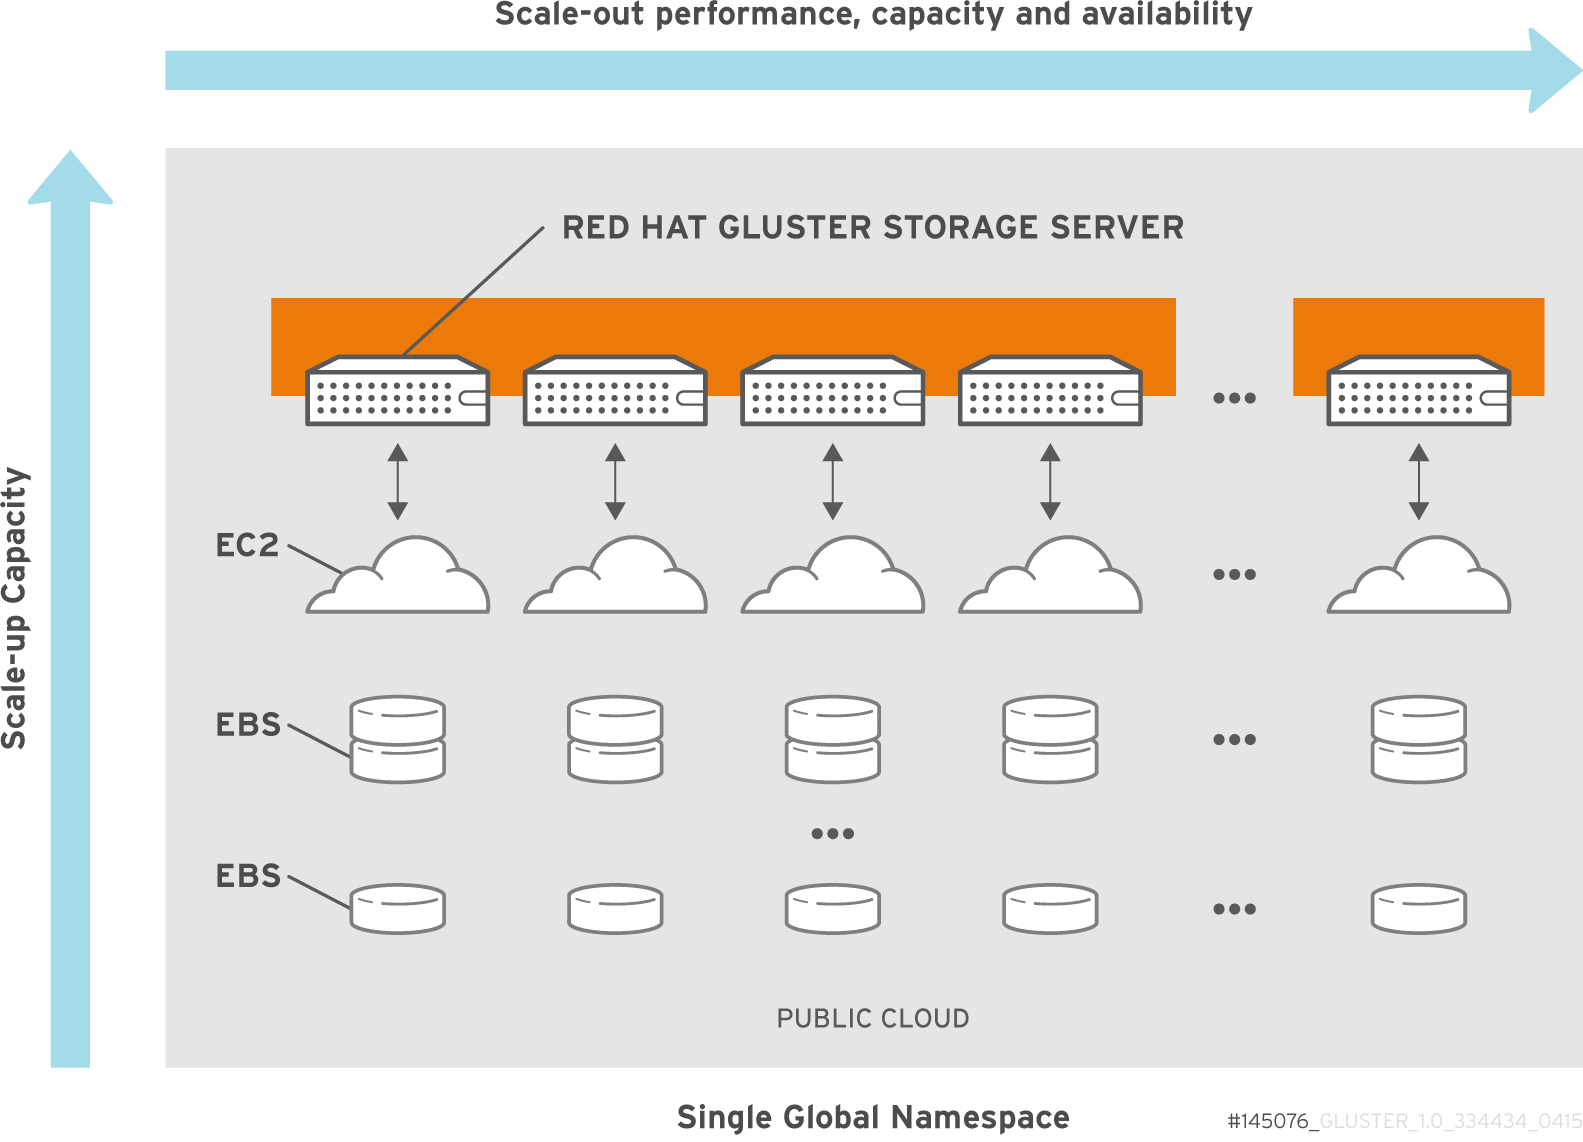
Figure 2.1. Amazon Web Services integration Architecture
Important
Note
2.1. Launching Red Hat Gluster Storage Instances
Table 2.1. Supported Configuration on Amazon Web Services
| EBS Volume Type | Minimum Number of Volumes per Instance | Maximum Number of Volumes per Instance | EBS Volume Capacity Range | Brick Range |
|---|---|---|---|---|
| Magnetic | 1 | 24 | 1 GiB - 1 TiB | 1 GiB - 24 TiB |
| General purpose SSD | 1 | 24 | 1 GiB - 16 TiB | 1GiB - 384 TiB |
| PIOPS SSD | 1 | 24 | 4 GiB - 16 TiB | 128 GiB - 384 TiB |
- There is a limit on the total provisioned IOPS per volume and the limit is 40,000. Hence, while adding 24 PIOPS SSD disks, you must ensure that the total IOPS of all disks does not exceed 40,000.
- Creation of Red Hat Gluster Storage volume snapshot is supported on magnetic, general purpose SSD and PIOPS EBS volumes. You can also browse the snapshot content using USS. See chapter Managing Snapshots in the Red Hat Gluster Storage 3.1 Administration Guide for information on managing Red Hat Gluster Storage volume snapshots.
- Tiering feature of Red Hat Gluster Storage is supported in the Amazon Web Service environment. You can attach bricks created out of PIOPS or general purpose SSD volumes as hot tier to an existing or new Red Hat Gluster Storage volume created out of magnetic EBS volumes. See chapter Managing Tiering in the Red Hat Gluster Storage 3.1 Administration Guide for information on creation of tiered volumes.
- Navigate to the Amazon Web Services home page at http://aws.amazon.com. The Amazon Web Services home page appears.
- Login to Amazon Web Services. The Amazon Web Services main screen is displayed.
- Click the Amazon EC2 tab. The Amazon EC2 Console Dashboard is displayed.

- Click Launch Instance.The Step 1: Choose an AMI screen is displayed.

- Click My AMIs and select shared with me checkbox. Click Select for the corresponding AMI and click Next: Choose an Instance Type. The Step 2: Choose an Instance Type screen is displayed.

- Select Large as the instance type, and click Next: Configure Instance Details . The Step 3: Configure Instance Details screen displays.

- Specify the configuration for your instance or continue with the default settings, and click Next: Add Storage The Step 4: Add Storage screen displays.

- In the Add Storage screen, specify the storage details and click Next: Tag Instance. The Step 5: Tag Instance screen is displayed.

- Enter a name for the instance in the Value field for Name, and click Next: Configure Security Group. You can use this name later to verify that the instance is operating correctly. The Step 6: Configure Security Group screen is displayed.

- Select an existing security group or create a new security group and click Review and Launch.You must ensure to open the following TCP port numbers in the selected security group:
- 22
- 6000, 6001, 6002, 443, and 8080 ports if Red Hat Gluster Storage for OpenStack Swift is enabled
- Choose an existing key pair or create a new key pair, and click Launch Instance.


2.2. Verifying that Red Hat Gluster Storage Instance is Running
- On the Amazon Web Services home page, click the Amazon EC2 tab. The Amazon EC2 Console Dashboard is displayed.
- Click the Instances link from the Instances section on the left. The screen displays your current instances.

- Check the Status column and verify that the instance is running. A yellow circle indicates a status of pending while a green circle indicates that the instance is running.Click the instance and verify the details displayed in the Description tab.

- Note the domain name in the Public DNS field. You can use this domain to perform a remote login to the instance.
- Using SSH and the domain from the previous step, login to the Red Hat Amazon Machine Image instance. You must use the key pair that was selected or created when launching the instance.Example:Enter the following in command line:
# ssh -i rhs-aws.pem ec2-user@ec2-23-20-52-123.compute-1.amazonaws.com
# sudo su
- At the command line, enter the following command:
# service glusterd statusVerify that the command indicates that theglusterddaemon is running on the instance.Note
Samba and NFS-Ganesha channels are disabled by default. To use standalone Samba and NFS-Ganesha, perform the following steps to enable the repos and install the relevant packages.- For enabling the Red Hat Gluster Storage Samba repo, run the following command:
# yum-config-manager --enable rhui-REGION-rh-gluster-3-samba-for-rhel-6-server-rpms
- For enabling the Red Hat Gluster Storage NFS-Ganesha repo, run the following command:
# yum-config-manager --enable rhui-REGION-rh-gluster-3-nfs-for-rhel-6-server-rpms
Important
yum update to update the Amazon EC2 Red Hat Gluster Storage AMI, follow the steps listed in https://access.redhat.com/solutions/1556793 Knowledgebase article.
2.3. Provisioning Storage
Important
2.3.1. Provisioning Storage for Two-way Replication Volumes
- Login to Amazon Web Services at http://aws.amazon.com and select the tab.
- In the select the option to add the Amazon Elastic Block Storage Volumes
- Create a thinly provisioned logical volume using the following steps:
- Create a physical volume (PV) by using the
pvcreatecommand.For example:# pvcreate --dataalignment 1280K /dev/sdb
Note
- Here,
/dev/sdbis a storage device. This command has to be executed on all the disks if there are multiple volumes. For example:# pvcreate --dataalignment 1280K /dev/sdc /dev/sdd /dev/sde ...
- The device name and the alignment value will vary based on the device you are using.
Use the correctdataalignmentoption based on your device. For more information, see section Brick Configuration in the Red Hat Gluster Storage 3.1 Administration Guide. - Create a Volume Group (VG) from the PV using the
vgcreatecommand:For example:# vgcreate --physicalextentsize 128K rhs_vg /dev/sdb
Note
Here,/dev/sdbis a storage device. This command has to be executed on all the disks if there are multiple volumes. For example:# vgcreate --physicalextentsize 128K rhs_vg /dev/sdc /dev/sdd /dev/sde ...
- Create a thin-pool using the following commands:
- Create an LV to serve as the metadata device using the following command:
# lvcreate -L metadev_sz --name metadata_device_name VOLGROUP
For example:# lvcreate -L 16776960K --name rhs_pool_meta rhs_vg
- Create an LV to serve as the data device using the following command:
# lvcreate -L datadev_sz --name thin_pool VOLGROUP
For example:# lvcreate -L 536870400K --name rhs_pool rhs_vg
- Create a thin pool from the data LV and the metadata LV using the following command:
# lvconvert --chunksize STRIPE_WIDTH --thinpool VOLGROUP/thin_pool --poolmetadata VOLGROUP/metadata_device_name --zero n
For example:# lvconvert --chunksize 1280K --thinpool rhs_vg/rhs_pool --poolmetadata rhs_vg/rhs_pool_meta --zero n
Note
By default, the newly provisioned chunks in a thin pool are zeroed to prevent data leaking between different block devices. In the case of Red Hat Gluster Storage, where data is accessed via a file system, this option can be turned off for better performance.
- Create a thinly provisioned volume from the previously created pool using the
lvcreatecommand:For example:# lvcreate -V 1G -T rhs_vg/rhs_pool -n rhs_lv
It is recommended that only one LV should be created in a thin pool.
- Format the logical volume using the following command:
#
mkfs.xfs -i size=512 DEVICEFor example, to format/dev/glustervg/glusterlv:#
mkfs.xfs -i size=512 /dev/glustervg/glusterlv - Mount the device using the following commands:
#
mkdir -p /export/glusterlv# mount /dev/glustervg/glusterlv /export/glusterlv - Using the following command, add the device to
/etc/fstabso that it mounts automatically when the system reboots:#
echo "/dev/glustervg/glusterlv /export/glusterlv xfs defaults 0 2" >> /etc/fstab
2.3.2. Provisioning Storage for Three-way Replication Volumes
- Login to Amazon Web Services at http://aws.amazon.com and select the tab.
- Create three AWS instances in three different availability zones. All the bricks of a replica pair must be from different availability zones. For each replica set, select the instances for the bricks from three different availability zones. A replica pair must not have a brick along with its replica from the same availability zone.
- Add single EBS volume to each AWS instances
- Create a thinly provisioned logical volume using the following steps:
- Create a physical volume (PV) by using the
pvcreatecommand.For example:# pvcreate --dataalignment 1280K /dev/sdb
Note
- Here,
/dev/sdbis a storage device. This command has to be executed on all the disks if there are multiple volumes. For example:# pvcreate --dataalignment 1280K /dev/sdc /dev/sdd /dev/sde ...
- The device name and the alignment value will vary based on the device you are using.
Use the correctdataalignmentoption based on your device. For more information, see section Brick Configuration in the Red Hat Gluster Storage 3.1 Administration Guide. - Create a Volume Group (VG) from the PV using the
vgcreatecommand:For example:# vgcreate --physicalextentsize 128K rhs_vg /dev/sdb
Note
Here,/dev/sdbis a storage device. This command has to be executed on all the disks if there are multiple volumes. For example:# vgcreate --physicalextentsize 128K rhs_vg /dev/sdc /dev/sdd /dev/sde ...
- Create a thin-pool using the following commands:
- Create an LV to serve as the metadata device using the following command:
# lvcreate -L metadev_sz --name metadata_device_name VOLGROUP
For example:# lvcreate -L 16776960K --name rhs_pool_meta rhs_vg
- Create an LV to serve as the data device using the following command:
# lvcreate -L datadev_sz --name thin_pool VOLGROUP
For example:# lvcreate -L 536870400K --name rhs_pool rhs_vg
- Create a thin pool from the data LV and the metadata LV using the following command:
# lvconvert --chunksize STRIPE_WIDTH --thinpool VOLGROUP/thin_pool --poolmetadata VOLGROUP/metadata_device_name
For example:# lvconvert --chunksize 1280K --thinpool rhs_vg/rhs_pool --poolmetadata rhs_vg/rhs_pool_meta
Note
By default, the newly provisioned chunks in a thin pool are zeroed to prevent data leaking between different block devices. In the case of Red Hat Gluster Storage, where data is accessed via a file system, this option can be turned off for better performance.# lvchange --zero n VOLGROUP/thin_pool
For example:# lvchange --zero n rhs_vg/rhs_pool
- Create a thinly provisioned volume from the previously created pool using the
lvcreatecommand:For example:# lvcreate -V 1G -T rhs_vg/rhs_pool -n rhs_lv
It is recommended that only one LV should be created in a thin pool.
- Format the logical volume using the following command:
#
mkfs.xfs -i size=512 DEVICEFor example, to format/dev/glustervg/glusterlv:#
mkfs.xfs -i size=512 /dev/glustervg/glusterlv - Mount the device using the following commands:
#
mkdir -p /export/glusterlv# mount /dev/glustervg/glusterlv /export/glusterlv - Using the following command, add the device to
/etc/fstabso that it mounts automatically when the system reboots:#
echo "/dev/glustervg/glusterlv /export/glusterlv xfs defaults 0 2" >> /etc/fstab
client-side quorum to avoid split-brain scenarios, unavailability of two zones would make the access read-only.
2.4. Stopping and Restarting Red Hat Gluster Storage Instance
Chapter 3. Accessing Red Hat Gluster Storage using Microsoft Azure
The architecture of Microsoft Azure itself shapes the way solutions are designed. Microsoft Azure offers a cloud service that can function either as a platform-as-a-service (PaaS) or infrastructure-as-a-service (IaaS) environment. For Gluster Storage, the cloud service should be an IaaS layer that provides a logical container to deploy virtual instances to. Within the IaaS container, Microsoft Azure provides network services like DNS and DHCP, which makes managing the virtual instances similar to managing a physical deployment.
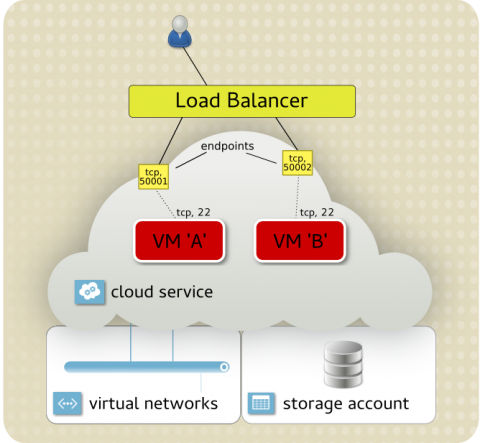
Figure 3.1. integration Architecture
cloudapp.net domain. Access to instances inside the cloud service is done by specifying the cloud service name and TCP port (endpoint). Most typically, this is SSH access. For example, you may have 30 virtual instances running inside a cloud service, so accessing them individually is done by exposing a different endpoint for each instance: 50,001 links to port 22 on instance A, and 50,002 links to port 22 on instance B.

Figure 3.2. Microsoft Azure and Red Hat Gluster Storage workflow
Important
3.1. Image Profile and Sizing
Note
/mnt/resource and is configured by the Windows Azure Linux Agent to provide swap space and temporary storage for applications.
- A virtual disk has a maximum size of 1023 GB. Larger disk sizes can be accommodated by aggregating multiple 1023 GB disks together.
- Once a disk has been defined, its size cannot be changed easily. Because capacity costs in Microsoft Azure Standard Storage are based on use, not allocated space, it is recommended that all disks assigned to a Red Hat Gluster Storage node are 1023 GB.
- Although attributes like CPU, RAM, and disk count can be easily changed after an instance is created, networking characteristics cannot. When planning your configuration, consider the network topology and connectivity you need before the instance are created. Microsoft Azure instance supports multiple network cards and multiple virtual networks, but these types of advanced networking features are only configurable using the Windows Powershell.
3.2. Prerequisites
- Install the Microsoft Azure CLI based on the instructions listed at https://access.redhat.com/articles/uploading-rhel-image-to-azure#install-the-azure-cross-platform-cli-on-your-azure-administration-server-6.
- Migrate your subscriptions from Red Hat to Microsoft Azure based on the instructions listed at https://access.redhat.com/articles/migrating-to-red-hat-cloud-access.
3.3. Planning Guidelines
- Designate a management server for interaction and control with Microsoft Azure services. For simple Gluster Storage deployments (single site, single NIC), the management platform can be a Linux server/workstation. For more complex deployments, a Windows desktop with Powershell is recommended.
- Build custom images based on Red Hat Enterprise Linux 7 with the Hyper-V drivers included within the initramfs file. Instances will fail to start if these drivers are not present.
- Use a virtual network for your Red Hat Gluster Storage nodes.
- For geo-replication, deploy a common
/etc/hostsfile to all nodes or use a shared DNS server. - Pricing for standard storage is based on used capacity. It therefore makes sense to use the maximum size for data disks (1023 GB) and allocate as many as the instance supports at install time to minimize future administration overheads.
- If NFS is the preferred way to connect to the Gluster Storage nodes, consider using a
Dseries instance that has a more modern CPU with a higher clock speed. - Use availability sets to group Gluster Storage nodes within a replication set together to enhance availability.
- Use
mdadmto combine disks to form a larger disk. - Use fewer, larger virtual machines to deliver the highest capacity.
- For highly available data access, use a replicated GlusterFS volume with the native
glusterfsclient. - Use a non-default SSH port for public access to the SSH services running on each of the Gluster Storage nodes (that is, use --ssh with vm create ).
3.4. Setting up Red Hat Gluster Storage in Microsoft Azure
3.4.1. Obtaining Red Hat Gluster Storage for Microsoft Azure
- Visit the Red Hat Customer Service Portal at https://access.redhat.com/login and enter your user name and password to log in.
- Click Downloads to visit the Software & Download Center.
- In the Red Hat Gluster Storage Server area, click to download the latest version of the
VHDimage.
3.4.2. Define the Network Topology
- Create the cloud service for the Gluster Storage nodes.
# azure service create --serviceName service_name --location location
For example,# azure service create --serviceName rhgs313-cluster --location "East US" info: Executing command service create + Creating cloud service data: Cloud service name rhgs313-cluster info: service create command OK
cloudapp.netwill be appended to the service name, and the full service name will be exposed directly to the Internet. In this case,rhgs313-cluster.cloudapp.net. - Create a virtual network for the Gluster Storage nodes to connect to. In this example, the network is created within the East US location.
# azure network vnet create --vnet "rhgs313-vnet" --location "East US" --address-space 10.18.0.0 --cidr 16
info:    Executing command network vnet create
info:    Using default subnet start IP: 10.18.0.0
info:    Using default subnet cidr: 19
+ Looking up network configuration
+ Looking up locations
+ Setting network configuration
info:    network vnet create command OK
3.4.3. Resizing Virtual Hard Disks
"The VHD http://mystorageaccount.blob.core.windows.net/vhds/MyLinuxVM.vhd has an unsupported virtual size of 21475270656 bytes. The size must be a whole number (in MBs).”qemu-img to convert (if needed) and resize the VHD.
Note
- Resizing the VHD directly using tools such as
qemu-imgorvbox-managemay result in an unbootable VHD. So it is recommended to first convert the VHD to a RAW disk image. If the VM image was already created as RAW disk image (the default for some Hypervisors such as KVM) then you may skip this step:# qemu-img convert -f vpc -O raw rhgs313-cluster.vhd rhgs313-cluster.raw
- Calculate the required size of the disk image to ensure that the virtual size is aligned to 1MB. The following bash shell script can assist with this. The script uses
qemu-img infoto determine the virtual size of the disk image and then calculates the size to the next 1MB:rawdisk="rhgs313-cluster.raw" vhddisk="rhgs313-cluster.vhd" MB=$((1024*1024)) size=$(qemu-img info -f raw --output json "$rawdisk" | \ gawk 'match($0, /"virtual-size": ([0-9]+),/, val) {print val[1]}') rounded_size=$((($size/$MB + 1)*$MB)) echo "Rounded Size = $rounded_size" - Resize the raw disk using
$rounded_sizeas set in the above script:# qemu-img resize rhgs31-cluster.raw $rounded_size
- Now, convert the RAW disk back to a fixed-size VHD:
# qemu-img convert -f raw -o subformat=fixed -O rhgs313-cluster.raw rhgs313-cluster.vhd
3.4.4. Upload the Disk Image to Microsoft Azure
Note
# azure vm image create image_name --location location --os linux VHD_image_name
 # azure vm image create rhgs-3.1.3 --location "East US" --os linux rhgs313.vhd
 info:    Executing command vm image create
+ Retrieving storage accounts
info:    VHD size : 20 GB
info:    Uploading 20973568.5 KB
Requested:100.0% Completed:100.0% Running:   0 Time: 7m50s Speed:  3876 KB/s
info:    https://bauderhel7.blob.core.windows.net/vm-images/rhgs313.vhd was uploaded successfully
info:    vm image create command OK
# azure vm image list | awk '$3 == "User" {print $2;}'Note
awk is used to display only the images added under the Microsoft Azure account.
3.4.5. Deploy the Gluster Storage Instances
- To create instances from the prepared image
# azure vm create --vm-name vm_name --availability-set name_of_the_availability_set --vm-size size --virtual-network-name vnet_name --ssh port_number --connect cluster_name username_and_password
For example,# azure vm create --vm-name rhgs313-1 --availability-set AS1 -S 10.18.0.11 --vm-size Medium --virtual-network-name rhgs313-vnet --ssh 50001 --connect rhgs313-cluster rhgs-3.1.3 rhgsuser 'AzureAdm1n!' info: Executing command vm create + Looking up image rhgs-313 + Looking up virtual network + Looking up cloud service + Getting cloud service properties + Looking up deployment + Creating VM info: OK info: vm create command OK
- Adding 1023 GB data disk to each of the instances.
# azure vm disk attach-new VM_name 1023
For example# azure vm disk attach-new rhgs313-1 1023 info: Executing command vm disk attach-new + Getting virtual machines + Adding Data-Disk info: vm disk attach-new command OK
- Perform the above steps of creating instances and attaching disks for all the instances
- Confirm that the instances have been properly created:
# azure vm list
# azure vm show vm-name
- A Microsoft Azure availability set provides a level of fault tolerance to the instances it holds, protecting against system failure or planned outages. This is achieved by ensuring instances within the same availability set are deployed across different fault and upgrade domains within a Microsoft Azure datacenter.
- When Gluster Storage replicates data between bricks, associate the replica sets to a specific availability set. By using availability sets in the replication design, incidents within the Microsoft Azure infrastructure cannot affect all members of a replica set simultaneously.
- Each instance is assigned a static IP (
-S) within therhgs-- virtual network and an endpoint added to the cloud service to allow SSH access (--ssh port). - There are single quotation marks (') around the password to prevent bash interpretation issues.
Following is the example for creating four instances from the prepared image.
- They are named
rhgs31-n. - Their IP address are 10.18.0.11 to 10.18.0.14.
azure vm create), they can be added to the same availability set (--availability-set).
for i in 1 2 3 4; do as=$((i/3)); azure vm create --vm-name rhgs31-$i --availability-set AS$as -S 10.18.0.1$i --vm-size Medium --virtual-network-name rhgs-vnet --ssh 5000$i --connect rhgs-cluster rhgs3.1 rhgsuser 'AzureAdm1n!'; done
for node in 1 2 3 4; do for disk in 1 2 3 4; do azure vm disk attach-new rhgs31-$node 1023; done ; done
# azure vm list
# azure vm show vm-name
Note
3.4.6. Configure the Gluster Storage Cluster
Note
- Log into each node.
# ssh rhgsuser@rhgs313-cluster.cloudapp.net -p 50001
- Register each node to Red Hat Network using the
subscription-managercommand, and attach the relevant Red Hat Storage subscriptions.For information on registering to the Red Hat Network, see https://access.redhat.com/documentation/en-US/Red_Hat_Storage/3.1/html-single/Installation_Guide/index.html#chap-Installing_Red_Hat_Storage-Subscribing-RHGS - Update each node to ensure the latest enhancements and patches are in place.
# yum update
- Follow the instructions in the Red Hat Gluster Storage Administration Guide to create the trusted storage pool: https://access.redhat.com/documentation/en-US/Red_Hat_Storage/3.1/html/Administration_Guide/chap-Trusted_Storage_Pools.html.
3.5. Appendix - Creating a Custom Disk Image from ISO
- Download the latest ISO for Gluster Storage from here: https://access.redhat.com/downloads/content/186/ver=3.1/rhel---7/3.1/x86_64/product-software
- Using
virt-manager, create a qcow2 image with two cores, 4 GB RAM, 20 GB virtio HDD, and a single NIC. - Boot the instance from the ISO image and complete the installation of Gluster Storage. Do not allocate swap space since the Windows Azure agent sets up an ephemeral disk at runtime for swap space.
- Reboot the instance and log in.
- Set a generic hostname.On Red Hat Enterprise Linux 7:
# hostnamectl set-hostname localhost.localdomain
On Red Hat Enterprise Linux 6:# vim /etc/sysconfig/network NETWORKING=yes HOSTNAME=localhost.localdomain
- Confirm that DHCP is configured in
/etc/sysconfig/network-scripts/ifcfg-eth0.DEVICE=eth0 ONBOOT=yes BOOTPROTO=dhcp IPV6INIT=no TYPE=Ethernet USERCTL=no PEERDNS=yes
- Update the udev rules to avoid conflicts with Microsoft Azure and Hyper-V.
# rm -f /etc/udev/rules.d/70-persistent-net.rules
# rm -f /lib/udev/rules.d/75-persistent-net-generator.rules
- On Red Hat Enterprise Linux 7, apply the default firewall rules for Gluster Storage. These rulesets are used for inter-node communication, the GlusterFS client, and NFS.
# firewall-cmd --zone=public --add-service=glusterfs --permanent
# firewall-cmd --zone=public --add-service=nfs --add-service=rpc-bind --permanent
- Register the virtual machine.
# subscription-manager register --auto-attach
# subscription-manager repos --disable=*
- Enable the Extras and Gluster Storage repositories. This is either rhel-6- or rhel-7-.
# subscription-manager repos --enable rhel-7-server-rpms --enable rhel-7-server-extras-rpms --enable rh-gluster-3-for-rhel-7-server-rpms
- Update the system and install the Microsoft Azure Linux agent.
# yum update –y
# yum –y install WALinuxAgent
- Disable any swap space defined during the Gluster Storage installation. This is required on Red Hat Enterprise Linux 7. Microsoft Azure allocates ephemeral storage at runtime, which is used for swap, so swap space does not need to be explicitly defined.
# swapoff -v /dev/rhgs/swap
# sed -i '/.* swap/d' /etc/fstab
On Red Hat Enterprise Linux 6, the installer enables disk configuration to be changed, so the swap is not defined. However, if a logical volume was created, then remove the configuration as on RHEL 7. - Red Hat Enterprise Linux 7 only. A Linux virtual machine running in Azure requires the hv_storvsc and hv_vmbus drivers within the initramfs image. The Red Hat Enterprise Linux 6 installer includes these drivers automatically, but under Red Hat Enterprise Linux 7, the installer only adds these drivers if Hyper-V devices are detected at installation time. When building a virtual machine image using virt-manager, add these Hyper-V drivers manually.
- Add the following content to
/etc/dracut.conf.. - Regenerate
initramfs.# dracut -f -v
- Update the kernel boot settings.On Red Hat Enterprise Linux 7:
- Set the GRUB_CMDLINE_LINUX variable in /etc/default/grub.
``rd.lvm.lv=rhgs/root console=ttyS0 earlyprintk=ttyS0 rootdelay=300
- Refresh the grub2 configuration.
# grub2-mkconfig -o /boot/grub2/grub.cfg
- Remove the rhqb, quiet, or crashkernel=auto parameters.
On Red Hat Enterprise Linux 6:- Update the kernel boot line in /boot/grub/menu.lst:
console=ttyS0 earlyprintk=ttyS0 rootdelay=300 numa=off
- Remove the rhqb, quiet, or crashkernel=auto parameters.
- Enable the Windows Azure agent to start at boot.
- On Red Hat Enterprise Linux 7:.
# systemctl enable waagent
- On Red Hat Enterprise Linux 6:.
# chkconfig waagent on
- Unregister the virtual machine using Red Hat Subscription Manager.
# subscription-manager unregister
- De-provision the instance to remove the local settings; this allows the instance to be used as a disk image within Microsoft Azure.
# yum clean all
# waagent -force -deprovision
# export HISTSIZE=0
# poweroff
- Dump the XML of the instance to find the filename of the virtual disk that was created, and convert it to a Microsoft Azure compatible VHD file. In this example, the instance was initially created using the
qcow2disk format.# virsh dumpxml image-name # qemu-img convert -f qcow2 -O vpc -o subformat=fixed -O vpc rhgs313.qcow2 rhgs313.vhd
3.6. Appendix - Performance Categorization
3.6.1. Storage Type
3.6.2. Bandwidth
iperf to determine the upper limit between the client and Red Hat Gluster Storage node. This testing showed that a single network interface can be expected to deliver between 600 - 700 Mbit.
3.6.3. Disk Latencies
mdadm tool. The LUN was then configured using recommended best practices, based on LVM, dm-thinp, and the XFS file system. The fio tool was then used to reveal the random read profile of the underlying disks at increasing levels of concurrency.
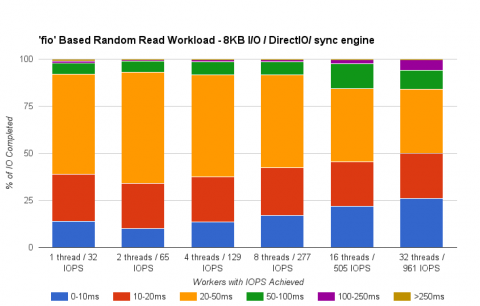
Figure 3.3. Disk Latencies
- Typical latencies are in the 20 - 50 ms range.
- Attaining higher IOPS requires a multi-threaded workload; that is, one thread=32 IOPS, 32 threads = 961 IOPS.
- Combining the virtual drives with
mdadmallows the LUN to deliver IOPS beyond that of a single virtual disk.
3.6.4. GlusterFS
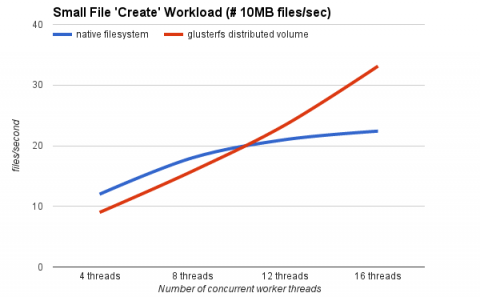
Figure 3.4. Gluster Performance: Small File "Create" Workload
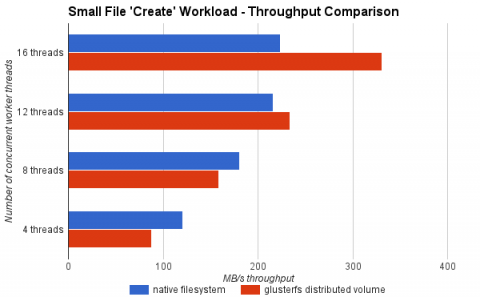
- Although the native file system starts well, a performance cross-over occurs between 8 - 12 threads, with the native file system fading and the GlusterFS volume continuing to scale.
- The throughput of the GlusterFS volume scales linearly with the increase in client workload.
- At higher concurrency, the GlusterFS volume outperforms the local file system by up to 47%.
- During high concurrency, the native file system slows down under load. Examining the disk subsystems statistics during the test run revealed the issue was increased I/O wait times (70 - 90%).
Chapter 4. Using Red Hat Gluster Storage in the Google Cloud Platform
The Google Cloud Platform is Google’s public cloud offering, which provides many services to run a fully integrated cloud-based environment. The Google Compute Engine is what drives and manages the virtual machine environment. This chapter is based on this virtual machine infrastructure. This virtual framework provides networking, storage, and virtual machines to scale out the Red Hat Gluster Storage environment to meet the demands of the specified workload.
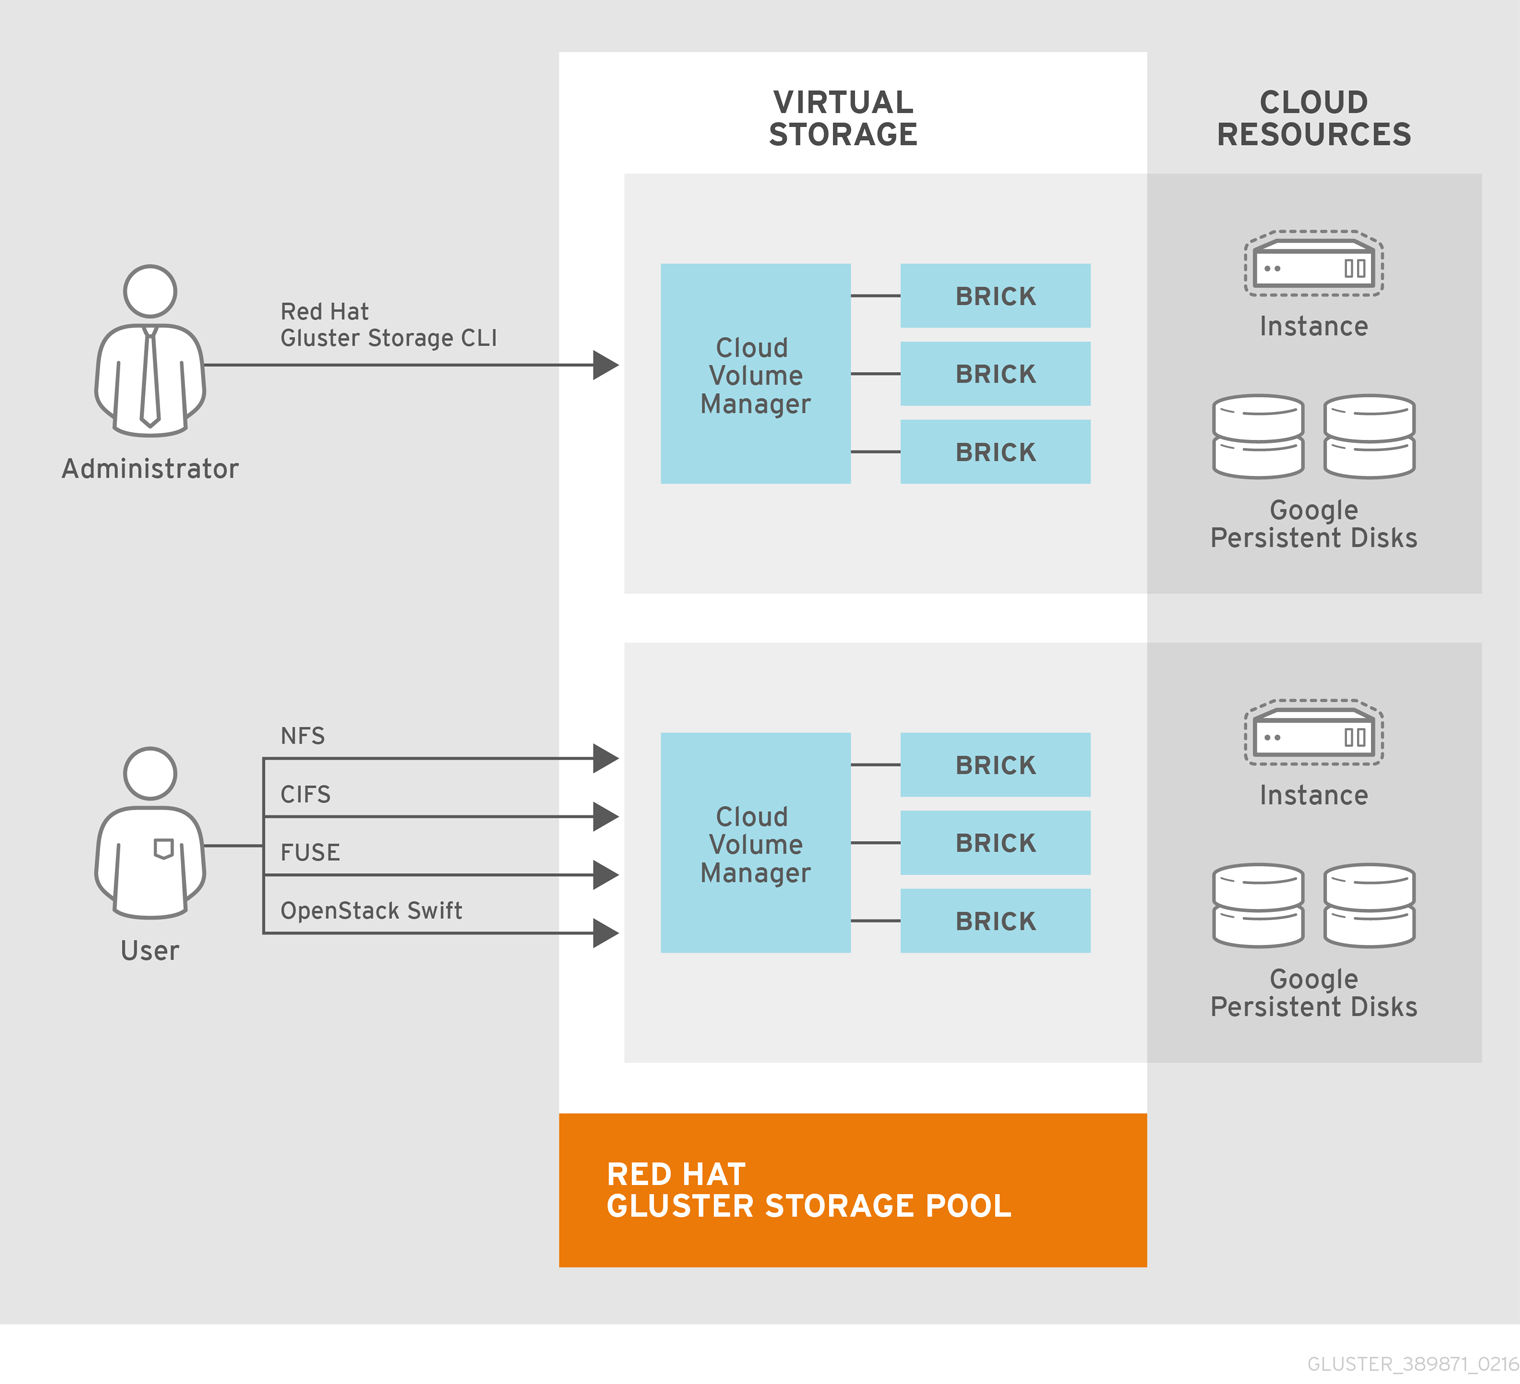
Figure 4.1. Integration Architecture
4.1. Planning your Deployment
The original test build was limited by the maximum per-VM persistent disk size of 10 TB. Google has since increased that limit to 64 TB. Red Hat will support persistent disks per VM up to Google's current maximum size of 64 TB. (Note that 64 TB is both a per-disk and a per-VM maximum, so the actual data disk maximum will be 64 TB minus the operating system disk size.)
4.1.1. Environment
4.1.2. Prerequisites
- Google account
- Google Cloud SDK. The Google Cloud SDK contains tools and libraries that enable you to easily create and manage resources on Google Cloud Platform. It will be used later to facilitate the creation of the multiple Red Hat Gluster Storage instances . For instructions to setup and install the Google Cloud SDK, see https://cloud.google.com/sdk.
- Subscription to access the Red Hat Gluster Storage software channels. For information on subscribing to the Red Hat Gluster Storage 3.1 channels, see https://access.redhat.com/documentation/en-US/Red_Hat_Storage/3.1/html-single/Installation_Guide/index.html#chap-Installing_Red_Hat_Storage-Subscribing-RHGS.
4.1.3. Primary Storage Pool Configuration
- Red Hat Gluster Storage configured in a 10 x 2 Distribute-Replicate volume
- 20 x n1-highmem-4 instances:
Resource Specification vCPU 4 Memory 26 GB Boot Disk 20 GB standard persistent disk Data Disk 10,220 GB standard persistent disk. The maximum persistent disk allocation for a single instance is 10 TB. Therefore the maximum size of our data disk is necessarily 10 TB minus the 20 GB size of the boot disk, or 10,220 GB. Image Custom Red Hat Gluster Storage 3.1 on Red Hat Enterprise Linux 7 - VM zone allocation:Each Gluster synchronous replica pair is placed across zones in order to limit the impact of a zone failure. A single zone failure will not result in a loss of data access. Note that the setting synchronous replica pairs is a function of the order the bricks defined in the
gluster volume createcommand.

4.1.4. Secondary Storage Pool Configuration
- Gluster configured in a 10 x 1 Distribute volume
- 10 x n1-highmem-4 instances:
Resource Specification vCPU 4 Memory 24 GB Boot Disk 20 GB standard persistent disk Data Disk 10,220 GB standard persistent disk Image Custom Red Hat Gluster Storage 3.1 on Red Hat Enterprise Linux 7 - VM zone allocation:The secondary storage pool as designed as a receiver of asynchronous replication, via geo-replication, in a remote region for disaster recovery. To limit the cost of this protective layer, this storage pool is not synchronously replicated within its local region and a distribute-only gluster volume is used. In order to limit the potential impact of an outage, all nodes in this region are placed in the same zone.

4.1.5. Client Configuration
- 10 x n1-standard-2 instances:
Resource Specification vCPU 2 Memory 7.5 GB Boot Disk 10 GB standard persistent disk Image Custom Red Hat Gluster Storage 3.1 on Red Hat Enterprise Linux 7
4.1.6. Trusted Pool Topology

4.1.7. Obtaining Red Hat Gluster Storage for Google Cloud Platform
- Visit the Red Hat Customer Service Portal at https://access.redhat.com/login and enter your user name and password to log in.
- Click Downloads to visit the Software & Download Center.
- In the Red Hat Gluster Storage Server area, click to download the latest version of the
qcow2image.
4.2. Setting up Google Compute Engine
4.2.1. SSH Keys
- Generate SSH keypair for use with Google Compute Engine using the following command:
# ssh-keygen -t rsa -f ~/.ssh/google_compute_engine
- In the Google Developers Console, click Computer > Compute Engine > Metadata > SSH Keys > Edit.

- Enter the output generated from
~/.ssh/google_compute_engine.pubfile, and click Save.
- To enable SSH agent to use this identity file for each new local console session, run the following command on the console:
# ssh-add ~/.ssh/google_compute_engine
- Adding the below line to your
~/.ssh/configfile helps you automate this command.IdentityFile ~/.ssh/google_compute_engine
- You can now connect via standard SSH to the new VM instances created in your Google Compute Engine project.
# ssh -i ~/.ssh/google_compute_engine <username>@<instance_external_ip>
~/.ssh/config file with aliases that allows simple SSH connections by instance name.
4.2.2. Setting up Quota
- Local region (see US-CENTRAL1 illustration in Section 4.1.3, “Primary Storage Pool Configuration”)
- Total persistent disk reserved (GB) >= 206,000
- CPUs >= 100
- Remote region (see EUROPE-WEST1 illustration in Section 4.1.4, “Secondary Storage Pool Configuration”)
- Total persistent disk reserved (GB) >= 103,000
- CPUs >=40
4.3. Converting qcow2 to .raw Format
qcow2 image to .raw format using the following command:
# qemu-img convert image_name disk.raw
# qemu-img convert RHGS-3.1.3-9.x86_64.qcow2 disk.raw
4.4. Packaging the Image for Google Compute Engine
# tar -czSf disk.raw.tar.gz disk.raw
4.5. Uploading the Image into Google Cloud Storage
gcloud auth login command before uploading the image to the Google cloud. Running the command will open a browser and prompts for google account credentials. The PROJECT_ID is set by default and follow the subsequent CLI instructions and make changes if required.
gsutil command to create the storage bucket and upload the image.
# gsutil mb gs://rhgs_image_upload
# gsutil cp disk.raw.tar.gz gs://rhgs_image_upload
4.6. Importing the Image into Google Compute Engine
# gcloud compute images create rhgs31 --source-uri gs://rhgs_image_upload/disk.raw.tar.gz
4.7. Creating a VM Instance to Configure the Disks for Red Hat Gluster Storage Instances
- In the Google Developers Console, click Compute > Compute Engine > VM instances > Create Instance.
 The Create Instance window is displayed.
- Enter the following in the Create a new instance window and click Create.
- Name: rhgs-primary-n01
- Zone: us-central1-a
- Machine type: n1-highmem-4 (4 vCPUs, 26 GB memory)
- Boot disk: New 20 GB standard persistent disk
- Image: rhgs31 (our uploaded image file)
4.8. Creating the Initial Data Disk
- In the Google Developers Console, click Compute > Compute Engine > Disks > New disk.

- Enter the following in the New Disk window and click Create.
- Name: rhgs-primary-n01-data
- Zone: us-central1-a
- Disk Type: Standard persistent disk
- Source Type: None (blank disk)
- Size (GB): 10220
4.9. Attaching and Configuring the Data Disk
- From the Google Developers Console, click Compute > Compute Engine > VM instances > rhgs-primary-n01 > Attach > rhgs-primary-n01-data.

- Choose the mode as Read/write.

- Connect to the rhgs-primary-n01 instance via SSH, and configure the data disk:
# ssh username@instance_external_ip
- Confirm the data disk is visible as /dev/sdb:
# fdisk -l /dev/sdb

Disk /dev/sdb: 10984.4 GB, 10984378859520 bytes
255 heads, 63 sectors/track, 1335441 cylinders
Units = cylinders of 16065 * 512 = 8225280 bytes
Sector size (logical/physical): 512 bytes / 4096 bytes
I/O size (minimum/optimal): 4096 bytes / 4096 bytes
Disk identifier: 0x00000000
- Configure LVM, format the filesystem, and mount the data disk:The script below can be used to complete this process per documented recommendations.
Warning
This script assumes a large enough block device to accommodate the maximum supported metadata LV size of 16 GB for LVM thin provisioning needed for snapshots. You should understand what each step in the script is doing before using it.#!/bin/bash pvcreate /dev/sdb vgcreate rhgs_vg /dev/sdb # Create metadata LV with the maximum supported size of 16GB lvcreate -L 16777216K --name rhgs_pool_meta rhgs_vg # Create data LV with the remainder of the VG space lvcreate -l 100%FREE --name rhgs_pool rhgs_vg # The lvconvert command below required 4096 free extents, so reduce the LV lvreduce -f -l 4096 /dev/rhgs_vg/rhgs_pool # Convert our LVs to a thin pool lvconvert --yes --thinpool rhgs_vg/rhgs_pool --poolmetadata rhgs_vg/rhgs_pool_meta # Disable zeroing of thin pool chunks for performance boost lvchange --zero n rhgs_vg/rhgs_pool # The -V flag for lvcreate does not allow a ‘100%FREE’ option like -l does. # So we’ll get the size of rhgs_pool from lvs for maximum efficiency LVSIZE=$(lvs --units g | grep rhgs_pool | awk '{print $4}' | awk -F. '{print $1}') # Create the thin LV for the bricks lvcreate -V ${LVSIZE}G -T rhgs_vg/rhgs_pool -n rhgs_lv # Create the XFS filesystem with 512B inode size and 8KB directory block size # This step may take a while... mkfs.xfs -f -i size=512 -n size=8192 -L rhgs_lv /dev/rhgs_vg/rhgs_lv # Create mountpoint and fstab entry mkdir -p /rhgs/bricks echo "LABEL=rhgs_lv /rhgs/bricks xfs rw,inode64,noatime,nouuid 1 2" >> /etc/fstab mount /rhgs/bricks df -h /rhgs/bricks
4.10. Detaching the Disks for the Image Creation Process
- In the Google Developers Console, click Compute > Compute Engine > VM instances > rhgs-primary-n01.
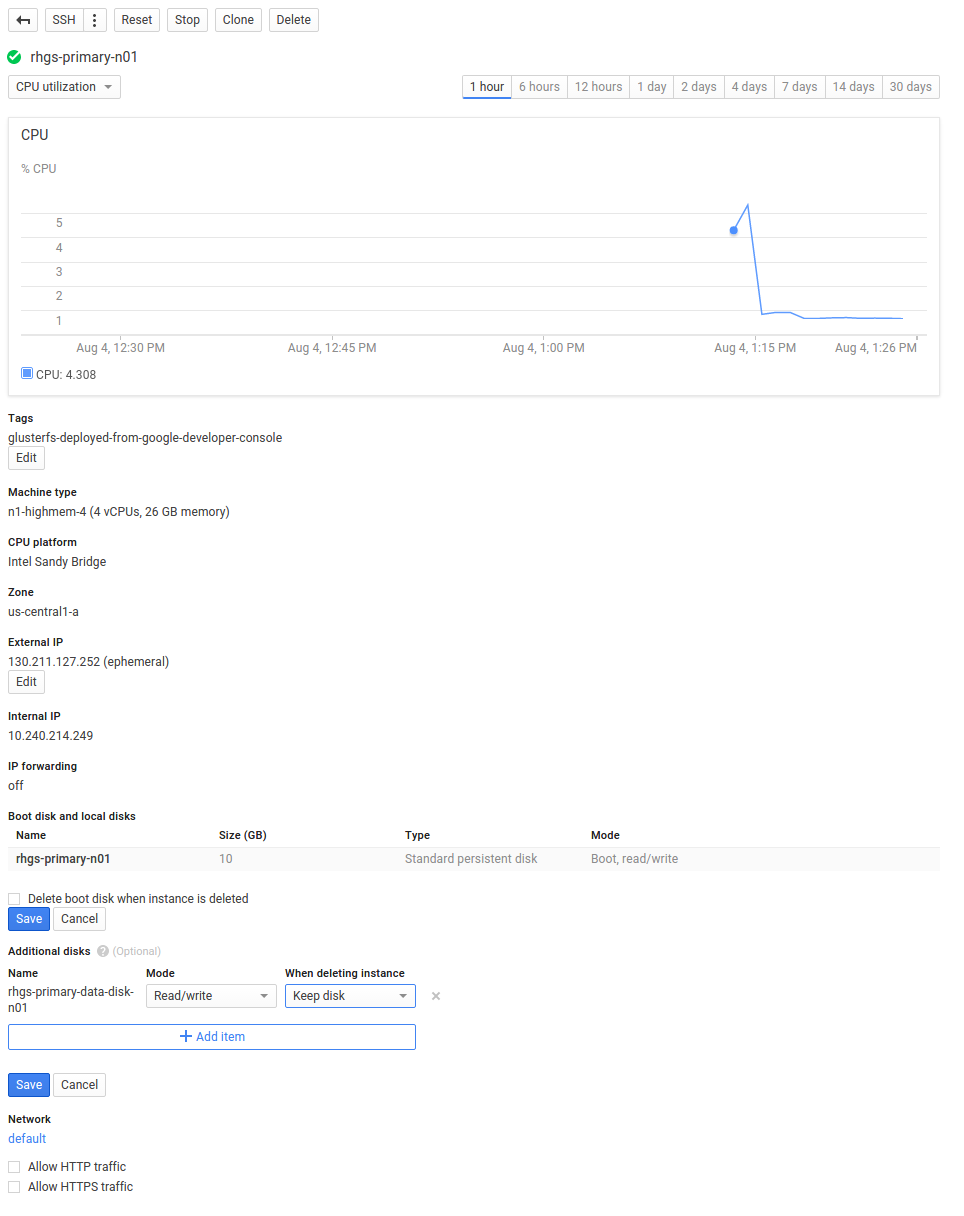 Scroll down to the Disks section (there should be one for the boot disk and one for the additional disks). Ensure that the checkbox delete boot disk when instance is deleted is unchecked and the option for When deleting instance is selected the additional disk shows Keep disk.Now, click Delete on the top to delete the VM instance.
4.11. Creating Multiple Red Hat Gluster Storage Instances Using Images
- Creating an image of the rhgs-primary-n01 as Root persistent disk.In the Google Developers Console, click Compute > Compute Engine > Images > New image.
 The Create a new image window is displayed.
 Enter the following in Create a new image window and click Create .
- Name: rhgs-image01
- Source disk: rhgs-primary-n01
- Creating an image of the rhgs-primary-n01-data as Data persistent disk.In the Google Developers Console, click Compute > Compute Engine > Images > New image .Enter the following in Create a new image window and click Create .
- Name: rhgs-data-image01
- Source disk: rhgs-primary-n01-data
4.12. Using Google Cloud Deployment Manager to Deploy Multiple Instances
- Login and authenticate to Google Cloud by following the steps listed at https://cloud.google.com/sdk/gcloud/#gcloud.auth.
- Copy the configuration contents in the Section 4.16, “Appendix: Configuration files for Red Hat Gluster Storage Deployment”.
- Run the following gcloud command:
# gcloud deployment-manager deployments create rghs --config glusterfs-config.yaml
4.13. Configuring Red Hat Gluster Storage
4.13.1. Peer the Nodes
# for i in {02..20};
 do gluster peer probe rhgs-primary-n${i};
 done
# gluster peer status | grep Hostname | grep -v rhgs
Hostname: 10.240.21.133
# gluster peer probe rhgs-primary-n01
peer probe: success.
# gluster peer status | grep Hostname | grep n01
Hostname: rhgs-primary-n01
# for i in {02..10};
 do gluster peer probe rhgs-secondary-n${i};
done# gluster peer probe rhgs-secondary-n01
4.13.2. Creating Distribute-Replicate Volumes
# gluster volume create myvol replica 2 \
 rhgs-primary-n01:/rhgs/bricks/myvol rhgs-primary-n02:/rhgs/bricks/myvol \
 rhgs-primary-n03:/rhgs/bricks/myvol rhgs-primary-n04:/rhgs/bricks/myvol \
 rhgs-primary-n05:/rhgs/bricks/myvol rhgs-primary-n06:/rhgs/bricks/myvol \
 rhgs-primary-n07:/rhgs/bricks/myvol rhgs-primary-n08:/rhgs/bricks/myvol \
rhgs-primary-n09:/rhgs/bricks/myvol rhgs-primary-n10:/rhgs/bricks/myvol \
 rhgs-primary-n11:/rhgs/bricks/myvol rhgs-primary-n12:/rhgs/bricks/myvol \
 rhgs-primary-n13:/rhgs/bricks/myvol rhgs-primary-n14:/rhgs/bricks/myvol \
 rhgs-primary-n15:/rhgs/bricks/myvol rhgs-primary-n16:/rhgs/bricks/myvol \
 rhgs-primary-n17:/rhgs/bricks/myvol rhgs-primary-n18:/rhgs/bricks/myvol \
 rhgs-primary-n19:/rhgs/bricks/myvol rhgs-primary-n20:/rhgs/bricks/myvol
volume create: myvol: success: please start the volume to access data

# gluster volume start myvol
volume start: myvol: success

# gluster volume info myvol
Volume Name: myvol
Type: Distributed-Replicate
Volume ID: f093e120-b291-4362-a859-8d2d4dd87f3a
Status: Started
Snap Volume: no
Number of Bricks: 10 x 2 = 20
Transport-type: tcp
Bricks:
Brick1: rhgs-primary-n01:/rhgs/bricks/myvol
Brick2: rhgs-primary-n02:/rhgs/bricks/myvol
Brick3: rhgs-primary-n03:/rhgs/bricks/myvol
Brick4: rhgs-primary-n04:/rhgs/bricks/myvol
Brick5: rhgs-primary-n05:/rhgs/bricks/myvol
Brick6: rhgs-primary-n06:/rhgs/bricks/myvol
Brick7: rhgs-primary-n07:/rhgs/bricks/myvol
Brick8: rhgs-primary-n08:/rhgs/bricks/myvol
Brick9: rhgs-primary-n09:/rhgs/bricks/myvol
Brick10: rhgs-primary-n10:/rhgs/bricks/myvol
Brick11: rhgs-primary-n11:/rhgs/bricks/myvol
Brick12: rhgs-primary-n12:/rhgs/bricks/myvol
Brick13: rhgs-primary-n13:/rhgs/bricks/myvol
Brick14: rhgs-primary-n14:/rhgs/bricks/myvol
Brick15: rhgs-primary-n15:/rhgs/bricks/myvol
Brick16: rhgs-primary-n16:/rhgs/bricks/myvol
Brick17: rhgs-primary-n17:/rhgs/bricks/myvol
Brick18: rhgs-primary-n18:/rhgs/bricks/myvol
Brick19: rhgs-primary-n19:/rhgs/bricks/myvol
Brick20: rhgs-primary-n20:/rhgs/bricks/myvol
Options Reconfigured:
performance.readdir-ahead: on
auto-delete: disable
snap-max-soft-limit: 90
snap-max-hard-limit: 256
Distribute set
|
+-- Replica set 0
|    |
|    +-- Brick 0: rhgs-primary-n01:/rhgs/bricks/myvol
|    |
|    +-- Brick 1: rhgs-primary-n02:/rhgs/bricks/myvol
|
+-- Replica set 1
|    |
|    +-- Brick 0: rhgs-primary-n03:/rhgs/bricks/myvol
|    |
|    +-- Brick 1: rhgs-primary-n04:/rhgs/bricks/myvol
|
+-- Replica set 2
|    |
|    +-- Brick 0: rhgs-primary-n05:/rhgs/bricks/myvol
|    |
|    +-- Brick 1: rhgs-primary-n06:/rhgs/bricks/myvol
|
+-- Replica set 3
|    |
|    +-- Brick 0: rhgs-primary-n07:/rhgs/bricks/myvol
|    |
|    +-- Brick 1: rhgs-primary-n08:/rhgs/bricks/myvol
|
+-- Replica set 4
|    |
|    +-- Brick 0: rhgs-primary-n09:/rhgs/bricks/myvol
|    |
|    +-- Brick 1: rhgs-primary-n10:/rhgs/bricks/myvol
|
+-- Replica set 5
|    |
|    +-- Brick 0: rhgs-primary-n11:/rhgs/bricks/myvol
|    |
|    +-- Brick 1: rhgs-primary-n12:/rhgs/bricks/myvol
|
+-- Replica set 6
|    |
|    +-- Brick 0: rhgs-primary-n13:/rhgs/bricks/myvol
|    |
|    +-- Brick 1: rhgs-primary-n14:/rhgs/bricks/myvol
|
+-- Replica set 7
|    |
|    +-- Brick 0: rhgs-primary-n15:/rhgs/bricks/myvol
|    |
|    +-- Brick 1: rhgs-primary-n16:/rhgs/bricks/myvol
|
+-- Replica set 8
|    |
|    +-- Brick 0: rhgs-primary-n17:/rhgs/bricks/myvol
|    |
|    +-- Brick 1: rhgs-primary-n18:/rhgs/bricks/myvol
|
+-- Replica set 9
      |
      +-- Brick 0: rhgs-primary-n19:/rhgs/bricks/myvol
      |
+-- Brick 1: rhgs-primary-n20:/rhgs/bricks/myvol# gluster volume create myvol-slave \ rhgs-secondary-n01:/rhgs/bricks/myvol-slave \ rhgs-secondary-n02:/rhgs/bricks/myvol-slave \ rhgs-secondary-n03:/rhgs/bricks/myvol-slave \ rhgs-secondary-n04:/rhgs/bricks/myvol-slave \ rhgs-secondary-n05:/rhgs/bricks/myvol-slave \ rhgs-secondary-n06:/rhgs/bricks/myvol-slave \ rhgs-secondary-n07:/rhgs/bricks/myvol-slave \ rhgs-secondary-n08:/rhgs/bricks/myvol-slave \ rhgs-secondary-n09:/rhgs/bricks/myvol-slave \ rhgs-secondary-n10:/rhgs/bricks/myvol-slave volume create: myvol-slave: success: please start the volume to access data
# gluster volume start myvol-slave
volume start: myvol-slave: success
# gluster volume info myvol-slave
Volume Name: myvol-slave
Type: Distribute
Volume ID: 64295b00-ac19-436c-9aac-6069e0a5b8cf
Status: Started
Snap Volume: no
Number of Bricks: 10
Transport-type: tcp
Bricks:
Brick1: rhgs-secondary-n01:/rhgs/bricks/myvol-slave
Brick2: rhgs-secondary-n02:/rhgs/bricks/myvol-slave
Brick3: rhgs-secondary-n03:/rhgs/bricks/myvol-slave
Brick4: rhgs-secondary-n04:/rhgs/bricks/myvol-slave
Brick5: rhgs-secondary-n05:/rhgs/bricks/myvol-slave
Brick6: rhgs-secondary-n06:/rhgs/bricks/myvol-slave
Brick7: rhgs-secondary-n07:/rhgs/bricks/myvol-slave
Brick8: rhgs-secondary-n08:/rhgs/bricks/myvol-slave
Brick9: rhgs-secondary-n09:/rhgs/bricks/myvol-slave
Brick10: rhgs-secondary-n10:/rhgs/bricks/myvol-slave
Options Reconfigured:
performance.readdir-ahead: on
snap-max-hard-limit: 256
snap-max-soft-limit: 90
auto-delete: disable
Distribute set
|
+-- Brick 0: rhgs-secondary-n01:/rhgs/bricks/myvol-slave
|
+-- Brick 1: rhgs-secondary-n02:/rhgs/bricks/myvol-slave
|
+-- Brick 2: rhgs-secondary-n03:/rhgs/bricks/myvol-slave
|
+-- Brick 3: rhgs-secondary-n04:/rhgs/bricks/myvol-slave
|
+-- Brick 4: rhgs-secondary-n05:/rhgs/bricks/myvol-slave
|
+-- Brick 5: rhgs-secondary-n06:/rhgs/bricks/myvol-slave
|
+-- Brick 6: rhgs-secondary-n07:/rhgs/bricks/myvol-slave
|
+-- Brick 7: rhgs-secondary-n08:/rhgs/bricks/myvol-slave
|
+-- Brick 8: rhgs-secondary-n09:/rhgs/bricks/myvol-slave
|
+-- Brick 9: rhgs-secondary-n10:/rhgs/bricks/myvol-slave
4.13.3. Setting up Geo-Replication from the Primary to the Secondary Region
myvol volume to the remote region myvol-slave volume.
- As a prerequisite, all secondary/slave side nodes must allow root user login via SSH. The below commands should be run on all of nodes rhgs-secondary-n{01..10}.
# sed -i s/PermitRootLogin\ no/PermitRootLogin\ yes/ \
/etc/ssh/sshd_config
# service sshd restart
- Create a SSH keypair for the root user on rhgs-primary-n01, and copy the contents of the public key:
# ssh-keygen
# cat ~root/.ssh/id_rsa.pub
ssh-rsa AAAAB3NzaC1yc2EAAAABIwAAAQEAmtzZdIR+pEl16LqH0kbGQfA7sTe1iWHhV/x+5zVDb91Z+gzMVdBTBaLyugeoBlxzOeFFnc/7a9TwNSr7YWt/yKZxh+lnqq
/9xcWtONUrfvLH4TEWu4dlRwCvXGsdv23lQK0YabaY9hqzshscFtSnQTmzT13LPc9drH+k7lHBu4KjA4igDvX/j41or0weneg1vcqAP9vRyh4xXgtocqBiAqJegBZ5O
/QO1ynyJBysp7tIHF7HZuh3sFCxtqEPPsJkVJDiQZ/NqTr3hAqDzmn4USOX3FbSOvomlWa8We6tGb9nfUH6vBQGyKbWk4YOzm6E5oTzuRBGA1vCPmwpwR/cw==
root@rhgs-primary-n01
- On rhgs-secondary-n01, add the SSH public key from rhgs-primary-n01 to the root user’s authorized_keys file:
# echo "ssh-rsa AAAAB3NzaC1yc2EAAAABIwAAAQEAmtzZdIR+pEl16LqH0kbGQfA7sTe1iWHhV/x+5zVDb91Z+gzMVdBTBaLyugeoBlxzOeFFnc/7a9TwNSr7YWt
/yKZxh+lnqq7/9xcWtONUrfvLH4TEWu4dlRwCvXGsdv23lQK0YabaY9hqzshscFtSnQTmzT13LPc9drH+k7lHBu4KjA4igDvX
j41or0weneg1vcqAP9vRyh4xXgtocqBiAqJegBZ5O/QO1ynyJBysp7tIHF7HZuh3sFCxtqEPPsJkVJDiQZ
/NqTr3hAqDzmn4USOX3FbSOvomlWa8We6tGb9nfUH6vBQGyKbWk4YOzm6E5oTzuRBGA1vCPmwpwR/cw== root@rhgs-primary-n01" | sudo tee ~root/.ssh
/authorized_keys > /dev/null
Note
The above SSH public key is for illustration purposes only. Use the key from your ownid_rsa.pubfile on rhgs-primary-n01.
- Create a common pem pub file on rhgs-primary-n01:
Note
This must be done on the node where passwordless SSH to the secondary node was configured.# gluster system:: execute gsec_create
- Create the geo-replication session from the primary site to the secondary site. The push-pem option is needed to perform the necessary pem-file setup on the slave nodes.
# gluster volume geo-replication myvol \
rhgs-secondary-n01::myvol-slave create push-pem
# gluster volume geo-replication myvol \
rhgs-secondary-n01::myvol-slave start
- Verify the geo-replication status. After a few minutes, the initialization stage should complete, and each connection should show Active or Passive for its status.
# gluster volume geo-replication myvol rhgs-secondary-n01::myvol-slave status
MASTER NODE         MASTER VOL    MASTER BRICK          SLAVE USER    SLAVE                              STATUS     CHECKPOINT STATUS    CRAWL STATUS
------------------------------------------------------------------------------------------------------------------------------------------------------------------------------------------------------------
rhgs-primary-n01    myvol         /rhgs/bricks/myvol    root          rhgs-secondary-n10::myvol-slave    Active     N/A                  Changelog Crawl
rhgs-primary-n18    myvol         /rhgs/bricks/myvol    root          rhgs-secondary-n05::myvol-slave    Passive    N/A                  N/A
rhgs-primary-n06    myvol         /rhgs/bricks/myvol    root          rhgs-secondary-n07::myvol-slave    Passive    N/A                  N/A
rhgs-primary-n02    myvol         /rhgs/bricks/myvol    root          rhgs-secondary-n02::myvol-slave    Passive    N/A                  N/A
rhgs-primary-n10    myvol         /rhgs/bricks/myvol    root          rhgs-secondary-n09::myvol-slave    Passive    N/A                  N/A
rhgs-primary-n14    myvol         /rhgs/bricks/myvol    root          rhgs-secondary-n01::myvol-slave    Passive    N/A                  N/A
rhgs-primary-n03    myvol         /rhgs/bricks/myvol    root          rhgs-secondary-n03::myvol-slave    Active     N/A                  Changelog Crawl
rhgs-primary-n09    myvol         /rhgs/bricks/myvol    root          rhgs-secondary-n08::myvol-slave    Active     N/A                  Changelog Crawl
rhgs-primary-n11    myvol         /rhgs/bricks/myvol    root          rhgs-secondary-n10::myvol-slave    Active     N/A                  Changelog Crawl
rhgs-primary-n13    myvol         /rhgs/bricks/myvol    root          rhgs-secondary-n03::myvol-slave    Active     N/A                  Changelog Crawl
rhgs-primary-n19    myvol         /rhgs/bricks/myvol    root          rhgs-secondary-n08::myvol-slave    Active     N/A                  Changelog Crawl
rhgs-primary-n17    myvol         /rhgs/bricks/myvol    root          rhgs-secondary-n04::myvol-slave    Active     N/A                  Changelog Crawl
rhgs-primary-n05    myvol         /rhgs/bricks/myvol    root          rhgs-secondary-n06::myvol-slave    Active     N/A                  Changelog Crawl
rhgs-primary-n15    myvol         /rhgs/bricks/myvol    root          rhgs-secondary-n06::myvol-slave    Active     N/A                  Changelog Crawl
rhgs-primary-n16    myvol         /rhgs/bricks/myvol    root          rhgs-secondary-n07::myvol-slave    Passive    N/A                  N/A
rhgs-primary-n07    myvol         /rhgs/bricks/myvol    root          rhgs-secondary-n04::myvol-slave    Active     N/A                  Changelog Crawl
rhgs-primary-n20    myvol         /rhgs/bricks/myvol    root          rhgs-secondary-n09::myvol-slave    Passive    N/A                  N/A
rhgs-primary-n12    myvol         /rhgs/bricks/myvol    root          rhgs-secondary-n02::myvol-slave    Passive    N/A                  N/A
rhgs-primary-n04    myvol         /rhgs/bricks/myvol    root          rhgs-secondary-n01::myvol-slave    Passive    N/A                  N/A
rhgs-primary-n08    myvol         /rhgs/bricks/myvol    root          rhgs-secondary-n05::myvol-slave    Passive    N/A                  N/A
4.14. Setting Up Clients to Access Data
- NFS and SMB clients
The NFS and SMB protocols are available for use, but due to limitations in the network configuration these protocols cannot be made highly available with CTDB or Pacemaker as would be normally recommended.
You must ensure to register and subscribe your system before installing Native Client. Instructions for registering the system is available at: https://access.redhat.com/documentation/en-US/Red_Hat_Storage/3.1/html/Administration_Guide/chap-Accessing_Data_-_Setting_Up_Clients.html#Installing_Native_Client.
4.14.1. Installing Native Client
# yum -y install glusterfs-fuse attr
4.14.2. Mounting Red Hat Gluster Storage Volumes
# mkdir -p /rhgs/client/myvol
# sh -c 'echo "rhgs-primary-n01:myvol /rhgs/client/myvol \
 glusterfs defaults 0 0" >> /etc/fstab'
4.14.3. Testing Mounted Volumes
# mount /rhgs/client/myvol'
4.15. Appendix - Building Red Hat Gluster Storage Compute Engine Image from Scratch
Note
4.15.1. Installing Red Hat Gluster Storage from the ISO to a RAW Disk Image File
dd command to create a 20 GB sparse file to serve as the RAW disk image:
# dd if=/dev/zero of=disk.raw bs=1 count=0 seek=20G
Note
4.15.2. Enabling and Starting the Network Interface
- Enable the default eth0 network interface at boot time:
# sed -i s/ONBOOT=no/ONBOOT=yes/ /etc/sysconfig/network-scripts/ifcfg-eth0
- Start the eth0 network interface:
# ifup eth0
4.15.3. Subscribing to the Red Hat Gluster Storage Server Channels
4.15.4. Updating your System
# yum -y update
4.15.5. Tuning and Miscellaneous Configuration
rhgs-sequential-io using the following command:
# tuned-adm profile rhgs-sequential-io
Note
rhgs-sequential-io profile is appropriate for this environment, but the rhgs-random-io profile may be more appropriate for different workloads.
# setenforce 0
4.15.6. Customizing the Virtual Machine for Google Compute Engine
# init 0
4.16. Appendix: Configuration files for Red Hat Gluster Storage Deployment
# Copyright 2015 Google Inc. All Rights Reserved.
#
# Licensed under the Apache License, Version 2.0 (the "License");
# you may not use this file except in compliance with the License.
# You may obtain a copy of the License at
#
#     http://www.apache.org/licenses/LICENSE-2.0
#
# Unless required by applicable law or agreed to in writing, software
# distributed under the License is distributed on an "AS IS" BASIS,
# WITHOUT WARRANTIES OR CONDITIONS OF ANY KIND, either express or implied.
# See the License for the specific language governing permissions and
# limitations under the License.

#
# glusterfs-config.yaml
#
# The Gluster FS deployment consists of a primary pool and a secondary pool
#   of resources, each on a separate zone.
#

imports:
  - path: gluster_instance.jinja
  - path: path_utils.jinja
resources:
- name: gluster_instance
  type: gluster_instance.jinja
  properties:
    namePrefix: rhgs
    numPrimaryReplicas: 10
    primaryZone: us-central1-a
    secondaryZone: us-central1-b
    numSecondaryReplicas: 10
    backupZone: europe-west1-b
    sourceImage: global/images/rhgs-image01
    dataSourceImage: global/images/rhgs-data-image01
    machineType: n1-highmem-4
    network: default
    bootDiskType: pd-standard
    dataDiskType: pd-standard
    dataDiskSizeGb: 10230
# Copyright 2015 Google Inc. All Rights Reserved.
#
# Licensed under the Apache License, Version 2.0 (the "License");
# you may not use this file except in compliance with the License.
# You may obtain a copy of the License at
#
#     http://www.apache.org/licenses/LICENSE-2.0
#
# Unless required by applicable law or agreed to in writing, software
# distributed under the License is distributed on an "AS IS" BASIS,
# WITHOUT WARRANTIES OR CONDITIONS OF ANY KIND, either express or implied.
# See the License for the specific language governing permissions and
# limitations under the License.

# GlusterFs configuration variables
#
# Required Cloud resource input parameters:
#  * numPrimaryReplicas - number of instances to create in the primary zone
#  * numSecondaryReplicas - number of instances to create in the secondary zone
#  * namePrefix - hostname prefix
#    The instance number (0 based) will be appended ("-n<#><#>")
#  * primaryZone - Compute Engine zone for the instance (short name)
#  * secondaryZone - Compute Engine zone for the instance (short name)
#  * network - Compute Engine network for the instance (full URI)
#  * image - Compute Engine image for the instance (full URI)
#  * machineType - Compute Engine machine type for the instance (full URI)
#  * bootDiskType - Compute Engine boot disk type for the instance (full URI)
#  * dataDiskType: Compute Engine data disk type for the instance (full URI)
#  * dataDiskSizeGb: Data disk size in Gigabytes

{% import 'path_utils.jinja' as path_utils with context %}

# Grab the config properties
{% set numPrimaryReplicas = properties["numPrimaryReplicas"] + 1%}
{% set numSecondaryReplicas = properties["numSecondaryReplicas"] + 1 %}
{% set image = properties["image"] %}

# Macros and variables dealing with naming
{% set prefix = properties["namePrefix"] %}

{% macro hostname(prefix, id) -%}
{{ "%s-n%02d"|format(prefix, id) }}
{%- endmacro %}

{% macro diskname(prefix, id) -%}
{{ "%s-data-disk-n%02d"|format(prefix, id) }}
{%- endmacro %}

# Expand resource input parameters into full URLs
{% set network = path_utils.networkPath(properties["network"]) %}
{% set primaryZone = properties["primaryZone"] %}
{% set bootDiskType = path_utils.diskTypePath(
    primaryZone, properties["bootDiskType"]) %}
{% set dataDiskType = path_utils.diskTypePath(
    primaryZone, properties["dataDiskType"]) %}
{% set machineType = path_utils.machineTypePath(
    primaryZone, properties["machineType"]) %}

resources:
# Add clone instances in the local Zone
{% for n_suffix in range(1, numPrimaryReplicas) %}

  {% set namePrefix = prefix + '-primary' %}

- type: compute.v1.disk
  name: {{ diskname(namePrefix, n_suffix) }}
  properties:

    zone: {{ primaryZone }}
    type: {{ dataDiskType }}
    sizeGb: {{ properties["dataDiskSizeGb"] }}
    sourceImage: {{ properties["dataSourceImage"] }}

- type: compute.v1.instance
  name: {{ hostname(namePrefix, n_suffix) }}
  properties:
    zone: {{ primaryZone }}
    machineType: {{ machineType }}

    disks:
    # Request boot disk creation (mark for autodelete)
    - deviceName: boot
      type: PERSISTENT
      boot: true
      autoDelete: true
      initializeParams:
        sourceImage: {{ properties["sourceImage"] }}
        diskType: {{ bootDiskType }}
        diskSizeGb: 10

    # Attach the existing data disk (mark for autodelete)
    - deviceName: {{ diskname(namePrefix, n_suffix) }}
      source: $(ref.{{ diskname(namePrefix, n_suffix) }}.selfLink)
      autoDelete: true
      type: PERSISTENT

    networkInterfaces:
    - network: {{ network }}
      accessConfigs:
      - name: External NAT
        type: ONE_TO_ONE_NAT

    tags:
      items:
      - "glusterfs-deployed-from-google-developer-console"

{% endfor %}

# Setup in-region replicas
{% set network = path_utils.networkPath(properties["network"]) %}
{% set secondaryZone = properties["secondaryZone"] %}
{% set bootDiskType = path_utils.diskTypePath(
    secondaryZone, properties["bootDiskType"]) %}
{% set dataDiskType = path_utils.diskTypePath(
    secondaryZone, properties["dataDiskType"]) %}
{% set machineType = path_utils.machineTypePath(
    secondaryZone, properties["machineType"]) %}
{% for n_suffix in range(1, numPrimaryReplicas) %}

  {% set namePrefix = prefix + '-secondary' %}

- type: compute.v1.disk
  name: {{ diskname(namePrefix, n_suffix) }}
  properties:
    zone: {{ secondaryZone }}
    type: {{ dataDiskType }}
    sizeGb: {{ properties["dataDiskSizeGb"] }}
    sourceImage: {{ properties["dataSourceImage"] }}

- type: compute.v1.instance
  name: {{ hostname(namePrefix, n_suffix) }}
  properties:
    zone: {{ secondaryZone }}
    machineType: {{ machineType }}

    disks:
    # Request boot disk creation (mark for autodelete)
    - deviceName: boot
      type: PERSISTENT
      boot: true
      autoDelete: true
      initializeParams:
        sourceImage: {{ properties["sourceImage"] }}
        diskType: {{ bootDiskType }}
        diskSizeGb: 10

    # Attach the existing data disk (mark for autodelete)
    - deviceName: {{ diskname(namePrefix, n_suffix) }}
      source: $(ref.{{ diskname(namePrefix, n_suffix) }}.selfLink)
      autoDelete: true
      type: PERSISTENT

    networkInterfaces:
    - network: {{ network }}
      accessConfigs:
      - name: External NAT
        type: ONE_TO_ONE_NAT

    tags:
      items:
      - "glusterfs-deployed-from-google-developer-console"

{% endfor %}


# Add clone instances in the remote Zone
{% set backupZone = properties["backupZone"] %}
{% set bootDiskType = path_utils.diskTypePath(
    backupZone, properties["bootDiskType"]) %}
{% set dataDiskType = path_utils.diskTypePath(
    backupZone, properties["dataDiskType"]) %}
{% set machineType = path_utils.machineTypePath(
    backupZone, properties["machineType"]) %}
{% for n_suffix in range(1, numSecondaryReplicas) %}
  {% set namePrefix = prefix + '-backup' %}

- type: compute.v1.disk
  name: {{ diskname(namePrefix, n_suffix) }}
  properties:
    zone: {{ backupZone }}
    type: {{ dataDiskType }}
    sizeGb: {{ properties["dataDiskSizeGb"] }}
#    sourceImage: {{ properties["dataSourceImage"] }}

- type: compute.v1.instance
  name: {{ hostname(namePrefix, n_suffix) }}
  properties:
    zone: {{ backupZone }}
    machineType: {{ machineType }}

    disks:
    # Request boot disk creation (mark for autodelete)
    - deviceName: boot
      type: PERSISTENT
      boot: true
      autoDelete: true
      initializeParams:
        sourceImage: {{ properties["sourceImage"] }}
        diskType: {{ bootDiskType }}
        diskSizeGb: 10

    # Attach the existing data disk (mark for autodelete)
    - deviceName: {{ diskname(namePrefix, n_suffix) }}
      source: $(ref.{{ diskname(namePrefix, n_suffix) }}.selfLink)
      autoDelete: true
      type: PERSISTENT

    networkInterfaces:
    - network: {{ network }}
      accessConfigs:
      - name: External NAT
        type: ONE_TO_ONE_NAT

    tags:
      items:
      - "glusterfs-deployed-from-google-developer-console"

{% endfor %}
# Copyright 2015 Google Inc. All rights reserved.
#
# Licensed under the Apache License, Version 2.0 (the "License");
# you may not use this file except in compliance with the License.
# You may obtain a copy of the License at
#
#     http://www.apache.org/licenses/LICENSE-2.0
#
# Unless required by applicable law or agreed to in writing, software
# distributed under the License is distributed on an "AS IS" BASIS,
# WITHOUT WARRANTIES OR CONDITIONS OF ANY KIND, either express or implied.
# See the License for the specific language governing permissions and
# limitations under the License.

# path_utils.jinja
#
# Jinja macros for expanding short resource names into full paths
# Must have reference to the global env object, so when including this file,
# use the jinja import "with context" option.

{% macro projectPrefix() -%}
{{ "https://www.googleapis.com/compute/v1/projects/%s"|format(env["project"]) }}
{%- endmacro %}

{% macro imagePath(image) -%}
{% if image.startswith("https://") -%}
{{ image }}
{% elif image.startswith("debian-") -%}
{{ "https://www.googleapis.com/compute/v1/projects/debian-cloud/global/images/" + image }}
{% elif image.startswith("windows-") -%}
{{ "https://www.googleapis.com/compute/v1/projects/windows-cloud/global/images/" + image }}
{% endif -%}
{%- endmacro %}

{% macro machineTypePath(zone, machineType) -%}
{% if machineType.startswith("https://") -%}
{{ machineType }}
{% else -%}
{{ "%s/zones/%s/machineTypes/%s"|format(projectPrefix(), zone, machineType) }}
{% endif -%}
{%- endmacro %}

{% macro networkPath(network) -%}
{% if network.startswith("https://") -%}
{{ network }}
{% else -%}
{{ "%s/global/networks/%s"|format(projectPrefix(), network) }}
{% endif -%}
{%- endmacro %}

{% macro diskTypePath(zone, diskType) -%}
{% if diskType.startswith("https://") -%}
{{ diskType }}
{% else -%}
{{ "%s/zones/%s/diskTypes/%s"|format(projectPrefix(), zone, diskType) }}
{% endif -%}
{%- endmacro %}
Appendix A. Revision History
| Revision History | |||
|---|---|---|---|
| Revision 2.0-1 | Oct 20 2016 | ||
| |||
| Revision 1.0-1 | Aug 25 2016 | ||
| |||
| Revision 1.0-0 | Jun 21 2016 | ||
| |||