
Chapter 8. LDAP Authentication Tutorial
Abstract
This tutorial explains how to set up an X.500 directory server and configure the OSGi container to use LDAP authentication.
8.1. Tutorial Overview
Goals
In this tutorial you will:
- Install 389 Directory Server
- Add user entries to the LDAP server
- Add groups to manage security roles
- Configure Fuse to use LDAP authentication
- Configure Fuse to use roles for authorization
- Configure SSL/TLS connections to the LDAP server
8.2. Set-up a Directory Server and Console
This stage of the tutorial explains how to install the X.500 directory server and the management console from the Fedora 389 Directory Server project. If you already have access to a 389 Directory Server instance, you can skip the instructions for installing the 389 Directory Server and install the 389 Management Console instead.
Prerequisites
If you are installing on a Red Hat Enterprise Linux platform, you must first install the Extra Packages for Enterprise Linux (EPEL). See the installation notes under RHEL/Cent OS/ EPEL ( RHEL 6, RHEL 7, Cent OS 6, Cent OSý7) on the fedoraproject.org site.
Install 389 Directory Server
If you do not have access to an existing 389 Directory Server instance, you can install 389 Directory Server on your local machine, as follows:
On Red Hat Enterprise Linux and Fedora platforms, use the standard
dnfpackage management utility to install 389 Directory Server. Enter the following command at a command prompt (you must have administrator privileges on your machine):sudo dnf install 389-ds
NoteThe required
389-dsand389-consoleRPM packages are available for Fedora, RHEL6+EPEL, and CentOS7+EPEL platforms. At the time of writing, the389-consolepackage is not yet available for RHEL 7.After installing the 389 directory server packages, enter the following command to configure the directory server:
sudo setup-ds-admin.pl
The script is interactive and prompts you to provide the basic configuration settings for the 389 directory server. When the script is complete, it automatically launches the 389 directory server in the background.
- For more details about how to install 389 Directory Server, see the Download page.
Install 389 Management Console
If you already have access to a 389 Directory Server instance, you only need to install the 389 Management Console, which enables you to log in and manage the server remotely. You can install the 389 Management Console, as follows:
On Red Hat Enterprise Linux and Fedora platforms—use the standard
dnfpackage management utility to install the 389 Management Console. Enter the following command at a command prompt (you must have administrator privileges on your machine):sudo dnf install 389-console
-
On Windows platforms—see the Windows Console download instructions from
fedoraproject.org.
Connect the console to the server
To connect the 389 Directory Server Console to the LDAP server:
Enter the following command to start up the 389 Management Console:
389-console
A login dialog appears. Fill in the LDAP login credentials in the
User IDandPasswordfields, and customize the hostname in theAdministration URLfield to connect to your 389 management server instance (port9830is the default port for the 389 management server instance).
-
The 389 Management Console window appears. Select the
Servers and Applicationstab. In the left-hand pane, drill down to the
Directory Servericon.
-
Select the
Directory Servericon in the left-hand pane and clickOpen, to open the389 Directory Server Console. -
In the
389 Directory Server Console, click theDirectorytab, to view the Directory Information Tree (DIT). Expand the root node,
YourDomain(usually named after a hostname, and shown aslocaldomainin the following screenshot), to view the DIT.
8.3. Add User Entries to the Directory Server
The basic prerequisite for using LDAP authentication with the OSGi container is to have an X.500 directory server running and configured with a collection of user entries. For many use cases, you will also want to configure a number of groups to manage user roles.
Alternative to adding user entries
If you already have user entries and groups defined in your LDAP server, you might prefer to map the existing LDAP groups to JAAS roles using the roles.mapping property in the LDAPLoginModule configuration, instead of creating new entries. For details, see Section 2.1.7, “JAAS LDAP Login Module”.
Goals
In this portion of the tutorial you will
Adding user entries
Perform the following steps to add user entries to the directory server:
- Ensure that the LDAP server and console are running. See Section 8.2, “Set-up a Directory Server and Console”.
In the
Directory Server Console, click on theDirectorytab, and drill down to thePeoplenode, under theYourDomainnode (whereYourDomainis shown aslocaldomainin the following screenshots).
-
Right-click the
Peoplenode, and select menu:[ > New > >User> ] from the context menu, to open theCreate New Userdialog. -
Select the tab in the left-hand pane of the
Create New Userdialog. Fill in the fields of the
Usertab, as follows:-
Set the
First Namefield toJohn. -
Set the
Last Namefield toDoe. -
Set the
User IDfield tojdoe. -
Enter the password,
secret, in thePasswordfield. Enter the password,
secret, in theConfirm Passwordfield.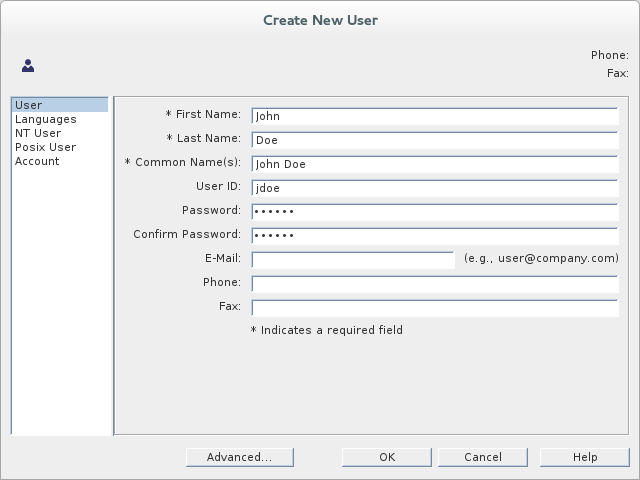
-
Set the
- Click .
Add a user
Jane Doeby following Step 3 to Step 6.In Step 5.e, use
janedoefor the new user’sUser IDand use the password,secret, for the password fields.Add a user
Camel Riderby following Step 3 to Step 6.In Step 5.e, use
criderfor the new user’sUser IDand use the password,secret, for the password fields.
Adding groups for the roles
To add the groups that define the roles:
-
In the
Directorytab of theDirectory Server Console, drill down to theGroupsnode, under theYourDomainnode. -
Right-click the
Groupsnode, and select menu:[ > New > >Group> ] from the context menu, to open theCreate New Groupdialog. -
Select the tab in the left-hand pane of the
Create New Groupdialog. Fill in the fields of the
Generaltab, as follows:-
Set the
Group Namefield toadmin. Optionally, enter a description in the
Descriptionfield.
-
Set the
Select the tab in the left-hand pane of the
Create New Groupdialog.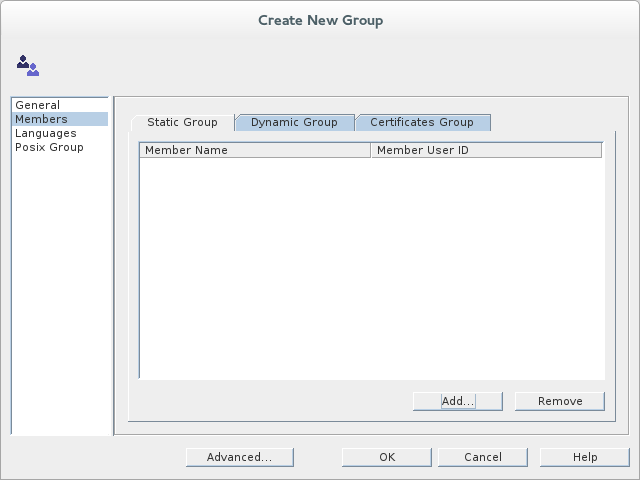
-
Click
Addto open theSearch users and groupsdialog. In the
Searchfield, selectUsersfrom the drop-down menu, and click theSearchbutton.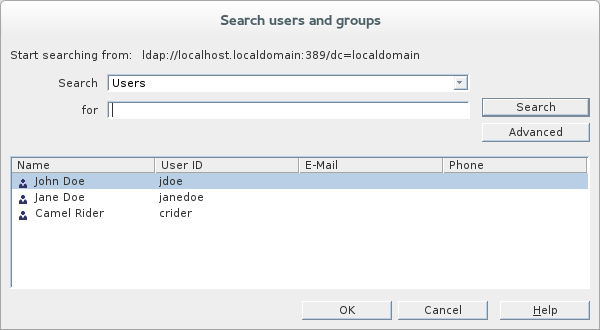
-
From the list of users that is now displayed, select
John Doe. -
Click , to close the
Search users and groupsdialog. -
Click , to close the
Create New Groupdialog. Add a
managerrole by following Step 2 to Step 10.In Step 4, enter
managerin theGroup Namefield.In Step 8, select
Jane Doe.Add a
viewerrole by following Step 2 to Step 10.In Step 4, enter
viewerin theGroup Namefield.In Step 8, select
Camel Rider.Add an
sshrole by following Step 2 to Step 10.In Step 4, enter
sshin theGroup Namefield.In Step 8, select all of the users,
John Doe,Jane Doe, andCamel Rider.
8.4. Enable LDAP Authentication in the OSGi Container
This section explains how to configure an LDAP realm in the OSGi container. The new realm overrides the default karaf realm, so that the container authenticates credentials based on user entries stored in the X.500 directory server.
References
More detailed documentation is available on LDAP authentication, as follows:
- LDAPLoginModule options—are described in detail in Section 2.1.7, “JAAS LDAP Login Module”.
- Configurations for other directory servers—this tutorial covers only 389-DS. For details of how to configure other directory servers, such as Microsoft Active Directory, see the section called “Filter settings for different directory servers”.
Procedure for standalone OSGi container
To enable LDAP authentication in a standalone OSGi container:
- Ensure that the X.500 directory server is running.
Start the Karaf container by entering the following command in a terminal window:
./bin/fuse
-
Create a file called
ldap-module.xml. Copy Example 8.1, “JAAS Realm for Standalone” into
ldap-module.xml.Example 8.1. JAAS Realm for Standalone
<?xml version="2.0" encoding="UTF-8"?> <blueprint xmlns="http://www.osgi.org/xmlns/blueprint/v1.0.0" xmlns:jaas="http://karaf.apache.org/xmlns/jaas/v1.0.0" xmlns:ext="http://aries.apache.org/blueprint/xmlns/blueprint-ext/v1.0.0"> <jaas:config name="karaf" rank="200"> <jaas:module className="org.apache.karaf.jaas.modules.ldap.LDAPLoginModule" flags="required"> initialContextFactory=com.sun.jndi.ldap.LdapCtxFactory connection.url=ldap://localhost:389 connection.username=cn=Directory Manager connection.password=DIRECTORY_MANAGER_PASSWORD connection.protocol= user.base.dn=ou=People,dc=localdomain user.filter=(&(objectClass=inetOrgPerson)(uid=%u)) user.search.subtree=true role.base.dn=ou=Groups,dc=localdomain role.name.attribute=cn role.filter=(uniquemember=%fqdn) role.search.subtree=true authentication=simple </jaas:module> </jaas:config> </blueprint>You must customize the following settings in the
ldap-module.xmlfile:- connection.url
-
Set this URL to the actual location of your directory server instance. Normally, this URL has the format,
ldap://Hostname:Port. For example, the default port for the 389 Directory Server is IP port389. - connection.username
-
Specifies the username that is used to authenticate the connection to the directory server. For 389 Directory Server, the default is usually
cn=Directory Manager. - connection.password
- Specifies the password part of the credentials for connecting to the directory server.
- authentication
You can specify either of the following alternatives for the authentication protocol:
-
simpleimplies that user credentials are supplied and you are obliged to set theconnection.usernameandconnection.passwordoptions in this case. noneimplies that authentication is not performed. You must not set theconnection.usernameandconnection.passwordoptions in this case.This login module creates a JAAS realm called
karaf, which is the same name as the default JAAS realm used by Fuse. By redefining this realm with arankattribute value greater than0, it overrides the standardkarafrealm which has the rank0.For more details about how to configure Fuse to use LDAP, see Section 2.1.7, “JAAS LDAP Login Module”.
ImportantWhen setting the JAAS properties above, do not enclose the property values in double quotes.
-
To deploy the new LDAP module, copy the
ldap-module.xmlinto the Karaf container’sdeploy/directory (hot deploy).The LDAP module is automatically activated.
NoteSubsequently, if you need to undeploy the LDAP module, you can do so by deleting the
ldap-module.xmlfile from thedeploy/directory while the Karaf container is running.
Test the LDAP authentication
Test the new LDAP realm by connecting to the running container using the Karaf client utility, as follows:
- Open a new command prompt.
-
Change directory to the Karaf
InstallDir/bindirectory. Enter the following command to log on to the running container instance using the identity
jdoe:./client -u jdoe -p secret
You should successfully log into the container’s remote console. At the command console, type
jaas:followed by the [Tab] key (to activate content completion):jdoe@root()> jaas: Display all 31 possibilities? (31 lines)? jaas:cancel jaas:group-add ... jaas:whoami
You should see that
jdoehas access to all of thejaascommands (consistent with theadminrole).-
Log off the remote console by entering the
logoutcommand. Enter the following command to log on to the running container instance using the identity
janedoe:./client -u janedoe -p secret
You should successfully log into the container’s remote console. At the command console, type
jaas:followed by the [Tab] key (to activate content completion):janedoe@root()> jaas: Display all 25 possibilities? (25 lines)? jaas:cancel jaas:group-add ... jaas:users
You should see that
janedoehas access to almost all of thejaascommands (consistent with themanagerrole).-
Log off the remote console by entering the
logoutcommand. Enter the following command to log on to the running container instance using the identity
crider:./client -u crider -p secret
You should successfully log into the container’s remote console. At the command console, type
jaas:followed by the [Tab] key (to activate content completion):crider@root()> jaas: jaas:manage jaas:realm-list jaas:realm-manage jaas:realms jaas:user-list jaas:users
You should see that
criderhas access to only five of thejaascommands (consistent with theviewerrole).-
Log off the remote console by entering the
logoutcommand.
Troubleshooting
If you run into any difficulties while testing the LDAP connection, increase the logging level to DEBUG to get a detailed trace of what is happening on the connection to the LDAP server.
Perform the following steps:
From the Karaf console, enter the following command to increase the logging level to
DEBUG:log:set DEBUG
Observe the Karaf log in real time:
log:tail
To escape from the log listing, type Ctrl-C.