
Chapter 2. Implementing the Twitter to Salesforce sample integration
This sample integration watches Twitter for tweets that mention a particular Twitter user. When the integration finds such tweets, it filters them so that only those tweets that contain the text that you specify cause the integration to continue.
For tweets that contain the specified text, the integration passes data related to the tweet, including the Twitter user name, to Salesforce and Salesforce creates a new contact.
Prerequisites
-
You need a Twitter developer account. If you do not already have one, go to https://apps.twitter.com, sign in to Twitter, and click Apply for a developer account. Obtaining the developer account is quick when you provide a professional email address, such as
me@redhat.comrather than a personal address such asyou@gmail.com. - You need an account in a Salesforce installation that is used for development. This account must have Salesforce API access, which is available in a Salesforce Enterprise account or a Salesforce Developer account. To obtain a free developer account, visit https://developer.salesforce.com/signup. It takes less than two minutes to obtain a Salesforce account.
- You must be logged in to your Fuse Online environment.
To implement, deploy, and test this sample integration, the main steps are:
- Section 2.1, “Registering Fuse Online as a Twitter client application”
- Section 2.2, “Creating a Twitter connection”
- Section 2.3, “Registering Fuse Online as a Salesforce client application”
- Section 2.4, “Creating a Salesforce connection”
- Section 2.5, “Creating and deploying the Twitter to Salesforce sample integration”
- Section 2.6, “Confirming that the Twitter to Salesforce integration works”
- Section 2.7, “Cleaning up your integration”
2.1. Registering Fuse Online as a Twitter client application
In an integration, to connect to Twitter, the first thing you must do is register your Fuse Online environment as a client application that can access Twitter. This lets you create any number of integrations that connect to Twitter. In other words, you need to register a particular Fuse Online environment with Twitter only once.
In each Fuse Online environment, there can be only one registration of Fuse Online as a Twitter client application. However, while each Twitter connection uses the same registration, it can use different user credentials.
Prerequisite
You are logged in to Fuse Online.
Procedure
In Fuse Online:
- In the left panel, click Settings.
-
On the Settings page, near the top, to the right of the callback URL, click
 to copy the callback URL for your installation of Fuse Online to the clipboard. You will need this URL later in this procedure.
- Click the Twitter entry to display the Consumer API Key and Consumer API Secret Key fields.
In another browser tab, go to your Twitter developer account, sign in if you need to, and then do the following:
- Click Projects & Apps.
- On the Overview page, scroll down to click Create an app.
- In the App name field, enter a name such as My Fuse Online Client.
- In the Application description field, enter a tip such as For leveraging tweets.
- Scroll down to Set up Your App and then click App settings.
- Next to Authentication Settings, click Edit.
- Switch on the Enable 3-legged OAuth option.
-
In the Callback URLs field, paste the URL that you copied at the beginning of this procedure. It should be something like this:
https://app-proj912876.7b63.fuse-ignite.openshiftapps.com/api/v1/credentials/callback In the Website URL field, paste the URL again and remove
api/v1/credentials/callbackfrom the end of the URL.You can skip the next few fields.
- Click Save.
- At the top of the page for the app that you just created, click the Keys and tokens tab.
- Under Consumer Keys, click View keys.
- Copy the API key.
- Return to your Fuse Online Settings page and paste the Twitter consumer API key into the Fuse Online Twitter Consumer API Key field.
- Return to the Twitter Keys and tokens tab and copy the consumer API secret key.
- Return to your Fuse Online Settings page and paste the Twitter consumer API secret key into the Fuse Online Twitter Consumer API Secret Key field.
- Click Save.
- Click the Twitter entry to collapse it.
2.2. Creating a Twitter connection
To create an integration that obtains data from Twitter, you must first create a Twitter connection. After you create a Twitter connection, you can use it in any number of integrations.
Prerequisites
- You are logged in to Fuse Online.
- Fuse Online is open in a web browser.
- You registered your Fuse Online environment as an application that can access Twitter.
- You added the Twitter consumer API key and consumer API secret key that you received after registration to the Fuse Online Settings page.
Procedure
- In Fuse Online, in the left panel, click Connections to display any available connections.
- Click Create Connection to display the available connectors. A connector is a template that you use to create one or more connections.
- Click the Twitter connector.
Click Connect Twitter to display a Twitter authorization page. You might need to log in to Twitter before you see the authorization page.
If Connect Twitter does not appear, then your Fuse Online environment is not registered as a Twitter client application. See Registering Fuse Online as a Twitter client application. When you try to create a Twitter connection and your Fuse Online environment is not registered as a Twitter client application, then Fuse Online displays multiple fields that prompt for authorization information. While you can create a Twitter connection by entering values in these fields, it is not recommended.
- Click Authorize app to return to Fuse Online.
-
In the Name field, enter your choice of a name that helps you distinguish this connection from any other connections. For example, enter
Twitter Connect 1. -
In the Description field, optionally enter any information that is helpful to know about this connection. For example, enter
Sample Twitter connection that uses my Twitter login credentials. - Click Save to see that the connection you created is now available. If you entered the example name, you would see that Twitter Connect 1 appears as a connection that you can choose to add to an integration.
2.3. Registering Fuse Online as a Salesforce client application
In an integration, to connect to Salesforce, the first thing you must do is register your Fuse Online environment as a client application that can access Salesforce. This lets you create any number of integrations that connect to Salesforce. In other words, you need to register a particular Fuse Online environment with Salesforce only once.
In each Fuse Online environment, there can be only one registration of Fuse Online as a Salesforce client application. However, while each Salesforce connection uses the same registration, it can use different user credentials.
If you already registered Fuse Online as a Salesforce client and created a Salesforce connection, skip to Creating and deploying the Twitter to Salesforce integration.
Prerequisite
You are logged in to Fuse Online.
Procedure
In Fuse Online:
- In the left panel, click Settings.
-
On the Settings page, near the top, to the right of the callback URL, click
to copy the callback URL for your Fuse Online environment to the clipboard. You will need this URL toward the end of this procedure.
- Click the Salesforce entry to display the Client ID and Client Secret fields.
In another browser tab, log in to your Salesforce account and follow the steps below to create a connected app. These instructions assume that you are using the Salesforce Classic user interface. To switch from the Salesforce Lightning Experience interface, click your profile icon and select Switch to Salesforce Classic. For additional information, see the Salesforce documentation for Create a Connected App.
- In Salesforce, in the upper right, click Setup.
- In the left panel, select Build > Create > Apps.
- Scroll down to Connected Apps and click New.
- Enter the required information and then select Enable OAuth Settings.
-
In the Callback URL field, paste your Fuse Online URL, which you copied at the beginning of this procedure. For example:
https://app-proj912876.7b63.fuse-ignite.openshiftapps.com/api/v1/credentials/callback. For OAuth Scopes, add:
- Access and manage your data (api)
- Allow access to your unique identifier (openid)
- Perform requests on your behalf at any time (refresh_token, offline_accesss)
- Select Configure ID token and then Include Standard Claims.
- Scroll down and click Save.
-
Scroll up to see that Salesforce indicates a short wait:

- Click Continue.
- Copy the consumer key that Salesforce provides.
- Return to your Fuse Online Settings page and paste the Salesforce-provided consumer key into the Fuse Online Salesforce Client ID field.
- Return to Salesforce and copy the consumer secret that Salesforce provides.
- Return to your Fuse Online Settings page and paste the Salesforce-provided consumer secret into the Fuse Online Salesforce Client Secret field.
- Click Save.
- Click the Salesforce entry to collapse it.
2.4. Creating a Salesforce connection
To create an integration that accesses data in Salesforce, you must first create a Salesforce connection. After you create a Salesforce connection, you can use it in multiple integrations.
Prerequisites
- You are logged in to Fuse Online.
- Fuse Online is open in a web browser.
- You must have already registered your Fuse Online environment as an application that can access Salesforce.
You added the Salesforce client ID and client secret that you received after registration to the Fuse Online Settings page.
If you did not already register Fuse Online, see Registering Fuse Online as a Salesforce client application.
Be sure to wait 2 - 10 minutes after registering your Fuse Online installation as a Salesforce client before you try to create a Salesforce connection.
Procedure
- In Fuse Online, in the left panel, click Connections to display available connections.
- Click Create Connection to display the available connectors. A connector is a template for creating one or more connections.
- Click the Salesforce connector.
Click Connect Salesforce to display a Salesforce authorization page. You might need to log in to Salesforce before you see the authorization page.
If Connect Salesforce does not appear, then your Fuse Online environment is not registered as a Salesforce client application. See Registering Fuse Online as a Salesforce client application. When you try to create a Salesforce connection and your Fuse Online environment is not registered as a Salesforce client application, then Fuse Online displays multiple fields that prompt for authorization information. While you can create a Salesforce connection by entering values in these fields, it is not recommended.
NoteThe following error indicates that Salesforce does not have the correct Fuse Online callback URL:
error=redirect_uri_mismatch&error_description=redirect_uri%20must%20match%20configurationIf you get this error message, then in Salesforce, ensure that the Fuse Online callback URL is specified according to the instructions in Registering Fuse Online as a Salesforce client application.
- Click Allow to return to Fuse Online.
-
In the Name field, enter your choice of a name that helps you distinguish this connection from any other connections. For example, enter
SF Connect 1. -
In the Description field, optionally enter any information that is helpful to know about this connection. For example, enter
Sample Salesforce connection that uses my Salesforce login credentials. - Click Save to see that the connection you created is now available. If you entered the example name, you would see that SF Connect 1 appears as a connection that you can choose to add to an integration.
2.5. Creating and deploying the Twitter to Salesforce sample integration
To create and deploy an integration that uses the Twitter and Salesforce connections that you created, the main steps are:
Prerequisites
- You registered your Fuse Online environment as a Twitter client and created a Fuse Online Twitter connection.
- You registered your Fuse Online environment as a Salesforce client and created a Fuse Online Salesforce connection.
- Fuse Online is open and you are logged in.
2.5.1. Choosing the start connection
In Fuse Online, to create the sample Twitter to Salesforce integration, the first task is to choose the start connection.
Prerequisites
- You created a Twitter connection.
Procedure
- On the left, click Integrations.
- Click Create Integration.
- On the Choose a connection page, click the Twitter connection that you created. If you gave it the example name, you would click Twitter Connect 1. When the integration starts, it uses the credentials defined in this connection to connect to Twitter.
- On the Choose an action page, to the right of the Mention action entry, click Select.
- On the Configure the action page, click Next. No configuration is required.
Next step
When the integration is running, after connecting to Twitter, the integration monitors Twitter for mentions that include your Twitter screen name. A match triggers the next step in the integration. However, before you add steps that operate on data between connections, you choose the connection that the integration uses to finish its work.
2.5.2. Choosing the finish connection
In Fuse Online, to continue creating the Twitter to Salesforce sample integration, after you add the start connection, you add the finish connection to the integration.
Prerequisites
- You added the Twitter connection to the integration as the start connection.
- Fuse Online is prompting you to add the finish connection.
- You created a Salesforce connection.
Procedure
- On the Choose a connection page, click the Salesforce connection that you created. If you gave it the example name, you would click SF Connect 1. This integration finishes by using the credentials defined in this connection to connect to Salesforce.
- On the Choose an action page, to the right of the New record entry, click Select.
- On the Configure the action page, click in the Object name field and select Contact as the Salesforce record to create.
- Click Next to add the finish connection to the integration.
2.5.3. Adding a basic filter step
In Fuse Online, to continue creating the Twitter to Salesforce sample integration, add a basic filter step that checks tweets that mention you for particular content. At integration execution time, processing continues only if that content is present.
Prerequisites
- You added the Twitter connection as the integration’s start connection.
- You just added the Salesforce connection as the integration’s finish connection.
Procedure
- In the integration visualization, click the plus sign, which displays the steps that you can add to the integration.
- Click Basic Filter.
-
In the Property Name field, start to enter
textand whentextappears below the field, click it. The Twittertextfield, which contains a tweet, is the data that you want the filter to evaluate. - In the Operator field, accept contains as the condition to be met for the integration to continue.
-
In the Keywords field, enter
#RedHatIsGreator some other text that you choose for the value to check for. A tweet that mentions you must contain the text you enter here for the integration to continue operating on this data. - Click Done to add the basic filter step to the integration.
2.5.4. Adding a data mapping step
To continue creating the Twitter to Salesforce sample integration, add a data mapping step that correlates Twitter mention fields to Salesforce contact fields.
Prerequisites
- The integration’s start connection is to Twitter.
- The integration’s finish connection is to Salesforce.
- You just added the filter step between the two connections.
Procedure
- In Fuse Online, in the integration visualization, click the plus sign that is between the filter step and the finish connection.
- Click Data Mapper and wait a few moments. When the data fields appear, the Sources panel on the left displays the Twitter fields and the Target panel on the right displays the Salesforce fields.
Map the Twitter
namefield to the SalesforceFirstNameandLastNamefields:-
In the Sources panel, click the magnifying glass
 to display the search field and enter
 name. -
Under the
userfolder, click thenamefield and then click the Create New Mapping icon. - In the Mapping Details panel, in the Targets field, type FirstName to filter the list of target fields and then select /FirstName. The data mapper displays a line from the source name field to the target FirstName field.
In the Mapping Details panel, in the Targets field, type LastName to filter the list of target fields and then select /LastName.
The data mapper displays another line from the Twitter name field, but this time it goes to the Salesforce LastName field. The blue lines indicate the current focus.
NoteIf you accidentally map the wrong fields then delete the incorrect mapping by clicking the trash can icon in the data mapper’s Mapping Details panel.
-
In the Sources panel, click the magnifying glass
Map the Twitter
screenNamefield to the SalesforceTitlefield:- In the Sources panel, click the screenName field.
-
On the right, at the top of the Target panel, click the magnifying glass
to display the search field and enter
Title. - Click the Title field. The data mapper displays a line from the Twitter screenName field to the Salesforce Title field.
Map the Twitter
textfield to the SalesforceDescriptionfield:-
In the Sources search field, enter
textand click the text field. Be sure to click the toplevel text field. Do not click one of the text fields that is contained in the user field. -
In the Target search field, enter
description. - Click the Salesforce Description field to create the mapping.
-
In the Sources search field, enter
-
In the upper right, click the grid icon
 to display the list of mappings, which should look like this:
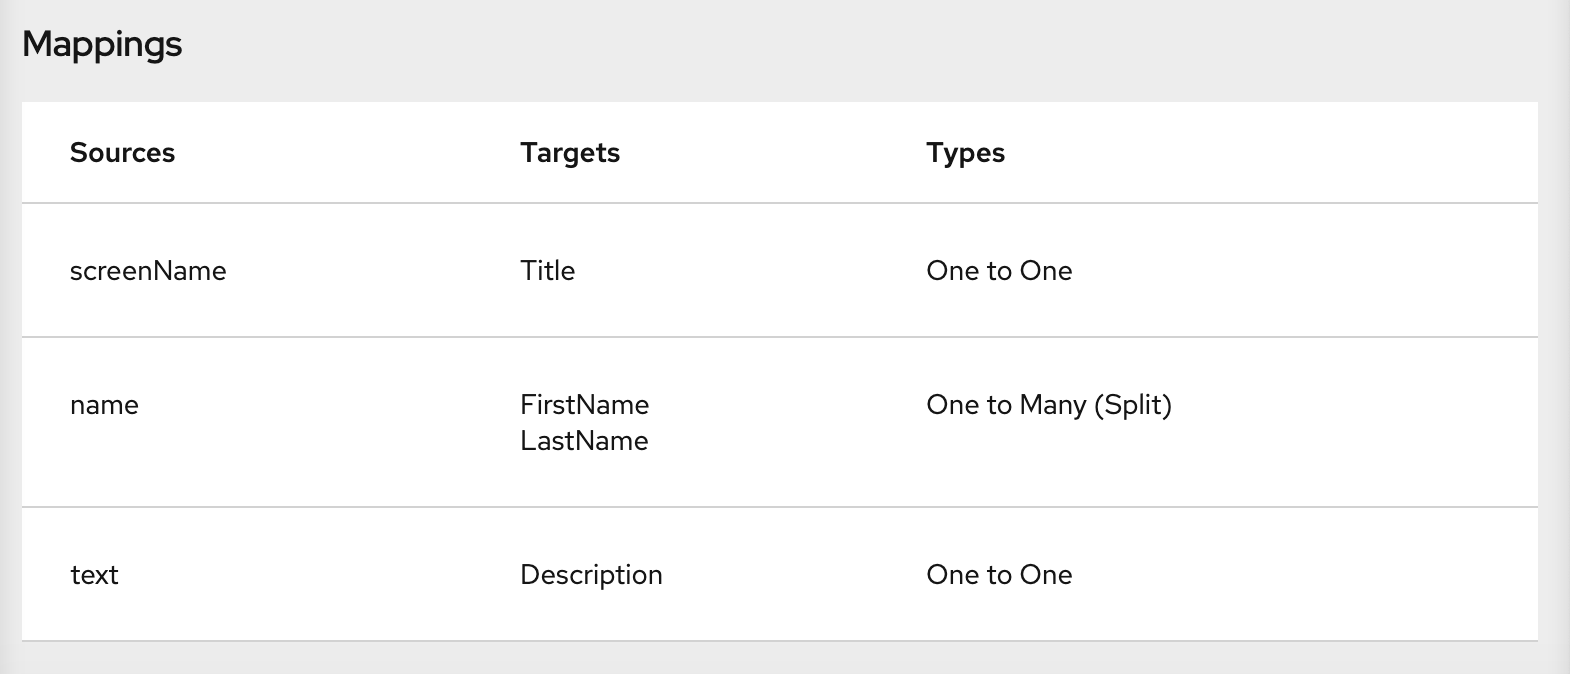
- In the upper right, click Done.
2.5.5. Giving the integration a name and deploying it
When the Twitter to Salesforce sample integration is complete then you can deploy it and see how it works.
Prerequisites
- The integration’s start connection is Twitter.
- The integration’s finish connection is Salesforce.
- The integration has a filter step.
- You just added a data mapping step to the integration.
Procedure
- In the upper right corner, click Publish.
-
In the Name field, enter a name of your choice that distinguishes this integration from any other integrations. For example:
Twitter to Salesforce Sample Integration. - In the Description field, optionally enter some information about the integration.
Click Save and publish.
Fuse Online starts to deploy the integration and then displays the integration summary. Near the top, you can see a progress indicator that shows the publishing stages. Fuse Online is generating the runtime for the integration and will start it when the runtime is ready. This takes a few minutes.
A Fuse Online account is limited to a specific number of integrations that can be running at one time. For details, see the pricing plan. If you are already running the maximum number of integrations, then you must stop an integration before you can start running another one.
If you are already running the maximum number of integrations, follow these steps to stop an integration:
- In the left panel, click Integrations.
-
In the entry for the integration that you want to stop, click
 on the far right.
- In the popup, click Stop.
After stopping an integration, start another integration as follows:
- In the left panel, click Integrations.
-
In the entry for the integration that you want to start, click
on the far right.
- In the popup, click Start.
2.6. Confirming that the Twitter to Salesforce integration works
To confirm that the Twitter to Salesforce sample integration is working, create some tweets and check for results in Salesforce.
Prerequisites
- In Fuse Online, Running appears next to the name that you specified for the Twitter to Salesforce sample integration when you published it.
- You can access your Twitter and Salesforce accounts.
Procedure
- In Fuse Online in the panel on the left, click Integrations to see that the integration you created is a Running integration. If you entered the example name, you would see that Twitter to Salesforce Sample Integration is running.
Confirm that the integration does not create a contact record when a tweet does not contain the text you specified in the basic filter step:
In Twitter, send a tweet that:
- Mentions your Twitter handle
Does not contain the text that you specified in the basic filter step
For example:
@Aslan #likesRedHat.
- Wait for the polling interval to elapse, which can be 30 - 60 seconds.
- In Salesforce, confirm that there is not a new contact record for the name that is associated with the Twitter account that you used to tweet.
Confirm that the integration creates a new contact record when it should:
In Twitter, send a tweet that:
- Mentions your Twitter handle
Contains the text that you specified in the basic filter step
For example:
@Aslan knows #RedHatIsGreat.
- Wait for the polling interval to elapse.
In Salesforce, do the following:
- Log in to your regular Salesforce account, not your Salesforce developer account.
- On your home page, under Recent Items you should see your new contact.
Click on it to view the details.
The new contact record should have the name that is associated with the Twitter account that you used to tweet. The text of your tweet should be in the Description field, and your Twitter screen name should be in the Title field.
Optionally, view the integration log to troubleshoot an unexpected result or to learn more about integration execution:
- In Fuse Online, in the left panel, click Integrations.
- View your Twitter to Salesforce integration.
- In the integration’s summary page, click the Activity tab.
- Click the integration execution for which you want to view activity information.
2.7. Cleaning up your integration
When you are done working with a sample integration, you should stop it and delete it so that you can use the resources for another integration.
Prerequisites
- You are finished working with a sample integration that you published.
Procedure
- In Fuse Online, in the left panel, click Integrations.
- In the main panel, identify the entry for the sample integration that you want to stop.
-
In that entry, to the right, click
and then click Stop.
- Click Stop to confirm that you want to stop running the integration.
-
In the entry for the integration that you just stopped, to the right, click
and then click Delete.
- Click Delete to confirm that you want to delete the integration.