
Chapter 3. Defining a Route
This tutorial walks you through adding and configuring endpoints to a route. Endpoints define the source and sink for messages traveling through the route. For your ZooOrderApp project, the starting (source) endpoint is the folder containing the XML message files. The sink (finishing) endpoint is another folder that you specify in your project.
Goals
In this tutorial you complete the following tasks:
- Add source and sink endpoints to the route
- Configure the endpoints
- Connect the endpoints
Before you begin
Before you start this tutorial:
- You must set up your workspace environment, as described in the Chapter 2, Setting up your environment tutorial.
-
In CodeReady Studio, open your
ZooOrderAppproject’s/src/main/resources/OSGI-INF/blueprint/blueprint.xmlfile in the Editor view. -
If needed, click the Design tab at the bottom of the Editor view to see the graphic display of the initial route, labeled
Route_route1.
Configuring the source endpoint
Follow these steps to configure the src/data folder as the route’s source endpoint:
Drag a File component (
 ) from the Palette's Components drawer to the canvas, and drop it in the
 Route_route1container node.The File component changes to a
From _from1node inside theRoute_route1container node.On the canvas, select the
From _from1node.The Properties view, located below the canvas, displays the node’s property fields for editing.
To specify the source directory for the message files, in the Properties view, click the Advanced tab:
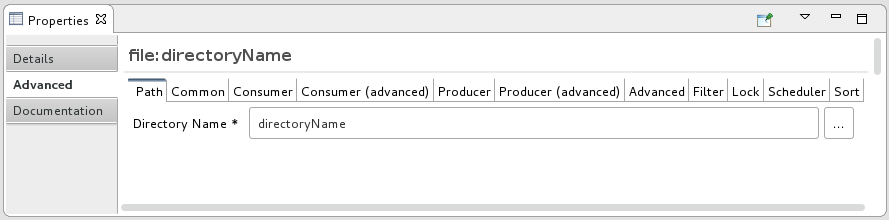
In the Directory Name field, enter
src/data:
The path
src/datais relative to the project’s directory.On the Consumer tab, enable the Noop option by clicking its check box.
The Noop option prevents the
message#.xmlfiles from being deleted from thesrc/datafolder, and it enables idempotency to ensure that eachmessage#.xmlfile is consumed only once.Select the Details tab to open the file node’s Details page.
Notice that the tooling automatically populates the Uri field with the Directory Name and Noop properties you configured on the Advanced tab. It also populates the Id field with an autogenerated ID (
_from1): Note
NoteThe tooling prefixes autogenerated ID values with an underscore (_). You can optionally change the ID value. The underscore prefix is not a requirement.
Leave the autogenerated Id as is.
- Select File → Save to save the route.
Configuring the sink endpoint
To add and configure the route’s sink (target) endpoint:
Drag another File component from the Palette's Components drawer and drop it in the
Route_route1container node.The File component changes to a
To_to1node inside theRoute_route1container node.On the canvas, select the
To_to1node.The Properties view, located below the canvas, displays the node’s property fields for editing.
On the Details tab:
-
In the Uri field, type
file:target/messages/received. In the Id field, type
_Received.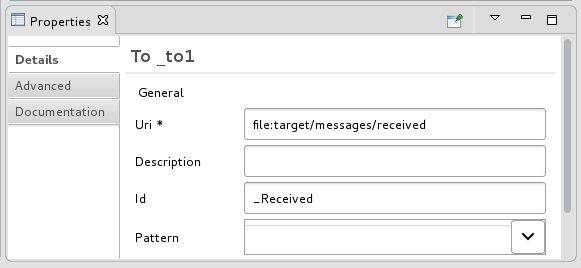 Note
NoteThe tooling will create the
target/messages/receivedfolder at runtime.
-
In the Uri field, type
In the
Route_route1container, select the From _from1 node and drag its connector arrow ( ) over the To_Received node, and then release it:
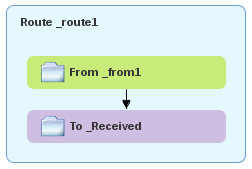 Note
NoteThe two file nodes are connected and aligned on the canvas according to the route editor’s layout direction preference setting. The choices are Down (the default) and Right.
To access the route editor 's layout preference options:
- On Linux and Windows machines, select Windows → Preferences → Fuse Tooling → Editor → Choose the layout direction for the diagram editor.
- On OS X, select CodeReady Studio → Preferences → Fuse Tooling → Editor → Choose the layout direction for the diagram editor.
NoteIf you do not connect the nodes before you close the project, the tooling automatically connects them when you reopen it.
- Save the route.
Click the Source tab at the bottom of the canvas to display the XML for the route:
<?xml version="1.0" encoding="UTF-8"?>

<blueprint xmlns="http://www.osgi.org/xmlns/blueprint/v1.0.0"
    xmlns:xsi="http://www.w3.org/2001/XMLSchema-instance"
    xsi:schemaLocation="http://www.osgi.org/xmlns/blueprint/v1.0.0
    https://www.osgi.org/xmlns/blueprint/v1.0.0/blueprint.xsd
    http://camel.apache.org/schema/blueprint
    http://camel.apache.org/schema/blueprint/camel-blueprint.xsd">

    <camelContext id="_context1" xmlns="http://camel.apache.org/schema/blueprint">
        <route id="_route1">
            <from id="_from1" uri="file:src/data?noop=true"/>
            <to id="_Received" uri="file:target/messages/received"/>
        </route>
    </camelContext>
</blueprint>
Next steps
Now that you have added and configured endpoints in the route, you can run the route as described in the Chapter 4, Running a Route tutorial.