
Red Hat Training
A Red Hat training course is available for Red Hat Fuse
Chapter 1. Accessing the Fuse Console
How you access the Fuse Console depends on your Fuse distribution:
- Fuse on OpenShift
Fuse Standalone:
1.1. Accessing the Fuse Console on OpenShift
You can deploy the Fuse Console either from the OpenShift Console or from the command line.
Security and user management for the Fuse Console is handled by OpenShift.
The Fuse Console templates configure end-to-end encryption by default so that your Fuse Console requests are secured end-to-end, from the browser to the in-cluster services.
Role-based access control (for users accessing the Fuse Console after it is deployed) is not yet available for Fuse on OpenShift.
1.1.1. Before you begin (cluster-mode setup)
If you want to deploy the Fuse Console in cluster mode on the OpenShift Container Platform environment, you need the cluster admin role and the cluster mode template. Run the following command:
oc adm policy add-cluster-role-to-user cluster-admin system:serviceaccount:openshift-infra:template-instance-controller
The cluster mode template is only available, by default, on the latest version of the OpenShift Container Platform. It is not provided with the OpenShift Online default catalog.
1.1.2. Deploying the Fuse Console from the OpenShift Console
To deploy the Fuse Console on your OpenShift cluster, follow these steps:
- In the OpenShift console, open an existing project or create a new project.
Add the Fuse Console to your OpenShift project:
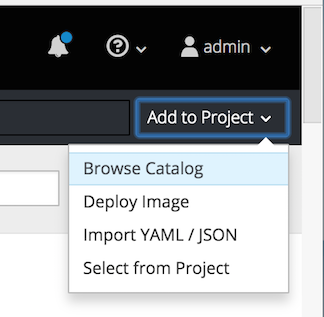
Select Add to Project → Browse Catalog.
The Select an item to add to the current project page opens.
In the Search field, type Fuse Console.
The Red Hat Fuse 7.x Console item should appear as the search result.
NoteIf the Red Hat Fuse Console item does not appear as the search result, or if the item that appears is not the latest version, you can install the Fuse Console templates manually as described in the "Prepare the OpenShift server" section of the Fuse on OpenShift Guide.
Click the Red Hat Fuse Console item.
The Red Hat Fuse Console wizard opens.
Click Next. The Configuration page of the wizard opens.
Optionally, you can change the default values of the configuration parameters.
Click Create.
The Results page of the wizard indicates that the Red Hat Fuse Console has been created.
- Click the Continue to the project overview link to verify that the Fuse Console application is added to the project.
To open the Fuse Console, click the provided URL link and then log in.
An Authorize Access page opens in the browser listing the required permissions.
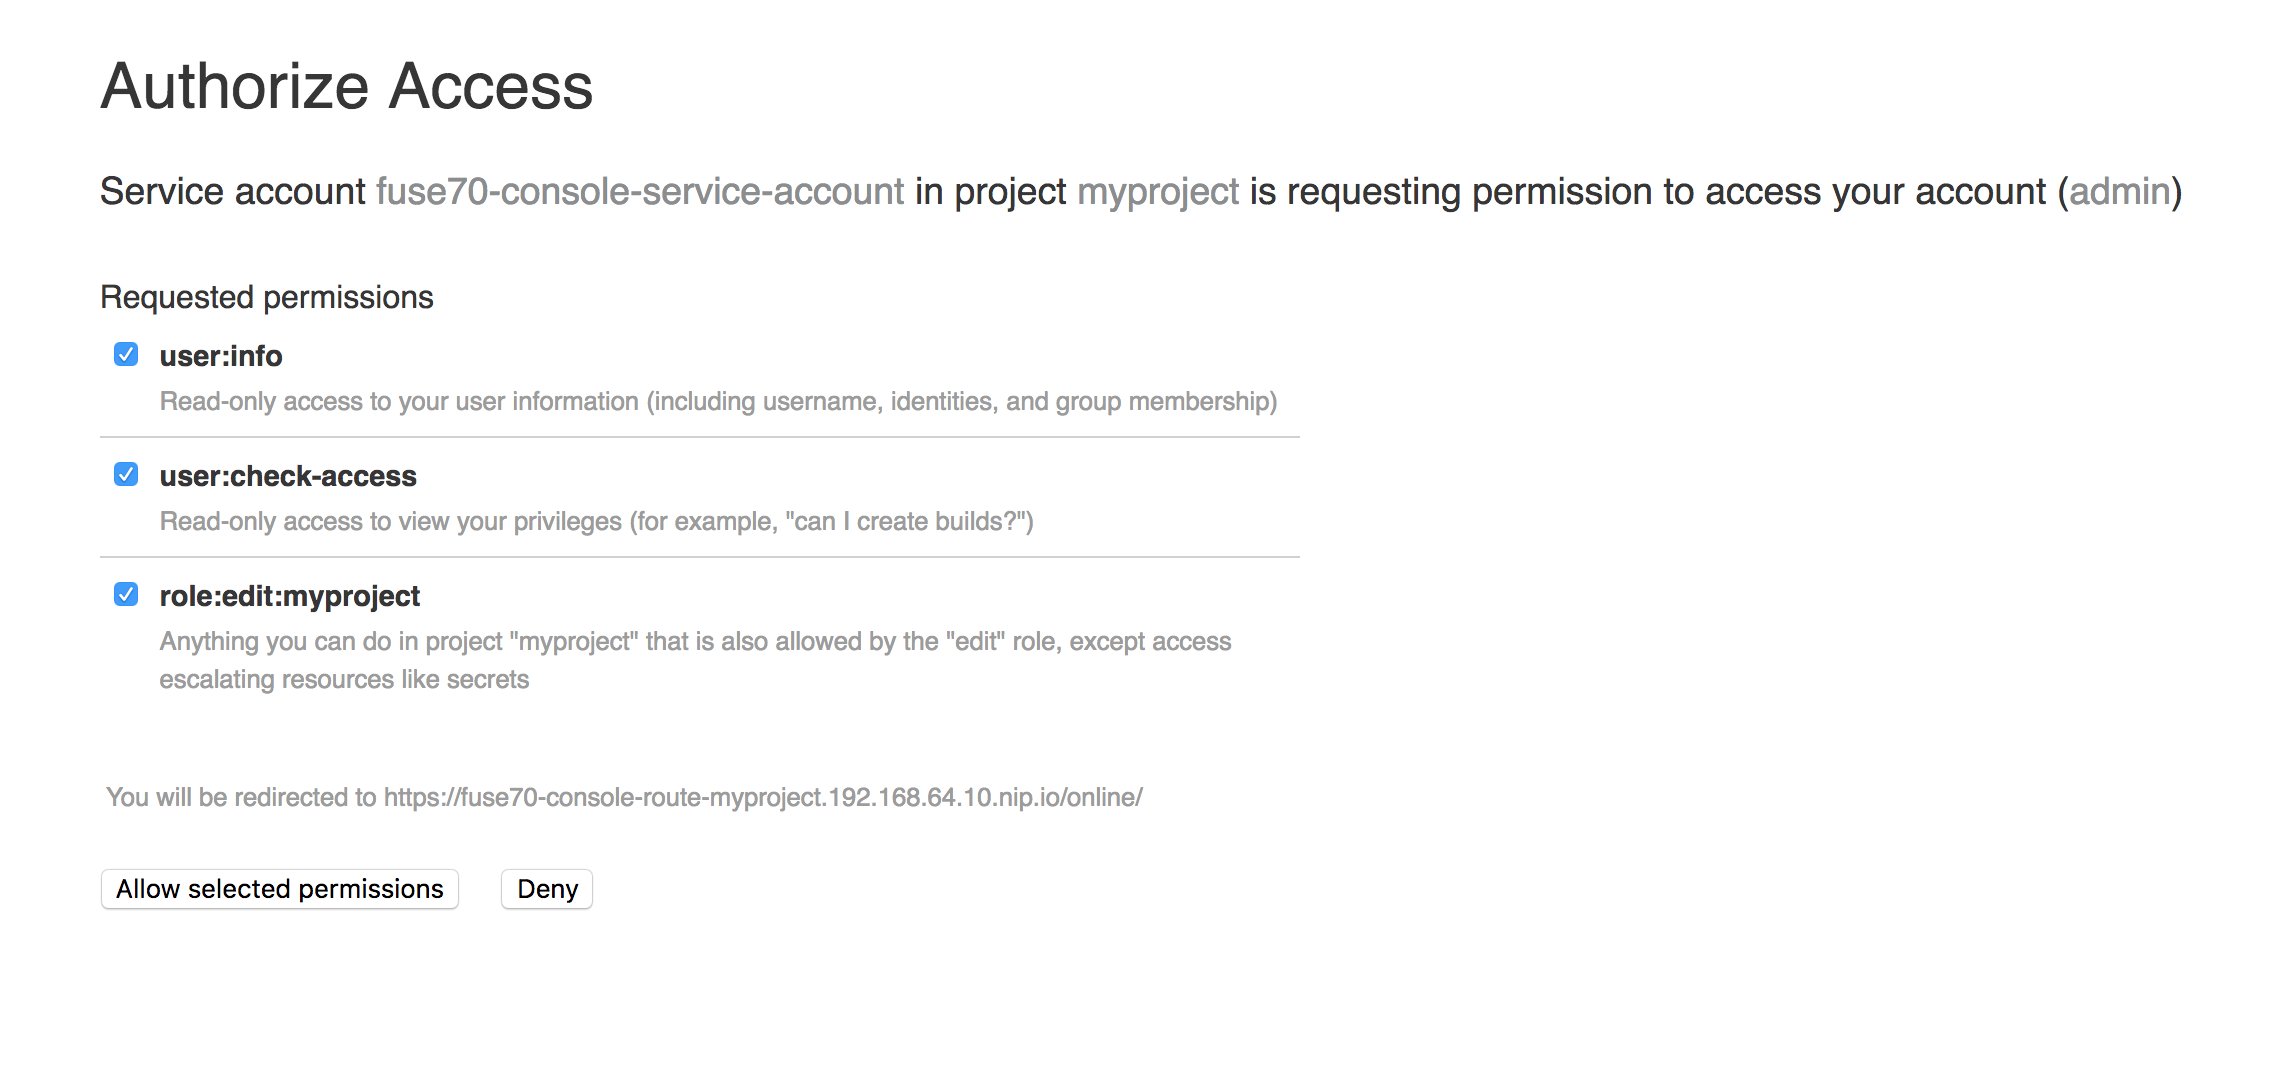
Click Allow selected permissons.
The Fuse Console opens in the browser and shows the Fuse pods running in the project.
Click Connect for the application that you want to view.
A new browser window opens showing the application in the Fuse Console.

1.1.3. Deploying the Fuse Console from the command line
Table 1.1, “Fuse Console templates” describes the two OpenShift templates that you can use to access the Fuse Console from the command line, depending on the type of Fuse application deployment.
Table 1.1. Fuse Console templates
| Type | Description |
|---|---|
| cluster | Use an OAuth client that requires the cluster-admin role to be created. The Fuse Console can discover and connect to Fuse applications deployed across multiple namespaces or projects. |
| namespace | Use a service account as OAuth client, which only requires the admin role in a project to be created. This restricts the Fuse Console access to this single project, and as such acts as a single tenant deployment. |
Optionally, you can view a list of the template parameters by running the following command:
oc process --parameters -f https://raw.githubusercontent.com/jboss-fuse/application-templates/application-templates-2.1.fuse-730065-redhat-00002/fis-console-namespace-template.json
To deploy the Fuse Console from the command line:
Create a new application based on a Fuse Console template by running one of the following commands (where myproject is the name of your project):
For the Fuse Console cluster template, where
myhostis the hostname to access the Fuse Console:oc new-app -n myproject -f https://raw.githubusercontent.com/jboss-fuse/application-templates/application-templates-2.1.fuse-730065-redhat-00002/fis-console-cluster-template.json -p ROUTE_HOSTNAME=myhost
For the Fuse Console namespace template:
oc new-app -n myproject -f https://raw.githubusercontent.com/jboss-fuse/application-templates/application-templates-2.1.fuse-730065-redhat-00002/fis-console-namespace-template.json
NoteYou can omit the route_hostname parameter for the namespace template because OpenShift automatically generates one.
Obtain the status of your deployment by running this command:
oc status
- To access the Fuse Console from a browser, use the provided URL (for example, https://fuse-console.192.168.64.12.nip.io).
1.2. Accessing the Fuse Console for Spring Boot standalone
To access the Fuse Console for a standalone Fuse Spring Boot distribution:
Add hawtio-springboot to your Fuse application’s
pom.xmlfile dependencies.<dependency> <groupId>io.hawt</groupId> <artifactId>hawtio-springboot</artifactId> </dependency>
Note that you do not need to specify the version because it is provided by the Maven BOM.
Edit the
src/main/resources/application.propertiesfile:Set the following properties to false:
-
endpoints.jolokia.sensitive -
endpoints.hawtio.sensitive -
hawtio.authenticationEnabled
-
Set the following properties to true:
-
endpoints.hawtio.enabled endpoints.jolokia.enabledYour application.properties settings should look similar to the following example:
# ports

server.port=8080

management.port=10001


# enable management endpoints for healthchecks and hawtio

endpoints.enabled = false

endpoints.hawtio.enabled = true

endpoints.jolokia.enabled = true

endpoints.health.enabled = true

management.health.defaults.enabled=false

camel.health.enabled=false

camel.health.indicator.enabled=true

endpoints.jolokia.sensitive=false

endpoints.hawtio.sensitive=false

hawtio.authenticationEnabled=false
NoteBy default, authentication for the Fuse Console on Spring Boot is disabled. Optionally, you can enable authentication by writing code specific to your Fuse Console distribution. Here is an example that you can use for guidance:
https://github.com/hawtio/hawtio/tree/master/examples/springboot-authentication
-
Run the Fuse application:
mvn spring-boot:run
To determine the port number for the Fuse Console URL, obtain the management.port value by looking at the value set in the
src/main/resources/application.propertiesfile. For example:management.port = 10001
To open the Fuse Console in a browser, use the following URL syntax where nnnnn is the value of the management.port property:
http://localhost:nnnnn/hawtio/index.htmlFor example:
http://localhost:10001/hawtio/index.html
1.3. Accessing the Fuse Console for JBoss EAP standalone
Before you can access the Fuse Console for Red Hat JBoss Enterprise Application Platform, you must install Fuse on the JBoss EAP container. For step-by-step instructions, see Installing on JBoss EAP.
To access the Fuse Console for a standalone JBoss EAP distribution:
Start Red Hat Fuse standalone with the following command:
On Linux/Mac OS:
./bin/standalone.shOn Windows:
./bin/standalone.bat-
In a web browser, enter the URL to connect to the Fuse Console. For example:
http://localhost:8080/hawtio - In the login page, enter your user name and password and then click Log In.
By default, the Fuse Console shows the Home page. The left navigation tabs indicate the running plugins.
1.3.1. Resolving delayed Fuse Console loading
If the main Fuse Console page takes a long time to display in the browser, you might need to reduce the number and the size of the log files. You can use the periodic-size-rotating-file-handler to rotate the file when it reaches a maximum size (rotate-size) and maintains a number of files (max-backup-index). For details on how to use this handler, see the Red Hat JBoss Enterprise Application Platform product documentation.
1.4. Accessing the Fuse Console for Karaf standalone
To access the Fuse Console for Apache Karaf standalone:
- Install Fuse on the Karaf container. For step-by-step instructions, see Installing on Apache Karaf.
In the command line, navigate to the directory in which you installed Red Hat Fuse and run the following command to start Fuse standalone:
./bin/fuse
The Karaf console starts and shows version information, the default Fuse Console URL, and a list of common commands.
-
In a browser, enter the URL to connect to the Fuse Console. For example:
http://localhost:8181/hawtio - In the login page, enter your user name and password and then click Log In.
By default, the Fuse Console shows the Home page. The left navigation tabs indicate the running plugins.