
Red Hat Training
A Red Hat training course is available for Red Hat Fuse
Chapter 4. Get Started for Developers
You can start using Fuse on OpenShift by creating an application and deploying it to OpenShift using one of the following OpenShift Source-to-Image (S2I) application development workflows:
- S2I binary workflow
- S2I with build input from a binary source. This workflow is characterized by the fact that the build is partly executed on the developer’s own machine. After building a binary package locally, this workflow hands off the binary package to OpenShift. For more details, see Binary Source from the OpenShift 3.5 Developer Guide.
- S2I source workflow
- S2I with build input from a Git source. This workflow is characterised by the fact that the build is executed entirely on the OpenShift server. For more details, see Git Source from the OpenShift 3.5 Developer Guide.
4.1. Prerequisites
4.1.1. Access to an OpenShift Server
The fundamental requirement for developing and testing Fuse on OpenShift projects is having access to an OpenShift Server. You have the following basic alternatives:
4.1.1.1. Install Container Development Kit (CDK) on Your Local Machine
As a developer, if you want to get started quickly, the most practical alternative is to install Red Hat CDK on your local machine. Using CDK, you can boot a virtual machine (VM) instance that runs an image of OpenShift on Red Hat Enterprise Linux (RHEL) 7. An installation of CDK consists of the following key components:
- A virtual machine (libvirt, VirtualBox, or Hyper-V)
- Minishift to start and manage the Container Development Environment
Red Hat CDK is intended for development purposes only. It is not intended for other purposes, such as production environments, and may not address known security vulnerabilities. For full support of running mission-critical applications inside of docker-formatted containers, you need an active RHEL 7 or RHEL Atomic subscription. For more details, see Support for Red Hat Container Development Kit (CDK).
To install the CDK on your local machine:
- For Fuse on OpenShift, we recommend that you install version 3.8 of CDK. Detailed instructions for installing and using CDK 3.8 are provided in the Red Hat CDK 3.8 Getting Started Guide.
- Configure your OpenShift credentials to gain access to the Red Hat container registry by following the instructions in Section 2.1, “Configure Authentication to the Red Hat Container Registry”.
Install the Fuse on OpenShift images and templates manually as described in Chapter 2, Get Started for Administrators.
NoteYour version of CDK might have Fuse on OpenShift images and templates pre-installed. However, you must install (or update) the Fuse on OpenShift images and templates after you configure your OpenShift credentials.
- Before you proceed with the examples in this chapter, you should read and thoroughly understand the contents of the Red Hat CDK 3.8 Getting Started Guide.
4.1.1.2. Get Remote Access to an Existing OpenShift Server
Your IT department might already have set up an OpenShift cluster on some server machines. In this case, the following requirements must be satisfied for getting started with Fuse on OpenShift:
- The server machines must be running a supported version of OpenShift Container Platform (as documented in the Supported Configurations page). The examples in this guide have been tested against version 3.11.
- Ask the OpenShift administrator to install the latest Fuse on OpenShift container base images and the Fuse on OpenShift templates on the OpenShift servers.
- Ask the OpenShift administrator to create a user account for you, having the usual developer permissions (enabling you to create, deploy, and run OpenShift projects).
-
Ask the administrator for the URL of the OpenShift Server (which you can use either to browse to the OpenShift console or connect to OpenShift using the
occommand-line client) and the login credentials for your account.
4.1.2. Java Version
On your developer machine, make sure you have installed a Java version that is supported by Fuse 7.3. For details of the supported Java versions, see Supported Configurations.
4.1.3. Install the Requisite Client-Side Tools
We recommend that you have the following tools installed on your developer machine:
- Apache Maven 3.6.x
- Required for local builds of OpenShift projects. Download the appropriate package from the Apache Maven download page. Make sure that you have at least version 3.6.x (or later) installed, otherwise Maven might have problems resolving dependencies when you build your project.
- Git
- Required for the OpenShift S2I source workflow and generally recommended for source control of your Fuse on OpenShift projects. Download the appropriate package from the Git Downloads page.
- OpenShift client
If you are using CDK, you can add the
ocbinary to your PATH usingminishift oc-envwhich displays the command you need to type into your shell (the output ofoc-envwill differ depending on OS and shell type):$ minishift oc-env export PATH="/Users/john/.minishift/cache/oc/v1.5.0:$PATH" # Run this command to configure your shell: # eval $(minishift oc-env)
For more details, see Using the OpenShift Client Binary in CDK 3.8 Getting Started Guide.
If you are not using CDK, follow the instructions in the CLI Reference to install the
occlient tool.- (Optional) Docker client
Advanced users might find it convenient to have the Docker client tool installed (to communicate with the docker daemon running on an OpenShift server). For information about specific binary installations for your operating system, see the Docker installation site.
For more details, see Reusing the docker Daemon in CDK 3.8 Getting Started Guide.
Make sure that you install versions of the oc tool and the docker tool that are compatible with the version of OpenShift running on the OpenShift Server.
4.2. Prepare Your Development Environment
After installing the required software and tools, prepare your development environment as follows.
4.2.1. Configure Maven Repositories
Configure the Maven repositories, which hold the archetypes and artifacts you will need for building an Fuse on OpenShift project on your local machine. Edit your Maven settings.xml file, which is usually located in ~/.m2/settings.xml (on Linux or macOS) or Documents and Settings\<USER_NAME>\.m2\settings.xml (on Windows). The following Maven repositories are required:
-
Maven central:
https://repo1.maven.org/maven2 -
Red Hat GA repository:
https://maven.repository.redhat.com/ga -
Red Hat EA repository:
https://maven.repository.redhat.com/earlyaccess/all
You must add the preceding repositories both to the dependency repositories section as well as the plug-in repositories section of your settings.xml file.
4.2.2. (Optional) Install Developer Studio
Red Hat JBoss Developer Studio is an Eclipse-based development environment, which includes support for developing Fuse on OpenShift applications. For details about how to install this development environment, see Install Red Hat JBoss Developer Studio.
4.3. Create and Deploy a Project Using the S2I Binary Workflow
In this section, you will use the OpenShift S2I binary workflow to create, build, and deploy an Fuse on OpenShift project.
Create a new Fuse on OpenShift project using a Maven archetype. For this example, we use an archetype that creates a sample Spring Boot Camel project. Open a new shell prompt and enter the following Maven command:
mvn org.apache.maven.plugins:maven-archetype-plugin:2.4:generate \
  -DarchetypeCatalog=https://maven.repository.redhat.com/ga/io/fabric8/archetypes/archetypes-catalog/2.2.0.fuse-730042-redhat-00002/archetypes-catalog-2.2.0.fuse-730042-redhat-00002-archetype-catalog.xml \
  -DarchetypeGroupId=org.jboss.fuse.fis.archetypes \
  -DarchetypeArtifactId=spring-boot-camel-xml-archetype \
  -DarchetypeVersion=2.2.0.fuse-730042-redhat-00002
The archetype plug-in switches to interactive mode to prompt you for the remaining fields:
Define value for property 'groupId': : org.example.fis
Define value for property 'artifactId': : fuse73-spring-boot
Define value for property 'version':  1.0-SNAPSHOT: :
Define value for property 'package':  org.example.fis: :
[INFO] Using property: spring-boot-version = 1.5.17.RELEASE
Confirm properties configuration:
groupId: org.example.fis
artifactId: fuse73-spring-boot
version: 1.0-SNAPSHOT
package: org.example.fis
spring-boot-version: 1.5.17.RELEASE
 Y: :
When prompted, enter
org.example.fisfor thegroupIdvalue andfuse73-spring-bootfor theartifactIdvalue. Accept the defaults for the remaining fields.-
If the previous command exited with the
BUILD SUCCESSstatus, you should now have a new Fuse on OpenShift project under thefuse73-spring-bootsubdirectory. You can inspect the XML DSL code in thefuse73-spring-boot/src/main/resources/spring/camel-context.xmlfile. The demonstration code defines a simple Camel route that continuously sends message containing a random number to the log. In preparation for building and deploying the Fuse on OpenShift project, log in to the OpenShift Server as follows:
oc login -u developer -p developer https://OPENSHIFT_IP_ADDR:8443
Where,
OPENSHIFT_IP_ADDRis a placeholder for the OpenShift server’s IP address as this IP address is not always the same.NoteThe
developeruser (withdeveloperpassword) is a standard account that is automatically created on the virtual OpenShift Server by CDK. If you are accessing a remote server, use the URL and credentials provided by your OpenShift administrator.Run the following command to ensure that Fuse on OpenShift images and templates are already installed and you can access them.
oc get template -n openshift
If the images and templates are not pre-installed, or if the provided versions are out of date, install (or update) the Fuse on OpenShift images and templates manually. For more information on how to install Fuse on OpenShift images see Chapter 2, Get Started for Administrators.
Create a new project namespace called
test(assuming it does not already exist), as follows:oc new-project test
If the
testproject namespace already exists, you can switch to it using the following command:oc project test
You are now ready to build and deploy the
fuse73-spring-bootproject. Assuming you are still logged into OpenShift, change to the directory of thefuse73-spring-bootproject, and then build and deploy the project, as follows:cd fuse73-spring-boot mvn fabric8:deploy -Popenshift
At the end of a successful build, you should see some output like the following:
...
[INFO] OpenShift platform detected
[INFO] Using project: test
[INFO] Creating a Service from openshift.yml namespace test name fuse73-spring-boot
[INFO] Created Service: target/fabric8/applyJson/test/service-fuse73-spring-boot.json
[INFO] Using project: test
[INFO] Creating a DeploymentConfig from openshift.yml namespace test name fuse73-spring-boot
[INFO] Created DeploymentConfig: target/fabric8/applyJson/test/deploymentconfig-fuse73-spring-boot.json
[INFO] Creating Route test:fuse73-spring-boot host: null
[INFO] F8: HINT: Use the command `oc get pods -w` to watch your pods start up
[INFO] ------------------------------------------------------------------------
[INFO] BUILD SUCCESS
[INFO] ------------------------------------------------------------------------
[INFO] Total time: 05:38 min
[INFO] Finished at: 2019-02-22T12:08:11+01:00
[INFO] Final Memory: 63M/272M
[INFO] ------------------------------------------------------------------------
NoteThe first time you run this command, Maven has to download a lot of dependencies, which takes several minutes. Subsequent builds will be faster.
-
Navigate to the OpenShift console in your browser and log in to the console with your credentials (for example, with username
developerand password,developer). - In the OpenShift console, scroll down to find the test project namespace. Click the test project to open the test project namespace. The Overview tab of the test project opens, showing the fuse73-spring-boot application.
Click the arrow on the left of the fuse73-spring-boot deployment to expand and view the details of this deployment, as shown.
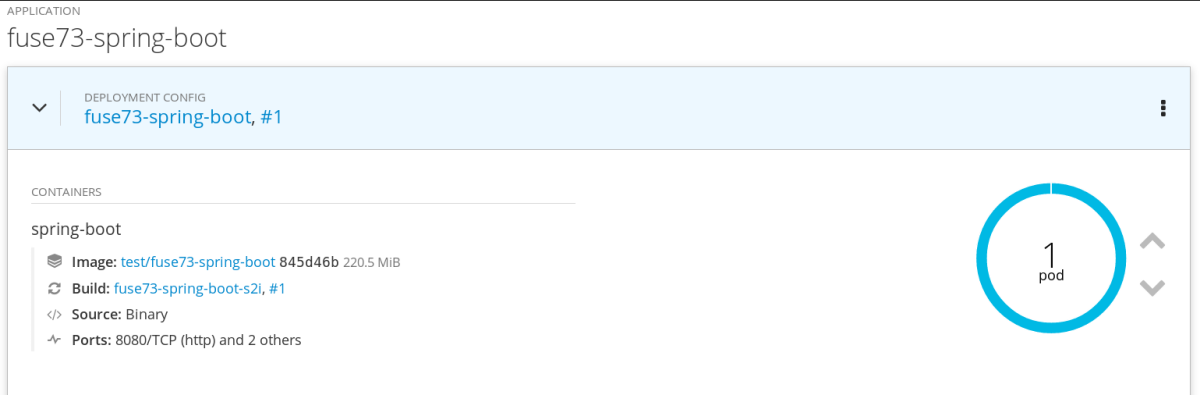
Click in the centre of the pod icon (blue circle) to view the list of pods for fuse73-spring-boot.

Click on the pod Name (in this example,
fuse73-spring-boot-1-kxdjm) to view the details of the running pod.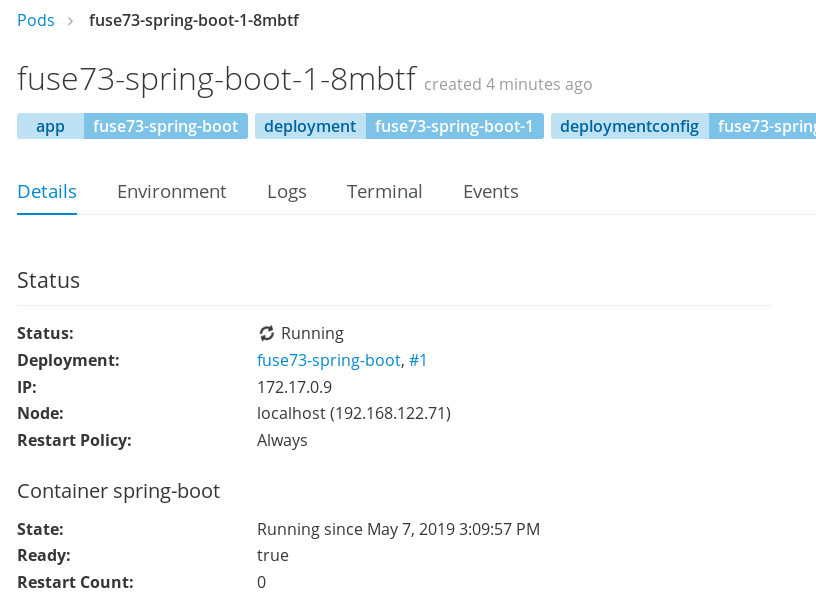
Click on the Logs tab to view the application log and scroll down the log to find the random number log messages generated by the Camel application.
...
07:30:32.406 [Camel (camel) thread #0 - timer://foo] INFO  simple-route - >>> 985
07:30:34.405 [Camel (camel) thread #0 - timer://foo] INFO  simple-route - >>> 741
07:30:36.409 [Camel (camel) thread #0 - timer://foo] INFO  simple-route - >>> 796
07:30:38.409 [Camel (camel) thread #0 - timer://foo] INFO  simple-route - >>> 211
07:30:40.411 [Camel (camel) thread #0 - timer://foo] INFO  simple-route - >>> 511
07:30:42.411 [Camel (camel) thread #0 - timer://foo] INFO simple-route - >>> 942
-
Click Overview on the left-hand navigation bar to return to the applications overview in the
testnamespace. To shut down the running pod, click the down arrow beside the pod icon. When a dialog prompts you with the question Scale down deployment fuse73-spring-boot-1?, click Scale Down.
(Optional) If you are using CDK, you can shut down the virtual OpenShift Server completely by returning to the shell prompt and entering the following command:
minishift stop
4.3.1. Undeploy and Redeploy the Project
You can undeploy or redeploy your projects, as follows:
To undeploy the project, enter the command:
mvn fabric8:undeploy
To redeploy the project, enter the commands:
mvn fabric8:undeploy
mvn fabric8:deploy -Popenshift
4.4. Accessing the Fuse Console
The Red Hat Fuse Console is a web-based console that you access from a browser to monitor and manage one or more running Fuse containers (pods). The Fuse Console is based on HawtIO open source software. For a list of supported browsers, see Suupported Configurations.
In OpenShift, you can access the Fuse Console in two ways:
- From a specific pod so that you can monitor that single running Fuse container.
- By adding the centralized Fuse Console catalog item to your project so that you can monitor all the running Fuse containers in your project.
4.4.1. Monitoring a single Fuse pod
To open the Fuse Console for a pod running the Fuse on OpenShift Spring Boot example:
From the Applications → Pods view in your OpenShift project, click on the pod name to view the details of the running Fuse on OpenShift Spring Boot pod. On the right-hand side of this page, you see a summary of the container template:
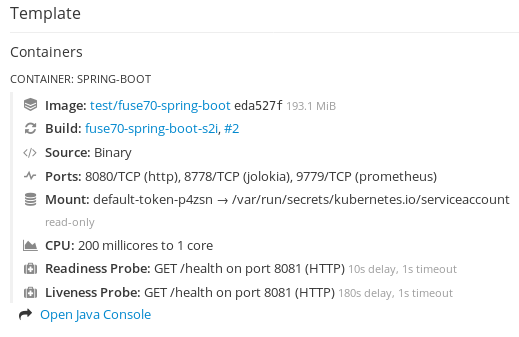
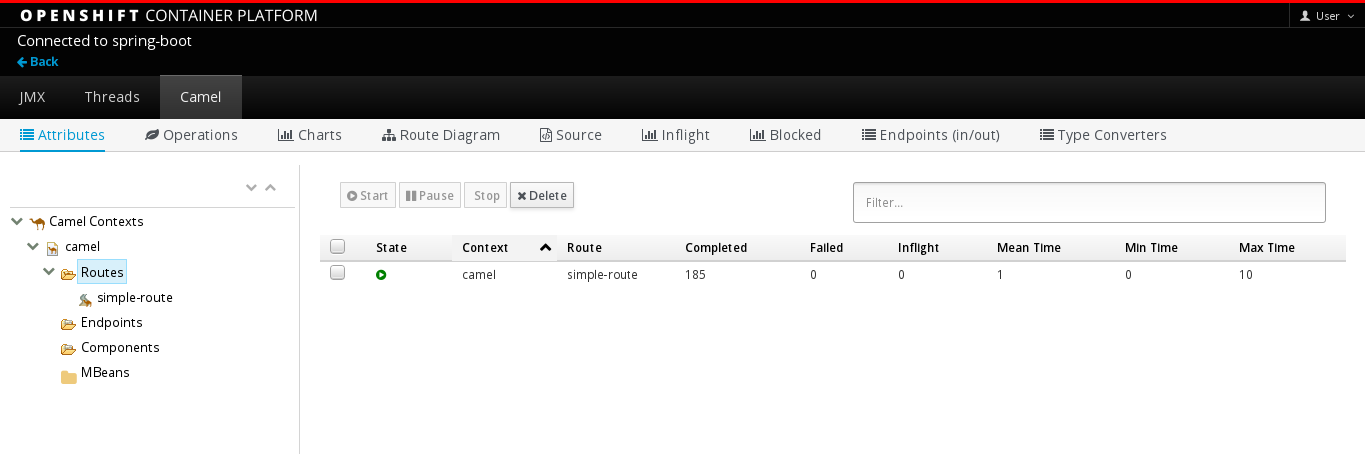
From this view, click on the Open Java Console link to open the HawtIO console.
 Note
NoteIn order to configure OpenShift to display a link to HawtIO console in the pod view, the pod running a Fuse on OpenShift image must declare a tcp port within a name attribute set to
jolokia:{ "kind": "Pod", [...] "spec": { "containers": [ { [...] "ports": [ { "name": "jolokia", "containerPort": 8778, "protocol": "TCP" }
4.4.2. Monitoring all Fuse pods in an OpenShift project
In addition to accessing the Fuse Console to monitor a single pod, you can add a centralized version of the Fuse Console to your OpenShift project to examine and manage the details of one or more Fuse pods. For information on how to access the centralized Fuse Console, see Accessing the Fuse Console on OpenShift in "Managing Fuse".
4.5. Create and Deploy a Project Using the S2I Source Workflow
In this section, you will use the OpenShift S2I source workflow to build and deploy a Fuse on OpenShift project based on a template. The starting point for this demonstration is a quickstart project stored in a remote Git repository. Using the OpenShift console, you will download, build, and deploy this quickstart project in the OpenShift server.
-
Navigate to the OpenShift console in your browser (https://OPENSHIFT_IP_ADDR:8443, replace
OPENSHIFT_IP_ADDRwith the IP address that was displayed in the case of CDK) and log in to the console with your credentials (for example, with usernamedeveloperand password,developer). In the Catalog search field, enter
Red Hat Fuse 7.3 Camel XMLas the search string and select the Red Hat Fuse 7.3 Camel XML DSL with Spring Boot template.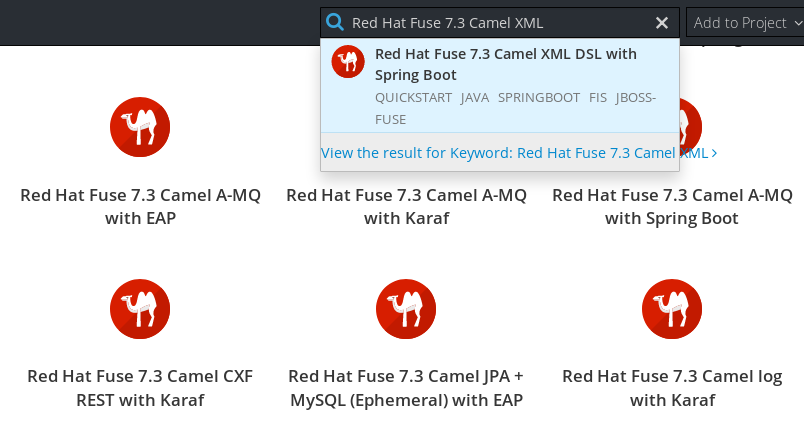
- The Information step of the template wizard opens. Click Next.
The Configuration step of the template wizard opens, as shown. From the Add to Project dropdown, select My Project.
NoteAlternatively, if you prefer to create a new project for this example, select Create Project from the Add to Project dropdown. A Project Name field then appears for you to fill in the name of the new project.
You can accept the default values for the rest of the settings in the Configuration step. Click Create.
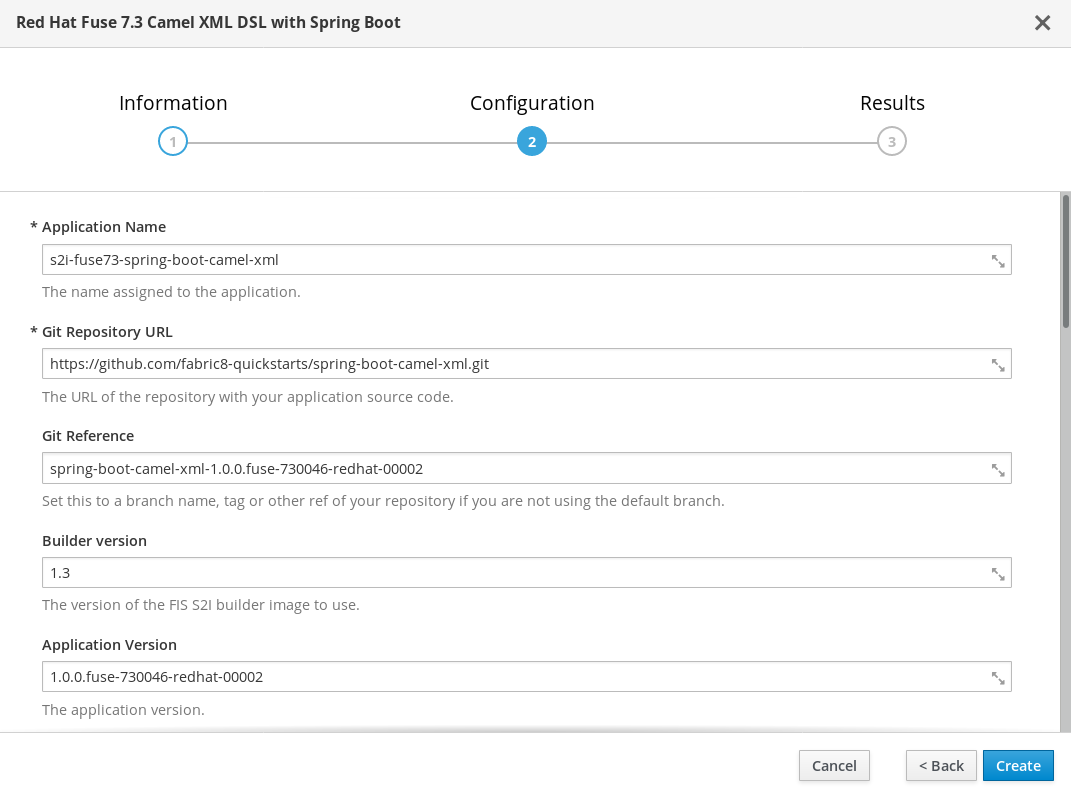 Note
NoteIf you want to modify the application code (instead of just running the quickstart as is), you would need to fork the original quickstart Git repository and fill in the appropriate values in the Git Repository URL and Git Reference fields.
- The Results step of the template wizard opens. Click Close.
- In the right-hand My Projects pane, click My Project. The Overview tab of the My Project project opens, showing the s2i-fuse73-spring-boot-camel-xml application.
Click the arrow on the left of the s2i-fuse73-spring-boot-camel-xml deployment to expand and view the details of this deployment, as shown.
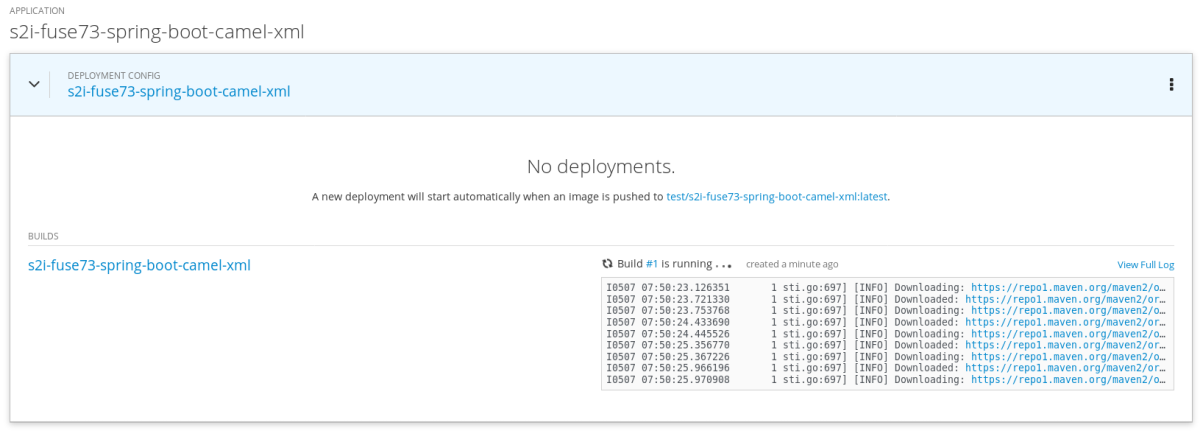
In this view, you can see the build log. If the build should fail for any reason, the build log can help you to diagnose the problem.
NoteThe build can take several minutes to complete, because a lot of dependencies must be downloaded from remote Maven repositories. To speed up build times, we recommend you deploy a Nexus server on your local network.
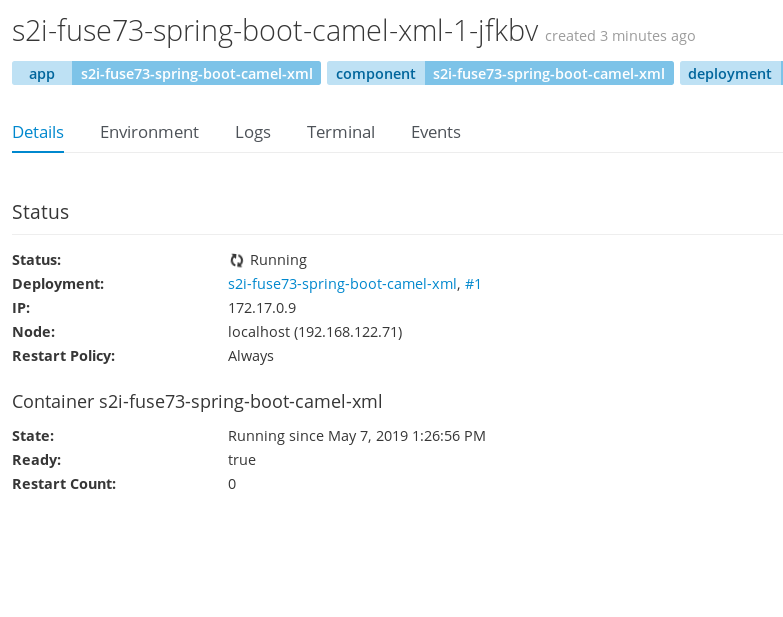
If the build completes successfully, the pod icon shows as a blue circle with 1 pod running. Click in the centre of the pod icon (blue circle) to view the list of pods for s2i-fuse73-spring-boot-camel-xml.
NoteIf multiple pods are running, you would see a list of running pods at this point. Otherwise (if there is just one pod), you get straight through to the details view of the running pod.
The pod details view opens. Click on the Logs tab to view the application log and scroll down the log to find the log messages generated by the Camel application.
-
Click Overview on the left-hand navigation bar to return to the overview of the applications in the
My Projectnamespace. To shut down the running pod, click the down arrow
beside the pod icon. When a dialog prompts you with the question Scale down deployment s2i-fuse73-spring-boot-camel-xml-1?, click Scale Down.
(Optional) If you are using CDK, you can shut down the virtual OpenShift Server completely by returning to the shell prompt and entering the following command:
minishift stop