Red Hat Training
A Red Hat training course is available for Red Hat Fuse
Chapter 1. Getting Started with Spring Boot Standalone
1.1. About Spring Boot standalone deployment mode
In standalone deployment mode, a Spring Boot application is packaged as a Jar file and runs directly inside the Java Virtual Machine (JVM). That is, the Spring Boot application can be run directly using the java command with the -jar option — for example:
java -jar SpringBootApplication.jar
Where Spring Boot provides the main class for the executable Jar. This approach to packaging and running the application is consistent with the microservices philosophy, where a service is packaged with the minimum set of requirements. The container is also minimal, being just the JVM itself.
The following elements are required for building a Spring Boot standalone application in Fuse:
The Fuse Bill of Materials (BOM) — defines a carefully curated set of dependencies from the Red Hat Maven repository. The BOM exploits Maven’s dependency management mechanism to define the appropriate versions of Maven dependencies.
Note that only dependencies defined in the Fuse BOM are supported by Red Hat.
- The Spring Boot Maven Plug-In — implements the build process for a standalone Spring Boot application in Maven. This plug-in is responsible for packaging your Spring Boot application as an executable Jar file.
For details about the OpenShift mode of deployment, see the Fuse on OpenShift Guide.
1.2. Overview of Fuse boosters
Red Hat Fuse provides the following boosters to help you get started with Fuse applications and demonstrate useful components:
- Section 1.3, “Circuit Breaker booster” - An example of enabling a distributed application to cope with interruptions to network connectivity and temporary unavailability of backend services.
- Section 1.4, “Externalized Configuration booster” - An example of how to externalize configuration for an Apache Camel route.
- Section 1.5, “REST API booster” - An example that introduces the mechanics of interacting with a remote (exposed by Apache Camel) service using the HTTP protocol.
1.2.1. Prerequisites
To build and run the booster demonstrations, install the following prerequisites:
- A supported version of the Java Developer Kit (JDK). See the Supported Configurations page for details.
- Apache Maven 3.3.x or later. See the Maven Download page. To learn more about Maven, see Appendix A, Preparing to use Maven.
1.2.2. Generate a booster project
To generate a project for any of the Fuse boosters:
- Navigate to https://developers.redhat.com/launch.
- Click LAUNCH YOUR PROJECT.
- The launcher wizard prompts you to log in to your Red Hat account. Click the Log in or register button to log in.
- On the first page, type a name for the project.
- On the Select Target Environment page, click Build and run locally.
On the Select Mission & Runtime page:
- Select the mission that you want to use (Circuit Breaker, Externalized Configuration, or REST API Level 0.
- Select the Fuse runtime (not the Spring Boot runtime).
- Select the latest 7.x.x (Red Hat Fuse) version from the Runtime Version dropdown menu.
- On the Confirm Application Summary & Setup page, click Set Up Application.
- After downloading the ZIP file, use an archive utility to extract the generated project to a convenient location on your local filesystem.
Follow the instructions to build and run the booster that you downloaded:
1.3. Circuit Breaker booster
The Netflix/Hystrix circuit breaker component enables distributed applications to cope with interruptions to network connectivity and temporary unavailability of backend services. The basic idea of the circuit breaker pattern is that the loss of a dependent service is detected automatically and an alternative behavior can be programmed, in case the backend service is temporarily unavailable.
The Fuse circuit breaker booster consists of two related services:
- A name service, which returns a name to greet
-
A greetings service, which invokes the name service to get a name and then returns the string,
Hello, NAME.
In this demonstration, the Hystrix circuit breaker is inserted between the greetings service and the name service. If the name service becomes unavailable, the greetings service can fall back to an alternative behavior and respond to the client immediately, instead of blocking or timing out while it waits for the name service to restart.
1.3.1. Build and run the Circuit Breaker booster
After you follow the Section 1.2.2, “Generate a booster project” steps for the Circuit Breaker mission, follow these steps to build and run the Circuit breaker booster project:
Open a shell prompt and build the project from the command line, using Maven:
cd PROJECT_DIR
mvn clean package
Open a new shell prompt and start the name service, as follows:
cd name-service
mvn spring-boot:run -DskipTests -Dserver.port=8081
As Spring Boot starts up, you should see some output like the following:
...
2017-12-08 15:44:24.223  INFO 22758 --- [           main] o.a.camel.spring.SpringCamelContext      : Total 1 routes, of which 1 are started
2017-12-08 15:44:24.227  INFO 22758 --- [           main] o.a.camel.spring.SpringCamelContext      : Apache Camel 2.20.0 (CamelContext: camel-1) started in 0.776 seconds
2017-12-08 15:44:24.234  INFO 22758 --- [           main] org.jboss.fuse.boosters.cb.Application   : Started Application in 4.137 seconds (JVM running for 4.744)
Open a new shell prompt and start the greetings service, as follows:
cd greetings-service
mvn spring-boot:run -DskipTests
As Spring Boot starts up, you should see some output like the following:
...
2017-12-08 15:46:58.521  INFO 22887 --- [           main] o.a.c.c.s.CamelHttpTransportServlet      : Initialized CamelHttpTransportServlet[name=CamelServlet, contextPath=]
2017-12-08 15:46:58.524  INFO 22887 --- [           main] s.b.c.e.t.TomcatEmbeddedServletContainer : Tomcat started on port(s): 8080 (http)
2017-12-08 15:46:58.536  INFO 22887 --- [           main] org.jboss.fuse.boosters.cb.Application   : Started Application in 6.263 seconds (JVM running for 6.819)
The greetings service exposes a REST endpoint at the URL,
http://localhost:8080/camel/greetings.Go to http://localhost:8080
When you open this page, it invokes the Greeting Service:
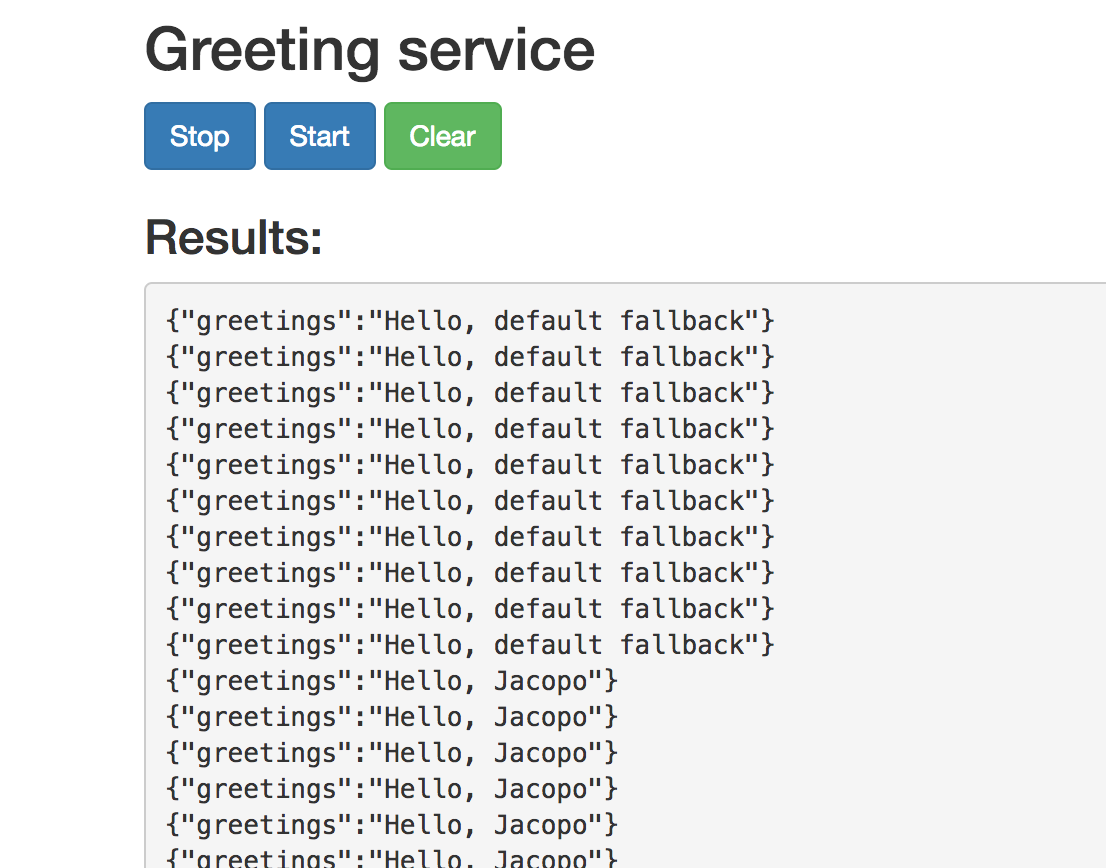
This page also provides a link to the Hystrix dashboard, which monitors the state of the circuit breaker.
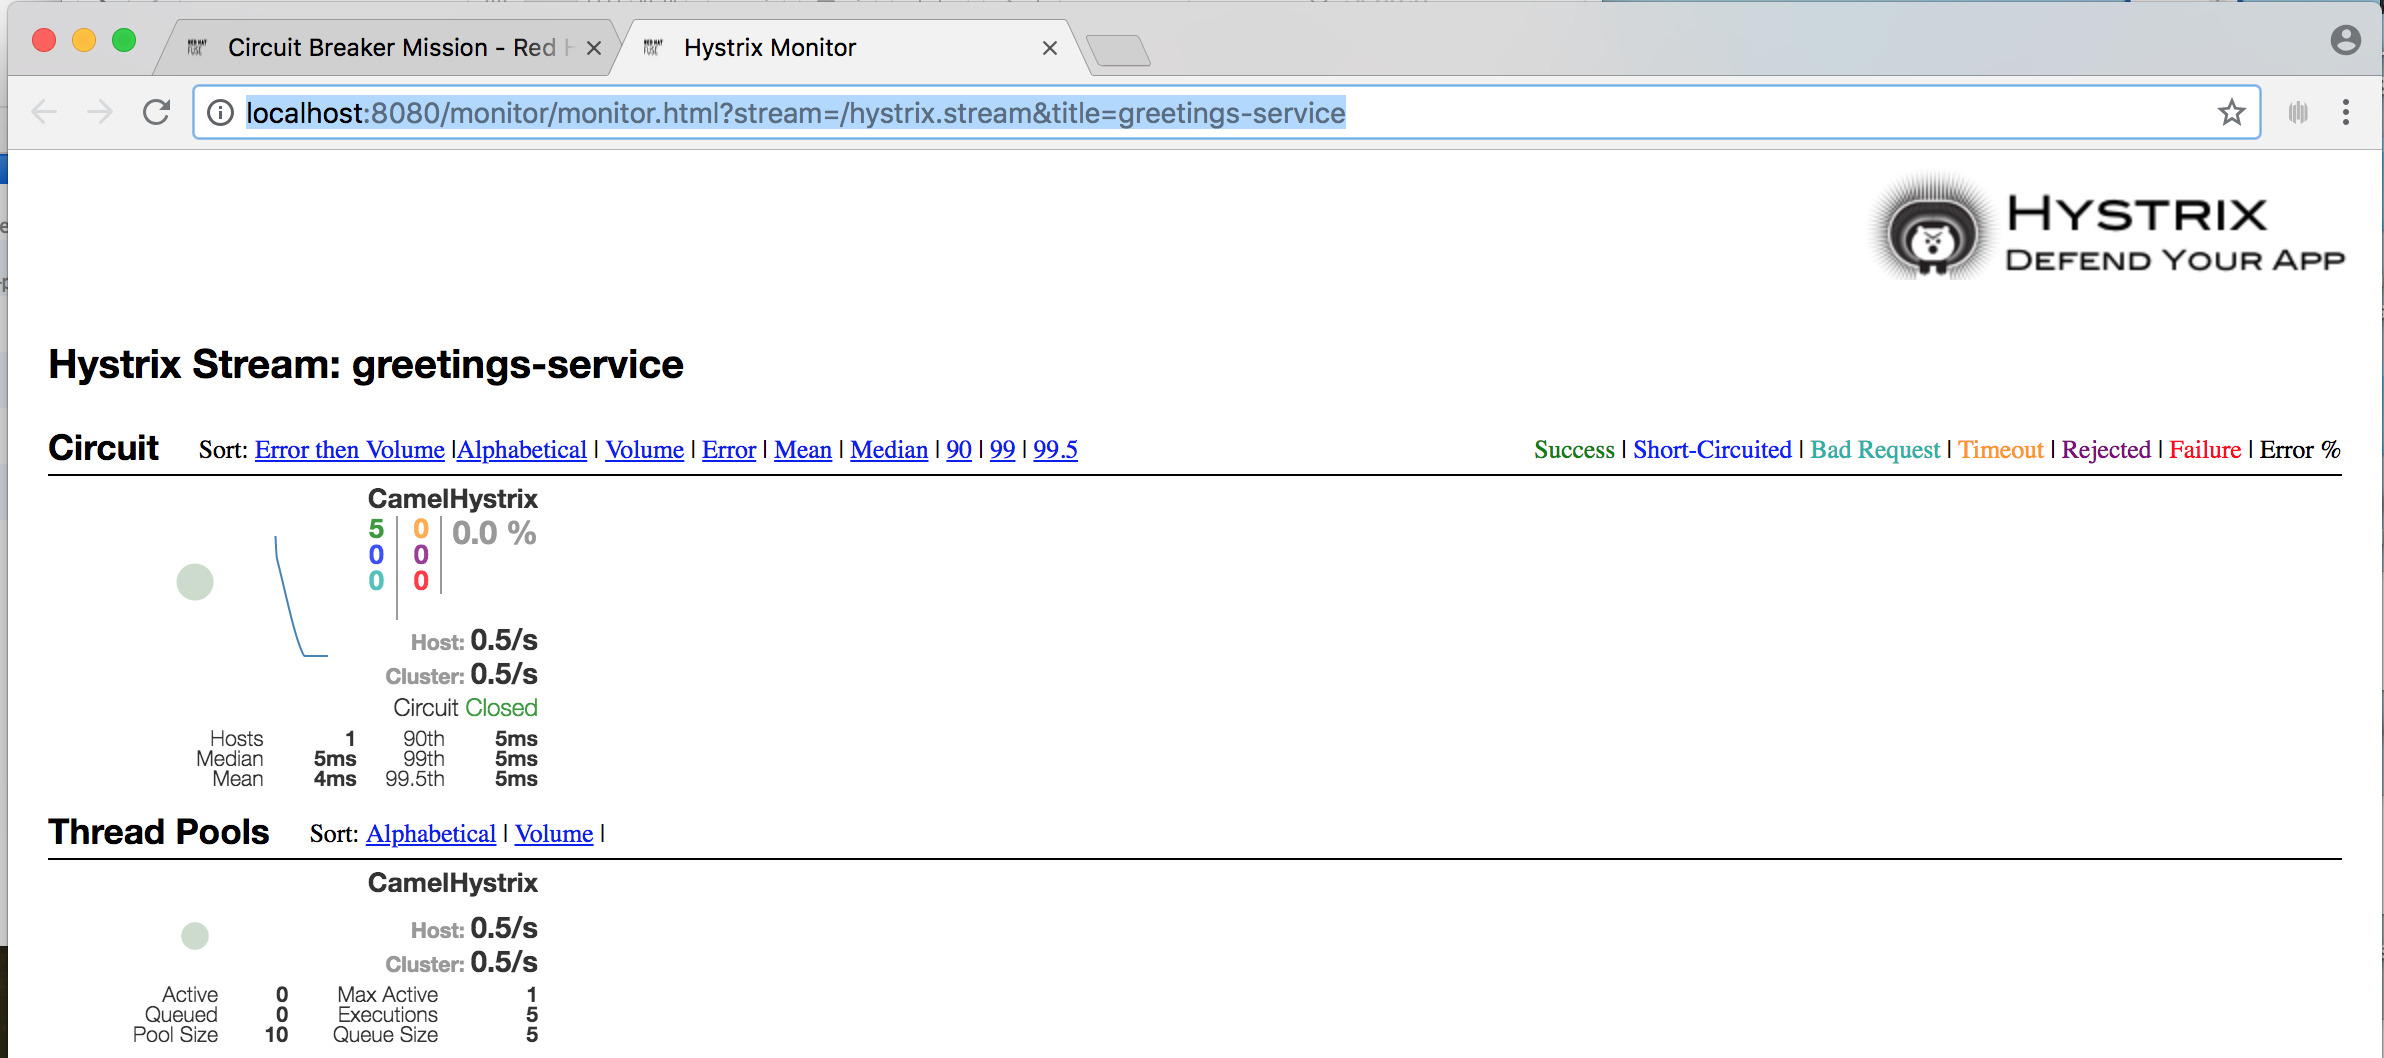
To demonstrate the circuit breaker functionality provided by Camel Hystrix, kill the backend name service by pressing Ctrl+C while in the window of the shell prompt where the name service is running.
Now that the name service is unavailable, the circuit breaker kicks in to prevent the greetings service from hanging when it is invoked.
Observe the changes in the Hystrix Monitor dashboard and in the Greeting Service output:
1.4. Externalized Configuration booster
The Externalized Configuration booster provides an example of how to externalize configuration for an Apache Camel route. For Spring Boot standalone deployments, the configuration data is stored in an application.properties file.
For Fuse on OpenShift deployments, the configuration data is stored in a ConfigMap object.
1.4.1. Build and run the Externalized Configuration booster
After you follow the Section 1.2.2, “Generate a booster project” steps for the Externalized Configuration mission, follow these steps to build and run the Externalized Configuration booster as a standalone project on your local machine:
- Download the project and extract the archive on your local filesystem.
Build the project:
cd PROJECT_DIR
mvn clean package
Run the service:
mvn spring-boot:run
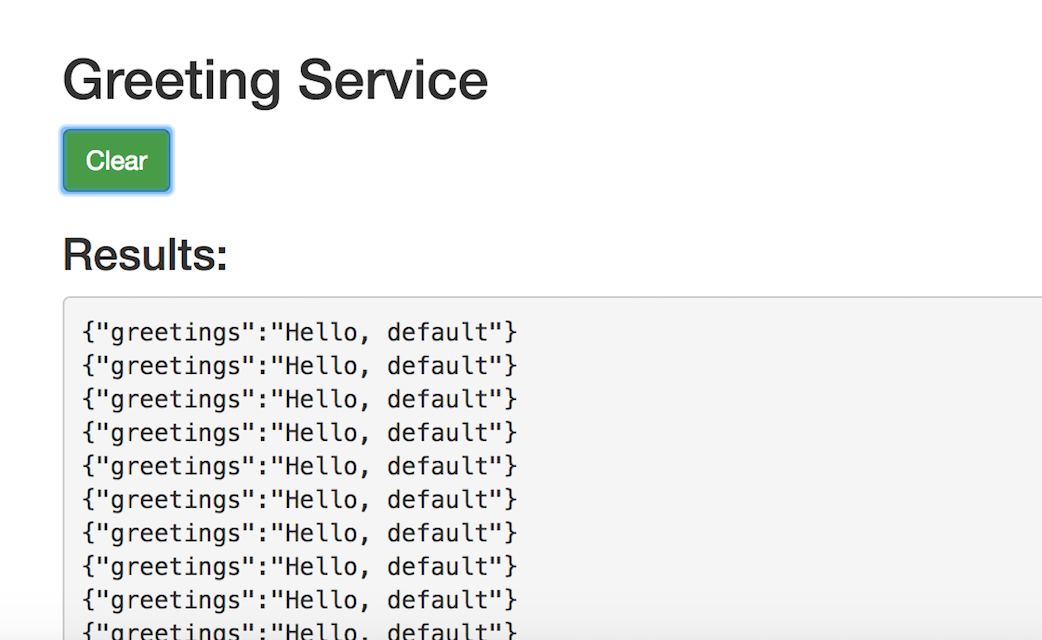
Open a web browser to http://localhost:8080. This page invokes a Greeting Service every 5 seconds. The Greetings Service responds by using the
booster.nameToGreetvaluefrom thetarget/classes/application.propertiesfile.The Greeting Service prints a greeting to “default” every five seconds:
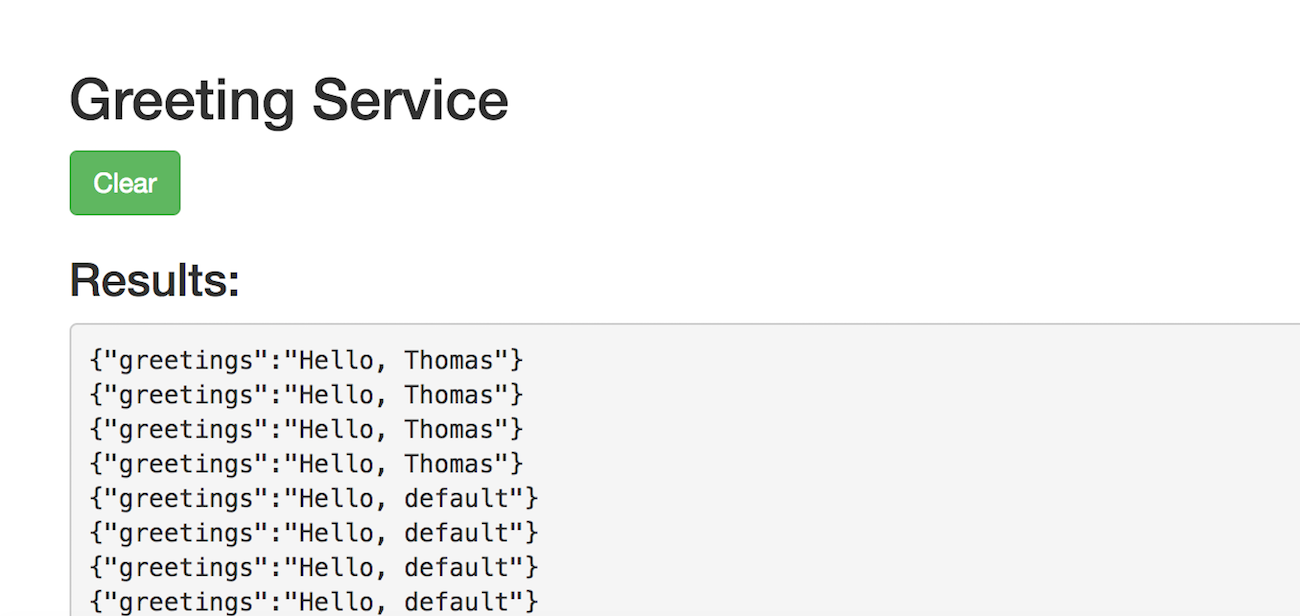
Modify the
booster.nameToGreetvalue:-
Open the
target/classes/application.propertiesfile in an editor. Change the value of the
booster.nameToGreetvaluefrom default to another value, for example Thomas:booster.nameToGreetvalue=Thomas
-
Open the
- In the Terminal window, stop the service by pressing CTRL+C.
Run the service again:
mvn spring-boot:run
In the web browser, return to the http://localhost:8080 page to view the changed value in the Greeting Service’s results window.
1.5. REST API booster
The REST API Level 0 mission shows how to map business operations to a remote procedure call endpoint over HTTP by using a REST framework. This mission corresponds to Level 0 in the Richardson Maturity Model.
This booster introduces the mechanics of interacting with a remote (exposed by Apache Camel) service using the HTTP protocol. By using this Fuse booster, you can quickly prototype and flexibly design a REST API.
Use this booster to:
-
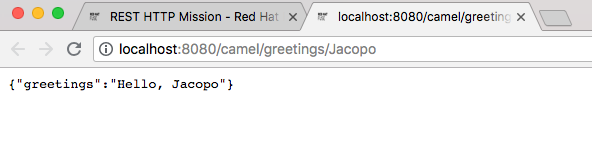
Execute an HTTP GET request on the
camel/greetings/{name}endpoint. This request produces a response in JSON format with a payload ofHello, $name!(where$nameis replaced by the value of the URL parameter from the HTTP GET request). -
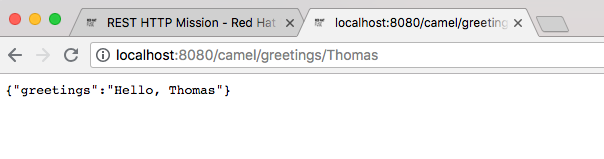
Change the value of the URL
{name}parameter to see the changed value reflected in the response. - View the REST API’s Swagger page.
1.5.1. Build and run the REST API booster
After you follow the Section 1.2.2, “Generate a booster project” steps for the REST API mission, follow these steps to build and run the REST API booster as a standalone project on your local machine:
- Download the project and extract the archive on your local filesystem.
Build the project:
cd PROJECT_DIR
mvn clean package
Run the service:
mvn spring-boot:run
- Open a web browser to: http://localhost:8080
To execute the example HTTP GET request, click the camel/greetings/{name} button.
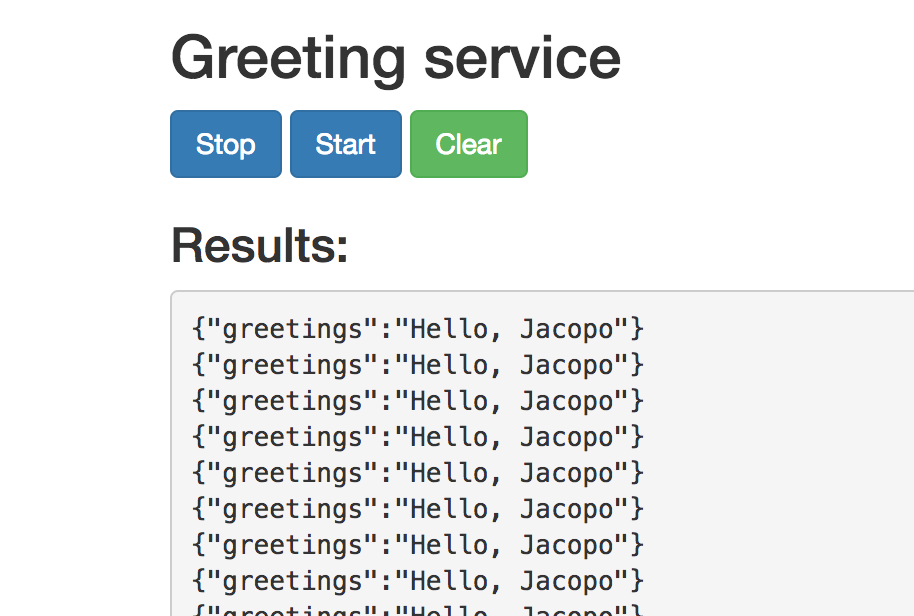
A new web browser window opens with the
localhost:8080/camel/greetings/JacopoURL. The default value of the URL{name}parameter is Jacopo.The JSON response appears in the browser window:
To change the value of the
{name} `parameter, change the URL. For example, to change the name to Thomas, use this URL: `localhost:8080/camel/greetings/Thomas.The updated JSON response appears in the browser window:
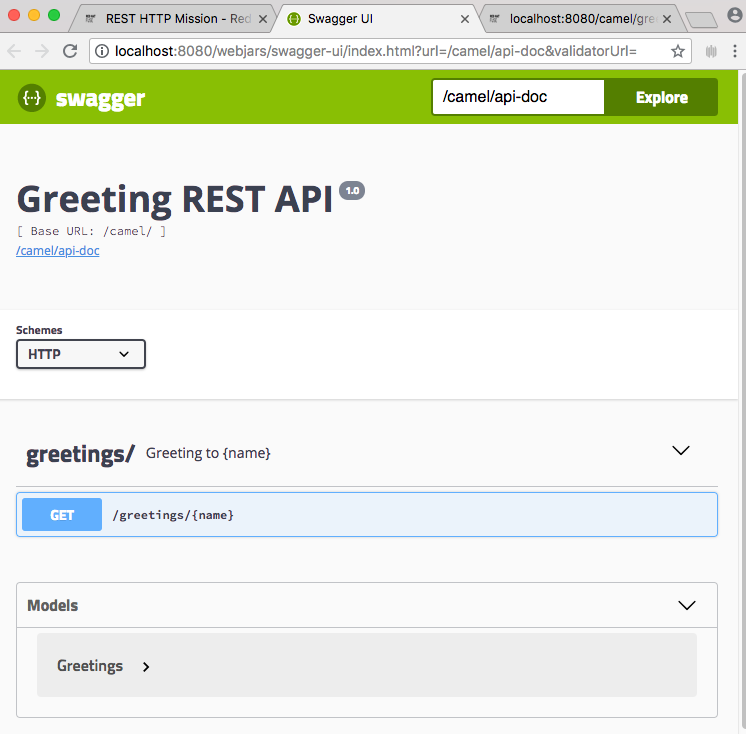
To view the REST API’s Swagger page, click the API Swagger page button.
The API swagger page opens in a browser window.