
Red Hat Training
A Red Hat training course is available for Red Hat Fuse
Chapter 9. Trigger integration execution with a REST API call
To trigger execution of an integration on demand, start the integration with a REST API service that you provide. Integrations that start this way are referred to as API provider integrations. An API provider integration allows REST API clients to invoke commands that trigger execution of the integration.
When Fuse Online publishes an API provider integration, it annotates the API service definition for use with Red Hat 3scale. 3scale is Red Hat’s API management solution. 3scale enforces API access policies, centralizes API control, provides high availability for your API, and integrates with Red Hat Fuse. For more information, see the API Gateway documentation that is available from the Red Hat 3scale documentation page.
If you are running Fuse Online on OCP on premise, the default behavior is that APIs are not exposed for automatic discovery in 3scale. To expose APIs for automatic discovery in 3scale, see Expose APIs in 3scale for API provider integrations.
The following topics provide information and instructions for creating API provider integrations:
- Section 9.1, “Overview and benefit of API provider integrations”
- Section 9.2, “About API provider flows”
- Section 9.3, “About API provider URLs”
- Section 9.4, “General workflow for creating integrations that are triggered by API calls”
- Section 9.5, “Create an integration that is triggered by an API call”
- Section 9.6, “Create the integration’s operation flows”
- Section 9.7, “Configure and publish the API provider quickstart integration”
- Section 9.8, “Execute the API provider quickstart integration”
In this release, an API provider integration is a Technology Preview feature.
9.1. Overview and benefit of API provider integrations
API provider integrations start with a REST API service that Fuse Online makes available. This REST API service is defined by an OpenAPI 2.0 schema that you provide.
The benefit of API provider integrations is that calls from REST API clients trigger execution of the integration. This is different from other Fuse Online integrations. A traditional Fuse Online integration periodically monitors an application or service and triggers execution of the integration when it finds a new event or message. For example, an integration might start with a Twitter connection that watches for tweets that contain Red Hat Fuse. Fuse Online executes the integration only when the connection to Twitter finds such tweets.
An API provider integration makes it possible to call a REST API when a particular event occurs. This call triggers execution of the integration. To set this up, you upload an OpenAPI 2.0 schema to Fuse Online. Fuse Online publishes the API and provides the URL where the service is available. In Fuse Online, for each operation that the OpenAPI schema defines, you add connections and steps that process data as required for the particular operation. For example, consider a human resources application that calls a REST API service that Fuse Online has made available. Suppose the call invokes the operation that adds a new employee. The integration flow that handles this call could:
- Connect to an application that creates an expense report for new employee equipment.
- Connect to a SQL database to add an internal ticket for setting up new equipment.
- Connect to Google mail to send a message to the new employee that provides orientation information.
There are many ways to call the REST APIs that trigger integration execution, including:
- A web browser page that takes data input and generates the call.
- An application that explicitly calls the REST APIs.
- Other APIs that call the REST API, for example a webhook.
9.2. About API provider flows
A Fuse Online integration that does not start with a REST API service has one flow. That is, each time Fuse Online executes the integration, Fuse Online connects to the same applications, applies the same steps between connections, and finishes integration execution in the same way. In other words, the integration has one execution path.
An API provider integration has multiple flows. Each operation that the OpenAPI schema defines has its own flow, which Fuse Online automatically creates. For each operation, you can edit its flow by:
- Adding connections to the applications that need to process the data.
- Adding steps between connections, including data mapping steps.
- Altering the return code for the finish connection, which sends a response to the application that invoked the call that triggered execution of the integration.
9.3. About API provider URLs
After you publish an API provider integration, Fuse Online displays the external URL for your REST API service. This is where Fuse Online publishes your REST API service. This external URL is the base URL for calls from REST clients to your REST API service URLs. Fuse Online displays this URL in the integration’s summary page. Examples of REST clients are the curl utility, a web browser, the Postman app, and other applications that make REST calls.
In an integration, each operation that the OpenAPI schema defines has its own integration flow. Consequently, each operation can also have its own REST API service URL. Each URL is defined by the base URL and optionally by a subpath. REST API calls that trigger execution of a particular integration flow specify that operation’s URL.
Your OpenAPI schema determines which HTTP verbs (such as GET, POST, DELETE and so on) you can specify in calls to your REST API service URLs. Examples of calls to API provider URLs are in the instructions for trying out the API provider quickstart.
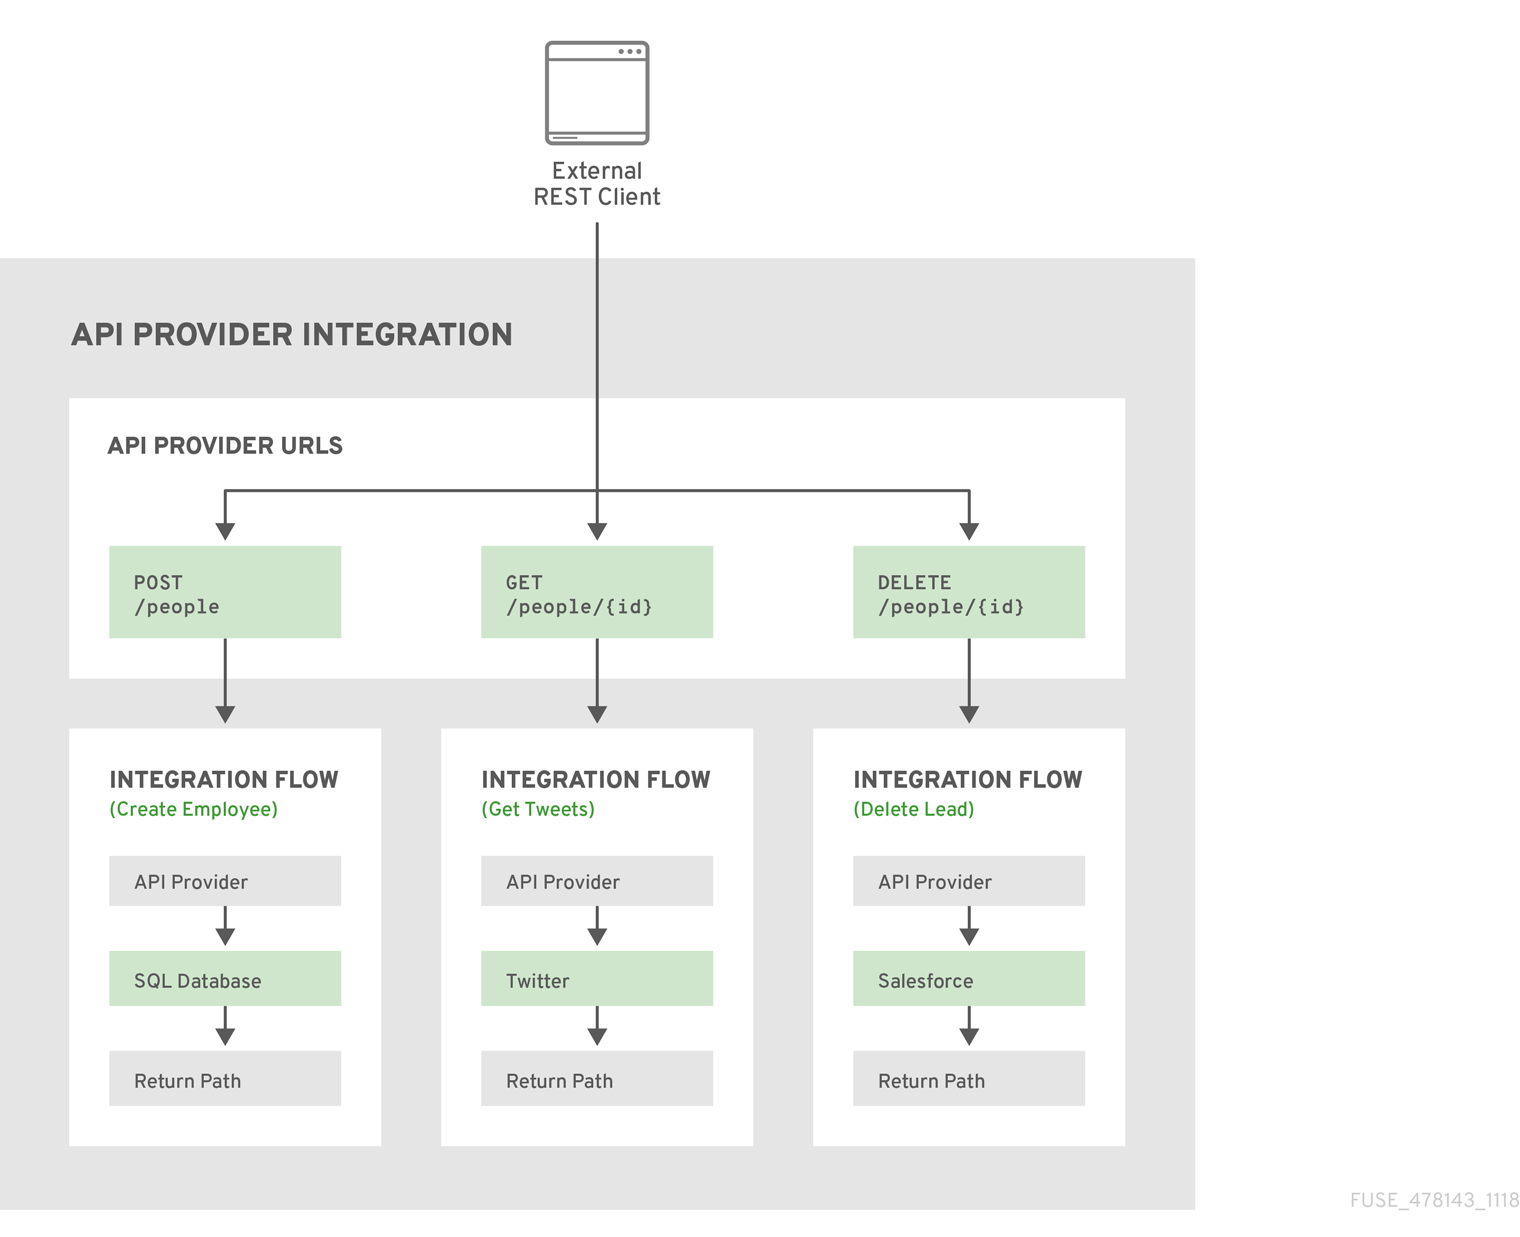
The following diagram shows an API provider integration that processes data about people. An external REST API client invokes the REST API URLs that are deployed by the API provider integration. Invocation of a URL triggers execution of the integration flow for one REST operation. This API provider integration has 3 flows. Each integration flow can use any connection or step that is available in Fuse Online. The REST API along with its integration flows is one Fuse Online integration, which is deployed in one OpenShift container/pod.
9.4. General workflow for creating integrations that are triggered by API calls
In Fuse Online, after you click Create Integration, the workflow for creating an API provider integration is as follows.
- On the Choose a Start Connection page, click the API Provider card.
On the Start integration with an API call page, upload a file that contains an OpenAPI 2.0 schema or indicate that you want to create the schema now. If you upload a file, you can review and edit it. If you select Create from scratch, Fuse Online opens an editor that supports creation of OpenAPI schemas.
CautionAfter you save or publish an API provider integration, you cannot update the OpenAPI definition for the REST API service. If you need to edit the OpenAPI definition then you must start over and create a new API provider integration.
- Give the integration a name and save it.
On the Choose operation page, for each operation that the OpenAPI schema defines, create the integration flow for that operation:
- Click an operation to display the Add to Integration page.
- Add the connections that are required to implement the selected operation.
- Add additional steps that process data between connections. For example, in the visual representation of this integration flow, check for data type mismatch indications. For each data type mismatch, add a step that maps data fields.
In the visual representation of this integration flow, click the flow’s finish connection and specify a return code. When Fuse Online executes this integration flow and reaches this connection, Fuse Online sends the return code to your API service, which in turn sends a response to the caller that invoked the API that triggered the integration.
In this release, because an API provider integration is a Technology Preview feature, the integration flow always returns the code that you select. Error handling is not yet supported.
Publish the integration.
Fuse Online provides the URL where your REST API service is available.
Optionally, use the
curlutility to test the integration flows.For example, suppose that the following
curlcommand triggers execution of an integration flow for the Get Task by ID operation. The HTTPGETcommand is the default request so there is no requirement to specifyGET. The last part of the URL specifies the ID of the task to get:curl -k https://i-task-api-proj319352.6a63.fuse-ignite.openshiftapps.com/api/todo/1
9.5. Create an integration that is triggered by an API call
To be able to invoke a call that triggers execution of an integration, you provide an OpenAPI schema that defines the operations that the integration can perform. For each operation, you specify an integration flow that connects to the applications and processes the integration data according to the requirements for that operation.
Prerequisites
You can provide an OpenAPI schema for the REST API operations that you want the integration to perform.
To experiment, download the
task-api.jsonfile, which is an OpenAPI schema for an API provider quickstart. You can then drag this file in when Fuse Online prompts you to provide an OpenAPI schema.- You have a plan for the integration flow for each OpenAPI operation.
- You created a connection for each application or service that you want to add to an integration flow.
Procedure
- In Fuse Online, in the left navigation panel, click Integrations.
- In the upper right, click Create Integration.
- On the Choose a Start Connection page, click the API Provider card.
On the Start integration with an API call page, if you have an OpenAPI 2.0 schema that defines the REST API operations then upload it in one of the following ways:
- Drag and drop the file that contains the schema.
- Click Choose File to navigate to and select the file that contains the schema.
- Click Use a URL and enter the URL for the schema.
Or, if you need to define the schema, select Create from scratch.
Click Next.
If you uploaded a schema, remember that this is your only opportunity to change it. To review or edit the schema:
- Click Review/Edit to open the Apicurio editor.
- Review and edit as needed.
- In the upper right, click Save or Cancel to close the editor.
- Click Next and go to step 6 in this procedure.
If you are creating a schema from scratch then in the Apicurio editor that Syndesis opens:
- Define the OpenAPI schema.
- In the upper right, click Save, which closes the editor.
- Click Next.
For information about using the Apicurio editor, see Design and develop an API definition with Apicurito. In this Technology Preview release, you cannot edit the operation description that will appear in the operations list in Fuse Online.
- On the Give this integration a name page, enter a name for your integration.
- Optionally, enter a description that helps you distinguish this integration from other integrations.
- Click Save and continue to display the Choose Operation page. You are ready to define a flow for each operation.
9.6. Create the integration’s operation flows
The OpenAPI schema that defines your REST API service defines the operations that the service can perform. After you create an API provider integration, you can edit the integration flow for each operation.
Each operation has exactly one integration flow. In an integration flow, you can add connections to other applications and services, as well as steps that operate on data between connections.
Prerequisites
- You created an API provider integration, gave it a name, and saved it.
- You created a connection to each application or service that you want an integration flow to connect to. For details, see the information about creating connections.
- Fuse Online is displaying the Choose operation page.
Procedure
- In the Choose operation page, click the entry for an operation whose flow you want to edit. This opens the Add to Integration page.
In the integration visualization panel on the left, click the
 icon at the bottom. When you hover over this icon, Provided API Return Path appears.
Every API provider integration ends each integration flow by sending a response to the REST API caller that triggered execution of the integration flow.
Specify the operation’s return code as follows:
- In the Provided API Return Path page, click in the Return Code input field, which displays a list of possible return codes.
Scroll to 200 OK and click it.
If there is a return code that better describes the result then you can select that one instead. However, in this Technology Preview release, you can select only one return code. Whenever an API call triggers execution of this integration flow, this is the return code. This Technology Preview release does not support error handling.
- Click Done.
In the upper right, click Save as Draft.
After you implement the return code for at least one operation, you can publish the integration to start running it. When it is running, you can invoke an API call that triggers execution of the integration flow for which you defined the return code. However, you probably want to add more steps to the operation’s flow.
In this integration flow, to connect to another application or service:
- In the integration flow visualization panel on the left, hover over the plus sign in the location where you want to add a connection and in the popup that appears, click Add a connection.
- Click the connection that you want to add to this integration flow.
- Click the action that you want this connection to perform.
- Configure the action.
- Click Done.
- In the upper right, click Save as Draft.
For each connection that you want to add to this integration flow, repeat this subset of instructions. Add all desired connections to the integration flow before you continue.
In this integration flow, to process data between connections:
- In the integration flow visualization panel on the left, hover over the plus sign in the location where you want to add a step and in the popup that appears, click Add a step.
- In the Choose a Step page, click the step that you want to add.
- Configure the step.
- Click Done.
In the upper right, click Save as Draft.
For help, see Adding steps between connections.
Repeat this subset of instructions to add another step that processes data between connections.
-
In the integration flow visualization panel on the left, check for data type mismatch
 icons, which indicate that the connection cannot process the incoming data. You need to add a data mapper step here. Go back to the previous subset of instructions. On the Choose a Step page, click Data Mapper, and define the needed mappings. For help, see Map integration data fields to the next connection in the integration.
When this integration flow has all needed connections and steps, do one of the following:
- To start running the integration, in the upper right, click Publish. This builds the integration and makes it available to be executed. You can publish the integration each time that you complete the creation of an operation’s integration flow or each time that you edit an operation’s integration flow.
- To edit the integration flow for another operation, in the upper right, click Go to Operations List.
Repeat this procedure to edit another operation’s integration flow.
In this Technology Preview release, in an integration flow, a connection to a SQL database that executes a SELECT statement returns only the first record in the result set.
Next steps
When an API provider integration is running, you can use the curl utility to confirm that it is working as expected. For examples of doing this, see the description of the API provider quickstart.
9.7. Configure and publish the API provider quickstart integration
Fuse Online provides an API provider quickstart integration that you can import into your Fuse Online environment. This quickstart includes an OpenAPI schema for a task management API. After importing the quickstart integration, you configure return codes, and then publish the integration. After you complete the procedure described below, the Task API integration is running and ready to be executed.
The API provider quickstart helps you quickly learn how to configure, publish, and test an API provider integration. But it is not a real-world example of how useful an API provider integration can be. For a real-world example, suppose that you already used Fuse Online to publish several integrations. You could define an OpenAPI schema for triggering execution of those integrations. To do this, you would edit the integration flow for each OpenAPI operation to be almost the same as the integrations you already published.
A video of configuring and publishing this quickstart is also available.
Prerequisites
Fuse Online is open in a browser.
Procedure
To import the Task API quickstart integration:
-
Go to https://github.com/syndesisio/syndesis-quickstarts/tree/master/api-provider and download
TaskAPI-export.zip. - In Fuse Online, in the left navigation panel, click Integrations.
- In the upper right, click Import.
- Drag and drop the zip file that you downloaded. Fuse Online indicates that it has successfully imported the file.
- In the left navigation panel, click Integrations to see an entry for the Task API integration that you just imported. The entry indicates that configuration is required.
-
Go to https://github.com/syndesisio/syndesis-quickstarts/tree/master/api-provider and download
To configure the Task API integration:
- Click the Task API entry to display the integration summary.
- In the upper right, click Edit Integration to display a list of the operations that this API provides.
To configure the integration flow for the Create Task operation:
Click the Create Task entry to display a page that prompts you to add a connection or add a step.
Connections and steps have already been added to this integration flow. In the integration flow visualization panel on the left, move your cursor over the icons to see what they represent. Click a step or connection to view its configuration. When you are done examining one, click another one to examine it. When you click a database connection, you can see the SQL statement that it executes.
-
In the integration flow visualization panel on the left, click the
icon at the bottom. You might have to scroll down to see it. When you hover over it, Fuse Online displays Provided API Return Path.
- Click in the Return Code input field and scroll to select 201 Created.
- Click Done.
- In the upper right, click Save as Draft and then Go to Operation List.
To configure the integration flow for the Delete Task for ID operation:
Click the Delete Task for ID entry to display a page that prompts you to add a connection or add a step.
This integration flow has a data mapper step and a connection to the sample database that is provided with Fuse Online. In the integration flow visualization panel, click the database connection to view the SQL statement that it executes.
-
In the integration flow visualization panel, click the
icon at the bottom.
- Click in the Return Code input field and scroll to select 200 OK.
- Click Done.
- In the upper right, click Save as Draft and then Go to Operation List.
To configure the integration flow for the Get Task by ID operation:
Click the Get Task by ID entry to display a page that prompts you to add a connection or add a step.
This integration flow has two data mapper steps, a connection to the sample database that is provided with Fuse Online, and a log step. In the integration flow visualization panel, click an icon for a step or connection to view its configuration. When you are done examining one, click another one.
-
In the integration flow visualization panel, click the
icon at the bottom.
- Click in the Return Code input field and scroll to select 200 OK.
- Click Done.
In the upper right, click Publish.
Fuse Online displays the integration summary page and shows publication progress as it assemblies, builds, deploys, and starts the integration. The integration summary page also provides the external URL for the API provider service, which looks something like this:
https://i-task-api-proj319352.6a63.fuse-ignite.openshiftapps.com/api/This is where Fuse Online makes the Task API service available. REST API calls specify URLs that start with this base URL.
9.8. Execute the API provider quickstart integration
When the Fuse Online Task API quickstart integration is running, you can invoke curl utility commands that send HTTP requests to the Task API service. How you specify the HTTP request determines which integration flow the call triggers.
Prerequisite
Fuse Online indicates that the Task API is Running.
Procedure
- In Fuse Online, in the left navigation panel, click Integrations.
- Click the Task API integration to display its summary.
- Copy the integration’s external URL.
In a terminal, invoke a command such as the following to assign the integration’s external URL to the
externalURLenvironment variable. Be sure to replace the URL in this sample command with the URL you copied:export externalURL="https://i-task-api-proj319352.6a63.fuse-ignite.openshiftapps.com/api"Invoke a
curlcommand that triggers execution of the integration flow for the Create Task operation:curl -k --header "Content-Type: application/json" --request POST --data '{ "task":"my new task!"}' $externalURL/todo-
-kallowscurlto proceed and operate even for server connections that are otherwise considered insecure. -
--headerindicates that the command is sending JSON format data. -
--requestspecifies the HTTPPOSTcommand, which stores data. -
--dataspecifies the JSON format content to be stored. In this example the content is{ "task":"my new task!"}. $externalURL/todois the URL to invoke.This command sends an HTTP
POSTrequest to the Task API service, which triggers execution of the Create Task operation’s integration flow. The integration flow adds a new task to the sample database and returns a message such as the following to indicate what it did:
{"completed":false,"id":1,"task":"my new task!"}-
Invoke a
curlcommand that triggers execution of the integration flow for the Get Task by ID operation:curl -k $externalURL/todo/1
To obtain a task, the
curlcommand needs to specify only the URL. The HTTPGETcommand is the default request. The last part of the URL specifies the ID of the task to get.Invoke a
curlcommand that triggers execution of the integration flow for the Delete Task for ID operation:curl -k -X DELETE $externalURL/todo/1
This command invokes the HTTP
DELETEcommand with the same URL as the command that obtained a task by its ID.