
Red Hat Training
A Red Hat training course is available for Red Hat Fuse
Chapter 6. Map integration data to fields for the next connection
In most integrations, you need to map data fields that have already been obtained or processed to data fields that the next connection in the integration can process. Fuse Online provides a data mapper to help you do this. In an integration, at each point where you need to map data fields, add a data mapper step. Details for mapping data fields are in the following topics:
- Section 6.1, “Identify where data mapping is needed”
- Section 6.2, “Find the data field that you want to map”
- Section 6.3, “Map one source field to one target field”
- Section 6.4, “Example of missing or unwanted data when combining or separating fields”
- Section 6.5, “Combine multiple source fields into one target field”
- Section 6.6, “Separate one source field into multiple target fields”
- Section 6.7, “Transform source or target data”
- Section 6.8, “View the mappings in a step”
- Section 6.9, “Descriptions of available transformations”
6.1. Identify where data mapping is needed
Fuse Online displays warning icons to indicate where an integration requires data mapping.
Prerequisites
- You are creating or editing an integration.
- The integration contains all connections that it requires.
Procedure
-
In the integration visualization panel on the left, look for any
 icons.
Click the icon to see the message. A Data Type Mismatch notification indicates that you need to add a data mapper step before that connection.
In the integration’s visualization panel, to the right of a connection, click
 to display information about that connection, including its input and/or output type.
6.2. Find the data field that you want to map
In a relatively simple integration, mapping data fields is easy and intuitive. In more complex integrations or integrations that handle large sets of data fields, mapping from source to target is easier when you have some background about how to use the data mapper.
The data mapper displays two columns of data fields:
- Sources is a list of the data fields that are obtained or processed in all previous steps in the integration.
- Target is a list of the data fields that the next connection in the integration expects and can process.
To quickly find the data field that you want to map, you can do any of the following:
Search for it.
The Sources panel and the Target panel each have a search field at the top. If the search field is not visible, click
 at the top right of the Sources or Target panel.
Enter the names of the fields that you want to map.
To do this, in the upper right of the Configure Mapper page, click the plus sign to display the Mapping Details panel. In the Sources section, enter the name of the source field. In the Action section, accept the default Map, which maps one field to one other field. Or, select Combine or Separate. In the Target section, enter the name of the field that you want to map to.
Expand and collapse folders to limit the visible fields.
To view the data fields available in a particular step, expand the folder for that step.
As you add steps to an integration, Fuse Online numbers and renumbers them to indicate the order in which the integration processes the steps. When you are creating or editing an integration, these numbers are visible in the integration visualization panel on the left. When you add a data mapping step, the step numbers appear in the folder labels in the Sources panel and in the Target panel.
The folder label also displays the name of the data type that is output by that step. Connections to applications such as Twitter, Salesforce, and SQL define their own data types. For connecting to applications such as Amazon S3, AMQ, AMQP, Dropbox, and FTP/SFTP, you define the connection’s input and/or output type when you add the connection to an integration and select the action that the connection performs. When you specify the data type, you also give the type a name. The type name you specify appears as the name of a folder in the data mapper. If you specified a description when you declared the data type, then the type description appears when you hover over the step folder in the mapper.
6.3. Map one source field to one target field
The default mapping behavior maps one source field to one target field. For example, map the Name field to the CustomerName field.
Procedure
In the Sources panel, click the data field that you want to map from.
You might need to expand an integration step to see the data fields that it provides.
When there are many source fields, you can search for the field of interest by clicking the
and entering the name of the data field in the search field.
In the Target panel, click the data field that you want to map to.
The data mapper displays a line that connects the two fields that you just selected.
Optionally, preview the data mapping result. This is useful when you add a transformation to the mapping or when the mapping requires a type conversion.
-
In the upper right of the data mapper, click
 and select Show Mapping Preview to display a text input field on the source field and a read-only result field on the target field.
- In the source field’s data input field, enter text. Click somewhere outside this text box to display the mapping result in the read-only field on the target field.
- Optionally, to see the result of a transformation, add a transformation in the Mapping Details panel.
-
Hide the preview fields by clicking
again and selecting Show Mapping Preview.
-
In the upper right of the data mapper, click
Optionally, to confirm that the mapping is defined, in the upper right, click
 to display the defined mappings.
You can also preview data mapping results in this view. If preview fields are not visible, click
and select Show Mapping Preview. Enter data as described in the previous step. In the table of defined mappings, preview fields appear for only the selected mapping. To see preview fields for another mapping, select it.
Click
again to display the data field panels.
- In the upper right, click Done to add the data mapper step to the integration.
Alternative procedure
Here is another way to map a single source field to a single target field:
- In the Configure Mapper page, in the upper right, click the plus sign to display the Mapping Details panel.
- In the Sources section, enter the name of the source field.
- In the Action section, accept the default Map action.
- In the Target section, enter the name of the field that you want to map to and click Enter.
6.4. Example of missing or unwanted data when combining or separating fields
In a data mapping, you might need to identify missing or unwanted data when a source or target field contains compound data. For example, consider a long_address field that has this format:
number street apartment city state zip zip+4 country
Suppose that you want to separate the long_address field into discrete fields for number, street, city, state, and zip. To do this, you select long_address as the source field and then select the target fields. You then add padding fields at the locations for the parts of the source field that you do not want. In this example, the unwanted parts are apartment, zip+4, and country.
To identify the unwanted parts, you need to know the order of the parts. The order indicates an index for each part of the content in the compound field. For example, the long_address field has 8 ordered parts. Starting at 1, the index of each part is:
| 1 | number |
| 2 | street |
| 3 | apartment |
| 4 | city |
| 5 | state |
| 6 | zip |
| 7 | zip+4 |
| 8 | country |
In the data mapper, to identify apartment, zip+4, and country as missing, you add padding fields at indexes 3, 7, and 8. See Separate one source field into multiple target fields.
Now suppose that you want to combine source fields for number, street, city, state, and zip into a long_address target field. Further suppose that there are no source fields to provide content for apartment, zip+4, and country. In the data mapper, again you need to identify these fields as missing and add padding fields at indexes 3, 7, and 8. See Combine multiple source fields into one target field.
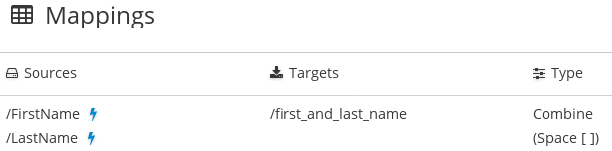
6.5. Combine multiple source fields into one target field
In a data mapper step, you can combine multiple source fields into one compound target field. For example, you can map the FirstName and LastName fields to the CustomerName field.
Prerequisite
For the target field, you must know what type of content is in each part of this compound field, the order and index of each part of the content, and the separator between parts, such as a space or comma. See Example of missing or unwanted data.
Procedure
- In the Target panel, click the field into which you want to map more than one source field.
In the Sources panel, if there is a field that contains the fields that you want to map to the target field, then click that container field to map all contained fields to the target field.
To individually select each source field, click the first field that you want to combine into the target field. For each of the other fields that you want to combine into the target field, hover over that field, and press CTRL-Mouse1 (CMD-Mouse1 on MacOS).
The data mapper automatically changes the field action from Map to Combine.
When you are done you should see a line from each of the source fields to the target field.
- In the Mapping Details panel, in the Separator field, accept or select the character that the data mapper inserts in the target field between the content from different source fields. The default is a space.
In the Mapping Details panel, under Sources, ensure that the source fields are in the same order as the corresponding content in the compound target field.
If necessary, drag and drop source fields to achieve the same order. The data mapper automatically updates the index numbers to reflect the new order.
If you mapped a source field to each part of the compound target field, then skip to the next step.
If the target field expects data that is not available to be mapped, then in the Mapping Details panel, edit the index of each source field so that it is the same as the index of the corresponding data in the compound target field. The data mapper automatically adds padding fields as needed to indicate missing data.
If you accidentally create too many padding fields, click the trash-can icon on each extra padding field to delete it.
Optionally, preview the data mapping result:
-
In the upper right of the data mapper, click
and select Show Mapping Preview to display a text input field on each source field for the currently selected mapping and a read-only result field on the target field of the currently selected mapping.
In the source data input fields, enter text. Click outside the text box to display the mapping result in the read-only field on the target field.
If you reorder the source fields or add a transformation to the mapping then the result field on the target field reflects this. If the data mapper detects any errors, it displays informative messages at the top of the Mapping Details panel.
Hide the preview fields by clicking
again and selecting Show Mapping Preview.
If you redisplay the preview fields, any data that you entered in them is still there and it remains there until you exit the data mapper.
-
In the upper right of the data mapper, click
To confirm that the mapping is correctly defined, in the upper right, click
to display the mappings defined in this step. A mapping that combines the values of more than one source field into one target field looks like this:
 .
.
You can also preview mapping results in this view. Click
, select Show Mapping Preview, and enter text as described in the previous step. Preview fields appear for only the selected mapping. Click another mapping in the table to view preview fields for it.
6.6. Separate one source field into multiple target fields
In a data mapper step, you can separate a compound source field into multiple target fields. For example, map the Name field to the FirstName and LastName fields.
Prerequisite
For the source field, you must know what type of content is in each part of this compound field, the order and index of each part of the content, and the separator between parts, such as a space or comma. See Example of missing or unwanted data.
Procedure
- In the Sources panel, click the field whose content you want to separate.
- In the Target panel, click the first field that you want to separate the source field data into.
In the Target panel, for each additional target field that you want to contain some of the data from the source field, hover over the field and press CTRL-Mouse1 (CMD-Mouse1 on MacOS) to select it.
The data mapper automatically changes the field action to Separate.
When you are done selecting target fields, you should see lines from the source field to each of the target fields.
- In the Mapping Details panel, in the Separator field, accept or select the character in the source field that indicates where to separate the source field values. The default is a space.
In the Mapping Details panel, under Targets, ensure that the target fields are in the same order as the corresponding content in the compound source field.
If necessary, drag and drop target fields to achieve the same order. The data mapper automatically updates the index numbers to reflect the new order.
If you mapped each part of the compound source field to a target field, then skip to the next step.
If the source field contains data that you do not need, then in the Mapping Details panel, edit the index of each target field so that it is the same as the index of the corresponding data in the compound source field. The data mapper automatically adds padding fields as needed to indicate unwanted data.
Optionally, preview the data mapping result:
-
In the upper right of the data mapper, click
and select Show Mapping Preview to display a text input field on the source field and read-only result fields on each target field.
In the source field’s data input field, enter text. Be sure to enter the separator character between the parts of the field. Click outside the text box to display the mapping result in the read-only fields on the target fields.
If you reorder the target fields or add a transformation to a target field then the result fields on the target fields reflect this. If the data mapper detects any errors, it displays informative messages at the top of the Mapping Details panel.
Hide the preview fields by clicking
again and selecting Show Mapping Preview.
If you redisplay the preview fields, any data that you entered in them is still there and it remains there until you exit the data mapper.
-
In the upper right of the data mapper, click
To confirm that the mapping is correctly defined, click
to display the mappings defined in this step. A mapping that separates the value of a source field into multiple target fields looks like this:
 .
.
You can also preview mapping results in this view. Click
, select Show Mapping Preview, and enter text as described in the previous step. Preview fields appear for only the selected mapping. Click another mapping in the table to view preview fields for it.
6.7. Transform source or target data
In the data mapper, after you define a mapping, you can transform any field in the mapping. Transforming a data field defines how you want to store the data. For example, you could specify the Capitalize transformation to ensure that the first letter of a data value is uppercase.
Procedure
- Map the fields. This can be a one-to-one mapping, a combination mapping, or a separation mapping.
- In the Mapping Details panel, under Sources or under Targets, in the box for the field that you want to transform, click the arrow that points to the trash can. This displays a field where you can select the transformation that you want the data mapper to perform.
- Click in this field to display the list of transformations.
- Click the transformation that you want to perform.
- If the transformation requires any input parameters, specify them in the appropriate input fields.
- To add another transformation, click the arrow that points to the trash can again.
Additional resource
6.8. View the mappings in a step
While you are adding or editing a data mapper step, you can view the mappings already defined in this step. This lets you check whether the correct mappings are in place.
Prerequisites
- You are creating or editing an integration.
- You are adding a data mapper step. That is, the data mapper is visible.
Procedure
-
In the upper right, click
.
-
To dismiss the list of mappings and redisplay the source and target fields, click
again.
6.9. Descriptions of available transformations
The following table describes the available transformations. The date and number types refer generically to any of the various forms of these concepts. That is, number includes, for example, integer, long, double. Date includes, for example, date, Time, ZonedDateTime.
| Transformation | Input Type | Output Type | Parameter (* = required) | Description |
|---|---|---|---|---|
|
| number | number | None | Return the absolute value of a number. |
|
| date | date |
| Add days to a date. The default is 0 days. |
|
| date | date |
| Add seconds to a date. The default is 0 seconds. |
|
| string | string | string | Append a string to the end of a string. The default is to append nothing. |
|
| string | string | None | Convert a phrase to a camelized string by removing whitespace, making the first word lowercase, and capitalizing the first letter of each subsequent word. |
|
| string | string | None | Capitalize the first character in a string. |
|
| number | number | None | Return the whole number ceiling of a number. |
|
| any | Boolean |
| Return true if a field contains the specified value. |
|
| number | number |
|
Convert a number that represents an area to another unit. For the |
|
| number | number |
|
Convert a number that represents a distance to another unit. For the |
|
| number | number |
|
Convert a number that represents mass to another unit. For the |
|
| number | number |
|
Convert a number that represents volume to another unit. For the |
|
| date | number | None | Return the day of the week (1 through 7) that corresponds to the date. |
|
| date | number | None | Return the day of the year (1 through 366) that corresponds to the date. |
|
| string | Boolean |
|
Return true if a string ends with the specified |
|
| any | Boolean |
|
Return true if a field is equal to the specified |
|
| string | string | None | From a string that represents a file name, return the file extension without the dot. |
|
| number | number | None | Return the whole number floor of a number. |
|
| any | string |
|
In |
|
| string | number |
|
In a string, starting at 0, return the first index of the specified |
|
| any | Boolean | None | Return true if a field is null. |
|
| string | number |
|
In a string, starting at 0, return the last index of the specified |
|
| any | number | None |
Return the length of the field, or |
|
| string | string | None | Convert a string to lowercase. |
|
| string | string | None | Replace consecutive whitespace characters with a single space and trim leading and trailing whitespace from a string. |
|
| string | string |
|
Insert the character supplied in |
|
| string | string |
|
Insert the character supplied in |
|
| string | string |
|
Prefix |
|
| string | string |
|
In a string, replace all occurrences of the supplied matching string with the supplied |
|
| string | string |
|
In a string, replace the first occurrence of the specified |
|
| number | number | None | Return the rounded whole number of a number. |
|
| string | string | None | Replace each occurrence of whitespace, colon (:), underscore (_), plus (+), and equals (=) with a hyphen (-). |
|
| string | string | None | Replace each occurrence of whitespace, colon (:), hyphen (-), plus (+), and equals (=) with an underscore (_). |
|
| string | Boolean |
| Return true if a string starts with the specified string (including case). |
|
| string | string |
|
Retrieve a segment of a string from the specified inclusive |
|
| string | string |
|
Retrieve the segment of a string after the specified |
|
| string | string |
|
Retrieve a segment of a string before the supplied |
|
| string | string | None | Trim leading and trailing whitespace from a string. |
|
| string | string | None | Trim leading whitespace from a string. |
|
| string | string | None | Trim trailing whitespace from a string. |
|
| string | string | None | Convert a string to uppercase. |