
Chapter 11. Integrating Spring Boot with Kubernetes
The Spring Cloud Kubernetes plugin currently enables you to integrate the following features of Spring Boot and Kubernetes:
11.1. Spring Boot externalized configuration
In Spring Boot, externalized configuration is the mechanism that enables you to inject configuration values from external sources into Java code. In your Java code, injection is typically enabled by annotating with the @Value annotation (to inject into a single field) or the @ConfigurationProperties annotation (to inject into multiple properties on a Java bean class).
The configuration data can come from a wide variety of different sources (or property sources). In particular, configuration properties are often set in a project’s application.properties file (or application.yaml file, if you prefer).
11.1.1. Kubernetes ConfigMap
A Kubernetes ConfigMap is a mechanism that can provide configuration data to a deployed application. A ConfigMap object is typically defined in a YAML file, which is then uploaded to the Kubernetes cluster, making the configuration data available to deployed applications.
11.1.2. Kubernetes Secrets
A Kubernetes Secrets is a mechanism for providing sensitive data (such as passwords, certificates, and so on) to deployed applications.
11.1.3. Spring Cloud Kubernetes plugin
The Spring Cloud Kubernetes plug-in implements the integration between Kubernetes and Spring Boot. In principle, you could access the configuration data from a ConfigMap using the Kubernetes API. It is much more convenient, however, to integrate Kubernetes ConfigMap directly with the Spring Boot externalized configuration mechanism, so that Kubernetes ConfigMaps behave as an alternative property source for Spring Boot configuration. This is essentially what the Spring Cloud Kubernetes plug-in provides.
11.1.4. Enabling Spring Boot with Kubernetes integration
You can enable Kubernetes integration by adding it as a Maven dependency to pom.xml file.
Procedure
Enable the Kubernetes integration by adding the following Maven dependency to the pom.xml file of your Spring Boot Maven project.
<project ...>
  ...
  <dependencies>
    ...
    <dependency>
      <groupId>org.springframework.cloud</groupId>
      <artifactId>spring-cloud-starter-kubernetes-config</artifactId>
    </dependency>
    ...
  </dependencies>
  ...
</project>
To complete the integration,
- Add some annotations to your Java source code
- Create a Kubernetes ConfigMap object
- Modify the OpenShift service account permissions to allow your application to read the ConfigMap object.
Additional resources
- For more details see Running Tutorial for ConfigMap Property Source.
11.2. Running tutorial for ConfigMap Property Source
The following tutorial allows you to experiment with setting Kubernetes Secrets and ConfigMaps. Enable the Spring Cloud Kubernetes plug-in as explained in the Enabling Spring Boot with Kubernetes Integration to integrate Kubernetes configuration objects with Spring Boot Externalized Configuration.
11.2.1. Running Spring Boot Camel Config quickstart
The following tutorial is based on the spring-boot-camel-config-archetype Maven archetype, which enables you to set up Kubernetes Secrets and ConfigMaps.
Procedure
Open a new shell prompt and enter the following Maven command to create a simple Camel Spring Boot project.
mvn org.apache.maven.plugins:maven-archetype-plugin:2.4:generate \
  -DarchetypeCatalog=https://maven.repository.redhat.com/ga/io/fabric8/archetypes/archetypes-catalog/2.2.0.fuse-sb2-7_11_1-00018-redhat-00002/archetypes-catalog-2.2.0.fuse-sb2-7_11_1-00018-redhat-00002-archetype-catalog.xml \
  -DarchetypeGroupId=org.jboss.fuse.fis.archetypes \
  -DarchetypeArtifactId=spring-boot-camel-config-archetype \
  -DarchetypeVersion=2.2.0.fuse-sb2-7_11_1-00018-redhat-00002
The archetype plug-in switches to interactive mode to prompt you for the remaining fields:
Define value for property 'groupId': : org.example.fis
Define value for property 'artifactId': : fuse711-configmap
Define value for property 'version':  1.0-SNAPSHOT: :
Define value for property 'package':  org.example.fis: :
Confirm properties configuration:
groupId: org.example.fis
artifactId: fuse711-configmap
version: 1.0-SNAPSHOT
package: org.example.fis
Y: : Y
When prompted, enter
org.example.fisfor thegroupIdvalue andfuse711-configmapfor theartifactIdvalue. Accept the defaults for the remaining fields.Log in to OpenShift and switch to the OpenShift project where you will deploy your application. For example, to log in as the
developeruser and deploy to theopenshiftproject, enter the following commands:oc login -u developer -p developer oc project openshift
At the command line, change to the directory of the new
fuse711-configmapproject and create the Secret object for this application.cd fuse711-configmap oc create -f sample-secret.yml
NoteIt is necessary to create the Secret object before you deploy the application, otherwise the deployed container enters a wait state until the Secret becomes available. If you subsequently create the Secret, the container will come out of the wait state. For more information on how to set up Secret Object, see Setting up Secret.
Build and deploy the quickstart application. From the top level of the
fuse711-configmapproject, enter:mvn oc:deploy -Popenshift
View the application log as follows.
- Navigate to the OpenShift web console in your browser (https://OPENSHIFT_IP_ADDR, replace OPENSHIFT_IP_ADDR with the IP address of the cluster) and log in to the console with your credentials (for example, with username developer and password, developer).
- In the left hand side panel, expand Home. Click Status to view the Project Status page. All the existing applications in the selected namespace (for example, openshift) are displayed.
-
Click
fuse711-configmapto view the Overview information page for the quickstart. - In the left hand side panel, expand Workloads.
-
Click Pods and then click
fuse711-configmap-xxxx. The pod details for the application are displayed. - Click on the Logs tab to view the application logs.
The default recipient list, which is configured in
src/main/resources/application.properties, sends the generated messages to two dummy endpoints:direct:async-queueanddirect:file. This causes messages like the following to be written to the application log:5:44:57.377 [Camel (camel) thread #0 - timer://order] INFO generate-order-route - Generating message message-44, sending to the recipient list 15:44:57.378 [Camel (camel) thread #0 - timer://order] INFO target-route-queue - ----> message-44 pushed to an async queue (simulation) 15:44:57.379 [Camel (camel) thread #0 - timer://order] INFO target-route-queue - ----> Using username 'myuser' for the async queue 15:44:57.380 [Camel (camel) thread #0 - timer://order] INFO target-route--file - ----> message-44 written to a file
Before you can update the configuration of the
fuse711-configmapapplication using a ConfigMap object, you must give thefuse711-configmapapplication permission to view data from the OpenShift ApiServer. Enter the following command to give theviewpermission to thefuse711-configmapapplication’s service account:oc policy add-role-to-user view system:serviceaccount:openshift:qs-camel-config
NoteA service account is specified using the syntax
system:serviceaccount:PROJECT_NAME:SERVICE_ACCOUNT_NAME. Thefis-configdeployment descriptor defines theSERVICE_ACCOUNT_NAMEto beqs-camel-config.To see the live reload feature in action, create a ConfigMap object as follows:
oc create -f sample-configmap.yml
The new ConfigMap overrides the recipient list of the Camel route in the running application, configuring it to send the generated messages to three dummy endpoints:
direct:async-queue,direct:file, anddirect:mail. For more information about ConfigMap object, see Setting up ConfigMap. This causes messages like the following to be written to the application log:16:25:24.121 [Camel (camel) thread #0 - timer://order] INFO generate-order-route - Generating message message-9, sending to the recipient list 16:25:24.124 [Camel (camel) thread #0 - timer://order] INFO target-route-queue - ----> message-9 pushed to an async queue (simulation) 16:25:24.125 [Camel (camel) thread #0 - timer://order] INFO target-route-queue - ----> Using username 'myuser' for the async queue 16:25:24.125 [Camel (camel) thread #0 - timer://order] INFO target-route--file - ----> message-9 written to a file (simulation) 16:25:24.126 [Camel (camel) thread #0 - timer://order] INFO target-route--mail - ----> message-9 sent via mail
11.2.2. Configuration properties bean
A configuration properties bean is a regular Java bean that can receive configuration settings by injection. It provides the basic interface between your Java code and the external configuration mechanisms.
Externalized Configuration and Bean Registry
Following image shows how Spring Boot Externalized Configuration works in the spring-boot-camel-config quickstart.
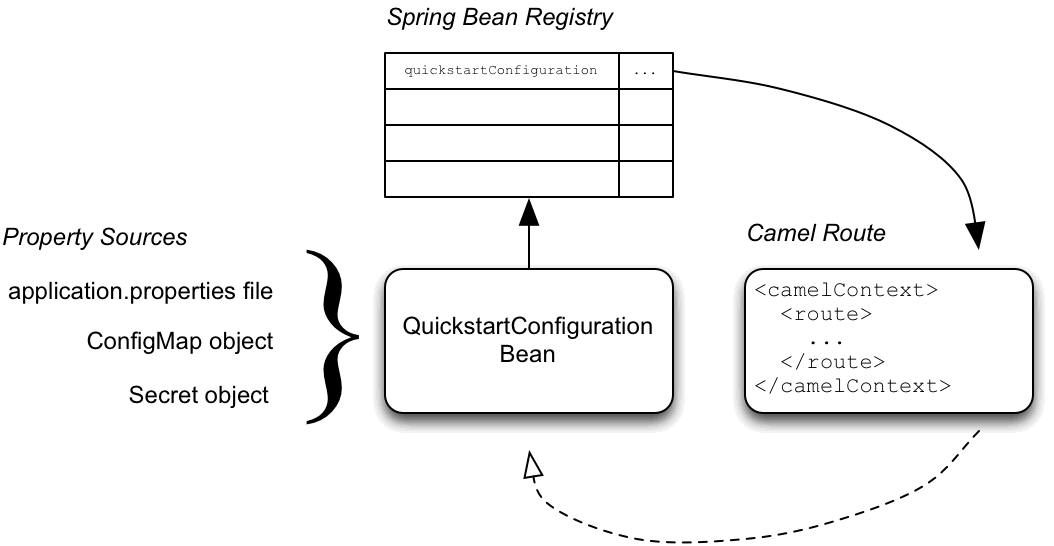
The configuration mechanism has the following main parts:
- Property Sources
-
Provides property settings for injection into configuration. The default property source is the
application.propertiesfile for the application, and this can optionally be overridden by a ConfigMap object or a Secret object. - Configuration Properties bean
-
Receives configuraton updates from the property sources. A configuration properties bean is a Java bean decorated by the
@Configurationand@ConfigurationPropertiesannotations. - Spring bean registry
- With the requisite annotations, a configuration properties bean is registered in the Spring bean registry.
- Integration with Camel bean registry
- The Camel bean registry is automatically integrated with the Spring bean registry, so that registered Spring beans can be referenced in your Camel routes.
QuickstartConfiguration class
The configuration properties bean for the fuse711-configmap project is defined as the QuickstartConfiguration Java class (under the src/main/java/org/example/fis/ directory), as follows:
package org.example.fis;

import org.springframework.boot.context.properties.ConfigurationProperties;
import org.springframework.context.annotation.Configuration;

@Configuration  1
@ConfigurationProperties(prefix = "quickstart")  2
public class QuickstartConfiguration {

    /**
     * A comma-separated list of routes to use as recipients for messages.
     */
    private String recipients;  3

    /**
     * The username to use when connecting to the async queue (simulation)
     */
    private String queueUsername;  4

    /**
     * The password to use when connecting to the async queue (simulation)
     */
    private String queuePassword;  5

    // Setters and Getters for Bean properties
    // NOT SHOWN
    ...
}
- 1
- The
@Configurationannotation causes theQuickstartConfigurationclass to be instantiated and registered in Spring as the bean with ID,quickstartConfiguration. This automatically makes the bean accessible from Camel. For example, thetarget-route-queueroute is able to access thequeueUserNameproperty using the Camel syntax${bean:quickstartConfiguration?method=getQueueUsername}. - 2
- The
@ConfigurationPropertiesannotation defines a prefix,quickstart, that must be used when defining property values in a property source. For example, a properties file would reference therecipientsproperty asquickstart.recipients. - 3
- The
recipientproperty is injectable from property sources. - 4
- The
queueUsernameproperty is injectable from property sources. - 5
- The
queuePasswordproperty is injectable from property sources.
11.2.3. Setting up Secret
The Kubernetes Secret in this quickstart is set up in the standard way, apart from one additional required step: the Spring Cloud Kubernetes plug-in must be configured with the mount paths of the Secrets, so that it can read the Secrets at run time. To set up the Secret:
- Create a Sample Secret Object
- Configure volume mount for the Secret
- Configure spring-cloud-kubernetes to read Secret properties
Sample Secret object
The quickstart project provides a sample Secret, sample-secret.yml, as follows. Property values in Secret objects are always base64 encoded (use the base64 command-line utility). When the Secret is mounted in a pod’s filesystem, the values are automatically decoded back into plain text.
sample-secret.yml file
apiVersion: v1
kind: Secret
metadata: 1
  name: camel-config
type: Opaque
data:
  # The username is 'myuser'
  quickstart.queue-username: bXl1c2VyCg== 2
  quickstart.queue-password: MWYyZDFlMmU2N2Rm 3
- 1
- metadata.name: Identifies the Secret. Other parts of the OpenShift system use this identifier to reference the Secret.
- 2
- quickstart.queue-username: Is meant to be injected into the
queueUsernameproperty of thequickstartConfigurationbean. The value must be base64 encoded. - 3
- quickstart.queue-password: Is meant to be injected into the
queuePasswordproperty of thequickstartConfigurationbean. The value must be base64 encoded.
Kubernetes does not allow you to define property names in CamelCase (it requires property names to be all lowercase). To work around this limitation, use the hyphenated form queue-username, which Spring Boot matches with queueUsername. This takes advantage of Spring Boot’s relaxed binding rules for externalized configuration.
Configure volume mount for the Secret
The application must be configured to load the Secret at run time, by configuring the Secret as a volume mount. After the application starts, the Secret properties then become available at the specified location in the filesystem. The deployment.yml file for the application is located under src/main/jkube/ directory, which defines the volume mount for the Secret.
deployment.yml file
spec:
  template:
    spec:
      serviceAccountName: "qs-camel-config"
      volumes: 1
        - name: "camel-config"
          secret:
            # The secret must be created before deploying this application
            secretName: "camel-config"
      containers:
        -
          volumeMounts: 2
            - name: "camel-config"
              readOnly: true
              # Mount the secret where spring-cloud-kubernetes is configured to read it
              # see src/main/resources/bootstrap.yml
              mountPath: "/etc/secrets/camel-config"
          resources:
#            requests:
#              cpu: "0.2"
#              memory: 256Mi
#            limits:
#              cpu: "1.0"
#              memory: 256Mi
             env:
              - name: SPRING_APPLICATION_JSON
               value: '{"server":{"undertow":{"io-threads":1, "worker-threads":2 }}}'
- 1
- In the
volumessection, the deployment declares a new volume namedcamel-config, which references the Secret namedcamel-config. - 2
- In the
volumeMountssection, the deployment declares a new volume mount, which references thecamel-configvolume and specifies that the Secret volume should be mounted to the path/etc/secrets/camel-configin the pod’s filesystem.
Configuring spring-cloud-kubernetes to read Secret properties
To integrate secrets with Spring Boot externalized configuration, the Spring Cloud Kubernetes plug-in must be configured with the secret’s mount path. Spring Cloud Kubernetes reads the secrets from the specified location and makes them available to Spring Boot as property sources. The Spring Cloud Kubernetes plug-in is configured by settings in the bootstrap.yml file, located under src/main/resources in the quickstart project.
bootstrap.yml file
# Startup configuration of Spring-cloud-kubernetes
spring:
  application:
    name: camel-config
  cloud:
    kubernetes:
      reload:
        # Enable live reload on ConfigMap change (disabled for Secrets by default)
        enabled: true
      secrets:
        paths: /etc/secrets/camel-config
The spring.cloud.kubernetes.secrets.paths property specifies the list of paths of secrets volume mounts in the pod.
A bootstrap.properties file (or bootstrap.yml file) behaves similarly to an application.properties file, but it is loaded at an earlier phase of application start-up. It is more reliable to set the properties relating to the Spring Cloud Kubernetes plug-in in the bootstrap.properties file.
11.2.4. Setting up ConfigMap
In addition to creating a ConfigMap object and setting the view permission appropriately, the integration with Spring Cloud Kubernetes requires you to match the ConfigMap’s metadata.name with the value of the spring.application.name property configured in the project’s bootstrap.yml file. To set up the ConfigMap:
- Create Sample ConfigMap Object
- Set up the view permission
- Configure the Spring Cloud Kubernetes plug-in
Sample ConfigMap object
The quickstart project provides a sample ConfigMap, sample-configmap.yml.
kind: ConfigMap
apiVersion: v1
metadata: 1
  # Must match the 'spring.application.name' property of the application
  name: camel-config
data:
  application.properties: | 2
    # Override the configuration properties here
    quickstart.recipients=direct:async-queue,direct:file,direct:mail 3
- 1
- metadata.name: Identifies the ConfigMap. Other parts of the OpenShift system use this identifier to reference the ConfigMap.
- 2
- data.application.properties: This section lists property settings that can override settings from the original
application.propertiesfile that was deployed with the application. - 3
- quickstart.recipients: Is meant to be injected into the
recipientsproperty of thequickstartConfigurationbean.
Setting the view permission
As shown in the deployment.yml file for the Secret, the serviceAccountName is set to qs-camel-config in the project’s deployment.yml file. Hence, you need to enter the following command to enable the view permission on the quickstart application (assuming that it deploys into the test project namespace):
oc policy add-role-to-user view system:serviceaccount:test:qs-camel-config
Configuring the Spring Cloud Kubernetes plug-in
The Spring Cloud Kubernetes plug-in is configured by the following settings in the bootstrap.yml file.
- spring.application.name
-
This value must match the
metadata.nameof the ConfigMap object (for example, as defined insample-configmap.ymlin the quickstart project). It defaults toapplication. - spring.cloud.kubernetes.reload.enabled
-
Setting this to
trueenables dynamic reloading of ConfigMap objects.
For more details about the supported properties, see PropertySource Reload Configuration Properties.
11.3. Using ConfigMap PropertySource
Kubernetes has the notion of ConfigMap for passing configuration to the application. The Spring cloud Kubernetes plug-in provides integration with ConfigMap to make config maps accessible by Spring Boot.
The ConfigMap PropertySource when enabled will look up Kubernetes for a ConfigMap named after the application (see spring.application.name). If the map is found it will read its data and do the following:
11.3.1. Applying individual properties
Let’s assume that we have a Spring Boot application named demo that uses properties to read its thread pool configuration.
-
pool.size.core -
pool.size.max
This can be externalized to config map in YAML format:
kind: ConfigMap
apiVersion: v1
metadata:
  name: demo
data:
  pool.size.core: 1
  pool.size.max: 16
11.3.2. Applying application.yaml ConfigMap property
Individual properties work fine for most cases but sometimes we find YAML is more convenient. In this case we use a single property named application.yaml and embed our YAML inside it:
kind: ConfigMap
apiVersion: v1
metadata:
  name: demo
data:
  application.yaml: |-
    pool:
      size:
        core: 1
        max:16
11.3.3. Applying application.properties ConfigMap property
You can also define the ConfigMap properties in the style of a Spring Boot application.properties file. In this case we use a single property named application.properties and list the property settings inside it:
kind: ConfigMap
apiVersion: v1
metadata:
  name: demo
data:
  application.properties: |-
    pool.size.core: 1
    pool.size.max: 16
11.3.4. Deploying a ConfigMap
To deploy a ConfigMap and make it accessible to a Spring Boot application, perform the following steps.
Procedure
-
In your Spring Boot application, use the externalized configuration mechanism to access the ConfigMap property source. For example, by annotating a Java bean with the
@Configurationannotation, it becomes possible for the bean’s property values to be injected by a ConfigMap. -
In your project’s
bootstrap.propertiesfile (orbootstrap.yamlfile), set thespring.application.nameproperty to match the name of the ConfigMap. Enable the
viewpermission on the service account that is associated with your application (by default, this would be the service account calleddefault). For example, to add theviewpermission to thedefaultservice account:oc policy add-role-to-user view system:serviceaccount:$(oc project -q):default -n $(oc project -q)
11.4. Using Secrets PropertySource
Kubernetes has the notion of Secrets for storing sensitive data such as password, OAuth tokens, etc. The Spring cloud Kubernetes plug-in provides integration with Secrets to make secrets accessible by Spring Boot.
The Secrets property source when enabled will look up Kubernetes for Secrets from the following sources. If the secrets are found, their data is made available to the application.
- Reading recursively from secrets mounts
-
Named after the application (see
spring.application.name) - Matching some labels
Please note that, by default, consuming Secrets via API (points 2 and 3 above) is not enabled.
11.4.1. Example of setting Secrets
Let’s assume that we have a Spring Boot application named demo that uses properties to read its ActiveMQ and PostreSQL configuration.
amq.username
amq.password
pg.username
pg.password
These secrets can be externalized to Secrets in YAML format:
- ActiveMQ Secrets
apiVersion: v1 kind: Secret metadata: name: activemq-secrets labels: broker: activemq type: Opaque data: amq.username: bXl1c2VyCg== amq.password: MWYyZDFlMmU2N2Rm- PostreSQL Secrets
apiVersion: v1
kind: Secret
metadata:
  name: postgres-secrets
  labels:
    db: postgres
type: Opaque
data:
  pg.username: dXNlcgo=
  pg.password: cGdhZG1pbgo=
11.4.2. Consuming the Secrets
You can select the Secrets to consume in a number of ways:
By listing the directories where the secrets are mapped:
-Dspring.cloud.kubernetes.secrets.paths=/etc/secrets/activemq,etc/secrets/postgres
If you have all the secrets mapped to a common root, you can set them like this:
-Dspring.cloud.kubernetes.secrets.paths=/etc/secrets
By setting a named secret:
-Dspring.cloud.kubernetes.secrets.name=postgres-secrets
By defining a list of labels:
-Dspring.cloud.kubernetes.secrets.labels.broker=activemq
-Dspring.cloud.kubernetes.secrets.labels.db=postgres
11.4.3. Configuration properties for Secrets PropertySource
You can use the following properties to configure the Secrets property source:
- spring.cloud.kubernetes.secrets.enabled
-
Enable the Secrets property source. Type is
Booleanand default istrue. - spring.cloud.kubernetes.secrets.name
-
Sets the name of the secret to look up. Type is
Stringand default is${spring.application.name}. - spring.cloud.kubernetes.secrets.labels
-
Sets the labels used to lookup secrets. This property behaves as defined by Map-based binding. Type is
java.util.Mapand default isnull. - spring.cloud.kubernetes.secrets.paths
-
Sets the paths where secrets are mounted. This property behaves as defined by Collection-based binding. Type is
java.util.Listand default isnull. - spring.cloud.kubernetes.secrets.enableApi
-
Enable/disable consuming secrets via APIs. Type is
Booleanand default isfalse.
Access to secrets via API may be restricted for security reasons — the preferred way is to mount a secret to the POD.
11.5. Using PropertySource Reload
Some applications may need to detect changes on external property sources and update their internal status to reflect the new configuration. The reload feature of Spring Cloud Kubernetes is able to trigger an application reload when a related ConfigMap or Secret change.
11.5.1. Enabling PropertySource Reload
The PropertySource reload feature of Spring Cloud Kubernetes is disabled by default.
Procedure
-
Navigate to
src/main/resourcesdirectory of the quickstart project and open thebootstrap.ymlfile. -
Change the configuration property
spring.cloud.kubernetes.reload.enabled=true.
11.5.2. Levels of PropertySource Reload
The following levels of reload are supported for property spring.cloud.kubernetes.reload.strategy:
- refresh
(default) only configuration beans annotated with
@ConfigurationPropertiesor@RefreshScopeare reloaded. This reload level leverages the refresh feature of Spring Cloud Context.NoteThe PropertySource reload feature can only be used for simple properties (that is, not collections) when the reload strategy is set to
refresh. Properties backed by collections must not be changed at runtime.- restart_context
- the whole Spring ApplicationContext is gracefully restarted. Beans are recreated with the new configuration.
- shutdown
- the Spring ApplicationContext is shut down to activate a restart of the container. When using this level, make sure that the lifecycle of all non-daemon threads is bound to the ApplicationContext and that a replication controller or replica set is configured to restart the pod.
11.5.3. Example of PropertySource Reload
The following example explains what happens when the reload feature is enabled.
Procedure
Assume that the reload feature is enabled with default settings (refresh mode). The following bean will be refreshed when the config map changes:
@Configuration
@ConfigurationProperties(prefix = "bean")
public class MyConfig {

    private String message = "a message that can be changed live";

    // getter and setters

}
To see the changes that are happening, create another bean that prints the message periodically as shown below.
@Component
public class MyBean {

    @Autowired
    private MyConfig config;

    @Scheduled(fixedDelay = 5000)
    public void hello() {
        System.out.println("The message is: " + config.getMessage());
    }
}
You can change the message printed by the application by using a ConfigMap as shown below.
apiVersion: v1
kind: ConfigMap
metadata:
  name: reload-example
data:
  application.properties: |-
    bean.message=Hello World!
Any change to the property named
bean.messagein the Config Map associated with the pod will be reflected in the output of the program.
11.5.4. PropertySource Reload operating modes
The reload feature supports two operating modes:
- event
-
(default) watches for changes in ConfigMaps or secrets using the Kubernetes API (web socket). Any event will produce a re-check on the configuration and a reload in case of changes. The
viewrole on the service account is required in order to listen for config map changes. A higher level role (eg.edit) is required for secrets (secrets are not monitored by default). - polling
-
re-creates the configuration periodically from config maps and secrets to see if it has changed. The polling period can be configured using the property
spring.cloud.kubernetes.reload.periodand defaults to 15 seconds. It requires the same role as the monitored property source. This means, for example, that using polling on file mounted secret sources does not require particular privileges.
11.5.5. PropertySource Reload configuration properties
The following properties can be used to configure the reloading feature:
- spring.cloud.kubernetes.reload.enabled
-
Enables monitoring of property sources and configuration reload. Type is
Booleanand default isfalse. - spring.cloud.kubernetes.reload.monitoring-config-maps
-
Allow monitoring changes in config maps. Type is
Booleanand default istrue. - spring.cloud.kubernetes.reload.monitoring-secrets
-
Allow monitoring changes in secrets. Type is
Booleanand default isfalse. - spring.cloud.kubernetes.reload.strategy
-
The strategy to use when firing a reload (
refresh,restart_context,shutdown). Type isEnumand default isrefresh. - spring.cloud.kubernetes.reload.mode
-
Specifies how to listen for changes in property sources (
event,polling). Type isEnumand default isevent. - spring.cloud.kubernetes.reload.period
-
The period in milliseconds for verifying changes when using the
pollingstrategy. Type isLongand default is15000.
Note the following points:
-
The
spring.cloud.kubernetes.reload.*properties should not be used in ConfigMaps or Secrets. Changing such properties at run time may lead to unexpected results; -
Deleting a property or the whole config map does not restore the original state of the beans when using the
refreshlevel.