
Red Hat Training
A Red Hat training course is available for Red Hat Fuse
Chapter 5. Adding a Content-Based Router
This tutorial shows how to add a Content-Based Router (CBR) and logging to a route.
A CBR routes a message to a destination based on its content. In this tutorial, the CBR that you create routes messages to different folders based on the value of each message’s quantity field (the number of animals in the order). The maximum value of animals for each order is 10. The CBR routes the messages to different folders, depending on whether the quantity is greater than 10.
Goals
In this tutorial you complete the following tasks:
- Add a Content-Based Router to your route
Configure the Content-Based Router:
- Add a log endpoint to each output branch of the content-based router
- Add a Set Header EIP after each log endpoint
- Add an Otherwise branch to the content-based router
Prerequisites
To start this tutorial, you need the ZooOrderApp project resulting from one of the following:
Completing the Chapter 4, Running a Route tutorial.
or
-
Completing the Chapter 2, Setting up your environment tutorial and replacing your project’s
blueprint.xmlfile with the providedblueprintContexts/blueprint1.xmlfile, as described in the section called “About the resource files”.
Adding and configuring a Content-Based Router
To add and configure a Content-Based Router for your route:
-
In Project Explorer, double-click
ZooOrderApp/src/main/resources/OSGI-INF/blueprint/blueprint.xmlto open it in the Editor view. -
On the Design canvas, select the
To_Receivednode and then select the trash can icon to delete it. In the Palette, open the Routing drawer and drag a Choice (
 ) pattern to the canvas and drop it in the
 Route_route1container.The
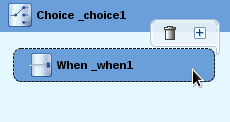
Route_route1container expands to accommodate theChoice_choice1node. The error icon indicates that theChoice_choice1node requires a child node, which you add next.From the Routing drawer, drag a When (
 ) pattern to the canvas and drop it on the
 Choice_choice1node: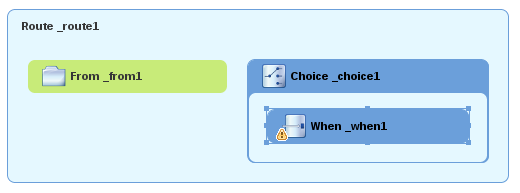
The
Choice_choice1container expands to accommodate theWhen_when1node. The decorating the
 When_when1node indicates that one or more required property values must be set.NoteThe tooling prevents you from dropping a pattern onto an invalid drop point in a Route container.
On the canvas, select the
When_when1node, to open its properties in the Properties view: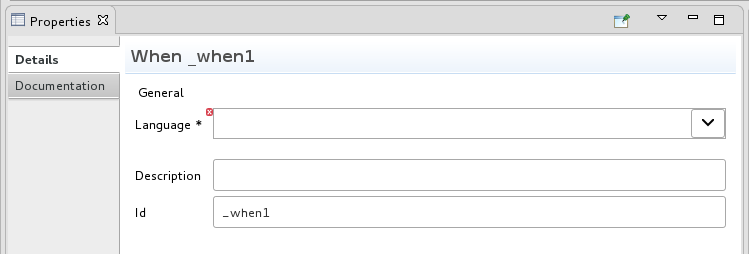
-
Click the
 button in the Language field to open the list of available languages.
Select xpath (for the XML query language) because the test messages are written in XML.
NoteOnce you select the expression Language, the Properties view displays its properties in an indented list directly below the Language field. The Id property in this list sets the ID of the expression. The Id property following the Description field sets the ID of the
Whennode.In the Expression field, type:
/order/orderline/quantity/text() > 10This expression specifies that only messages in which the value of the quantity field is greater than 10 travel this path in the route (to the invalidOrders folder).
Leave each of the remaining properties as they are.
NoteEnabling Trim removes any leading or trailing white spaces and line breaks from the message.

In the
Route_route1container, select theFrom_from1node and drag its connector arrow over theChoice_choice1node, then release it: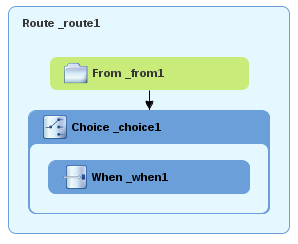
- On the menu bar, click File → Save to save the routing context file.
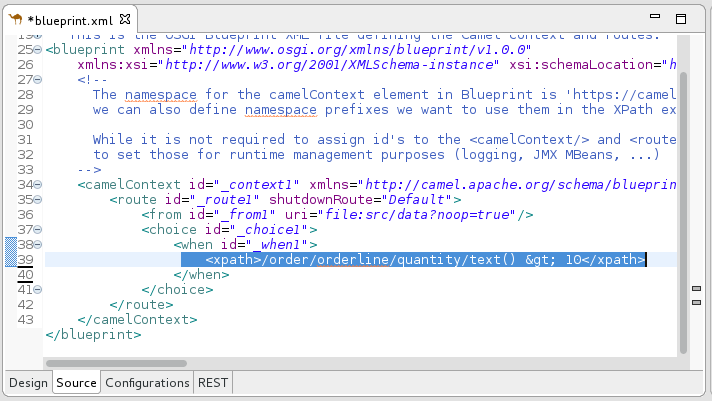
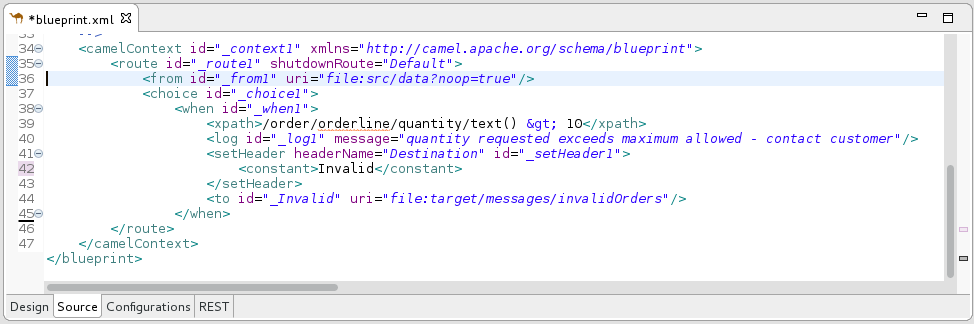
Click the Source tab to view the XML for the route:
Adding and configuring logging
Adding logging to a route allows you to track the activity of the route.
To add logging to your CBR route:
-
In the Palette, open the Components drawer and select a Log (
 ) component.
Drag the Log component to the canvas and drop it on the
When_when1node.The
When_when1container expands to accommodate theLog_log1node: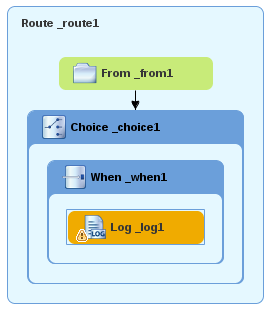
-
On the canvas, select the
Log_log1node to open its properties in the Properties view. In the Message field, type:
The quantity requested exceeds the maximum allowed - contact customer.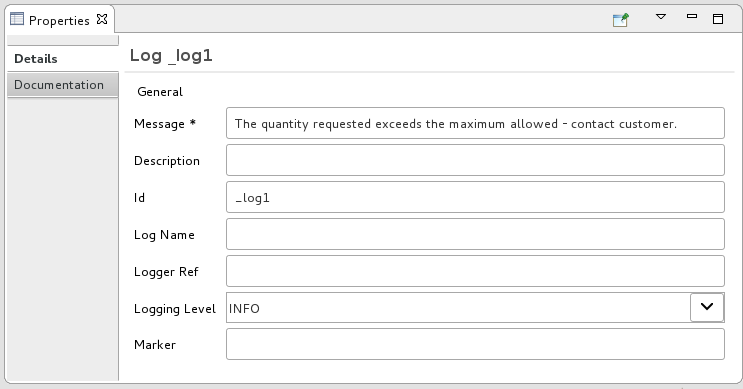
Leave each of the remaining properties as they are.
+
The tooling auto-generates a log node id value. In the Fuse Integration perspective’s Messages view, the tooling inserts the contents of the log node’s Id field in the Trace Node Id column for message instances, when tracing is enabled on the route (see the Chapter 8, Tracing a message through a route tutorial). In the Console, it adds the contents of the log node’s Message field to the log data whenever the route runs.
- On the menu bar, click File → Save to save the routing context file.
Adding and configuring message headers
A message header contains information to process a message.
To add and configure message headers:
-
In the Palette, open the Transformation drawer and select a Set Header (
 ) pattern.
Drag the Set Header pattern to the canvas and drop it in the
When_when1container.The
When_when1container expands to accommodate theSetHeader_setHeader1node.On the canvas, select the
Log_log1node and drag its connector arrow over theSetHeader_setHeader1node, and then release it: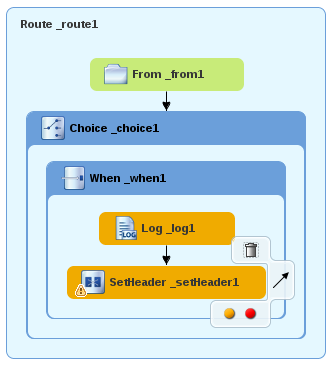
On the canvas, select the
SetHeader_setHeader1node to open its properties in the Properties view:
-
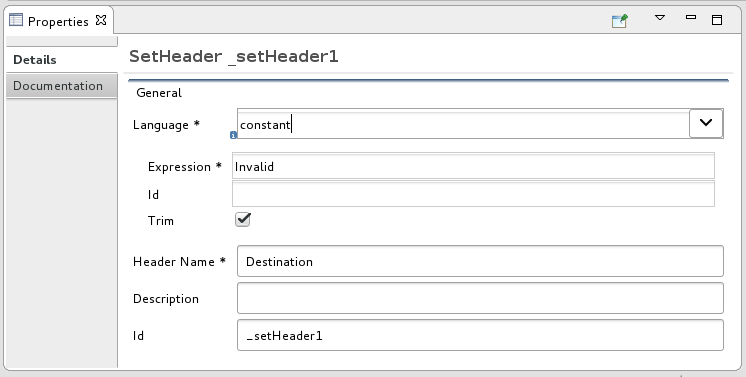
Click the
button in the Language field to open the list of available languages, and select constant:
-
In the Expression field, type
Invalid. -
In the Header Name field, type
Destination. Leave each of the remaining properties as they are.
-
In the Palette, open the Components drawer and select the File (
 ) component.
Drag the File component to the canvas and drop it in the
When_when1container.The
When_when1container expands to accommodate theTo_to1node.On the canvas, select the
SetHeader_setHeader1node and drag its connector arrow over theTo_to1node, and then release it: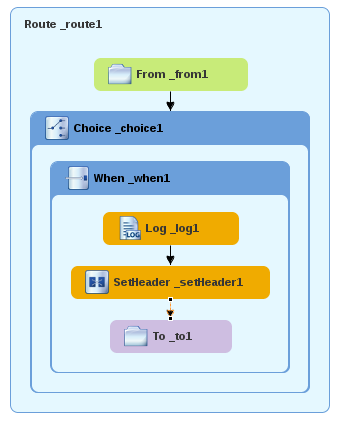
On the canvas, select the
To_to1node to open its properties in the Properties view: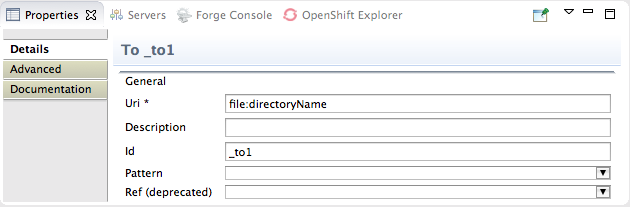
On the Details tab, replace directoryName with
target/messages/invalidOrdersin the Uri field, and type_Invalidin the Id field: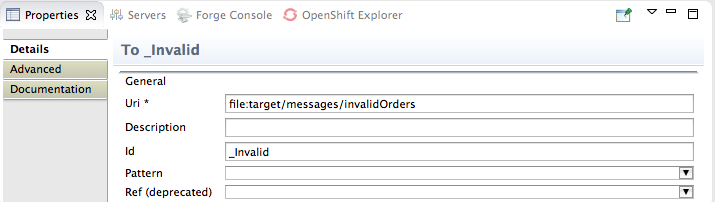
- On the menu bar, click File → Save to save the routing context file.
Click the Source tab to view the XML for the route:
Adding and configuring a branch to handle valid orders
So far, the CBR handles messages that contain invalid orders.
To add and configure an otherwise branch of your route to handle valid orders:
-
In the Palette, open the Routing drawer and select the Otherwise (
) pattern.
Drag the Otherwise pattern to the canvas and drop it into the
Choice_choice1container: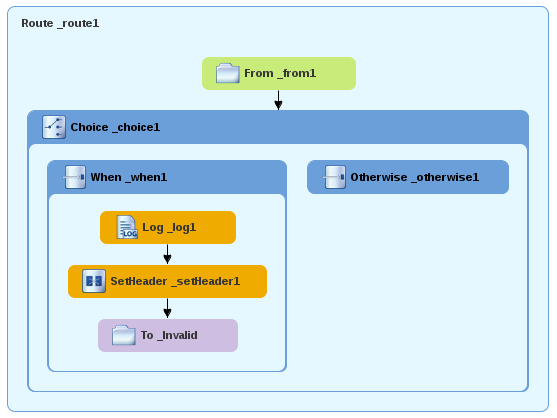
The
Choice_choice1container expands to accommodate theOtherwise_otherwise1node.-
On the canvas, select the
Otherwise_otherwise1node to open its properties in the Properties view. In the Id field, type
_elseValid: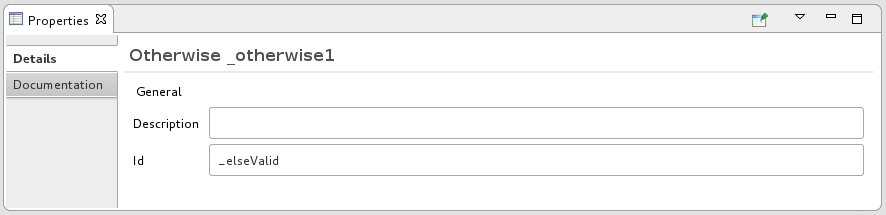 Note
NoteThe
elseValidnode will route to the terminalfilenode (file:target/messages/validOrders) any message that does not match the XPath expression set for theWhen_when1node.-
In the Palette, open the Components drawer and select the Log (
) component.
Drag the Log component to the canvas and drop it on the
Otherwise_elseValidnode:
The
Otherwise-elseValidcontainer expands to accommodate theLog_log2node.-
On the canvas, select the
Log_log2node to open its properties in the Properties view. In the Message field, type
This is a valid order - OK to process.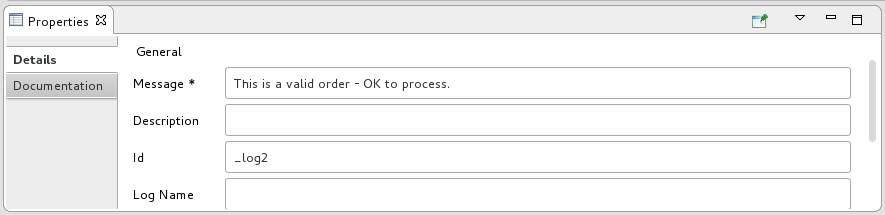
Leave the remaining properties as they are.
- In the Palette, open the Transformation drawer and select the Set Header pattern.
Drag the Set Header pattern to the canvas and drop it into the
Otherwise_elseValidcontainer.The
Otherwise_elseValidcontainer expands to accommodate theSetHeader_setHeader2node.On the canvas, select the
Log_log2node and drag its connector arrow over theSetHeader_setHeader2node, and then release it: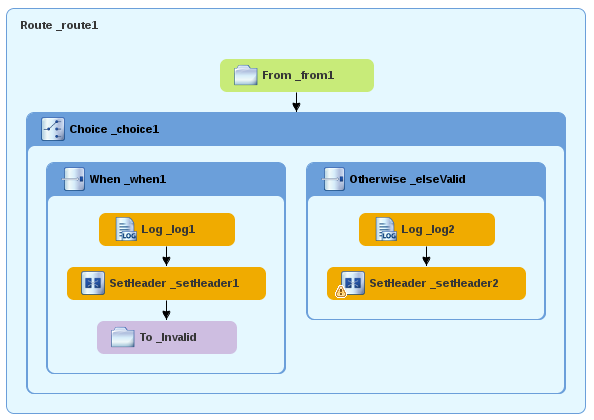 Note
NoteYou can collapse containers to free up space when the diagram becomes congested. To do so, select the container you want to collapse, and then click its
 button:
To reopen the container, select it and then click its
 button:
Collapsing and expanding containers in the Design tab does not affect the routing context file. It remains unchanged.
-
On the canvas, select the
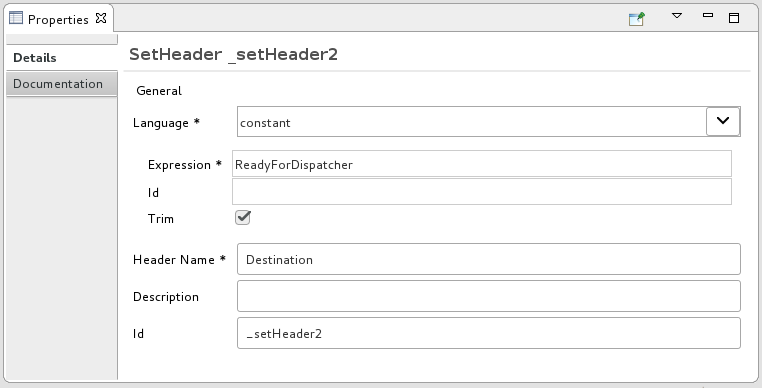
SetHeader_setHeader2node to open its properties in the Properties view. -
Click the
button in the Language field to open the list of available languages, and select constant.
-
In the Expression field, type
ReadyForDispatcher. -
In the Header Name field, type
Destination. Leave the remaining properties as they are.
-
In the Palette, open the Components drawer and select the File (
) component.
Drag the File component to the canvas and drop it into the
Otherwise_elseValidcontainer.The
Otherwise_elseValidcontainer expands to accommodate theTo_to1node.On the canvas, select the
SetHeader_setHeader2node, and drag its connector arrow over theTo_to1node and then release it: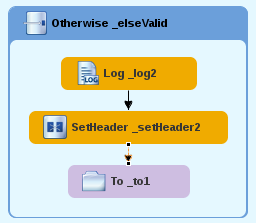
-
On the canvas, select the
To_to1node to open its properties in the Properties view. In the URI field, replace directoryName with
target/messages/validOrders, and in the Id field, type_Valid.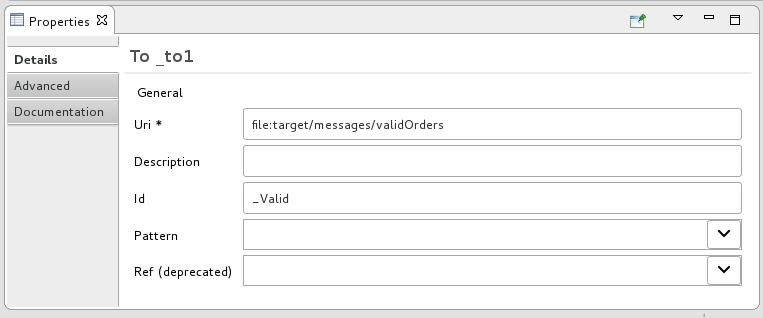
Save the routing context file.
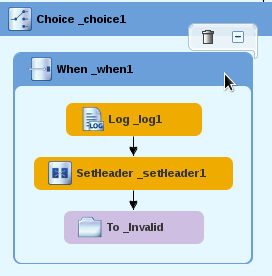
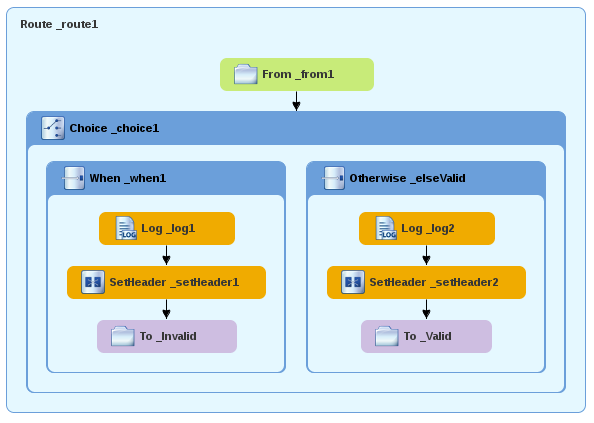
Here is the completed content-based router with logs and message headers:
Click the Source tab at the bottom, left of the canvas to display the XML for the route.
<?xml version="1.0" encoding="UTF-8"?> <blueprint xmlns="http://www.osgi.org/xmlns/blueprint/v1.0.0" xmlns:xsi="http://www.w3.org/2001/XMLSchema-instance" xsi:schemaLocation="http://www.osgi.org/xmlns/blueprint/v1.0.0 https://www.osgi.org/xmlns/blueprint/v1.0.0/blueprint.xsd http://camel.apache.org/schema/blueprint http://camel.apache.org/schema/blueprint/camel-blueprint.xsd"> <camelContext id="_context1" xmlns="http://camel.apache.org/schema/blueprint"> <route id="_route1"> <from id="_from1" uri="file:src/data?noop=true"/> <choice id="_choice1"> <when id="_when1"> <xpath>/order/orderline/quantity/text() > 10</xpath> <log id="_log1" message="The quantity requested exceeds the maximum allowed - contact customer."/> <setHeader headerName="Destination" id="_setHeader1"> <constant>Invalid</constant> </setHeader> <to id="_Invalid" uri="file:target/messages/invalidOrders"/> </when> <otherwise id="_elseValid"> <log id="_log2" message="This is a valid order - OK to process."/> <setHeader headerName="Destination" id="_setHeader2"> <constant>ReadyForDispatcher</constant> </setHeader> <to id="_Valid" uri="file:target/messages/validOrders"/> </otherwise> </choice> </route> </camelContext> </blueprint>
Verifying the CBR
You can run the new route as described in the the section called “Running the route” tutorial.
After you run it, to verify whether the route executed properly you can check the target destination folders in Project Explorer:
-
Select
ZooOrderApp. - Right-click it to open the context menu, and then select Refresh.
Under the project root node (
ZooOrderApp), locate thetarget/messages/folder and expand it.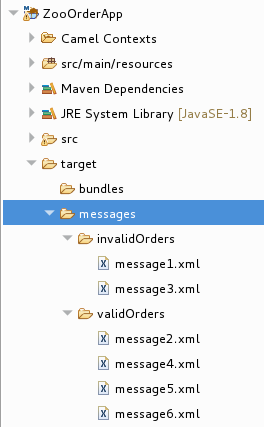
Check that the
target/messages/invalidOrdersfolder containsmessage1.xmlandmessage3.xml.In these messages, the value of the
quantityelement exceeds 10.Check that the
target/messages/validOrdersfolder contains the four message files that contain valid orders:message2.xml,message4.xml,message5.xmlandmessage6.xml.In these messages, the value of the
quantityelement is less than or equal to 10.NoteTo view message content, double-click each message to open it in the route editor’s XML editor.
Next steps
In the next tutorial, Chapter 6, Adding another route to the routing context, you add a second route that further processes valid order messages.