
Red Hat Training
A Red Hat training course is available for Red Hat Fuse
Ignite Sample Integration Tutorials
Instructions for Creating Sample Integrations
Abstract
Preface
Ignite lets you obtain data from an application or service, operate on that data if you need to, and then send the data to a completely different application or service. You can do all this without writing code.
Explore Ignite by creating these sample integrations:
A user guide for Ignite is also available.
In this release, consider the names Red Hat Fuse Online and Ignite as interchangeable.
To obtain support, in Ignite, in the upper right, click
 and then select Support.
Chapter 1. Comparison of sample integrations
You can create the sample integrations in any order. To help you decide which one to try first, the following table compares them.
| Comparison Point | Twitter to Salesforce | Salesforce to Database | AMQ to REST API |
| Average time to complete | 25 minutes. This includes the time needed to obtain Twitter and Salesforce accounts. It does not include 5 - 12 minutes of waiting for Salesforce registration to take effect and for Ignite to start running the integration. | 10 minutes if you already created the Twitter to Salesforce sample. Otherwise, 20 minutes, which includes the time needed to obtain a Salesforce account. This does not include waiting time. | 25 minutes. This does not include the time it takes Ignite to start running the integration. |
| Prerequisites | Twitter account, Salesforce account | Salesforce account | None |
| Demonstrated features include | Connections, OAuth support, data mapping, filtering | Connections, OAuth support, data mapping, SQL database access | Connections, data mapping, custom step extension, custom REST API client connector |
Chapter 2. Logging in to Ignite
In this release, you receive a link for accessing Ignite. Clicking this link displays the Red Hat OpenShift Online Log In page, which prompts you to log in by using your Red Hat account. Logging in prompts you to authorize Ignite to access to your account:
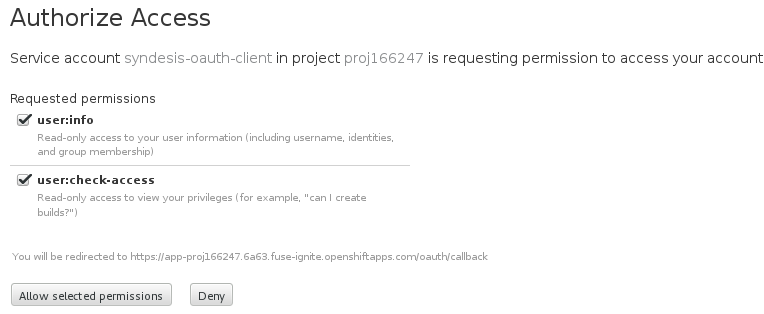
Click Allow selected permissions. You need to do this only once. The next time you log in, Ignite immediately appears.
Red Hat supports using Ignite in the following browsers:
- Chrome
- Firefox
- Microsoft Edge
Chapter 3. Implement a Twitter to Salesforce sample integration
This sample integration watches Twitter for tweets that mention a particular Twitter user. When the integration finds such tweets, it filters them so that only those tweets that contain the text you specify cause the integration to continue.
For tweets that contain the specified text, the integration passes data related to the tweet, including the Twitter user name, to Salesforce and Salesforce creates a new contact.
To implement, deploy, and test this sample integration, the main steps are:
- Section 3.2, “Register Ignite as a Twitter client”
- Section 3.3, “Create a Twitter connection”
- Section 3.4, “Register Ignite as a Salesforce client”
- Section 3.5, “Create a Salesforce connection”
- Section 3.6, “Create and deploy Twitter to Salesforce sample integration”
- Section 3.7, “Confirm that the Twitter to Salesforce integration works”
- Section 3.8, “Clean up your integration”
Before you implement this sample integration, see Section 3.1, “Prerequisites for implementing Twitter to Salesforce integration”.
3.1. Prerequisites for implementing Twitter to Salesforce integration
To implement a Twitter to Salesforce sample integration:
- You need a Twitter account. You can obtain one at http://twitter.com.
- You need an account in a Salesforce installation that is used for development. This account must have Salesforce API access, which is available in a Salesforce Enterprise account or a Salesforce Developer account. To obtain a free developer account, visit https://developer.salesforce.com/signup. It takes less than two minutes to obtain a Salesforce account.
3.2. Register Ignite as a Twitter client
You must register your installation of Ignite as an application that can access Twitter. This lets you create any number of integrations that connect to Twitter. In other words, you need to register a particular installation of Ignite with Twitter only once.
In each Ignite environment, there can be only one registration of Ignite as a Twitter client. However, while each Twitter connection uses the same registration, it can use different user credentials.
Perform these steps:
In Ignite:
- In the left panel, click Settings.
-
Near the top of the OAuth Application Management page, where you see
During registration, enter this callback URL:, copy the URL at the end of the sentence to the clipboard. - To the right of the Twitter entry, click Register to display the Client ID and Client Secret fields.
In another browser tab, go to the Twitter Application Management web site at https://apps.twitter.com and do the following:
-
Confirm that the URL is
apps.twitter.comand not justtwitter.com. - If you are not already logged in to the Twitter Application Management site, log in.
- Click Create New App.
- In the Name field, enter a name for your new app. This name must be unique among all names of apps registered with Twitter.
- In the Description field, enter helpful information. Twitter requires some input in this field.
-
In the Website field, paste the URL that you copied at the beginning of this procedure and remove
api/v1/credentials/callbackfrom the end of the URL. -
In the Callback URL field, paste the URL again. It should be something like this:
https://app-proj9128.7b63.fuse-ignite.openshiftapps.com/api/v1/credentials/callback. - Click Yes to agree to the Twitter developer agreement.
- Click Create your Twitter application.
- Click the Keys and Access Tokens tab.
- Copy the Consumer Key.
-
Confirm that the URL is
- On your Ignite installation Settings page, paste the Twitter consumer key into the Twitter Client ID field.
- On the Twitter Keys and Access Tokens tab, copy the Consumer Secret and paste it into the Ignite Twitter Client Secret field.
- Click Save and then click Ok.
3.3. Create a Twitter connection
A connection to Twitter requires registration of Ignite as an application that can access Twitter. If you did not already register Ignite, see Section 3.2, “Register Ignite as a Twitter client”.
After you create a Twitter connection, you can use it in multiple integrations.
To create a Twitter connection:
- In Ignite, in the left panel, click Connections to display any available connections.
- In the upper right, click Create Connection to display the available connectors. A connector is a template that you use to create one or more connections.
- Click the Twitter connector.
- Click Connect Twitter to display a Twitter authorization page. You might need to log in to Twitter before you see the authorization page.
- Click Authorize app to return to Ignite.
-
In the Connection Name field, enter your choice of a name that helps you distinguish this connection from any other connections. For example, enter
Twitter Connect 1. -
In the Description field, optionally enter any information that is helpful to know about this connection. For example, enter
Sample Twitter connection that uses my Twitter login credentials. - In the upper right, click Create to see that the connection you created is now available. If you entered the example name, you would see that Twitter Connect 1 is now available.
3.4. Register Ignite as a Salesforce client
You must register your installation of Ignite as an application that can access Salesforce. This lets you create any number of integrations that connect to Salesforce. In other words, you need to register a particular installation of Ignite with Salesforce only once.
If you already registered Ignite as a Salesforce client and created a Salesforce connection, skip to Section 3.6, “Create and deploy Twitter to Salesforce sample integration”.
In each Ignite environment, there can be only one registration of Ignite as a Salesforce client. However, while each Salesforce connection uses the same registration, it can use different user credentials.
Perform these steps to register Ignite as a Salesforce client:
In Ignite:
- In the left panel, click Settings.
-
Near the top of the OAuth Application Management page, where you see
During registration, enter this callback URL:, copy that URL to the clipboard. - To the right of the Salesforce entry, click Register to display the Client ID and Client Secret fields.
In another browser tab, log in to your Salesforce account and follow the steps below to create a connected app. These instructions assume that you are using the Salesforce Classic user interface. To switch from the Salesforce Lightning Experience interface, click your profile icon and select Switch to Salesforce Classic. For additional information, see the Salesforce documentation for Create a Connected App.
- In Salesforce, in the upper right, click Setup.
- In the left panel, select Build > Create > Apps.
- Scroll down to Connected Apps and click New.
- Enter the required information and then select Enable OAuth Settings.
-
In the Callback URL field, paste your Ignite URL, which you copied at the beginning of this procedure. For example:
https://app-proj9128.7b63.fuse-ignite.openshiftapps.com/api/v1/credentials/callback. For OAuth Scopes, add:
- Access and manage your data
- Allow access to your unique identifier
- Perform requests on your behalf at any time
- Select Include ID token and then Include Standard Claims.
- Scroll down and click Save.
-
Scroll up to see that Salesforce indicates a short wait:

- Click Continue.
- Copy the consumer key that Salesforce provides.
- Return to your Ignite installation Settings page and paste the Salesforce-provided consumer key into the Salesforce Client ID field.
- Back in Salesforce, copy the consumer secret that Salesforce provides.
- Return to your Ignite installation Settings page and paste the Salesforce-provided consumer secret into the Salesforce Client Secret field.
- Click Save and then click Ok.
3.5. Create a Salesforce connection
A connection to Salesforce requires registration of Ignite as an application that can access Salesforce.
If you did not already register Ignite see Section 3.4, “Register Ignite as a Salesforce client”.
Be sure to wait 2 - 10 minutes after registering your Ignite installation as a Salesforce client before you try to create a Salesforce connection. After you create a Salesforce connection, you can use it in multiple integrations.
To create a Salesforce connection:
- In the left panel, click Connections to display available connections.
- In the upper right, click Create Connection to display the available connectors. A connector is a template for creating one or more connections.
- Click the Salesforce connector.
Click Connect Salesforce to display a Salesforce authorization page. You might need to log in to Salesforce before you see the authorization page.
NoteThe following error indicates that Salesforce does not have the correct Ignite callback URL:
error=redirect_uri_mismatch&error_description=redirect_uri%20must%20match%20configurationIf you get this error message, then in Salesforce, ensure that the Ignite callback URL is specified according to the instructions in Section 3.4, “Register Ignite as a Salesforce client”.
- Click Allow to return to Ignite.
-
In the Connection Name field, enter your choice of a name that helps you distinguish this connection from any other connections. For example, enter
SF Connect 1. -
In the Description field, optionally enter any information that is helpful to know about this connection. For example, enter
Sample Salesforce connection that uses my Salesforce login credentials. - In the upper right, click Create to see that the connection you created is now available. If you entered the example name, you would see that SF Connect 1 is now available.
3.6. Create and deploy Twitter to Salesforce sample integration
To create and deploy an integration that uses the Twitter and Salesforce connections you created, the main steps are:
3.6.1. Choose the start connection
To choose the start connection:
- On the left, click Integrations.
- In the upper right, click Create Integration.
- On the Choose a Start Connection page, click the Twitter connection you created. If you gave it the example name, you would click Twitter Connect 1. When the integration starts, it uses the credentials defined in this connection to connect to Twitter.
- On the Choose an Action page, click Mention.
After connecting to Twitter, the integration monitors Twitter for mentions that include your Twitter screen name. A match triggers the next step in the integration. However, before you add steps that operate on data between connections, you choose the connection that the integration uses to finish its work.
3.6.2. Choose the finish connection
To add the finish connection to the integration:
- On the Choose a Finish Connection page, click the Salesforce connection you created. If you gave it the example name, you would click SF Connect 1. This integration finishes by using the credentials defined in this connection to connect to Salesforce.
- On the Choose an Action page, click New record.
- On the next page, accept Contact as the Salesforce record to create.
- Click Done to add the finish connection to the integration.
3.6.3. Add a basic filter step
Add a basic filter step that checks tweets that mention you for particular content. The integration continues only if that content is present.
To add a basic filter step:
- In the main panel, click Add a step.
- Click Basic Filter.
-
In the first field (The data you want to evaluate), start to enter
textand whentextappears below the field, click it. This indicates that the content to filter for is in the Twittertextfield, which contains the text of the tweet. - Accept contains as the condition to be met for the integration to continue.
-
In the last field, enter
#RedHatIsGreator some other text you choose. A tweet that mentions you must contain the text you enter here for the integration to continue operating on this data. - Click Done to complete the basic filter step.
3.6.4. Add a data mapping step
Add a data mapping step that correlates Twitter mention fields to Salesforce contact fields:
- In the left panel, hover over the plus sign between the filter step and the finish connection to display a pop-up in which you click Add a Step.
- Click Data Mapper and wait a few moments. When the data fields appear, the Sources panel on the left displays the Twitter fields and the Target panel on the right displays the Salesforce fields.
Map the Twitter
namefield to the SalesforceFirstNameandLastNamefields:-
In the Sources panel, click the magnifying glass
 to display the search field and enter
 name. -
Under the
userfolder, click thenamefield. - In the Mapping Details panel, under Action, click the down caret and select Separate.
-
Below that, under Targets, in the input field, start to type
FirstName. When /FirstName appears below the field, click it. The data mapper displays a line from the Twitter name field to the Salesforce FirstName field. - In the lower right, click Add Target.
-
In the new target, in the input field, start to type
LastName. When /LastName appears below the field, click it. The data mapper displays another line from the Twitter name field, but this time it goes to the Salesforce LastName field. The blue lines indicate the current focus.
-
In the Sources panel, click the magnifying glass
Map the Twitter
screenNamefield to the SalesforceTitlefield:- In the Sources panel, scroll down to click the screenName field.
-
On the right, at the top of the Target panel, click the magnifying glass
to display the search field and enter
Title. - Click the Title field. The data mapper displays a line from the Twitter screenName field to the Salesforce Title field.
Map the Twitter
textfield to the SalesforceDescriptionfield:-
In the Sources search field, enter
textand under Status, click the text field. -
In the Target search field, enter
descriptionand then click the Salesforce Description field to create the mapping. -
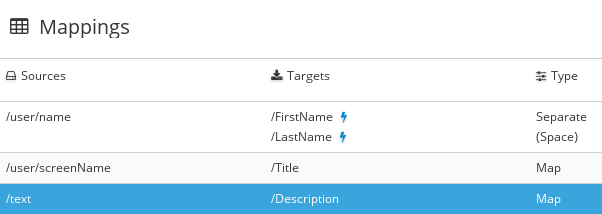
In the upper right, click the grid icon
 to display the list of mappings, which should look like this:
-
In the Sources search field, enter
- In the upper right, click Done.
3.6.5. Give the integration a name and deploy it
The sample integration is complete. To deploy it:
-
At the top of the left panel, in the Integration Name field, enter a name of your choice that distinguishes this integration from any other integrations. For example:
Twitter to Salesforce Sample Integration. - In the upper right corner, click Publish.
Ignite displays the integration summary page with a Publishing spinning circle. Ignite is generating the runtime for the integration and will start it when the runtime is ready. This takes a few minutes.
A Fuse Online account is limited to a specific number of integrations that can be running at one time. For details, see the pricing plan. If you are already running the maximum number of integrations, then you must unpublish an integration before you can publish (start running) another one.
If you are using a Fuse Online evaluation account, then only one integration at a time can be running (published). If you already created one of the other sample integrations and that integration is running then this integration is automatically in the Unpublished state. You must stop the running integration by unpublishing it. You can then publish this integration.
If you are already running the maximum number of integrations, follow these steps to unpublish (stop) an integration:
- In the left panel, click Integrations.
-
In the entry for the integration that you want to stop, click
 on the far right.
- In the popup, click Unpublish.
After unpublishing an integration, start another integration as follows:
- In the left panel, click Integrations.
-
In the entry for the integration that you want to start, click
on the far right.
- In the popup, click Publish.
3.7. Confirm that the Twitter to Salesforce integration works
To confirm that the Twitter to Salesforce sample integration is working:
- In the panel on the left, click Integrations to see that the integration you created is a Published integration, which means that it is running. If you entered the example name, you would see that Twitter to Salesforce Sample Integration is running.
Confirm that the integration does not create a contact record when a tweet does not contain the text you specified in the basic filter step:
In Twitter, send a tweet that:
- Mentions your Twitter handle
Does not contain the text you specified in the basic filter step
For example:
@Aslan #likesRedHat.
- Wait for the polling interval to elapse, which can be 30 - 60 seconds.
- In Salesforce, confirm that a contact record with your name does not exist.
Confirm that the integration creates a new contact record when it should:
In Twitter, send a tweet that:
- Mentions your Twitter handle
Contains the text you specified in the basic filter step
For example:
@Aslan knows #RedHatIsGreat.
- Wait for the polling interval to elapse.
-
In Salesforce, locate a contact record that has your name, the text of your tweet in the
Descriptionfield, and your Twitter screen name in theTitlefield.
3.8. Clean up your integration
When you are done working with a sample integration, unpublish it and delete it:
- In the left panel, click Integrations.
- In the main panel, identify the entry for the sample integration that you want to unpublish.
-
In that entry, to the right, click
and then click Unpublish.
- Click OK to confirm that you want to stop running the integration.
-
In the entry for the integration that you just unpublished, to the right, click
and then click Delete.
- Click OK to confirm that you want to delete the integration.
Chapter 4. Implement a Salesforce to database sample integration
This sample integration captures updates in Salesforce and then calls a database stored procedure, which synchronizes that database with the Salesforce updates.
To implement, deploy, and test this sample integration, the main steps are:
If you already created the Twitter to Salesforce sample integration:
- Ignite is already registered as a Salesforce client. You do not need to do this again.
- You already have a Salesforce connection, which you can reuse in this sample integration.
If you did not already create the Twitter to Salesforce sample integration, then you must register Ignite as a Salesforce client and create a Salesforce connection in order to complete the Salesforce to database sample integration.
Before you implement this sample integration, see Section 4.1, “Prerequisites for implementing Salesforce to database integration”.
4.1. Prerequisites for implementing Salesforce to database integration
To implement a Salesforce to database sample integration, you need an account in a Salesforce installation that is used for development. This account must have Salesforce API access, which is available in a Salesforce Enterprise account or a Salesforce Developer account. To obtain a free developer account, visit https://developer.salesforce.com/signup. It takes less than two minutes to obtain a Salesforce account.
4.2. Register Ignite as a Salesforce client
You must register your installation of Ignite as an application that can access Salesforce. This lets you create any number of integrations that connect to Salesforce. In other words, you need to register a particular installation of Ignite with Salesforce only once.
If you already registered Ignite as a Salesforce client and created a Salesforce connection, skip to Section 4.4, “Create and deploy Salesforce to database sample integration”.
In each Ignite environment, there can be only one registration of Ignite as a Salesforce client. However, while each Salesforce connection uses the same registration, it can use different user credentials.
Perform these steps to register Ignite as a Salesforce client:
In Ignite:
- In the left panel, click Settings.
-
Near the top of the OAuth Application Management page, where you see
During registration, enter this callback URL:, copy that URL to the clipboard. - To the right of the Salesforce entry, click Register to display the Client ID and Client Secret fields.
In another browser tab, log in to your Salesforce account and follow the steps below to create a connected app. These instructions assume that you are using the Salesforce Classic user interface. To switch from the Salesforce Lightning Experience interface, click your profile icon and select Switch to Salesforce Classic. For additional information, see the Salesforce documentation for Create a Connected App.
- In Salesforce, in the upper right, click Setup.
- In the left panel, select Build > Create > Apps.
- Scroll down to Connected Apps and click New.
- Enter the required information and then select Enable OAuth Settings.
-
In the Callback URL field, paste your Ignite URL, which you copied at the beginning of this procedure. For example:
https://app-proj9128.7b63.fuse-ignite.openshiftapps.com/api/v1/credentials/callback. For OAuth Scopes, add:
- Access and manage your data
- Allow access to your unique identifier
- Perform requests on your behalf at any time
- Select Include ID token and then Include Standard Claims.
- Scroll down and click Save.
-
Scroll up to see that Salesforce indicates a short wait:
- Click Continue.
- Copy the consumer key that Salesforce provides.
- Return to your Ignite installation Settings page and paste the Salesforce-provided consumer key into the Salesforce Client ID field.
- Back in Salesforce, copy the consumer secret that Salesforce provides.
- Return to your Ignite installation Settings page and paste the Salesforce-provided consumer secret into the Salesforce Client Secret field.
- Click Save and then click Ok.
4.3. Create a Salesforce connection
A connection to Salesforce requires registration of Ignite as an application that can access Salesforce.
If you did not already register Ignite, see Section 4.2, “Register Ignite as a Salesforce client”.
Be sure to wait 2 - 10 minutes after registering your Ignite installation as a Salesforce client before you try to create a Salesforce connection. After you create a Salesforce connection, you can use it in multiple integrations.
To create a Salesforce connection:
- In the left panel, click Connections to display available connections.
- In the upper right, click Create Connection to display the available connectors. A connector is a template for creating one or more connections.
- Click the Salesforce connector.
Click Connect Salesforce to display a Salesforce authorization page. You might need to log in to Salesforce before you see the authorization page.
NoteThe following error indicates that Salesforce does not have the correct Ignite callback URL:
error=redirect_uri_mismatch&error_description=redirect_uri%20must%20match%20configurationIf you get this error message, then in Salesforce, ensure that the Ignite callback URL is specified according to the instructions in Section 4.2, “Register Ignite as a Salesforce client”.
- Click Allow to return to Ignite.
-
In the Connection Name field, enter your choice of a name that helps you distinguish this connection from any other connections. For example, enter
SF Connect 1. -
In the Description field, optionally enter any information that is helpful to know about this connection. For example, enter
Sample Salesforce connection that uses my Salesforce login credentials. - In the upper right, click Create to see that the connection you created is now available. If you entered the example name, you would see that SF Connect 1 is now available.
4.4. Create and deploy Salesforce to database sample integration
To create and deploy an integration that uses the Salesforce connection and the database connection, the main steps are:
4.4.1. Choose the start connection
To choose the start connection:
- On the left, click Integrations.
- Click Create Integration.
- On the Choose a Start Connection page, click your Salesforce connection. If you specified the example name, you would click SF Connect 1.
- On the Choose an Action page, click On create.
- In the Object name field, select Lead.
- Click Done to add the start connection to the integration.
After connecting to Salesforce, the integration watches for notifications that a Salesforce Lead record was created. When the integration finds such a notification, it passes the new lead’s data to the next step in the integration.
However, before you can add the next step, you must choose the integration’s finish connection.
4.4.2. Choose the finish connection
To add the finish connection to the integration:
- On the Choose a Finish Connection page, click the PostgresDB connection. This integration finishes by using the credentials defined in this database connection to connect to the provided sample database.
- On the Choose an Action page, click Invoke SQL stored procedure, which passes data to a stored procedure.
- In the Procedure Name field, click and select add_lead, which is the provided stored procedure to run in the sample database. The selected procedure determines the requirements for additional steps in the integration, for example, which Salesforce data fields need to be mapped to which database fields.
- Click Done to add the finish connection to the integration.
4.4.3. Add a data mapping step
To add a step that maps Salesforce fields to database fields:
- In the left panel, hover over the plus sign immediately after the start connection to display a pop-up in which you click Add a Step.
- Click Data Mapper and wait a few moments. When the data fields appear, the Sources panel on the left displays the Salesforce fields and the Target panel on the right displays the database fields.
Map the Salesforce
Companyfield to the databasecompanyfield:- On the left, in the Sources panel, click Company.
- On the right, in the Target panel, click company. The data mapper displays a line from the source field to the target field.
-
Map the Sources (Salesforce)
Emailfield to the Target (database)emailfield. Map two Salesforce fields (
FirstNameandLastName) to the databasefirst_and_last_namefield:- In the Sources panel, click FirstName.
- In the Target panel, click first_and_last_name.
- In the Mapping Details panel, under Action, select Combine.
- Just above that, click Add Source.
-
Under Source, in the input field, start to type
LastName. When /LastName appears below the field, click it. The data mapper displays a line from the Sources LastName field to the Target first_and_last_name field.
Add the following mappings:
Map This Salesforce Field To This Database Field LeadSourcelead_sourceStatuslead_statusPhonephoneRatingrating- In the upper right, click Done.
4.4.4. Give the integration a name and deploy it
The sample integration is complete. To deploy it:
- In the upper right, click Publish to give it a name.
-
In the Integration Name field, enter a name for the integration. For example,
Salesforce to Database Sample Integration. - In the upper right corner, click Publish.
Ignite displays the integration summary page with a Publishing spinning circle. Ignite is generating the runtime for the integration and will start it when the runtime is ready. This takes a few minutes.
A Fuse Online account is limited to a specific number of integrations that can be running at one time. For details, see the pricing plan. If you are already running the maximum number of integrations, then you must unpublish an integration before you can publish (start running) another one.
If you are using a Fuse Online evaluation account, then only one integration at a time can be running (published). If you already created one of the other sample integrations and that integration is running then this integration is automatically in the Unpublished state. You must stop the running integration by unpublishing it. You can then publish this integration.
If you are already running the maximum number of integrations, follow these steps to unpublish (stop) an integration:
- In the left panel, click Integrations.
-
In the entry for the integration that you want to stop, click
on the far right.
- In the popup, click Unpublish.
After unpublishing an integration, start another integration as follows:
- In the left panel, click Integrations.
-
In the entry for the integration that you want to start, click
on the far right.
- In the popup, click Publish.
4.5. Confirm that the Salesforce to database integration works
To confirm that the Salesforce to database integration is working:
- In the left panel, click Integrations.
- If necessary, wait until your sample integration is a Published integration, which means that it is running. If you used the example name, you would see that Salesforce to Database Sample Integration is Published.
- In your Salesforce installation, create a new lead. Be sure to enter data in the fields that you mapped: Company, Email, FirstName, LastName, LeadSource, Status, Phone, and Rating.
-
In a new browser window, insert
todo-in front of the URL for your Ignite installation. For example:https://todo-app-proj7614.6a63.fuse-ignite.openshiftapps.com/. - In the To Do App display, you should see a notification that a new lead was created in the database.
4.6. Clean up your integration
When you are done working with a sample integration, unpublish it and delete it:
- In the left panel, click Integrations.
- In the main panel, identify the entry for the sample integration that you want to unpublish.
-
In that entry, to the right, click
and then click Unpublish.
- Click OK to confirm that you want to stop running the integration.
-
In the entry for the integration that you just unpublished, to the right, click
and then click Delete.
- Click OK to confirm that you want to delete the integration.
Chapter 5. Implement an AMQ to REST API sample integration
This sample integration connects to an AMQ broker to obtain item delivery records for a hypothetical enterprise. The integration then executes a custom step that operates on the records to identify any items that were damaged when they were received. After a simple data mapping, the integration connects to a REST API to obtain and provide contact information for vendors of damaged items.
The other sample integrations use connectors and data operations that are built into Ignite. This integration also does that, but in addition, it provides instructions for customizing and extending Ignite by leading you through the procedures for:
- Adding a custom data operation by uploading an extension.
- Adding a custom REST API client connector by uploading a Swagger file.
Ignite provides the extension file and the Swagger file.
To implement the AMQ to REST API sample integration, the main steps are:
- Section 5.1, “Create an AMQ connection”
- Section 5.2, “Make a custom step available”
- Section 5.3, “Create a REST API connector”
- Section 5.4, “Upload the To Do app icon”
- Section 5.5, “Create a REST API connection”
- Section 5.6, “Create and deploy AMQ to REST API sample integration”
- Section 5.7, “Confirm that the AMQ to REST API integration works”
- Section 5.8, “Clean up your integration”
5.1. Create an AMQ connection
The AMQ to REST API sample integration starts by connecting to an AMQ broker that is provided in your OpenShift project. Before you start to create the integration itself, you must:
5.1.1. Start the provided AMQ broker
To start the AMQ broker:
- In a browser, go to the OpenShift Web Console at https://console.fuse-ignite.openshift.com/console/. Your installation of Ignite runs on OpenShift Online.
-
In the console, click the name of your Ignite project, which is something like
proj123456. - In the Overview page, scroll down to Other Resources to see the provided AMQ broker.
- To the left of broker-amq, #1, click the caret to display more information.
- In the additional information, all the way to the right, click the up caret to scale up to running 1 pod. This starts the AMQ broker.
5.1.2. Create a connection to that AMQ broker
To create a connection to the AMQ broker that is running in your Fuse Online project in OpenShift:
- In Ignite, in the left panel, click Connections to display any available connections.
- In the upper right, click Create Connection to display Ignite connectors.
- Click the AMQ connector.
Configure the connection by entering:
-
In the Broker URL field, enter
tcp://broker-amq-tcp:61616as the location to obtain data from. -
In the Username field, enter
amqas the user name for the account that accesses this AMQ broker. -
In the Password field, enter
topSecretas the password for the account that accesses this AMQ broker. - Leave the other fields blank.
-
In the Broker URL field, enter
- Click Validate. Ignite immediately tries to validate the connection and displays a message that indicates whether validation is successful. If validation fails, check the values you entered and try again.
- When validation is successful, click Next.
-
In the Connection Name field, enter your choice of a name that helps you distinguish this connection from any other connections. For example, enter
AMQ Broker 1. -
In the Description field, optionally enter any information that is helpful to know about this connection. For example, enter
Sample AMQ connection that uses the provided broker. - In the upper right, click Create to see that the connection you created is now available. If you entered the example name, you would see that AMQ Broker 1 is now available.
5.2. Make a custom step available
Ignite provides a number of steps that operate on integration data between connections. If Ignite does not provide a between-connections step that meets your need, a developer can code an extension that defines one or more custom steps that operate on data between connections. The developer gives you a .jar file that contains the extension. You then upload the extension in Ignite to make the custom step(s) available for use in integrations.
The AMQ to REST API sample integration uses a custom step that operates on data between connections to identify items that were damaged when they were received.
To make the Damage Reporter custom step available:
- In a new browser tab, go to https://github.com/syndesisio/fuse-online-sample-extension/releases.
-
Download the extension’s
.jarfile. - In Ignite, in the left panel, click Customizations.
- At the top, click Extensions.
- Click Import Extension.
-
Click Browse and select the downloaded
.jarfile that contains the extension. Ignite validates the file, extracts and displays the extension’s name, ID, and description, and lists Damage Reporter as the custom step that the extension defines. - Click Import. Ignite makes the custom step available and displays the extension details page.
For more information about coding an extension and creating its .jar file, see the Tooling User Guide.
5.3. Create a REST API connector
Ignite can create connectors for REST APIs that support Hypertext Transfer Protocol (HTTP)/1.0 or HTTP/1.1. To do this, Ignite requires a valid Swagger 2.0 specification that describes a REST API you want to connect to.
Your Ignite installation provides the To Do app, which has a REST API for which a Swagger specification is available.
To create a REST API connector for the To Do app:
Identify the URL for your Ignite installation’s copy of the Swagger specification:
- In the Ignite navigation panel, click Home.
- Copy the URL into a text editor.
-
At the beginning of the URL, insert
todo-. -
At the end of the URL, replace
dashboardwithswagger.json.
The result is something like this:
https://todo-app-proj217402.6a63.fuse-ignite.openshiftapps.com/swagger.json- In the Ignite navigation panel, click Customizations.
- Click Create API Connector.
- Select Use a URL.
- In the input box, paste the URL for your Swagger specification and click Next.
- On the Review Swagger Actions page, click Next. If you see a warning, you can ignore it.
- Click Next again to accept HTTP Basic Authorization.
On the Review/Edit Connector Details page, Ignite populates the fields with values from the Swagger specification.
- If you want to, you can change the values in the Connector Name and Description fields.
-
Confirm that the value in the Host field is correct. For example, it should be something like this:
https://todo-app-proj217402.6a63.fuse-ignite.openshiftapps.com. -
Confirm that the value in the Base URL field is
/api.
- Click Create Connector.
Ignite displays the API Client Connectors tab with an entry for the Todo App API that you just created.
5.4. Upload the To Do app icon
To show the flow of an integration, Ignite displays icons that identify the applications that the integration is connecting to. Your Ignite installation provides an icon for the REST API connector that you just created for the To Do app.
To upload the To Do app icon:
Display the To Do app icon:
- In a new browser tab, paste the URL for your Swagger specification.
-
At the end of the URL, replace
swagger.jsonwithimages/todo_icon.pngand click Enter. For example:https://todo-app-proj217402.6a63.fuse-ignite.openshiftapps.com/images/todo_icon.png.
-
Save the
todo_icon.pngimage. - In Ignite, in the API Client Connectors tab, click the entry for the Todo App API to display its details.
- On the Connector Details page, click Browse.
-
Navigate to
todo_icon.png, select it, and click Open. - Refresh the display of the Connector Details page. The image now appears on the left.
5.5. Create a REST API connection
To create a connection to the To Do app REST API:
- In Ignite, in the left panel, click Connections to display any available connections.
- In the upper right, click Create Connection to display available connectors.
- Click the Todo App API connector that you just created.
- In the Todo App API Configuration, notice that Ignite populates the Authentication Type, Base Path, and Host fields from the connector information.
- In the Password field, enter any value. For this sample integration, password and user name values are required but they are not used.
- In the Username field, enter any value.
- Click Next.
-
In the Connection Name field, enter your choice of a name that helps you distinguish this connection from any other connections. For example, enter
Todo App API Client. -
In the Description field, optionally enter any information that is helpful to know about this connection. For example, enter
Connection to the provided Todo app REST API. - In the upper right, click Create to see that the connection you created is now available.
5.6. Create and deploy AMQ to REST API sample integration
To create and deploy the AMQ to REST API sample integration, the main steps are:
5.6.1. Choose the start connection
To choose the start connection:
- On the left, click Integrations.
- Click Create Integration.
- On the Choose a Start Connection page, click your AMQ connection. If you specified the example name, you would click AMQ Broker 1.
- On the Choose an Action page, click the Subscribe for Messages action to receive messages from the queue you specify.
-
In the Destination Name field, enter
inventoryReceivedfor the name of the queue to obtain data from. - Click in the Destination Type field and select Queue.
- Leave the other fields blank.
- Click Done to add the start connection to the integration.
After connecting to AMQ, the integration watches for messages on the inventoryReceived queue. When a message is available, the integration passes it to the Damage Reporter step. However, before you can add that step to the integration, you must choose the integration’s finish connection.
5.6.2. Choose the finish connection
To add the finish connection to the integration:
- On the Choose a Finish Connection page, click the To Do app connection that you created. If you assigned the example name, you would click Todo App API Client.
- On the Choose an Action page, click Create new task, which provides information about who to contact to address a particular damaged item.
5.6.3. Add a damage reporter step
With the start and finish connections in place, you are ready to add the custom step that receives the messages from the AMQ broker and identifies any items that were damaged when they were received.
To add the custom damage reporter step:
- In the center, click Add a Step.
- On the Choose a Step page, click Damage Reporter.
5.6.4. Add a data mapping step
Add a data mapping step that correlates the task field in the output from the damage reporter step to the task field in the database that the REST API accesses:
- In the left panel, hover over the plus sign between the damage reporter step and the finish connection to display a pop-up in which you click Add a Step.
- On the Choose a Step page, click Data Mapper. In the data mapper, the Sources panel on the left displays the fields in the output from the damage reporter step. The Target panel on the right displays the fields in the database that the API accesses.
-
In the Sources panel, click the
taskfield. -
In the Target panel, expand the
bodyfield and clicktask. - Click Done.
5.6.5. Give the integration a name and deploy it
The sample integration is complete. To deploy it:
- In the upper right, click Publish to give it a name.
-
In the Integration Name field, enter a name for the integration. For example,
AMQ to REST API Sample Integration. - Optionally, in the Description field, enter information that might be helpful to know about this integration.
- In the upper right corner, click Publish.
Ignite displays the integration summary page with a Publishing spinning circle. Ignite is generating the runtime for the integration and will start it when the runtime is ready. This takes a few minutes.
A Fuse Online account is limited to a specific number of integrations that can be running at one time. For details, see the pricing plan. If you are already running the maximum number of integrations, then you must unpublish an integration before you can publish (start running) another one.
If you are using a Fuse Online evaluation account, then only one integration at a time can be running (published). If you already created one of the other sample integrations and that integration is running then this integration is automatically in the Unpublished state. You must stop the running integration by unpublishing it. You can then publish this integration.
If you are already running the maximum number of integrations, follow these steps to unpublish (stop) an integration:
- In the left panel, click Integrations.
-
In the entry for the integration that you want to stop, click
on the far right.
- In the popup, click Unpublish.
After unpublishing an integration, start another integration as follows:
- In the left panel, click Integrations.
-
In the entry for the integration that you want to start, click
on the far right.
- In the popup, click Publish.
5.7. Confirm that the AMQ to REST API integration works
To confirm that the AMQ to REST API integration is working:
- In the left panel, click Integrations.
- Confirm that your AMQ to REST API integration is Published, which means that it is running. The integration must be Published before you continue with these instructions.
-
In a new browser window, go to the To Do app display by inserting
todo-in front of the URL for your Ignite installation. For example:https://todo-app-proj7614.6a63.fuse-ignite.openshiftapps.com/. - In the To Do app display, click Show JMS Form to display an input box that contains an XML message.
Click Send JMS Message to send that message to the AMQ broker in your OpenShift project.
Successful execution returns a task from the To Do app client API. The task identifies the ID of the damaged item and the contact information for its vendor.
Edit the XML message to specify two damaged items:
- Click Show JMS Form to display the message input box again.
-
In the XML message, change the entry for the undamaged item to specify
damaged="true". - Click Send JMS Message. The To Do app client API returns a new task that contains IDs for two damaged items and contact information for the two vendors.
Edit the XML message to specify an unknown vendor:
- Click Show JMS Form.
-
In the XML message, for an item that has
damaged="true", change the name of the vendor. - Click Send JMS Message. The To Do app client API returns a new task that indicates that there is no contact information for the vendor of a damaged item. The To Do app accesses a database that has only two vendors.
5.8. Clean up your integration
When you are done working with a sample integration, unpublish it and delete it:
- In the left panel, click Integrations.
- In the main panel, identify the entry for the sample integration that you want to unpublish.
-
In that entry, to the right, click
and then click Unpublish.
- Click OK to confirm that you want to stop running the integration.
-
In the entry for the integration that you just unpublished, to the right, click
and then click Delete.
- Click OK to confirm that you want to delete the integration.