
Chapter 2. Managing DNS zones in IdM
As Identity Management (IdM) administrator, you can manage how IdM DNS zones work. The chapter describes the following topics and procedures:
Prerequisites
DNS service is installed on the IdM server. For more information about how to install an IdM server with integrated DNS, see one of the following links:
2.1. Supported DNS zone types
Identity Management (IdM) supports two types of DNS zones: primary and forward zones. These two types of zones are described here, including an example scenario for DNS forwarding.
This guide uses the BIND terminology for zone types which is different from the terminology used for Microsoft Windows DNS. Primary zones in BIND serve the same purpose as forward lookup zones and reverse lookup zones in Microsoft Windows DNS. Forward zones in BIND serve the same purpose as conditional forwarders in Microsoft Windows DNS.
- Primary DNS zones
Primary DNS zones contain authoritative DNS data and can accept dynamic DNS updates. This behavior is equivalent to the
type mastersetting in standard BIND configuration. You can manage primary zones using theipa dnszone-*commands.In compliance with standard DNS rules, every primary zone must contain
start of authority(SOA) andnameserver(NS) records. IdM generates these records automatically when the DNS zone is created, but you must copy the NS records manually to the parent zone to create proper delegation.In accordance with standard BIND behavior, queries for names for which the server is not authoritative are forwarded to other DNS servers. These DNS servers, so called forwarders, may or may not be authoritative for the query.
Example 2.1. Example scenario for DNS forwarding
The IdM server contains the
test.example.primary zone. This zone contains an NS delegation record for thesub.test.example.name. In addition, thetest.example.zone is configured with the192.0.2.254forwarder IP address for thesub.text.examplesubzone.A client querying the name
nonexistent.test.example.receives theNXDomainanswer, and no forwarding occurs because the IdM server is authoritative for this name.On the other hand, querying for the
host1.sub.test.example.name is forwarded to the configured forwarder192.0.2.254because the IdM server is not authoritative for this name.- Forward DNS zones
From the perspective of IdM, forward DNS zones do not contain any authoritative data. In fact, a forward "zone" usually only contains two pieces of information:
- A domain name
- The IP address of a DNS server associated with the domain
All queries for names belonging to the domain defined are forwarded to the specified IP address. This behavior is equivalent to the type forward setting in standard BIND configuration. You can manage forward zones using the ipa dnsforwardzone-* commands.
Forward DNS zones are especially useful in the context of IdM-Active Directory (AD) trusts. If the IdM DNS server is authoritative for the idm.example.com zone and the AD DNS server is authoritative for the ad.example.com zone, then ad.example.com is a DNS forward zone for the idm.example.com primary zone. That means that when a query comes from an IdM client for the IP address of somehost.ad.example.com, the query is forwarded to an AD domain controller specified in the ad.example.com IdM DNS forward zone.
2.2. Adding a primary DNS zone in IdM Web UI
Follow this procedure to add a primary DNS zone using the Identity Management (IdM) Web UI.
Prerequisites
- You are logged in as IdM administrator.
Procedure
In the IdM Web UI, click
Network Services→DNS→DNS Zones.Figure 2.1. Managing IdM DNS primary zones

- Click at the top of the list of all zones.
Provide the zone name.
Figure 2.2. Entering an new IdM primary zone

- Click .
2.3. Adding a primary DNS zone in IdM CLI
Follow this procedure to add a primary DNS zone using the Identity Management (IdM) command-line interface (CLI).
Prerequisites
- You are logged in as IdM administrator.
Procedure
The
ipa dnszone-addcommand adds a new zone to the DNS domain. Adding a new zone requires you to specify the name of the new subdomain. You can pass the subdomain name directly with the command:$ ipa dnszone-add newzone.idm.example.comIf you do not pass the name to
ipa dnszone-add, the script prompts for it automatically.
Additional resources
-
See
ipa dnszone-add --help.
2.4. Removing a primary DNS zone in IdM Web UI
Follow this procedure to remove a primary DNS zone from Identity Management (IdM) using the IdM Web UI.
Prerequisites
- You are logged in as IdM administrator.
Procedure
-
In the IdM Web UI, click
Network Services→DNS→DNS Zones. Select the check box by the zone name and click .
Figure 2.3. Removing a primary DNS Zone

- In the Remove DNS zones dialog window, confirm that you want to delete the selected zone.
2.5. Removing a primary DNS zone in IdM CLI
Follow this procedure to remove a primary DNS zone from Identity Management (IdM) using the IdM command-line interface (CLI).
Prerequisites
- You are logged in as IdM administrator.
Procedure
To remove a primary DNS zone, enter the
ipa dnszone-delcommand, followed by the name of the zone you want to remove. For example:$ ipa dnszone-del idm.example.com
2.6. DNS configuration priorities
You can configure many DNS configuration options on the following levels. Each level has a different priority.
- Zone-specific configuration
-
The level of configuration specific for a particular zone defined in IdM has the highest priority. You can manage zone-specific configuration by using the
ipa dnszone-*andipa dnsforwardzone-*commands. - Per-server configuration
-
You are asked to define per-server forwarders during the installation of an IdM server. You can manage per-server forwarders by using the
ipa dnsserver-*commands. If you do not want to set a per-server forwarder when installing a replica, you can use the--no-forwarderoption. - Global DNS configuration
-
If no zone-specific configuration is defined, IdM uses global DNS configuration stored in LDAP. You can manage global DNS configuration using the
ipa dnsconfig-*commands. Settings defined in global DNS configuration are applied to all IdM DNS servers. - Configuration in
/etc/named.conf Configuration defined in the
/etc/named.conffile on each IdM DNS server has the lowest priority. It is specific for each server and must be edited manually.The
/etc/named.conffile is usually only used to specify DNS forwarding to a local DNS cache. Other options are managed using the commands for zone-specific and global DNS configuration mentioned above.
You can configure DNS options on multiple levels at the same time. In such cases, configuration with the highest priority takes precedence over configuration defined at lower levels.
Additional resources
- The Priority order of configuration section in Per Server Config in LDAP
2.7. Configuration attributes of primary IdM DNS zones
Identity Management (IdM) creates a new zone with certain default configuration, such as the refresh periods, transfer settings, or cache settings. In IdM DNS zone attributes, you can find the attributes of the default zone configuration that you can modify using one of the following options:
-
The
dnszone-modcommand in the command-line interface (CLI). For more information, see Editing the configuration of a primary DNS zone in IdM CLI. - The IdM Web UI. For more information, see Editing the configuration of a primary DNS zone in IdM Web UI.
-
An Ansible playbook that uses the
ipadnszonemodule. For more information, see Managing DNS zones in IdM.
Along with setting the actual information for the zone, the settings define how the DNS server handles the start of authority (SOA) record entries and how it updates its records from the DNS name server.
Table 2.1. IdM DNS zone attributes
| Attribute | Command-Line Option | Description |
|---|---|---|
| Authoritative name server |
| Sets the domain name of the primary DNS name server, also known as SOA MNAME.
By default, each IdM server advertises itself in the SOA MNAME field. Consequently, the value stored in LDAP using |
| Administrator e-mail address |
| Sets the email address to use for the zone administrator. This defaults to the root account on the host. |
| SOA serial |
| Sets a serial number in the SOA record. Note that IdM sets the version number automatically and users are not expected to modify it. |
| SOA refresh |
| Sets the interval, in seconds, for a secondary DNS server to wait before requesting updates from the primary DNS server. |
| SOA retry |
| Sets the time, in seconds, to wait before retrying a failed refresh operation. |
| SOA expire |
| Sets the time, in seconds, that a secondary DNS server will try to perform a refresh update before ending the operation attempt. |
| SOA minimum |
| Sets the time to live (TTL) value in seconds for negative caching according to RFC 2308. |
| SOA time to live |
|
Sets TTL in seconds for records at zone apex. In zone |
| Default time to live |
|
Sets the default time to live (TTL) value in seconds for negative caching for all values in a zone that never had an individual TTL value set before. Requires a restart of the |
| BIND update policy |
| Sets the permissions allowed to clients in the DNS zone. |
| Dynamic update |
| Enables dynamic updates to DNS records for clients. Note that if this is set to false, IdM client machines will not be able to add or update their IP address. |
| Allow transfer |
| Gives a list of IP addresses or network names which are allowed to transfer the given zone, separated by semicolons (;).
Zone transfers are disabled by default. The default |
| Allow query |
| Gives a list of IP addresses or network names which are allowed to issue DNS queries, separated by semicolons (;). |
| Allow PTR sync |
| Sets whether A or AAAA records (forward records) for the zone will be automatically synchronized with the PTR (reverse) records. |
| Zone forwarders |
| Specifies a forwarder specifically configured for the DNS zone. This is separate from any global forwarders used in the IdM domain. To specify multiple forwarders, use the option multiple times. |
| Forward policy |
| Specifies the forward policy. For information about the supported policies, see DNS forward policies in IdM. |
2.8. Editing the configuration of a primary DNS zone in IdM Web UI
Follow this procedure to edit the configuration attributes of a primary Identity Management (IdM) DNS using the IdM Web UI.
Prerequisites
- You are logged in as IdM administrator.
Procedure
In the IdM Web UI, click
Network Services→DNS→DNS Zones.Figure 2.4. DNS primary zones management
In the
DNS Zonessection, click on the zone name in the list of all zones to open the DNS zone page.Figure 2.5. Editing a primary zone

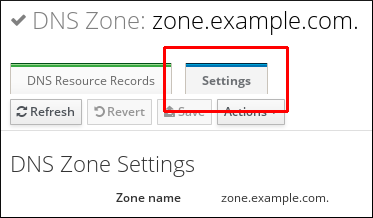
Click
Settings.Figure 2.6. The Settings tab in the primary zone edit page
Change the zone configuration as required.
For information about the available settings, see IdM DNS zone attributes.
Click to confirm the new configuration.
NoteIf you are changing the default time to live (TTL) of a zone, restart the
named-pkcs11service on all IdM DNS servers to make the changes take effect. All other settings are automatically activated immediately.
2.9. Editing the configuration of a primary DNS zone in IdM CLI
Follow this procedure to edit the configuration of a primary DNS zone using the Identity Management (IdM) command-line interface (CLI).
Prerequisites
- You are logged in as IdM administrator.
Procedure
To modify an existing primary DNS zone, use the
ipa dnszone-modcommand. For example, to set the time to wait before retrying a failed refresh operation to 1800 seconds:$ ipa dnszone-mod --retry 1800For more information about the available settings and their corresponding CLI options, see IdM DNS zone attributes.
If a specific setting does not have a value in the DNS zone entry you are modifying, the
ipa dnszone-modcommand adds the value. If the setting does not have a value, the command overwrites the current value with the specified value.NoteIf you are changing the default time to live (TTL) of a zone, restart the
named-pkcs11service on all IdM DNS servers to make the changes take effect. All other settings are automatically activated immediately.
Additional resources
-
See
ipa dnszone-mod --help.
2.10. Zone transfers in IdM
In an Identity Management (IdM) deployment that has integrated DNS, you can use zone transfers to copy all resource records from one name server to another. Name servers maintain authoritative data for their zones. If you make changes to the zone on a DNS server that is authoritative for zone A DNS zone, you must distribute the changes among the other name servers in the IdM DNS domain that are outside zone A.
The IdM-integrated DNS can be written to by different servers simultaneously. The Start of Authority (SOA) serial numbers in IdM zones are not synchronized among the individual IdM DNS servers. For this reason, configure your DNS servers outside the to-be-transferred zone to only use one specific DNS server inside the to-be-transferred zone. This prevents zone transfer failures caused by non-synchronized SOA serial numbers.
IdM supports zone transfers according to the RFC 5936 (AXFR) and RFC 1995 (IXFR) standards.
Additional resources
2.11. Enabling zone transfers in IdM Web UI
Follow this procedure to enable zone transfers in Identity Management (IdM) using the IdM Web UI.
Prerequisites
- You are logged in as IdM administrator.
Procedure
-
In the IdM Web UI, click
Network Services→DNS→DNS Zones. -
Click
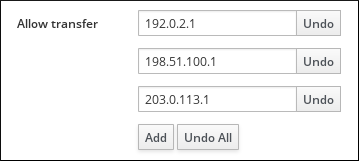
Settings. Under
Allow transfer, specify the name servers to which you want to transfer the zone records.Figure 2.7. Enabling zone transfers
- Click at the top of the DNS zone page to confirm the new configuration.
2.12. Enabling zone transfers in IdM CLI
Follow this procedure to enable zone transfers in Identity Management (IdM) using the IdM command-line interface (CLI).
Prerequisites
- You are logged in as IdM administrator.
- You have root access to the secondary DNS servers.
Procedure
To enable zone transfers in the
BINDservice, enter theipa dnszone-modcommand, and specify the list of name servers that are outside the to-be-transferred zone to which the zone records will be transferred using the--allow-transferoption. For example:$ ipa dnszone-mod --allow-transfer=192.0.2.1;198.51.100.1;203.0.113.1 idm.example.com
Verification steps
SSH to one of the DNS servers to which zone transfer has been enabled:
$ ssh 192.0.2.1Transfer the IdM DNS zone using a tool such as the
digutility:# dig @ipa-server zone_name AXFR
If the command returns no error, you have successfully enabled zone transfer for zone_name.