
Chapter 8. Ensuring system integrity with Keylime
With Keylime, you can continuously monitor the integrity of remote systems and verify the state of systems at boot. You can also send encrypted files to the monitored systems, and specify automated actions triggered whenever a monitored system fails the integrity test.
8.1. How Keylime works
You can deploy Keylime agents to perform one or more of the following actions:
- Runtime integrity monitoring
- Keylime runtime integrity monitoring continuously monitors the system on which the agent is deployed and measures the integrity of the files included in the allowlist and not included in the excludelist.
- Measured boot
- Keylime measured boot verifies the system state at boot.
Keylime’s concept of trust is based on the Trusted Platform Module (TPM) technology. A TPM is a hardware, firmware, or virtual component with integrated cryptographic keys. By polling TPM quotes and comparing the hashes of objects, Keylime provides initial and runtime monitoring of remote systems.
Keylime running in a virtual machine or using a virtual TPM depends upon the integrity of the underlying host. Ensure you trust the host environment before relying upon Keylime measurements in a virtual environment.
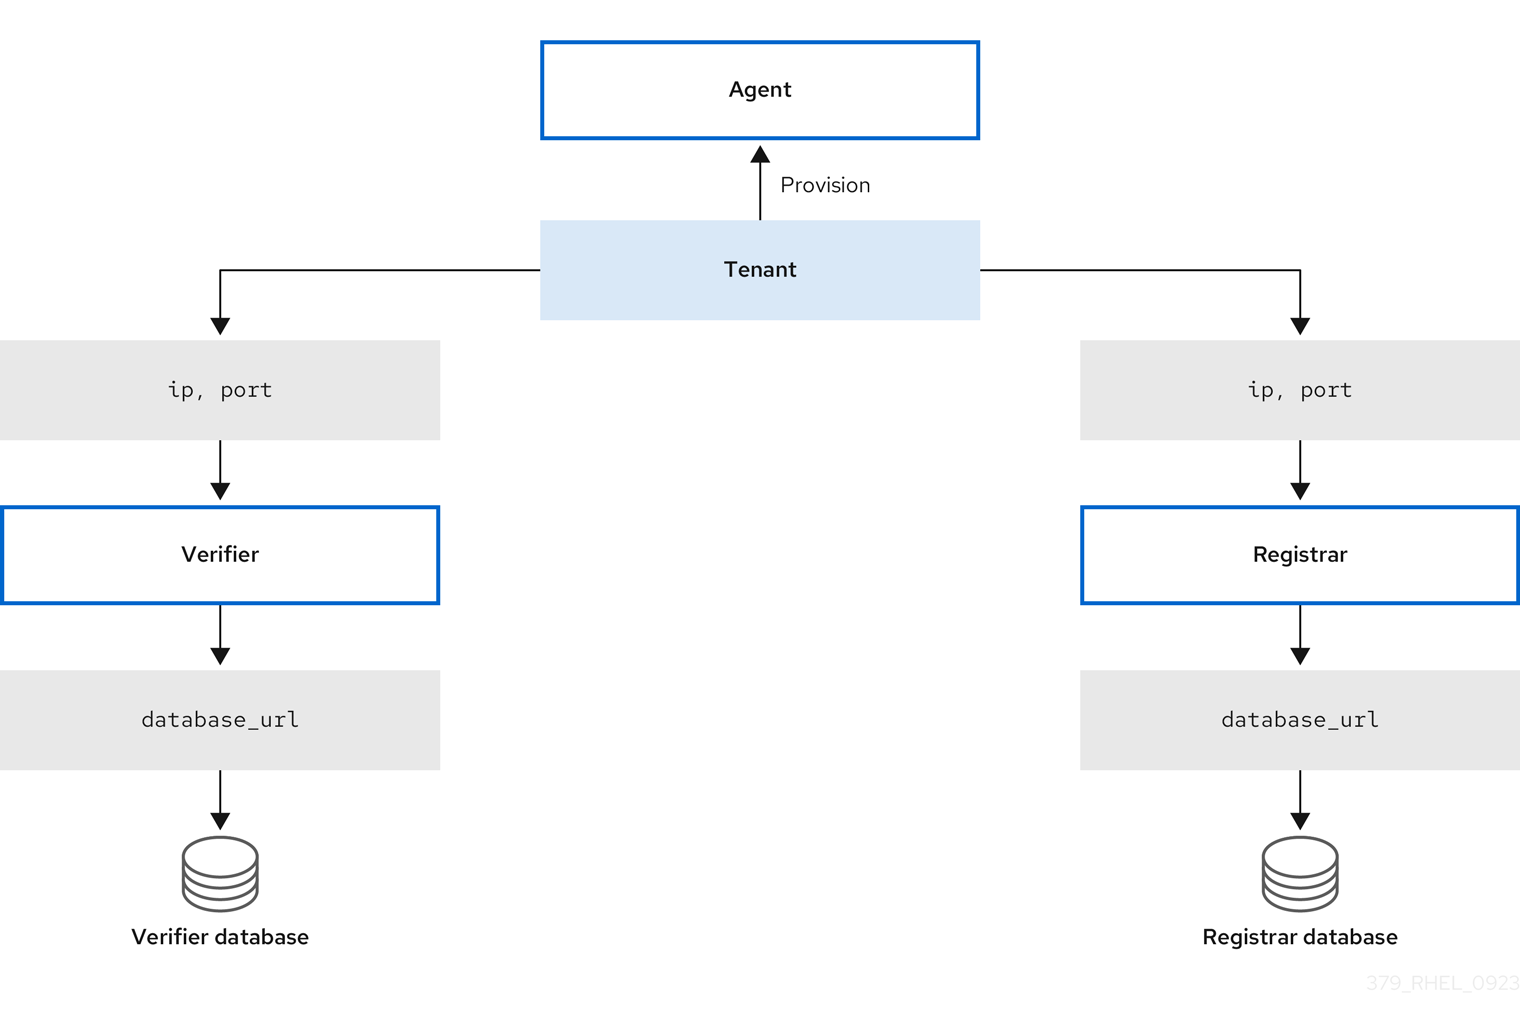
Keylime consists of three main components:
- Verifier
- Initially and continuously verifies the integrity of the systems that run the agent.
- Registrar
- Contains a database of all agents and it hosts the public keys of the TPM vendors.
- Agent
- Deployed to remote systems measured by the verifier.
In addition, Keylime uses the keylime_tenant utility for many functions, including provisioning the agents on the target systems.
Figure 8.1. Connections between Keylime components through configurations
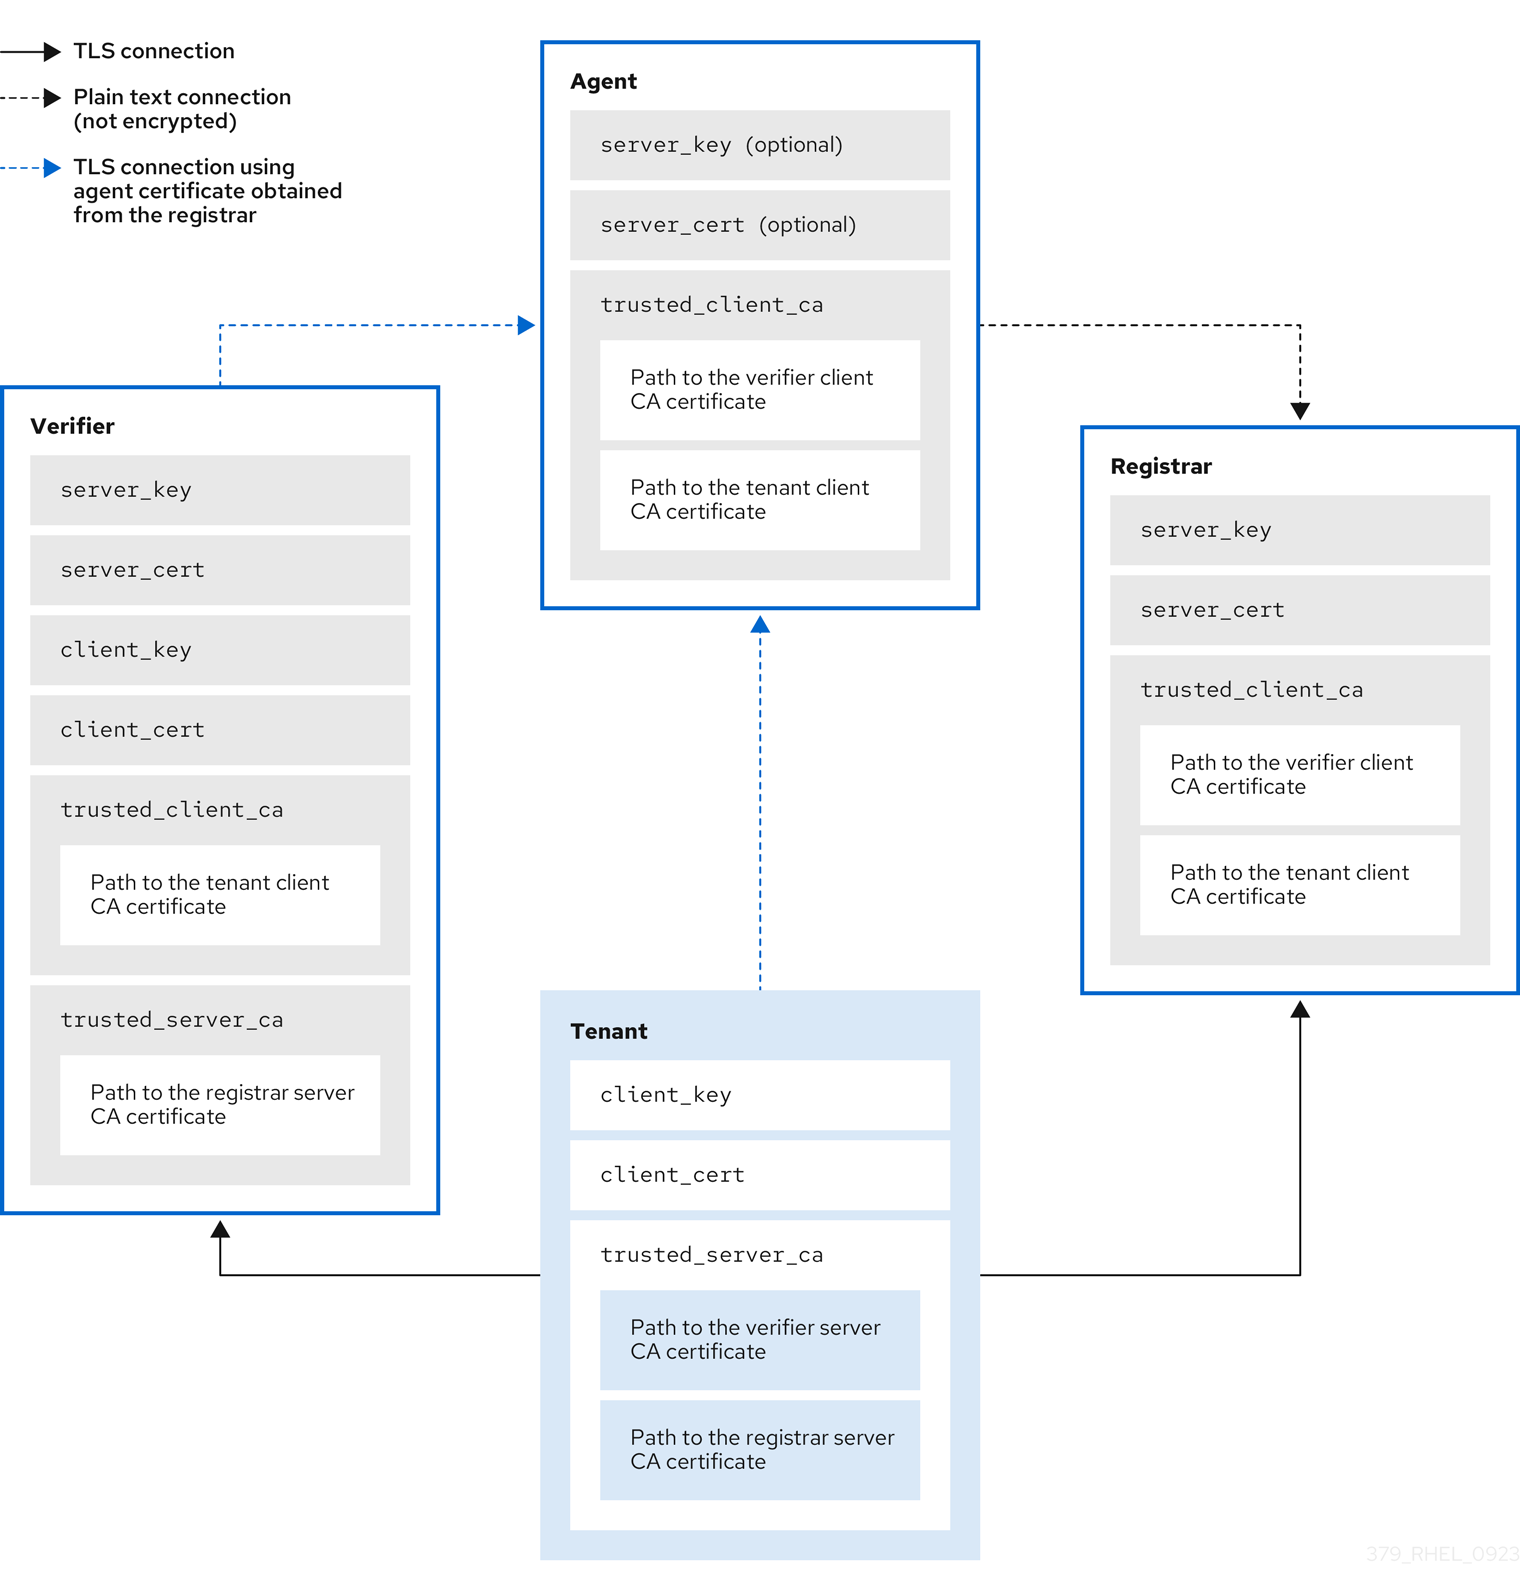
Keylime ensures the integrity of the monitored systems in a chain of trust by using keys and certificates exchanged between the components and the tenant. For a secure foundation of this chain, use a certificate authority (CA) that you can trust.
If the agent receives no key and certificate, it generates a key and a self-signed certificate with no involvement from the CA.
Figure 8.2. Connections between Keylime components certificates and keys
8.2. Configuring Keylime verifier
The verifier is the most important component in Keylime. It performs initial and periodic checks of system integrity and supports bootstrapping a cryptographic key securely with the agent. The verifier uses mutual TLS encryption for its control interface.
To maintain the chain of trust, keep the system that runs the verifier secure and under your control.
You can install the verifier on a separate system or on the same system as the Keylime registrar, depending on your requirements. Running the verifier and registrar on separate systems provides better performance.
To keep the configuration files organized within the drop-in directories, use file names with a two-digit number prefix, for example /etc/keylime/verifier.conf.d/00-verifier-ip.conf. The configuration processing reads the files inside the drop-in directory in lexicographic order and sets each option to the last value it reads.
Prerequisites
-
You have
rootpermissions and network connection to the system or systems on which you want to install Keylime components. - You have valid keys and certificates from your certificate authority.
Optional: You have access to the databases where Keylime saves data from the verifier. You can use any of the following database management systems:
- SQLite (default)
- PostgreSQL
- MySQL
- MariaDB
Procedure
Install the Keylime verifier:
# dnf install keylime-verifierDefine the IP address and port of verifier by creating a new
.conffile in the/etc/keylime/verifier.conf.d/directory, for example,/etc/keylime/verifier.conf.d/00-verifier-ip.conf, with the following content:[verifier] ip = <verifier_IP_address>
-
Replace
<verifier_IP_address>with the verifier’s IP address. Alternatively, useip = *orip = 0.0.0.0to bind the verifier to all available IP addresses. -
Optionally, you can also change the verifier’s port from the default value
8881by using theportoption.
-
Replace
Optional: Configure the verifier’s database for the list of agents. The default configuration uses an SQLite database in the verifier’s
/var/lib/keylime/cv_data.sqlite/directory. You can define a different database by creating a new.conffile in the/etc/keylime/verifier.conf.d/directory, for example,/etc/keylime/verifier.conf.d/00-db-url.conf, with the following content:[verifier] database_url = <protocol>://<name>:<password>@<ip_address_or_hostname>/<properties>Replace
<protocol>://<name>:<password>@<ip_address_or_hostname>/<properties>with the URL of the database, for example,postgresql://verifier:UQ?nRNY9g7GZzN7@198.51.100.1/verifierdb.Ensure that the credentials you use provide the permissions for Keylime to create the database structure.
Add certificates and keys to the verifier. You can either let Keylime generate them, or use existing keys and certificates:
-
With the default
tls_dir = generateoption, Keylime generates new certificates for the verifier, registrar, and tenant in the/var/lib/keylime/cv_ca/directory. To load existing keys and certificates in the configuration, define their location in the verifier configuration.
NoteCertificates must be accessible by the
keylimeuser, under which the Keylime services are running.Create a new
.conffile in the/etc/keylime/verifier.conf.d/directory, for example,/etc/keylime/verifier.conf.d/00-keys-and-certs.conf, with the following content:[verifier] tls_dir = /var/lib/keylime/cv_ca server_key = </path/to/server_key> server_key_password = <passphrase1> server_cert = </path/to/server_cert> trusted_client_ca = ['</path/to/ca/cert1>', '</path/to/ca/cert2>'] client_key = </path/to/client_key> client_key_password = <passphrase2> client_cert = </path/to/client_cert> trusted_server_ca = ['</path/to/ca/cert3>', '</path/to/ca/cert4>']
NoteUse absolute paths to define key and certificate locations. Alternatively, relative paths are resolved from the directory defined in the
tls_diroption.
-
With the default
Open the port in firewall:
# firewall-cmd --add-port 8881/tcp
# firewall-cmd --runtime-to-permanent
If you use a different port, replace
8881with the port number defined in the.conffile.Start the verifier service:
# systemctl enable --now keylime_verifierNoteIn the default configuration, start the
keylime_verifierbefore starting thekeylime_registrarservice because the verifier creates the CA and certificates for the other Keylime components. This order is not necessary when you use custom certificates.
Verification
Check that the
keylime_verifierservice is active and running:# systemctl status keylime_verifier ● keylime_verifier.service - The Keylime verifier Loaded: loaded (/usr/lib/systemd/system/keylime_verifier.service; disabled; vendor preset: disabled) Active: active (running) since Wed 2022-11-09 10:10:08 EST; 1min 45s ago
Next steps
8.3. Configuring Keylime registrar
The registrar is the Keylime component that contains a database of all agents, and it hosts the public keys of the TPM vendors. After the registrar’s HTTPS service accepts trusted platform module (TPM) public keys, it presents an interface to obtain these public keys for checking quotes.
To maintain the chain of trust, keep the system that runs the registrar secure and under your control.
You can install the registrar on a separate system or on the same system as the Keylime verifier, depending on your requirements. Running the verifier and registrar on separate systems provides better performance.
To keep the configuration files organized within the drop-in directories, use file names with a two-digit number prefix, for example /etc/keylime/registrar.conf.d/00-registrar-ip.conf. The configuration processing reads the files inside the drop-in directory in lexicographic order and sets each option to the last value it reads.
Prerequisites
- You have network access to the systems where the Keylime verifier is installed and running. For more information, see Section 8.2, “Configuring Keylime verifier”.
-
You have
rootpermissions and network connection to the system or systems on which you want to install Keylime components. You have access to the database where Keylime saves data from the registrar. You can use any of the following database management systems:
- SQLite (default)
- PostgreSQL
- MySQL
- MariaDB
- You have valid keys and certificates from your certificate authority.
Procedure
Install the Keylime registrar:
# dnf install keylime-registrarDefine the IP address and port of the registrar by creating a new
.conffile in the/etc/keylime/registrar.conf.d/directory, for example,/etc/keylime/registrar.conf.d/00-registrar-ip.conf, with the following content:[registrar] ip = <registrar_IP_address>-
Replace
<registrar_IP_address>with the registrar’s IP address. Alternatively, useip = *orip = 0.0.0.0to bind the registrar to all available IP addresses. -
Optionally, change the port to which the Keylime agents connect by using the
portoption. The default value is8890. -
Optionally, change the TLS port to which the Keylime verifier and tenant connect by using the
tls_portoption. The default value is8891.
-
Replace
Optional: Configure the registrar’s database for the list of agents. The default configuration uses an SQLite database in the registrar’s
/var/lib/keylime/reg_data.sqlitedirectory. You can create a new.conffile in the/etc/keylime/registrar.conf.d/directory, for example,/etc/keylime/registrar.conf.d/00-db-url.conf, with the following content:[registrar] database_url = <protocol>://<name>:<password>@<ip_address_or_hostname>/<properties>Replace
<protocol>://<name>:<password>@<ip_address_or_hostname>/<properties>with the URL of the database, for example,postgresql://registrar:EKYYX-bqY2?#raXm@198.51.100.1/registrardb.Ensure that the credentials you use have the permissions for Keylime to create the database structure.
Add certificates and keys to the registrar:
-
You can use the default configuration and load the keys and certificates to the
/var/lib/keylime/reg_ca/directory. Alternatively, you can define the location of the keys and certificates in the configuration. Create a new
.conffile in the/etc/keylime/registrar.conf.d/directory, for example,/etc/keylime/registrar.conf.d/00-keys-and-certs.conf, with the following content:[registrar] tls_dir = /var/lib/keylime/reg_ca server_key = </path/to/server_key> server_key_password = <passphrase1> server_cert = </path/to/server_cert> trusted_client_ca = ['</path/to/ca/cert1>', '</path/to/ca/cert2>']
NoteUse absolute paths to define key and certificate locations. Alternatively, you can define a directory in the
tls_diroption and use paths relative to that directory.
-
You can use the default configuration and load the keys and certificates to the
Open the ports in firewall:
# firewall-cmd --add-port 8890/tcp --add-port 8891/tcp
# firewall-cmd --runtime-to-permanent
If you use a different port, replace
8890or8891with the port number defined in the.conffile.Start the
keylime_registrarservice:# systemctl enable --now keylime_registrarNoteIn the default configuration, start the
keylime_verifierbefore starting thekeylime_registrarservice because the verifier creates the CA and certificates for the other Keylime components. This order is not necessary when you use custom certificates.
Verification
Check that the
keylime_registrarservice is active and running:# systemctl status keylime_registrar ● keylime_registrar.service - The Keylime registrar service Loaded: loaded (/usr/lib/systemd/system/keylime_registrar.service; disabled; vendor preset: disabled) Active: active (running) since Wed 2022-11-09 10:10:17 EST; 1min 42s ago ...
Next steps
8.4. Setting up a Keylime server by using System Roles
You can set up the verifier and registrar, which are the Keylime server components, by using the keylime_server RHEL System Role. The keylime_server role installs and configures both the verifier and registrar components together on each node.
Perform this procedure on the Ansible control node.
For more information about Keylime, see 8.1. How Keylime works
Prerequisites
- You have prepared the control node and the managed nodes
- You are logged in to the control node as a user who can run playbooks on the managed nodes.
-
The account you use to connect to the managed nodes has
sudopermissions on them. - The managed nodes or groups of managed nodes on which you want to run this playbook are listed in the Ansible inventory file.
Procedure
Create a playbook that defines the required role:
Create a new YAML file and open it in a text editor, for example:
# vi keylime-playbook.ymlInsert the following content:
---
- name: Manage keylime servers
  hosts: all
  vars:
    keylime_server_verifier_ip: "{{ ansible_host }}"
    keylime_server_registrar_ip: "{{ ansible_host }}"
    keylime_server_verifier_tls_dir: <ver_tls_directory>
    keylime_server_verifier_server_cert: <ver_server_certfile>
    keylime_server_verifier_server_key: <ver_server_key>
    keylime_server_verifier_server_key_passphrase: <ver_server_key_passphrase>
    keylime_server_verifier_trusted_client_ca: <ver_trusted_client_ca_list>
    keylime_server_verifier_client_cert: <ver_client_certfile>
    keylime_server_verifier_client_key: <ver_client_key>
    keylime_server_verifier_client_key_passphrase: <ver_client_key_passphrase>
    keylime_server_verifier_trusted_server_ca: <ver_trusted_server_ca_list>
    keylime_server_registrar_tls_dir: <reg_tls_directory>
    keylime_server_registrar_server_cert: <reg_server_certfile>
    keylime_server_registrar_server_key: <reg_server_key>
    keylime_server_registrar_server_key_passphrase: <reg_server_key_passphrase>
    keylime_server_registrar_trusted_client_ca: <reg_trusted_client_ca_list>
  roles:
    - rhel-system-roles.keylime_server
You can find out more about the variables in Variables for the keylime_server RHEL System Role.
Run the playbook:
$ ansible-playbook <keylime-playbook.yml>
Verification
Check that the
keylime_verifierservice is active and running on the managed host:# systemctl status keylime_verifier ● keylime_verifier.service - The Keylime verifier Loaded: loaded (/usr/lib/systemd/system/keylime_verifier.service; disabled; vendor preset: disabled) Active: active (running) since Wed 2022-11-09 10:10:08 EST; 1min 45s agoCheck that the
keylime_registrarservice is active and running:# systemctl status keylime_registrar ● keylime_registrar.service - The Keylime registrar service Loaded: loaded (/usr/lib/systemd/system/keylime_registrar.service; disabled; vendor preset: disabled) Active: active (running) since Wed 2022-11-09 10:10:17 EST; 1min 42s ago ...
Next steps
8.5. Variables for the keylime_server RHEL System Role
When setting up a Keylime server by using the keylime_server RHEL System Role, you can customize the following variables for registrar and verifier.
List of keylime_server RHEL System Role variables for configuring the Keylime verifier
keylime_server_verifier_ip- Defines the IP address of the verifier.
keylime_server_verifier_tls_dir-
Specifies the directory where the keys and certificates are stored. If set to default, the verifier uses the
/var/lib/keylime/cv_cadirectory. keylime_server_verifier_server_key_passphrase- Specifies a passphrase to decrypt the server private key. If the value is empty, the private key is not encrypted.
keylime_server_verifier_server_cert: Specifies the Keylime verifier server certificate file.
keylime_server_verifier_trusted_client_ca-
Defines the list of trusted client CA certificates. You must store the files in the directory set in the
keylime_server_verifier_tls_diroption. keylime_server_verifier_client_key- Defines the file containing the Keylime verifier private client key.
keylime_server_verifier_client_key_passphrase- Defines the passphrase to decrypt the client private key file. If the value is empty, the private key is not encrypted.
keylime_server_verifier_client_cert- Defines the Keylime verifier client certificate file.
keylime_server_verifier_trusted_server_ca-
Defines the list of trusted server CA certificates. You must store the files in the directory set in the
keylime_server_verifier_tls_diroption.
List of registrar variables for setting up keylime_server RHEL System Role
keylime_server_registrar_ip- Defines the IP address of the registrar.
keylime_server_registrar_tls_dir-
Specifies the directory where you store the keys and certificates for the registrar. If you set it to default, the registrar uses the
/var/lib/keylime/reg_cadirectory. keylime_server_registrar_server_key- Defines the Keylime registrar private server key file.
keylime_server_registrar_server_key_passphrase- Specifies the passphrase to decrypt the server private key of the registrar. If the value is empty, the private key is not encrypted.
keylime_server_registrar_server_cert- Specifies the Keylime registrar server certificate file.
keylime_server_registrar_trusted_client_ca-
Defines the list of trusted client CA certificates. You must store the files in the directory set in the
keylime_server_registrar_tls_diroption.
8.6. Configuring Keylime tenant
Keylime uses the keylime_tenant utility for many functions, including provisioning the agents on the target systems. You can install keylime_tenant on any system, including the systems that run other Keylime components, or on a separate system, depending on your requirements.
Prerequisites
-
You have
rootpermissions and network connection to the system or systems on which you want to install Keylime components. You have network access to the systems where the other Keylime components are configured:
- Verifier
- For more information, see Section 8.2, “Configuring Keylime verifier”.
- Registrar
- For more information, see Section 8.3, “Configuring Keylime registrar”.
Procedure
Install the Keylime tenant:
# dnf install keylime-tenantDefine the tenant’s connection to the Keylime verifier by editing the
/etc/keylime/tenant.conf.d/00-verifier-ip.conffile:[tenant] verifier_ip = <verifier_ip>-
Replace
<verifier_ip>with the IP address to the verifier’s system. -
If the verifier uses a different port than the default value
8881, add theverifier_port = <verifier_port>setting.
-
Replace
Define the tenant’s connection to the Keylime registrar by editing the
/etc/keylime/tenant.conf.d/00-registrar-ip.conffile:[tenant] registrar_ip = <registrar_ip> registrar_port = <registrar_port>
-
Replace
<registrar_ip>with the IP address to the registrar’s system. -
If the registrar uses a different port than the default value
8891, add theregistrar_port = <registrar_port>setting.
-
Replace
Add certificates and keys to the tenant:
-
You can use the default configuration and load the keys and certificates to the
/var/lib/keylime/cv_cadirectory. Alternatively, you can define the location of the keys and certificates in the configuration. Create a new
.conffile in the/etc/keylime/tenant.conf.d/directory, for example,/etc/keylime/tenant.conf.d/00-keys-and-certs.conf, with the following content:[tenant] tls_dir = /var/lib/keylime/cv_ca client_key = tenant-key.pem client_key_password = <passphrase1> client_cert = tenant-cert.pem trusted_server_ca = ['</path/to/ca/cert>']
The
trusted_server_caparameter accepts paths to the verifier and registrar server CA certificate. You can provide multiple comma-separated paths, for example if the verifier and registrar use different CAs.NoteUse absolute paths to define key and certificate locations. Alternatively, you can define a directory in the
tls_diroption and use paths relative to that directory.
-
You can use the default configuration and load the keys and certificates to the
-
Optional: If the trusted platform module (TPM) endorsement key (EK) cannot be verified by using certificates in the
/var/lib/keylime/tpm_cert_storedirectory, add the certificate to that directory. This can occur particularly when using virtual machines with emulated TPMs.
Verification
Check the status of the verifier:
# keylime_tenant -c cvstatus
Reading configuration from ['/etc/keylime/logging.conf']
2022-10-14 12:56:08.155 - keylime.tpm - INFO - TPM2-TOOLS Version: 5.2
Reading configuration from ['/etc/keylime/tenant.conf']
2022-10-14 12:56:08.157 - keylime.tenant - INFO - Setting up client TLS...
2022-10-14 12:56:08.158 - keylime.tenant - INFO - Using default client_cert option for tenant
2022-10-14 12:56:08.158 - keylime.tenant - INFO - Using default client_key option for tenant
2022-10-14 12:56:08.178 - keylime.tenant - INFO - TLS is enabled.
2022-10-14 12:56:08.178 - keylime.tenant - WARNING - Using default UUID d432fbb3-d2f1-4a97-9ef7-75bd81c00000
2022-10-14 12:56:08.221 - keylime.tenant - INFO - Verifier at 127.0.0.1 with Port 8881 does not have agent d432fbb3-d2f1-4a97-9ef7-75bd81c00000.
If correctly set up, and if no agent is configured, the verifier responds that it does not recognize the default agent UUID.
Check the status of the registrar:
# keylime_tenant -c regstatus
Reading configuration from ['/etc/keylime/logging.conf']
2022-10-14 12:56:02.114 - keylime.tpm - INFO - TPM2-TOOLS Version: 5.2
Reading configuration from ['/etc/keylime/tenant.conf']
2022-10-14 12:56:02.116 - keylime.tenant - INFO - Setting up client TLS...
2022-10-14 12:56:02.116 - keylime.tenant - INFO - Using default client_cert option for tenant
2022-10-14 12:56:02.116 - keylime.tenant - INFO - Using default client_key option for tenant
2022-10-14 12:56:02.137 - keylime.tenant - INFO - TLS is enabled.
2022-10-14 12:56:02.137 - keylime.tenant - WARNING - Using default UUID d432fbb3-d2f1-4a97-9ef7-75bd81c00000
2022-10-14 12:56:02.171 - keylime.registrar_client - CRITICAL - Error: could not get agent d432fbb3-d2f1-4a97-9ef7-75bd81c00000 data from Registrar Server: 404
2022-10-14 12:56:02.172 - keylime.registrar_client - CRITICAL - Response code 404: agent d432fbb3-d2f1-4a97-9ef7-75bd81c00000 not found
2022-10-14 12:56:02.172 - keylime.tenant - INFO - Agent d432fbb3-d2f1-4a97-9ef7-75bd81c00000 does not exist on the registrar. Please register the agent with the registrar.
2022-10-14 12:56:02.172 - keylime.tenant - INFO - {"code": 404, "status": "Agent d432fbb3-d2f1-4a97-9ef7-75bd81c00000 does not exist on registrar 127.0.0.1 port 8891.", "results": {}}
If correctly set up, and if no agent is configured, the registrar responds that it does not recognize the default agent UUID.
Additional resources
-
For additional advanced options for the
keylime_tenantutility, enter thekeylime_tenant -hcommand.
8.7. Configuring Keylime agent
The Keylime agent is the component deployed to all systems to be monitored by Keylime.
By default, the Keylime agent stores all its data in the /var/lib/keylime/ directory of the monitored system.
To keep the configuration files organized within the drop-in directories, use file names with a two-digit number prefix, for example /etc/keylime/agent.conf.d/00-registrar-ip.conf. The configuration processing reads the files inside the drop-in directory in lexicographic order and sets each option to the last value it reads.
Prerequisites
-
You have
rootpermissions to the monitored system. The monitored system has a Trusted Platform Module (TPM).
NoteTo verify, enter the
tpm2_pcrreadcommand. If the output returns several hashes, a TPM is available.You have network access to the systems where the other Keylime components are configured:
- Verifier
- For more information, see Section 8.2, “Configuring Keylime verifier”.
- Registrar
- For more information, see Section 8.3, “Configuring Keylime registrar”.
- Tenant
- For more information, see Section 8.6, “Configuring Keylime tenant”.
- Integrity measurement architecture (IMA) is enabled on the monitored system. For more information, see Enabling integrity measurement architecture and extended verification module.
Procedure
Install the Keylime agent:
# dnf install keylime-agentThis command installs the
keylime-agent-rustpackage.Define the agent’s IP address and port in the configuration files. Create a new
.conffile in the/etc/keylime/agent.conf.d/directory, for example,/etc/keylime/agent.conf.d/00-agent-ip.conf, with the following content:[agent] ip = '<agent_ip>'NoteThe Keylime agent configuration uses the TOML format, which is different from the INI format used for configuration of the other components. Therefore, enter values in valid TOML syntax, for example, paths in single quotation marks and arrays of multiple paths in square brackets.
-
Replace
<agent_IP_address>with the agent’s IP address. Alternatively, useip = '*'orip = '0.0.0.0'to bind the agent to all available IP addresses. -
Optionally, you can also change the agent’s port from the default value
9002by using theport = '<agent_port>'option.
-
Replace
Define the registrar’s IP address and port in the configuration files. Create a new
.conffile in the/etc/keylime/agent.conf.d/directory, for example,/etc/keylime/agent.conf.d/00-registrar-ip.conf, with the following content:[agent] registrar_ip = '<registrar_IP_address>'-
Replace
<registrar_IP_address>with the registrar’s IP address. -
Optionally, you can also change the registrar’s port from the default value
8890by using theregistrar_port = '<registrar_port>'option.
-
Replace
Optional: Define the agent’s universally unique identifier (UUID). If it is not defined, the default UUID is used. Create a new
.conffile in the/etc/keylime/agent.conf.d/directory, for example,/etc/keylime/agent.conf.d/00-agent-uuid.conf, with the following content:[agent] uuid = '<agent_UUID>'-
Replace
<agent_UUID>with the agent’s UUID, for exampled432fbb3-d2f1-4a97-9ef7-abcdef012345. You can use theuuidgenutility to generate a UUID.
-
Replace
Optional: Load existing keys and certificates for the agent. If the agent receives no
server_keyandserver_cert, it generates its own key and a self-signed certificate.Define the location of the keys and certificates in the configuration. Create a new
.conffile in the/etc/keylime/agent.conf.d/directory, for example,/etc/keylime/agent.conf.d/00-keys-and-certs.conf, with the following content:[agent] server_key = '</path/to/server_key>' server_key_password = '<passphrase1>' server_cert = '</path/to/server_cert>' trusted_client_ca = '</path/to/ca/cert>' trusted_client_ca = '[</path/to/ca/cert3>, </path/to/ca/cert4>]'
NoteUse absolute paths to define key and certificate locations. The Keylime agent does not accept relative paths.
Open the port in firewall:
# firewall-cmd --add-port 9002/tcp
# firewall-cmd --runtime-to-permanent
If you use a different port, replace
9002with the port number defined in the.conffile.Enable and start the
keylime_agentservice:# systemctl enable --now keylime_agentOptional: From the system where the Keylime tenant is configured, verify that the agent is correctly configured and can connect to the registrar.
# keylime_tenant -c regstatus --uuid <agent_uuid>
Reading configuration from ['/etc/keylime/logging.conf']
...
==\n-----END CERTIFICATE-----\n", "ip": "127.0.0.1", "port": 9002, "regcount": 1, "operational_state": "Registered"}}}
Replace
<agent_uuid>with the agent’s UUID.If the registrar and agent are correctly configured, the output displays the agent’s IP address and port, followed by
"operational_state": "Registered".
Create a new IMA policy by entering the following content into the
/etc/ima/ima-policyfile:# PROC_SUPER_MAGIC dont_measure fsmagic=0x9fa0 # SYSFS_MAGIC dont_measure fsmagic=0x62656572 # DEBUGFS_MAGIC dont_measure fsmagic=0x64626720 # TMPFS_MAGIC dont_measure fsmagic=0x01021994 # RAMFS_MAGIC dont_measure fsmagic=0x858458f6 # SECURITYFS_MAGIC dont_measure fsmagic=0x73636673 # SELINUX_MAGIC dont_measure fsmagic=0xf97cff8c # CGROUP_SUPER_MAGIC dont_measure fsmagic=0x27e0eb # OVERLAYFS_MAGIC dont_measure fsmagic=0x794c7630 # Do not measure log, audit or tmp files dont_measure obj_type=var_log_t dont_measure obj_type=auditd_log_t dont_measure obj_type=tmp_t # MEASUREMENTS measure func=BPRM_CHECK measure func=FILE_MMAP mask=MAY_EXEC measure func=MODULE_CHECK uid=0
- Reboot the system to apply the new IMA policy.
Verification
Verify that the agent is running:
# systemctl status keylime_agent
● keylime_agent.service - The Keylime compute agent
     Loaded: loaded (/usr/lib/systemd/system/keylime_agent.service; enabled; preset: disabled)
     Active: active (running) since ...
Next steps
After the agent is configured on all systems you want to monitor, you can deploy Keylime to perform one or both of the following functions:
Additional resources
8.8. Deploying Keylime for runtime monitoring
To verify that the state of monitored systems is correct, the Keylime agent must be running on the monitored systems.
Because Keylime runtime monitoring uses integrity measurement architecture (IMA) to measure large numbers of files, it might have a significant impact on the performance of your system.
When provisioning the agent, you can also define a file that Keylime sends to the monitored system. Keylime encrypts the file sent to the agent, and decrypts it only if the agent’s system complies with the TPM policy and with the IMA allowlist.
You can make Keylime ignore changes of specific files or within specific directories by configuring a Keylime excludelist.
From Keylime version 7.3.0, provided in RHEL 9.3, the allowlist and excludelist are combined into the Keylime runtime policy.
Prerequisites
You have network access to the systems where the Keylime components are configured:
- Verifier
- For more information, see Section 8.2, “Configuring Keylime verifier”.
- Registrar
- For more information, see Section 8.3, “Configuring Keylime registrar”.
- Tenant
- For more information, see Section 8.6, “Configuring Keylime tenant”.
- Agent
- For more information, see Section 8.7, “Configuring Keylime agent”.
Procedure
On the monitored system where the Keylime agent is configured and running, generate an allowlist from the current state of the system:
# /usr/share/keylime/scripts/create_allowlist.sh -o <allowlist.txt> -h sha256sumReplace
<allowlist.txt>with the file name of the allowlist.ImportantUse the SHA-256 hash function. SHA-1 is not secure and has been deprecated in RHEL 9. For additional information, see SHA-1 deprecation in Red Hat Enterprise Linux 9.
Copy the generated allowlist to the system where the
keylime_tenantutility is configured, for example:# scp <allowlist.txt> root@<tenant.ip>:/root/<allowlist.txt>Optional: You can define a list of files or directories excluded from Keylime measurements by creating a file on the tenant system and entering the files and directories to exclude. The excludelist accepts Python regular expressions with one regular expression per line. See Regular expression operations at docs.python.org for the complete list of special characters. For example, to exclude all files in the
/tmp/directory and some subdirectories of the/var/directory from Keylime measurements, create a/root/<excludelist.txt>file with the following content:/var/cache/.* /var/lock/.* /var/log/.* /var/run/.* /var/spool/.* /var/tmp/.* /tmp/.*
Save the excludelist on the tenant system.
Combine the allowlist and excludelist into the Keylime runtime policy:
# keylime_create_policy -a <allowlist.txt> -e <excludelist.txt> -o <policy.json>On the system where the Keylime tenant is configured, provision the agent by using the
keylime_tenantutility:# keylime_tenant -c add -t <agent_ip> -u <agent_uuid> --runtime-policy <policy.json> --cert default-
Replace
<agent_ip>with the agent’s IP address. -
Replace
<agent_uuid>with the agent’s UUID. -
Replace
<policy.json>with the path to the Keylime runtime policy file. With the
--certoption, the tenant generates and signs a certificate for the agent by using the CA certificates and keys located in the specified directory, or the default/var/lib/keylime/ca/directory. If the directory contains no CA certificates and keys, the tenant will generate them automatically according to the configuration in the/etc/keylime/ca.conffile and save them to the specified directory. The tenant then sends these keys and certificates to the agent.When generating CA certificates or signing agent certificates, you may be prompted for the password to access the CA private key:
Please enter the password to decrypt your keystore:.If you do not want to use a certificate, use the
-foption instead for delivering a file to the agent. Provisioning an agent requires sending any file, even an empty file.NoteKeylime encrypts the file sent to the agent, and decrypts it only if the agent’s system complies with the TPM policy and the IMA allowlist. By default, Keylime decompresses
.zipfiles.
As an example, with the following command,
keylime_tenantprovisions a new Keylime agent at127.0.0.1with UUIDd432fbb3-d2f1-4a97-9ef7-75bd81c00000and loads a runtime policypolicy.json. It also generates a certificate in the default directory and sends the certificate file to the agent. Keylime decrypts the file only if the TPM policy configured in/etc/keylime/verifier.confis satisfied:# keylime_tenant -c add -t 127.0.0.1 -u d432fbb3-d2f1-4a97-9ef7-75bd81c00000 --cert default --runtime-policy policy.jsonNoteYou can stop Keylime from monitoring a node by using the
# keylime_tenant -c delete -u <agent_uuid>command.You can modify the configuration of an already registered agent by using the
keylime_tenant -c updatecommand.-
Replace
Verification
- Optional: Reboot the monitored system before verification to verify that the settings are persistent.
Verify a successful attestation of the agent:
# keylime_tenant -c cvstatus -u <agent.uuid>
...
{"<agent.uuid>": {"operational_state": "Get Quote"..."attestation_count": 5
...
Replace
<agent.uuid>with the agent’s UUID.If the value of
operational_stateisGet Quoteandattestation_countis non-zero, the attestation of this agent is successful.If the value of
operational_stateisInvalid QuoteorFailedattestation fails, the command displays output similar to the following:{"<agent.uuid>": {"operational_state": "Invalid Quote", ... "ima.validation.ima-ng.not_in_allowlist", "attestation_count": 5, "last_received_quote": 1684150329, "last_successful_attestation": 1684150327}}If the attestation fails, display more details in the verifier log:
# journalctl -u keylime_verifier
keylime.tpm - INFO - Checking IMA measurement list...
keylime.ima - WARNING - File not found in allowlist: /root/bad-script.sh
keylime.ima - ERROR - IMA ERRORS: template-hash 0 fnf 1 hash 0 good 781
keylime.cloudverifier - WARNING - agent D432FBB3-D2F1-4A97-9EF7-75BD81C00000 failed, stopping polling
Additional resources
- For more information about IMA, see Enhancing security with the kernel integrity subsystem.
8.9. Deploying Keylime for measured boot attestation
When you configure Keylime for measured boot attestation, Keylime checks that the boot process on the measured system corresponds to the state you defined.
Prerequisites
You have network access to the systems where the Keylime components are configured:
- Verifier
- For more information, see Section 8.2, “Configuring Keylime verifier”.
- Registrar
- For more information, see Section 8.3, “Configuring Keylime registrar”.
- Tenant
- For more information, see Section 8.6, “Configuring Keylime tenant”.
- Agent
- For more information, see Section 8.7, “Configuring Keylime agent”.
- Unified Extensible Firmware Interface (UEFI) is enabled on the agent system.
Procedure
On the monitored system where the Keylime agent is configured and running, install the
python3-keylimepackage, which contains thecreate_mb_refstatescript:# dnf -y install python3-keylime
On the monitored system, generate a policy from the measured boot log of the current state of the system by using the
create_mb_refstatescript:# /usr/share/keylime/scripts/create_mb_refstate /sys/kernel/security/tpm0/binary_bios_measurements <./measured_boot_reference_state.json>Replace
<./measured_boot_reference_state.json>with the path where the script saves the generated policy.ImportantThe policy generated with the
create_mb_refstatescript is based on the current state of the system and is very strict. Any modifications of the system including kernel updates and system updates will change the boot process and the system will fail the attestation.Copy the generated policy to the system where the
keylime_tenantutility is configured, for example:# scp root@<agent_ip>:<./measured_boot_reference_state.json> <./measured_boot_reference_state.json>On the system where the Keylime tenant is configured, provision the agent by using the
keylime_tenantutility:# keylime_tenant -c add -t <agent_ip> -u <agent_uuid> --mb_refstate <./measured_boot_reference_state.json>-
Replace
<agent_ip>with the agent’s IP address. -
Replace
<agent_uuid>with the agent’s UUID. -
Replace
<./measured_boot_reference_state.json>with the path to the measured boot policy.
If you configure measured boot in combination with runtime monitoring, provide all the options from both use cases when entering the
keylime_tenant -c addcommand.NoteYou can stop Keylime from monitoring a node by using the
# keylime_tenant -c delete -t <agent_ip> -u <agent_uuid>command.You can modify the configuration of an already registered agent by using the
keylime_tenant -c updatecommand.-
Replace
Verification
Reboot the monitored system and verify a successful attestation of the agent:
# keylime_tenant -c cvstatus -u <agent_uuid>
...
{"<agent.uuid>": {"operational_state": "Get Quote"..."attestation_count": 5
...
Replace
<agent_uuid>with the agent’s UUID.If the value of
operational_stateisGet Quoteandattestation_countis non-zero, the attestation of this agent is successful.If the value of
operational_stateisInvalid QuoteorFailedattestation fails, the command displays output similar to the following:{"<agent.uuid>": {"operational_state": "Invalid Quote", ... "ima.validation.ima-ng.not_in_allowlist", "attestation_count": 5, "last_received_quote": 1684150329, "last_successful_attestation": 1684150327}}If the attestation fails, display more details in the verifier log:
# journalctl -u keylime_verifier
{"d432fbb3-d2f1-4a97-9ef7-75bd81c00000": {"operational_state": "Tenant Quote Failed", ... "last_event_id": "measured_boot.invalid_pcr_0", "attestation_count": 0, "last_received_quote": 1684487093, "last_successful_attestation": 0}}