
Chapter 8. Configuring network bonds using the web console
Learn how network bonding works and configure network bonds in the RHEL 9 web console.
The RHEL 9 web console is build on top of the NetworkManager service.
Prerequisites
- The RHEL 9 web console installed and enabled. For details, see Installing the web console.
8.1. Upstream switch configuration depending on the bonding modes
Depending on the bonding mode you want to use, you must configure the ports on the switch:
| Bonding mode | Configuration on the switch |
|---|---|
|
| Requires static EtherChannel enabled, not Link Aggregation Control Protocol (LACP)-negotiated. |
|
| No configuration required on the switch. |
|
| Requires static EtherChannel enabled, not LACP-negotiated. |
|
| Requires static EtherChannel enabled, not LACP-negotiated. |
|
| Requires LACP-negotiated EtherChannel enabled. |
|
| No configuration required on the switch. |
|
| No configuration required on the switch. |
For details how to configure your switch, see the documentation of the switch.
Certain network bonding features, such as the fail-over mechanism, do not support direct cable connections without a network switch. For further details, see the Is bonding supported with direct connection using crossover cables? KCS solution.
8.2. Bond modes
In RHEL 9 there are several mode options. Each mode option is characterize by specific load balancing and fault tolerance. The behavior of the bonded interfaces depends upon the mode. The bonding modes provide fault tolerance, load balancing or both.
Load balancing modes
- Round Robin: Sequentially transmit packets from the first available interface to the last one.
Fault tolerance modes
- Active Backup: Only when the primary interface fails, one of a backup interfaces replaces it. Only a MAC address used by active interface is visible.
Broadcast: All transmissions are sent on all interfaces.
NoteBroadcasting significantly increases network traffic on all the bonded interfaces.
Fault tolerance and load balancing modes
- XOR: The destination MAC addresses are distributed equally between interfaces with a modulo hash. Each interface then serves the same group of MAC addresses.
802.3ad: Sets an IEEE 802.3ad dynamic link aggregation policy. Creates aggregation groups that share the same speed and duplex settings. Transmits and receives on all interfaces in the active aggregator.
NoteThis mode requires a switch that is 802.3ad compliant.
- Adaptive transmit load balancing: The outgoing traffic is distributed according to the current load on each interface. Incoming traffic is received by the current interface. If the receiving interface fails, another interface takes over the MAC address of the failed one.
Adaptive load balancing: Includes transmit and receive load balancing for IPv4 traffic.
Receive load balancing is achieved through Address Resolution Protocol (ARP) negotiation, therefore, it is necessary to set Link Monitoring to ARP in the bond’s configuration.
8.3. Configuring a network bond by using the RHEL web console
Use the RHEL web console to configure a network bond if you prefer to manage network settings using a web browser-based interface.
Prerequisites
- You are logged in to the RHEL web console.
- Two or more physical or virtual network devices are installed on the server.
- To use Ethernet devices as members of the bond, the physical or virtual Ethernet devices must be installed on the server.
To use team, bridge, or VLAN devices as members of the bond, create them in advance as described in:
Procedure
-
Select the
Networkingtab in the navigation on the left side of the screen. -
Click in the
Interfacessection. - Enter the name of the bond device you want to create.
- Select the interfaces that should be members of the bond.
Select the mode of the bond.
If you select
Active backup, the web console shows the additional fieldPrimaryin which you can select the preferred active device.-
Set the link monitoring mode. For example, when you use the
Adaptive load balancingmode, set it toARP. Optional: Adjust the monitoring interval, link up delay, and link down delay settings. Typically, you only change the defaults for troubleshooting purposes.
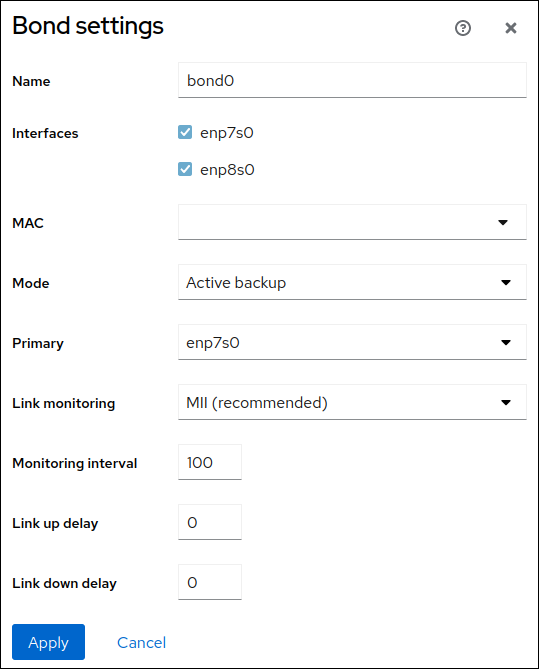
- Click .
By default, the bond uses a dynamic IP address. If you want to set a static IP address:
-
Click the name of the bond in the
Interfacessection. -
Click
Editnext to the protocol you want to configure. -
Select
Manualnext toAddresses, and enter the IP address, prefix, and default gateway. -
In the
DNSsection, click the button, and enter the IP address of the DNS server. Repeat this step to set multiple DNS servers. -
In the
DNS search domainssection, click the button, and enter the search domain. If the interface requires static routes, configure them in the
Routessection.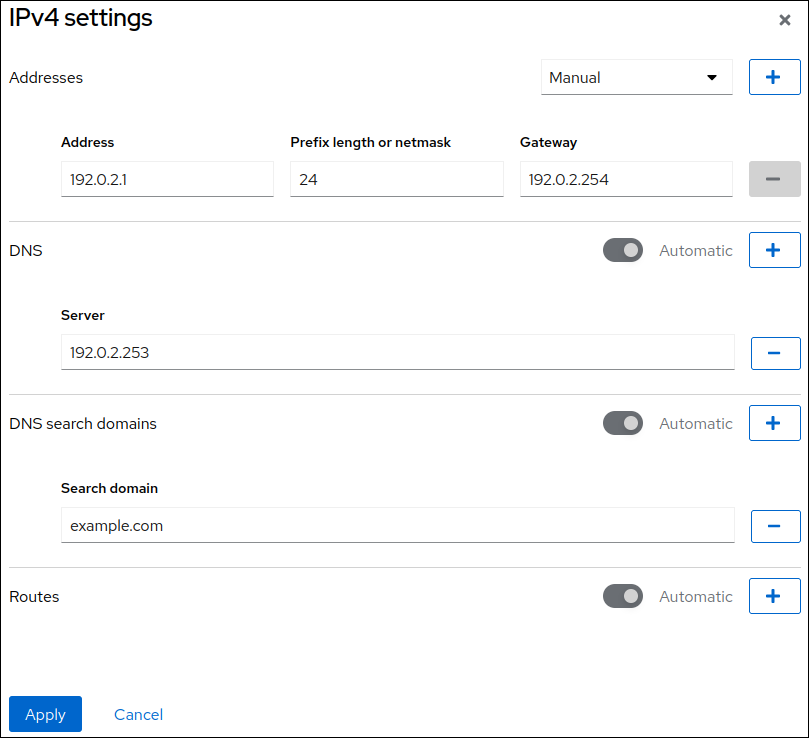
- Click
-
Click the name of the bond in the
Verification
Select the
Networkingtab in the navigation on the left side of the screen, and check if there is incoming and outgoing traffic on the interface:
Temporarily remove the network cable from the host.
Note that there is no method to properly test link failure events using software utilities. Tools that deactivate connections, such as the web console, show only the bonding driver’s ability to handle member configuration changes and not actual link failure events.
Display the status of the bond:
# cat /proc/net/bonding/bond0
8.4. Adding interfaces to the bond using the web console
Network bonds can include multiple interfaces and you can add or remove any of them at any time.
Learn how to add a network interface to an existing bond.
Prerequisites
- Having a bond with multiple interfaces configured as described in Configuring a network bond using the web console
Procedure
Log in to the web console.
For details, see Logging in to the web console.
- Open Networking.
- In the Interfaces table, click on the bond you want to configure.
- In the bond settings screen, scroll down to the table of members (interfaces).
- Click the drop down icon.
- Select the interface in the drop down menu and click it.
Verification steps
- Check that the selected interface appeared in the Interface members table in the bond settings screen.
8.5. Removing or disabling an interface from the bond using the web console
Network bonds can include multiple interfaces. If you need to change a device, you can remove or disable particular interfaces from the bond, which will work with the rest of the active interfaces.
To stop using an interface included in a bond, you can:
- Remove the interface from the bond.
- Disable the interface temporarily. The interface stays a part of the bond, but the bond will not use it until you enable it again.
Prerequisites
- Having a bond with multiple interfaces configured as described in Configuring a network bond using the web console
Procedure
- Log in to the RHEL web console. For details, see Logging in to the web console.
- Open Networking.
- Click the bond you want to configure.
- In the bond settings screen, scroll down to the table of ports (interfaces).
Select the interface and remove or disable it:
- To remove the interface, click the button.
- To disable or enable the interface, toggle the switch next to the selected interface.
Based on your choice, the web console either removes or disables the interface from the bond and you can see it back in the Networking section as a standalone interface.
8.6. Removing or disabling a bond using the web console
Remove or disable a network bond using the web console. If you disable the bond, the interfaces stay in the bond, but the bond will not be used for network traffic.
Prerequisites
- There is an existing bond in the web console.
Procedure
Log in to the web console.
For details, see Logging in to the web console.
- Open Networking.
- Click the bond you want to remove.
In the bond settings screen, you can disable or enable the bond by toggling a switcher or click the button to remove the bond permanently.

Verification steps
- Go back to Networking and verify that all the interfaces from the bond are now standalone interfaces.