
Chapter 21. Managing user groups in IdM CLI
This chapter introduces user groups management using the IdM CLI.
A user group is a set of users with common privileges, password policies, and other characteristics.
A user group in Identity Management (IdM) can include:
- IdM users
- other IdM user groups
- external users, which are users that exist outside of IdM
21.1. The different group types in IdM
IdM supports the following types of groups:
- POSIX groups (the default)
POSIX groups support Linux POSIX attributes for their members. Note that groups that interact with Active Directory cannot use POSIX attributes.
POSIX attributes identify users as separate entities. Examples of POSIX attributes relevant to users include
uidNumber, a user number (UID), andgidNumber, a group number (GID).- Non-POSIX groups
Non-POSIX groups do not support POSIX attributes. For example, these groups do not have a GID defined.
All members of this type of group must belong to the IdM domain.
- External groups
Use external groups to add group members that exist in an identity store outside of the IdM domain, such as:
- A local system
- An Active Directory domain
- A directory service
External groups do not support POSIX attributes. For example, these groups do not have a GID defined.
Table 21.1. User groups created by default
| Group name | Default group members |
|---|---|
|
| All IdM users |
|
|
Users with administrative privileges, including the default |
|
| This is a legacy group that no longer has any special privileges |
|
| Users with privileges to manage the Active Directory trusts |
When you add a user to a user group, the user gains the privileges and policies associated with the group. For example, to grant administrative privileges to a user, add the user to the admins group.
Do not delete the admins group. As admins is a pre-defined group required by IdM, this operation causes problems with certain commands.
In addition, IdM creates user private groups by default whenever a new user is created in IdM. For more information about private groups, see Adding users without a private group.
21.2. Direct and indirect group members
User group attributes in IdM apply to both direct and indirect members: when group B is a member of group A, all users in group B are considered indirect members of group A.
For example, in the following diagram:
- User 1 and User 2 are direct members of group A.
- User 3, User 4, and User 5 are indirect members of group A.
Figure 21.1. Direct and Indirect Group Membership
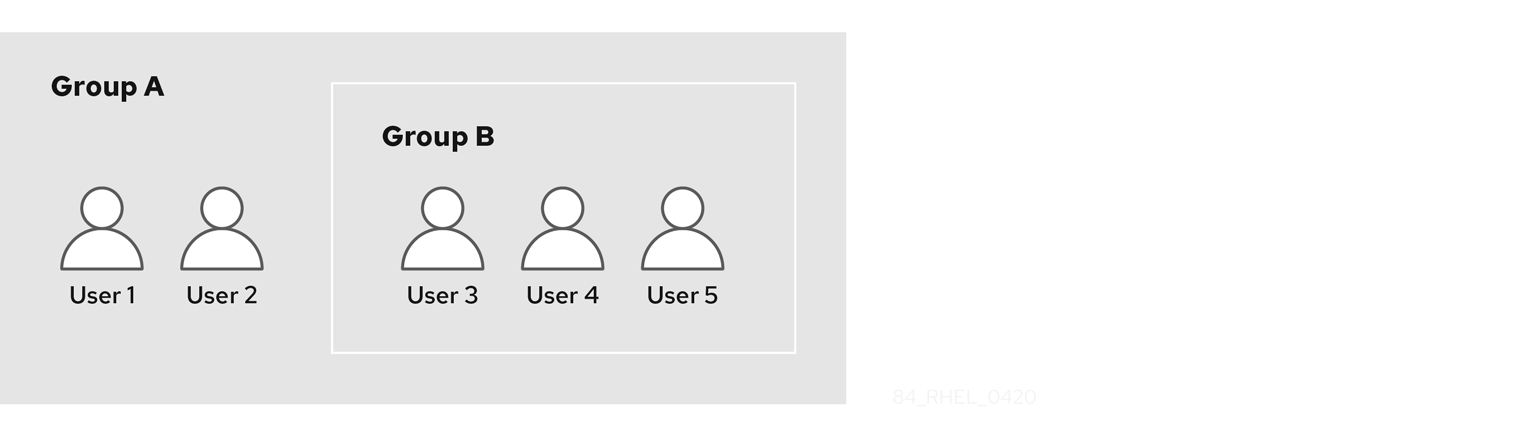
If you set a password policy for user group A, the policy also applies to all users in user group B.
21.3. Adding a user group using IdM CLI
Follow this procedure to add a user group using the IdM CLI.
Prerequisites
- You must be logged in as the administrator. For details, see Using kinit to log in to IdM manually.
Procedure
Add a user group by using the
ipa group-add group_namecommand. For example, to create group_a:$ ipa group-add group_a --------------------- Added group "group_a" --------------------- Group name: group_a GID: 1133400009
By default,
ipa group-addadds a POSIX user group. To specify a different group type, add options toipa group-add:-
--nonposixto create a non-POSIX group --externalto create an external groupFor details on group types, see The different group types in IdM.
You can specify a custom GID when adding a user group by using the
--gid=custom_GIDoption. If you do this, be careful to avoid ID conflicts. If you do not specify a custom GID, IdM automatically assigns a GID from the available ID range.-
21.4. Searching for user groups using IdM CLI
Follow this procedure to search for existing user groups using the IdM CLI.
Procedure
Display all user groups by using the
ipa group-findcommand. To specify a group type, add options toipa group-find:-
Display all POSIX groups using the
ipa group-find --posixcommand. -
Display all non-POSIX groups using the
ipa group-find --nonposixcommand. Display all external groups using the
ipa group-find --externalcommand.For more information about different group types, see The different group types in IdM.
-
Display all POSIX groups using the
21.5. Deleting a user group using IdM CLI
Follow this procedure to delete a user group using IdM CLI. Note that deleting a group does not delete the group members from IdM.
Prerequisites
- You must be logged in as the administrator. For details, see Using kinit to log in to IdM manually.
Procedure
Delete a user group by using the
ipa group-del group_namecommand. For example, to delete group_a:$ ipa group-del group_a -------------------------- Deleted group "group_a" --------------------------
21.6. Adding a member to a user group using IdM CLI
You can add both users and user groups as members of a user group. For more information, see The different group types in IdM and Direct and indirect group members. Follow this procedure to add a member to a user group by using the IdM CLI.
Prerequisites
- You must be logged in as the administrator. For details, see Using kinit to log in to IdM manually.
Procedure
Add a member to a user group by using the
ipa group-add-membercommand.Specify the type of member using these options:
-
--usersadds an IdM user -
--externaladds a user that exists outside the IdM domain, in the format ofDOMAIN\user_nameoruser_name@domain -
--groupsadds an IdM user group
For example, to add group_b as a member of group_a:
$ ipa group-add-member group_a --groups=group_b
Group name: group_a
GID: 1133400009
Member users: user_a
Member groups: group_b
Indirect Member users: user_b
-------------------------
Number of members added 1
-------------------------
Members of group_b are now indirect members of group_a.
-
When adding a group as a member of another group, do not create recursive groups. For example, if Group A is a member of Group B, do not add Group B as a member of Group A. Recursive groups can cause unpredictable behavior.
After you add a member to a user group, the update may take some time to spread to all clients in your Identity Management environment. This is because when any given host resolves users, groups and netgroups, the System Security Services Daemon (SSSD) first looks into its cache and performs server lookups only for missing or expired records.
21.7. Adding users without a user private group
By default, IdM creates user private groups (UPGs) whenever a new user is created in IdM. UPGs are a specific group type:
- The UPG has the same name as the newly created user.
- The user is the only member of the UPG. The UPG cannot contain any other members.
- The GID of the private group matches the UID of the user.
However, it is possible to add users without creating a UPG.
21.7.1. Users without a user private group
If a NIS group or another system group already uses the GID that would be assigned to a user private group, it is necessary to avoid creating a UPG.
You can do this in two ways:
- Add a new user without a UPG, without disabling private groups globally. See Adding a user without a user private group when private groups are globally enabled.
- Disable UPGs globally for all users, then add a new user. See Disabling user private groups globally for all users and Adding a user when user private groups are globally disabled.
In both cases, IdM will require specifying a GID when adding new users, otherwise the operation will fail. This is because IdM requires a GID for the new user, but the default user group ipausers is a non-POSIX group and therefore does not have an associated GID. The GID you specify does not have to correspond to an already existing group.
Specifying the GID does not create a new group. It only sets the GID attribute for the new user, because the attribute is required by IdM.
21.7.2. Adding a user without a user private group when private groups are globally enabled
You can add a user without creating a user private group (UPG) even when UPGs are enabled on the system. This requires manually setting a GID for the new user. For details on why this is needed, see Users without a user private group.
Procedure
To prevent IdM from creating a UPG, add the
--noprivateoption to theipa user-addcommand.Note that for the command to succeed, you must specify a custom GID. For example, to add a new user with GID 10000:
$ ipa user-add jsmith --first=John --last=Smith --noprivate --gid 10000
21.7.3. Disabling user private groups globally for all users
You can disable user private groups (UPGs) globally. This prevents the creation of UPGs for all new users. Existing users are unaffected by this change.
Procedure
Obtain administrator privileges:
$ kinit admin
IdM uses the Directory Server Managed Entries Plug-in to manage UPGs. List the instances of the plug-in:
$ ipa-managed-entries --list
To ensure IdM does not create UPGs, disable the plug-in instance responsible for managing user private groups:
$ ipa-managed-entries -e "UPG Definition" disable
Disabling Plugin
NoteTo re-enable the
UPG Definitioninstance later, use theipa-managed-entries -e "UPG Definition" enablecommand.Restart Directory Server to load the new configuration.
$ sudo systemctl restart dirsrv.target
To add a user after UPGs have been disabled, you need to specify a GID. For more information, see Adding a user when user private groups are globally disabled
Verification steps
To check if UPGs are globally disabled, use the disable command again:
$ ipa-managed-entries -e "UPG Definition" disable
Plugin already disabled
21.7.4. Adding a user when user private groups are globally disabled
When user private groups (UPGs) are disabled globally, IdM does not assign a GID to a new user automatically. To successfully add a user, you must assign a GID manually or by using an automember rule. For details on why this is required, see Users without a user private group.
Prerequisities
- UPGs must be disabled globally for all users. For more information, see Disabling user private groups globally for all users
Procedure
To make sure adding a new user succeeds when creating UPGs is disabled, choose one of the following:
Specify a custom GID when adding a new user. The GID does not have to correspond to an already existing user group.
For example, when adding a user from the command line, add the
--gidoption to theipa user-addcommand.- Use an automember rule to add the user to an existing group with a GID.
21.8. Adding users or groups as member managers to an IdM user group using the IdM CLI
Follow this procedure to add users or groups as member managers to an IdM user group using the IdM CLI. Member managers can add users or groups to IdM user groups but cannot change the attributes of a group.
Prerequisites
- You must be logged in as the administrator. For details, see Using kinit to log in to IdM manually.
- You must have the name of the user or group you are adding as member managers and the name of the group you want them to manage.
Procedure
Add a user as a member manager to an IdM user group by using the
ipa group-add-member-managercommand.For example, to add the user
testas a member manager ofgroup_a:$ ipa group-add-member-manager group_a --users=test Group name: group_a GID: 1133400009 Membership managed by users: test ------------------------- Number of members added 1 -------------------------
User
testcan now manage members ofgroup_a.Add a group as a member manager to an IdM user group by using the
ipa group-add-member-managercommand.For example, to add the group
group_adminsas a member manager ofgroup_a:$ ipa group-add-member-manager group_a --groups=group_admins Group name: group_a GID: 1133400009 Membership managed by groups: group_admins Membership managed by users: test ------------------------- Number of members added 1 -------------------------
Group
group_adminscan now manage members ofgroup_a.
After you add a member manager to a user group, the update may take some time to spread to all clients in your Identity Management environment.
Verification steps
Using the
ipa group-showcommand to verify the user and group were added as member managers.$ ipa group-show group_a Group name: group_a GID: 1133400009 Membership managed by groups: group_admins Membership managed by users: test
Additional resources
-
See
ipa group-add-member-manager --helpfor more details.
21.9. Viewing group members using IdM CLI
Follow this procedure to view members of a group using IdM CLI. You can view both direct and indirect group members. For more information, see Direct and indirect group members.
Procedure:
To list members of a group, use the
ipa group-show group_namecommand. For example:$ ipa group-show group_a ... Member users: user_a Member groups: group_b Indirect Member users: user_b
NoteThe list of indirect members does not include external users from trusted Active Directory domains. The Active Directory trust user objects are not visible in the Identity Management interface because they do not exist as LDAP objects within Identity Management.
21.10. Removing a member from a user group using IdM CLI
Follow this procedure to remove a member from a user group using IdM CLI.
Prerequisites
- You must be logged in as the administrator. For details, see Using kinit to log in to IdM manually.
Procedure
-
Optional. Use the
ipa group-showcommand to confirm that the group includes the member you want to remove. Remove a member from a user group by using the
ipa group-remove-membercommand.Specify members to remove using these options:
-
--usersremoves an IdM user -
--externalremoves a user that exists outside the IdM domain, in the format ofDOMAIN\user_nameoruser_name@domain -
--groupsremoves an IdM user group
For example, to remove user1, user2, and group1 from a group called group_name:
$ ipa group-remove-member group_name --users=user1 --users=user2 --groups=group1
-
21.11. Removing users or groups as member managers from an IdM user group using the IdM CLI
Follow this procedure to remove users or groups as member managers from an IdM user group using the IdM CLI. Member managers can remove users or groups from IdM user groups but cannot change the attributes of a group.
Prerequisites
- You must be logged in as the administrator. For details, see Using kinit to log in to IdM manually.
- You must have the name of the existing member manager user or group you are removing and the name of the group they are managing.
Procedure
Remove a user as a member manager of an IdM user group by using the
ipa group-remove-member-managercommand.For example, to remove the user
testas a member manager ofgroup_a:$ ipa group-remove-member-manager group_a --users=test Group name: group_a GID: 1133400009 Membership managed by groups: group_admins --------------------------- Number of members removed 1 ---------------------------
User
testcan no longer manage members ofgroup_a.Remove a group as a member manager of an IdM user group by using the
ipa group-remove-member-managercommand.For example, to remove the group
group_adminsas a member manager ofgroup_a:$ ipa group-remove-member-manager group_a --groups=group_admins Group name: group_a GID: 1133400009 --------------------------- Number of members removed 1 ---------------------------
Group
group_adminscan no longer manage members ofgroup_a.
After you remove a member manager from a user group, the update may take some time to spread to all clients in your Identity Management environment.
Verification steps
Using the
ipa group-showcommand to verify the user and group were removed as member managers.$ ipa group-show group_a Group name: group_a GID: 1133400009
Additional resources
-
See
ipa group-remove-member-manager --helpfor more details.
21.12. Enabling group merging for local and remote groups in IdM
Groups are either centrally managed, provided by a domain such as Identity Management (IdM) or Active Directory (AD), or they are managed on a local system in the etc/group file. In most cases, users rely on a centrally managed store. However, in some cases software still relies on membership in known groups for managing access control.
If you want to manage groups from a domain controller and from the local etc/group file, you can enable group merging. You can configure your nsswitch.conf file to check both the local files and the remote service. If a group appears in both, the list of member users is combined and returned in a single response.
The steps below describe how to enable group merging for a user, idmuser.
Procedure
Add
[SUCCESS=merge]to the/etc/nsswitch.conffile:# Allow initgroups to default to the setting for group. initgroups: sss [SUCCESS=merge] files
Add the idmuser to IdM:
# ipa user-add idmuser
First name: idm
Last name: user
---------------------
Added user "idmuser"
---------------------
User login: idmuser
First name: idm
Last name: user
Full name: idm user
Display name: idm user
Initials: tu
Home directory: /home/idmuser
GECOS: idm user
Login shell: /bin/sh
Principal name: idmuser@IPA.TEST
Principal alias: idmuser@IPA.TEST
Email address: idmuser@ipa.test
UID: 19000024
GID: 19000024
Password: False
Member of groups: ipausers
Kerberos keys available: False
Verify the GID of the local
audiogroup.$ getent group audio --------------------- audio:x:63
Add the group
audioto IdM:$ ipa group-add audio --gid 63 ------------------- Added group "audio" ------------------- Group name: audio GID: 63
NoteThe GID you define when adding the
audiogroup to IdM must be the same as the GID of the localaudiogroup.Add idmuser user to the IdM
audiogroup:$ ipa group-add-member audio --users=idmuser Group name: audio GID: 63 Member users: idmuser ------------------------- Number of members added 1 -------------------------
Verification
- Log in as the idmuser.
Verify the idmuser has the local group in their session:
$ id idmuser
uid=1867800003(idmuser) gid=1867800003(idmuser) groups=1867800003(idmuser),63(audio),10(wheel)