
Chapter 3. Mounting NFS shares
As a system administrator, you can mount remote NFS shares on your system to access shared data.
3.10. Getting started with FS-Cache
FS-Cache is a persistent local cache that file systems can use to take data retrieved from over the network and cache it on local disk. This helps minimize network traffic for users accessing data from a file system mounted over the network (for example, NFS).
3.10.1. Overview of the FS-Cache
The following diagram is a high-level illustration of how FS-Cache works:
Figure 3.1. FS-Cache Overview
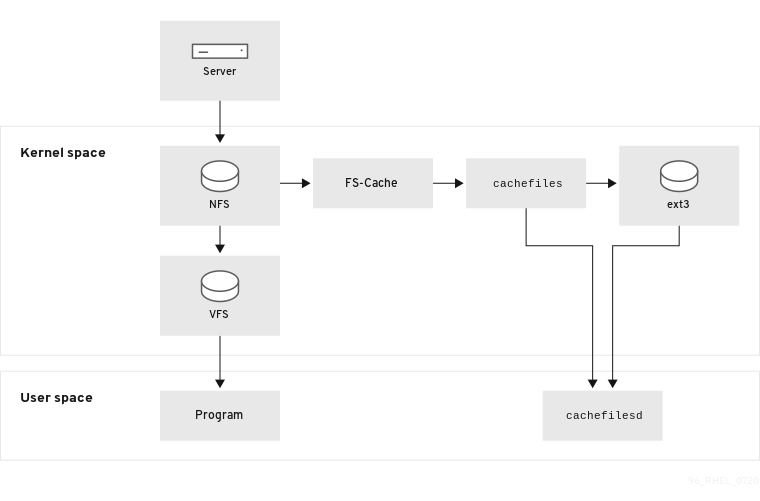
FS-Cache is designed to be as transparent as possible to the users and administrators of a system. Unlike cachefs on Solaris, FS-Cache allows a file system on a server to interact directly with a client’s local cache without creating an overmounted file system. With NFS, a mount option instructs the client to mount the NFS share with FS-cache enabled. The mount point will cause automatic upload for two kernel modules: fscache and cachefiles. The cachefilesd daemon communicates with the kernel modules to implement the cache.
FS-Cache does not alter the basic operation of a file system that works over the network - it merely provides that file system with a persistent place in which it can cache data. For example, a client can still mount an NFS share whether or not FS-Cache is enabled. In addition, cached NFS can handle files that will not fit into the cache (whether individually or collectively) as files can be partially cached and do not have to be read completely up front. FS-Cache also hides all I/O errors that occur in the cache from the client file system driver.
To provide caching services, FS-Cache needs a cache back end. A cache back end is a storage driver configured to provide caching services, which is cachefiles. In this case, FS-Cache requires a mounted block-based file system, such as ext3, that supports bmap and extended attributes as its cache back end.
File systems that support functionalities required by FS-Cache cache back end include the Red Hat Enterprise Linux 9 implementations of the following file systems:
- ext3 (with extended attributes enabled)
- ext4
- XFS
FS-Cache cannot arbitrarily cache any file system, whether through the network or otherwise: the shared file system’s driver must be altered to allow interaction with FS-Cache, data storage/retrieval, and metadata setup and validation. FS-Cache needs indexing keys and coherency data from the cached file system to support persistence: indexing keys to match file system objects to cache objects, and coherency data to determine whether the cache objects are still valid.
In Red Hat Enterprise Linux 9, the cachefilesd package is not installed by default and needs to be installed manually.
3.10.2. Performance guarantee
FS-Cache does not guarantee increased performance. Using a cache incurs a performance penalty: for example, cached NFS shares add disk accesses to cross-network lookups. While FS-Cache tries to be as asynchronous as possible, there are synchronous paths, such as read operations, where this is not possible.
For example, using FS-Cache to cache an NFS share between two computers over an otherwise unladen GigE network likely will not demonstrate any performance improvements on file access. Rather, NFS requests would be satisfied faster from server memory rather than from local disk.
The use of FS-Cache, therefore, is a compromise between various factors. If FS-Cache is being used to cache NFS traffic, for example, it may slow the client down a little, but massively reduce the network and server loading by satisfying read requests locally without consuming network bandwidth.
3.10.3. Using the cache with NFS
NFS will not use the cache unless explicitly instructed. This paragraph shows how to configure an NFS mount by using FS-Cache.
NFS indexes cache contents using NFS file handle, not the file name, which means hard-linked files share the cache correctly.
NFS versions 3, 4.0, 4.1 and 4.2 support caching. However, each version uses different branches for caching.
Prerequisites
The cachefilesd package is installed and running. To ensure it is running, use the following command:
# systemctl start cachefilesd
# systemctl status cachefilesd
The status must be active (running).
Procedure
Mount NFS shares with the following option:
# mount nfs-share:/ /mount/point -o fscAll access to files under
/mount/pointwill go through the cache, unless the file is opened for direct I/O or writing.
3.10.4. Setting up a cache
Currently, Red Hat Enterprise Linux 9 only provides the cachefiles caching back end. The cachefilesd daemon initiates and manages cachefiles. The /etc/cachefilesd.conf file controls how cachefiles provides caching services.
The cache back end works by maintaining a certain amount of free space on the partition hosting the cache. It grows and shrinks the cache in response to other elements of the system using up free space, making it safe to use on the root file system (for example, on a laptop). FS-Cache sets defaults on this behavior, which can be configured via cache cull limits. For more information about configuring cache cull limits, see Cache cull limits configuration.
This procedure shows how to set up a cache.
Prerequisites
The cachefilesd package is installed and service has started successfully. To be sure the service is running, use the following command:
# systemctl start cachefilesd
# systemctl status cachefilesd
The status must be active (running).
Procedure
Configure in a cache back end which directory to use as a cache, use the following parameter:
$ dir /path/to/cacheTypically, the cache back end directory is set in
/etc/cachefilesd.confas/var/cache/fscache, as in:$ dir /var/cache/fscache
If you want to change the cache back end directory, the selinux context must be same as
/var/cache/fscache:# semanage fcontext -a -e /var/cache/fscache /path/to/cache # restorecon -Rv /path/to/cache
- Replace /path/to/cache with the directory name while setting up cache.
If the given commands for setting selinux context did not work, use the following commands:
# semanage permissive -a cachefilesd_t
# semanage permissive -a cachefiles_kernel_t
FS-Cache will store the cache in the file system that hosts
/path/to/cache. On a laptop, it is advisable to use the root file system (/) as the host file system, but for a desktop machine it would be more prudent to mount a disk partition specifically for the cache.The host file system must support user-defined extended attributes. FS-Cache uses these attributes to store coherency maintenance information. To enable user-defined extended attributes on a device with ext3 file systems, enter:
# tune2fs -o user_xattr /dev/device
To enable extended attributes for a file system at the mount time, as an alternative, use the following command:
# mount /dev/device /path/to/cache -o user_xattr
Once the configuration file is in place, start up the
cachefilesdservice:# systemctl start cachefilesd
To configure
cachefilesdto start at boot time, execute the following command as root:# systemctl enable cachefilesd
3.10.5. Configuring NFS cache sharing
There are several potential issues to do with NFS cache sharing. Because the cache is persistent, blocks of data in the cache are indexed on a sequence of four keys:
- Level 1: Server details
- Level 2: Some mount options; security type; FSID; uniquifier
- Level 3: File Handle
- Level 4: Page number in file
To avoid coherency management problems between superblocks, all NFS superblocks that require to cache the data have unique Level 2 keys. Normally, two NFS mounts with same source volume and options share a superblock, and therefore share the caching, even if they mount different directories within that volume.
This is an example how to configure cache sharing with different options.
Procedure
Mount NFS shares with the following commands:
mount home0:/disk0/fred /home/fred -o fsc
mount home0:/disk0/jim /home/jim -o fsc
Here,
/home/fredand/home/jimlikely share the superblock as they have the same options, especially if they come from the same volume/partition on the NFS server (home0).To not share the superblock, use the
mountcommand with the following options:mount home0:/disk0/fred /home/fred -o fsc,rsize=8192 mount home0:/disk0/jim /home/jim -o fsc,rsize=65536
In this case,
/home/fredand/home/jimwill not share the superblock as they have different network access parameters, which are part of the Level 2 key.To cache the contents of the two subtrees (
/home/fred1and/home/fred2) twice with not sharing the superblock, use the following command:mount home0:/disk0/fred /home/fred1 -o fsc,rsize=8192 mount home0:/disk0/fred /home/fred2 -o fsc,rsize=65536
Another way to avoid superblock sharing is to suppress it explicitly with the
nosharecacheparameter. Using the same example:mount home0:/disk0/fred /home/fred -o nosharecache,fsc mount home0:/disk0/jim /home/jim -o nosharecache,fsc
However, in this case only one of the superblocks is permitted to use cache since there is nothing to distinguish the Level 2 keys of
home0:/disk0/fredandhome0:/disk0/jim.To specify the addressing to the superblock, use the
fsc=unique-identifiermount option to set a unique identifier on at least one of the mounts, for example:mount home0:/disk0/fred /home/fred -o nosharecache,fsc mount home0:/disk0/jim /home/jim -o nosharecache,fsc=jim
Here, the unique identifier
jimis added to the Level 2 key used in the cache for/home/jim.
The user can not share caches between superblocks that have different communications or protocol parameters. For example, it is not possible to share between NFSv4.0 and NFSv3 or between NFSv4.1 and NFSv4.2 because they force different superblocks. Also setting parameters, such as the read size (rsize), prevents cache sharing because, again, it forces a different superblock.
3.10.6. Cache limitations with NFS
There are some cache limitations with NFS:
- Opening a file from a shared file system for direct I/O automatically bypasses the cache. This is because this type of access must be direct to the server.
- Opening a file from a shared file system for either direct I/O or writing flushes the cached copy of the file. FS-Cache will not cache the file again until it is no longer opened for direct I/O or writing.
- Furthermore, this release of FS-Cache only caches regular NFS files. FS-Cache will not cache directories, symlinks, device files, FIFOs and sockets.
3.10.7. Cache cull limits configuration
The cachefilesd daemon works by caching remote data from shared file systems to free space on the disk. This could potentially consume all available free space, which could be bad if the disk also contains the root partition. To control this, cachefilesd tries to maintain a certain amount of free space by discarding old objects, such as less-recently accessed objects, from the cache. This behavior is known as cache culling.
Cache culling is done on the basis of the percentage of blocks and the percentage of files available in the underlying file system. There are settings in /etc/cachefilesd.conf which control six limits:
- brun N% (percentage of blocks), frun N% (percentage of files)
- If the amount of free space and the number of available files in the cache rises above both these limits, then culling is turned off.
- bcull N% (percentage of blocks), fcull N% (percentage of files)
- If the amount of available space or the number of files in the cache falls below either of these limits, then culling is started.
- bstop N% (percentage of blocks), fstop N% (percentage of files)
- If the amount of available space or the number of available files in the cache falls below either of these limits, then no further allocation of disk space or files is permitted until culling has raised things above these limits again.
The default value of N for each setting is as follows:
-
brun/frun- 10% -
bcull/fcull- 7% -
bstop/fstop- 3%
When configuring these settings, the following must hold true:
-
0 ≤
bstop<bcull<brun< 100 -
0 ≤
fstop<fcull<frun< 100
These are the percentages of available space and available files and do not appear as 100 minus the percentage displayed by the df program.
Culling depends on both bxxx and fxxx pairs simultaneously; the user can not treat them separately.
3.10.8. Retrieving statistical information from the fscache kernel module
FS-Cache also keeps track of general statistical information. This procedure shows how to get this information.
Procedure
To view the statistical information about FS-Cache, use the following command:
# cat /proc/fs/fscache/stats
FS-Cache statistics includes information about decision points and object counters. For more information, see the following kernel document:
/usr/share/doc/kernel-doc-4.18.0/Documentation/filesystems/caching/fscache.txt
3.10.9. FS-Cache references
This section provides reference information for FS-Cache.
For more information about
cachefilesdand how to configure it, seeman cachefilesdandman cachefilesd.conf. The following kernel documents also provide additional information:-
/usr/share/doc/cachefilesd/README -
/usr/share/man/man5/cachefilesd.conf.5.gz -
/usr/share/man/man8/cachefilesd.8.gz
-
For general information about FS-Cache, including details on its design constraints, available statistics, and capabilities, see the following kernel document:
/usr/share/doc/kernel-doc-4.18.0/Documentation/filesystems/caching/fscache.txt