
Chapter 7. Configuring DNS and realm settings for a trust
Before you connect Identity Management (IdM) and Active Directory (AD) in a trust, you need to ensure that servers see each other and resolve domain names correctly. To configure DNS to allow using domain names between:
- One primary IdM server using integrated DNS server and Certification Authority.
- One AD Domain Controller.
DNS settings require:
- Configuring DNS zones in the IdM server
- Configuring conditional DNS forwarding in AD
- Verifying correctness of the DNS configuration
7.1. Unique primary DNS domains
In Windows, every domain is a Kerberos realm and a DNS domain at the same time. Every domain managed by the domain controller needs to have its own dedicated DNS zone. The same applies when Identity Management (IdM) is trusted by Active Directory (AD) as a forest. AD expects IdM to have its own DNS domain. For the trust setup to work, the DNS domain needs to be dedicated to the Linux environment.
Each system must have its own unique primary DNS domain configured. For example:
-
ad.example.comfor AD andidm.example.comfor IdM -
example.comfor AD andidm.example.comfor IdM -
ad.example.comfor AD andexample.comfor IdM
The most convenient management solution is an environment where each DNS domain is managed by integrated DNS servers, but it is possible to use any other standard-compliant DNS server as well.
- Kerberos realm names as upper-case versions of primary DNS domain names
-
Kerberos realm names must be the same as the primary DNS domain names, with all letters uppercase. For example, if the domain names are
ad.example.comfor AD andidm.example.comfor IdM, the Kerberos realm names are required to beAD.EXAMPLE.COMandIDM.EXAMPLE.COM. - DNS records resolvable from all DNS domains in the trust
- All machines must be able to resolve DNS records from all DNS domains involved in the trust relationship.
- IdM and AD DNS Domains
- Systems joined to IdM can be distributed over multiple DNS domains. Red Hat recommends that you deploy IdM clients in a DNS zone different to the ones owned by Active Directory. The primary IdM DNS domain must have proper SRV records to support AD trusts.
In some environments with trusts between IdM and Active Directory, you can install an IdM client on a host that is part of the Active Directory DNS domain. The host can then benefit from the Linux-focused features of IdM. This is not a recommended configuration and has some limitations. See Configuring IdM clients in an Active Directory DNS domain for more details.
You can acquire a list of the required SRV records specific to your system setup by running the following command:
$ ipa dns-update-system-records --dry-run
The generated list can look for example like this:
IPA DNS records:
  _kerberos-master._tcp.idm.example.com. 86400 IN SRV 0 100 88 server.idm.example.com.
  _kerberos-master._udp.idm.example.com. 86400 IN SRV 0 100 88 server.idm.example.com.
  _kerberos._tcp.idm.example.com. 86400 IN SRV 0 100 88 server.idm.example.com.
  _kerberos._tcp.idm.example.com. 86400 IN SRV 0 100 88 server.idm.example.com.
  _kerberos.idm.example.com. 86400 IN TXT "IDM.EXAMPLE.COM"
  _kpasswd._tcp.idm.example.com. 86400 IN SRV 0 100 464 server.idm.example.com.
  _kpasswd._udp.idm.example.com. 86400 IN SRV 0 100 464 server.idm.example.com.
  _ldap._tcp.idm.example.com. 86400 IN SRV 0 100 389 server.idm.example.com.
  _ipa-ca.idm.example.com. 86400 IN A 192.168.122.2
For other DNS domains that are part of the same IdM realm, it is not required for the SRV records to be configured when the trust to AD is configured. The reason is that AD domain controllers do not use SRV records to discover KDCs but rather base the KDC discovery on name suffix routing information for the trust.
7.2. Configuring a DNS forward zone in the IdM Web UI
Follow this procedure to add a DNS forward zone to the Identity Management (IdM) server by using the IdM Web UI.
With DNS forward zones, you can forward DNS queries for a specific zone to a different DNS server. For example, you can forward DNS queries for the Active Directory (AD) domain to an AD DNS server.
Prerequisites
- Access to the IdM Web UI with a user account that has administrator rights.
- Correctly configured DNS server.
Procedure
- Log in to the IdM Web UI with administrator privileges. For details, see Accessing the IdM Web UI in a web browser.
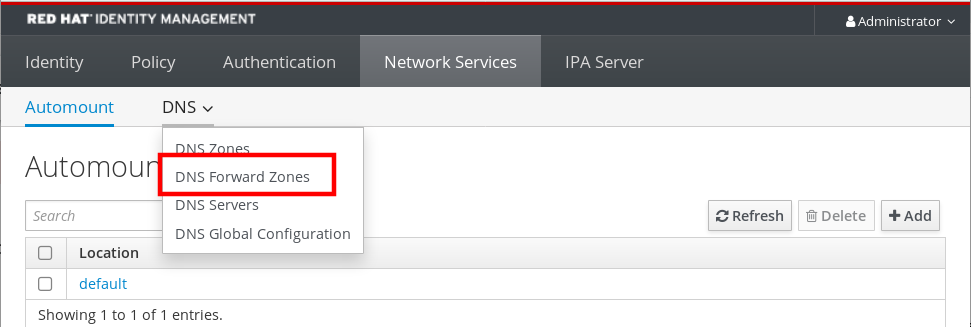
- Click on the Network Services tab.
- Click on the DNS tab.
In the drop down menu, click on the DNS Forward Zones item.
- Click on the Add button.
- In the Add DNS forward zone dialog box, add a zone name.
- In the Zone forwarders item, click on the Add button.
- In the Zone forwarders field, add the IP address of the server for which you want to create the forward zone.
Click on the Add button.

The forwarded zone has been added to the DNS settings and you can verify it in the DNS Forward Zones settings. The Web UI informs you about success with the following pop-up message: DNS Forward Zone successfully added.
The Web UI might display a warning about a DNSSEC validation failure after adding a forward zone to the configuration.
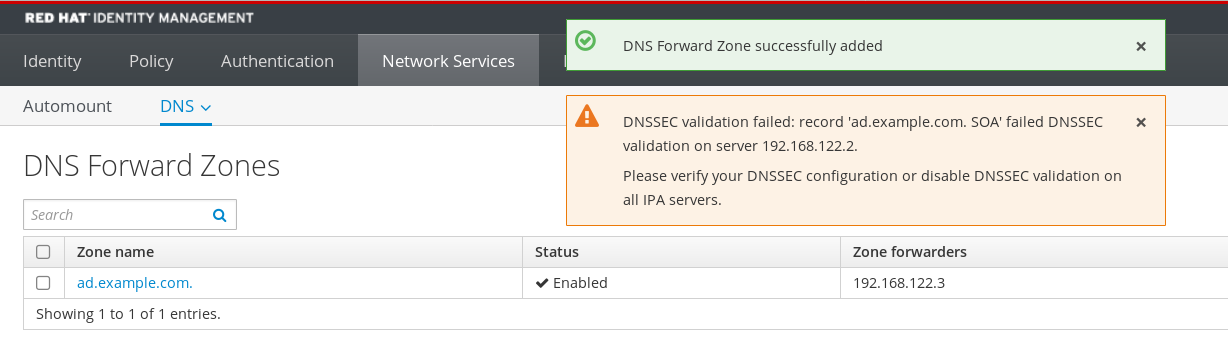
DNSSEC (Domain Name System Security Extensions) secures DNS data with a digital signature to protect DNS from attacks. This service is enabled by default in the IdM server. The warning appears because the remote DNS server does not use DNSSEC. Red Hat recommends that you enable DNSSEC on the remote DNS server.
If you cannot enable DNSSEC validation on the remote server, you can disable DNSSEC in the IdM server:
Choose the appropriate configuration file to edit:
-
If your IdM server is using RHEL 8.0 or RHEL 8.1, open the
/etc/named.conffile. -
If your IdM server is using RHEL 8.2 or later, open the
/etc/named/ipa-options-ext.conffile.
-
If your IdM server is using RHEL 8.0 or RHEL 8.1, open the
Add the following DNSSEC parameters:
dnssec-enable no;
dnssec-validation no;
- Save and close the configuration file.
Restart the DNS service:
# systemctl restart named-pkcs11
Verification steps
Use the
nslookupcommand with the name of the remote DNS server:$ nslookup ad.example.com Server: 192.168.122.2 Address: 192.168.122.2#53 No-authoritative answer: Name: ad.example.com Address: 192.168.122.3
If you configured the domain forwarding correctly, the IP address of the remote DNS server is displayed.
7.3. Configuring a DNS forward zone in the CLI
Follow this procedure to add a new DNS forward zone to the Identity Management (IdM) server using the command line interface (CLI).
With DNS forward zones, you can forward DNS queries for a specific zone to a different DNS server. For example, you can forward DNS queries for the Active Directory (AD) domain to an AD DNS server.
Prerequisites
- Access to the CLI with a user account that has administrator rights.
- Correctly configured DNS server.
Procedure
Create a DNS forward zone for the AD domain, and specify the IP address of the remote DNS server with the
--forwarderoption:# ipa dnsforwardzone-add ad.example.com --forwarder=192.168.122.3 --forward-policy=first
You might see a warning about a DNSSEC validation failure in the /var/log/messages system logs after adding a new forward zone to the configuration:
named-pkcs11[2572]: no valid DS resolving 'host.ad.example.com/A/IN': 192.168.100.25#53
DNSSEC (Domain Name System Security Extensions) secures DNS data with a digital signature to protect DNS from attacks. This service is enabled by default in the IdM server. The warning appears because the remote DNS server does not use DNSSEC. Red Hat recommends that you enable DNSSEC on the remote DNS server.
If you cannot enable DNSSEC validation on the remote server, you can disable DNSSEC in the IdM server:
-
Open the
/etc/named/ipa-options-ext.conffile. Add the following DNSSEC parameters:
dnssec-enable no;
dnssec-validation no;
- Save and close the configuration file.
Restart the DNS service:
# systemctl restart named-pkcs11
Verification steps
Use the
nslookupcommand with the name of the remote DNS server:$ nslookup ad.example.com Server: 192.168.122.2 Address: 192.168.122.2#53 No-authoritative answer: Name: ad.example.com Address: 192.168.122.3
If the domain forwarding is configured correctly, the
nslookuprequest displays an IP address of the remote DNS server.
7.4. Configuring DNS forwarding in AD
Follow this procedure to set up a DNS forwarding in Active Directory (AD) for the Identity Management (IdM) server.
Prerequisites
- Windows Server with AD installed.
- DNS port open on both servers.
Procedure
- Log in to the Windows Server.
- Open Server Manager.
- Open DNS Manager.
In Conditional Forwarders, add a new conditional forwarder with:
- The IdM server IP address
-
A fully qualified domain name, for example,
server.idm.example.com
- Save the settings.
7.5. Verifying the DNS configuration
Before configuring trust, verify that the Identity Management (IdM) and Active Directory (AD) servers can resolve themselves and each other.
Prerequisites
- You need to be logged in with sudo permissions.
Procedure
Run a DNS query for the Kerberos over UDP and LDAP over TCP service records.
[admin@server ~]# dig +short -t SRV _kerberos._udp.idm.example.com.
0 100 88 server.idm.example.com.

[admin@server ~]# dig +short -t SRV _ldap._tcp.idm.example.com.
0 100 389 server.idm.example.com.
The commands are expected to list all IdM servers.
Run a DNS query for the TXT record with the IdM Kerberos realm name. The obtained value is expected to match the Kerberos realm you specified when installing IdM.
[admin@server ~]# dig +short -t TXT _kerberos.idm.example.com.
"IDM.EXAMPLE.COM"
If the previous steps did not return all the expected records, update the DNS configuration with the missing records:
If your IdM environment uses an integrated DNS server, enter the
ipa dns-update-system-recordscommand without any options to update your system records:[admin@server ~]$ ipa dns-update-system-records
If your IdM environment does not use an integrated DNS server:
On the IdM server, export the IdM DNS records into a file:
[admin@server ~]$ ipa dns-update-system-records --dry-run --out dns_records_file.nsupdate
The command creates a file named dns_records_file.nsupdate with the relevant IdM DNS records.
-
Submit a DNS update request to your DNS server using the
nsupdateutility and the dns_records_file.nsupdate file. For more information, see Updating External DNS Records Using nsupdate in RHEL 7 documentation. Alternatively, refer to your DNS server documentation for adding DNS records.
Verify that IdM is able to resolve service records for AD with a command that runs a DNS query for Kerberos and LDAP over TCP service records:
[admin@server ~]# dig +short -t SRV _kerberos._tcp.dc._msdcs.ad.example.com.
0 100 88 addc1.ad.example.com.

[admin@server ~]# dig +short -t SRV _ldap._tcp.dc._msdcs.ad.example.com.
0 100 389 addc1.ad.example.com.