
Chapter 17. Optimizing virtual machine performance
Virtual machines (VMs) always experience some degree of performance deterioration in comparison to the host. The following sections explain the reasons for this deterioration and provide instructions on how to minimize the performance impact of virtualization in RHEL 9, so that your hardware infrastructure resources can be used as efficiently as possible.
17.1. What influences virtual machine performance
VMs are run as user-space processes on the host. The hypervisor therefore needs to convert the host’s system resources so that the VMs can use them. As a consequence, a portion of the resources is consumed by the conversion, and the VM therefore cannot achieve the same performance efficiency as the host.
The impact of virtualization on system performance
More specific reasons for VM performance loss include:
- Virtual CPUs (vCPUs) are implemented as threads on the host, handled by the Linux scheduler.
- VMs do not automatically inherit optimization features, such as NUMA or huge pages, from the host kernel.
- Disk and network I/O settings of the host might have a significant performance impact on the VM.
- Network traffic typically travels to a VM through a software-based bridge.
- Depending on the host devices and their models, there might be significant overhead due to emulation of particular hardware.
The severity of the virtualization impact on the VM performance is influenced by a variety factors, which include:
- The number of concurrently running VMs.
- The amount of virtual devices used by each VM.
- The device types used by the VMs.
Reducing VM performance loss
RHEL 9 provides a number of features you can use to reduce the negative performance effects of virtualization. Notably:
-
The
TuneDservice can automatically optimize the resource distribution and performance of your VMs. - Block I/O tuning can improve the performances of the VM’s block devices, such as disks.
- NUMA tuning can increase vCPU performance.
- Virtual networking can be optimized in various ways.
Tuning VM performance can have adverse effects on other virtualization functions. For example, it can make migrating the modified VM more difficult.
17.2. Optimizing virtual machine performance by using TuneD
The TuneD utility is a tuning profile delivery mechanism that adapts RHEL for certain workload characteristics, such as requirements for CPU-intensive tasks or storage-network throughput responsiveness. It provides a number of tuning profiles that are pre-configured to enhance performance and reduce power consumption in a number of specific use cases. You can edit these profiles or create new profiles to create performance solutions tailored to your environment, including virtualized environments.
To optimize RHEL 9 for virtualization, use the following profiles:
-
For RHEL 9 virtual machines, use the virtual-guest profile. It is based on the generally applicable
throughput-performanceprofile, but also decreases the swappiness of virtual memory. - For RHEL 9 virtualization hosts, use the virtual-host profile. This enables more aggressive writeback of dirty memory pages, which benefits the host performance.
Prerequisites
-
The
TuneDservice is installed and enabled.
Procedure
To enable a specific TuneD profile:
List the available
TuneDprofiles.# tuned-adm list Available profiles: - balanced - General non-specialized TuneD profile - desktop - Optimize for the desktop use-case [...] - virtual-guest - Optimize for running inside a virtual guest - virtual-host - Optimize for running KVM guests Current active profile: balanced
Optional: Create a new
TuneDprofile or edit an existingTuneDprofile.For more information, see Customizing TuneD profiles.
Activate a
TuneDprofile.# tuned-adm profile selected-profileTo optimize a virtualization host, use the virtual-host profile.
# tuned-adm profile virtual-hostOn a RHEL guest operating system, use the virtual-guest profile.
# tuned-adm profile virtual-guest
Additional resources
17.3. Optimizing libvirt daemons
The libvirt virtualization suite works as a management layer for the RHEL hypervisor, and your libvirt configuration significantly impacts your virtualization host. Notably, RHEL 9 contains two different types of libvirt daemons, monolithic or modular, and which type of daemons you use affects how granularly you can configure individual virtualization drivers.
17.3.1. Types of libvirt daemons
RHEL 9 supports the following libvirt daemon types:
- Monolithic libvirt
The traditional
libvirtdaemon,libvirtd, controls a wide variety of virtualization drivers, by using a single configuration file -/etc/libvirt/libvirtd.conf.As such,
libvirtdallows for centralized hypervisor configuration, but may use system resources inefficiently. Therefore,libvirtdwill become unsupported in a future major release of RHEL.However, if you updated to RHEL 9 from RHEL 8, your host still uses
libvirtdby default.- Modular libvirt
Newly introduced in RHEL 9, modular
libvirtprovides a specific daemon for each virtualization driver. These include the following:- virtqemud - A primary daemon for hypervisor management
- virtinterfaced - A secondary daemon for host NIC management
- virtnetworkd - A secondary daemon for virtual network management
- virtnodedevd - A secondary daemon for host physical device management
- virtnwfilterd - A secondary daemon for host firewall management
- virtsecretd - A secondary daemon for host secret management
- virtstoraged - A secondary daemon for storage management
Each of the daemons has a separate configuration file - for example
/etc/libvirt/virtqemud.conf. As such, modularlibvirtdaemons provide better options for fine-tuninglibvirtresource management.If you performed a fresh install of RHEL 9, modular
libvirtis configured by default.
Next steps
-
If your RHEL 9 uses
libvirtd, Red Hat recommends switching to modular daemons. For instructions, see Enabling modular libvirt daemons.
17.3.2. Enabling modular libvirt daemons
In RHEL 9, the libvirt library uses modular daemons that handle individual virtualization driver sets on your host. For example, the virtqemud daemon handles QEMU drivers.
If you performed a fresh install of a RHEL 9 host, your hypervisor uses modular libvirt daemons by default. However, if you upgraded your host from RHEL 8 to RHEL 9, your hypervisor uses the monolithic libvirtd daemon, which is the default in RHEL 8.
If that is the case, Red Hat recommends enabling the modular libvirt daemons instead, because they provide better options for fine-tuning libvirt resource management. In addition, libvirtd will become unsupported in a future major release of RHEL.
Prerequisites
Your hypervisor is using the monolithic
libvirtdservice.# systemctl is-active libvirtd.service activeIf this command displays
active, you are usinglibvirtd.- Your virtual machines are shut down.
Procedure
Stop
libvirtdand its sockets.$ systemctl stop libvirtd.service $ systemctl stop libvirtd{,-ro,-admin,-tcp,-tls}.socket
Disable
libvirtdto prevent it from starting on boot.$ systemctl disable libvirtd.service $ systemctl disable libvirtd{,-ro,-admin,-tcp,-tls}.socket
Enable the modular
libvirtdaemons.# for drv in qemu interface network nodedev nwfilter secret storage; do systemctl unmask virt${drv}d.service; systemctl unmask virt${drv}d{,-ro,-admin}.socket; systemctl enable virt${drv}d.service; systemctl enable virt${drv}d{,-ro,-admin}.socket; doneStart the sockets for the modular daemons.
# for drv in qemu network nodedev nwfilter secret storage; do systemctl start virt${drv}d{,-ro,-admin}.socket; doneOptional: If you require connecting to your host from remote hosts, enable and start the virtualization proxy daemon.
Check whether the
libvirtd-tls.socketservice is enabled on your system.# cat /etc/libvirt/libvirt.conf | grep listen_tls listen_tls = 0If
libvirtd-tls.socketis not enabled (listen_tls = 0), activatevirtproxydas follows:# systemctl unmask virtproxyd.service # systemctl unmask virtproxyd{,-ro,-admin}.socket # systemctl enable virtproxyd.service # systemctl enable virtproxyd{,-ro,-admin}.socket # systemctl start virtproxyd{,-ro,-admin}.socket
If
libvirtd-tls.socketis enabled (listen_tls = 1), activatevirtproxydas follows:# systemctl unmask virtproxyd.service # systemctl unmask virtproxyd{,-ro,-admin,-tls}.socket # systemctl enable virtproxyd.service # systemctl enable virtproxyd{,-ro,-admin,-tls}.socket # systemctl start virtproxyd{,-ro,-admin,-tls}.socket
To enable the TLS socket of
virtproxyd, your host must have TLS certificates configured to work withlibvirt. For more information, see the Upstream libvirt documentation.
Verification
Activate the enabled virtualization daemons.
# virsh uri
qemu:///system
Verify that your host is using the
virtqemudmodular daemon.# systemctl is-active virtqemud.service activeIf the status is
active, you have successfully enabled modularlibvirtdaemons.
17.4. Configuring virtual machine memory
To improve the performance of a virtual machine (VM), you can assign additional host RAM to the VM. Similarly, you can decrease the amount of memory allocated to a VM so the host memory can be allocated to other VMs or tasks.
To perform these actions, you can use the web console or the command-line interface.
17.4.1. Adding and removing virtual machine memory by using the web console
To improve the performance of a virtual machine (VM) or to free up the host resources it is using, you can use the web console to adjust amount of memory allocated to the VM.
Prerequisites
The guest OS is running the memory balloon drivers. To verify this is the case:
Ensure the VM’s configuration includes the
memballoondevice:# virsh dumpxml testguest | grep memballoon <memballoon model='virtio'> </memballoon>If this commands displays any output and the model is not set to
none, thememballoondevice is present.Ensure the balloon drivers are running in the guest OS.
-
In Windows guests, the drivers are installed as a part of the
virtio-windriver package. For instructions, see Installing KVM paravirtualized drivers for Windows virtual machines. -
In Linux guests, the drivers are generally included by default and activate when the
memballoondevice is present.
-
In Windows guests, the drivers are installed as a part of the
- The web console VM plug-in is installed on your system.
Procedure
Optional: Obtain the information about the maximum memory and currently used memory for a VM. This will serve as a baseline for your changes, and also for verification.
# virsh dominfo testguest
Max memory:     2097152 KiB
Used memory:    2097152 KiB
In the interface, click the VM whose information you want to see.
A new page opens with an Overview section with basic information about the selected VM and a Console section to access the VM’s graphical interface.
Click next to the
Memoryline in the Overview pane.The
Memory Adjustmentdialog appears.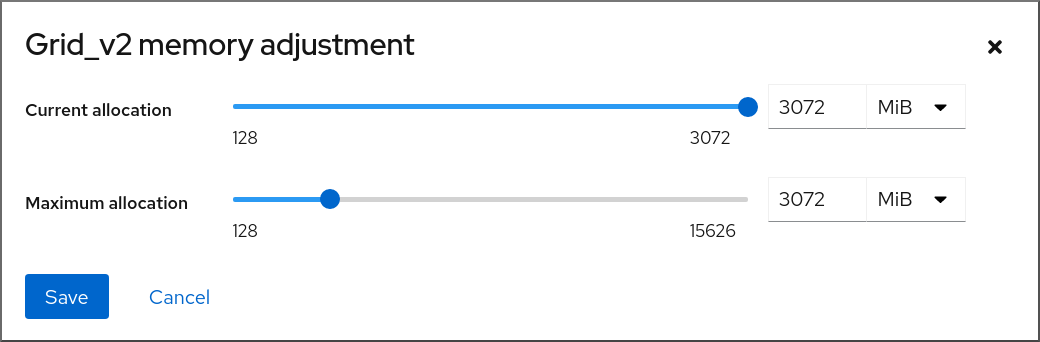
Configure the virtual CPUs for the selected VM.
Maximum allocation - Sets the maximum amount of host memory that the VM can use for its processes. You can specify the maximum memory when creating the VM or increase it later. You can specify memory as multiples of MiB or GiB.
Adjusting maximum memory allocation is only possible on a shut-off VM.
Current allocation - Sets the actual amount of memory allocated to the VM. This value can be less than the Maximum allocation but cannot exceed it. You can adjust the value to regulate the memory available to the VM for its processes. You can specify memory as multiples of MiB or GiB.
If you do not specify this value, the default allocation is the Maximum allocation value.
Click .
The memory allocation of the VM is adjusted.
17.4.2. Adding and removing virtual machine memory by using the command-line interface
To improve the performance of a virtual machine (VM) or to free up the host resources it is using, you can use the CLI to adjust amount of memory allocated to the VM.
Prerequisites
The guest OS is running the memory balloon drivers. To verify this is the case:
Ensure the VM’s configuration includes the
memballoondevice:# virsh dumpxml testguest | grep memballoon <memballoon model='virtio'> </memballoon>If this commands displays any output and the model is not set to
none, thememballoondevice is present.Ensure the ballon drivers are running in the guest OS.
-
In Windows guests, the drivers are installed as a part of the
virtio-windriver package. For instructions, see Installing KVM paravirtualized drivers for Windows virtual machines. -
In Linux guests, the drivers are generally included by default and activate when the
memballoondevice is present.
-
In Windows guests, the drivers are installed as a part of the
Procedure
Optional: Obtain the information about the maximum memory and currently used memory for a VM. This will serve as a baseline for your changes, and also for verification.
# virsh dominfo testguest
Max memory:     2097152 KiB
Used memory:    2097152 KiB
Adjust the maximum memory allocated to a VM. Increasing this value improves the performance potential of the VM, and reducing the value lowers the performance footprint the VM has on your host. Note that this change can only be performed on a shut-off VM, so adjusting a running VM requires a reboot to take effect.
For example, to change the maximum memory that the testguest VM can use to 4096 MiB:
# virt-xml testguest --edit --memory memory=4096,currentMemory=4096
Domain 'testguest' defined successfully.
Changes will take effect after the domain is fully powered off.
To increase the maximum memory of a running VM, you can attach a memory device to the VM. This is also referred to as memory hot plug. For details, see Attaching memory devices to virtual machines.
WarningRemoving memory devices from a running VM (also referred as a memory hot unplug) is not supported, and highly discouraged by Red Hat.
Optional: You can also adjust the memory currently used by the VM, up to the maximum allocation. This regulates the memory load that the VM has on the host until the next reboot, without changing the maximum VM allocation.
# virsh setmem testguest --current 2048
Verification
Confirm that the memory used by the VM has been updated:
# virsh dominfo testguest
Max memory:     4194304 KiB
Used memory:    2097152 KiB
Optional: If you adjusted the current VM memory, you can obtain the memory balloon statistics of the VM to evaluate how effectively it regulates its memory use.
 # virsh domstats --balloon testguest
Domain: 'testguest'
  balloon.current=365624
  balloon.maximum=4194304
  balloon.swap_in=0
  balloon.swap_out=0
  balloon.major_fault=306
  balloon.minor_fault=156117
  balloon.unused=3834448
  balloon.available=4035008
  balloon.usable=3746340
  balloon.last-update=1587971682
  balloon.disk_caches=75444
  balloon.hugetlb_pgalloc=0
  balloon.hugetlb_pgfail=0
  balloon.rss=1005456
17.4.3. Adding and removing virtual machine memory by using virtio-mem
As a Technology Preview, RHEL 9 provides the virtio-mem paravirtualized memory device. virtio-mem can be used to dynamically add or remove host memory in virtual machines (VMs). For example, you can use this device to move memory resources between running VMs or to resize VM memory in cloud setups based on your current requirements.
virtio-mem is included in RHEL 9 as a Technology Preview, which means it is not supported.
17.4.3.1. Prerequisites
- The host has Intel 64 or AMD64 CPU architecture.
- The host and VMs use RHEL 9 as the operating system.
17.4.3.2. Overview of virtio-mem
virtio-mem is a paravirtualized memory device that can be used to dynamically add or remove host memory in virtual machines (VMs). For example, you can use this device to move memory resources between running VMs or to resize VM memory in cloud setups based on your current requirements.
Using virtio-mem you can increase the memory of a VM beyond its initial size, and shrink it back to its original size, in units that can have the size of 2 to several hundred mebibytes (MiBs). Note, however, that virtio-mem also relies on a specific guest operating system configuration, especially to reliably unplug memory.
virtio-mem is included in RHEL 9 as a Technology Preview, which means it is not supported.
virtio-mem Technology Preview limitations
virtio-mem is currently not compatible with the following features:
- Using pre-allocation of memory on the host
- Using HugePages on the host
- Using memory locking for real-time applications on the host
- Using encrypted virtualization on the host
- Dynamic memory metadata allocation in the host
-
Combining
virtio-memwithmemballooninflation and deflation on the host -
Unplugging the
virtio-memdevice from a VM -
Unloading or reloading the
virtio_memdriver in a VM -
Hibernating or suspending a VM with the
virtio_memdriver loaded
Memory onlining in virtual machines
When attaching memory to a running RHEL VM (also known as memory hot-plugging), you must set the hot-plugged memory to an online state in the VM operating system. Otherwise, the system will not be able to use the memory.
The following table summarizes the main considerations when choosing between the available memory onlining configurations.
Table 17.1. Comparison of memory onlining configurations
| Configuration name | Unplugging memory from a VM | A risk of creating a memory zone imbalance | A potential use case | Memory requirements of the intended workload |
|---|---|---|---|---|
|
| Hot-plugged memory can be reliably unplugged. | Yes | Hot-plugging a comparatively small amount of memory | Mostly user-space memory |
|
| Movable portions of hot-plugged memory can be reliably unplugged. | Minimal | Hot-plugging a large amount of memory | Mostly user-space memory |
|
| Hot-plugged memory cannot be reliably unplugged. | No | Unreliable memory unplugging is acceptable. | User-space or kernel-space memory |
A zone imbalance is a lack of available memory pages in one of the Linux memory zones. A zone imbalance can negatively impact the system performance. For example, the kernel might crash if it runs out of free memory for unmovable allocations. Usually, movable allocations contain mostly user-space memory pages and unmovable allocations contain mostly kernel-space memory pages.
For a more detailed explanation of memory onlining considerations, see: Onlining and Offlining Memory Blocks and Zone Imbalances
17.4.3.3. Configuring memory onlining in virtual machines
Before using virtio-mem to attach memory to a running virtual machine (also known as memory hot-plugging), you must configure the virtual machine (VM) operating system to automatically set the hot-plugged memory to an online state. Otherwise, the guest operating system is not able to use the additional memory. You can choose from one of the following configurations for memory onlining:
-
online_movable -
online_kernel -
auto-movable
To learn about differences between these configurations, see: Memory onlining in virtual machines
Memory onlining is configured with udev rules by default in RHEL. However, when using virtio-mem, it is recommended to configure memory onlining directly in the kernel.
virtio-mem is included in RHEL 9 as a Technology Preview, which means it is not supported.
Prerequisites
- The host has Intel 64 or AMD64 CPU architecture.
- The host and VMs use RHEL 9 as the operating system.
Procedure
To set memory onlining to use the
online_movableconfiguration in the VM:Set the
memhp_default_statekernel command line parameter toonline_movable:# grubby --update-kernel=ALL --remove-args=memhp_default_state --args=memhp_default_state=online_movable- Reboot the VM.
To set memory onlining to use the
online_kernelconfiguration in the VM:Set the
memhp_default_statekernel command line parameter toonline_kernel:# grubby --update-kernel=ALL --remove-args=memhp_default_state --args=memhp_default_state=online_kernel- Reboot the VM.
To use the
auto-movablememory onlining policy in the VM:Set the
memhp_default_statekernel command line parameter toonline:# grubby --update-kernel=ALL --remove-args=memhp_default_state --args=memhp_default_state=onlineSet the
memory_hotplug.online_policykernel command line parameter toauto-movable:# grubby --update-kernel=ALL --remove-args="memory_hotplug.online_policy" --args=memory_hotplug.online_policy=auto-movableOptional: To further tune the
auto-movableonlining policy, change thememory_hotplug.auto_movable_ratioandmemory_hotplug.auto_movable_numa_awareparameters:# grubby --update-kernel=ALL --remove-args="memory_hotplug.auto_movable_ratio" --args=memory_hotplug.auto_movable_ratio=<percentage> # grubby --update-kernel=ALL --remove-args="memory_hotplug.memory_auto_movable_numa_aware" --args=memory_hotplug.auto_movable_numa_aware=<y/n>
-
The
memory_hotplug.auto_movable_ratio parametersets the maximum ratio of memory only available for movable allocations compared to memory available for any allocations. The ratio is expressed in percents and the default value is: 301 (%), which is a 3:1 ratio. The
memory_hotplug.auto_movable_numa_awareparameter controls whether thememory_hotplug.auto_movable_ratioparameter applies to memory across all available NUMA nodes or only for memory within a single NUMA node. The default value is: y (yes)For example, if the maximum ratio is set to 301% and the
memory_hotplug.auto_movable_numa_awareis set to y (yes), than the 3:1 ratio is applied even within the NUMA node with the attachedvirtio-memdevice. If the parameter is set to n (no), the maximum 3:1 ratio is applied only for all the NUMA nodes as a whole.Additionally, if the ratio is not exceeded, the newly hot-plugged memory will be available only for movable allocations. Otherwise, the newly hot-plugged memory will be available for both movable and unmovable allocations.
-
The
- Reboot the VM.
Verification
To see if the
online_movableconfiguration has been set correctly, check the current value of thememhp_default_statekernel parameter:# cat /sys/devices/system/memory/auto_online_blocks online_movableTo see if the
online_kernelconfiguration has been set correctly, check the current value of thememhp_default_statekernel parameter:# cat /sys/devices/system/memory/auto_online_blocks online_kernelTo see if the
auto-movableconfiguration has been set correctly, check the following kernel parameters:memhp_default_state:# cat /sys/devices/system/memory/auto_online_blocks onlinememory_hotplug.online_policy:# cat /sys/module/memory_hotplug/parameters/online_policy auto-movablememory_hotplug.auto_movable_ratio:# cat /sys/module/memory_hotplug/parameters/auto_movable_ratio 301memory_hotplug.auto_movable_numa_aware:# cat /sys/module/memory_hotplug/parameters/auto_movable_numa_aware y
17.4.3.4. Attaching a virtio-mem device to virtual machines
To attach additional memory to a running virtual machine (also known as memory hot-plugging) and afterwards be able to resize the hot-plugged memory, you can use a virtio-mem device. Specifically, you can use libvirt XML configuration files and virsh commands to define and attach virtio-mem devices to virtual machines (VMs).
virtio-mem is included in RHEL 9 as a Technology Preview, which means it is not supported.
Prerequisites
- The host has Intel 64 or AMD64 CPU architecture.
- The host and VMs use RHEL 9 as the operating system.
- The VM has memory onlining configured. For instructions, see: Configuring memory onlining in virtual machines
Procedure
Ensure the XML configuration of the target VM includes the
maxMemoryparameter:# virsh edit testguest1 <domain type='kvm'> <name>testguest1</name> ... <maxMemory slots='2' unit='GiB'>128</maxMemory> ... </domain>
In this example, the XML configuration of the
testguest1VM defines amaxMemoryparameter with 2 slots and 128 gibibyte (GiB) size. ThemaxMemorysize specifies the maximum memory the VM can use, which includes both initial and hot-plugged memory. Currently, you must reserve one slot for each attachedvirtio-memdevice.Ensure the XML configuration of the target VM has at least one NUMA node defined, for example:
# virsh edit testguest1

<domain type='kvm'>
  <name>testguest1</name>
  ...
  <vcpu placement='static'>8</vcpu>
  ...
  <cpu ...>
    <numa>
      <cell id='0' cpus='0-7' memory='16' unit='GiB'/>
    </numa>
  ...
</domain>
In this example, one NUMA node with 16 GiB of initial memory is defined and is assigned to 8 CPUs in the
testguest1VM. To use memory devices in a VM, you must have at least one NUMA node defined.Create and open an XML file to define
virtio-memdevices on the host, for example:# vim virtio-mem-device.xmlAdd XML definitions of
virtio-memdevices to the file and save it:<memory model='virtio-mem'> <target> <size unit='GiB'>48</size> <node>0</node> <block unit='MiB'>2</block> <requested unit='GiB'>16</requested> <current unit='GiB'>16</current> </target> <alias name='ua-virtiomem0'/> <address type='pci' domain='0x0000' bus='0x00' slot='0x02' function='0x0'/> </memory> <memory model='virtio-mem'> <target> <size unit='GiB'>48</size> <node>1</node> <block unit='MiB'>2</block> <requested unit='GiB'>0</requested> <current unit='GiB'>0</current> </target> <alias name='ua-virtiomem1'/> <address type='pci' domain='0x0000' bus='0x00' slot='0x04' function='0x0'/> </memory>In this example, two
virtio-memdevices are defined with the following parameters:-
size: This is the maximum size of the device. In the example, it is 48 GiB. Thesizemust be a multiple of theblocksize. -
node: This is the assigned vNUMA node for thevirtio-memdevice. -
block: This is the block size of the device. It must be at least the size of the Transparent Huge Page (THP), which is 2 MiB on Intel 64 or AMD64 CPU architecture. The 2 MiB block size on Intel 64 or AMD64 architecture is usually a good default choice. When usingvirtio-memwith Virtual Function I/O (VFIO) or mediated devices (mdev), the total number of blocks across allvirtio-memdevices must not be larger than 32768, otherwise the plugging of RAM might fail. -
requested: This is the amount of memory you attach to the VM with thevirtio-memdevice. However, it is just a request towards the VM and it might not be resolved successfully, for example if the VM is not properly configured. Therequestedsize must be a multiple of theblocksize and cannot exceed the maximum definedsize. -
current: This represents the current size thevirtio-memdevice provides to the VM. Thecurrentsize can differ from therequestedsize, for example when requests cannot be completed or when rebooting the VM. alias: This is an optional user-defined alias that you can use to specify the intendedvirtio-memdevice, for example when editing the device with libvirt commands. All user-defined aliases in libvirt must start with the "ua-" prefix.Apart from these specific parameters,
libvirthandles thevirtio-memdevice like any other PCI device. For more information on managing PCI devices attached to VMs, see: Managing virtual devices
-
Use the XML file to attach the defined
virtio-memdevices to a VM. For example, to permanently attach the two devices defined in thevirtio-mem-device.xmlto the runningtestguest1VM:# virsh attach-device testguest1 virtio-mem-device.xml --live --configThe
--liveoption attaches the device to a running VM only, without persistence between boots. The--configoption makes the configuration changes persistent. You can also attach the device to a shutdown VM without the--liveoption.Optional: To dynamically change the
requestedsize of avirtio-memdevice attached to a running VM, use thevirsh update-memory-devicecommand:# virsh update-memory-device testguest1 --alias ua-virtiomem0 --requested-size 4GiBIn this example:
-
testguest1is the VM you want to update. -
--alias ua-virtiomem0is thevirtio-memdevice specified by a previously defined alias. -
--requested-size 4GiBchanges therequestedsize of thevirtio-memdevice to 4 GiB.
-
Verification
In the VM, check the available RAM and see if the total amount now includes the hot-plugged memory:
# free -h

        total    used    free   shared  buff/cache   available
Mem:    31Gi     5.5Gi   14Gi   1.3Gi   11Gi         23Gi
Swap:   8.0Gi    0B      8.0Gi
# numactl -H available: 1 nodes (0) node 0 cpus: 0 1 2 3 4 5 6 7 node 0 size: 29564 MB node 0 free: 13351 MB node distances: node 0 0: 10The current amount of plugged-in RAM can be also viewed on the host by displaying the XML configuration of the running VM:
# virsh dumpxml testguest1

<domain type='kvm'>
  <name>testguest1</name>
  ...
  <currentMemory unit='GiB'>31</currentMemory>
  ...
  <memory model='virtio-mem'>
      <target>
        <size unit='GiB'>48</size>
        <node>0</node>
        <block unit='MiB'>2</block>
        <requested unit='GiB'>16</requested>
        <current unit='GiB'>16</current>
      </target>
      <alias name='ua-virtiomem0'/>
      <address type='pci' domain='0x0000' bus='0x08' slot='0x00' function='0x0'/>
  ...
</domain>
In this example:
-
<currentMemory unit='GiB'>31</currentMemory>represents the total RAM available in the VM from all sources. -
<current unit='GiB'>16</current>represents the current size of the plugged-in RAM provided by thevirtio-memdevice.
-
Additional resources
17.4.4. Additional resources
17.5. Optimizing virtual machine I/O performance
The input and output (I/O) capabilities of a virtual machine (VM) can significantly limit the VM’s overall efficiency. To address this, you can optimize a VM’s I/O by configuring block I/O parameters.
17.5.1. Tuning block I/O in virtual machines
When multiple block devices are being used by one or more VMs, it might be important to adjust the I/O priority of specific virtual devices by modifying their I/O weights.
Increasing the I/O weight of a device increases its priority for I/O bandwidth, and therefore provides it with more host resources. Similarly, reducing a device’s weight makes it consume less host resources.
Each device’s weight value must be within the 100 to 1000 range. Alternatively, the value can be 0, which removes that device from per-device listings.
Procedure
To display and set a VM’s block I/O parameters:
Display the current
<blkio>parameters for a VM:# virsh dumpxml VM-name<domain> [...] <blkiotune> <weight>800</weight> <device> <path>/dev/sda</path> <weight>1000</weight> </device> <device> <path>/dev/sdb</path> <weight>500</weight> </device> </blkiotune> [...] </domain>Edit the I/O weight of a specified device:
# virsh blkiotune VM-name --device-weights device, I/O-weightFor example, the following changes the weight of the /dev/sda device in the liftrul VM to 500.
# virsh blkiotune liftbrul --device-weights /dev/sda, 500
17.5.2. Disk I/O throttling in virtual machines
When several VMs are running simultaneously, they can interfere with system performance by using excessive disk I/O. Disk I/O throttling in KVM virtualization provides the ability to set a limit on disk I/O requests sent from the VMs to the host machine. This can prevent a VM from over-utilizing shared resources and impacting the performance of other VMs.
To enable disk I/O throttling, set a limit on disk I/O requests sent from each block device attached to VMs to the host machine.
Procedure
Use the
virsh domblklistcommand to list the names of all the disk devices on a specified VM.# virsh domblklist rollin-coal Target Source ------------------------------------------------ vda /var/lib/libvirt/images/rollin-coal.qcow2 sda - sdb /home/horridly-demanding-processes.isoFind the host block device where the virtual disk that you want to throttle is mounted.
For example, if you want to throttle the
sdbvirtual disk from the previous step, the following output shows that the disk is mounted on the/dev/nvme0n1p3partition.$ lsblk NAME MAJ:MIN RM SIZE RO TYPE MOUNTPOINT zram0 252:0 0 4G 0 disk [SWAP] nvme0n1 259:0 0 238.5G 0 disk ├─nvme0n1p1 259:1 0 600M 0 part /boot/efi ├─nvme0n1p2 259:2 0 1G 0 part /boot └─nvme0n1p3 259:3 0 236.9G 0 part └─luks-a1123911-6f37-463c-b4eb-fxzy1ac12fea 253:0 0 236.9G 0 crypt /homeSet I/O limits for the block device by using the
virsh blkiotunecommand.# virsh blkiotune VM-name --parameter device,limitThe following example throttles the
sdbdisk on therollin-coalVM to 1000 read and write I/O operations per second and to 50 MB per second read and write throughput.# virsh blkiotune rollin-coal --device-read-iops-sec /dev/nvme0n1p3,1000 --device-write-iops-sec /dev/nvme0n1p3,1000 --device-write-bytes-sec /dev/nvme0n1p3,52428800 --device-read-bytes-sec /dev/nvme0n1p3,52428800
Additional information
- Disk I/O throttling can be useful in various situations, for example when VMs belonging to different customers are running on the same host, or when quality of service guarantees are given for different VMs. Disk I/O throttling can also be used to simulate slower disks.
- I/O throttling can be applied independently to each block device attached to a VM and supports limits on throughput and I/O operations.
-
Red Hat does not support using the
virsh blkdeviotunecommand to configure I/O throttling in VMs. For more information about unsupported features when using RHEL 9 as a VM host, see Unsupported features in RHEL 9 virtualization.
17.5.3. Enabling multi-queue virtio-scsi
When using virtio-scsi storage devices in your virtual machines (VMs), the multi-queue virtio-scsi feature provides improved storage performance and scalability. It enables each virtual CPU (vCPU) to have a separate queue and interrupt to use without affecting other vCPUs.
Procedure
To enable multi-queue virtio-scsi support for a specific VM, add the following to the VM’s XML configuration, where N is the total number of vCPU queues:
<controller type='scsi' index='0' model='virtio-scsi'>
   <driver queues='N' />
</controller>
17.6. Optimizing virtual machine CPU performance
Much like physical CPUs in host machines, vCPUs are critical to virtual machine (VM) performance. As a result, optimizing vCPUs can have a significant impact on the resource efficiency of your VMs. To optimize your vCPU:
- Adjust how many host CPUs are assigned to the VM. You can do this using the CLI or the web console.
Ensure that the vCPU model is aligned with the CPU model of the host. For example, to set the testguest1 VM to use the CPU model of the host:
# virt-xml testguest1 --edit --cpu host-model- Manage kernel same-page merging (KSM).
If your host machine uses Non-Uniform Memory Access (NUMA), you can also configure NUMA for its VMs. This maps the host’s CPU and memory processes onto the CPU and memory processes of the VM as closely as possible. In effect, NUMA tuning provides the vCPU with a more streamlined access to the system memory allocated to the VM, which can improve the vCPU processing effectiveness.
For details, see Configuring NUMA in a virtual machine and Sample vCPU performance tuning scenario.
17.6.1. Adding and removing virtual CPUs by using the command-line interface
To increase or optimize the CPU performance of a virtual machine (VM), you can add or remove virtual CPUs (vCPUs) assigned to the VM.
When performed on a running VM, this is also referred to as vCPU hot plugging and hot unplugging. However, note that vCPU hot unplug is not supported in RHEL 9, and Red Hat highly discourages its use.
Prerequisites
Optional: View the current state of the vCPUs in the targeted VM. For example, to display the number of vCPUs on the testguest VM:
# virsh vcpucount testguest
maximum      config         4
maximum      live           2
current      config         2
current      live           1
This output indicates that testguest is currently using 1 vCPU, and 1 more vCPu can be hot plugged to it to increase the VM’s performance. However, after reboot, the number of vCPUs testguest uses will change to 2, and it will be possible to hot plug 2 more vCPUs.
Procedure
Adjust the maximum number of vCPUs that can be attached to a VM, which takes effect on the VM’s next boot.
For example, to increase the maximum vCPU count for the testguest VM to 8:
# virsh setvcpus testguest 8 --maximum --configNote that the maximum may be limited by the CPU topology, host hardware, the hypervisor, and other factors.
Adjust the current number of vCPUs attached to a VM, up to the maximum configured in the previous step. For example:
To increase the number of vCPUs attached to the running testguest VM to 4:
# virsh setvcpus testguest 4 --liveThis increases the VM’s performance and host load footprint of testguest until the VM’s next boot.
To permanently decrease the number of vCPUs attached to the testguest VM to 1:
# virsh setvcpus testguest 1 --configThis decreases the VM’s performance and host load footprint of testguest after the VM’s next boot. However, if needed, additional vCPUs can be hot plugged to the VM to temporarily increase its performance.
Verification
Confirm that the current state of vCPU for the VM reflects your changes.
# virsh vcpucount testguest
maximum      config         8
maximum      live           4
current      config         1
current      live           4
Additional resources
17.6.2. Managing virtual CPUs by using the web console
By using the RHEL 9 web console, you can review and configure virtual CPUs used by virtual machines (VMs) to which the web console is connected.
Prerequisites
- The web console VM plug-in is installed on your system.
Procedure
In the interface, click the VM whose information you want to see.
A new page opens with an Overview section with basic information about the selected VM and a Console section to access the VM’s graphical interface.
Click next to the number of vCPUs in the Overview pane.
The vCPU details dialog appears.

Configure the virtual CPUs for the selected VM.
vCPU Count - The number of vCPUs currently in use.
NoteThe vCPU count cannot be greater than the vCPU Maximum.
- vCPU Maximum - The maximum number of virtual CPUs that can be configured for the VM. If this value is higher than the vCPU Count, additional vCPUs can be attached to the VM.
- Sockets - The number of sockets to expose to the VM.
- Cores per socket - The number of cores for each socket to expose to the VM.
Threads per core - The number of threads for each core to expose to the VM.
Note that the Sockets, Cores per socket, and Threads per core options adjust the CPU topology of the VM. This may be beneficial for vCPU performance and may impact the functionality of certain software in the guest OS. If a different setting is not required by your deployment, keep the default values.
Click .
The virtual CPUs for the VM are configured.
NoteChanges to virtual CPU settings only take effect after the VM is restarted.
Additional resources
17.6.3. Configuring NUMA in a virtual machine
The following methods can be used to configure Non-Uniform Memory Access (NUMA) settings of a virtual machine (VM) on a RHEL 9 host.
Prerequisites
The host is a NUMA-compatible machine. To detect whether this is the case, use the
virsh nodeinfocommand and see theNUMA cell(s)line:# virsh nodeinfo CPU model: x86_64 CPU(s): 48 CPU frequency: 1200 MHz CPU socket(s): 1 Core(s) per socket: 12 Thread(s) per core: 2 NUMA cell(s): 2 Memory size: 67012964 KiB
If the value of the line is 2 or greater, the host is NUMA-compatible.
Procedure
For ease of use, you can set up a VM’s NUMA configuration by using automated utilities and services. However, manual NUMA setup is more likely to yield a significant performance improvement.
Automatic methods
Set the VM’s NUMA policy to
Preferred. For example, to do so for the testguest5 VM:# virt-xml testguest5 --edit --vcpus placement=auto # virt-xml testguest5 --edit --numatune mode=preferred
Enable automatic NUMA balancing on the host:
# echo 1 > /proc/sys/kernel/numa_balancingStart the
numadservice to automatically align the VM CPU with memory resources.# systemctl start numad
Manual methods
Pin specific vCPU threads to a specific host CPU or range of CPUs. This is also possible on non-NUMA hosts and VMs, and is recommended as a safe method of vCPU performance improvement.
For example, the following commands pin vCPU threads 0 to 5 of the testguest6 VM to host CPUs 1, 3, 5, 7, 9, and 11, respectively:
# virsh vcpupin testguest6 0 1
# virsh vcpupin testguest6 1 3
# virsh vcpupin testguest6 2 5
# virsh vcpupin testguest6 3 7
# virsh vcpupin testguest6 4 9
# virsh vcpupin testguest6 5 11
Afterwards, you can verify whether this was successful:
# virsh vcpupin testguest6
VCPU   CPU Affinity
----------------------
0      1
1      3
2      5
3      7
4      9
5      11
After pinning vCPU threads, you can also pin QEMU process threads associated with a specified VM to a specific host CPU or range of CPUs. For example, the following commands pin the QEMU process thread of testguest6 to CPUs 13 and 15, and verify this was successful:
# virsh emulatorpin testguest6 13,15
# virsh emulatorpin testguest6
emulator: CPU Affinity
----------------------------------
       *: 13,15
Finally, you can also specify which host NUMA nodes will be assigned specifically to a certain VM. This can improve the host memory usage by the VM’s vCPU. For example, the following commands set testguest6 to use host NUMA nodes 3 to 5, and verify this was successful:
# virsh numatune testguest6 --nodeset 3-5
# virsh numatune testguest6
For best performance results, it is recommended to use all of the manual tuning methods listed above
Known issues
Additional resources
- Sample vCPU performance tuning scenario
-
View the current NUMA configuration of your system using the
numastatutility
17.6.4. Sample vCPU performance tuning scenario
To obtain the best vCPU performance possible, Red Hat recommends by using manual vcpupin, emulatorpin, and numatune settings together, for example like in the following scenario.
Starting scenario
Your host has the following hardware specifics:
- 2 NUMA nodes
- 3 CPU cores on each node
- 2 threads on each core
The output of
virsh nodeinfoof such a machine would look similar to:# virsh nodeinfo CPU model: x86_64 CPU(s): 12 CPU frequency: 3661 MHz CPU socket(s): 2 Core(s) per socket: 3 Thread(s) per core: 2 NUMA cell(s): 2 Memory size: 31248692 KiBYou intend to modify an existing VM to have 8 vCPUs, which means that it will not fit in a single NUMA node.
Therefore, you should distribute 4 vCPUs on each NUMA node and make the vCPU topology resemble the host topology as closely as possible. This means that vCPUs that run as sibling threads of a given physical CPU should be pinned to host threads on the same core. For details, see the Solution below:
Solution
Obtain the information about the host topology:
# virsh capabilitiesThe output should include a section that looks similar to the following:
<topology> <cells num="2"> <cell id="0"> <memory unit="KiB">15624346</memory> <pages unit="KiB" size="4">3906086</pages> <pages unit="KiB" size="2048">0</pages> <pages unit="KiB" size="1048576">0</pages> <distances> <sibling id="0" value="10" /> <sibling id="1" value="21" /> </distances> <cpus num="6"> <cpu id="0" socket_id="0" core_id="0" siblings="0,3" /> <cpu id="1" socket_id="0" core_id="1" siblings="1,4" /> <cpu id="2" socket_id="0" core_id="2" siblings="2,5" /> <cpu id="3" socket_id="0" core_id="0" siblings="0,3" /> <cpu id="4" socket_id="0" core_id="1" siblings="1,4" /> <cpu id="5" socket_id="0" core_id="2" siblings="2,5" /> </cpus> </cell> <cell id="1"> <memory unit="KiB">15624346</memory> <pages unit="KiB" size="4">3906086</pages> <pages unit="KiB" size="2048">0</pages> <pages unit="KiB" size="1048576">0</pages> <distances> <sibling id="0" value="21" /> <sibling id="1" value="10" /> </distances> <cpus num="6"> <cpu id="6" socket_id="1" core_id="3" siblings="6,9" /> <cpu id="7" socket_id="1" core_id="4" siblings="7,10" /> <cpu id="8" socket_id="1" core_id="5" siblings="8,11" /> <cpu id="9" socket_id="1" core_id="3" siblings="6,9" /> <cpu id="10" socket_id="1" core_id="4" siblings="7,10" /> <cpu id="11" socket_id="1" core_id="5" siblings="8,11" /> </cpus> </cell> </cells> </topology>- Optional: Test the performance of the VM by using the applicable tools and utilities.
Set up and mount 1 GiB huge pages on the host:
Add the following line to the host’s kernel command line:
default_hugepagesz=1G hugepagesz=1G
Create the
/etc/systemd/system/hugetlb-gigantic-pages.servicefile with the following content:[Unit] Description=HugeTLB Gigantic Pages Reservation DefaultDependencies=no Before=dev-hugepages.mount ConditionPathExists=/sys/devices/system/node ConditionKernelCommandLine=hugepagesz=1G [Service] Type=oneshot RemainAfterExit=yes ExecStart=/etc/systemd/hugetlb-reserve-pages.sh [Install] WantedBy=sysinit.target
Create the
/etc/systemd/hugetlb-reserve-pages.shfile with the following content:#!/bin/sh nodes_path=/sys/devices/system/node/ if [ ! -d $nodes_path ]; then echo "ERROR: $nodes_path does not exist" exit 1 fi reserve_pages() { echo $1 > $nodes_path/$2/hugepages/hugepages-1048576kB/nr_hugepages } reserve_pages 4 node1 reserve_pages 4 node2This reserves four 1GiB huge pages from node1 and four 1GiB huge pages from node2.
Make the script created in the previous step executable:
# chmod +x /etc/systemd/hugetlb-reserve-pages.shEnable huge page reservation on boot:
# systemctl enable hugetlb-gigantic-pages
Use the
virsh editcommand to edit the XML configuration of the VM you wish to optimize, in this example super-VM:# virsh edit super-vmAdjust the XML configuration of the VM in the following way:
-
Set the VM to use 8 static vCPUs. Use the
<vcpu/>element to do this. Pin each of the vCPU threads to the corresponding host CPU threads that it mirrors in the topology. To do so, use the
<vcpupin/>elements in the<cputune>section.Note that, as shown by the
virsh capabilitiesutility above, host CPU threads are not ordered sequentially in their respective cores. In addition, the vCPU threads should be pinned to the highest available set of host cores on the same NUMA node. For a table illustration, see the Sample topology section below.The XML configuration for steps a. and b. can look similar to:
<cputune>
  <vcpupin vcpu='0' cpuset='1'/>
  <vcpupin vcpu='1' cpuset='4'/>
  <vcpupin vcpu='2' cpuset='2'/>
  <vcpupin vcpu='3' cpuset='5'/>
  <vcpupin vcpu='4' cpuset='7'/>
  <vcpupin vcpu='5' cpuset='10'/>
  <vcpupin vcpu='6' cpuset='8'/>
  <vcpupin vcpu='7' cpuset='11'/>
  <emulatorpin cpuset='6,9'/>
</cputune>
Set the VM to use 1 GiB huge pages:
<memoryBacking>
  <hugepages>
    <page size='1' unit='GiB'/>
  </hugepages>
</memoryBacking>
Configure the VM’s NUMA nodes to use memory from the corresponding NUMA nodes on the host. To do so, use the
<memnode/>elements in the<numatune/>section:<numatune> <memory mode="preferred" nodeset="1"/> <memnode cellid="0" mode="strict" nodeset="0"/> <memnode cellid="1" mode="strict" nodeset="1"/> </numatune>
Ensure the CPU mode is set to
host-passthrough, and that the CPU uses cache inpassthroughmode:<cpu mode="host-passthrough"> <topology sockets="2" cores="2" threads="2"/> <cache mode="passthrough"/>
-
Set the VM to use 8 static vCPUs. Use the
Verification
Confirm that the resulting XML configuration of the VM includes a section similar to the following:
[...] <memoryBacking> <hugepages> <page size='1' unit='GiB'/> </hugepages> </memoryBacking> <vcpu placement='static'>8</vcpu> <cputune> <vcpupin vcpu='0' cpuset='1'/> <vcpupin vcpu='1' cpuset='4'/> <vcpupin vcpu='2' cpuset='2'/> <vcpupin vcpu='3' cpuset='5'/> <vcpupin vcpu='4' cpuset='7'/> <vcpupin vcpu='5' cpuset='10'/> <vcpupin vcpu='6' cpuset='8'/> <vcpupin vcpu='7' cpuset='11'/> <emulatorpin cpuset='6,9'/> </cputune> <numatune> <memory mode="preferred" nodeset="1"/> <memnode cellid="0" mode="strict" nodeset="0"/> <memnode cellid="1" mode="strict" nodeset="1"/> </numatune> <cpu mode="host-passthrough"> <topology sockets="2" cores="2" threads="2"/> <cache mode="passthrough"/> <numa> <cell id="0" cpus="0-3" memory="2" unit="GiB"> <distances> <sibling id="0" value="10"/> <sibling id="1" value="21"/> </distances> </cell> <cell id="1" cpus="4-7" memory="2" unit="GiB"> <distances> <sibling id="0" value="21"/> <sibling id="1" value="10"/> </distances> </cell> </numa> </cpu> </domain>- Optional: Test the performance of the VM by using the applicable tools and utilities to evaluate the impact of the VM’s optimization.
Sample topology
The following tables illustrate the connections between the vCPUs and the host CPUs they should be pinned to:
Table 17.2. Host topology
CPU threads
0
3
1
4
2
5
6
9
7
10
8
11
Cores
0
1
2
3
4
5
Sockets
0
1
NUMA nodes
0
1
Table 17.3. VM topology
vCPU threads
0
1
2
3
4
5
6
7
Cores
0
1
2
3
Sockets
0
1
NUMA nodes
0
1
Table 17.4. Combined host and VM topology
vCPU threads
0
1
2
3
4
5
6
7
Host CPU threads
0
3
1
4
2
5
6
9
7
10
8
11
Cores
0
1
2
3
4
5
Sockets
0
1
NUMA nodes
0
1
In this scenario, there are 2 NUMA nodes and 8 vCPUs. Therefore, 4 vCPU threads should be pinned to each node.
In addition, Red Hat recommends leaving at least a single CPU thread available on each node for host system operations.
Because in this example, each NUMA node houses 3 cores, each with 2 host CPU threads, the set for node 0 translates as follows:
<vcpupin vcpu='0' cpuset='1'/>
<vcpupin vcpu='1' cpuset='4'/>
<vcpupin vcpu='2' cpuset='2'/>
<vcpupin vcpu='3' cpuset='5'/>
17.6.5. Managing kernel same-page merging
Kernel Same-Page Merging (KSM) improves memory density by sharing identical memory pages between virtual machines (VMs). However, enabling KSM increases CPU utilization, and might adversely affect overall performance depending on the workload.
Depending on your requirements, you can either enable or disable KSM for a single session or persistently.
In RHEL 9 and later, KSM is disabled by default.
Prerequisites
- Root access to your host system.
Procedure
Disable KSM:
To deactivate KSM for a single session, use the
systemctlutility to stopksmandksmtunedservices.# systemctl stop ksm # systemctl stop ksmtuned
To deactivate KSM persistently, use the
systemctlutility to disableksmandksmtunedservices.# systemctl disable ksm Removed /etc/systemd/system/multi-user.target.wants/ksm.service. # systemctl disable ksmtuned Removed /etc/systemd/system/multi-user.target.wants/ksmtuned.service.
Memory pages shared between VMs before deactivating KSM will remain shared. To stop sharing, delete all the PageKSM pages in the system by using the following command:
# echo 2 > /sys/kernel/mm/ksm/run
After anonymous pages replace the KSM pages, the khugepaged kernel service will rebuild transparent hugepages on the VM’s physical memory.
- Enable KSM:
Enabling KSM increases CPU utilization and affects overall CPU performance.
Install the
ksmtunedservice:# dnf install ksmtuned
Start the service:
To enable KSM for a single session, use the
systemctlutility to start theksmandksmtunedservices.# systemctl start ksm # systemctl start ksmtuned
To enable KSM persistently, use the
systemctlutility to enable theksmandksmtunedservices.# systemctl enable ksm Created symlink /etc/systemd/system/multi-user.target.wants/ksm.service → /usr/lib/systemd/system/ksm.service # systemctl enable ksmtuned Created symlink /etc/systemd/system/multi-user.target.wants/ksmtuned.service → /usr/lib/systemd/system/ksmtuned.service
17.7. Optimizing virtual machine network performance
Due to the virtual nature of a VM’s network interface card (NIC), the VM loses a portion of its allocated host network bandwidth, which can reduce the overall workload efficiency of the VM. The following tips can minimize the negative impact of virtualization on the virtual NIC (vNIC) throughput.
Procedure
Use any of the following methods and observe if it has a beneficial effect on your VM network performance:
- Enable the vhost_net module
On the host, ensure the
vhost_netkernel feature is enabled:# lsmod | grep vhost vhost_net 32768 1 vhost 53248 1 vhost_net tap 24576 1 vhost_net tun 57344 6 vhost_netIf the output of this command is blank, enable the
vhost_netkernel module:# modprobe vhost_net- Set up multi-queue virtio-net
To set up the multi-queue virtio-net feature for a VM, use the
virsh editcommand to edit to the XML configuration of the VM. In the XML, add the following to the<devices>section, and replaceNwith the number of vCPUs in the VM, up to 16:<interface type='network'> <source network='default'/> <model type='virtio'/> <driver name='vhost' queues='N'/> </interface>If the VM is running, restart it for the changes to take effect.
- Batching network packets
In Linux VM configurations with a long transmission path, batching packets before submitting them to the kernel may improve cache utilization. To set up packet batching, use the following command on the host, and replace tap0 with the name of the network interface that the VMs use:
# ethtool -C tap0 rx-frames 64- SR-IOV
- If your host NIC supports SR-IOV, use SR-IOV device assignment for your vNICs. For more information, see Managing SR-IOV devices.
Additional resources
17.8. Virtual machine performance monitoring tools
To identify what consumes the most VM resources and which aspect of VM performance needs optimization, performance diagnostic tools, both general and VM-specific, can be used.
Default OS performance monitoring tools
For standard performance evaluation, you can use the utilities provided by default by your host and guest operating systems:
On your RHEL 9 host, as root, use the
toputility or the system monitor application, and look forqemuandvirtin the output. This shows how much host system resources your VMs are consuming.-
If the monitoring tool displays that any of the
qemuorvirtprocesses consume a large portion of the host CPU or memory capacity, use theperfutility to investigate. For details, see below. -
In addition, if a
vhost_netthread process, named for example vhost_net-1234, is displayed as consuming an excessive amount of host CPU capacity, consider using virtual network optimization features, such asmulti-queue virtio-net.
-
If the monitoring tool displays that any of the
On the guest operating system, use performance utilities and applications available on the system to evaluate which processes consume the most system resources.
-
On Linux systems, you can use the
toputility. - On Windows systems, you can use the Task Manager application.
-
On Linux systems, you can use the
perf kvm
You can use the perf utility to collect and analyze virtualization-specific statistics about the performance of your RHEL 9 host. To do so:
On the host, install the perf package:
# dnf install perfUse one of the
perf kvm statcommands to display perf statistics for your virtualization host:-
For real-time monitoring of your hypervisor, use the
perf kvm stat livecommand. -
To log the perf data of your hypervisor over a period of time, activate the logging by using the
perf kvm stat recordcommand. After the command is canceled or interrupted, the data is saved in theperf.data.guestfile, which can be analyzed by using theperf kvm stat reportcommand.
-
For real-time monitoring of your hypervisor, use the
Analyze the
perfoutput for types ofVM-EXITevents and their distribution. For example, thePAUSE_INSTRUCTIONevents should be infrequent, but in the following output, the high occurrence of this event suggests that the host CPUs are not handling the running vCPUs well. In such a scenario, consider shutting down some of your active VMs, removing vCPUs from these VMs, or tuning the performance of the vCPUs.# perf kvm stat report Analyze events for all VMs, all VCPUs: VM-EXIT Samples Samples% Time% Min Time Max Time Avg time EXTERNAL_INTERRUPT 365634 31.59% 18.04% 0.42us 58780.59us 204.08us ( +- 0.99% ) MSR_WRITE 293428 25.35% 0.13% 0.59us 17873.02us 1.80us ( +- 4.63% ) PREEMPTION_TIMER 276162 23.86% 0.23% 0.51us 21396.03us 3.38us ( +- 5.19% ) PAUSE_INSTRUCTION 189375 16.36% 11.75% 0.72us 29655.25us 256.77us ( +- 0.70% ) HLT 20440 1.77% 69.83% 0.62us 79319.41us 14134.56us ( +- 0.79% ) VMCALL 12426 1.07% 0.03% 1.02us 5416.25us 8.77us ( +- 7.36% ) EXCEPTION_NMI 27 0.00% 0.00% 0.69us 1.34us 0.98us ( +- 3.50% ) EPT_MISCONFIG 5 0.00% 0.00% 5.15us 10.85us 7.88us ( +- 11.67% ) Total Samples:1157497, Total events handled time:413728274.66us.Other event types that can signal problems in the output of
perf kvm statinclude:-
INSN_EMULATION- suggests suboptimal VM I/O configuration.
-
For more information about using perf to monitor virtualization performance, see the perf-kvm man page.
numastat
To see the current NUMA configuration of your system, you can use the numastat utility, which is provided by installing the numactl package.
The following shows a host with 4 running VMs, each obtaining memory from multiple NUMA nodes. This is not optimal for vCPU performance, and warrants adjusting:
# numastat -c qemu-kvm

Per-node process memory usage (in MBs)
PID              Node 0 Node 1 Node 2 Node 3 Node 4 Node 5 Node 6 Node 7 Total
---------------  ------ ------ ------ ------ ------ ------ ------ ------ -----
51722 (qemu-kvm)     68     16    357   6936      2      3    147    598  8128
51747 (qemu-kvm)    245     11      5     18   5172   2532      1     92  8076
53736 (qemu-kvm)     62    432   1661    506   4851    136     22    445  8116
53773 (qemu-kvm)   1393      3      1      2     12      0      0   6702  8114
---------------  ------ ------ ------ ------ ------ ------ ------ ------ -----
Total              1769    463   2024   7462  10037   2672    169   7837 32434
In contrast, the following shows memory being provided to each VM by a single node, which is significantly more efficient.
# numastat -c qemu-kvm

Per-node process memory usage (in MBs)
PID              Node 0 Node 1 Node 2 Node 3 Node 4 Node 5 Node 6 Node 7 Total
---------------  ------ ------ ------ ------ ------ ------ ------ ------ -----
51747 (qemu-kvm)      0      0      7      0   8072      0      1      0  8080
53736 (qemu-kvm)      0      0      7      0      0      0   8113      0  8120
53773 (qemu-kvm)      0      0      7      0      0      0      1   8110  8118
59065 (qemu-kvm)      0      0   8050      0      0      0      0      0  8051
---------------  ------ ------ ------ ------ ------ ------ ------ ------ -----
Total                 0      0   8072      0   8072      0   8114   8110 32368