
Chapter 16. Configuring virtual machine network connections
For your virtual machines (VMs) to connect over a network to your host, to other VMs on your host, and to locations on an external network, the VM networking must be configured accordingly. To provide VM networking, the RHEL 9 hypervisor and newly created VMs have a default network configuration, which can also be modified further. For example:
- You can enable the VMs on your host to be discovered and connected to by locations outside the host, as if the VMs were on the same network as the host.
- You can partially or completely isolate a VM from inbound network traffic to increase its security and minimize the risk of any problems with the VM impacting the host.
The following sections explain the various types of VM network configuration and provide instructions for setting up selected VM network configurations.
16.1. Understanding virtual networking
The connection of virtual machines (VMs) to other devices and locations on a network has to be facilitated by the host hardware. The following sections explain the mechanisms of VM network connections and describe the default VM network setting.
16.1.1. How virtual networks work
Virtual networking uses the concept of a virtual network switch. A virtual network switch is a software construct that operates on a host machine. VMs connect to the network through the virtual network switch. Based on the configuration of the virtual switch, a VM can use an existing virtual network managed by the hypervisor, or a different network connection method.
The following figure shows a virtual network switch connecting two VMs to the network:
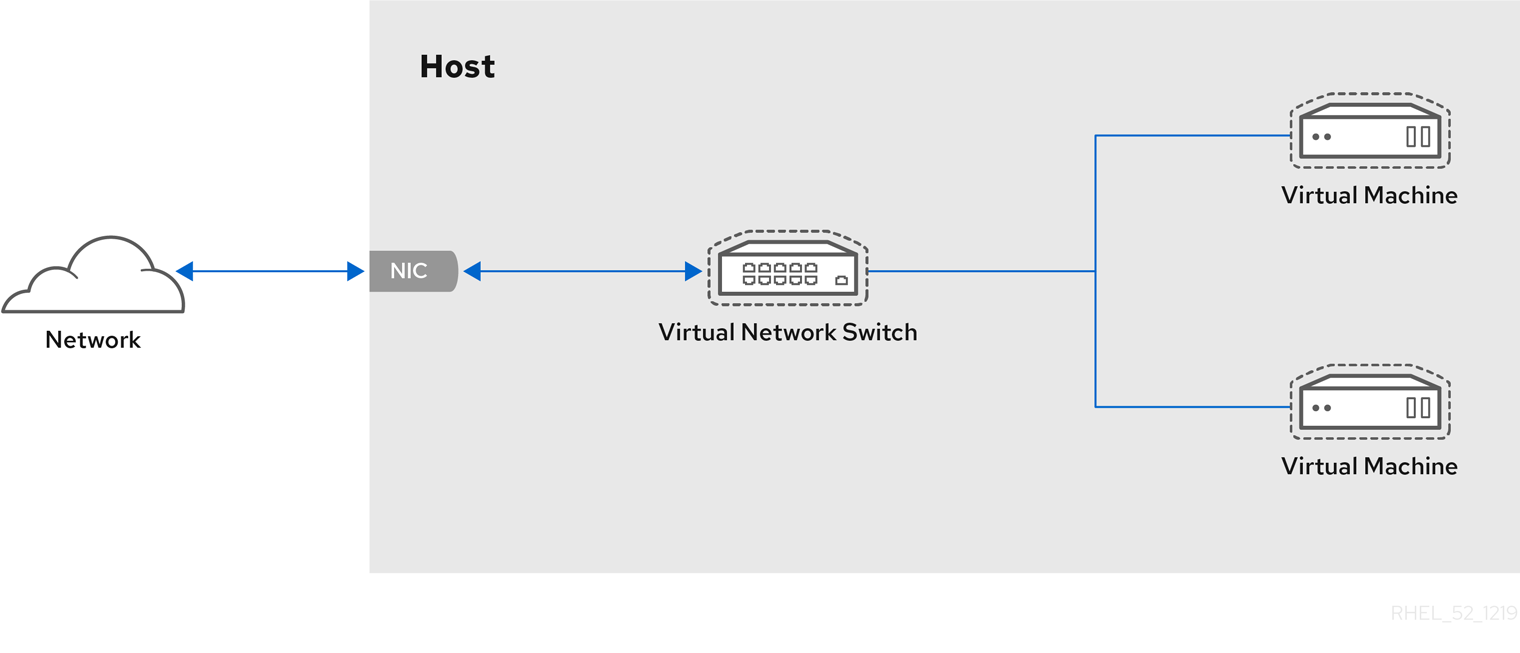
From the perspective of a guest operating system, a virtual network connection is the same as a physical network connection. Host machines view virtual network switches as network interfaces. When the virtnetworkd service is first installed and started, it creates virbr0, the default network interface for VMs.
To view information about this interface, use the ip utility on the host.
$ ip addr show virbr0
3: virbr0: <BROADCAST,MULTICAST,UP,LOWER_UP> mtu 1500 qdisc noqueue state
UNKNOWN link/ether 1b:c4:94:cf:fd:17 brd ff:ff:ff:ff:ff:ff
inet 192.0.2.1/24 brd 192.0.2.255 scope global virbr0
By default, all VMs on a single host are connected to the same NAT-type virtual network, named default, which uses the virbr0 interface. For details, see Virtual networking default configuration.
For basic outbound-only network access from VMs, no additional network setup is usually needed, because the default network is installed along with the libvirt-daemon-config-network package, and is automatically started when the virtnetworkd service is started.
If a different VM network functionality is needed, you can create additional virtual networks and network interfaces and configure your VMs to use them. In addition to the default NAT, these networks and interfaces can be configured to use one of the following modes:
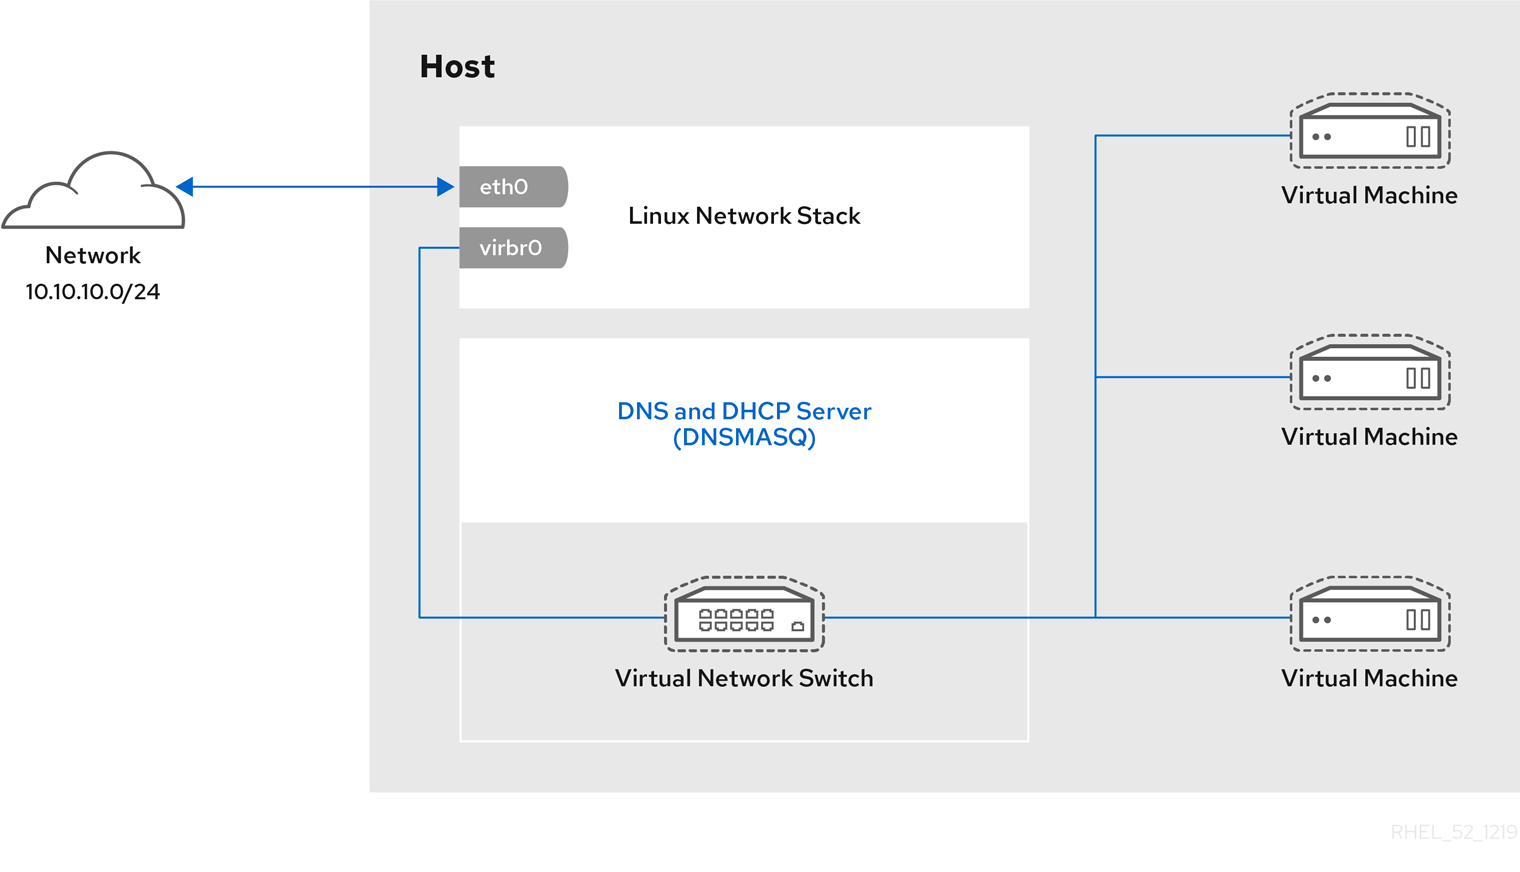
16.1.2. Virtual networking default configuration
When the virtnetworkd service is first installed on a virtualization host, it contains an initial virtual network configuration in network address translation (NAT) mode. By default, all VMs on the host are connected to the same libvirt virtual network, named default. VMs on this network can connect to locations both on the host and on the network beyond the host, but with the following limitations:
-
VMs on the network are visible to the host and other VMs on the host, but the network traffic is affected by the firewalls in the guest operating system’s network stack and by the
libvirtnetwork filtering rules attached to the guest interface. - VMs on the network can connect to locations outside the host but are not visible to them. Outbound traffic is affected by the NAT rules, as well as the host system’s firewall.
The following diagram illustrates the default VM network configuration:
16.2. Using the web console for managing virtual machine network interfaces
Using the RHEL 9 web console, you can manage the virtual network interfaces for the virtual machines to which the web console is connected. You can:
16.2.1. Viewing and editing virtual network interface information in the web console
By using the RHEL 9 web console, you can view and modify the virtual network interfaces on a selected virtual machine (VM):
Prerequisites
- The web console VM plug-in is installed on your system.
Procedure
In the interface, click the VM whose information you want to see.
A new page opens with an Overview section with basic information about the selected VM and a Console section to access the VM’s graphical interface.
Scroll to .
The Networks Interfaces section displays information about the virtual network interface configured for the VM as well as options to Add, Delete, Edit, or Unplug network interfaces.

The information includes the following:
Type - The type of network interface for the VM. The types include virtual network, bridge to LAN, and direct attachment.
NoteGeneric Ethernet connection is not supported in RHEL 9 and later.
- Model type - The model of the virtual network interface.
- MAC Address - The MAC address of the virtual network interface.
- IP Address - The IP address of the virtual network interface.
- Source - The source of the network interface. This is dependent on the network type.
- State - The state of the virtual network interface.
To edit the virtual network interface settings, Click . The Virtual Network Interface Settings dialog opens.
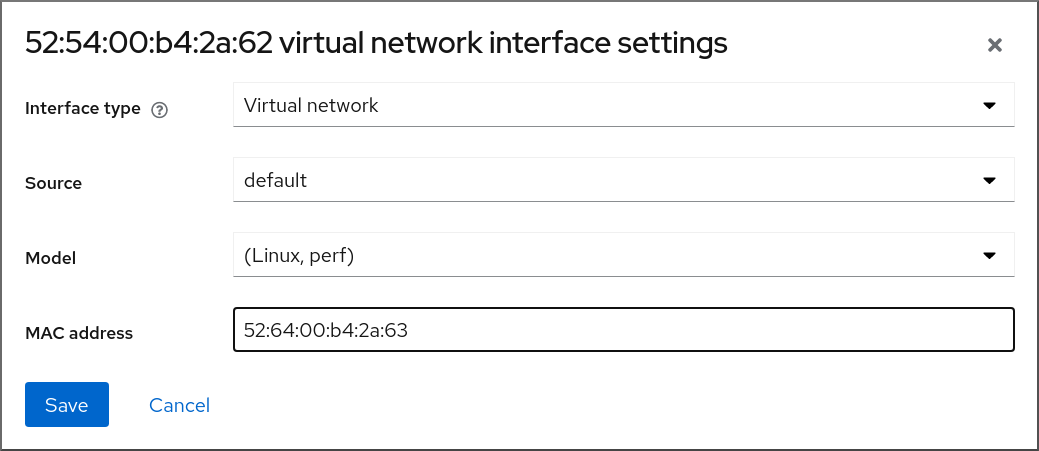
- Change the interface type, source, model, or MAC address.
Click . The network interface is modified.
NoteChanges to the virtual network interface settings take effect only after restarting the VM.
Additionally, MAC address can only be modified when the VM is shut off.
Additional resources
16.2.2. Adding and connecting virtual network interfaces in the web console
By using the RHEL 9 web console, you can create a virtual network interface and connect a virtual machine (VM) to it.
Prerequisites
- The web console VM plug-in is installed on your system.
Procedure
In the interface, click the VM whose information you want to see.
A new page opens with an Overview section with basic information about the selected VM and a Console section to access the VM’s graphical interface.
Scroll to .
The Networks Interfaces section displays information about the virtual network interface configured for the VM as well as options to Add, Delete, Edit, or Plug network interfaces.

Click in the row of the virtual network interface you want to connect.
The selected virtual network interface connects to the VM.
16.2.3. Disconnecting and removing virtual network interfaces in the web console
By using the RHEL 9 web console, you can disconnect the virtual network interfaces connected to a selected virtual machine (VM).
Prerequisites
- The web console VM plug-in is installed on your system.
Procedure
In the interface, click the VM whose information you want to see.
A new page opens with an Overview section with basic information about the selected VM and a Console section to access the VM’s graphical interface.
Scroll to .
The Networks Interfaces section displays information about the virtual network interface configured for the VM as well as options to Add, Delete, Edit, or Unplug network interfaces.
Click in the row of the virtual network interface you want to disconnect.
The selected virtual network interface disconnects from the VM.
16.3. Recommended virtual machine networking configurations
In many scenarios, the default VM networking configuration is sufficient. However, if adjusting the configuration is required, you can use the command-line interface (CLI) or the RHEL 9 web console to do so. The following sections describe selected VM network setups for such situations.
16.3.1. Configuring externally visible virtual machines by using the command-line interface
By default, a newly created VM connects to a NAT-type network that uses virbr0, the default virtual bridge on the host. This ensures that the VM can use the host’s network interface controller (NIC) for connecting to outside networks, but the VM is not reachable from external systems.
If you require a VM to appear on the same external network as the hypervisor, you must use bridged mode instead. To do so, attach the VM to a bridge device connected to the hypervisor’s physical network device. To use the command-line interface for this, follow the instructions below.
Prerequisites
- A shut-down existing VM with the default NAT setup.
The IP configuration of the hypervisor. This varies depending on the network connection of the host. As an example, this procedure uses a scenario where the host is connected to the network by using an ethernet cable, and the hosts' physical NIC MAC address is assigned to a static IP on a DHCP server. Therefore, the ethernet interface is treated as the hypervisor IP.
To obtain the IP configuration of the ethernet interface, use the
ip addrutility:# ip addr [...] enp0s25: <BROADCAST,MULTICAST,UP,LOWER_UP> mtu 1500 qdisc fq_codel state UP group default qlen 1000 link/ether 54:ee:75:49:dc:46 brd ff:ff:ff:ff:ff:ff inet 192.0.2.1/24 brd 192.0.2.255 scope global dynamic noprefixroute enp0s25
Procedure
Create and set up a bridge connection for the physical interface on the host. For instructions, see the Configuring a network bridge.
Note that in a scenario where static IP assignment is used, you must move the IPv4 setting of the physical ethernet interface to the bridge interface.
Modify the VM’s network to use the created bridged interface. For example, the following sets testguest to use bridge0.
# virt-xml testguest --edit --network bridge=bridge0
Domain 'testguest' defined successfully.
Start the VM.
# virsh start testguestIn the guest operating system, adjust the IP and DHCP settings of the system’s network interface as if the VM was another physical system in the same network as the hypervisor.
The specific steps for this will differ depending on the guest OS used by the VM. For example, if the guest OS is RHEL 9, see Configuring an Ethernet connection.
Verification
Ensure the newly created bridge is running and contains both the host’s physical interface and the interface of the VM.
# ip link show master bridge0
2: enp0s25: <BROADCAST,MULTICAST,UP,LOWER_UP> mtu 1500 qdisc fq_codel master bridge0 state UP mode DEFAULT group default qlen 1000
    link/ether 54:ee:75:49:dc:46 brd ff:ff:ff:ff:ff:ff
10: vnet0: <BROADCAST,MULTICAST,UP,LOWER_UP> mtu 1500 qdisc fq_codel master bridge0 state UNKNOWN mode DEFAULT group default qlen 1000
    link/ether fe:54:00:89:15:40 brd ff:ff:ff:ff:ff:ff
Ensure the VM appears on the same external network as the hypervisor:
In the guest operating system, obtain the network ID of the system. For example, if it is a Linux guest:
# ip addr
[...]
enp0s0: <BROADCAST,MULTICAST,UP,LOWER_UP> mtu 1500 qdisc fq_codel state UP group default qlen 1000
    link/ether 52:54:00:09:15:46 brd ff:ff:ff:ff:ff:ff
    inet 192.0.2.1/24 brd 192.0.2.255 scope global dynamic noprefixroute enp0s0
From an external system connected to the local network, connect to the VM by using the obtained ID.
# ssh root@192.0.2.1
root@192.0.2.1's password:
Last login: Mon Sep 24 12:05:36 2019
root~#*
If the connection works, the network has been configured successfully.
Troubleshooting
In certain situations, such as when using a client-to-site VPN while the VM is hosted on the client, using bridged mode for making your VMs available to external locations is not possible.
To work around this problem, you can set destination NAT by using
nftablesfor the VM.
16.3.2. Configuring externally visible virtual machines by using the web console
By default, a newly created VM connects to a NAT-type network that uses virbr0, the default virtual bridge on the host. This ensures that the VM can use the host’s network interface controller (NIC) for connecting to outside networks, but the VM is not reachable from external systems.
If you require a VM to appear on the same external network as the hypervisor, you must use bridged mode instead. To do so, attach the VM to a bridge device connected to the hypervisor’s physical network device. To use the RHEL 9 web console for this, follow the instructions below.
Prerequisites
- The web console VM plug-in is installed on your system.
- A shut-down existing VM with the default NAT setup.
The IP configuration of the hypervisor. This varies depending on the network connection of the host. As an example, this procedure uses a scenario where the host is connected to the network by using an ethernet cable, and the hosts' physical NIC MAC address is assigned to a static IP on a DHCP server. Therefore, the ethernet interface is treated as the hypervisor IP.
To obtain the IP configuration of the ethernet interface, go to the
Networkingtab in the web console, and see theInterfacessection.Procedure
Create and set up a bridge connection for the physical interface on the host. For instructions, see Configuring network bridges in the web console.
Note that in a scenario where static IP assignment is used, you must move the IPv4 setting of the physical ethernet interface to the bridge interface.
Modify the VM’s network to use the bridged interface. In the Network Interfaces tab of the VM:
- Click
In the
Add Virtual Network Interfacedialog, set:-
Interface Type to
Bridge to LAN -
Source to the newly created bridge, for example
bridge0
-
Interface Type to
- Click
- Optional: Click for all the other interfaces connected to the VM.
- Click to start the VM.
In the guest operating system, adjust the IP and DHCP settings of the system’s network interface as if the VM was another physical system in the same network as the hypervisor.
The specific steps for this will differ depending on the guest OS used by the VM. For example, if the guest OS is RHEL 9, see Configuring an Ethernet connection.
Verification
- In the Networking tab of the host’s web console, click the row with the newly created bridge to ensure it is running and contains both the host’s physical interface and the interface of the VM.
Ensure the VM appears on the same external network as the hypervisor.
In the guest operating system, obtain the network ID of the system. For example, if it is a Linux guest:
# ip addr
[...]
enp0s0: <BROADCAST,MULTICAST,UP,LOWER_UP> mtu 1500 qdisc fq_codel state UP group default qlen 1000
    link/ether 52:54:00:09:15:46 brd ff:ff:ff:ff:ff:ff
    inet 192.0.2.1/24 brd 192.0.2.255 scope global dynamic noprefixroute enp0s0
From an external system connected to the local network, connect to the VM by using the obtained ID.
# ssh root@192.0.2.1
root@192.0.2.1's password:
Last login: Mon Sep 24 12:05:36 2019
root~#*
If the connection works, the network has been configured successfully.
Troubleshooting
- In certain situations, such as when using a client-to-site VPN while the VM is hosted on the client, using bridged mode for making your VMs available to external locations is not possible.
16.4. Types of virtual machine network connections
To modify the networking properties and behavior of your VMs, change the type of virtual network or interface the VMs use. The following sections describe the connection types available to VMs in RHEL 9.
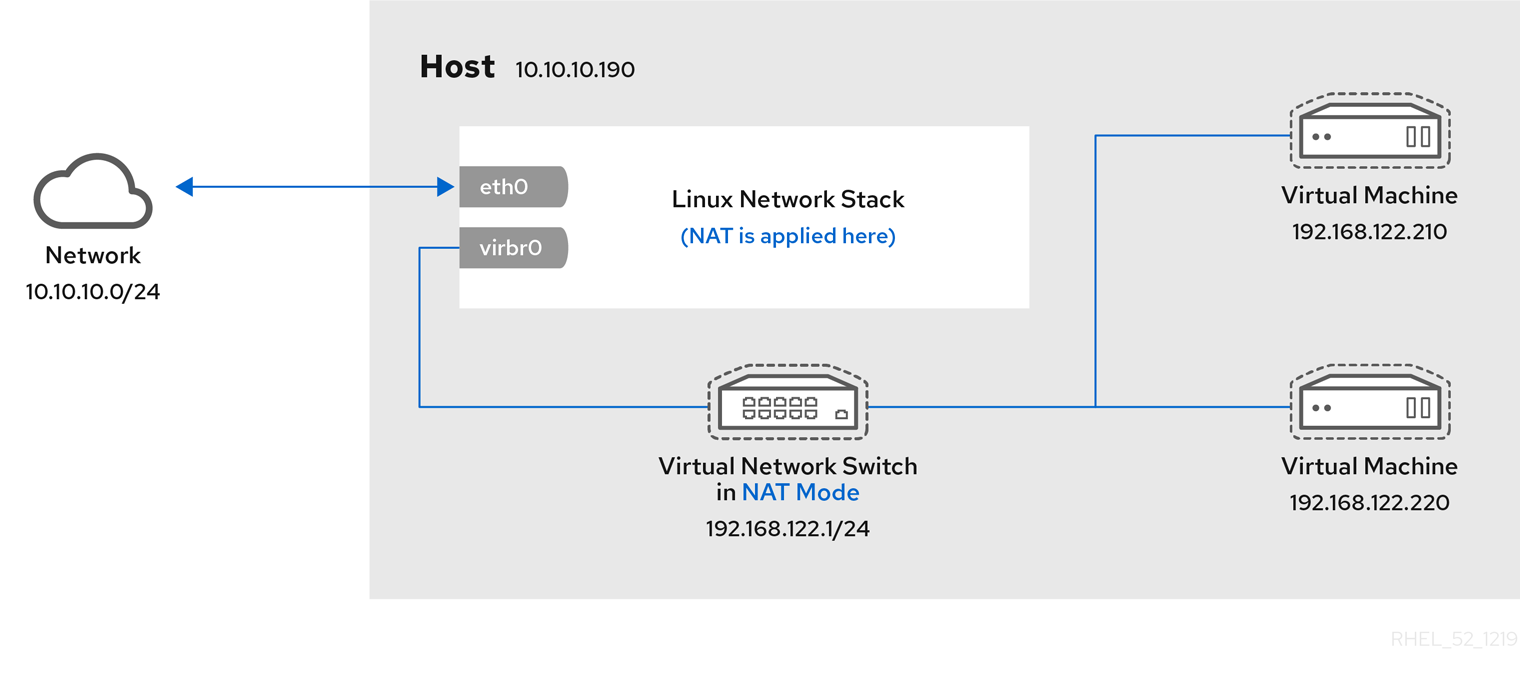
16.4.1. Virtual networking with network address translation
By default, virtual network switches operate in network address translation (NAT) mode. They use IP masquerading rather than Source-NAT (SNAT) or Destination-NAT (DNAT). IP masquerading enables connected VMs to use the host machine’s IP address for communication with any external network. When the virtual network switch is operating in NAT mode, computers external to the host cannot communicate with the VMs inside the host.
Virtual network switches use NAT configured by firewall rules. Editing these rules while the switch is running is not recommended, because incorrect rules may result in the switch being unable to communicate.
16.4.2. Virtual networking in routed mode
When using Routed mode, the virtual switch connects to the physical LAN connected to the host machine, passing traffic back and forth without the use of NAT. The virtual switch can examine all traffic and use the information contained within the network packets to make routing decisions. When using this mode, the virtual machines (VMs) are all in a single subnet, separate from the host machine. The VM subnet is routed through a virtual switch, which exists on the host machine. This enables incoming connections, but requires extra routing-table entries for systems on the external network.
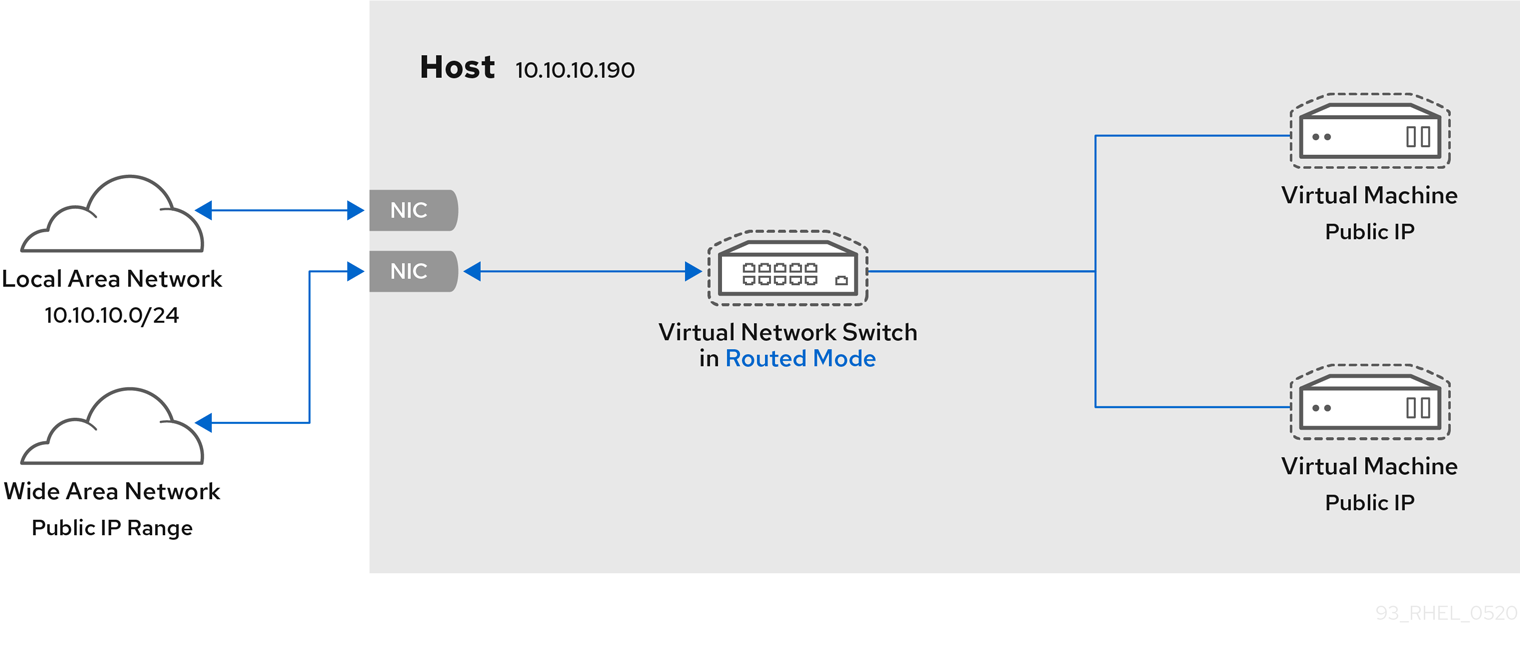
Routed mode uses routing based on the IP address:
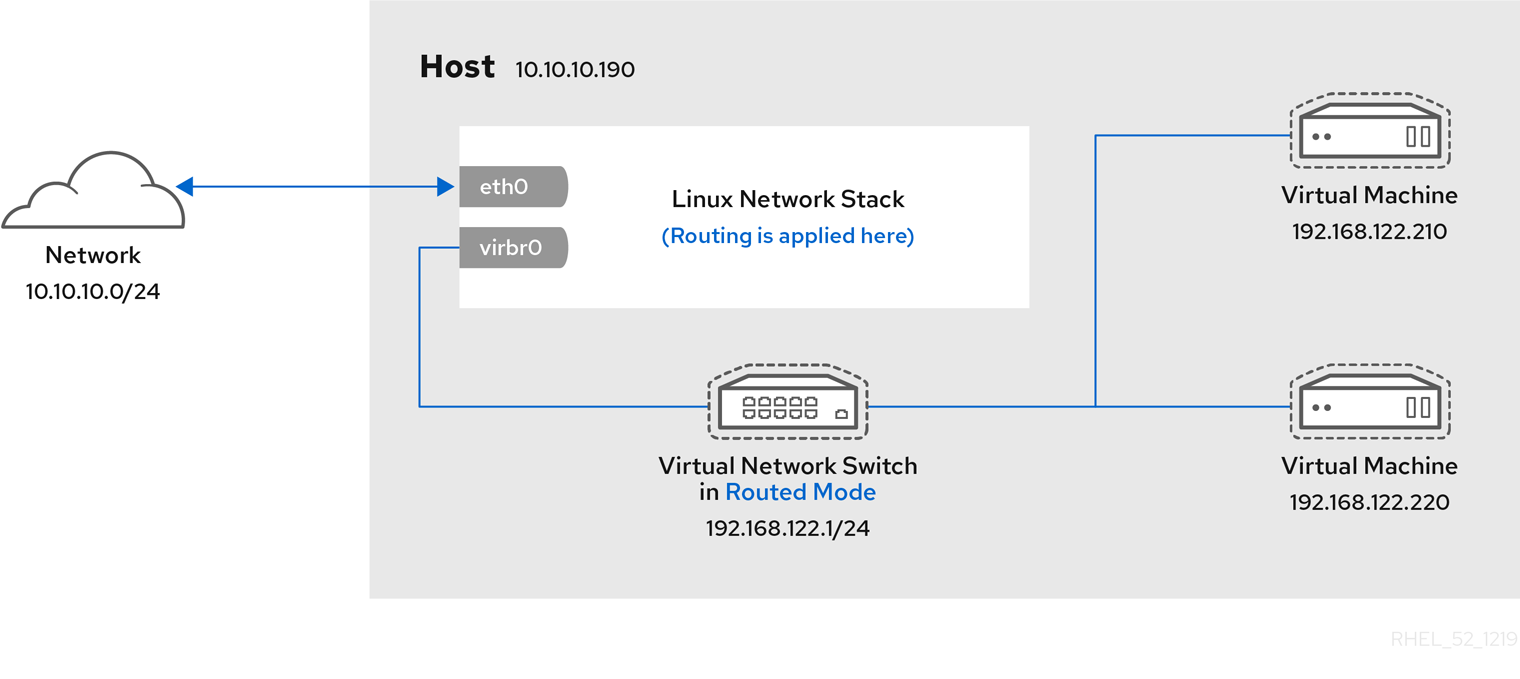
A common topology that uses routed mode is virtual server hosting (VSH). A VSH provider may have several host machines, each with two physical network connections. One interface is used for management and accounting, the other for the VMs to connect through. Each VM has its own public IP address, but the host machines use private IP addresses so that only internal administrators can manage the VMs.
16.4.3. Virtual networking in bridged mode
In most VM networking modes, VMs automatically create and connect to the virbr0 virtual bridge. In contrast, in bridged mode, the VM connects to an existing Linux bridge on the host. As a result, the VM is directly visible on the physical network. This enables incoming connections, but does not require any extra routing-table entries.
Bridged mode uses connection switching based on the MAC address:
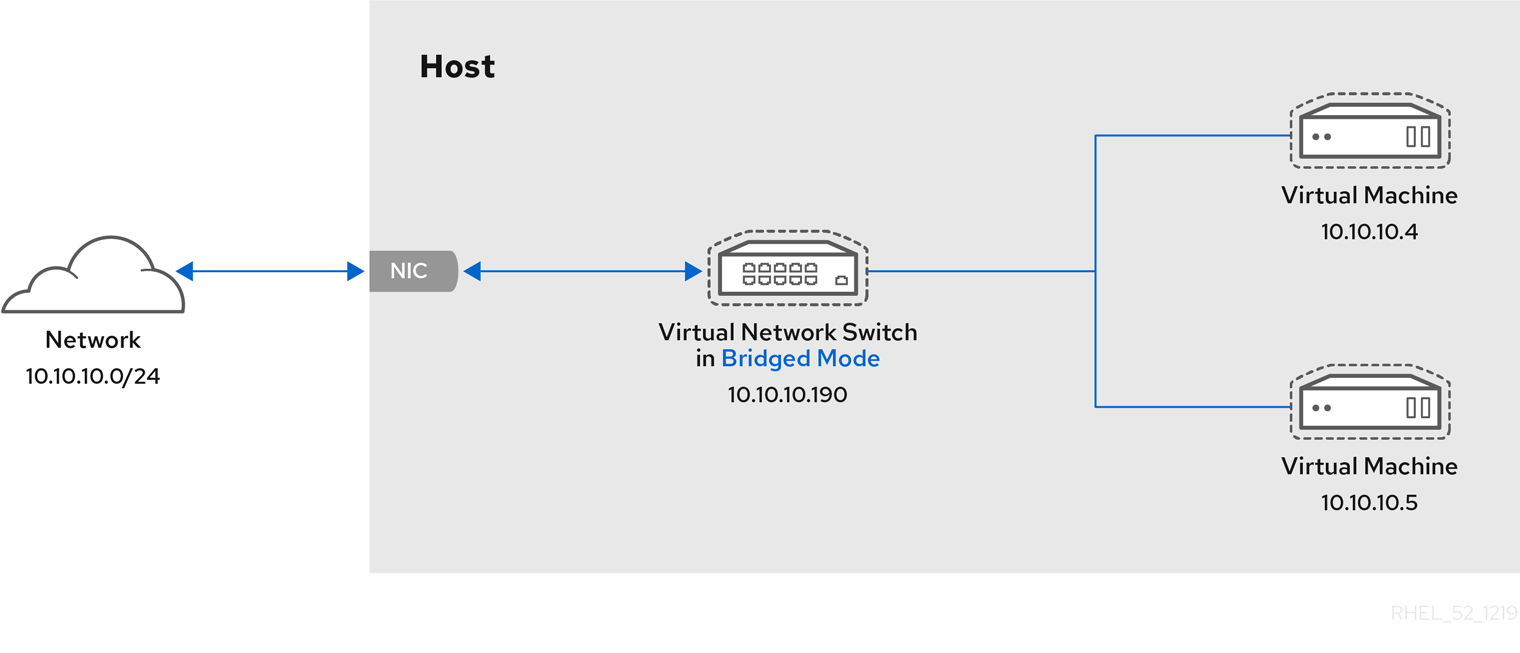
In bridged mode, the VM appear within the same subnet as the host machine. All other physical machines on the same physical network can detect the VM and access it.
Bridged network bonding
It is possible to use multiple physical bridge interfaces on the hypervisor by joining them together with a bond. The bond can then be added to a bridge, after which the VMs can be added to the bridge as well. However, the bonding driver has several modes of operation, and not all of these modes work with a bridge where VMs are in use.
The following bonding modes are usable:
- mode 1
- mode 2
- mode 4
In contrast, modes 0, 3, 5, or 6 is likely to cause the connection to fail. Also note that media-independent interface (MII) monitoring should be used to monitor bonding modes, as Address Resolution Protocol (ARP) monitoring does not work correctly.
For more information about bonding modes, refer to the Red Hat Knowledgebase.
Common scenarios
The most common use cases for bridged mode include:
- Deploying VMs in an existing network alongside host machines, making the difference between virtual and physical machines invisible to the end user.
- Deploying VMs without making any changes to existing physical network configuration settings.
- Deploying VMs that must be easily accessible to an existing physical network. Placing VMs on a physical network where they must access DHCP services.
- Connecting VMs to an existing network where virtual LANs (VLANs) are used.
- A demilitarized zone (DMZ) network. For a DMZ deployment with VMs, Red Hat recommends setting up the DMZ at the physical network router and switches, and connecting the VMs to the physical network by using bridged mode.
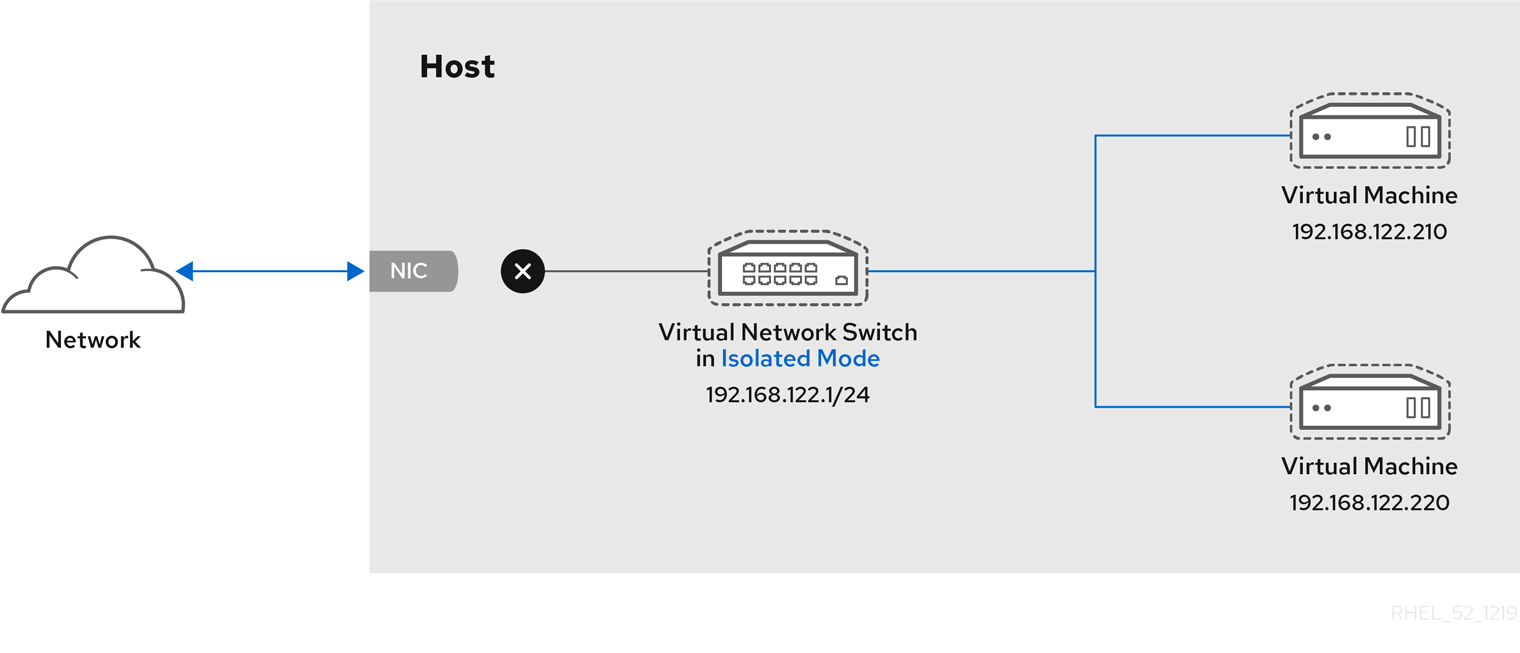
16.4.4. Virtual networking in isolated mode
By using isolated mode, virtual machines connected to the virtual switch can communicate with each other and with the host machine, but their traffic will not pass outside of the host machine, and they cannot receive traffic from outside the host machine. Using dnsmasq in this mode is required for basic functionality such as DHCP.
16.4.5. Virtual networking in open mode
When using open mode for networking, libvirt does not generate any firewall rules for the network. As a result, libvirt does not overwrite firewall rules provided by the host, and the user can therefore manually manage the VM’s firewall rules.
16.4.6. Comparison of virtual machine connection types
The following table provides information about the locations to which selected types of virtual machine (VM) network configurations can connect, and to which they are visible.
Table 16.1. Virtual machine connection types
| Connection to the host | Connection to other VMs on the host | Connection to outside locations | Visible to outside locations | |
|---|---|---|---|---|
| Bridged mode | YES | YES | YES | YES |
| NAT | YES | YES | YES | no |
| Routed mode | YES | YES | YES | YES |
| Isolated mode | YES | YES | no | no |
| Open mode | Depends on the host’s firewall rules | |||
16.5. Booting virtual machines from a PXE server
Virtual machines (VMs) that use Preboot Execution Environment (PXE) can boot and load their configuration from a network. This chapter describes how to use libvirt to boot VMs from a PXE server on a virtual or bridged network.
These procedures are provided only as an example. Ensure that you have sufficient backups before proceeding.
16.5.1. Setting up a PXE boot server on a virtual network
This procedure describes how to configure a libvirt virtual network to provide Preboot Execution Environment (PXE). This enables virtual machines on your host to be configured to boot from a boot image available on the virtual network.
Prerequisites
A local PXE server (DHCP and TFTP), such as:
- libvirt internal server
- manually configured dhcpd and tftpd
- dnsmasq
- Cobbler server
-
PXE boot images, such as
PXELINUXconfigured by Cobbler or manually.
Procedure
-
Place the PXE boot images and configuration in
/var/lib/tftpbootfolder. Set folder permissions:
# chmod -R a+r /var/lib/tftpbootSet folder ownership:
# chown -R nobody: /var/lib/tftpbootUpdate SELinux context:
# chcon -R --reference /usr/sbin/dnsmasq /var/lib/tftpboot
# chcon -R --reference /usr/libexec/libvirt_leaseshelper /var/lib/tftpboot
Shut down the virtual network:
# virsh net-destroy defaultOpen the virtual network configuration file in your default editor:
# virsh net-edit defaultEdit the
<ip>element to include the appropriate address, network mask, DHCP address range, and boot file, where example-pxelinux is the name of the boot image file.<ip address='192.0.2.1' netmask='255.255.255.0'> <tftp root='/var/lib/tftpboot'/> <dhcp> <range start='192.0.2.2' end='192.0.2.254' /> <bootp file='example-pxelinux'/> </dhcp> </ip>Start the virtual network:
# virsh net-start default
Verification
Verify that the
defaultvirtual network is active:# virsh net-list Name State Autostart Persistent --------------------------------------------------- default active no no
Additional resources
16.5.2. Booting virtual machines by using PXE and a virtual network
To boot virtual machines (VMs) from a Preboot Execution Environment (PXE) server available on a virtual network, you must enable PXE booting.
Prerequisites
- A PXE boot server is set up on the virtual network as described in Setting up a PXE boot server on a virtual network.
Procedure
Create a new VM with PXE booting enabled. For example, to install from a PXE, available on the
defaultvirtual network, into a new 10 GB qcow2 image file:# virt-install --pxe --network network=default --memory 2048 --vcpus 2 --disk size=10Alternatively, you can manually edit the XML configuration file of an existing VM:
Ensure the
<os>element has a<boot dev='network'/>element inside:<os> <type arch='x86_64' machine='pc-i440fx-rhel7.0.0'>hvm</type> <boot dev='network'/> <boot dev='hd'/> </os>
Ensure the guest network is configured to use your virtual network:
<interface type='network'>
   <mac address='52:54:00:66:79:14'/>
   <source network='default'/>
   <target dev='vnet0'/>
   <alias name='net0'/>
   <address type='pci' domain='0x0000' bus='0x00' slot='0x03' function='0x0'/>
</interface>
Verification
-
Start the VM by using the
virsh startcommand. If PXE is configured correctly, the VM boots from a boot image available on the PXE server.
16.5.3. Booting virtual machines by using PXE and a bridged network
To boot virtual machines (VMs) from a Preboot Execution Environment (PXE) server available on a bridged network, you must enable PXE booting.
Prerequisites
- Network bridging is enabled.
- A PXE boot server is available on the bridged network.
Procedure
Create a new VM with PXE booting enabled. For example, to install from a PXE, available on the
breth0bridged network, into a new 10 GB qcow2 image file:# virt-install --pxe --network bridge=breth0 --memory 2048 --vcpus 2 --disk size=10Alternatively, you can manually edit the XML configuration file of an existing VM:
Ensure the
<os>element has a<boot dev='network'/>element inside:<os> <type arch='x86_64' machine='pc-i440fx-rhel7.0.0'>hvm</type> <boot dev='network'/> <boot dev='hd'/> </os>
Ensure the VM is configured to use your bridged network:
<interface type='bridge'>
   <mac address='52:54:00:5a:ad:cb'/>
   <source bridge='breth0'/>
   <target dev='vnet0'/>
   <alias name='net0'/>
   <address type='pci' domain='0x0000' bus='0x00' slot='0x03' function='0x0'/>
</interface>
Verification
-
Start the VM by using the
virsh startcommand. If PXE is configured correctly, the VM boots from a boot image available on the PXE server.
Additional resources
16.6. Configuring the passt user-space connection
If you require non-privileged access to a virtual network, for example when using a session connection of libvirt, you can configure your virtual machine (VM) to use the passt networking back end.
Prerequisites
The
passtpackage has been installed on your system.# dnf install passt
Procedure
Open the XML configuration of the VM on which you want to use a
passtconnection. For example:# virsh edit <testguest1>In the
<devices>section, add an<interface type='user'>element that usespasstas its backend type.For example, the following configuration sets up a
passtconnection that uses addresses and routes copied from the host interface associated with the first default route:<devices> [...] <interface type='user'> <backend type='passt'/> </interface> </devices>Optionally, when using
passt, you can specify multiple<portForward>elements to forward incoming network traffic for the host to this VM interface. You can also customize interface IP addresses. For example:<devices> [...] <interface type='user'> <backend type='passt'/> <mac address="52:54:00:98:d8:b7"/> <source dev='eth0'/> <ip family='ipv4' address='192.0.2.1' prefix='24'/> <ip family='ipv6' address='::ffff:c000:201'/> <portForward proto='tcp'> <range start='2022' to='22'/> </portForward> <portForward proto='udp' address='1.2.3.4'> <range start='5000' end='5020' to='6000'/> <range start='5010' end='5015' exclude='yes'/> </portForward> <portForward proto='tcp' address='2001:db8:ac10:fd01::1:10' dev='eth0'> <range start='8080'/> <range start='4433' to='3444'/> </portForward> </interface> </devices>This example configuration sets up a
passtconnection with the following parameters:-
The VM copies the network routes for forwarding traffic from the
eth0host interface. -
The interface MAC is set to
52:54:00:98:d8:b7. If unset, a random one will be generated. -
The IPv4 address is set to
192.0.2.1/24, and the IPv6 address is set to::ffff:c000:201. -
The TCP port
2022on the host forwards its network traffic to port22on the VM. -
The TCP address
2001:db8:ac10:fd01::1:10on host interfaceeth0and port8080forwards its network traffic to port8080on the VM. Port4433forwards to port3444on the VM. -
The UDP address
1.2.3.4and ports5000 - 5009and5016 - 5020on the host forward their network traffic to ports6000 - 6009and6016 - 6020on the VM.
-
The VM copies the network routes for forwarding traffic from the
- Save the XML configuration.
Verification
Start or restart the VM you configured with
passt:# virsh reboot <vm-name> # virsh start <vm-name>
If the VM boots successfully, it is now using the
passtnetworking backend.
Additional resources
16.7. Additional resources
- Configuring and managing networking
- Attach specific network interface cards as SR-IOV devices to increase VM performance.