
Chapter 5. Configuring VLAN tagging
A Virtual Local Area Network (VLAN) is a logical network within a physical network. The VLAN interface tags packets with the VLAN ID as they pass through the interface, and removes tags of returning packets. You create VLAN interfaces on top of another interface, such as Ethernet, bond, team, or bridge devices. These interfaces are called the parent interface.
Red Hat Enterprise Linux provides administrators different options to configure VLAN devices. For example:
-
Use
nmclito configure VLAN tagging using the command line. - Use the RHEL web console to configure VLAN tagging using a web browser.
-
Use
nmtuito configure VLAN tagging in a text-based user interface. -
Use the
nm-connection-editorapplication to configure connections in a graphical interface. -
Use
nmstatectlto configure connections through the Nmstate API. - Use RHEL system roles to automate the VLAN configuration on one or multiple hosts.
5.1. Configuring VLAN tagging by using nmcli
You can configure Virtual Local Area Network (VLAN) tagging on the command line using the nmcli utility.
Prerequisites
- The interface you plan to use as a parent to the virtual VLAN interface supports VLAN tags.
If you configure the VLAN on top of a bond interface:
- The ports of the bond are up.
-
The bond is not configured with the
fail_over_mac=followoption. A VLAN virtual device cannot change its MAC address to match the parent’s new MAC address. In such a case, the traffic would still be sent with the incorrect source MAC address. -
The bond is usually not expected to get IP addresses from a DHCP server or IPv6 auto-configuration. Ensure it by setting the
ipv4.method=disableandipv6.method=ignoreoptions while creating the bond. Otherwise, if DHCP or IPv6 auto-configuration fails after some time, the interface might be brought down.
- The switch, the host is connected to, is configured to support VLAN tags. For details, see the documentation of your switch.
Procedure
Display the network interfaces:
# nmcli device status
DEVICE   TYPE      STATE         CONNECTION
enp1s0   ethernet  disconnected  enp1s0
bridge0  bridge    connected     bridge0
bond0    bond      connected     bond0
...
Create the VLAN interface. For example, to create a VLAN interface named
vlan10that usesenp1s0as its parent interface and that tags packets with VLAN ID10, enter:# nmcli connection add type vlan con-name vlan10 ifname vlan10 vlan.parent enp1s0 vlan.id 10Note that the VLAN must be within the range from
0to4094.By default, the VLAN connection inherits the maximum transmission unit (MTU) from the parent interface. Optionally, set a different MTU value:
# nmcli connection modify vlan10 ethernet.mtu 2000Configure the IPv4 settings:
To use this VLAN device as a port of other devices, enter:
# nmcli connection modify vlan10 ipv4.method disabled- To use DHCP, no action is required.
To set a static IPv4 address, network mask, default gateway, and DNS server to the
vlan10connection, enter:# nmcli connection modify vlan10 ipv4.addresses '192.0.2.1/24' ipv4.gateway '192.0.2.254' ipv4.dns '192.0.2.253' ipv4.method manual
Configure the IPv6 settings:
To use this VLAN device as a port of other devices, enter:
# nmcli connection modify vlan10 ipv6.method disabled- To use stateless address autoconfiguration (SLAAC), no action is required.
To set a static IPv6 address, network mask, default gateway, and DNS server to the
vlan10connection, enter:# nmcli connection modify vlan10 ipv6.addresses '2001:db8:1::1/32' ipv6.gateway '2001:db8:1::fffe' ipv6.dns '2001:db8:1::fffd' ipv6.method manual
Activate the connection:
# nmcli connection up vlan10
Verification
Verify the settings:
# ip -d addr show vlan10
4: vlan10@enp1s0: <BROADCAST,MULTICAST,UP,LOWER_UP> mtu 1500 qdisc noqueue state UP group default qlen 1000
    link/ether 52:54:00:72:2f:6e brd ff:ff:ff:ff:ff:ff promiscuity 0
    vlan protocol 802.1Q id 10 <REORDER_HDR> numtxqueues 1 numrxqueues 1 gso_max_size 65536 gso_max_segs 65535
    inet 192.0.2.1/24 brd 192.0.2.255 scope global noprefixroute vlan10
       valid_lft forever preferred_lft forever
    inet6 2001:db8:1::1/32 scope global noprefixroute
       valid_lft forever preferred_lft forever
    inet6 fe80::8dd7:9030:6f8e:89e6/64 scope link noprefixroute
       valid_lft forever preferred_lft forever
Additional resources
- Configuring NetworkManager to avoid using a specific profile to provide a default gateway
-
nm-settings(5)man page
5.2. Configuring nested VLANs by using nmcli
802.1ad is a protocol used for Virtual Local Area Network (VLAN) tagging. It is also known as Q-in-Q tagging. You can use this technology to create multiple VLAN tags within a single Ethernet frame to achieve the following benefits:
- Increased network scalability by creating multiple isolated network segments within a VLAN. This enables you to segment and organize large networks into smaller, manageable units.
- Improved traffic management by isolating and controlling different types of network traffic. This can improve the network performance and reduce network congestion.
- Efficient resource utilization by enabling the creation of smaller, more targeted network segments.
- Enhanced security by isolating network traffic and reducing the risk of unauthorized access to sensitive data.
Prerequisites
- The interface you plan to use as a parent to the virtual VLAN interface supports VLAN tags.
If you configure the VLAN on top of a bond interface:
- The ports of the bond are up.
-
The bond is not configured with the
fail_over_mac=followoption. A VLAN virtual device cannot change its MAC address to match the parent’s new MAC address. In such a case, the traffic would still be sent with the incorrect source MAC address. -
The bond is usually not expected to get IP addresses from a DHCP server or IPv6 auto-configuration. Ensure it by setting the
ipv4.method=disableandipv6.method=ignoreoptions while creating the bond. Otherwise, if DHCP or IPv6 auto-configuration fails after some time, the interface might be brought down.
- The switch, the host is connected to, is configured to support VLAN tags. For details, see the documentation of your switch.
Procedure
Display the physical network devices:
# nmcli device status
DEVICE   TYPE      STATE         CONNECTION
enp1s0  ethernet  connected      enp1s0
...
Create the base VLAN interface. For example, to create a base VLAN interface named
vlan10that usesenp1s0as its parent interface and that tags packets with VLAN ID10, enter:# nmcli connection add type vlan con-name vlan10 dev enp1s0 vlan.id 10Note that the VLAN must be within the range from
0to4094.By default, the VLAN connection inherits the maximum transmission unit (MTU) from the parent interface. Optionally, set a different MTU value:
# nmcli connection modify vlan10 ethernet.mtu 2000Create the nested VLAN interface on top of the base VLAN interface:
# nmcli connection add type vlan con-name vlan10.20 dev enp1s0.10 id 20 vlan.protocol 802.1adThis command creates a new VLAN connection with a name of
vlan10.20and a VLAN ID of20on the parent VLAN connectionvlan10. Thedevoption specifies the parent network device. In this case it isenp1s0.10. Thevlan.protocoloption specifies the VLAN encapsulation protocol. In this case it is802.1ad(Q-in-Q).Configure the IPv4 settings of the nested VLAN interface:
- To use DHCP, no action is required.
To set a static IPv4 address, network mask, default gateway, and DNS server to the
vlan10.20connection, enter:# nmcli connection modify vlan10.20 ipv4.method manual ipv4.addresses 192.0.2.1/24 ipv4.gateway 192.0.2.254 ipv4.dns 192.0.2.200
Configure the IPv6 settings of the nested VLAN interface:
- To use stateless address autoconfiguration (SLAAC), no action is required.
To set a static IPv4 address, network mask, default gateway, and DNS server to the vlan10 connection, enter:
# nmcli connection modify vlan10 ipv4.addresses '192.0.2.1/24' ipv4.gateway '192.0.2.254' ipv4.dns '192.0.2.253' ipv4.method manual
Activate the profile:
# nmcli connection up vlan10.20
Verification
Verify the configuration of the nested VLAN interface:
# ip -d addr show enp1s0.10.20
10: enp1s0.10.20@enp1s0.10: <BROADCAST,MULTICAST,UP,LOWER_UP> mtu 1500 qdisc noqueue state UP group default qlen 1000
    link/ether 52:54:00:d2:74:3e brd ff:ff:ff:ff:ff:ff promiscuity 0 minmtu 0 maxmtu 65535
    vlan protocol 802.1ad id 20 <REORDER_HDR> numtxqueues 1 numrxqueues 1 gso_max_size 65536 gso_max_segs 65535 tso_max_size 65536 tso_max_segs 65535 gro_max_size 65536
    inet 192.0.2.1/24 brd 192.0.2.255 scope global noprefixroute enp1s0.10.20
       valid_lft forever preferred_lft forever
    inet6 2001:db8:1::1/32 scope global noprefixroute
       valid_lft forever preferred_lft forever
    inet6 fe80::ce3b:84c5:9ef8:d0e6/64 scope link noprefixroute
       valid_lft forever preferred_lft forever
Additional resources
-
nm-settings(5)man page
5.3. Configuring VLAN tagging by using the RHEL web console
Use the RHEL web console to configure VLAN tagging if you prefer to manage network settings using a web browser-based interface.
Prerequisites
- The interface you plan to use as a parent to the virtual VLAN interface supports VLAN tags.
If you configure the VLAN on top of a bond interface:
- The ports of the bond are up.
-
The bond is not configured with the
fail_over_mac=followoption. A VLAN virtual device cannot change its MAC address to match the parent’s new MAC address. In such a case, the traffic would still be sent with the incorrect source MAC address. - The bond is usually not expected to get IP addresses from a DHCP server or IPv6 auto-configuration. Ensure it by disabling the IPv4 and IPv6 protocol creating the bond. Otherwise, if DHCP or IPv6 auto-configuration fails after some time, the interface might be brought down.
- The switch, the host is connected to, is configured to support VLAN tags. For details, see the documentation of your switch.
Procedure
- Select the Networking tab in the navigation on the left side of the screen.
- Click in the Interfaces section.
- Select the parent device.
- Enter the VLAN ID.
Enter the name of the VLAN device or keep the automatically-generated name.
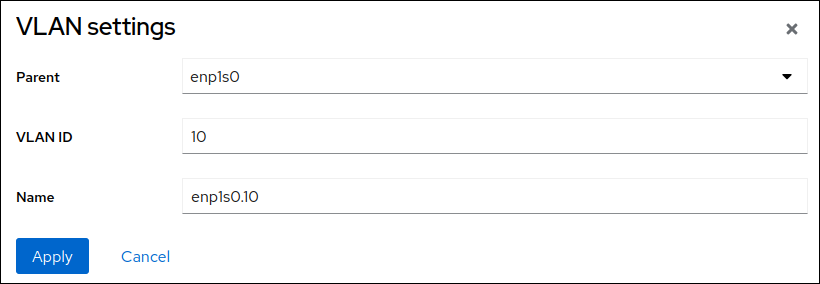
- Click .
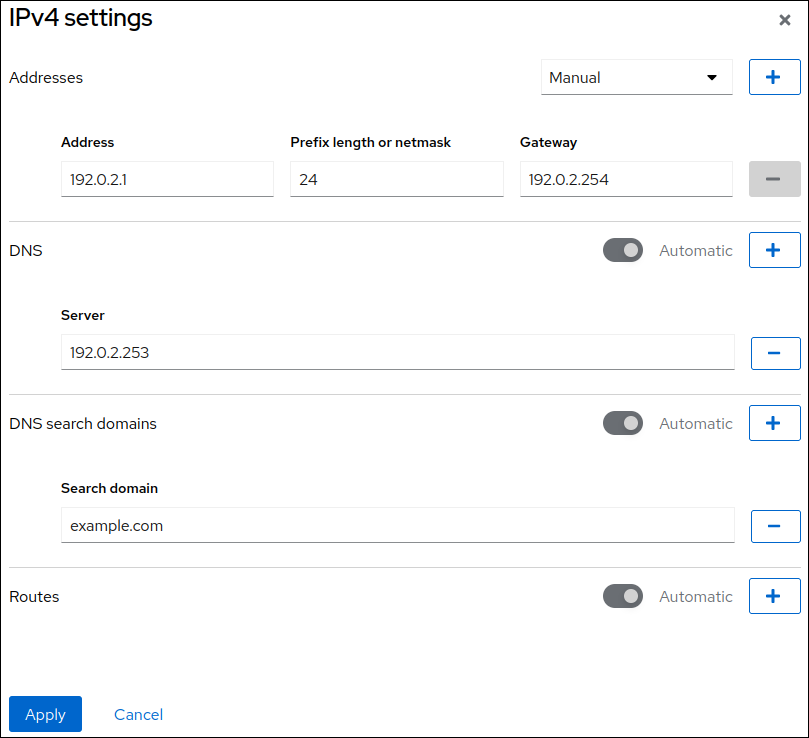
By default, the VLAN device uses a dynamic IP address. If you want to set a static IP address:
- Click the name of the VLAN device in the Interfaces section.
- Click Edit next to the protocol you want to configure.
- Select Manual next to Addresses, and enter the IP address, prefix, and default gateway.
- In the DNS section, click the button, and enter the IP address of the DNS server. Repeat this step to set multiple DNS servers.
- In the DNS search domains section, click the button, and enter the search domain.
If the interface requires static routes, configure them in the Routes section.
- Click
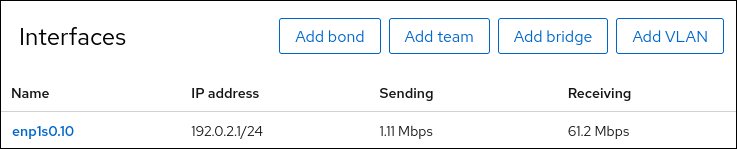
Verification
Select the Networking tab in the navigation on the left side of the screen, and check if there is incoming and outgoing traffic on the interface:
5.4. Configuring VLAN tagging by using nmtui
The nmtui application provides a text-based user interface for NetworkManager. You can use nmtui to configure VLAN tagging on a host without a graphical interface.
In nmtui:
- Navigate by using the cursor keys.
- Press a button by selecting it and hitting Enter.
- Select and deselect checkboxes by using Space.
Prerequisites
- The interface you plan to use as a parent to the virtual VLAN interface supports VLAN tags.
If you configure the VLAN on top of a bond interface:
- The ports of the bond are up.
-
The bond is not configured with the
fail_over_mac=followoption. A VLAN virtual device cannot change its MAC address to match the parent’s new MAC address. In such a case, the traffic would still be sent with the then incorrect source MAC address. -
The bond is usually not expected to get IP addresses from a DHCP server or IPv6 auto-configuration. Ensure it by setting the
ipv4.method=disableandipv6.method=ignoreoptions while creating the bond. Otherwise, if DHCP or IPv6 auto-configuration fails after some time, the interface might be brought down.
- The switch the host is connected to is configured to support VLAN tags. For details, see the documentation of your switch.
Procedure
If you do not know the network device name on which you want configure VLAN tagging, display the available devices:
# nmcli device status
DEVICE     TYPE      STATE                   CONNECTION
enp1s0     ethernet  unavailable             --
...
Start
nmtui:# nmtui-
Select
Edit a connection, and press Enter. -
Press the
Addbutton. -
Select
VLANfrom the list of network types, and press Enter. Optional: Enter a name for the NetworkManager profile to be created.
On hosts with multiple profiles, a meaningful name makes it easier to identify the purpose of a profile.
-
Enter the VLAN device name to be created into the
Devicefield. -
Enter the name of the device on which you want to configure VLAN tagging into the
Parentfield. -
Enter the VLAN ID. The ID must be within the range from
0to4094. Depending on your environment, configure the IP address settings in the
IPv4 configurationandIPv6 configurationareas accordingly. For this, press the button next to these areas, and select:-
Disabled, if this VLAN device does not require an IP address or you want to use it as a port of other devices. -
Automatic, if a DHCP server or stateless address autoconfiguration (SLAAC) dynamically assigns an IP address to the VLAN device. Manual, if the network requires static IP address settings. In this case, you must fill further fields:-
Press the
Showbutton next to the protocol you want to configure to display additional fields. Press the
Addbutton next toAddresses, and enter the IP address and the subnet mask in Classless Inter-Domain Routing (CIDR) format.If you do not specify a subnet mask, NetworkManager sets a
/32subnet mask for IPv4 addresses and/64for IPv6 addresses.- Enter the address of the default gateway.
-
Press the
Addbutton next toDNS servers, and enter the DNS server address. -
Press the
Addbutton next toSearch domains, and enter the DNS search domain.
-
Press the
Figure 5.1. Example of a VLAN connection with static IP address settings

-
-
Press the
OKbutton to create and automatically activate the new connection. -
Press the
Backbutton to return to the main menu. -
Select
Quit, and press Enter to close thenmtuiapplication.
Verification
Verify the settings:
# ip -d addr show vlan10
4: vlan10@enp1s0: <BROADCAST,MULTICAST,UP,LOWER_UP> mtu 1500 qdisc noqueue state UP group default qlen 1000
    link/ether 52:54:00:72:2f:6e brd ff:ff:ff:ff:ff:ff promiscuity 0
    vlan protocol 802.1Q id 10 <REORDER_HDR> numtxqueues 1 numrxqueues 1 gso_max_size 65536 gso_max_segs 65535
    inet 192.0.2.1/24 brd 192.0.2.255 scope global noprefixroute vlan10
       valid_lft forever preferred_lft forever
    inet6 2001:db8:1::1/32 scope global noprefixroute
       valid_lft forever preferred_lft forever
    inet6 fe80::8dd7:9030:6f8e:89e6/64 scope link noprefixroute
       valid_lft forever preferred_lft forever
5.5. Configuring VLAN tagging by using nm-connection-editor
You can configure Virtual Local Area Network (VLAN) tagging in a graphical interface using the nm-connection-editor application.
Prerequisites
- The interface you plan to use as a parent to the virtual VLAN interface supports VLAN tags.
If you configure the VLAN on top of a bond interface:
- The ports of the bond are up.
-
The bond is not configured with the
fail_over_mac=followoption. A VLAN virtual device cannot change its MAC address to match the parent’s new MAC address. In such a case, the traffic would still be sent with the incorrect source MAC address.
- The switch, the host is connected, to is configured to support VLAN tags. For details, see the documentation of your switch.
Procedure
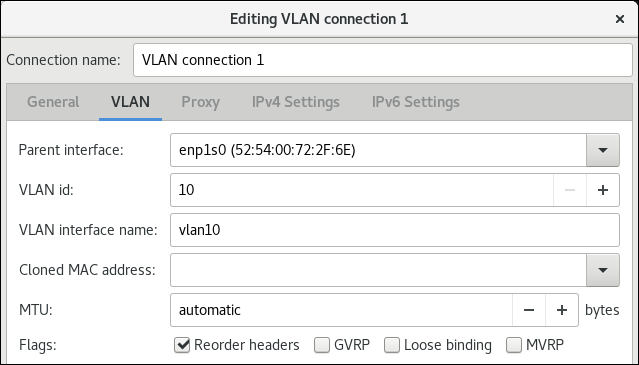
Open a terminal, and enter
nm-connection-editor:$ nm-connection-editor- Click the button to add a new connection.
- Select the VLAN connection type, and click .
On the VLAN tab:
- Select the parent interface.
- Select the VLAN id. Note that the VLAN must be within the range from 0 to 4094.
- By default, the VLAN connection inherits the maximum transmission unit (MTU) from the parent interface. Optionally, set a different MTU value.
Optionally, set the name of the VLAN interface and further VLAN-specific options.
Configure the IP address settings on both the IPv4 Settings and IPv6 Settings tabs:
- To use this bridge device as a port of other devices, set the Method field to Disabled.
- To use DHCP, leave the Method field at its default, Automatic (DHCP).
To use static IP settings, set the Method field to Manual and fill the fields accordingly:
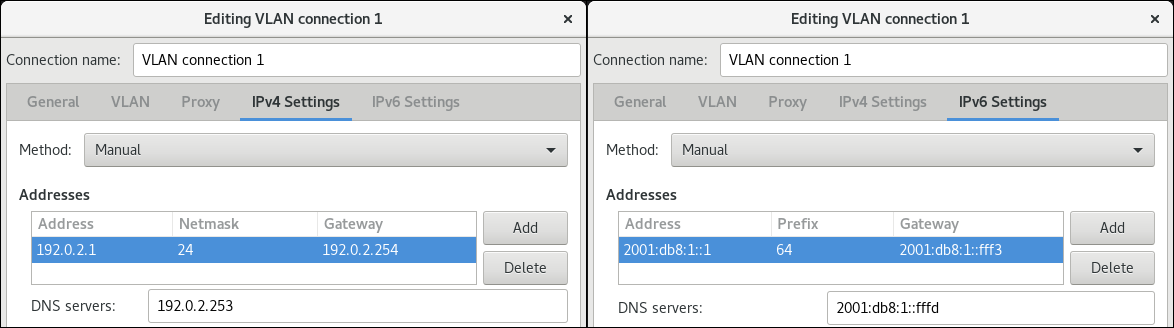
- Click .
-
Close
nm-connection-editor.
Verification
Verify the settings:
# ip -d addr show vlan10
4: vlan10@enp1s0: <BROADCAST,MULTICAST,UP,LOWER_UP> mtu 1500 qdisc noqueue state UP group default qlen 1000
    link/ether 52:54:00:d5:e0:fb brd ff:ff:ff:ff:ff:ff promiscuity 0
    vlan protocol 802.1Q id 10 <REORDER_HDR> numtxqueues 1 numrxqueues 1 gso_max_size 65536 gso_max_segs 65535
    inet 192.0.2.1/24 brd 192.0.2.255 scope global noprefixroute vlan10
       valid_lft forever preferred_lft forever
    inet6 2001:db8:1::1/32 scope global noprefixroute
       valid_lft forever preferred_lft forever
    inet6 fe80::8dd7:9030:6f8e:89e6/64 scope link noprefixroute
       valid_lft forever preferred_lft forever
5.6. Configuring VLAN tagging by using nmstatectl
Use the nmstatectl utility to configure Virtual Local Area Network VLAN through the Nmstate API. The Nmstate API ensures that, after setting the configuration, the result matches the configuration file. If anything fails, nmstatectl automatically rolls back the changes to avoid leaving the system in an incorrect state.
Depending on your environment, adjust the YAML file accordingly. For example, to use different devices than Ethernet adapters in the VLAN, adapt the base-iface attribute and type attributes of the ports you use in the VLAN.
Prerequisites
- To use Ethernet devices as ports in the VLAN, the physical or virtual Ethernet devices must be installed on the server.
-
The
nmstatepackage is installed.
Procedure
Create a YAML file, for example
~/create-vlan.yml, with the following content:--- interfaces: - name: vlan10 type: vlan state: up ipv4: enabled: true address: - ip: 192.0.2.1 prefix-length: 24 dhcp: false ipv6: enabled: true address: - ip: 2001:db8:1::1 prefix-length: 64 autoconf: false dhcp: false vlan: base-iface: enp1s0 id: 10 - name: enp1s0 type: ethernet state: up routes: config: - destination: 0.0.0.0/0 next-hop-address: 192.0.2.254 next-hop-interface: vlan10 - destination: ::/0 next-hop-address: 2001:db8:1::fffe next-hop-interface: vlan10 dns-resolver: config: search: - example.com server: - 192.0.2.200 - 2001:db8:1::ffbbThese settings define a VLAN with ID 10 that uses the
enp1s0device. As the child device, the VLAN connection has the following settings:-
A static IPv4 address -
192.0.2.1with the/24subnet mask -
A static IPv6 address -
2001:db8:1::1with the/64subnet mask -
An IPv4 default gateway -
192.0.2.254 -
An IPv6 default gateway -
2001:db8:1::fffe -
An IPv4 DNS server -
192.0.2.200 -
An IPv6 DNS server -
2001:db8:1::ffbb -
A DNS search domain -
example.com
-
A static IPv4 address -
Apply the settings to the system:
# nmstatectl apply ~/create-vlan.yml
Verification
Display the status of the devices and connections:
# nmcli device status
DEVICE      TYPE      STATE      CONNECTION
vlan10      vlan      connected  vlan10
Display all settings of the connection profile:
# nmcli connection show vlan10
connection.id:              vlan10
connection.uuid:            1722970f-788e-4f81-bd7d-a86bf21c9df5
connection.stable-id:       --
connection.type:            vlan
connection.interface-name:  vlan10
...
Display the connection settings in YAML format:
# nmstatectl show vlan0
Additional resources
-
nmstatectl(8)man page -
/usr/share/doc/nmstate/examples/directory
5.7. Configuring VLAN tagging by using the network RHEL system role
You can use the network RHEL system role to configure VLAN tagging. This example adds an Ethernet connection and a VLAN with ID 10 on top of this Ethernet connection. As the child device, the VLAN connection contains the IP, default gateway, and DNS configurations.
Depending on your environment, adjust the play accordingly. For example:
-
To use the VLAN as a port in other connections, such as a bond, omit the
ipattribute, and set the IP configuration in the child configuration. -
To use team, bridge, or bond devices in the VLAN, adapt the
interface_nameandtypeattributes of the ports you use in the VLAN.
Prerequisites
- You have prepared the control node and the managed nodes
- You are logged in to the control node as a user who can run playbooks on the managed nodes.
-
The account you use to connect to the managed nodes has
sudopermissions on them.
Procedure
Create a playbook file, for example
~/playbook.yml, with the following content:--- - name: Configure the network hosts: managed-node-01.example.com tasks: - name: Configure a VLAN that uses an Ethernet connection ansible.builtin.include_role: name: rhel-system-roles.network vars: network_connections: # Add an Ethernet profile for the underlying device of the VLAN - name: enp1s0 type: ethernet interface_name: enp1s0 autoconnect: yes state: up ip: dhcp4: no auto6: no # Define the VLAN profile - name: enp1s0.10 type: vlan ip: address: - "192.0.2.1/24" - "2001:db8:1::1/64" gateway4: 192.0.2.254 gateway6: 2001:db8:1::fffe dns: - 192.0.2.200 - 2001:db8:1::ffbb dns_search: - example.com vlan_id: 10 parent: enp1s0 state: upThese settings define a VLAN to operate on top of the
enp1s0device. The VLAN interface has the following settings:-
A static IPv4 address -
192.0.2.1with a/24subnet mask -
A static IPv6 address -
2001:db8:1::1with a/64subnet mask -
An IPv4 default gateway -
192.0.2.254 -
An IPv6 default gateway -
2001:db8:1::fffe -
An IPv4 DNS server -
192.0.2.200 -
An IPv6 DNS server -
2001:db8:1::ffbb -
A DNS search domain -
example.com VLAN ID -
10The
parentattribute in the VLAN profile configures the VLAN to operate on top of theenp1s0device. As the child device, the VLAN connection contains the IP, default gateway, and DNS configurations.
-
A static IPv4 address -
Validate the playbook syntax:
$ ansible-playbook --syntax-check ~/playbook.ymlNote that this command only validates the syntax and does not protect against a wrong but valid configuration.
Run the playbook:
$ ansible-playbook ~/playbook.yml
Additional resources
-
/usr/share/ansible/roles/rhel-system-roles.network/README.mdfile -
/usr/share/doc/rhel-system-roles/network/directory