
Chapter 14. Managing RHEL for Edge images
To manage the RHEL for Edge images, you can perform any of the following administrative tasks:
- Edit the RHEL for Edge image blueprint by using image builder in RHEL web console or in the command-line
- Build a commit update by using image builder command-line
- Update the RHEL for Edge images
-
Configure
rpm-ostreeremotes on nodes, to update node policy - Restore RHEL for Edge images manually or automatically by using greenboot
14.1. Editing a RHEL for Edge image blueprint by using image builder
You can edit the RHEL for Edge image blueprint to:
- Add additional components that you might require
- Modify the version of any existing component
- Remove any existing component
14.1.1. Adding a component to RHEL for Edge blueprint using image builder in RHEL web console
To add a component to a RHEL for Edge image blueprint, ensure that you have met the following prerequisites and then follow the procedure to edit the corresponding blueprint.
Prerequisites
- On a RHEL system, you have accessed the RHEL image builder dashboard.
- You have created a blueprint for RHEL for Edge image.
Procedure
On the RHEL image builder dashboard, click the blueprint that you want to edit.
To search for a specific blueprint, enter the blueprint name in the filter text box, and click .
On the upper right side of the blueprint, click .
The Edit blueprints wizard opens.
- On the Details page, update the blueprint name and click .
On the Packages page, follow the steps:
In the Available Packages, enter the package name that you want to add in the filter text box, and click .
A list with the component name appears.
- Click to add the component to the blueprint.
On the Review page, click .
The blueprint is now updated with the new package.
14.1.2. Removing a component from a blueprint using RHEL image builder in the web console
To remove one or more unwanted components from a blueprint that you created by using RHEL image builder, ensure that you have met the following prerequisites and then follow the procedure.
Prerequisites
- On a RHEL system, you have accessed the RHEL image builder dashboard.
- You have created a blueprint for RHEL for Edge image.
- You have added at least one component to the RHEL for Edge blueprint.
Procedure
On the RHEL image builder dashboard, click the blueprint that you want to edit.
To search for a specific blueprint, enter the blueprint name in the filter text box, and click .
On the upper right side of the blueprint, click .
The Edit blueprints wizard opens.
- On the Details page, update the blueprint name and click .
On the Packages page, follow the steps:
- From the Chosen packages, click to remove the chosen component. You can also click to remove all the packages at once.
On the Review page, click .
The blueprint is now updated.
14.1.3. Editing a RHEL for Edge image blueprint using command-line interface
You can change the specifications for your RHEL for Edge image blueprint by using RHEL image builder command-line. To do so, ensure that you have met the following prerequisites and then follow the procedure to edit the corresponding blueprint.
Prerequisites
- You have access to the RHEL image builder command-line.
- You have created a RHEL for Edge image blueprint.
Procedure
Save (export) the blueprint to a local text file:
# composer-cli blueprints save BLUEPRINT-NAME
Edit the
BLUEPRINT-NAME.tomlfile with a text editor of your choice and make your changes.Before finishing with the edits, verify that the file is a valid blueprint:
Increase the version number.
Ensure that you use a Semantic Versioning scheme.
Noteif you do not change the version, the patch component of the version is increased automatically.
Check if the contents are valid TOML specifications. See the TOML documentation for more information.
NoteTOML documentation is a community product and is not supported by Red Hat. You can report any issues with the tool at https://github.com/toml-lang/toml/issues.
- Save the file and close the editor.
Push (import) the blueprint back into RHEL image builder server:
# composer-cli blueprints push BLUEPRINT-NAME.toml
NoteWhen pushing the blueprint back into the RHEL image builder server, provide the file name including the
.tomlextension.Verify that the contents uploaded to RHEL image builder match your edits:
# composer-cli blueprints show BLUEPRINT-NAME
Check whether the components and versions listed in the blueprint and their dependencies are valid:
# composer-cli blueprints depsolve BLUEPRINT-NAME
14.2. Updating RHEL for Edge images
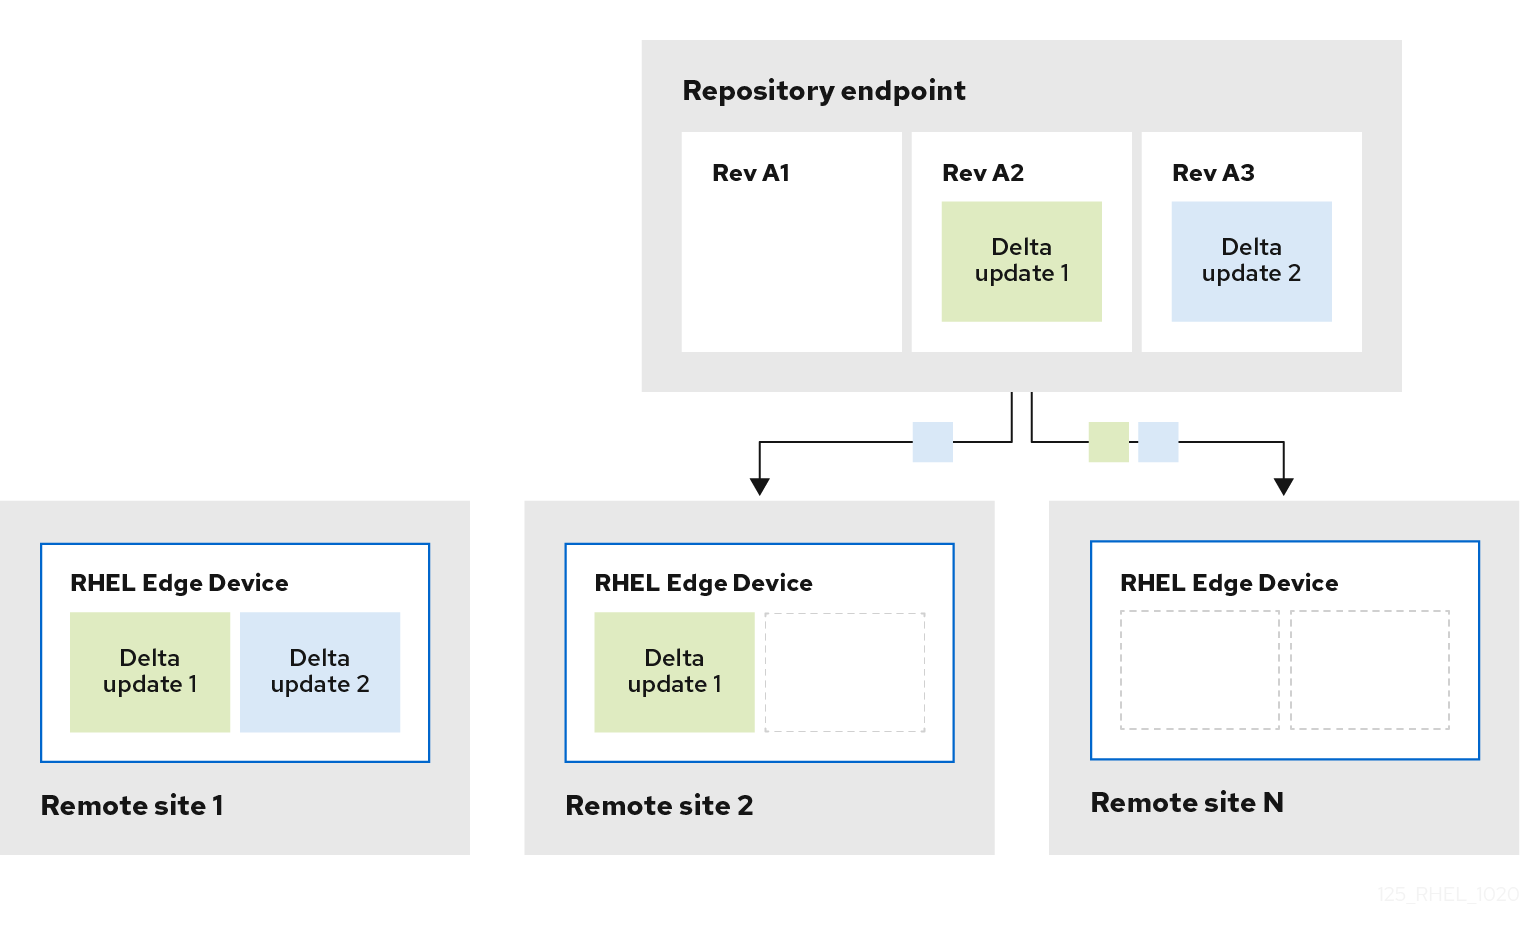
14.2.1. How RHEL for Edge image updates are deployed
With RHEL for Edge images, you can either deploy the updates manually or can automate the deployment process. The updates are applied in an atomic manner, where the state of each update is known, and the updates are staged and applied only upon reboot. Because no changes are seen until you reboot the device, you can schedule a reboot to ensure the highest possible uptime.
During the image update, only the updated operating system content is transferred over the network. This makes the deployment process more efficient compared to transferring the entire image. The operating system binaries and libraries in /usr are read-only, and the read and write state is maintained in /var and /etc directories.
When moving to a new deployment, the /etc and the /var directories are copied to the new deployment with read and write permissions. The /usr directory is copied as a soft link to the new deployment directory, with read-only permissions.
The following diagram illustrates the RHEL for Edge image update deployment process:
By default, the new system is booted using a procedure similar to a chroot operation, that is, the system enables control access to a filesystem while controlling the exposure to the underlying server environment. The new /sysroot directory mainly has the following parts:
-
Repository database at the
/sysroot/ostree/repodirectory. -
File system revisions at the
/sysroot/ostree/deploy/rhel/deploydirectory, which are created by each operation in the system update. -
The
/sysroot/ostree/bootdirectory, which links to deployments on the previous point. Note that/ostreeis a soft link to/sysroot/ostree. The files from the/sysroot/ostree/bootdirectory are not duplicated. The same file is used if it is not changed during the deployment. The files are hard-links to another file stored in the/sysroot/ostree/repo/objectsdirectory.
The operating system selects the deployment in the following way:
-
The
dracuttool parses theostreekernel argument in theinitramfs rootfile system and sets up the/usrdirectory as aread-onlybind mount. -
Bind the deployment directory in
/sysrootto/directory. -
Re-mount the operating system already mounted
dirsusing theMS_MOVEmount flag
If anything goes wrong, you can perform a deployment rollback by removing the old deployments with the rpm-ostree cleanup command. Each client machine contains an OSTree repository stored in /ostree/repo, and a set of deployments stored in /ostree/deploy/$STATEROOT/$CHECKSUM.
With the deployment updates in RHEL for Edge image, you can benefit from a better system consistency across multiple devices, easier reproducibility, and better isolation between the pre and post system states change.
14.2.2. Building a commit update
You can build a commit update after making a change in the blueprint, such as:
- Adding an additional package that your system requires
- Modifying the package version of any existing component
- Removing any existing package.
Prerequisites
- You have updated a system which is running RHEL image builder.
- You created a blueprint update.
- You have previously created an OSTree repository and served it through HTTP. See Setting up a web server to install RHEL for Edge images.
Procedure
Start the compose of the new commit image, with the following arguments:
--url,--ref,blueprint-name,edge-commit.# composer-cli compose start-ostree --ref rhel/9/x86_64/edge --url http://localhost:8080/repo <blueprint-name> edge-commitThe command instructs the compose process to fetch the metadata from the OStree repo before starting the compose. The resulting new OSTree commit contains a reference of the original OSTree commit as a parent image.
After the compose process finishes, fetch the
.tarfile.# composer-cli compose image <UUID>Extract the commit to a temporary directory, so that you can store the commit history in the OSTree repo.
$ tar -xf UUID.tar -C /var/tmpInspect the resulting OSTree repo commit, by using the
tar -xfcommand. It extracts the tar file to disk so you can inspect the resulting OSTree repo:$ ostree --repo=/var/tmp/repo log rhel/9/x86_64/edge commit d523ef801e8b1df69ddbf73ce810521b5c44e9127a379a4e3bba5889829546fa Parent: f47842de7e6859cee07d743d3c67949420874727883fa9dbbaeb5824ad949d91 ContentChecksum: f0f6703696331b661fa22d97358db48ba5f8b62711d9db83a00a79b3ae0dfe16 Date: 2023-06-04 20:22:28 /+0000 Version: 9
In the output example, there is a single OSTree commit in the repo that references a parent commit. The parent commit is the same checksum from the original OSTree commit that you previously made.
Merge the two commits by using the
ostree pull-localcommand:$ sudo ostree --repo=/var/srv/httpd/repo pull-local /var/tmp/repo 20 metadata, 22 content objects imported; 0 bytes content written
This command copies any new metadata and content from the location on the disk, for example,
/var/tmp, to a destination OSTree repo in/var/srv/httpd.
Verification
Inspect the target OSTree repo:
$ ostree --repo=/var/srv/httpd/repo log rhel/9/x86_64/edge
commit d523ef801e8b1df69ddbf73ce810521b5c44e9127a379a4e3bba5889829546fa
Parent:  f47842de7e6859cee07d743d3c67949420874727883fa9dbbaeb5824ad949d91
ContentChecksum:  f0f6703696331b661fa22d97358db48ba5f8b62711d9db83a00a79b3ae0dfe16
Date:  2023-06-04 20:22:28 /+0000
Version: 9
(no subject)

commit f47842de7e6859cee07d743d3c67949420874727883fa9dbbaeb5824ad949d91
ContentChecksum:  9054de3fe5f1210e3e52b38955bea0510915f89971e3b1ba121e15559d5f3a63
Date:  2023-06-04 20:01:08 /+0000
Version: 9
(no subject)
You can see that the target OSTree repo now contains two commits in the repository, in a logical order. After successful verification, you can update your RHEL for Edge system.
14.2.3. Deploying RHEL for Edge image updates manually
After you have edited a RHEL for Edge blueprint, you can update the image commit. RHEL image builder generates a new commit for the updated RHEL for Edge image. Use this new commit to deploy the image with latest package versions or with additional packages.
To deploy RHEL for Edge images updates, ensure that you meet the prerequisites and then follow the procedure.
Prerequisites
- On a RHEL system, you have accessed the RHEL image builder dashboard.
- You have created a RHEL for Edge image blueprint.
- You have edited the RHEL for Edge image blueprint.
Procedure
- On the RHEL image builder dashboard click .
On the Create Image window, perform the following steps:
In the Image output page:
- From the Select a blueprint dropdown list, select the blueprint that you edited.
-
From the Image output type dropdown list, select
RHEL for Edge Commit (.tar). Click .
In the OSTree settings page, enter:
- In the Repository URL field, enter the URL to the OSTree repository of the commit to embed in the image. For example, http://10.0.2.2:8080/repo/. See Setting up a web server to install RHEL for Edge image.
- In the Parent commit field, specify the parent commit ID that was previously generated. See Extracting RHEL for Edge image commit.
-
In the Ref field, you can either specify a name for your commit or leave it empty. By default, the web console specifies the
Refasrhel/9/arch_name/edge. Click .
In the Review page, check the customizations and click . RHEL image builder starts to create a RHEL for Edge image for the updated blueprint. The image creation process takes a few minutes to complete.
To view the RHEL for Edge image creation progress, click the blueprint name from the breadcrumbs, and then click the Images tab.
The resulting image includes the latest packages that you have added, if any, and have the original
commit IDas a parent.
Download the resulting RHEL for Edge Commit (
.tar) image.-
From the Images tab, click to save the RHEL for Edge Commit (
.tar) image to your system.
-
From the Images tab, click to save the RHEL for Edge Commit (
Extract the OSTree commit (
.tar) file.# tar -xf UUID-commit.tar -C UPGRADE_FOLDER
Upgrade the OSTree repo:
# ostree pull-local --repo http://10.0.2.2:8080/repo UPGRADE_FOLDER/repo OSTREE_REF
# ostree summary --update --repo http://10.0.2.2:8080/repo
Build a docker container, serving the child commit ID this time.
# podman build -t name-of-server --build-arg commit=UUID-child_commit.tar .
Run the container.
# podman run --rm -p 8000:80 name-of-serverOn the RHEL system provisioned, from the original edge image, verify the current status.
$ rpm-ostree status
If there is no new commit ID, run the following command to verify if there is any upgrade available:
$ rpm-ostree upgrade --check
The command output provides the current active OSTree commit ID.
Update OSTree to make the new OSTree commit ID available.
$ rpm-ostree upgrade
OSTree verifies if there is an update on the repository. If yes, it fetches the update and requests you to reboot your system so that you can activate the deployment of this new commit update.
Check the current status again:
$ rpm-ostree status
You can now see that there are 2 commits available:
- The active parent commit.
- A new commit that is not active and contains 1 added difference.
To activate the new deployment and to make the new commit active, reboot your system.
# systemctl reboot
The Anaconda Installer reboots into the new deployment. On the login screen, you can see a new deployment available for you to boot.
-
If you want to boot into the newest deployment (commit), the
rpm-ostreeupgrade command automatically orders the boot entries so that the new deployment is first in the list. Optionally, you can use the arrow key on your keyboard to select the GRUB menu entry and press . - Provide your login user account credentials.
Verify the OSTree status:
$ rpm-ostree status
The command output provides the active commit ID.
To view the changed packages, if any, run a diff between the parent commit and the new commit:
$ rpm-ostree db diff parent_commit new_commit
The update shows that the package you have installed is available and ready for use.
14.2.4. Deploying RHEL for Edge image updates manually using the command-line
After you have edited a RHEL for Edge blueprint, you can update the image commit. RHEL image builder generates a new commit for the updated RHEL for Edge image. Use the new commit to deploy the image with latest package versions or with additional packages using the CLI.
To deploy RHEL for Edge image updates using the CLI, ensure that you meet the prerequisites, and then follow the procedure.
Prerequisites
- You created the RHEL for Edge image blueprint.
- You edited the RHEL for Edge image blueprint. See Editing a RHEL for Edge image blueprint using command-line interface.
Procedure
Create the RHEL for Edge Commit (
.tar) image with the following arguments:# composer-cli compose start-ostree --ref ostree_ref --url URL-OSTree-repository -blueprint_name_ image-type
where
-
refis the reference you provided during the creation of the RHEL for Edge Container commit. For example,rhel/9/x86_64/edge. -
URL-OSTree-repositoryis the URL to the OSTree repository of the commit to embed in the image. For example, http://10.0.2.2:8080/repo/. See Setting up a web server to install RHEL for Edge image. image-typeisedge-commit.RHEL image builder creates a RHEL for Edge image for the updated blueprint.
-
Check the RHEL for Edge image creation progress:
# composer-cli compose status
NoteThe image creation processes can take up to ten to thirty minutes to complete.
The resulting image includes the latest packages that you have added, if any, and has the original
commit IDas a parent.- Download the resulting RHEL for Edge image. For more information, see Downloading a RHEL for Edge image using the RHEL image builder command-line interface.
Extract the OSTree commit.
# tar -xf UUID-commit.tar -C UPGRADE_FOLDER
- Serve the OSTree commit by using httpd. See Setting up a web server to install RHEL for Edge image.
Upgrade the OSTree repo:
# ostree pull-local --repo http://10.0.2.2:8080/repo UPGRADE_FOLDER/repo OSTREE_REF
# ostree summary --update --repo http://10.0.2.2:8080/repo
On the RHEL system provisioned from the original edge image, verify the current status:
$ rpm-ostree status
If there is no new commit ID, run the following command to verify if there is any upgrade available:
$ rpm-ostree upgrade --check
The command output provides the current active OSTree commit ID.
Update OSTree to make the new OSTree commit ID available:
$ rpm-ostree upgrade
OSTree verifies if there is an update on the repository. If yes, it fetches the update and requests you to reboot your system so that you can activate the deployment of the new commit update.
Check the current status again:
$ rpm-ostree status
You should now see that there are 2 commits available:
- The active parent commit
- A new commit that is not active and contains 1 added difference
To activate the new deployment and make the new commit active, reboot your system:
# systemctl reboot
The Anaconda Installer reboots into the new deployment. On the login screen, you can see a new deployment available for you to boot.
-
If you want to boot into the newest deployment, the
rpm-ostree upgradecommand automatically orders the boot entries so that the new deployment is first in the list. Optionally, you can use the arrow key on your keyboard to select the GRUB menu entry and press . - Log in using your account credentials.
Verify the OSTree status:
$ rpm-ostree status
The command output provides the active commit ID.
To view the changed packages, if any, run a diff between the parent commit and the new commit:
$ rpm-ostree db diff parent_commit new_commit
The update shows that the package you have installed is available and ready for use.
14.2.5. Deploying RHEL for Edge image updates manually for non-network-base deployments
After editing a RHEL for Edge blueprint, you can update your RHEL for Edge Commit image with those updates. Use RHEL image builder to generate a new commit to update your RHEL for Edge image that is already deployed in a VM, for example. Use this new commit to deploy the image with latest package versions or with additional packages.
To deploy RHEL for Edge images updates, ensure that you meet the prerequisites and then follow the procedure.
Prerequisites
- On your host, you have opened the RHEL image builder app from the web console in a browser.
- You have a RHEL for Edge system provisioned that is up and running.
- You have an OSTree repository that is being served over HTTP.
- You have edited a previously created RHEL for Edge image blueprint.
Procedure
- On your system host, on the RHEL image builder dashboard, click .
On the Create Image window, perform the following steps:
In the Image output page:
- From the Select a blueprint dropdown list, select the blueprint that you edited.
-
From the Image output type dropdown list, select
RHEL for Edge Container (.tar). - Click .
In the OSTree settings page, enter:
- In the Repository URL field, enter the URL to the OSTree repository of the commit to embed in the image. For example, http://10.0.2.2:8080/repo/. See Setting up a web server to install RHEL for Edge image.
- In the Parent commit field, specify the parent commit ID that was previously generated. See Extracting RHEL for Edge image commit.
-
In the Ref field, you can either specify a name for your commit or leave it empty. By default, the web console specifies the
Refasrhel/9/arch_name/edge. - Click .
In the Review page, check the customizations and click .
RHEL image builder creates a RHEL for Edge image for the updated blueprint.
Click the Images tab to view the progress of RHEL for Edge image creation.
NoteThe image creation process takes a few minutes to complete.
The resulting image includes the latest packages that you have added, if any, and has the original
commit IDas a parent.
Download the resulting RHEL for Edge image on your host:
-
From the Images tab, click to save the RHEL for Edge Container (
.tar) image to your host system.
-
From the Images tab, click to save the RHEL for Edge Container (
On the RHEL system provisioned from the original edge image, perform the following steps:
Load the RHEL for Edge Container image into Podman, serving the child commit ID this time.
$ cat ./child-commit_ID-container.tar | sudo podman load
Run
Podman.# sudo podman run -p 8080:8080 localhost/edge-test
Upgrade the OSTree repo:
# ostree pull-local --repo http://10.0.2.2:8080/repo UPGRADE_FOLDER/repo OSTREE_REF
# ostree summary --update --repo http://10.0.2.2:8080/repo
On the RHEL system provisioned, from the original edge image, verify the current status.
$ rpm-ostree status
If there is no new commit ID, run the following command to verify if there is any upgrade available:
$ rpm-ostree upgrade --check
If there are updates available, the command output provides information about the available updates in the OSTree repository, such as the current active OSTree commit ID. Else, it prompts a message informing that there are no updates available.
Update OSTree to make the new OSTree commit ID available.
$ rpm-ostree upgrade
OSTree verifies if there is an update on the repository. If yes, it fetches the update and requests you to reboot your system so that you can activate the deployment of this new commit update.
Check the current system status:
$ rpm-ostree status
You can now see that there are 2 commits available:
- The active parent commit.
- A new commit that is not active and contains 1 added difference.
To activate the new deployment and to make the new commit active, reboot your system.
# systemctl reboot
The Anaconda Installer reboots into the new deployment. On the login screen, you can see a new deployment available for you to boot.
To boot into the newest commit, run the following command to automatically order the boot entries so that the new deployment is first in the list:
$ rpm-ostree upgrade
Optionally, you can use the arrow key on your keyboard to select the GRUB menu entry and press .
- Provide your login user account credentials.
Verify the OSTree status:
$ rpm-ostree status
The command output provides the active commit ID.
To view the changed packages, if any, run a diff between the parent commit and the new commit:
$ rpm-ostree db diff parent_commit new_commit
The update shows that the package you have installed is available and ready for use.
14.3. Upgrading RHEL for Edge systems
14.3.1. Upgrading your RHEL 8 system to RHEL 9
You can upgrade your RHEL 8 system to RHEL 9 by using the rpm-ostree rebase command. The command fully supports the default package set of RHEL for Edge upgrades from the most recent updates of RHEL 8 to the most recent updates of RHEL 9. The upgrade downloads and installs the RHEL 9 image in the background. After the upgrade finishes, you must reboot your system to use the new RHEL 9 image.
The upgrade does not support every possible rpm package version and inclusions. You must test your package additions to ensure that these packages works as expected.
Prerequisites
- You have a running RHEL for Edge 8 system
- You have an OSTree repository server by HTTP
- You created a blueprint for RHEL for Edge 9 image that you will upgrade
Procedure
On the system where RHEL image builder runs, create a RHEL for Edge 9 image:
Start the image compose:
$ sudo composer-cli compose start blueprint-name edge-commitOptionally, you can also create the new RHEL for Edge 9 image by using a pre-existing OSTree repository, by using the following command:
$ sudo composer-cli compose start-ostree --ref rhel/8/x86_64/edge --parent parent-OSTree-REF --url URL blueprint-name edge-commit- After the compose finishes, download the image.
Extract the downloaded image to
/var/www/html/folder:$ sudo tar -xf image_file -C /var/www/htmlStart the
httpdservice:$ systemctl start httpd.service
On the RHEL for Edge device, check the current remote repository configuration:
$ sudo cat /etc/ostree/remotes.d/edge.confNoteDepending on how your Kickstart file is configured, the
/etc/ostree/remotes.drepository can be empty. If you configured your remote repository, you can see its configuration. For theedge-installer,raw-image, andsimplified-installerimages, the remote is configured by default.Check the current URL repository:
$ sudo ostree remote show-url edgeedge is the of the Ostree repository.
List the remote reference branches:
$ ostree remote refs edgeYou can see the following output:
Error: Remote refs not available; server has no summary file
To add the new repository:
Configure the URL key to add a remote repository. For example:
$ sudo ostree remote add \ --no-gpg-verify rhel9 http://192.168.122.1/repo/Configure the URL key to point to the RHEL 9 commit for the upgrade. For example:
$ sudo cat /etc/ostree/remotes.d/edge.conf

[remote "edge"]
url=http://192.168.122.1/ostree/repo/
gpg-verify=false
Confirm if the URL has been set to the new remote repository:
$ sudo cat /etc/ostree/remotes.d/rhel9.conf

[remote "edge"]
url=http://192.168.122.1/repo/
gpg-verify=false
See the new URL repository:
$ sudo ostree remote show-url rhel9 http://192.168.122.1/ostree-rhel9/repo/List the current remote list options:
$ sudo ostree remote list

output:
edge
rhel9
Rebase your system to the RHEL version, providing the reference path for the RHEL 9 version:
$ rpm-ostree rebase rhel9:rhel/9/x86_64/edgeReboot your system.
$ systemctl reboot- Enter your username and password.
Check the current system status:
$ rpm-ostree status
Verification
Check the current status of the currently running deployment:
$ rpm-ostree statusOptional: List the processor and tasks managed by the kernel in real-time.
$ topIf the upgrade does not support your requirements, you have the option to manually rollback to the previous stable deployment RHEL 8 version:
$ sudo rpm-ostree rollbackReboot your system. Enter your username and password:
$ systemctl rebootAfter rebooting, your system runs RHEL 9 successfully.
NoteIf your upgrade succeeds and you do not want to use the previous deployment RHEL 8 version, you can delete the old repository:
$ sudo ostree remote delete edge
Additional resources
14.4. Deploying RHEL for Edge automatic image updates
After you install a RHEL for Edge image on an Edge device, you can check for image updates available, if any, and can auto-apply them.
The rpm-ostreed-automatic.service (systemd service) and rpm-ostreed-automatic.timer (systemd timer) control the frequency of checks and upgrades. The available updates, if any, appear as staged deployments.
Deploying automatic image updates involves the following high-level steps:
- Update the image update policy
- Enable automatic download and staging of updates
14.4.1. Updating the RHEL for Edge image update policy
To update the image update policy, use the AutomaticUpdatePolicy and an IdleExitTimeout setting from the rpm-ostreed.conf file at /etc/rpm-ostreed.conf location on an Edge device.
The AutomaticUpdatePolicy settings controls the automatic update policy and has the following update checks options:
-
none: Disables automatic updates. By default, theAutomaticUpdatePolicysetting is set tonone. -
check: Downloads enough metadata to display available updates withrpm-ostreestatus. -
stage: Downloads and unpacks the updates that are applied on a reboot.
The IdleExitTimeout setting controls the time in seconds of inactivity before the daemon exit and has the following options:
- 0: Disables auto-exit.
-
60: By default, the
IdleExitTimeoutsetting is set to60.
To enable automatic updates, perform the following steps:
Procedure
In the
/etc/rpm-ostreed.conffile, update the following:-
Change the value of
AutomaticUpdatePolicytocheck. -
To run the update checks, specify a value in seconds for
IdleExitTimeout.
-
Change the value of
Reload the
rpm-ostreedservice and enable thesystemdtimer.# systemctl reload rpm-ostreed # systemctl enable rpm-ostreed-automatic.timer --now
Verify the
rpm-ostreestatus to ensure the automatic update policy is configured and time is active.# rpm-ostree status
The command output shows the following:
State: idle; auto updates enabled (check; last run <minutes> ago)
Additionally, the output also displays information about the available updates.
14.4.2. Enabling RHEL for Edge automatic download and staging of updates
After you update the image update policy to check for image updates, the updates if any are displayed along with the update details. If you decide to apply the updates, enable the policy to automatically download and stage the updates. The available image updates are then downloaded and staged for deployment. The updates are applied and take effect when you reboot the Edge device.
To enable the policy for automatic download and staging of updates, perform the following updates:
Procedure
-
In the
/etc/rpm-ostreed.conffile, update ‘AutomaticUpdatePolicy’ tostage. Reload the rpm-ostreed service.
# systemctl enable rpm-ostreed-automatic.timer --now
Verify the rpm-ostree status
# rpm-ostree status
The command output shows the following:
State: idle
AutomaticUpdates: stage; rpm-ostreed-automatic.timer: last run <time> ago
To initiate the updates, you can either wait for the timer to initiate the updates, or can manually start the service.
# systemctl start rpm-ostreed-automatic.service
After the updates are initiated, the rpm-ostree status shows the following:
# rpm-ostree status
State: busy
AutomaticUpdates: stage; rpm-ostreed-automatic.service: running
Transaction: automatic (stage)
When the update is complete, a new deployment is staged in the list of deployments, and the original booted deployment is left untouched. You can decide if you want to boot the system using the new deployment or can wait for the next update.
To view the list of deployments, run the
rpm-ostree statuscommand.Following is a sample output.
# rpm-ostree status
State: idle
AutomaticUpdates: stage; rpm-ostreed-automatic.timer: last run <time> ago
Deployments:
To view the list of deployments with the updated package details, run the
rpm-ostree status -vcommand.
14.5. Rolling back RHEL for Edge images
Because RHEL for Edge applies transactional updates to the operating system, you can either manually or automatically roll back the unsuccessful updates to the last known good state, which prevents system failure during updates. You can automate the verification and rollback process by using the greenboot framework.
The greenboot health check framework leverages rpm-ostree to run custom health checks on system startup. In case of an issue, the system rolls back to the last working state. When you deploy a rpm-ostree update, it runs scripts to check that critical services can still work after the update. If the system does not work, for example, due to some failed package, you can roll back the system to a previous stable version of the system. This process ensures that your RHEL for Edge device is in an operational state.
After you update an image, it creates a new image deployment while preserving the previous image deployment. You can verify whether the update was successful. If the update is unsuccessful, for example, due to a failed package, you can roll back the system to a previous stable version.
14.5.1. Introducing the greenboot checks
Greenboot is a Generic Health Check Framework for systemd available on rpm-ostree based systems. It contains the following RPM packages that you can install on your system:
greenboot- a package that contains the following functionalities:- Checking provided scripts
- Reboot the system if the check fails
- Rollback to a previous deployment the reboot did not solve the issue.
-
greenboot-default-health-checks- a set of optional and selected health checks provided by yourgreenbootsystem maintainers.
Greenboot works in a RHEL for Edge system by using health check scripts that run on the system to assess the system health and automate a rollback to the last healthy state in case of some software fails. These health checks scripts are available in the /etc/greenboot/check/required.d directory. Greenboot supports shell scripts for the health checks. Having a health check framework is especially useful when you need to check for software problems and perform system rollbacks on edge devices where direct serviceability is either limited or non-existent. When you install and configure health check scripts, it triggers the health checks to run every time the system starts.
You can create your own health check scripts to assess the health of your workloads and applications. These additional health check scripts are useful components of software problem checks and automatic system rollbacks.
You cannot use rollback in case of any health check failure on a system that is not using OSTree.
14.5.2. RHEL for Edge images roll back with greenboot
With RHEL for Edge images, only transactional updates are applied to the operating system. The transactional updates are atomic, which means that the updates are applied only if all the updates are successful, and there is support for rollbacks. With the transactional updates, you can easily rollback the unsuccessful updates to the last known good state, preventing system failure during updates.
Performing health checks is especially useful when you need to check for software problems and perform system rollbacks on edge devices where direct serviceability is limited or non-existent.
You cannot use rollback in case of an update failure on a system that is not using OSTree, even if health checks might run.
You can use intelligent rollbacks with the greenboot health check framework to automatically assess system health every time the system starts. You can obtain pre-configured health from the greenboot-default-health-checks subpackage. These checks are located in the /usr/lib/greenboot/check read-only directory in rpm-ostree systems.
Greenboot leverages rpm-ostree and runs custom health checks that run on system startup. In case of an issue, the system rolls back the changes and preserves the last working state. When you deploy an rpm-ostree update, it runs scripts to check that critical services can still work after the update. If the system does not work, the update rolls back to the last known working version of the system. This process ensures that your RHEL for Edge device is in an operational state.
You can obtain pre-configured health from the greenboot-default-health-checks`subpackage. These checks are located in the `/usr/lib/greenboot/check read-only directory in rpm-ostree systems. You can also configure shell scripts as the following types of checks:
Example 14.1. The greenboot directory structure
etc
└─ greenboot
   ├─ check
   |   └─ required.d
   |   └─ init.py
   └─ green.d
└─ red.d- Required
-
Contains the health checks that must not fail. Place required shell scripts in the
/etc/greenboot/check/required.ddirectory. If the scripts fail, greenboot retries them three times by default. You can configure the number of retries in the/etc/greenboot/greenboot.conffile by setting theGREENBOOT_MAX_BOOTSparameter to the number of retries you want.
After all retries fail, greenboot automatically initiates a rollback if one is available. If a rollback is not available, the system log output shows that you need to perform a manual intervention.
- Wanted
-
Contains the health checks that might fail without causing the system to roll back. Place wanted shell scripts in the
/etc/greenboot/check/wanted.ddirectory.Greenbootinforms that the script fails, the system health status remains unaffected and it does not perform a rollback neither a reboot.
You can also specify shell scripts that will run after a check:
- Green
-
Contains the scripts to run after a successful boot. Place these scripts into the
/etc/greenboot/green.d`directory.Greenbootinforms that the boot was successful. - Red
-
Contains the scripts to run after a failed boot. Place these scripts into the
/etc/greenboot/red.ddirectory. The system attempts to boot three times and in case of failure, it executes the scripts.Greenbootinforms that the boot failed.
The following diagram illustrates the RHEL for Edge image roll back process.

After booting the updated operating system, greenboot runs the scripts in the required.d and wanted.d directories. If any of the scripts fail in the required.d directory, greenboot runs any scripts in the red.d directory, and then reboots the system.
Greenboot makes 2 more attempts to boot on the upgraded system. If during the third boot attempt the scripts in required.d are still failing, greenboot runs the red.d scripts one last time, to ensure that the script in the red.d directory tried to make a corrective action to fix the issue and this was not successful. Then, greenboot rollbacks the system from the current rpm-ostree deployment to the previous stable deployment.
14.5.3. Greenboot health check status
When deploying your updated system, wait until the greenboot health checks have finished before making the changes to ensure that those changes are not lost if greenboot rolls the system back to an earlier state. If you want to make configuration changes or deploy applications you must wait until the greenboot health checks have finished. This ensures that your changes are not lost if greenboot rolls your rpm-ostree system back to an earlier state.
The greenboot-healthcheck service runs once and then exits. You can check the status of the service to know if it is done, and to know the outcome, by using the following commands:
systemctl is-active greenboot-healthcheck.service-
This command reports
activewhen the service has exited. If it the service did not even run it showsinactive. systemctl show --property=SubState --value greenboot-healthcheck.service-
Reports
exitedwhen done,runningwhile still running. systemctl show --property=Result --value greenboot-healthcheck.service-
Reports
successwhen the checks passed. systemctl show --property=ExecMainStatus --value greenboot-healthcheck.service- Reports the numerical exit code of the service, 0 means success and nonzero values mean a failure occurred.
cat /run/motd.d/boot-status- Shows a message, such as "Boot Status is GREEN - Health Check SUCCESS".
14.5.4. Checking greenboot health checks statuses
Check the status of greenboot health checks before making changes to the system or during troubleshooting. You can use any of the following commands to help you ensure that greenboot scripts have finished running.
Use one of the following options to check the statuses:
To see a report of health check status, enter:
$ systemctl show --property=SubState --value greenboot-healthcheck.service
The following outputs are possible:
-
startmeans that greenboot checks are still running. -
exitedmeans that checks have passed and greenboot has exited. Greenboot runs the scripts in thegreen.ddirectory when the system is in a healthy state. -
failedmeans that checks have not passed. Greenboot runs the scripts inred.ddirectory when the system is in this state and might restart the system.
-
To see a report showing the numerical exit code of the service, where
0means success and nonzero values mean a failure occurred, use the following command:$ systemctl show --property=ExecMainStatus --value greenboot-healthcheck.service
To see a report showing a message about boot status, such as
Boot Status is GREEN - Health Check SUCCESS, enter:$ cat /run/motd.d/boot-status
14.5.5. Manually rolling back RHEL for Edge images
When you upgrade your operating system, a new deployment is created, and the rpm-ostree package also keeps the previous deployment. If there are issues on the updated version of the operating system, you can manually roll back to the previous deployment with a single rpm-ostree command, or by selecting the previous deployment in the GRUB boot loader.
To manually roll back to a previous version, perform the following steps.
Prerequisite
- You updated your system and it failed.
Procedure
Optional: Check for the fail error message:
$ journalctl -u greenboot-healthcheck.service.
Run the
rollbackcommand:# rpm-ostree rollback
The command output provides details about the commit ID that is being moved and indicates a completed transaction with the details of the package being removed.
Reboot the system.
# systemctl reboot
The command activates the previous commit with the stable content. The changes are applied and the previous version is restored.
14.5.6. Rolling back RHEL for Edge images using an automated process
Greenboot checks provides a framework that is integrated into the boot process and can trigger rpm-ostree rollbacks when a health check fails. For the health checks, you can create a custom script that indicates whether a health check passed or failed. Based on the result, you can decide when a rollback should be triggered. The following procedure shows how to create an health check script example:
Procedure
Create a script that returns a standard exit code
0.For example, the following script ensures that the configured DNS server is available:
#!/bin/bash

DNS_SERVER=$(grep ^nameserver /etc/resolv.conf | head -n 1 | cut -f2 -d" ")
COUNT=0
# check DNS server is available
ping -c1 $DNS_SERVER
while [ $? != '0' ] && [ $COUNT -lt 10 ]; do
((COUNT++))
echo "Checking for DNS: Attempt $COUNT ."
sleep 10
ping -c 1 $DNS_SERVER
done
Include an executable file for the health checks at
/etc/greenboot/check/required.d/.chmod +x check-dns.sh
During the next reboot, the script is executed as part of the boot process, before the system enters the
boot-complete.targetunit. If the health checks are successful, no action is taken. If the health checks fail, the system will reboot several times, before marking the update as failed and rolling back to the previous update.
Verification steps
To check if the default gateway is reachable, run the following health check script:
Create a script that returns a standard exit code
0.#!/bin/bash DEF_GW=$(ip r | awk '/^default/ {print $3}') SCRIPT=$(basename $0) count=10 connected=0 ping_timeout=5 interval=5 while [ $count -gt 0 -a $connected -eq 0 ]; do echo "$SCRIPT: Pinging default gateway $DEF_GW" ping -c 1 -q -W $ping_timeout $DEF_GW > /dev/null 2>&1 && connected=1 || sleep $interval ((--count)) done if [ $connected -eq 1 ]; then echo "$SCRIPT: Default gateway $DEF_GW is reachable." exit 0 else echo "$SCRIPT: Failed to ping default gateway $DEF_GW!" 1>&2 exit 1 fiInclude an executable file for the health checks at
/etc/greenboot/check/required.d/directory.chmod +x check-gw.sh