
Managing replication in Identity Management
Preparing and verifying replication environments
Abstract
Making open source more inclusive
Red Hat is committed to replacing problematic language in our code, documentation, and web properties. We are beginning with these four terms: master, slave, blacklist, and whitelist. Because of the enormity of this endeavor, these changes will be implemented gradually over several upcoming releases. For more details, see our CTO Chris Wright’s message.
In Identity Management, planned terminology replacements include:
- block list replaces blacklist
- allow list replaces whitelist
- secondary replaces slave
The word master is being replaced with more precise language, depending on the context:
- IdM server replaces IdM master
- CA renewal server replaces CA renewal master
- CRL publisher server replaces CRL master
- multi-supplier replaces multi-master
Providing feedback on Red Hat documentation
We appreciate your feedback on our documentation. Let us know how we can improve it.
Submitting feedback through Jira (account required)
- Log in to the Jira website.
- Click Create in the top navigation bar
- Enter a descriptive title in the Summary field.
- Enter your suggestion for improvement in the Description field. Include links to the relevant parts of the documentation.
- Click Create at the bottom of the dialogue.
Chapter 1. Managing replication topology
This chapter describes how to manage replication between servers in an Identity Management (IdM) domain.
Additional resources
1.1. Explaining replication agreements, topology suffixes and topology segments
When you create a replica, Identity Management (IdM) creates a replication agreement between the initial server and the replica. The data that is replicated is then stored in topology suffixes and when two replicas have a replication agreement between their suffixes, the suffixes form a topology segment. These concepts are explained in more detail in the following sections:
1.1.1. Replication agreements between IdM replicas
When an administrator creates a replica based on an existing server, Identity Management (IdM) creates a replication agreement between the initial server and the replica. The replication agreement ensures that the data and configuration is continuously replicated between the two servers.
IdM uses multiple read/write replica replication. In this configuration, all replicas joined in a replication agreement receive and provide updates, and are therefore considered suppliers and consumers. Replication agreements are always bilateral.
Figure 1.1. Server and replica agreements
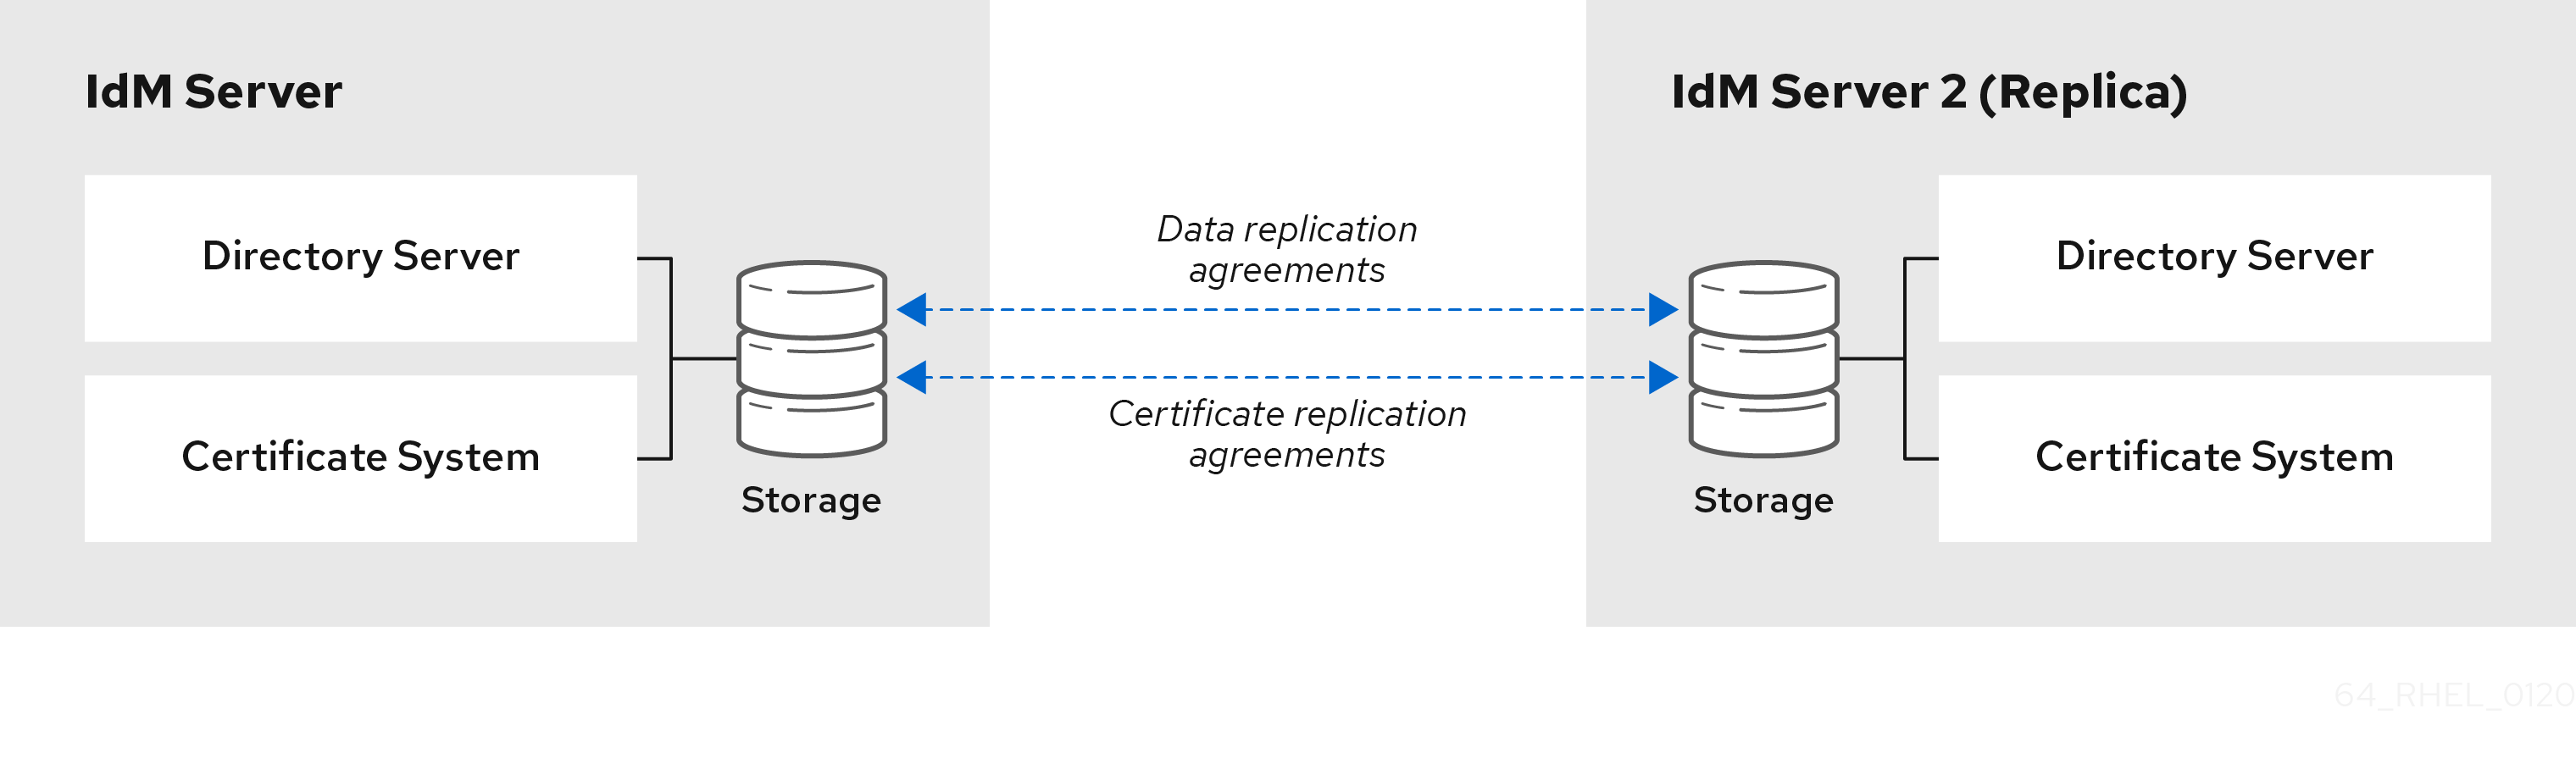
IdM uses two types of replication agreements:
- Domain replication agreements
- These agreements replicate the identity information.
- Certificate replication agreements
- These agreements replicate the certificate information.
Both replication channels are independent. Two servers can have one or both types of replication agreements configured between them. For example, when server A and server B have only domain replication agreement configured, only identity information is replicated between them, not the certificate information.
1.1.2. Topology suffixes
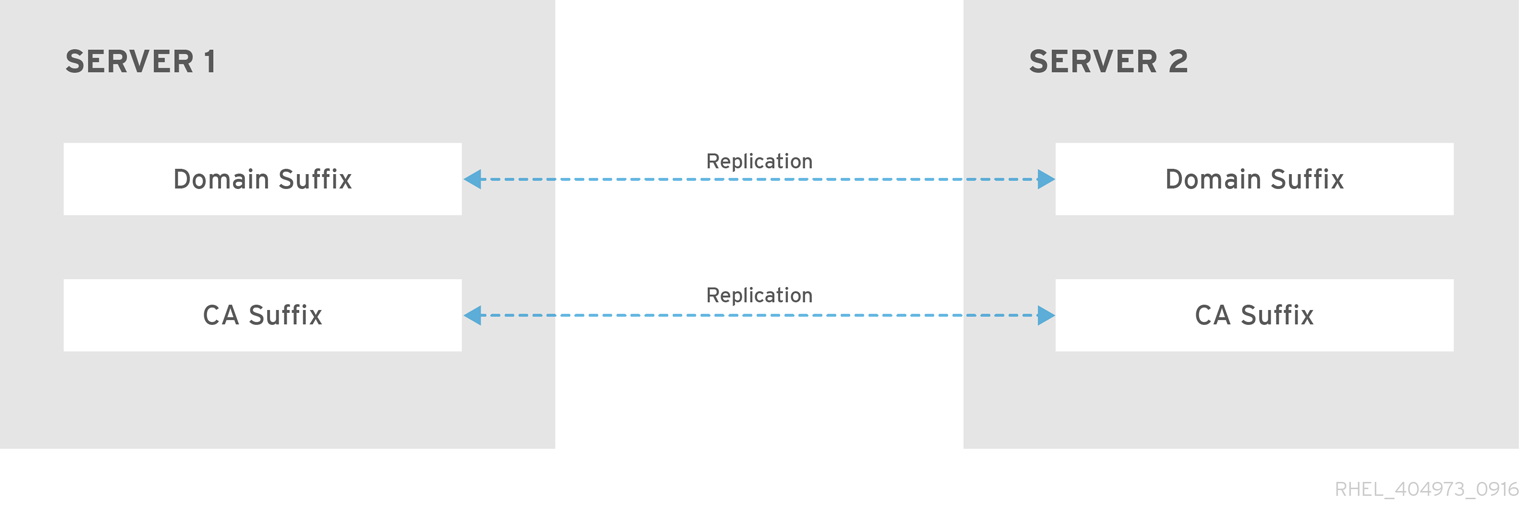
Topology suffixes store the data that is replicated. IdM supports two types of topology suffixes: domain and ca. Each suffix represents a separate server, a separate replication topology.
When a replication agreement is configured, it joins two topology suffixes of the same type on two different servers.
- The
domainsuffix: dc=example,dc=com The
domainsuffix contains all domain-related data.When two replicas have a replication agreement between their
domainsuffixes, they share directory data, such as users, groups, and policies.- The
casuffix: o=ipaca The
casuffix contains data for the Certificate System component. It is only present on servers with a certificate authority (CA) installed.When two replicas have a replication agreement between their
casuffixes, they share certificate data.
Figure 1.2. Topology suffixes
An initial topology replication agreement is set up between two servers by the ipa-replica-install script when installing a new replica.
Example 1.1. Viewing topology suffixes
The ipa topologysuffix-find command displays a list of topology suffixes:
$ ipa topologysuffix-find
---------------------------
2 topology suffixes matched
---------------------------
  Suffix name: ca
  Managed LDAP suffix DN: o=ipaca

  Suffix name: domain
  Managed LDAP suffix DN: dc=example,dc=com
----------------------------
Number of entries returned 2
----------------------------
1.1.3. Topology segments
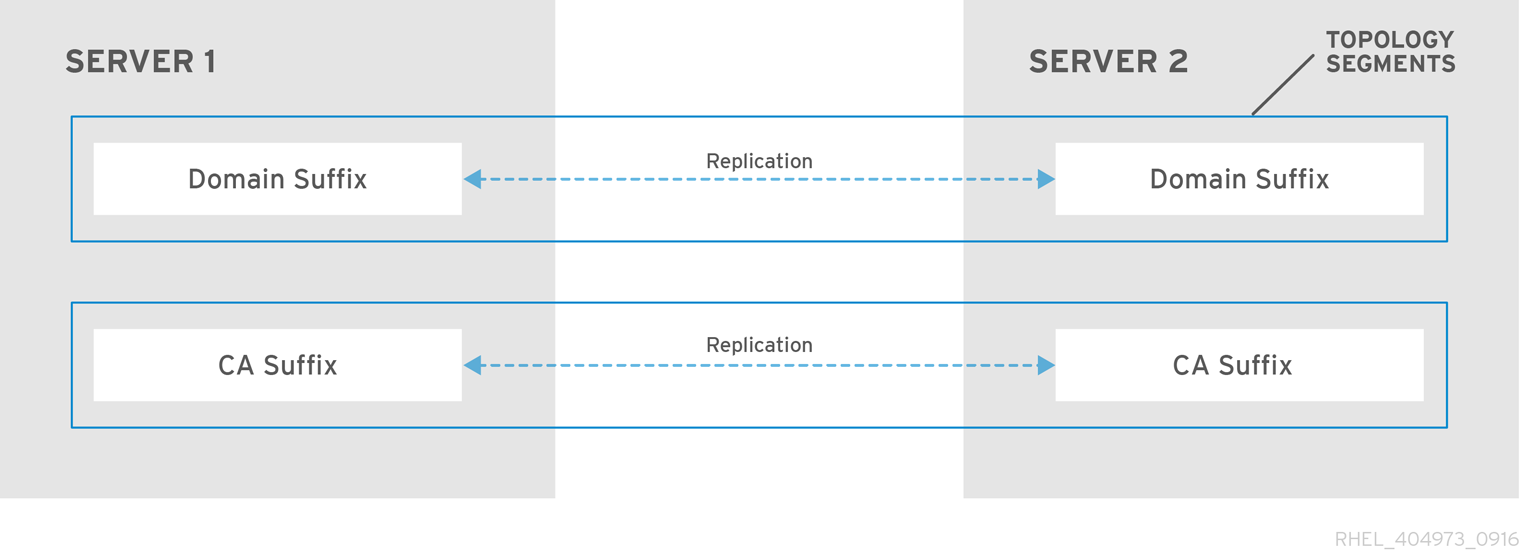
When two replicas have a replication agreement between their suffixes, the suffixes form a topology segment. Each topology segment consists of a left node and a right node. The nodes represent the servers joined in the replication agreement.
Topology segments in IdM are always bidirectional. Each segment represents two replication agreements: from server A to server B, and from server B to server A. The data is therefore replicated in both directions.
Figure 1.3. Topology segments
Example 1.2. Viewing topology segments
The ipa topologysegment-find command shows the current topology segments configured for the domain or CA suffixes. For example, for the domain suffix:
$ ipa topologysegment-find
Suffix name: domain
-----------------
1 segment matched
-----------------
  Segment name: server1.example.com-to-server2.example.com
  Left node: server1.example.com
  Right node: server2.example.com
  Connectivity: both
----------------------------
Number of entries returned 1
----------------------------
In this example, domain-related data is only replicated between two servers: server1.example.com and server2.example.com.
To display details for a particular segment only, use the ipa topologysegment-show command:
$ ipa topologysegment-show
Suffix name: domain
Segment name: server1.example.com-to-server2.example.com
  Segment name: server1.example.com-to-server2.example.com
  Left node: server1.example.com
  Right node: server2.example.com
  Connectivity: both
1.2. Using the topology graph to manage replication topology
The topology graph in the web UI shows the relationships between the servers in the domain. Using the Web UI, you can manipulate and transform the representation of the topology.
Accessing the topology graph
To access the topology graph:
- Select → → .
- If you make any changes to the topology that are not immediately reflected in the graph, click .
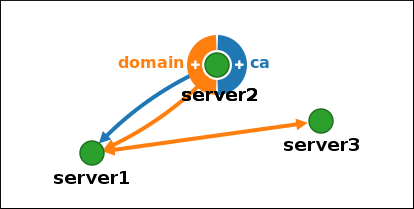
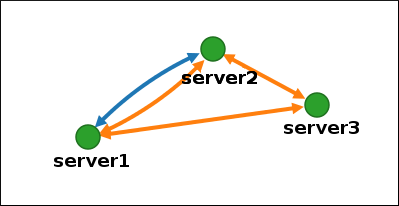
Interpreting the topology graph
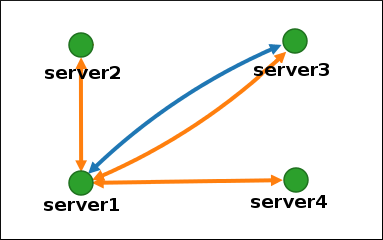
Servers joined in a domain replication agreement are connected by an orange arrow. Servers joined in a CA replication agreement are connected by a blue arrow.
- Topology graph example: recommended topology
The recommended topology example below shows one of the possible recommended topologies for four servers: each server is connected to at least two other servers, and more than one server is a CA server.
Figure 1.4. Recommended topology example

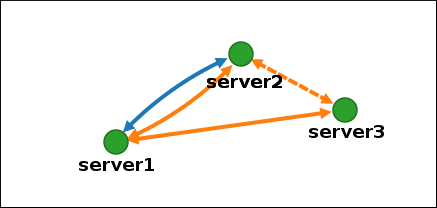
- Topology graph example: discouraged topology
In the discouraged topology example below,
server1is a single point of failure. All the other servers have replication agreements with this server, but not with any of the other servers. Therefore, ifserver1fails, all the other servers will become isolated.Avoid creating topologies like this.
Figure 1.5. Discouraged topology example: Single Point of Failure
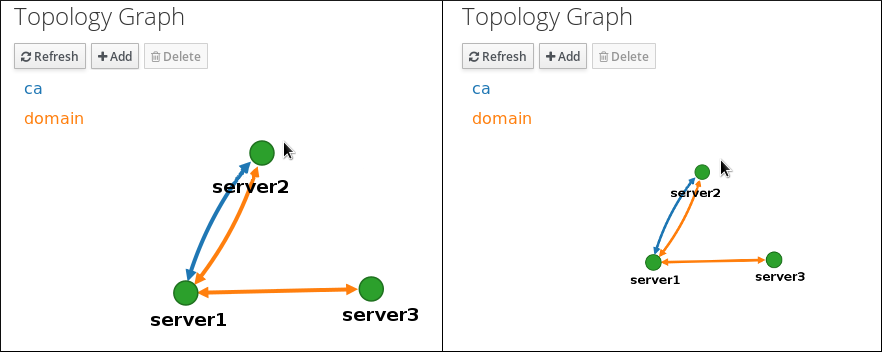
Customizing the topology view
You can move individual topology nodes by dragging the mouse:
Figure 1.6. Moving topology graph nodes
You can zoom in and zoom out the topology graph using the mouse wheel:
Figure 1.7. Zooming the topology graph
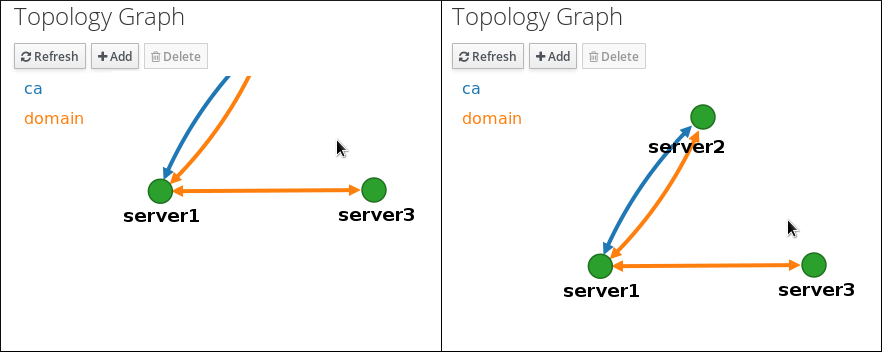
You can move the canvas of the topology graph by holding the left mouse button:
Figure 1.8. Moving the topology graph canvas
1.3. Setting up replication between two servers using the Web UI
Using the Web interface of Identity Management (IdM) you can choose two servers and create new replication agreement between them.
Prerequisites
- You have the IdM administrator credentials.
Procedure
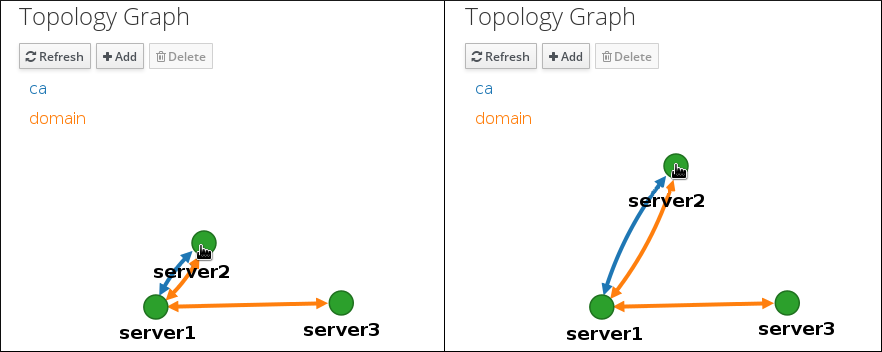
In the topology graph, hover your mouse over one of the server nodes.
Figure 1.9. Domain or CA options
-
Click on the
domainor thecapart of the circle depending on what type of topology segment you want to create. A new arrow representing the new replication agreement appears under your mouse pointer. Move your mouse to the other server node, and click on it.
Figure 1.10. Creating a new segment

-
In the
Add topology segmentwindow, click to confirm the properties of the new segment.
The new topology segment between the two servers joins them in a replication agreement. The topology graph now shows the updated replication topology:
Figure 1.11. New segment created
1.4. Stopping replication between two servers using the Web UI
Using the web interface of Identity Management (IdM) you can remove a replication agreement from servers.
Prerequisites
- You have the IdM administrator credentials.
Procedure
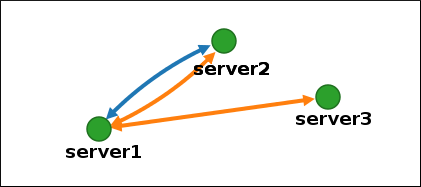
Click on an arrow representing the replication agreement you want to remove. This highlights the arrow.
Figure 1.12. Topology segment highlighted
- Click .
-
In the
Confirmationwindow, click .
IdM removes the topology segment between the two servers, which deletes their replication agreement. The topology graph now shows the updated replication topology:
Figure 1.13. Topology segment deleted
1.5. Setting up replication between two servers using the CLI
You can configure replication agreements between two servers using the ipa topologysegment-add command.
Prerequisites
- You have the IdM administrator credentials.
Procedure
Use the
ipa topologysegment-addcommand to create a topology segment for the two servers. When prompted, provide:-
the required topology suffix:
domainorca - the left node and the right node, representing the two servers
optionally, a custom name for the segment
For example:
$ ipa topologysegment-add
Suffix name: domain
Left node: server1.example.com
Right node: server2.example.com
Segment name [server1.example.com-to-server2.example.com]: new_segment
---------------------------
Added segment "new_segment"
---------------------------
  Segment name: new_segment
  Left node: server1.example.com
  Right node: server2.example.com
  Connectivity: both
Adding the new segment joins the servers in a replication agreement.
-
the required topology suffix:
Optional. Use the
ipa topologysegment-showcommand to verify that the new segment is configured.$ ipa topologysegment-show Suffix name: domain Segment name: new_segment Segment name: new_segment Left node: server1.example.com Right node: server2.example.com Connectivity: both
1.6. Stopping replication between two servers using the CLI
You can terminate replication agreements from command line using the ipa topology segment-del command.
Prerequisites
- You have the IdM administrator credentials.
Procedure
To stop replication, you must delete the corresponding replication segment between the servers. To do that, you need to know the segment name.
If you do not know the name, use the
ipa topologysegment-findcommand to display all segments, and locate the required segment in the output. When prompted, provide the required topology suffix:domainorca. For example:$ ipa topologysegment-find Suffix name: domain ------------------ 8 segments matched ------------------ Segment name: new_segment Left node: server1.example.com Right node: server2.example.com Connectivity: both ... ---------------------------- Number of entries returned 8 ----------------------------
Use the
ipa topologysegment-delcommand to remove the topology segment joining the two servers.$ ipa topologysegment-del Suffix name: domain Segment name: new_segment ----------------------------- Deleted segment "new_segment" -----------------------------
Deleting the segment removes the replication agreement.
Optional. Use the
ipa topologysegment-findcommand to verify that the segment is no longer listed.$ ipa topologysegment-find Suffix name: domain ------------------ 7 segments matched ------------------ Segment name: server2.example.com-to-server3.example.com Left node: server2.example.com Right node: server3.example.com Connectivity: both ... ---------------------------- Number of entries returned 7 ----------------------------
1.7. Removing server from topology using the Web UI
You can use Identity Management (IdM) web interface to remove a server from the topology.
Prerequisites
- You have the IdM administrator credentials.
- The server you want to remove is not the only server connecting other servers with the rest of the topology; this would cause the other servers to become isolated, which is not allowed.
- The server you want to remove is not your last CA or DNS server.
Removing a server is an irreversible action. If you remove a server, the only way to introduce it back into the topology is to install a new replica on the machine.
Procedure
To remove a server from the topology without uninstalling the server components from the machine:
- Select → → .
Click on the name of the server you want to delete.
Figure 1.14. Selecting a server
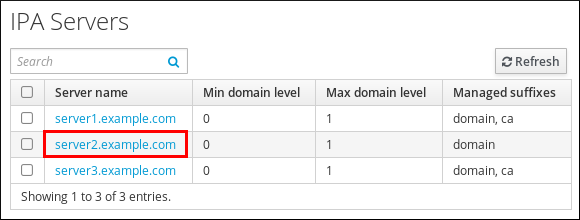
- Click .
1.8. Removing server from topology using the CLI
You can use the command line interface to remove a server from the topology.
Prerequisites
- You have the IdM administrator credentials.
- The server you want to remove is not the only server connecting other servers with the rest of the topology; this would cause the other servers to become isolated, which is not allowed
- The server you want to remove is not your last CA or DNS server.
Removing a server is an irreversible action. If you remove a server, the only way to introduce it back into the topology is to install a new replica on the machine.
Procedure
To remove server1.example.com:
On another server, run the
ipa server-delcommand to removeserver1.example.com. The command removes all topology segments pointing to the server:[user@server2 ~]$ ipa server-del Server name: server1.example.com Removing server1.example.com from replication topology, please wait... ---------------------------------------------------------- Deleted IPA server "server1.example.com" ----------------------------------------------------------
Optional: on
server1.example.com, run theipa server-install --uninstallcommand to uninstall the server components from the machine.[root@server1 ~]# ipa server-install --uninstall
1.9. Viewing server roles on an IdM server using the Web UI
Based on the services installed on an IdM server, it can perform various server roles. For example:
- CA server
- DNS server
- Key recovery authority (KRA) server.
For a complete list of the supported server roles, see → → .
-
Role status
absentmeans that no server in the topology is performing the role. -
Role status
enabledmeans that one or more servers in the topology are performing the role.
Figure 1.15. Server roles in the web UI

1.10. Viewing server roles on an IdM server using the CLI
Based on the services installed on an IdM server, it can perform various server roles. For example:
- CA server
- DNS server
- Key recovery authority (KRA) server.
You can view which servers perform which roles in the topology using the following commands.
-
The
ipa config-showcommand displays all CA servers and the current CA renewal server:
$ ipa config-show
  ...
  IPA masters: server1.example.com, server2.example.com, server3.example.com
  IPA CA servers: server1.example.com, server2.example.com
  IPA CA renewal master: server1.example.com
-
The
ipa server-showcommand displays a list of roles enabled on a particular server. For example, for a list of roles enabled on server.example.com:
$ ipa server-show
Server name: server.example.com
  ...
  Enabled server roles: CA server, DNS server, KRA server
-
The
ipa server-find --servrolesearches for all servers with a particular server role enabled. For example, to search for all CA servers:
$ ipa server-find --servrole "CA server"
---------------------
2 IPA servers matched
---------------------
  Server name: server1.example.com
  ...

  Server name: server2.example.com
  ...
----------------------------
Number of entries returned 2
----------------------------
1.11. Promoting a replica to a CA renewal server and CRL publisher server
If your IdM deployment uses an embedded certificate authority (CA), one of the IdM CA servers acts as the CA renewal server, a server that manages the renewal of CA subsystem certificates. One of the IdM CA servers also acts as the IdM CRL publisher server, a server that generates certificate revocation lists. By default, the CA renewal server and CRL publisher server roles are installed on the first server on which the system administrator installed the CA role using the ipa-server-install or ipa-ca-install command.
Prerequisites
- You have the IdM administrator credentials.
Chapter 2. Preparing your environment for managing IdM using Ansible playbooks
As a system administrator managing Identity Management (IdM), when working with Red Hat Ansible Engine, it is good practice to do the following:
- Create a subdirectory dedicated to Ansible playbooks in your home directory, for example ~/MyPlaybooks.
-
Copy and adapt sample Ansible playbooks from the
/usr/share/doc/ansible-freeipa/*and/usr/share/doc/rhel-system-roles/*directories and subdirectories into your ~/MyPlaybooks directory. - Include your inventory file in your ~/MyPlaybooks directory.
Using this practice, you can find all your playbooks in one place and you can run your playbooks without invoking root privileges.
You only need root privileges on the managed nodes to execute the ipaserver, ipareplica, ipaclient and ipabackup ansible-freeipa roles. These roles require privileged access to directories and the dnf software package manager.
Follow this procedure to create the ~/MyPlaybooks directory and configure it so that you can use it to store and run Ansible playbooks.
Prerequisites
- You have installed an IdM server on your managed nodes, server.idm.example.com and replica.idm.example.com.
- You have configured DNS and networking so you can log in to the managed nodes, server.idm.example.com and replica.idm.example.com, directly from the control node.
-
You know the IdM
adminpassword.
Procedure
Create a directory for your Ansible configuration and playbooks in your home directory:
$ mkdir ~/MyPlaybooks/Change into the ~/MyPlaybooks/ directory:
$ cd ~/MyPlaybooksCreate the ~/MyPlaybooks/ansible.cfg file with the following content:
[defaults]
inventory = /home/your_username/MyPlaybooks/inventory

[privilege_escalation]
become=True
Create the ~/MyPlaybooks/inventory file with the following content:
[eu]
server.idm.example.com

[us]
replica.idm.example.com

[ipaserver:children]
eu
us
This configuration defines two host groups, eu and us, for hosts in these locations. Additionally, this configuration defines the ipaserver host group, which contains all hosts from the eu and us groups.
[Optional] Create an SSH public and private key. To simplify access in your test environment, do not set a password on the private key:
$ ssh-keygenCopy the SSH public key to the IdM
adminaccount on each managed node:$ ssh-copy-id admin@server.idm.example.com $ ssh-copy-id admin@replica.idm.example.com
These commands require that you enter the IdM
adminpassword.
Additional resources
Chapter 3. Using Ansible to manage the replication topology in IdM
You can maintain multiple Identity Management (IdM) servers and let them replicate each other for redundancy purposes to mitigate or prevent server loss. For example, if one server fails, the other servers keep providing services to the domain. You can also recover the lost server by creating a new replica based on one of the remaining servers.
Data stored on an IdM server is replicated based on replication agreements: when two servers have a replication agreement configured, they share their data. The data that is replicated is stored in the topology suffixes. When two replicas have a replication agreement between their suffixes, the suffixes form a topology segment.
This chapter describes how to use Red Hat Ansible Engine to manage IdM replication agreements, topology segments, and topology suffixes. The chapter contains the following sections:
- Using Ansible to ensure a replication agreement exists in IdM
- Using Ansible to ensure replication agreements exist between multiple IdM replicas
- Using Ansible to check if a replication agreement exists between two replicas
- Using Ansible to verify that a topology suffix exists in IdM
- Using Ansible to re-initialize an IdM replica
- Using Ansible to ensure a replication agreement is absent in IdM
3.1. Using Ansible to ensure a replication agreement exists in IdM
Data stored on an Identity Management (IdM) server is replicated based on replication agreements: when two servers have a replication agreement configured, they share their data. Replication agreements are always bilateral: the data is replicated from the first replica to the other one as well as from the other replica to the first one.
Follow this procedure to use an Ansible playbook to ensure that a replication agreement of the domain type exists between server.idm.example.com and replica.idm.example.com.
Prerequisites
- Ensure that you understand the recommendations for designing your IdM topology listed in Guidelines for connecting IdM replicas in a topology.
-
You know the IdM
adminpassword. You have configured your Ansible control node to meet the following requirements:
- You are using Ansible version 2.14 or later.
-
You have installed the
ansible-freeipapackage on the Ansible controller. - The example assumes that in the ~/MyPlaybooks/ directory, you have created an Ansible inventory file with the fully-qualified domain name (FQDN) of the IdM server.
-
The example assumes that the secret.yml Ansible vault stores your
ipaadmin_password.
-
The target node, that is the node on which the
ansible-freeipamodule is executed, is part of the IdM domain as an IdM client, server or replica.
Procedure
Navigate to your ~/MyPlaybooks/ directory:
$ cd ~/MyPlaybooks/Copy the
add-topologysegment.ymlAnsible playbook file located in the/usr/share/doc/ansible-freeipa/playbooks/topology/directory:$ cp /usr/share/doc/ansible-freeipa/playbooks/topology/add-topologysegment.yml add-topologysegment-copy.yml-
Open the
add-topologysegment-copy.ymlfile for editing. Adapt the file by setting the following variables in the
ipatopologysegmenttask section:-
Set the
ipaadmin_passwordvariable to the password of the IdMadmin. -
Set the
suffixvariable to eitherdomainorca, depending on what type of segment you want to add. -
Set the
leftvariable to the name of the IdM server that you want to be the left node of the replication agreement. -
Set the
rightvariable to the name of the IdM server that you want to be the right node of the replication agreement. -
Ensure that the
statevariable is set topresent.
This is the modified Ansible playbook file for the current example:
--- - name: Playbook to handle topologysegment hosts: ipaserver vars_files: - /home/user_name/MyPlaybooks/secret.yml tasks: - name: Add topology segment ipatopologysegment: ipaadmin_password: "{{ ipaadmin_password }}" suffix: domain left: server.idm.example.com right: replica.idm.example.com state: present-
Set the
- Save the file.
Run the Ansible playbook. Specify the playbook file, the file storing the password protecting the secret.yml file, and the inventory file:
$ ansible-playbook --vault-password-file=password_file -v -i inventory add-topologysegment-copy.yml
Additional resources
- See Explaining Replication Agreements, Topology Suffixes, and Topology Segments.
-
See the
README-topology.mdfile in the/usr/share/doc/ansible-freeipa/directory. -
See the sample playbooks in the
/usr/share/doc/ansible-freeipa/playbooks/topologydirectory.
3.2. Using Ansible to ensure replication agreements exist between multiple IdM replicas
Data stored on an Identity Management (IdM) server is replicated based on replication agreements: when two servers have a replication agreement configured, they share their data. Replication agreements are always bilateral: the data is replicated from the first replica to the other one as well as from the other replica to the first one.
Follow this procedure to ensure replication agreements exist between multiple pairs of replicas in IdM.
Prerequisites
- Ensure that you understand the recommendations for designing your IdM topology listed in Connecting the replicas in a topology.
-
You know the IdM
adminpassword. You have configured your Ansible control node to meet the following requirements:
- You are using Ansible version 2.14 or later.
-
You have installed the
ansible-freeipapackage on the Ansible controller. - The example assumes that in the ~/MyPlaybooks/ directory, you have created an Ansible inventory file with the fully-qualified domain name (FQDN) of the IdM server.
-
The example assumes that the secret.yml Ansible vault stores your
ipaadmin_password.
-
The target node, that is the node on which the
ansible-freeipamodule is executed, is part of the IdM domain as an IdM client, server or replica.
Procedure
Navigate to your ~/MyPlaybooks/ directory:
$ cd ~/MyPlaybooks/Copy the
add-topologysegments.ymlAnsible playbook file located in the/usr/share/doc/ansible-freeipa/playbooks/topology/directory:$ cp /usr/share/doc/ansible-freeipa/playbooks/topology/add-topologysegments.yml add-topologysegments-copy.yml-
Open the
add-topologysegments-copy.ymlfile for editing. Adapt the file by setting the following variables in the
varssection:-
Set the
ipaadmin_passwordvariable to the password of the IdMadmin. For every topology segment, add a line in the
ipatopology_segmentssection and set the following variables:-
Set the
suffixvariable to eitherdomainorca, depending on what type of segment you want to add. -
Set the
leftvariable to the name of the IdM server that you want to be the left node of the replication agreement. -
Set the
rightvariable to the name of the IdM server that you want to be the right node of the replication agreement.
-
Set the
-
Set the
In the
taskssection of theadd-topologysegments-copy.ymlfile, ensure that thestatevariable is set topresent.This is the modified Ansible playbook file for the current example:
--- - name: Add topology segments hosts: ipaserver gather_facts: false vars: ipaadmin_password: "{{ ipaadmin_password }}" ipatopology_segments: - {suffix: domain, left: replica1.idm.example.com , right: replica2.idm.example.com } - {suffix: domain, left: replica2.idm.example.com , right: replica3.idm.example.com } - {suffix: domain, left: replica3.idm.example.com , right: replica4.idm.example.com } - {suffix: domain+ca, left: replica4.idm.example.com , right: replica1.idm.example.com } vars_files: - /home/user_name/MyPlaybooks/secret.yml tasks: - name: Add topology segment ipatopologysegment: ipaadmin_password: "{{ ipaadmin_password }}" suffix: "{{ item.suffix }}" name: "{{ item.name | default(omit) }}" left: "{{ item.left }}" right: "{{ item.right }}" state: present #state: absent #state: checked #state: reinitialized loop: "{{ ipatopology_segments | default([]) }}"- Save the file.
Run the Ansible playbook. Specify the playbook file, the file storing the password protecting the secret.yml file, and the inventory file:
$ ansible-playbook --vault-password-file=password_file -v -i inventory add-topologysegments-copy.yml
Additional resources
- See Explaining Replication Agreements, Topology Suffixes, and Topology Segments.
-
See the
README-topology.mdfile in the/usr/share/doc/ansible-freeipa/directory. -
See the sample playbooks in the
/usr/share/doc/ansible-freeipa/playbooks/topologydirectory.
3.3. Using Ansible to check if a replication agreement exists between two replicas
Data stored on an Identity Management (IdM) server is replicated based on replication agreements: when two servers have a replication agreement configured, they share their data. Replication agreements are always bilateral: the data is replicated from the first replica to the other one as well as from the other replica to the first one.
Follow this procedure to verify that replication agreements exist between multiple pairs of replicas in IdM.
Prerequisites
- Ensure that you understand the recommendations for designing your Identity Management (IdM) topology listed in Connecting the replicas in a topology.
-
You know the IdM
adminpassword. You have configured your Ansible control node to meet the following requirements:
- You are using Ansible version 2.14 or later.
-
You have installed the
ansible-freeipapackage on the Ansible controller. - The example assumes that in the ~/MyPlaybooks/ directory, you have created an Ansible inventory file with the fully-qualified domain name (FQDN) of the IdM server.
-
The example assumes that the secret.yml Ansible vault stores your
ipaadmin_password.
-
The target node, that is the node on which the
ansible-freeipamodule is executed, is part of the IdM domain as an IdM client, server or replica.
Procedure
Navigate to your ~/MyPlaybooks/ directory:
$ cd ~/MyPlaybooks/Copy the
check-topologysegments.ymlAnsible playbook file located in the/usr/share/doc/ansible-freeipa/playbooks/topology/directory:$ cp /usr/share/doc/ansible-freeipa/playbooks/topology/check-topologysegments.yml check-topologysegments-copy.yml-
Open the
check-topologysegments-copy.ymlfile for editing. Adapt the file by setting the following variables in the
varssection:-
Set the
ipaadmin_passwordvariable to the password of the IdMadmin. For every topology segment, add a line in the
ipatopology_segmentssection and set the following variables:-
Set the
suffixvariable to eitherdomainorca, depending on the type of segment you are adding. -
Set the
leftvariable to the name of the IdM server that you want to be the left node of the replication agreement. -
Set the
rightvariable to the name of the IdM server that you want to be the right node of the replication agreement.
-
Set the
-
Set the
In the
taskssection of thecheck-topologysegments-copy.ymlfile, ensure that thestatevariable is set topresent.This is the modified Ansible playbook file for the current example:
--- - name: Add topology segments hosts: ipaserver gather_facts: false vars: ipaadmin_password: "{{ ipaadmin_password }}" ipatopology_segments: - {suffix: domain, left: replica1.idm.example.com, right: replica2.idm.example.com } - {suffix: domain, left: replica2.idm.example.com , right: replica3.idm.example.com } - {suffix: domain, left: replica3.idm.example.com , right: replica4.idm.example.com } - {suffix: domain+ca, left: replica4.idm.example.com , right: replica1.idm.example.com } vars_files: - /home/user_name/MyPlaybooks/secret.yml tasks: - name: Check topology segment ipatopologysegment: ipaadmin_password: "{{ ipaadmin_password }}" suffix: "{{ item.suffix }}" name: "{{ item.name | default(omit) }}" left: "{{ item.left }}" right: "{{ item.right }}" state: checked loop: "{{ ipatopology_segments | default([]) }}"- Save the file.
Run the Ansible playbook. Specify the playbook file, the file storing the password protecting the secret.yml file, and the inventory file:
$ ansible-playbook --vault-password-file=password_file -v -i inventory check-topologysegments-copy.yml
Additional resources
- For more information about the concept of topology agreements, suffixes, and segments, see Explaining Replication Agreements, Topology Suffixes, and Topology Segments.
-
See the
README-topology.mdfile in the/usr/share/doc/ansible-freeipa/directory. -
See the sample playbooks in the
/usr/share/doc/ansible-freeipa/playbooks/topologydirectory.
3.4. Using Ansible to verify that a topology suffix exists in IdM
In the context of replication agreements in Identity Management (IdM), topology suffixes store the data that is replicated. IdM supports two types of topology suffixes: domain and ca. Each suffix represents a separate back end, a separate replication topology. When a replication agreement is configured, it joins two topology suffixes of the same type on two different servers.
The domain suffix contains all domain-related data, such as users, groups, and policies. The ca suffix contains data for the Certificate System component. It is only present on servers with a certificate authority (CA) installed.
Follow this procedure to use an Ansible playbook to ensure that a topology suffix exists in IdM. The example describes how to ensure that the domain suffix exists in IdM.
Prerequisites
-
You know the IdM
adminpassword. You have configured your Ansible control node to meet the following requirements:
- You are using Ansible version 2.14 or later.
-
You have installed the
ansible-freeipapackage on the Ansible controller. - The example assumes that in the ~/MyPlaybooks/ directory, you have created an Ansible inventory file with the fully-qualified domain name (FQDN) of the IdM server.
-
The example assumes that the secret.yml Ansible vault stores your
ipaadmin_password.
-
The target node, that is the node on which the
ansible-freeipamodule is executed, is part of the IdM domain as an IdM client, server or replica.
Procedure
Navigate to your ~/MyPlaybooks/ directory:
$ cd ~/MyPlaybooks/Copy the
verify-topologysuffix.ymlAnsible playbook file located in the/usr/share/doc/ansible-freeipa/playbooks/topology/directory:$ cp /usr/share/doc/ansible-freeipa/playbooks/topology/ verify-topologysuffix.yml verify-topologysuffix-copy.yml-
Open the
verify-topologysuffix-copy.ymlAnsible playbook file for editing. Adapt the file by setting the following variables in the
ipatopologysuffixsection:-
Set the
ipaadmin_passwordvariable to the password of the IdMadmin. -
Set the
suffixvariable todomain. If you are verifying the presence of thecasuffix, set the variable toca. -
Ensure that the
statevariable is set toverified. No other option is possible.
This is the modified Ansible playbook file for the current example:
--- - name: Playbook to handle topologysuffix hosts: ipaserver vars_files: - /home/user_name/MyPlaybooks/secret.yml tasks: - name: Verify topology suffix ipatopologysuffix: ipaadmin_password: "{{ ipaadmin_password }}" suffix: domain state: verified-
Set the
- Save the file.
Run the Ansible playbook. Specify the playbook file, the file storing the password protecting the secret.yml file, and the inventory file:
$ ansible-playbook --vault-password-file=password_file -v -i inventory verify-topologysuffix-copy.yml
Additional resources
- See Explaining Replication Agreements, Topology Suffixes, and Topology Segments.
-
See the
README-topology.mdfile in the/usr/share/doc/ansible-freeipa/directory. -
See the sample playbooks in the
/usr/share/doc/ansible-freeipa/playbooks/topologydirectory.
3.5. Using Ansible to reinitialize an IdM replica
If a replica has been offline for a long period of time or its database has been corrupted, you can reinitialize it. reinitialization refreshes the replica with an updated set of data. reinitialization can, for example, be used if an authoritative restore from backup is required.
In contrast to replication updates, during which replicas only send changed entries to each other, reinitialization refreshes the whole database.
The local host on which you run the command is the reinitialized replica. To specify the replica from which the data is obtained, use the direction option.
Follow this procedure to use an Ansible playbook to reinitialize the domain data on replica.idm.example.com from server.idm.example.com.
Prerequisites
-
You know the IdM
adminpassword. You have configured your Ansible control node to meet the following requirements:
- You are using Ansible version 2.14 or later.
-
You have installed the
ansible-freeipapackage on the Ansible controller. - The example assumes that in the ~/MyPlaybooks/ directory, you have created an Ansible inventory file with the fully-qualified domain name (FQDN) of the IdM server.
-
The example assumes that the secret.yml Ansible vault stores your
ipaadmin_password.
-
The target node, that is the node on which the
ansible-freeipamodule is executed, is part of the IdM domain as an IdM client, server or replica.
Procedure
Navigate to your ~/MyPlaybooks/ directory:
$ cd ~/MyPlaybooks/Copy the
reinitialize-topologysegment.ymlAnsible playbook file located in the/usr/share/doc/ansible-freeipa/playbooks/topology/directory:$ cp /usr/share/doc/ansible-freeipa/playbooks/topology/reinitialize-topologysegment.yml reinitialize-topologysegment-copy.yml-
Open the
reinitialize-topologysegment-copy.ymlfile for editing. Adapt the file by setting the following variables in the
ipatopologysegmentsection:-
Set the
ipaadmin_passwordvariable to the password of the IdMadmin. -
Set the
suffixvariable todomain. If you are reinitializing thecadata, set the variable toca. -
Set the
leftvariable to the left node of the replication agreement. -
Set the
rightvariable to the right node of the replication agreement. -
Set the
directionvariable to the direction of the reinitializing data. Theleft-to-rightdirection means that data flows from the left node to the right node. Ensure that the
statevariable is set toreinitialized.This is the modified Ansible playbook file for the current example:
---
- name: Playbook to handle topologysegment
  hosts: ipaserver

  vars_files:
  - /home/user_name/MyPlaybooks/secret.yml
  tasks:
  - name: Reinitialize topology segment
    ipatopologysegment:
      ipaadmin_password: "{{ ipaadmin_password }}"
      suffix: domain
      left: server.idm.example.com
      right: replica.idm.example.com
      direction: left-to-right
      state: reinitialized
-
Set the
- Save the file.
Run the Ansible playbook. Specify the playbook file, the file storing the password protecting the secret.yml file, and the inventory file:
$ ansible-playbook --vault-password-file=password_file -v -i inventory reinitialize-topologysegment-copy.yml
Additional resources
- See Explaining Replication Agreements, Topology Suffixes, and Topology Segments.
-
See the
README-topology.mdfile in the/usr/share/doc/ansible-freeipa/directory. -
See the sample playbooks in the
/usr/share/doc/ansible-freeipa/playbooks/topologydirectory.
3.6. Using Ansible to ensure a replication agreement is absent in IdM
Data stored on an Identity Management (IdM) server is replicated based on replication agreements: when two servers have a replication agreement configured, they share their data. Replication agreements are always bilateral: the data is replicated from the first replica to the other one as well as from the other replica to the first one.
Follow this procedure to ensure a replication agreement between two replicas does not exist in IdM. The example describes how to ensure a replication agreement of the domain type does not exist between the replica01.idm.example.com and replica02.idm.example.com IdM servers.
Prerequisites
- Ensure that you understand the recommendations for designing your IdM topology listed in Connecting the replicas in a topology
-
You know the IdM
adminpassword. You have configured your Ansible control node to meet the following requirements:
- You are using Ansible version 2.14 or later.
-
You have installed the
ansible-freeipapackage on the Ansible controller. - The example assumes that in the ~/MyPlaybooks/ directory, you have created an Ansible inventory file with the fully-qualified domain name (FQDN) of the IdM server.
-
The example assumes that the secret.yml Ansible vault stores your
ipaadmin_password.
-
The target node, that is the node on which the
ansible-freeipamodule is executed, is part of the IdM domain as an IdM client, server or replica.
Procedure
Navigate to your ~/MyPlaybooks/ directory:
$ cd ~/MyPlaybooks/Copy the
delete-topologysegment.ymlAnsible playbook file located in the/usr/share/doc/ansible-freeipa/playbooks/topology/directory:$ cp /usr/share/doc/ansible-freeipa/playbooks/topology/delete-topologysegment.yml delete-topologysegment-copy.yml-
Open the
delete-topologysegment-copy.ymlfile for editing. Adapt the file by setting the following variables in the
ipatopologysegmenttask section:-
Set the
ipaadmin_passwordvariable to the password of the IdMadmin. -
Set the
suffixvariable todomain. Alternatively, if you are ensuring that thecadata are not replicated between the left and right nodes, set the variable toca. -
Set the
leftvariable to the name of the IdM server that is the left node of the replication agreement. -
Set the
rightvariable to the name of the IdM server that is the right node of the replication agreement. -
Ensure that the
statevariable is set toabsent.
This is the modified Ansible playbook file for the current example:
--- - name: Playbook to handle topologysegment hosts: ipaserver vars_files: - /home/user_name/MyPlaybooks/secret.yml tasks: - name: Delete topology segment ipatopologysegment: ipaadmin_password: "{{ ipaadmin_password }}" suffix: domain left: replica01.idm.example.com right: replica02.idm.example.com: state: absent-
Set the
- Save the file.
Run the Ansible playbook. Specify the playbook file, the file storing the password protecting the secret.yml file, and the inventory file:
$ ansible-playbook --vault-password-file=password_file -v -i inventory delete-topologysegment-copy.yml
Additional resources
- See Explaining Replication Agreements, Topology Suffixes, and Topology Segments.
-
See the
README-topology.mdfile in the/usr/share/doc/ansible-freeipa/directory. -
See the sample playbooks in the
/usr/share/doc/ansible-freeipa/playbooks/topologydirectory.
3.7. Additional resources
Chapter 5. Checking IdM replication using Healthcheck
You can test Identity Management (IdM) replication using the Healthcheck tool.
For details, see Healthcheck in IdM.
5.1. Replication healthcheck tests
The Healthcheck tool tests the Identity Management (IdM) topology configuration and searches for replication conflict issues.
To list all tests, run the ipa-healthcheck with the --list-sources option:
# ipa-healthcheck --list-sources
The topology tests are placed under the ipahealthcheck.ipa.topology and ipahealthcheck.ds.replication sources:
- IPATopologyDomainCheck
This test verifies:
- Whether topology is not disconnected and there are replication paths between all servers.
If servers do not have more than the recommended number of replication agreements.
If the test fails, the test returns errors, such as connection errors or too many replication agreements.
If the test succeeds, the test returns the configured domains.
NoteThe test runs the
ipa topologysuffix-verifycommand for both the domain and ca suffixes (assuming the Certificate Authority is configured on this server).
- ReplicationConflictCheck
-
The test searches for entries in LDAP matching
(&(!(objectclass=nstombstone))(nsds5ReplConflict=*)).
Run these tests on all IdM servers when trying to check for issues.
For more information on resolving LDAP replication conflicts, see Solving common replication problems.
5.2. Screening replication using Healthcheck
Follow this procedure to run a standalone manual test of an Identity Management (IdM) replication topology and configuration using the Healthcheck tool.
The Healthcheck tool includes many tests, therefore, you can shorten the results with:
-
Replication conflict test:
--source=ipahealthcheck.ds.replication -
Correct topology test:
--source=ipahealthcheck.ipa.topology
Prerequisites
-
You must perform Healthcheck tests as the
rootuser.
Procedure
To run Healthcheck replication conflict and topology checks, enter:
# ipa-healthcheck --source=ipahealthcheck.ds.replication --source=ipahealthcheck.ipa.topology
Four different results are possible:
SUCCESS — the test passed successfully.
{ "source": "ipahealthcheck.ipa.topology", "check": "IPATopologyDomainCheck", "result": "SUCCESS", "kw": { "suffix": "domain" } }- WARNING — the test passed but there might be a problem.
ERROR — the test failed.
{ "source": "ipahealthcheck.ipa.topology", "check": "IPATopologyDomainCheck", "result": "ERROR", "uuid": d6ce3332-92da-423d-9818-e79f49ed321f "when": 20191007115449Z "duration": 0.005943 "kw": { "msg": "topologysuffix-verify domain failed, server2 is not connected (server2_139664377356472 in MainThread)" } }- CRITICAL — the test failed and it affects the IdM server functionality.
Additional resources
-
See
man ipa-healthcheck.