
Configuring and using network file services
A guide to configuring and using network file services in Red Hat Enterprise Linux 9.
Abstract
Making open source more inclusive
Red Hat is committed to replacing problematic language in our code, documentation, and web properties. We are beginning with these four terms: master, slave, blacklist, and whitelist. Because of the enormity of this endeavor, these changes will be implemented gradually over several upcoming releases. For more details, see our CTO Chris Wright’s message.
Providing feedback on Red Hat documentation
We appreciate your feedback on our documentation. Let us know how we can improve it.
Submitting feedback through Jira (account required)
- Log in to the Jira website.
- Click Create in the top navigation bar
- Enter a descriptive title in the Summary field.
- Enter your suggestion for improvement in the Description field. Include links to the relevant parts of the documentation.
- Click Create at the bottom of the dialogue.
Chapter 1. Using Samba as a server
Samba implements the Server Message Block (SMB) protocol in Red Hat Enterprise Linux. The SMB protocol is used to access resources on a server, such as file shares and shared printers. Additionally, Samba implements the Distributed Computing Environment Remote Procedure Call (DCE RPC) protocol used by Microsoft Windows.
You can run Samba as:
- An Active Directory (AD) or NT4 domain member
- A standalone server
An NT4 Primary Domain Controller (PDC) or Backup Domain Controller (BDC)
NoteRed Hat supports the PDC and BDC modes only in existing installations with Windows versions which support NT4 domains. Red Hat recommends not setting up a new Samba NT4 domain, because Microsoft operating systems later than Windows 7 and Windows Server 2008 R2 do not support NT4 domains.
Red Hat does not support running Samba as an AD domain controller (DC).
Independently of the installation mode, you can optionally share directories and printers. This enables Samba to act as a file and print server.
1.1. Understanding the different Samba services and modes
The samba package provides multiple services. Depending on your environment and the scenario you want to configure, you require one or more of these services and configure Samba in different modes.
1.1.1. The Samba services
Samba provides the following services:
smbdThis service provides file sharing and printing services using the SMB protocol. Additionally, the service is responsible for resource locking and for authenticating connecting users. For authenticating domain members,
smbdrequireswinbindd. Thesmbsystemdservice starts and stops thesmbddaemon.To use the
smbdservice, install thesambapackage.nmbdThis service provides host name and IP resolution using the NetBIOS over IPv4 protocol. Additionally to the name resolution, the
nmbdservice enables browsing the SMB network to locate domains, work groups, hosts, file shares, and printers. For this, the service either reports this information directly to the broadcasting client or forwards it to a local or master browser. Thenmbsystemdservice starts and stops thenmbddaemon.Note that modern SMB networks use DNS to resolve clients and IP addresses. For Kerberos a working DNS setup is required.
To use the
nmbdservice, install thesambapackage.winbinddThis service provides an interface for the Name Service Switch (NSS) to use AD or NT4 domain users and groups on the local system. This enables, for example, domain users to authenticate to services hosted on a Samba server or to other local services. The
winbindsystemdservice starts and stops thewinbindddaemon.If you set up Samba as a domain member,
winbinddmust be started before thesmbdservice. Otherwise, domain users and groups are not available to the local system..To use the
winbinddservice, install thesamba-winbindpackage.ImportantRed Hat only supports running Samba as a server with the
winbinddservice to provide domain users and groups to the local system. Due to certain limitations, such as missing Windows access control list (ACL) support and NT LAN Manager (NTLM) fallback, SSSD is not supported.
1.1.2. The Samba security services
The security parameter in the [global] section in the /etc/samba/smb.conf file manages how Samba authenticates users that are connecting to the service. Depending on the mode you install Samba in, the parameter must be set to different values:
- On an AD domain member, set
security = ads In this mode, Samba uses Kerberos to authenticate AD users.
For details about setting up Samba as a domain member, see Setting up Samba as an AD domain member server.
- On a standalone server, set
security = user In this mode, Samba uses a local database to authenticate connecting users.
For details about setting up Samba as a standalone server, see Setting up Samba as a standalone server.
- On an NT4 PDC or BDC, set
security = user - In this mode, Samba authenticates users to a local or LDAP database.
- On an NT4 domain member, set
security = domain In this mode, Samba authenticates connecting users to an NT4 PDC or BDC. You cannot use this mode on AD domain members.
For details about setting up Samba as a domain member, see Setting up Samba as an AD domain member server.
Additional resources
-
securityparameter in thesmb.conf(5)man page
1.1.3. Scenarios when Samba services and Samba client utilities load and reload their configuration
The following describes when Samba services and utilities load and reload their configuration:
Samba services reload their configuration:
- Automatically every 3 minutes
-
On manual request, for example, when you run the
smbcontrol all reload-configcommand.
- Samba client utilities read their configuration only when you start them.
Note that certain parameters, such as security require a restart of the smb service to take effect and a reload is not sufficient.
Additional resources
-
The
How configuration changes are appliedsection in thesmb.conf(5)man page -
The
smbd(8),nmbd(8), andwinbindd(8)man pages
1.1.4. Editing the Samba configuration in a safe way
Samba services automatically reload their configuration every 3 minutes. To prevent that the services reload the changes before you have verified the configuration using the testparm utility, you can edit the Samba configuration in a safe way.
Prerequisites
- Samba is installed.
Procedure
Create a copy of the
/etc/samba/smb.conffile:# cp /etc/samba/smb.conf /etc/samba/samba.conf.copy- Edit the copied file and make the required changes.
Verify the configuration in the
/etc/samba/samba.conf.copyfile:# testparm -s /etc/samba/samba.conf.copyIf
testparmreports errors, fix them and run the command again.Override the
/etc/samba/smb.conffile with the new configuration:# mv /etc/samba/samba.conf.copy /etc/samba/smb.confWait until the Samba services automatically reload their configuration or manually reload the configuration:
# smbcontrol all reload-config
1.2. Verifying the smb.conf file by using the testparm utility
The testparm utility verifies that the Samba configuration in the /etc/samba/smb.conf file is correct. The utility detects invalid parameters and values, but also incorrect settings, such as for ID mapping. If testparm reports no problem, the Samba services will successfully load the /etc/samba/smb.conf file. Note that testparm cannot verify that the configured services will be available or work as expected.
Red Hat recommends that you verify the /etc/samba/smb.conf file by using testparm after each modification of this file.
Prerequisites
- You installed Samba.
-
The
/etc/samba/smb.conffile exits.
Procedure
Run the
testparmutility as therootuser:# testparm Load smb config files from /etc/samba/smb.conf rlimit_max: increasing rlimit_max (1024) to minimum Windows limit (16384) Unknown parameter encountered: "log levell" Processing section "[example_share]" Loaded services file OK. ERROR: The idmap range for the domain * (tdb) overlaps with the range of DOMAIN (ad)! Server role: ROLE_DOMAIN_MEMBER Press enter to see a dump of your service definitions # Global parameters [global] ... [example_share] ...
The previous example output reports a non-existent parameter and an incorrect ID mapping configuration.
-
If
testparmreports incorrect parameters, values, or other errors in the configuration, fix the problem and run the utility again.
1.3. Setting up Samba as a standalone server
You can set up Samba as a server that is not a member of a domain. In this installation mode, Samba authenticates users to a local database instead of to a central DC. Additionally, you can enable guest access to allow users to connect to one or multiple services without authentication.
1.3.1. Setting up the server configuration for the standalone server
You can set up the server configuration for a Samba standalone server.
Procedure
Install the
sambapackage:# dnf install sambaEdit the
/etc/samba/smb.conffile and set the following parameters:[global] workgroup = Example-WG netbios name = Server security = user log file = /var/log/samba/%m.log log level = 1
This configuration defines a standalone server named
Serverwithin theExample-WGwork group. Additionally, this configuration enables logging on a minimal level (1) and log files will be stored in the/var/log/samba/directory. Samba will expand the%mmacro in thelog fileparameter to the NetBIOS name of connecting clients. This enables individual log files for each client.Optionally, configure file or printer sharing. See:
Verify the
/etc/samba/smb.conffile:# testparmIf you set up shares that require authentication, create the user accounts.
For details, see Creating and enabling local user accounts.
Open the required ports and reload the firewall configuration by using the
firewall-cmdutility:# firewall-cmd --permanent --add-service=samba # firewall-cmd --reload
Enable and start the
smbservice:# systemctl enable --now smb
Additional resources
-
smb.conf(5)man page
1.3.2. Creating and enabling local user accounts
To enable users to authenticate when they connect to a share, you must create the accounts on the Samba host both in the operating system and in the Samba database. Samba requires the operating system account to validate the Access Control Lists (ACL) on file system objects and the Samba account to authenticate connecting users.
If you use the passdb backend = tdbsam default setting, Samba stores user accounts in the /var/lib/samba/private/passdb.tdb database.
You can create a local Samba user named example.
Prerequisites
- Samba is installed and configured as a standalone server.
Procedure
Create the operating system account:
# useradd -M -s /sbin/nologin exampleThis command adds the
exampleaccount without creating a home directory. If the account is only used to authenticate to Samba, assign the/sbin/nologincommand as shell to prevent the account from logging in locally.Set a password to the operating system account to enable it:
# passwd example Enter new UNIX password:
passwordRetype new UNIX password:passwordpasswd: password updated successfullySamba does not use the password set on the operating system account to authenticate. However, you need to set a password to enable the account. If an account is disabled, Samba denies access if this user connects.
Add the user to the Samba database and set a password to the account:
# smbpasswd -a example New SMB password:
passwordRetype new SMB password:passwordAdded user example.Use this password to authenticate when using this account to connect to a Samba share.
Enable the Samba account:
# smbpasswd -e example
Enabled user example.
1.4. Understanding and configuring Samba ID mapping
Windows domains distinguish users and groups by unique Security Identifiers (SID). However, Linux requires unique UIDs and GIDs for each user and group. If you run Samba as a domain member, the winbindd service is responsible for providing information about domain users and groups to the operating system.
To enable the winbindd service to provide unique IDs for users and groups to Linux, you must configure ID mapping in the /etc/samba/smb.conf file for:
- The local database (default domain)
- The AD or NT4 domain the Samba server is a member of
- Each trusted domain from which users must be able to access resources on this Samba server
Samba provides different ID mapping back ends for specific configurations. The most frequently used back ends are:
| Back end | Use case |
|---|---|
|
|
The |
|
| AD domains only |
|
| AD and NT4 domains |
|
|
AD, NT4, and the |
1.4.1. Planning Samba ID ranges
Regardless of whether you store the Linux UIDs and GIDs in AD or if you configure Samba to generate them, each domain configuration requires a unique ID range that must not overlap with any of the other domains.
If you set overlapping ID ranges, Samba fails to work correctly.
Example 1.1. Unique ID Ranges
The following shows non-overlapping ID mapping ranges for the default (*), AD-DOM, and the TRUST-DOM domains.
[global]
...
idmap config * : backend = tdb
idmap config * : range = 10000-999999

idmap config AD-DOM:backend = rid
idmap config AD-DOM:range = 2000000-2999999

idmap config TRUST-DOM:backend = rid
idmap config TRUST-DOM:range = 4000000-4999999
You can only assign one range per domain. Therefore, leave enough space between the domains ranges. This enables you to extend the range later if your domain grows.
If you later assign a different range to a domain, the ownership of files and directories previously created by these users and groups will be lost.
1.4.2. The * default domain
In a domain environment, you add one ID mapping configuration for each of the following:
- The domain the Samba server is a member of
- Each trusted domain that should be able to access the Samba server
However, for all other objects, Samba assigns IDs from the default domain. This includes:
- Local Samba users and groups
-
Samba built-in accounts and groups, such as
BUILTIN\Administrators
You must configure the default domain as described to enable Samba to operate correctly.
The default domain back end must be writable to permanently store the assigned IDs.
For the default domain, you can use one of the following back ends:
tdbWhen you configure the default domain to use the
tdbback end, set an ID range that is big enough to include objects that will be created in the future and that are not part of a defined domain ID mapping configuration.For example, set the following in the
[global]section in the/etc/samba/smb.conffile:idmap config * : backend = tdb idmap config * : range = 10000-999999
For further details, see Using the TDB ID mapping back end.
autoridWhen you configure the default domain to use the
autoridback end, adding additional ID mapping configurations for domains is optional.For example, set the following in the
[global]section in the/etc/samba/smb.conffile:idmap config * : backend = autorid idmap config * : range = 10000-999999
For further details, see Using the autorid ID mapping back end.
1.4.3. Using the tdb ID mapping back end
The winbindd service uses the writable tdb ID mapping back end by default to store Security Identifier (SID), UID, and GID mapping tables. This includes local users, groups, and built-in principals.
Use this back end only for the * default domain. For example:
idmap config * : backend = tdb
idmap config * : range = 10000-999999
Additional resources
1.4.4. Using the ad ID mapping back end
You can configure a Samba AD member to use the ad ID mapping back end.
The ad ID mapping back end implements a read-only API to read account and group information from AD. This provides the following benefits:
- All user and group settings are stored centrally in AD.
- User and group IDs are consistent on all Samba servers that use this back end.
- The IDs are not stored in a local database which can corrupt, and therefore file ownerships cannot be lost.
The ad ID mapping back end does not support Active Directory domains with one-way trusts. If you configure a domain member in an Active Directory with one-way trusts, use instead one of the following ID mapping back ends: tdb, rid, or autorid.
The ad back end reads the following attributes from AD:
| AD attribute name | Object type | Mapped to |
|---|---|---|
|
| User and group | User or group name, depending on the object |
|
| User | User ID (UID) |
|
| Group | Group ID (GID) |
|
| User | Path to the shell of the user |
|
| User | Path to the home directory of the user |
|
| User | Primary group ID |
[a]
Samba only reads this attribute if you set idmap config DOMAIN:unix_nss_info = yes.
[b]
Samba only reads this attribute if you set idmap config DOMAIN:unix_primary_group = yes.
| ||
Prerequisites
-
Both users and groups must have unique IDs set in AD, and the IDs must be within the range configured in the
/etc/samba/smb.conffile. Objects whose IDs are outside of the range will not be available on the Samba server. - Users and groups must have all required attributes set in AD. If required attributes are missing, the user or group will not be available on the Samba server. The required attributes depend on your configuration. .Prerequisites
- You installed Samba.
-
The Samba configuration, except ID mapping, exists in the
/etc/samba/smb.conffile.
Procedure
Edit the
[global]section in the/etc/samba/smb.conffile:Add an ID mapping configuration for the default domain (
*) if it does not exist. For example:idmap config * : backend = tdb idmap config * : range = 10000-999999Enable the
adID mapping back end for the AD domain:idmap config DOMAIN : backend = adSet the range of IDs that is assigned to users and groups in the AD domain. For example:
idmap config DOMAIN : range = 2000000-2999999
ImportantThe range must not overlap with any other domain configuration on this server. Additionally, the range must be set big enough to include all IDs assigned in the future. For further details, see Planning Samba ID ranges.
Set that Samba uses the RFC 2307 schema when reading attributes from AD:
idmap config DOMAIN : schema_mode = rfc2307To enable Samba to read the login shell and the path to the users home directory from the corresponding AD attribute, set:
idmap config DOMAIN : unix_nss_info = yesAlternatively, you can set a uniform domain-wide home directory path and login shell that is applied to all users. For example:
template shell = /bin/bash
template homedir = /home/%U
By default, Samba uses the
primaryGroupIDattribute of a user object as the user’s primary group on Linux. Alternatively, you can configure Samba to use the value set in thegidNumberattribute instead:idmap config DOMAIN : unix_primary_group = yes
Verify the
/etc/samba/smb.conffile:# testparmReload the Samba configuration:
# smbcontrol all reload-config
Additional resources
- The * default domain
-
smb.conf(5)andidmap_ad(8)man pages -
VARIABLE SUBSTITUTIONSsection in thesmb.conf(5)man page
1.4.5. Using the rid ID mapping back end
You can configure a Samba domain member to use the rid ID mapping back end.
Samba can use the relative identifier (RID) of a Windows SID to generate an ID on Red Hat Enterprise Linux.
The RID is the last part of a SID. For example, if the SID of a user is S-1-5-21-5421822485-1151247151-421485315-30014, then 30014 is the corresponding RID.
The rid ID mapping back end implements a read-only API to calculate account and group information based on an algorithmic mapping scheme for AD and NT4 domains. When you configure the back end, you must set the lowest and highest RID in the idmap config DOMAIN : range parameter. Samba will not map users or groups with a lower or higher RID than set in this parameter.
As a read-only back end, rid cannot assign new IDs, such as for BUILTIN groups. Therefore, do not use this back end for the * default domain.
Benefits of using the rid back end
- All domain users and groups that have an RID within the configured range are automatically available on the domain member.
- You do not need to manually assign IDs, home directories, and login shells.
Drawbacks of using the rid back end
- All domain users get the same login shell and home directory assigned. However, you can use variables.
-
User and group IDs are only the same across Samba domain members if all use the
ridback end with the same ID range settings. - You cannot exclude individual users or groups from being available on the domain member. Only users and groups outside of the configured range are excluded.
-
Based on the formulas the
winbinddservice uses to calculate the IDs, duplicate IDs can occur in multi-domain environments if objects in different domains have the same RID.
Prerequisites
- You installed Samba.
-
The Samba configuration, except ID mapping, exists in the
/etc/samba/smb.conffile.
Procedure
Edit the
[global]section in the/etc/samba/smb.conffile:Add an ID mapping configuration for the default domain (
*) if it does not exist. For example:idmap config * : backend = tdb idmap config * : range = 10000-999999Enable the
ridID mapping back end for the domain:idmap config DOMAIN : backend = ridSet a range that is big enough to include all RIDs that will be assigned in the future. For example:
idmap config DOMAIN : range = 2000000-2999999
Samba ignores users and groups whose RIDs in this domain are not within the range.
ImportantThe range must not overlap with any other domain configuration on this server. Additionally, the range must be set big enough to include all IDs assigned in the future. For further details, see Planning Samba ID ranges.
Set a shell and home directory path that will be assigned to all mapped users. For example:
template shell = /bin/bash
template homedir = /home/%U
Verify the
/etc/samba/smb.conffile:# testparmReload the Samba configuration:
# smbcontrol all reload-config
Additional resources
- The * default domain
-
VARIABLE SUBSTITUTIONSsection in thesmb.conf(5)man page -
Calculation of the local ID from a RID, see the
idmap_rid(8)man page
1.4.6. Using the autorid ID mapping back end
You can configure a Samba domain member to use the autorid ID mapping back end.
The autorid back end works similar to the rid ID mapping back end, but can automatically assign IDs for different domains. This enables you to use the autorid back end in the following situations:
-
Only for the
*default domain -
For the
*default domain and additional domains, without the need to create ID mapping configurations for each of the additional domains - Only for specific domains
If you use autorid for the default domain, adding additional ID mapping configuration for domains is optional.
Parts of this section were adopted from the idmap config autorid documentation published in the Samba Wiki. License: CC BY 4.0. Authors and contributors: See the history tab on the Wiki page.
Benefits of using the autorid back end
- All domain users and groups whose calculated UID and GID is within the configured range are automatically available on the domain member.
- You do not need to manually assign IDs, home directories, and login shells.
- No duplicate IDs, even if multiple objects in a multi-domain environment have the same RID.
Drawbacks
- User and group IDs are not the same across Samba domain members.
- All domain users get the same login shell and home directory assigned. However, you can use variables.
- You cannot exclude individual users or groups from being available on the domain member. Only users and groups whose calculated UID or GID is outside of the configured range are excluded.
Prerequisites
- You installed Samba.
-
The Samba configuration, except ID mapping, exists in the
/etc/samba/smb.conffile.
Procedure
Edit the
[global]section in the/etc/samba/smb.conffile:Enable the
autoridID mapping back end for the*default domain:idmap config * : backend = autorid
Set a range that is big enough to assign IDs for all existing and future objects. For example:
idmap config * : range = 10000-999999Samba ignores users and groups whose calculated IDs in this domain are not within the range.
WarningAfter you set the range and Samba starts using it, you can only increase the upper limit of the range. Any other change to the range can result in new ID assignments, and thus in losing file ownerships.
Optionally, set a range size. For example:
idmap config * : rangesize = 200000Samba assigns this number of continuous IDs for each domain’s object until all IDs from the range set in the
idmap config * : rangeparameter are taken.NoteIf you set a rangesize, you need to adapt the range accordingly. The range needs to be a multiple of the rangesize.
Set a shell and home directory path that will be assigned to all mapped users. For example:
template shell = /bin/bash
template homedir = /home/%U
Optionally, add additional ID mapping configuration for domains. If no configuration for an individual domain is available, Samba calculates the ID using the
autoridback end settings in the previously configured*default domain.ImportantThe range must not overlap with any other domain configuration on this server. Additionally, the range must be set big enough to include all IDs assigned in the future. For further details, see Planning Samba ID ranges.
Verify the
/etc/samba/smb.conffile:# testparmReload the Samba configuration:
# smbcontrol all reload-config
Additional resources
-
THE MAPPING FORMULASsection in theidmap_autorid(8)man page -
rangesizeparameter description in theidmap_autorid(8)man page -
VARIABLE SUBSTITUTIONSsection in thesmb.conf(5)man page
1.5. Setting up Samba as an AD domain member server
If you are running an AD or NT4 domain, use Samba to add your Red Hat Enterprise Linux server as a member to the domain to gain the following:
- Access domain resources on other domain members
-
Authenticate domain users to local services, such as
sshd - Share directories and printers hosted on the server to act as a file and print server
1.5.1. Joining a RHEL system to an AD domain
Samba Winbind is an alternative to the System Security Services Daemon (SSSD) for connecting a Red Hat Enterprise Linux (RHEL) system with Active Directory (AD). You can join a RHEL system to an AD domain by using realmd to configure Samba Winbind.
Procedure
If your AD requires the deprecated RC4 encryption type for Kerberos authentication, enable support for these ciphers in RHEL:
# update-crypto-policies --set DEFAULT:AD-SUPPORTInstall the following packages:
# dnf install realmd oddjob-mkhomedir oddjob samba-winbind-clients \
       samba-winbind samba-common-tools samba-winbind-krb5-locator
To share directories or printers on the domain member, install the
sambapackage:# dnf install sambaBackup the existing
/etc/samba/smb.confSamba configuration file:# mv /etc/samba/smb.conf /etc/samba/smb.conf.bakJoin the domain. For example, to join a domain named
ad.example.com:# realm join --membership-software=samba --client-software=winbind ad.example.comUsing the previous command, the
realmutility automatically:-
Creates a
/etc/samba/smb.conffile for a membership in thead.example.comdomain -
Adds the
winbindmodule for user and group lookups to the/etc/nsswitch.conffile -
Updates the Pluggable Authentication Module (PAM) configuration files in the
/etc/pam.d/directory -
Starts the
winbindservice and enables the service to start when the system boots
-
Creates a
-
Optionally, set an alternative ID mapping back end or customized ID mapping settings in the
/etc/samba/smb.conffile.
For details, see Understanding and configuring Samba ID mapping.
Verify that the
winbindservice is running:# systemctl status winbind ... Active: active (running) since Tue 2018-11-06 19:10:40 CET; 15s agoImportantTo enable Samba to query domain user and group information, the
winbindservice must be running before you startsmb.If you installed the
sambapackage to share directories and printers, enable and start thesmbservice:# systemctl enable --now smb-
Optionally, if you are authenticating local logins to Active Directory, enable the
winbind_krb5_localauthplug-in. See Using the local authorization plug-in for MIT Kerberos.
Verification steps
Display an AD user’s details, such as the AD administrator account in the AD domain:
# getent passwd "AD\administrator"
AD\administrator:*:10000:10000::/home/administrator@AD:/bin/bash
Query the members of the domain users group in the AD domain:
# getent group "AD\Domain Users"
    AD\domain users:x:10000:user1,user2
Optionally, verify that you can use domain users and groups when you set permissions on files and directories. For example, to set the owner of the
/srv/samba/example.txtfile toAD\administratorand the group toAD\Domain Users:# chown "AD\administrator":"AD\Domain Users" /srv/samba/example.txtVerify that Kerberos authentication works as expected:
On the AD domain member, obtain a ticket for the
administrator@AD.EXAMPLE.COMprincipal:# kinit administrator@AD.EXAMPLE.COMDisplay the cached Kerberos ticket:
# klist
Ticket cache: KCM:0
Default principal: administrator@AD.EXAMPLE.COM

Valid starting       Expires              Service principal
01.11.2018 10:00:00  01.11.2018 20:00:00  krbtgt/AD.EXAMPLE.COM@AD.EXAMPLE.COM
        renew until 08.11.2018 05:00:00
Display the available domains:
# wbinfo --all-domains
BUILTIN
SAMBA-SERVER
AD
Additional resources
- If you do not want to use the deprecated RC4 ciphers, you can enable the AES encryption type in AD. See
- Enabling the AES encryption type in Active Directory using a GPO
-
realm(8)man page
1.5.2. Using the local authorization plug-in for MIT Kerberos
The winbind service provides Active Directory users to the domain member. In certain situations, administrators want to enable domain users to authenticate to local services, such as an SSH server, which are running on the domain member. When using Kerberos to authenticate the domain users, enable the winbind_krb5_localauth plug-in to correctly map Kerberos principals to Active Directory accounts through the winbind service.
For example, if the sAMAccountName attribute of an Active Directory user is set to EXAMPLE and the user tries to log with the user name lowercase, Kerberos returns the user name in upper case. As a consequence, the entries do not match and authentication fails.
Using the winbind_krb5_localauth plug-in, the account names are mapped correctly. Note that this only applies to GSSAPI authentication and not for getting the initial ticket granting ticket (TGT).
Prerequisites
- Samba is configured as a member of an Active Directory.
- Red Hat Enterprise Linux authenticates log in attempts against Active Directory.
-
The
winbindservice is running.
Procedure
Edit the /etc/krb5.conf file and add the following section:
[plugins]
localauth = {
     module = winbind:/usr/lib64/samba/krb5/winbind_krb5_localauth.so
     enable_only = winbind
}
Additional resources
-
winbind_krb5_localauth(8)man page.
1.6. Setting up Samba on an IdM domain member
You can set up Samba on a host that is joined to a Red Hat Identity Management (IdM) domain. Users from IdM and also, if available, from trusted Active Directory (AD) domains, can access shares and printer services provided by Samba.
Using Samba on an IdM domain member is an unsupported Technology Preview feature and contains certain limitations. For example, IdM trust controllers do not support the Active Directory Global Catalog service, and they do not support resolving IdM groups using the Distributed Computing Environment / Remote Procedure Calls (DCE/RPC) protocols. As a consequence, AD users can only access Samba shares and printers hosted on IdM clients when logged in to other IdM clients; AD users logged into a Windows machine can not access Samba shares hosted on an IdM domain member.
Customers deploying Samba on IdM domain members are encouraged to provide feedback to Red Hat.
If users from AD domains need to access shares and printer services provided by Samba, ensure the AES encryption type is enabled is AD. For more information, see Enabling the AES encryption type in Active Directory using a GPO.
Prerequisites
- The host is joined as a client to the IdM domain.
- Both the IdM servers and the client must run on RHEL 9.0 or later.
1.6.1. Preparing the IdM domain for installing Samba on domain members
Before you can set up Samba on an IdM client, you must prepare the IdM domain using the ipa-adtrust-install utility on an IdM server.
Any system where you run the ipa-adtrust-install command automatically becomes an AD trust controller. However, you must run ipa-adtrust-install only once on an IdM server.
Prerequisites
- IdM server is installed.
- You need root privileges to install packages and restart IdM services.
Procedure
Install the required packages:
[root@ipaserver ~]# dnf install ipa-server-trust-ad samba-clientAuthenticate as the IdM administrative user:
[root@ipaserver ~]# kinit adminRun the
ipa-adtrust-installutility:[root@ipaserver ~]# ipa-adtrust-installThe DNS service records are created automatically if IdM was installed with an integrated DNS server.
If you installed IdM without an integrated DNS server,
ipa-adtrust-installprints a list of service records that you must manually add to DNS before you can continue.The script prompts you that the
/etc/samba/smb.confalready exists and will be rewritten:WARNING: The smb.conf already exists. Running ipa-adtrust-install will break your existing Samba configuration. Do you wish to continue? [no]:
yesThe script prompts you to configure the
slapi-nisplug-in, a compatibility plug-in that allows older Linux clients to work with trusted users:Do you want to enable support for trusted domains in Schema Compatibility plugin? This will allow clients older than SSSD 1.9 and non-Linux clients to work with trusted users. Enable trusted domains support in slapi-nis? [no]:
yesWhen prompted, enter the NetBIOS name for the IdM domain or press Enter to accept the name suggested:
Trust is configured but no NetBIOS domain name found, setting it now.
Enter the NetBIOS name for the IPA domain.
Only up to 15 uppercase ASCII letters, digits and dashes are allowed.
Example: EXAMPLE.

NetBIOS domain name [IDM]:
You are prompted to run the SID generation task to create a SID for any existing users:
Do you want to run the ipa-sidgen task? [no]:
yesThis is a resource-intensive task, so if you have a high number of users, you can run this at another time.
(Optional) By default, the Dynamic RPC port range is defined as
49152-65535for Windows Server 2008 and later. If you need to define a different Dynamic RPC port range for your environment, configure Samba to use different ports and open those ports in your firewall settings. The following example sets the port range to55000-65000.[root@ipaserver ~]# net conf setparm global 'rpc server dynamic port range' 55000-65000 [root@ipaserver ~]# firewall-cmd --add-port=55000-65000/tcp [root@ipaserver ~]# firewall-cmd --runtime-to-permanent
Restart the
ipaservice:[root@ipaserver ~]# ipactl restartUse the
smbclientutility to verify that Samba responds to Kerberos authentication from the IdM side:[root@ipaserver ~]#
smbclient -L server.idm.example.com -U user_name --use-kerberos=requiredlp_load_ex: changing to config backend registry Sharename Type Comment --------- ---- ------- IPC$ IPC IPC Service (Samba 4.15.2) ...
1.6.2. Installing and configuring a Samba server on an IdM client
You can install and configure Samba on a client enrolled in an IdM domain.
Prerequisites
- Both the IdM servers and the client must run on RHEL 9.0 or later.
- The IdM domain is prepared as described in Preparing the IdM domain for installing Samba on domain members.
- If IdM has a trust configured with AD, enable the AES encryption type for Kerberos. For example, use a group policy object (GPO) to enable the AES encryption type. For details, see Enabling AES encryption in Active Directory using a GPO.
Procedure
Install the
ipa-client-sambapackage:[root@idm_client]# dnf install ipa-client-sambaUse the
ipa-client-sambautility to prepare the client and create an initial Samba configuration:[root@idm_client]# ipa-client-samba Searching for IPA server... IPA server: DNS discovery Chosen IPA master: idm_server.idm.example.com SMB principal to be created: cifs/idm_client.idm.example.com@IDM.EXAMPLE.COM NetBIOS name to be used: IDM_CLIENT Discovered domains to use: Domain name: idm.example.com NetBIOS name: IDM SID: S-1-5-21-525930803-952335037-206501584 ID range: 212000000 - 212199999 Domain name: ad.example.com NetBIOS name: AD SID: None ID range: 1918400000 - 1918599999 Continue to configure the system with these values? [no]: yes Samba domain member is configured. Please check configuration at /etc/samba/smb.conf and start smb and winbind services
By default,
ipa-client-sambaautomatically adds the[homes]section to the/etc/samba/smb.conffile that dynamically shares a user’s home directory when the user connects. If users do not have home directories on this server, or if you do not want to share them, remove the following lines from/etc/samba/smb.conf:[homes] read only = noShare directories and printers. For details, see:
Open the ports required for a Samba client in the local firewall:
[root@idm_client]# firewall-cmd --permanent --add-service=samba-client
[root@idm_client]# firewall-cmd --reload
Enable and start the
smbandwinbindservices:[root@idm_client]# systemctl enable --now smb winbind
Verification steps
Run the following verification step on a different IdM domain member that has the samba-client package installed:
List the shares on the Samba server using Kerberos authentication:
$
smbclient -L idm_client.idm.example.com -U user_name --use-kerberos=requiredlp_load_ex: changing to config backend registry Sharename Type Comment --------- ---- ------- example Disk IPC$ IPC IPC Service (Samba 4.15.2) ...
Additional resources
-
ipa-client-samba(1)man page
1.6.3. Manually adding an ID mapping configuration if IdM trusts a new domain
Samba requires an ID mapping configuration for each domain from which users access resources. On an existing Samba server running on an IdM client, you must manually add an ID mapping configuration after the administrator added a new trust to an Active Directory (AD) domain.
Prerequisites
- You configured Samba on an IdM client. Afterward, a new trust was added to IdM.
- The DES and RC4 encryption types for Kerberos must be disabled in the trusted AD domain. For security reasons, RHEL 9 does not support these weak encryption types.
Procedure
Authenticate using the host’s keytab:
[root@idm_client]# kinit -kUse the
ipa idrange-findcommand to display both the base ID and the ID range size of the new domain. For example, the following command displays the values for thead.example.comdomain:[root@idm_client]# ipa idrange-find --name="AD.EXAMPLE.COM_id_range" --raw --------------- 1 range matched --------------- cn: AD.EXAMPLE.COM_id_range ipabaseid: 1918400000 ipaidrangesize: 200000 ipabaserid: 0 ipanttrusteddomainsid: S-1-5-21-968346183-862388825-1738313271 iparangetype: ipa-ad-trust ---------------------------- Number of entries returned 1 ----------------------------
You need the values from the
ipabaseidandipaidrangesizeattributes in the next steps.To calculate the highest usable ID, use the following formula:
maximum_range = ipabaseid + ipaidrangesize - 1
With the values from the previous step, the highest usable ID for the
ad.example.comdomain is1918599999(1918400000 + 200000 - 1).Edit the
/etc/samba/smb.conffile, and add the ID mapping configuration for the domain to the[global]section:idmap config AD : range = 1918400000 - 1918599999 idmap config AD : backend = sss
Specify the value from
ipabaseidattribute as the lowest and the computed value from the previous step as the highest value of the range.Restart the
smbandwinbindservices:[root@idm_client]# systemctl restart smb winbind
Verification steps
List the shares on the Samba server using Kerberos authentication:
$
smbclient -L idm_client.idm.example.com -U user_name --use-kerberos=requiredlp_load_ex: changing to config backend registry Sharename Type Comment --------- ---- ------- example Disk IPC$ IPC IPC Service (Samba 4.15.2) ...
1.6.4. Additional resources
1.13. Configuring Samba for macOS clients
The fruit virtual file system (VFS) Samba module provides enhanced compatibility with Apple server message block (SMB) clients.
1.15. Setting up Samba as a print server
If you set up Samba as a print server, clients in your network can use Samba to print. Additionally, Windows clients can, if configured, download the driver from the Samba server.
Parts of this section were adopted from the Setting up Samba as a Print Server documentation published in the Samba Wiki. License: CC BY 4.0. Authors and contributors: See the history tab on the Wiki page.
Prerequisites
Samba has been set up in one of the following modes:
1.15.1. Enabling print server support in Samba
By default, print server support is not enabled in Samba. To use Samba as a print server, you must configure Samba accordingly.
Print jobs and printer operations require remote procedure calls (RPCs). By default, Samba starts the rpcd_spoolss service on demand to manage RPCs. During the first RPC call, or when you update the printer list in CUPS, Samba retrieves the printer information from CUPS. This can require approximately 1 second per printer. Therefore, if you have more than 50 printers, tune the rpcd_spoolss settings.
Prerequisites
The printers are configured in a CUPS server.
For details about configuring printers in CUPS, see the documentation provided in the CUPS web console (https://printserver:631/help) on the print server.
Procedure
Edit the
/etc/samba/smb.conffile:Add the
[printers]section to enable the printing backend in Samba:[printers] comment = All Printers path = /var/tmp/ printable = yes create mask = 0600
ImportantThe
[printers]share name is hard-coded and cannot be changed.If the CUPS server runs on a different host or port, specify the setting in the
[printers]section:cups server = printserver.example.com:631If you have many printers, set the number of idle seconds to a higher value than the numbers of printers connected to CUPS. For example, if you have 100 printers, set in the
[global]section:rpcd_spoolss:idle_seconds = 200If this setting does not scale in your environment, also increase the number of
rpcd_spoolssworkers in the[global]section:rpcd_spoolss:num_workers = 10By default,
rpcd_spoolssstarts 5 workers.
Verify the
/etc/samba/smb.conffile:# testparmOpen the required ports and reload the firewall configuration using the
firewall-cmdutility:# firewall-cmd --permanent --add-service=samba # firewall-cmd --reload
Restart the
smbservice:# systemctl restart smbAfter restarting the service, Samba automatically shares all printers that are configured in the CUPS back end. If you want to manually share only specific printers, see Manually sharing specific printers.
Verification
Submit a print job. For example, to print a PDF file, enter:
# smbclient -Uuser //sambaserver.example.com/printer_name -c "print example.pdf"
1.15.2. Manually sharing specific printers
If you configured Samba as a print server, by default, Samba shares all printers that are configured in the CUPS back end. The following procedure explains how to share only specific printers.
Prerequisites
- Samba is set up as a print server
Procedure
Edit the
/etc/samba/smb.conffile:In the
[global]section, disable automatic printer sharing by setting:load printers = no
Add a section for each printer you want to share. For example, to share the printer named
examplein the CUPS back end asExample-Printerin Samba, add the following section:[Example-Printer] path = /var/tmp/ printable = yes printer name = exampleYou do not need individual spool directories for each printer. You can set the same spool directory in the
pathparameter for the printer as you set in the[printers]section.
Verify the
/etc/samba/smb.conffile:# testparmReload the Samba configuration:
# smbcontrol all reload-config
1.16. Setting up automatic printer driver downloads for Windows clients on Samba print servers
If you are running a Samba print server for Windows clients, you can upload drivers and preconfigure printers. If a user connects to a printer, Windows automatically downloads and installs the driver locally on the client. The user does not require local administrator permissions for the installation. Additionally, Windows applies preconfigured driver settings, such as the number of trays.
Parts of this section were adopted from the Setting up Automatic Printer Driver Downloads for Windows Clients documentation published in the Samba Wiki. License: CC BY 4.0. Authors and contributors: See the history tab on the Wiki page.
Prerequisites
- Samba is set up as a print server
1.16.1. Basic information about printer drivers
This section provides general information about printer drivers.
Supported driver model version
Samba only supports the printer driver model version 3 which is supported in Windows 2000 and later, and Windows Server 2000 and later. Samba does not support the driver model version 4, introduced in Windows 8 and Windows Server 2012. However, these and later Windows versions also support version 3 drivers.
Package-aware drivers
Samba does not support package-aware drivers.
Preparing a printer driver for being uploaded
Before you can upload a driver to a Samba print server:
- Unpack the driver if it is provided in a compressed format.
Some drivers require to start a setup application that installs the driver locally on a Windows host. In certain situations, the installer extracts the individual files into the operating system’s temporary folder during the setup runs. To use the driver files for uploading:
- Start the installer.
- Copy the files from the temporary folder to a new location.
- Cancel the installation.
Ask your printer manufacturer for drivers that support uploading to a print server.
Providing 32-bit and 64-bit drivers for a printer to a client
To provide the driver for a printer for both 32-bit and 64-bit Windows clients, you must upload a driver with exactly the same name for both architectures. For example, if you are uploading the 32-bit driver named Example PostScript and the 64-bit driver named Example PostScript (v1.0), the names do not match. Consequently, you can only assign one of the drivers to a printer and the driver will not be available for both architectures.
1.16.2. Enabling users to upload and preconfigure drivers
To be able to upload and preconfigure printer drivers, a user or a group needs to have the SePrintOperatorPrivilege privilege granted. A user must be added into the printadmin group. Red Hat Enterprise Linux automatically creates this group when you install the samba package. The printadmin group gets assigned the lowest available dynamic system GID that is lower than 1000.
Procedure
For example, to grant the
SePrintOperatorPrivilegeprivilege to theprintadmingroup:# net rpc rights grant "printadmin" SePrintOperatorPrivilege -U "DOMAIN\administrator" Enter DOMAIN\administrator's password: Successfully granted rights.
NoteIn a domain environment, grant
SePrintOperatorPrivilegeto a domain group. This enables you to centrally manage the privilege by updating a user’s group membership.To list all users and groups having
SePrintOperatorPrivilegegranted:# net rpc rights list privileges SePrintOperatorPrivilege -U "DOMAIN\administrator" Enter administrator's password: SePrintOperatorPrivilege: BUILTIN\Administrators DOMAIN\printadmin
1.16.4. Creating a GPO to enable clients to trust the Samba print server
For security reasons, recent Windows operating systems prevent clients from downloading non-package-aware printer drivers from an untrusted server. If your print server is a member in an AD, you can create a Group Policy Object (GPO) in your domain to trust the Samba server.
Prerequisites
- The Samba print server is a member of an AD domain.
- The Windows computer you are using to create the GPO must have the Windows Remote Server Administration Tools (RSAT) installed. For details, see the Windows documentation.
Procedure
-
Log into a Windows computer using an account that is allowed to edit group policies, such as the AD domain
Administratoruser. -
Open the
Group Policy Management Console. Right-click to your AD domain and select
Create a GPO in this domain, and Link it here.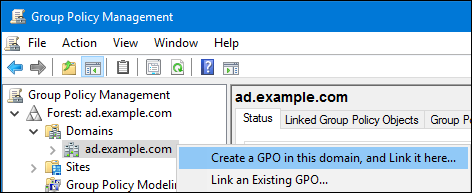
-
Enter a name for the GPO, such as
Legacy Printer Driver Policyand clickOK. The new GPO will be displayed under the domain entry. -
Right-click to the newly-created GPO and select
Editto open theGroup Policy Management Editor. Navigate to → → → .

On the right side of the window, double-click
Point and Print Restrictionto edit the policy:Enable the policy and set the following options:
-
Select
Users can only point and print to these serversand enter the fully-qualified domain name (FQDN) of the Samba print server to the field next to this option. In both check boxes under
Security Prompts, selectDo not show warning or elevation prompt.
-
Select
- Click OK.
Double-click
Package Point and Print - Approved serversto edit the policy:-
Enable the policy and click the
Showbutton. Enter the FQDN of the Samba print server.
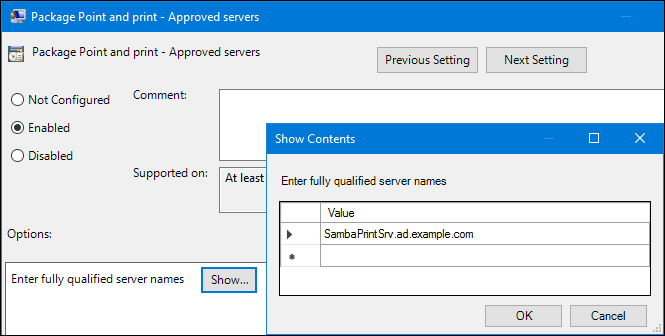
-
Close both the
Show Contentsand the policy’s properties window by clickingOK.
-
Enable the policy and click the
-
Close the
Group Policy Management Editor. -
Close the
Group Policy Management Console.
After the Windows domain members applied the group policy, printer drivers are automatically downloaded from the Samba server when a user connects to a printer.
Additional resources
- For using group policies, see the Windows documentation.
1.16.5. Uploading drivers and preconfiguring printers
Use the Print Management application on a Windows client to upload drivers and preconfigure printers hosted on the Samba print server. For further details, see the Windows documentation.
1.17. Running Samba on a server with FIPS mode enabled
This section provides an overview of the limitations of running Samba with FIPS mode enabled. It also provides the procedure for enabling FIPS mode on a Red Hat Enterprise Linux host running Samba.
1.17.1. Limitations of using Samba in FIPS mode
The following Samba modes and features work in FIPS mode under the indicated conditions:
- Samba as a domain member only in Active Directory (AD) or Red Hat Identity Management (IdM) environments with Kerberos authentication that uses AES ciphers.
- Samba as a file server on an Active Directory domain member. However, this requires that clients use Kerberos to authenticate to the server.
Due to the increased security of FIPS, the following Samba features and modes do not work if FIPS mode is enabled:
- NT LAN Manager (NTLM) authentication because RC4 ciphers are blocked
- The server message block version 1 (SMB1) protocol
- The stand-alone file server mode because it uses NTLM authentication
- NT4-style domain controllers
- NT4-style domain members. Note that Red Hat continues supporting the primary domain controller (PDC) functionality IdM uses in the background.
- Password changes against the Samba server. You can only perform password changes using Kerberos against an Active Directory domain controller.
The following feature is not tested in FIPS mode and, therefore, is not supported by Red Hat:
- Running Samba as a print server
1.17.2. Using Samba in FIPS mode
You can enable the FIPS mode on a RHEL host that runs Samba.
Prerequisites
- Samba is configured on the Red Hat Enterprise Linux host.
- Samba runs in a mode that is supported in FIPS mode.
Procedure
Enable the FIPS mode on RHEL:
# fips-mode-setup --enableReboot the server:
# rebootUse the
testparmutility to verify the configuration:# testparm -sIf the command displays any errors or incompatibilities, fix them to ensure that Samba works correctly.
Additional resources
1.18. Tuning the performance of a Samba server
Learn what settings can improve the performance of Samba in certain situations, and which settings can have a negative performance impact.
Parts of this section were adopted from the Performance Tuning documentation published in the Samba Wiki. License: CC BY 4.0. Authors and contributors: See the history tab on the Wiki page.
Prerequisites
- Samba is set up as a file or print server
1.18.1. Setting the SMB protocol version
Each new SMB version adds features and improves the performance of the protocol. The recent Windows and Windows Server operating systems always supports the latest protocol version. If Samba also uses the latest protocol version, Windows clients connecting to Samba benefit from the performance improvements. In Samba, the default value of the server max protocol is set to the latest supported stable SMB protocol version.
To always have the latest stable SMB protocol version enabled, do not set the server max protocol parameter. If you set the parameter manually, you will need to modify the setting with each new version of the SMB protocol, to have the latest protocol version enabled.
The following procedure explains how to use the default value in the server max protocol parameter.
Procedure
-
Remove the
server max protocolparameter from the[global]section in the/etc/samba/smb.conffile. Reload the Samba configuration
# smbcontrol all reload-config
1.18.3. Settings that can have a negative performance impact
By default, the kernel in Red Hat Enterprise Linux is tuned for high network performance. For example, the kernel uses an auto-tuning mechanism for buffer sizes. Setting the socket options parameter in the /etc/samba/smb.conf file overrides these kernel settings. As a result, setting this parameter decreases the Samba network performance in most cases.
To use the optimized settings from the Kernel, remove the socket options parameter from the [global] section in the /etc/samba/smb.conf.
1.19. Configuring Samba to be compatible with clients that require an SMB version lower than the default
Samba uses a reasonable and secure default value for the minimum server message block (SMB) version it supports. However, if you have clients that require an older SMB version, you can configure Samba to support it.
1.19.1. Setting the minimum SMB protocol version supported by a Samba server
In Samba, the server min protocol parameter in the /etc/samba/smb.conf file defines the minimum server message block (SMB) protocol version the Samba server supports. You can change the minimum SMB protocol version.
By default, Samba on RHEL 8.2 and later supports only SMB2 and newer protocol versions. Red Hat recommends to not use the deprecated SMB1 protocol. However, if your environment requires SMB1, you can manually set the server min protocol parameter to NT1 to re-enable SMB1.
Prerequisites
- Samba is installed and configured.
Procedure
Edit the
/etc/samba/smb.conffile, add theserver min protocolparameter, and set the parameter to the minimum SMB protocol version the server should support. For example, to set the minimum SMB protocol version toSMB3, add:server min protocol = SMB3
Restart the
smbservice:# systemctl restart smb
Additional resources
-
smb.conf(5)man page
1.20. Frequently used Samba command-line utilities
This chapter describes frequently used commands when working with a Samba server.
1.20.1. Using the net ads join and net rpc join commands
Using the join subcommand of the net utility, you can join Samba to an AD or NT4 domain. To join the domain, you must create the /etc/samba/smb.conf file manually, and optionally update additional configurations, such as PAM.
Red Hat recommends using the realm utility to join a domain. The realm utility automatically updates all involved configuration files.
Procedure
Manually create the
/etc/samba/smb.conffile with the following settings:For an AD domain member:
[global]
workgroup = domain_name
security = ads
passdb backend = tdbsam
realm = AD_REALM
For an NT4 domain member:
[global]
workgroup = domain_name
security = user
passdb backend = tdbsam
-
Add an ID mapping configuration for the
*default domain and for the domain you want to join to the[global] section in the/etc/samba/smb.conffile. Verify the
/etc/samba/smb.conffile:# testparmJoin the domain as the domain administrator:
To join an AD domain:
# net ads join -U "DOMAIN\administrator"To join an NT4 domain:
# net rpc join -U "DOMAIN\administrator"
Append the
winbindsource to thepasswdandgroupdatabase entry in the/etc/nsswitch.conffile:passwd: files
winbindgroup: fileswinbindEnable and start the
winbindservice:# systemctl enable --now winbindOptionally, configure PAM using the
authselectutility.For details, see the
authselect(8)man page.Optionally for AD environments, configure the Kerberos client.
For details, see the documentation of your Kerberos client.
Additional resources
1.20.2. Using the net rpc rights command
In Windows, you can assign privileges to accounts and groups to perform special operations, such as setting ACLs on a share or upload printer drivers. On a Samba server, you can use the net rpc rights command to manage privileges.
Listing privileges you can set
To list all available privileges and their owners, use the net rpc rights list command. For example:
# net rpc rights list -U "DOMAIN\administrator"
Enter DOMAIN\administrator's password:
     SeMachineAccountPrivilege  Add machines to domain
      SeTakeOwnershipPrivilege  Take ownership of files or other objects
             SeBackupPrivilege  Back up files and directories
            SeRestorePrivilege  Restore files and directories
     SeRemoteShutdownPrivilege  Force shutdown from a remote system
      SePrintOperatorPrivilege  Manage printers
           SeAddUsersPrivilege  Add users and groups to the domain
       SeDiskOperatorPrivilege  Manage disk shares
           SeSecurityPrivilege  System security
Granting privileges
To grant a privilege to an account or group, use the net rpc rights grant command.
For example, grant the SePrintOperatorPrivilege privilege to the DOMAIN\printadmin group:
# net rpc rights grant "DOMAIN\printadmin" SePrintOperatorPrivilege -U "DOMAIN\administrator"
Enter DOMAIN\administrator's password:
Successfully granted rights.
Revoking privileges
To revoke a privilege from an account or group, use the net rpc rights revoke command.
For example, to revoke the SePrintOperatorPrivilege privilege from the DOMAIN\printadmin group:
# net rpc rights remoke "DOMAIN\printadmin" SePrintOperatorPrivilege -U "DOMAIN\administrator"
Enter DOMAIN\administrator's password:
Successfully revoked rights.
1.20.4. Using the net user command
The net user command enables you to perform the following actions on an AD DC or NT4 PDC:
- List all user accounts
- Add users
- Remove Users
Specifying a connection method, such as ads for AD domains or rpc for NT4 domains, is only required when you list domain user accounts. Other user-related subcommands can auto-detect the connection method.
Pass the -U user_name parameter to the command to specify a user that is allowed to perform the requested action.
Listing domain user accounts
To list all users in an AD domain:
# net ads user -U "DOMAIN\administrator"To list all users in an NT4 domain:
# net rpc user -U "DOMAIN\administrator"Adding a user account to the domain
On a Samba domain member, you can use the net user add command to add a user account to the domain.
For example, add the user account to the domain:
Add the account:
# net user add user password -U "DOMAIN\administrator"
User user added
Optionally, use the remote procedure call (RPC) shell to enable the account on the AD DC or NT4 PDC. For example:
# net rpc shell -U DOMAIN\administrator -S DC_or_PDC_name Talking to domain DOMAIN (S-1-5-21-1424831554-512457234-5642315751) net rpc>
user edit disabled user: noSet user's disabled flag from [yes] to [no] net rpc>exit
Deleting a user account from the domain
On a Samba domain member, you can use the net user delete command to remove a user account from the domain.
For example, to remove the user account from the domain:
# net user delete user -U "DOMAIN\administrator"
User user deleted
1.20.5. Using the rpcclient utility
The rpcclient utility enables you to manually execute client-side Microsoft Remote Procedure Call (MS-RPC) functions on a local or remote SMB server. However, most of the features are integrated into separate utilities provided by Samba. Use rpcclient only for testing MS-PRC functions.
Prerequisites
-
The
samba-clientpackage is installed.
Examples
For example, you can use the rpcclient utility to:
Manage the printer Spool Subsystem (SPOOLSS).
Example 1.7. Assigning a Driver to a Printer
# rpcclient server_name -U "DOMAIN\administrator" -c 'setdriver "printer_name" "driver_name"'
Enter DOMAIN\administrators password:
Successfully set printer_name to driver driver_name.
Retrieve information about an SMB server.
Example 1.8. Listing all File Shares and Shared Printers
# rpcclient server_name -U "DOMAIN\administrator" -c 'netshareenum'
Enter DOMAIN\administrators password:
netname: Example_Share
	remark:
	path:   C:\srv\samba\example_share\
	password:
netname: Example_Printer
	remark:
	path:   C:\var\spool\samba\
	password:
Perform actions using the Security Account Manager Remote (SAMR) protocol.
Example 1.9. Listing Users on an SMB Server
# rpcclient server_name -U "DOMAIN\administrator" -c 'enumdomusers'
Enter DOMAIN\administrators password:
user:[user1] rid:[0x3e8]
user:[user2] rid:[0x3e9]
If you run the command against a standalone server or a domain member, it lists the users in the local database. Running the command against an AD DC or NT4 PDC lists the domain users.
Additional resources
-
rpcclient(1)man page
1.20.6. Using the samba-regedit application
Certain settings, such as printer configurations, are stored in the registry on the Samba server. You can use the ncurses-based samba-regedit application to edit the registry of a Samba server.

Prerequisites
-
The
samba-clientpackage is installed.
Procedure
To start the application, enter:
# samba-regeditUse the following keys:
- Cursor up and cursor down: Navigate through the registry tree and the values.
- Enter: Opens a key or edits a value.
-
Tab: Switches between the
KeyandValuepane. - Ctrl+C: Closes the application.
1.20.7. Using the smbcontrol utility
The smbcontrol utility enables you to send command messages to the smbd, nmbd, winbindd, or all of these services. These control messages instruct the service, for example, to reload its configuration.
Prerequisites
-
The
samba-common-toolspackage is installed.
Procedure
-
Reload the configuration of the
smbd,nmbd,winbinddservices by sending thereload-configmessage type to thealldestination:
# smbcontrol all reload-configAdditional resources
-
smbcontrol(1)man page
1.20.8. Using the smbpasswd utility
The smbpasswd utility manages user accounts and passwords in the local Samba database.
Prerequisites
-
The
samba-common-toolspackage is installed.
Procedure
If you run the command as a user,
smbpasswdchanges the Samba password of the user who run the command. For example:[user@server ~]$ smbpasswd New SMB password: password Retype new SMB password: password
If you run
smbpasswdas therootuser, you can use the utility, for example, to:Create a new user:
[root@server ~]# smbpasswd -a user_name New SMB password:
passwordRetype new SMB password:passwordAdded user user_name.NoteBefore you can add a user to the Samba database, you must create the account in the local operating system. See the Adding a new user from the command line section in the Configuring basic system settings guide.
Enable a Samba user:
[root@server ~]# smbpasswd -e user_name
Enabled user user_name.
Disable a Samba user:
[root@server ~]# smbpasswd -x user_name
Disabled user user_name
Delete a user:
[root@server ~]# smbpasswd -x user_name
Deleted user user_name.
Additional resources
-
smbpasswd(8)man page
1.20.9. Using the smbstatus utility
The smbstatus utility reports on:
-
Connections per PID of each
smbddaemon to the Samba server. This report includes the user name, primary group, SMB protocol version, encryption, and signing information. -
Connections per Samba share. This report includes the PID of the
smbddaemon, the IP of the connecting machine, the time stamp when the connection was established, encryption, and signing information. - A list of locked files. The report entries include further details, such as opportunistic lock (oplock) types
Prerequisites
-
The
sambapackage is installed. -
The
smbdservice is running.
Procedure
# smbstatus

Samba version 4.15.2
PID  Username              Group                Machine                            Protocol Version  Encryption  Signing
....-------------------------------------------------------------------------------------------------------------------------
963  DOMAIN\administrator  DOMAIN\domain users  client-pc  (ipv4:192.0.2.1:57786)  SMB3_02           -           AES-128-CMAC

Service  pid  Machine    Connected at                  Encryption  Signing:
....---------------------------------------------------------------------------
example  969  192.0.2.1  Thu Nov  1 10:00:00 2018 CEST  -           AES-128-CMAC

Locked files:
Pid  Uid    DenyMode   Access    R/W     Oplock      SharePath           Name      Time
....--------------------------------------------------------------------------------------------------------
969  10000  DENY_WRITE 0x120089  RDONLY  LEASE(RWH)  /srv/samba/example  file.txt  Thu Nov  1 10:00:00 2018
Additional resources
-
smbstatus(1)man page
1.20.10. Using the smbtar utility
The smbtar utility backs up the content of an SMB share or a subdirectory of it and stores the content in a tar archive. Alternatively, you can write the content to a tape device.
Prerequisites
-
The
samba-clientpackage is installed.
Procedure
Use the following command to back up the content of the
demodirectory on the//server/example/share and store the content in the/root/example.tararchive:# smbtar -s server -x example -u user_name -p password -t /root/example.tar
Additional resources
-
smbtar(1)man page
1.20.11. Using the wbinfo utility
The wbinfo utility queries and returns information created and used by the winbindd service.
Prerequisites
-
The
samba-winbind-clientspackage is installed.
Procedure
You can use wbinfo, for example, to:
List domain users:
# wbinfo -u
AD\administrator
AD\guest
...
List domain groups:
# wbinfo -g
AD\domain computers
AD\domain admins
AD\domain users
...
Display the SID of a user:
# wbinfo --name-to-sid="AD\administrator"
S-1-5-21-1762709870-351891212-3141221786-500 SID_USER (1)
Display information about domains and trusts:
# wbinfo --trusted-domains --verbose
Domain Name   DNS Domain            Trust Type  Transitive  In   Out
BUILTIN                             None        Yes         Yes  Yes
server                              None        Yes         Yes  Yes
DOMAIN1       domain1.example.com   None        Yes         Yes  Yes
DOMAIN2       domain2.example.com   External    No          Yes  Yes
Additional resources
-
wbinfo(1)man page
1.21. Additional resources
-
smb.conf(5)man page -
/usr/share/docs/samba-version/directory contains general documentation, example scripts, and LDAP schema files, provided by the Samba project - Setting up Samba and the Clustered Trivial Database (CDTB) to share directories stored on an GlusterFS volume
- Mounting an SMB Share on Red Hat Enterprise Linux
Chapter 2. Deploying an NFS server
By using the Network File System (NFS) protocol, remote users can mount shared directories over a network and use them as they were mounted locally. This enables you to consolidate resources onto centralized servers on the network.
2.1. Key features of minor NFSv4 versions
Each minor NFSv4 version brings enhancements aimed at improving performance and security. Use these improvements to utilize the full potential of NFSv4, ensuring efficient and reliable file sharing across networks.
Key features of NFSv4.2
- Server-side copy
- Server-side copy is a capability of the NFS server to copy files on the server without transferring the data back and forth over the network.
- Sparse files
- Enables files to have one or more empty spaces, or gaps, which are unallocated or uninitialized data blocks consisting only of zeros. This enables applications to map out the location of holes in the sparse file.
- Space reservation
- Clients can reserve or allocate space on the storage server before writing data. This prevents the server from running out of space.
- Labeled NFS
- Enforces data access rights and enables SELinux labels between a client and a server for individual files on an NFS file system.
- Layout enhancements
- Provides functionality to enable Parallel NFS (pNFS) servers to collect better performance statistics.
Key features of NFSv4.1
- Client-side support for pNFS
- The support of high-speed I/O to clustered servers enables you to store data on multiple machines, to provide direct access to data, and synchronization of updates to metadata.
- Sessions
- Sessions maintain the server’s state relative to the connections belonging to a client. These sessions provide improved performance and efficiency by reducing the overhead associated with establishing and terminating connections for each Remote Procedure Call (RPC) operation.
Key features of NFSv4.0
- RPC and security
-
The
RPCSEC_GSSframework enhances RPC security. The NFSv4 protocol introduces a new operation for in-band security negotiation. This enables clients to query server policies for accessing file system resources securely. - Procedure and operation structure
-
NFS 4.0 introduces the
COMPOUNDprocedure, which enables clients to merge multiple operations into a single request to reduce RPCs. - File system model
NFS 4.0 retains the hierarchical file system model, treating files as byte streams and encoding names with UTF-8 for internationalization.
File handle types
With volatile file handles, servers can adjust to file system changes and enable clients to adapt as needed without requiring permanent file handles.
Attribute types
The file attribute structure includes required, recommended, and named attributes, each serving distinct purposes. Required attributes, derived from NFSv3, are essential for distinguishing file types, while recommended attributes, such as ACLs, provide enhanced access control.
Multi-server namespace
Namespaces span across multiple servers, simplify file system transfers based on attributes, support referrals, redundancy, and seamless server migration.
- OPEN and CLOSE operations
- These operations can combine file lookup, creation, and semantic sharing at a single point and make the file access management more efficient.
- File locking
- File locking is part of the protocol, eliminating the need for RPC callbacks. File lock state is managed by the server under a lease-based model, where failure to renew the lease may result in state release by the server.
- Client caching and delegation
- Caching resembles previous versions, with client-determined timeouts for attribute and directory caching. Delegations in NFS 4.0 allow the server to assign certain responsibilities to the client, guaranteeing specific file sharing semantics and enabling local file operations without immediate server interaction.
2.2. The AUTH_SYS authentication method
The AUTH_SYS method, which is also known as AUTH_UNIX, is a client authentication mechanism. With AUTH_SYS, the client sends the User ID (UID) and Group ID (GID) of the user to the server to verify its identity and permissions when accessing files. It is considered less secure as it relies on the client-provided information, making it susceptible to unauthorized access if misconfigured.
Mapping mechanisms ensure that NFS clients can access files with the appropriate permissions on the server, even if the UID and GID assignments differ between systems. UIDs and GIDs are mapped between NFS client and server by the following mechanisms:
- Direct mapping
UIDs and GIDs are directly mapped by NFS servers and clients between local and remote systems. This requires consistent UID and GID assignments across all systems participating in NFS file sharing. For example, a user with UID 1000 on a client can only access the files on a share that a user with UID 1000 on the server has access to.
For a simplified ID management in an NFS environment, administrators often rely on centralized services, such as LDAP or Network Information Service (NIS) to manage UID and GID mappings across multiple systems.
- User and Group ID mapping
-
NFS servers and clients can use the
idmapdservice to translate UIDs and GIDs between different systems for consistent identification and permission assignment.
2.3. The AUTH_GSS authentication method
Kerberos is a network authentication protocol that allows secure authentication for clients and servers over a non-secure network. It uses symmetric key cryptography and requires a trusted Key Distribution Center (KDC) to authenticate users and services.
Unlike AUTH_SYS, with the RPCSEC_GSS Kerberos mechanism, the server does not depend on the client to correctly represent which user is accessing the file. Instead, cryptography is used to authenticate users to the server, which prevents a malicious client from impersonating a user without having that user’s Kerberos credentials.
In the /etc/exports file, the sec option defines one or multiple methods of Kerberos security that the share should provide, and clients can mount the share with one of these methods. The sec option supports the following values:
-
sys: no cryptographic protection (default) -
krb5: authentication only -
krb5i: authentication and integrity protection -
krb5p: authentication, integrity checking, and traffic encryption
Note that the more cryptographic functionality a method provides, the lower is the performance.
2.4. File permissions on exported file systems
File permissions on exported file systems determine access rights to files and directories for clients accessing them over NFS.
Once the NFS file system is mounted by a remote host, the only protection each shared file has is its file system permissions. If two users that share the same User ID (UID) value mount the same NFS file system on different client systems, they can modify each other’s files.
NFS treats the root user on the client as equivalent to the root user on the server. However, by default, the NFS server maps root to the nobody account when accessing an NFS share. The root_squash option controls this behavior.
Additional resources
-
exports(5)man page
2.5. Services required on an NFS server
Red Hat Enterprise Linux (RHEL) uses a combination of a kernel module and user-space processes to provide NFS file shares:
Table 2.1. Services required on an NFS server
| Service name | NFS versions | Description |
|---|---|---|
|
| 3, 4 | The NFS kernel module that services requests for shared NFS file systems. |
|
| 3 |
This process accepts port reservations from local remote procedure call (RPC) services, makes them available or advertised, allowing corresponding remote RPC services to access them. The |
|
| 3, 4 |
This service processes It checks that the requested NFS share is currently exported by the NFS server and that the client is allowed to access it. |
|
| 3, 4 | This process advertises explicit NFS versions and protocols the server defines. It works with the kernel to meet the dynamic demands of NFS clients, such as providing server threads each time an NFS client connects.
The |
|
| 3 | This kernel module implements the Network Lock Manager (NLM) protocol, which enables clients to lock files on the server. RHEL loads the module automatically when the NFS server runs. |
|
| 3, 4 | This service provides user quota information for remote users. |
|
| 4 | This process provides NFSv4 client and server upcalls, which map between NFSv4 names (strings in the form of `user@domain`) and local user and group IDs. |
|
| 3, 4 |
This service handles |
|
| 4 | This service provides a NFSv4 client tracking daemon that prevents the server from granting lock reclaims when other clients have taken conflicting locks during a network partition combined with a server reboot. |
|
| 3 | This service provides notification to other NFSv3 clients when the local host reboots, and to the kernel when a remote NFSv3 host reboots. |
Additional resources
-
rpcbind(8),rpc.mountd(8),rpc.nfsd(8),rpc.statd(8),rpc.rquotad(8),rpc.idmapd(8),nfsdcld(8)man pages
2.6. The /etc/exports configuration file
The /etc/exports file controls which directories the server exports. Each line contains an export point, a whitespace-separated list of clients that are allowed to mount the directory, and options for each of the clients:
<directory> <host_or_network_1>(<options_1>) <host_or_network_n>(<options_n>)...
The following are the individual parts of an /etc/exports entry:
- <export>
- The directory that is being exported.
- <host_or_network>
- The host or network to which the export is being shared. For example, you can specify a hostname, an IP address, or an IP network.
- <options>
- The options for the host or network.
Adding a space between a client and options, changes the behavior. For example, the following lines do not have the same meaning:
/projects	client.example.com(rw)
/projects	client.example.com (rw)
In the first line, the server allows only client.example.com to mount the /projects directory in read-write mode, and no other hosts can mount the share. However, due to the space between client.example.com and (rw) in the second line, the server exports the directory to client.example.com in read-only mode (default setting), but all other hosts can mount the share in read-write mode.
The NFS server uses the following default settings for each exported directory:
Table 2.2. Default options of entries in /etc/exports
| Default setting | Description |
|---|---|
|
| Exports the directory in read-only mode. |
|
| The NFS server does not reply to requests before changes made by previous requests are written to disk. |
|
| The server delays writing to the disk if it suspects another write request is pending.. |
|
|
Prevents that the |
2.7. Configuring an NFSv4-only server
If you do not have any NFSv3 clients in your network, you can configure the NFS server to support only NFSv4 or specific minor protocol versions of it. Using only NFSv4 on the server reduces the number of ports that are open to the network.
Procedure
Install the
nfs-utilspackage:# dnf install nfs-utilsEdit the
/etc/nfs.conffile, and make the following changes:Disable the
vers3parameter in the[nfsd]section to disable NFSv3:[nfsd] vers3=n
Optional: If you require only specific NFSv4 minor versions, uncomment all
vers4.<minor_version>parameters and set them accordingly, for example:[nfsd] vers3=n # vers4=y vers4.0=n vers4.1=n vers4.2=y
With this configuration, the server provides only NFS version 4.2.
ImportantIf you require only a specific NFSv4 minor version, set only the parameters for the minor versions. Do not uncomment the
vers4parameter to avoid an unpredictable activation or deactivation of minor versions. By default, thevers4parameter enables or disables all NFSv4 minor versions. However, this behavior changes if you setvers4in conjunction with otherversparameters.
Disable all NFSv3-related services:
# systemctl mask --now rpc-statd.service rpcbind.service rpcbind.socketOptional: Create a directory that you want to share, for example:
# mkdir -p /nfs/projects/If you want to share an existing directory, skip this step.
Set the permissions you require on the
/nfs/projects/directory:# chmod 2770 /nfs/projects/ # chgrp users /nfs/projects/
These commands set write permissions for the
usersgroup on the/nfs/projects/directory and ensure that the same group is automatically set on new entries created in this directory.Add an export point to the
/etc/exportsfile for each directory that you want to share:/nfs/projects/ 192.0.2.0/24(rw) 2001:db8::/32(rw)
This entry shares the
/nfs/projects/directory to be accessible with read and write access to clients in the192.0.2.0/24and2001:db8::/32subnets.Open the relevant ports in
firewalld:# firewall-cmd --permanent --add-service nfs # firewall-cmd --reload
Enable and start the NFS server:
# systemctl enable --now nfs-server
Verification
On the server, verify that the server provides only the NFS versions that you have configured:
# cat /proc/fs/nfsd/versions
-3 +4 -4.0 -4.1 +4.2
On a client, perform the following steps:
Install the
nfs-utilspackage:# dnf install nfs-utilsMount an exported NFS share:
# mount server.example.com:/nfs/projects/ /mnt/As a user which is a member of the
usersgroup, create a file in/mnt/:# touch /mnt/fileList the directory to verify that the file was created:
# ls -l /mnt/
total 0
-rw-r--r--. 1 demo users 0 Jan 16 14:18 file
2.8. Configuring an NFSv3 server with optional NFSv4 support
In a network which still uses NFSv3 clients, configure the server to provide shares by using the NFSv3 protocol. If you also have newer clients in your network, you can, additionally, enable NFSv4. By default, Red Hat Enterprise Linux NFS clients use the latest NFS version that the server provides.
Procedure
Install the
nfs-utilspackage:# dnf install nfs-utilsOptional: By default, NFSv3 and NFSv4 are enabled. If you do not require NFSv4 or only specific minor versions, uncomment all
vers4.<minor_version>parameters and set them accordingly:[nfsd] # vers3=y # vers4=y vers4.0=n vers4.1=n vers4.2=y
With this configuration, the server provides only the NFS version 3 and 4.2.
ImportantIf you require only a specific NFSv4 minor version, set only the parameters for the minor versions. Do not uncomment the
vers4parameter to avoid an unpredictable activation or deactivation of minor versions. By default, thevers4parameter enables or disables all NFSv4 minor versions. However, this behavior changes if you setvers4in conjunction with otherversparameters.By default, NFSv3 RPC services use random ports. To enable a firewall configuration, configure fixed port numbers in the
/etc/nfs.conffile:In the
[lockd]section, set a fixed port number for thenlockmgrRPC service, for example:[lockd] port=5555With this setting, the service automatically uses this port number for both the UDP and TCP protocol.
In the
[statd]section, set a fixed port number for therpc.statdservice, for example:[statd] port=6666With this setting, the service automatically uses this port number for both the UDP and TCP protocol.
Optional: Create a directory that you want to share, for example:
# mkdir -p /nfs/projects/If you want to share an existing directory, skip this step.
Set the permissions you require on the
/nfs/projects/directory:# chmod 2770 /nfs/projects/ # chgrp users /nfs/projects/
These commands set write permissions for the
usersgroup on the/nfs/projects/directory and ensure that the same group is automatically set on new entries created in this directory.Add an export point to the
/etc/exportsfile for each directory that you want to share:/nfs/projects/ 192.0.2.0/24(rw) 2001:db8::/32(rw)
This entry shares the
/nfs/projects/directory to be accessible with read and write access to clients in the192.0.2.0/24and2001:db8::/32subnets.Open the relevant ports in
firewalld:# firewall-cmd --permanent --add-service={nfs,rpc-bind,mountd} # firewall-cmd --permanent --add-port={5555/tcp,5555/udp,6666/tcp,6666/udp} # firewall-cmd --reload
Enable and start the NFS server:
# systemctl enable --now rpc-statd nfs-server
Verification
On the server, verify that the server provides only the NFS versions that you have configured:
# cat /proc/fs/nfsd/versions
+3 +4 -4.0 -4.1 +4.2
On a client, perform the following steps:
Install the
nfs-utilspackage:# dnf install nfs-utilsMount an exported NFS share:
# mount -o vers=<version> server.example.com:/nfs/projects/ /mnt/Verify that the share was mounted with the specified NFS version:
# mount | grep "/mnt"
server.example.com:/nfs/projects/ on /mnt type nfs (rw,relatime,vers=3,...
As a user which is a member of the
usersgroup, create a file in/mnt/:# touch /mnt/fileList the directory to verify that the file was created:
# ls -l /mnt/
total 0
-rw-r--r--. 1 demo users 0 Jan 16 14:18 file
2.9. Enabling quota support on an NFS server
If you want to restrict the amount of data a user or a group can store, you can configure quotas on the file system. On an NFS server, the rpc-rquotad service ensures that the quota is also applied to users on NFS clients.
Prerequisites
Procedure
Verify that quotas are enabled on the directories that you export:
For ext file system, enter:
# quotaon -p /nfs/projects/
group quota on /nfs/projects (/dev/sdb1) is on
user quota on /nfs/projects (/dev/sdb1) is on
project quota on /nfs/projects (/dev/sdb1) is off
For an XFS file system, enter:
# findmnt /nfs/projects
TARGET    	SOURCE	FSTYPE OPTIONS
/nfs/projects /dev/sdb1 xfs	rw,relatime,seclabel,attr2,inode64,logbufs=8,logbsize=32k,usrquota,grpquota
Install the
quota-rpcpackage:# dnf install rpc-quotadOptional. By default, the quota RPC service runs on port 875. If you want to run the service on a different port, append
-p <port_number>to theRPCRQUOTADOPTSvariable in the/etc/sysconfig/rpc-rquotadfile:RPCRQUOTADOPTS="-p __<port_number>__"
Optional: By default, remote hosts can only read quotas. To allow clients to set quotas, append the
-Soption to theRPCRQUOTADOPTSvariable in the/etc/sysconfig/rpc-rquotadfile:RPCRQUOTADOPTS="-S"
Open the port in
firewalld:# firewall-cmd --permanent --add-port=875/udp # firewall-cmd --reload
Enable and start the
rpc-quotadservice:# systemctl enable --now rpc-rquotad
Verification
On the client:
Mount the exported share:
# mount server.example.com:/nfs/projects/ /mnt/Display the quota. The command depends on the file system of the exported directory. For example:
To display the quota of a specific user on all mounted ext file systems, enter:
# quota -u <user_name>
Disk quotas for user demo (uid 1000):
     Filesystem     space     quota     limit     grace     files     quota      limit     grace
server.example.com:/nfs/projects
             0K       100M      200M                  0         0         0
To display the user and group quota on an XFS file system, enter:
# xfs_quota -x -c "report -h" /mnt/
User quota on /nfs/projects (/dev/vdb1)
            Blocks
User ID     Used     Soft     Hard     Warn/Grace
---------- ---------------------------------
root        0        0        0        00 [------]
demo        0        100M     200M     00 [------]
Additional resources
-
quota(1)man page -
xfs_quota(8)man page
2.10. Enabling NFS over RDMA on an NFS server
Remote Direct Memory Access (RDMA) is a protocol that enables a client system to directly transfer data from the memory of a storage server into its own memory. This enhances storage throughput, decreases latency in data transfer between the server and client, and reduces CPU load on both ends. If both the NFS server and clients are connected over RDMA, clients can use NFSoRDMA to mount an exported directory.
Prerequisites
- The NFS service is running and configured
- An InfiniBand or RDMA over Converged Ethernet (RoCE) device is installed on the server.
- IP over InfiniBand (IPoIB) is configured on the server, and the InfiniBand device has an IP address assigned.
Procedure
Install the
rdma-corepackage:# dnf install rdma-coreIf the package was already installed, verify that the
xprtrdmaandsvcrdmamodules in the/etc/rdma/modules/rdma.conffile are uncommented:# NFS over RDMA client support xprtrdma # NFS over RDMA server support svcrdma
Optional. By default, NFS over RDMA uses port 20049. If you want to use a different port, set the
rdma-portsetting in the[nfsd]section of the/etc/nfs.conffile:rdma-port=_<port>_
Open the NFSoRDMA port in
firewalld:# firewall-cmd --permanent --add-port={20049/tcp,20049/udp} # firewall-cmd --reload
Adjust the port numbers if you set a different port than 20049.
Restart the
nfs-serverservice:# systemctl restart nfs-server
Verification
On a client with InfiniBand hardware, perform the following steps:
Install the following packages:
# dnf install nfs-utils rdma-coreMount an exported NFS share over RDMA:
# mount -o rdma server.example.com:/nfs/projects/ /mnt/If you set a port number other than the default (20049), pass
port=<port_number>to the command:# mount -o rdma,port=<port_number> server.example.com:/nfs/projects/ /mnt/Verify that the share was mounted with the
rdmaoption:# mount | grep "/mnt" server.example.com:/nfs/projects/ on /mnt type nfs (...,proto=rdma,...)
Additional resources
2.11. Setting up an NFS server with Kerberos in a Red Hat Identity Management domain
If you use Red Hat Identity Management (IdM), you can join your NFS server to the IdM domain. This enables you to centrally manage users and groups and to use Kerberos for authentication, integrity protection, and traffic encryption.
Prerequisites
- The NFS server is enrolled in a Red Hat Identity Management (IdM) domain.
- The NFS server is running and configured.
Procedure
Obtain a kerberos ticket as an IdM administrator:
# kinit adminCreate a
nfs/<FQDN>service principal:# ipa service-add nfs/nfs_server.idm.example.comRetrieve the
nfsservice principal from IdM, and store it in the/etc/krb5.keytabfile:# ipa-getkeytab -s idm_server.idm.example.com -p nfs/nfs_server.idm.example.com -k /etc/krb5.keytabOptional: Display the principals in the
/etc/krb5.keytabfile:# klist -k /etc/krb5.keytab Keytab name: FILE:/etc/krb5.keytab KVNO Principal ---- -------------------------------------------------------------------------- 1 nfs/nfs_server.idm.example.com@IDM.EXAMPLE.COM 1 nfs/nfs_server.idm.example.com@IDM.EXAMPLE.COM 1 nfs/nfs_server.idm.example.com@IDM.EXAMPLE.COM 1 nfs/nfs_server.idm.example.com@IDM.EXAMPLE.COM 7 host/nfs_server.idm.example.com@IDM.EXAMPLE.COM 7 host/nfs_server.idm.example.com@IDM.EXAMPLE.COM 7 host/nfs_server.idm.example.com@IDM.EXAMPLE.COM 7 host/nfs_server.idm.example.com@IDM.EXAMPLE.COMBy default, the IdM client adds the host principal to the
/etc/krb5.keytabfile when you join the host to the IdM domain. If the host principal is missing, use theipa-getkeytab -s idm_server.idm.example.com -p host/nfs_server.idm.example.com -k /etc/krb5.keytabcommand to add it.Use the
ipa-client-automountutility to configure mapping of IdM IDs:# ipa-client-automount Searching for IPA server... IPA server: DNS discovery Location: default Continue to configure the system with these values? [no]: yes Configured /etc/idmapd.conf Restarting sssd, waiting for it to become available. Started autofs
Update your
/etc/exportsfile, and add the Kerberos security method to the client options. For example:/nfs/projects/ 192.0.2.0/24(rw,sec=krb5i)If you want that your clients can select from multiple security methods, specify them separated by colons:
/nfs/projects/ 192.0.2.0/24(rw,sec=krb5:krb5i:krb5p)Reload the exported file systems:
# exportfs -r