
Accessing Identity Management services
Logging in to IdM and managing its services
Abstract
Making open source more inclusive
Red Hat is committed to replacing problematic language in our code, documentation, and web properties. We are beginning with these four terms: master, slave, blacklist, and whitelist. Because of the enormity of this endeavor, these changes will be implemented gradually over several upcoming releases. For more details, see our CTO Chris Wright’s message.
In Identity Management, planned terminology replacements include:
- block list replaces blacklist
- allow list replaces whitelist
- secondary replaces slave
The word master is being replaced with more precise language, depending on the context:
- IdM server replaces IdM master
- CA renewal server replaces CA renewal master
- CRL publisher server replaces CRL master
- multi-supplier replaces multi-master
Providing feedback on Red Hat documentation
We appreciate your feedback on our documentation. Let us know how we can improve it.
Submitting feedback through Jira (account required)
- Log in to the Jira website.
- Click Create in the top navigation bar
- Enter a descriptive title in the Summary field.
- Enter your suggestion for improvement in the Description field. Include links to the relevant parts of the documentation.
- Click Create at the bottom of the dialogue.
Chapter 1. Logging in to Identity Management from the command line
Identity Management (IdM) uses the Kerberos protocol to support single sign-on. Single sign-on means that the user enters the correct user name and password only once, and then accesses IdM services without the system prompting for the credentials again.
In IdM, the System Security Services Daemon (SSSD) automatically obtains a ticket-granting ticket (TGT) for a user after the user successfully logs in to the desktop environment on an IdM client machine with the corresponding Kerberos principal name. This means that after logging in, the user is not required to use the kinit utility to access IdM resources.
If you have cleared your Kerberos credential cache or your Kerberos TGT has expired, you need to request a Kerberos ticket manually to access IdM resources. The following sections present basic user operations when using Kerberos in IdM.
1.1. Using kinit to log in to IdM manually
Follow this procedure to use the kinit utility to authenticate to an Identity Management (IdM) environment manually. The kinit utility obtains and caches a Kerberos ticket-granting ticket (TGT) on behalf of an IdM user.
Only use this procedure if you have destroyed your initial Kerberos TGT or if it has expired. As an IdM user, when logging onto your local machine you are also automatically logging in to IdM. This means that after logging in, you are not required to use the kinit utility to access IdM resources.
Procedure
To log in to IdM
Under the user name of the user who is currently logged in on the local system, use kinit without specifying a user name. For example, if you are logged in as
example_useron the local system:[example_user@server ~]$ kinit Password for example_user@EXAMPLE.COM: [example_user@server ~]$If the user name of the local user does not match any user entry in IdM, the authentication attempt fails:
[example_user@server ~]$ kinit
kinit: Client 'example_user@EXAMPLE.COM' not found in Kerberos database while getting initial credentials
Using a Kerberos principal that does not correspond to your local user name, pass the required user name to the
kinitutility. For example, to log in as theadminuser:[example_user@server ~]$ kinit admin Password for admin@EXAMPLE.COM: [example_user@server ~]$
Optionally, to verify that the login was successful, use the klist utility to display the cached TGT. In the following example, the cache contains a ticket for the
example_userprincipal, which means that on this particular host, onlyexample_useris currently allowed to access IdM services:$ klist Ticket cache: KEYRING:persistent:0:0 Default principal: example_user@EXAMPLE.COM Valid starting Expires Service principal 11/10/2019 08:35:45 11/10/2019 18:35:45 krbtgt/EXAMPLE.COM@EXAMPLE.COM
1.2. Destroying a user’s active Kerberos ticket
Follow this procedure to clear the credentials cache that contains the user’s active Kerberos ticket.
Procedure
To destroy your Kerberos ticket:
[example_user@server ~]$ kdestroyOptionally, to check that the Kerberos ticket has been destroyed:
[example_user@server ~]$ klist
klist: Credentials cache keyring 'persistent:0:0' not found
1.3. Configuring an external system for Kerberos authentication
Follow this procedure to configure an external system so that Identity Management (IdM) users can log in to IdM from the external system using their Kerberos credentials.
Enabling Kerberos authentication on external systems is especially useful when your infrastructure includes multiple realms or overlapping domains. It is also useful if the system has not been enrolled into any IdM domain through ipa-client-install.
To enable Kerberos authentication to IdM from a system that is not a member of the IdM domain, define an IdM-specific Kerberos configuration file on the external system.
Prerequisites
The
krb5-workstationpackage is installed on the external system.To find out whether the package is installed, use the following CLI command:
# dnf list installed krb5-workstation
Installed Packages
krb5-workstation.x86_64    1.16.1-19.el8     @BaseOS
Procedure
Copy the
/etc/krb5.conffile from the IdM server to the external system. For example:# scp /etc/krb5.conf root@externalsystem.example.com:/etc/krb5_ipa.confWarningDo not overwrite the existing
krb5.conffile on the external system.On the external system, set the terminal session to use the copied IdM Kerberos configuration file:
$ export KRB5_CONFIG=/etc/krb5_ipa.confThe
KRB5_CONFIGvariable exists only temporarily until you log out. To prevent this loss, export the variable with a different file name.-
Copy the Kerberos configuration snippets from the
/etc/krb5.conf.d/directory to the external system.
Users on the external system can now use the kinit utility to authenticate against the IdM server.
1.4. Additional resources
-
The
krb5.conf(5)man page. -
The
kinit(1)man page. -
The
klist(1)man page. -
The
kdestroy(1)man page.
Chapter 2. Viewing, starting and stopping the Identity Management services
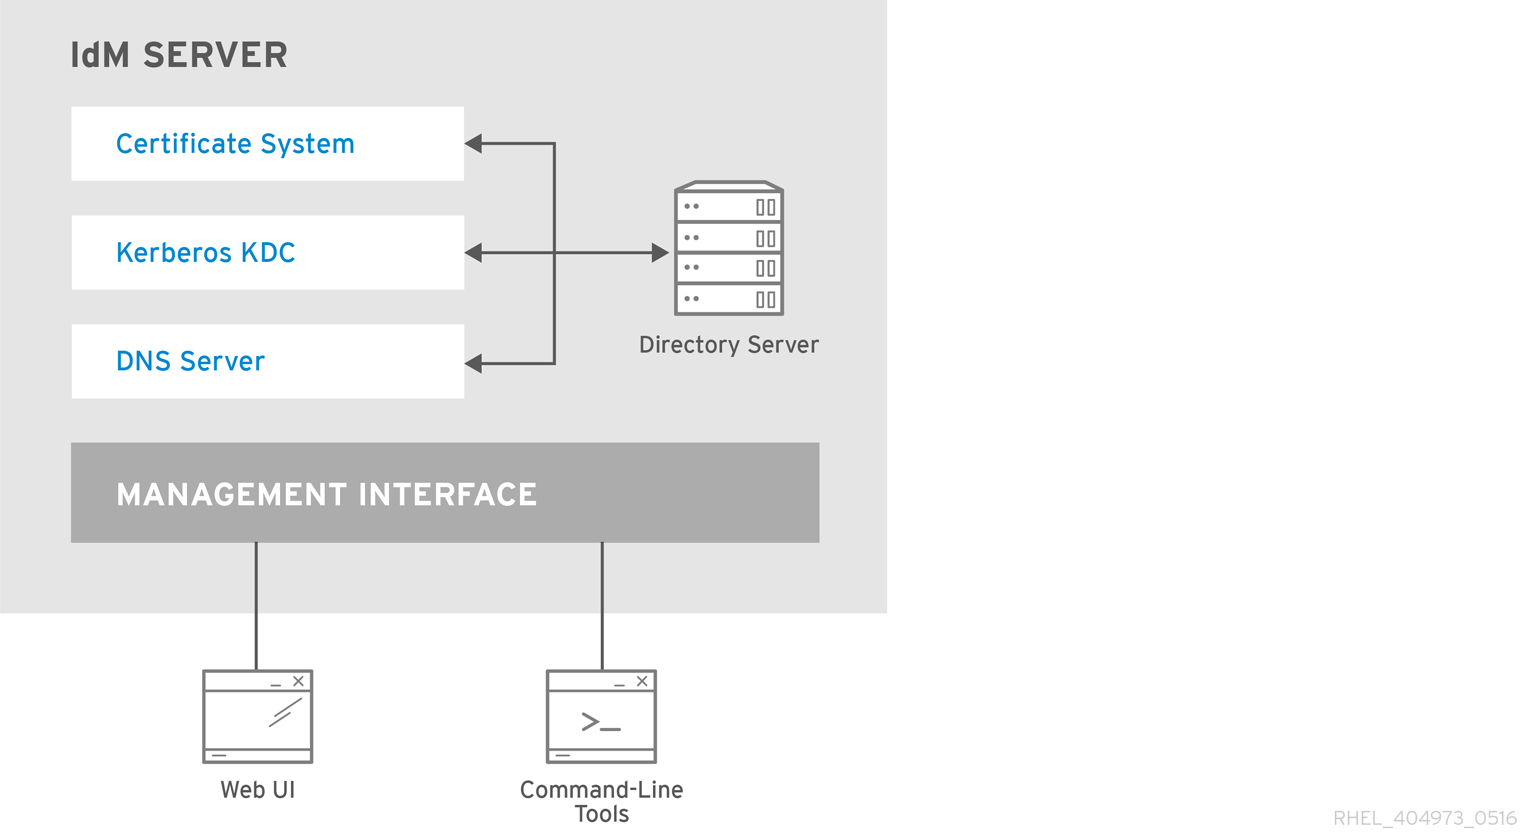
Identity Management (IdM) servers are Red Hat Enterprise Linux systems that work as domain controllers (DCs). A number of different services are running on IdM servers, most notably the Directory Server, Certificate Authority (CA), DNS, and Kerberos.
2.1. The IdM services
There are many different services that can be installed and run on the IdM servers and clients.
List of services hosted by IdM servers
Most of the following services are not strictly required to be installed on the IdM server. For example, you can install services such as a certificate authority (CA) or DNS server on an external server outside the IdM domain.
- Kerberos
-
the
krb5kdcandkadminservices
IdM uses the Kerberos protocol to support single sign-on. With Kerberos, users only need to present the correct username and password once and can access IdM services without the system prompting for credentials again.
Kerberos is divided into two parts:
-
The
krb5kdcservice is the Kerberos Authentication service and Key Distribution Center (KDC) daemon. -
The
kadminservice is the Kerberos database administration program.
For information about how to authenticate using Kerberos in IdM, see Logging in to Identity Management from the command line and Logging in to IdM in the Web UI: Using a Kerberos ticket.
- LDAP directory server
-
the
dirsrvservice
The IdM LDAP directory server instance stores all IdM information, such as information related to Kerberos, user accounts, host entries, services, policies, DNS, and others. The LDAP directory server instance is based on the same technology as Red Hat Directory Server. However, it is tuned to IdM-specific tasks.
- Certificate Authority
-
the
pki-tomcatdservice
The integrated certificate authority (CA) is based on the same technology as Red Hat Certificate System. pki is the command-line interface for accessing Certificate System services.
You can also install the server without the integrated CA if you create and provide all required certificates independently.
For more information, see Planning your CA services.
- Domain Name System (DNS)
-
the
namedservice
IdM uses DNS for dynamic service discovery. The IdM client installation utility can use information from DNS to automatically configure the client machine. After the client is enrolled in the IdM domain, it uses DNS to locate IdM servers and services within the domain. The BIND (Berkeley Internet Name Domain) implementation of the DNS (Domain Name System) protocols in Red Hat Enterprise Linux includes the named DNS server. named-pkcs11 is a version of the BIND DNS server built with native support for the PKCS#11 cryptographic standard.
For information, see Planning your DNS services and host names.
- Apache HTTP Server
-
the
httpdservice
The Apache HTTP web server provides the IdM Web UI, and also manages communication between the Certificate Authority and other IdM services.
- Samba / Winbind
-
smbandwinbindservices
Samba implements the Server Message Block (SMB) protocol, also known as the Common Internet File System (CIFS) protocol, in Red Hat Enterprise Linux. Via the smb service, the SMB protocol enables you to access resources on a server, such as file shares and shared printers. If you have configured a Trust with an Active Directory (AD) environment, the`Winbind` service manages communication between IdM servers and AD servers.
- One-time password (OTP) authentication
-
the
ipa-otpdservices
One-time passwords (OTP) are passwords that are generated by an authentication token for only one session, as part of two-factor authentication. OTP authentication is implemented in Red Hat Enterprise Linux via the ipa-otpd service.
For more information, see Logging in to the Identity Management Web UI using one time passwords.
- OpenDNSSEC
-
the
ipa-dnskeysyncdservice
OpenDNSSEC is a DNS manager that automates the process of keeping track of DNS security extensions (DNSSEC) keys and the signing of zones. The ipa-dnskeysyncd service manages synchronization between the IdM Directory Server and OpenDNSSEC.
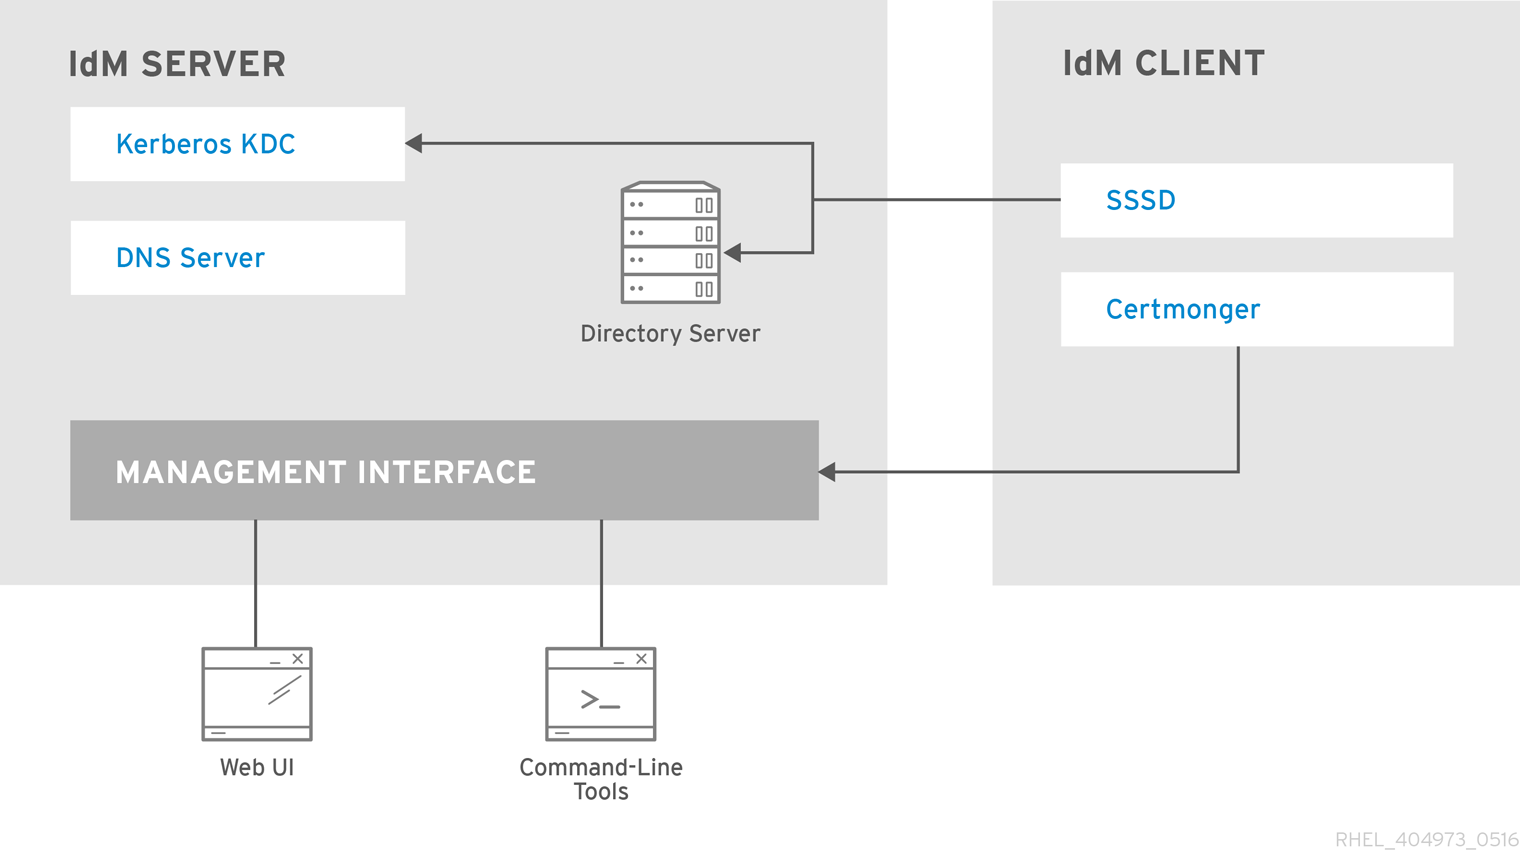
List of services hosted by IdM clients
-
System Security Services Daemon: the
sssdservice
The System Security Services Daemon (SSSD) is the client-side application that manages user authentication and caching credentials. Caching enables the local system to continue normal authentication operations if the IdM server becomes unavailable or if the client goes offline.
For more information, see Understanding SSSD and its benefits.
-
Certmonger: the
certmongerservice
The certmonger service monitors and renews the certificates on the client. It can request new certificates for the services on the system.
For more information, see Obtaining an IdM certificate for a service using certmonger.
2.2. Viewing the status of IdM services
To view the status of the IdM services that are configured on your IdM server, run the ipactl status command:
[root@server ~]# ipactl status
Directory Service: RUNNING
krb5kdc Service: RUNNING
kadmin Service: RUNNING
named Service: RUNNING
httpd Service: RUNNING
pki-tomcatd Service: RUNNING
smb Service: RUNNING
winbind Service: RUNNING
ipa-otpd Service: RUNNING
ipa-dnskeysyncd Service: RUNNING
ipa: INFO: The ipactl command was successful
The output of the ipactl status command on your server depends on your IdM configuration. For example, if an IdM deployment does not include a DNS server, the named service is not present in the list.
You cannot use the IdM web UI to view the status of all the IdM services running on a particular IdM server. Kerberized services running on different servers can be viewed in the Identity → Services tab of the IdM web UI.
You can start or stop the entire server, or an individual service only.
To start, stop, or restart the entire IdM server, see:
To start, stop, or restart an individual IdM service, see:
To display the version of IdM software, see:
2.3. Starting and stopping the entire Identity Management server
Use the ipa systemd service to stop, start, or restart the entire IdM server along with all the installed services. Using the systemctl utility to control the ipa systemd service ensures all services are stopped, started, or restarted in the appropriate order. The ipa systemd service also upgrades the RHEL IdM configuration before starting the IdM services, and it uses the proper SELinux contexts when administrating with IdM services. You do not need to have a valid Kerberos ticket to run the systemctl ipa commands.
ipa systemd service commands
To start the entire IdM server:
# systemctl start ipaTo stop the entire IdM server:
# systemctl stop ipaTo restart the entire IdM server:
# systemctl restart ipa
To show the status of all the services that make up IdM, use the ipactl utility:
# ipactl status-
Do not directly use the
ipactlutility to start, stop, or restart IdM services. Use thesystemctl ipacommands instead, which call theipactlutility in a predictable environment. -
You cannot use the IdM web UI to perform the
ipactlcommands.
2.4. Starting and stopping an individual Identity Management service
Changing IdM configuration files manually is generally not recommended. However, certain situations require that an administrator performs a manual configuration of specific services. In such situations, use the systemctl utility to stop, start, or restart an individual IdM service.
For example, use systemctl after customizing the Directory Server behavior, without modifying the other IdM services:
# systemctl restart dirsrv@REALM-NAME.service
Also, when initially deploying an IdM trust with Active Directory, modify the /etc/sssd/sssd.conf file, adding:
- Specific parameters to tune the timeout configuration options in an environment where remote servers have a high latency
- Specific parameters to tune the Active Directory site affinity
- Overrides for certain configuration options that are not provided by the global IdM settings
To apply the changes you have made in the /etc/sssd/sssd.conf file:
# systemctl restart sssd.service
Running systemctl restart sssd.service is required because the System Security Services Daemon (SSSD) does not automatically re-read or re-apply its configuration.
Note that for changes that affect IdM identity ranges, a complete server reboot is recommended.
To restart multiple IdM domain services, always use systemctl restart ipa. Because of dependencies between the services installed with the IdM server, the order in which they are started and stopped is critical. The ipa systemd service ensures that the services are started and stopped in the appropriate order.
Useful systemctl commands
To start a particular IdM service:
# systemctl start name.serviceTo stop a particular IdM service:
# systemctl stop name.serviceTo restart a particular IdM service:
# systemctl restart name.serviceTo view the status of a particular IdM service:
# systemctl status name.service
You cannot use the IdM web UI to start or stop the individual services running on IdM servers. You can only use the web UI to modify the settings of a Kerberized service by navigating to Identity → Services and selecting the service.
Additional resources
2.5. Methods for displaying IdM software version
You can display the IdM version number with:
- The IdM WebUI
-
ipacommands -
rpmcommands
- Displaying version through the WebUI
In the IdM WebUI, the software version can be displayed by choosing
Aboutfrom the username menu at the upper-right.
- Displaying version with
ipacommands From the command line, use the
ipa --versioncommand.[root@server ~]# ipa --version VERSION: 4.8.0, API_VERSION: 2.233
- Displaying version with
rpmcommands If IdM services are not operating properly, you can use the
rpmutility to determine the version number of theipa-serverpackage that is currently installed.[root@server ~]# rpm -q ipa-server ipa-server-4.8.0-11.module+el8.1.0+4247+9f3fd721.x86_64
Chapter 3. Introduction to the IdM command-line utilities
Learn more about the basics of using the Identity Management (IdM) command-line utilities.
Prerequisites
Installed and accessible IdM server.
For details, see Installing Identity Management.
- To use the IPA command-line interface, authenticate to IdM with a valid Kerberos ticket.
3.1. What is the IPA command line interface
The IPA command-line interface (CLI) is the basic command-line interface for Identity Management (IdM) administration.
It supports a lot of subcommands for managing IdM, such as the ipa user-add command to add a new user.
IPA CLI allows you to:
- Add, manage, or remove users, groups, hosts and other objects in the network.
- Manage certificates.
- Search entries.
- Display and list objects.
- Set access rights.
- Get help with the correct command syntax.
3.2. What is the IPA help
The IPA help is a built-in documentation system for the IdM server.
The IPA command-line interface (CLI) generates available help topics from loaded IdM plugin modules. To use the IPA help utility, you must:
- Have an IdM server installed and running.
- Be authenticated with a valid Kerberos ticket.
Entering the ipa help command without options displays information about basic help usage and the most common command examples.
You can use the following options for different ipa help use cases:
$ ipa help [TOPIC | COMMAND | topics | commands]-
[]— Brackets mean that all parameters are optional and you can write justipa helpand the command will be executed. |— The pipe character means or. Therefore, you can specify aTOPIC, aCOMMAND, ortopics, orcommands, with the basicipa helpcommand:-
topics— You can run the commandipa help topicsto display a list of topics that are covered by the IPA help, such asuser,cert,serverand many others. -
TOPIC— The TOPIC with capital letters is a variable. Therefore, you can specify a particular topic, for example,ipa help user. -
commands— You can enter the commandipa help commandsto display a list of commands which are covered by the IPA help, for example,user-add,ca-enable,server-showand many others. -
COMMAND— The COMMAND with capital letters is a variable. Therefore, you can specify a particular command, for example,ipa help user-add.
-
3.3. Using IPA help topics
The following procedure describes how to use the IPA help in the command-line interface.
Procedure
- Open a terminal and connect to the IdM server.
Enter
ipa help topicsto display a list of topics covered by help.$ ipa help topicsSelect one of the topics and create a command according to the following pattern:
ipa help [topic_name]. Instead of thetopic_namestring, add one of the topics you listed in the previous step.In the example, we use the following topic:
user$ ipa help userIf the IPA help output is too long and you cannot see the whole text, use the following syntax:
$ ipa help user | lessYou can then scroll down and read the whole help.
The IPA CLI displays a help page for the user topic. After reading the overview, you can see many examples with patterns for working with topic commands.
3.4. Using IPA help commands
The following procedure describes how to create IPA help commands in the command-line interface.
Procedure
- Open a terminal and connect to the IdM server.
Enter
ipa help commandsto display a list of commands covered by help.$ ipa help commandsSelect one of the commands and create a help command according to the following pattern:
ipa help <COMMAND>. Instead of the<COMMAND>string, add one of the commands you listed in the previous step.$ ipa help user-add
Additional resources
-
The
ipaman page.
3.5. Structure of IPA commands
The IPA CLI distinguishes the following types of commands:
- Built-in commands — Built-in commands are all available in the IdM server.
- Plug-in provided commands
The structure of IPA commands allows you to manage various types of objects. For example:
- Users,
- Hosts,
- DNS records,
- Certificates,
and many others.
For most of these objects, the IPA CLI includes commands to:
-
Add (
add) -
Modify (
mod) -
Delete (
del) -
Search (
find) -
Display (
show)
Commands have the following structure:
ipa user-add, ipa user-mod, ipa user-del, ipa user-find, ipa user-show
ipa host-add, ipa host-mod, ipa host-del, ipa host-find, ipa host-show
ipa dnsrecord-add, ipa dnsrecord-mod, ipa dnsrecord-del, ipa dnsrecord-find, ipa dnrecord-show
You can create a user with the ipa user-add [options], where [options] are optional. If you use just the ipa user-add command, the script asks you for details one by one.
To change an existing object, you need to define the object, therefore the command also includes an object: ipa user-mod USER_NAME [options].
3.6. Using an IPA command to add a user account to IdM
The following procedure describes how to add a new user to the Identity Management (IdM) database using the command line.
Prerequisites
- You need to have administrator privileges to add user accounts to the IdM server.
Procedure
- Open a terminal and connect to the IdM server.
Enter the command for adding a new user:
$ ipa user-addThe command runs a script that prompts you to provide basic data necessary for creating a user account.
- In the First name: field, enter the first name of the new user and press the Enter key.
- In the Last name: field, enter the last name of the new user and press the Enter key.
In the User login [suggested user name]: enter the user name, or just press the Enter key to accept the suggested user name.
The user name must be unique for the whole IdM database. If an error occurs because that user name already exists, repeat the process with the
ipa user-addcommand and use a different, unique user name.
After you add the user name, the user account is added to the IdM database and the IPA command line interface (CLI) prints the following output:
----------------------
Added user "euser"
----------------------
User login: euser
First name: Example
Last name: User
Full name: Example User
Display name: Example User
Initials: EU
Home directory: /home/euser
GECOS: Example User
Login shell: /bin/sh
Principal name: euser@IDM.EXAMPLE.COM
Principal alias: euser@IDM.EXAMPLE.COM
Email address: euser@idm.example.com
UID: 427200006
GID: 427200006
Password: False
Member of groups: ipausers
Kerberos keys available: False
By default, a user password is not set for the user account. To add a password while creating a user account, use the ipa user-add command with the following syntax:
$ ipa user-add --first=Example --last=User --passwordThe IPA CLI then prompts you to add or confirm a user name and password.
If the user has been created already, you can add the password with the ipa user-mod command.
Additional resources
-
Run the
ipa help user-addcommand for more information about parameters.
3.7. Using an IPA command to modify a user account in IdM
You can change many parameters for each user account. For example, you can add a new password to the user.
Basic command syntax is different from the user-add syntax because you need to define the existing user account for which you want to perform changes, for example, add a password.
Prerequisites
- You need to have administrator privileges to modify user accounts.
Procedure
- Open a terminal and connect to the IdM server.
Enter the
ipa user-modcommand, specify the user to modify, and any options, such as--passwordfor adding a password:$ ipa user-mod euser --passwordThe command runs a script where you can add the new password.
- Enter the new password and press the Enter key.
The IPA CLI prints the following output:
----------------------
Modified user "euser"
----------------------
User login: euser
First name: Example
Last name: User
Home directory: /home/euser
Principal name: euser@IDM.EXAMPLE.COM
Principal alias: euser@IDM.EXAMPLE.COM
Email address: euser@idm.example.com
UID: 427200006
GID: 427200006
Password: True
Member of groups: ipausers
Kerberos keys available: True
The user password is now set for the account and the user can log into IdM.
Additional resources
-
Run the
ipa help user-modcommand for more information about parameters.
3.8. How to supply a list of values to the IdM utilities
Identity Management (IdM) stores values for multi-valued attributes in lists.
IdM supports the following methods of supplying multi-valued lists:
Using the same command-line argument multiple times within the same command invocation:
$ ipa permission-add --right=read --permissions=write --permissions=delete ...Alternatively, you can enclose the list in curly braces, in which case the shell performs the expansion:
$ ipa permission-add --right={read,write,delete} ...
The examples above show a command permission-add which adds permissions to an object. The object is not mentioned in the example. Instead of … you need to add the object for which you want to add permissions.
When you update such multi-valued attributes from the command line, IdM completely overwrites the previous list of values with a new list. Therefore, when updating a multi-valued attribute, you must specify the whole new list, not just a single value you want to add.
For example, in the command above, the list of permissions includes reading, writing and deleting. When you decide to update the list with the permission-mod command, you must add all values, otherwise those not mentioned will be deleted.
Example 1: — The ipa permission-mod command updates all previously added permissions.
$ ipa permission-mod --right=read --right=write --right=delete ...or
$ ipa permission-mod --right={read,write,delete} ...
Example 2 — The ipa permission-mod command deletes the --right=delete argument because it is not included in the command:
$ ipa permission-mod --right=read --right=write ...or
$ ipa permission-mod --right={read,write} ...3.9. How to use special characters with the IdM utilities
When passing command-line arguments that include special characters to the ipa commands, escape these characters with a backslash (\). For example, common special characters include angle brackets (< and >), ampersand (&), asterisk (*), or vertical bar (|).
For example, to escape an asterisk (*):
$ ipa certprofile-show certificate_profile --out=exported\*profile.cfgCommands containing unescaped special characters do not work as expected because the shell cannot properly parse such characters.
Chapter 4. Searching Identity Management entries from the command line
The following sections describe how to use IPA commands, which helps you to find or show objects.
4.1. Overview of listing IdM entries
You can use the ipa *-find commands to help you to search for particular types of IdM entries.
To list all the find commands, use the following ipa help command:
$ ipa help commands | grep findYou may need to check if a particular user is included in the IdM database. You can then list all users with the following command:
$ ipa user-findTo list user groups whose specified attributes contain a keyword:
$ ipa group-find keyword
For example the ipa group-find admin command lists all groups whose names or descriptions include string admin:
----------------
3 groups matched
----------------
   Group name: admins
   Description: Account administrators group
   GID: 427200002

   Group name: editors
   Description: Limited admins who can edit other users
   GID: 427200002

   Group name: trust admins
   Description: Trusts administrators group
When searching user groups, you can also limit the search results to groups that contain a particular user:
$ ipa group-find --user=user_nameTo search for groups that do not contain a particular user:
$ ipa group-find --no-user=user_name4.2. Showing details for a particular entry
Use the ipa *-show command to display details about a particular IdM entry.
Procedure
To display details about a host named server.example.com:
$ ipa host-show server.example.com

Host name: server.example.com
Principal name: host/server.example.com@EXAMPLE.COM
...
4.3. Adjusting the search size and time limit
Some queries, such as requesting a list of IdM users, can return a very large number of entries. By tuning these search operations, you can improve the overall server performance when running the ipa *-find commands, such as ipa user-find, and when displaying corresponding lists in the Web UI.
- Search size limit
Defines the maximum number of entries returned for a request sent to the server from a client’s CLI or from a browser accessing the IdM Web UI.
Default: 100 entries.
- Search time limit
Defines the maximum time (in seconds) that the server waits for searches to run. Once the search reaches this limit, the server stops the search and returns the entries discovered in that time.
Default: 2 seconds.
If you set the values to -1, IdM will not apply any limits when searching.
Setting search size or time limits too high can negatively affect server performance.
4.3.1. Adjusting the search size and time limit in the command line
The following procedure describes adjusting search size and time limits in the command line:
- Globally
- For a specific entry
Procedure
To display current search time and size limits in CLI, use the
ipa config-showcommand:$ ipa config-show Search time limit: 2 Search size limit: 100To adjust the limits globally for all queries, use the
ipa config-modcommand and add the--searchrecordslimitand--searchtimelimitoptions. For example:$ ipa config-mod --searchrecordslimit=500 --searchtimelimit=5-
To temporarily adjust the limits only for a specific query, add the
--sizelimitor--timelimitoptions to the command. For example:
$ ipa user-find --sizelimit=200 --timelimit=1204.3.2. Adjusting the search size and time limit in the Web UI
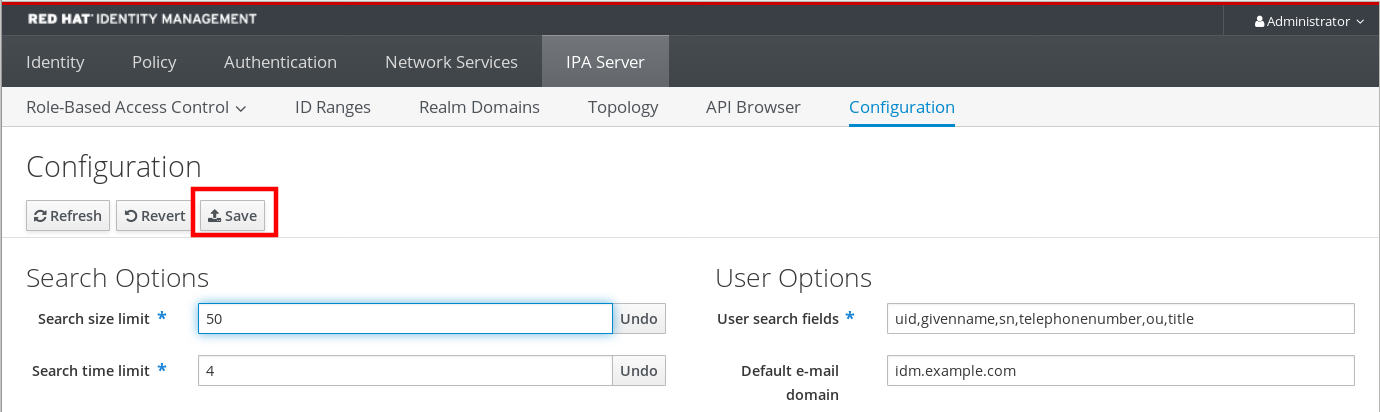
The following procedure describes adjusting global search size and time limits in the IdM Web UI.
Procedure
- Log in to the IdM Web UI.
Click IPA Server.

- On the IPA Server tab, click Configuration.
Set the required values in the Search Options area.
Default values are:
- Search size limit: 100 entries
- Search time limit: 2 seconds
Click Save at the top of the page.
Chapter 5. Accessing the IdM Web UI in a web browser
The IdM (Identity Management) Web UI is a web application for IdM administration, a graphical alternative to the IdM command line interface (CLI)
5.1. What is the IdM Web UI
The IdM (Identity Management) Web UI is a web application for IdM administration. You can access the IdM Web UI as:
- IdM users: A limited set of operations depending on permissions granted to the user in the IdM server. Basically, active IdM users can log in to the IdM server and configure their own account. They cannot change settings of other users or the IdM server settings.
- Administrators: Full access rights to the IdM server.
- Active Directory users: A set of operations depending on permissions granted to the user. Active Directory users can now be administrators for Identity Management. For details, see Enabling AD users to administer IdM.
5.2. Web browsers supported for accessing the Web UI
Identity Management (IdM) supports the following browsers for connecting to the Web UI:
- Mozilla Firefox 38 and later
- Google Chrome 46 and later
You might experience problems accessing the IdM Web UI with a smart card if your browser attempts to use TLS v1.3:
[ssl:error] [pid 125757:tid 140436077168384] [client 999.999.999.999:99999] AH: verify client post handshake
[ssl:error] [pid 125757:tid 140436077168384] [client 999.999.999.999:99999] AH10158: cannot perform post-handshake authentication
[ssl:error] [pid 125757:tid 140436077168384] SSL Library Error: error:14268117:SSL routines:SSL_verify_client_post_handshake:extension not received
This is because the most recent versions of browsers do not have TLS Post-Handshake Authentication (PHA) enabled by default, or they do not support PHA. PHA is necessary to require a TLS client certificate for only a part of a web site, such as when accessing the IdM Web UI with smart card authentication.
To resolve this issue for Mozilla Firefox 68 and later, enable TLS PHA:
-
Enter
about:configin the address bar to access the Mozilla Firefox preferences menu. -
Enter
security.tls.enable_post_handshake_authin the search bar. - Click the toggle button to set the parameter to true.
To resolve this issue for Chrome, which currently does not support PHA, disable TLS v1.3:
-
Open the
/etc/httpd/conf.d/ssl.confconfiguration file. Add
-TLSv1.3to theSSLProtocoloption:SSLProtocol all -TLSv1 -TLSv1.1 -TLSv1.3Restart the
httpdservice:service httpd restart
Note that IdM manages the ssl.conf file and might overwrite its contents during package updates. Verify custom settings after updating IdM packages.
5.3. Accessing the Web UI
The following procedure describes the first logging in to the IdM (Identity Management) Web UI with a password.
After the first login you can configure your IdM server to authenticate with:
Kerberos ticket
For details, see Kerberos authentication in Identity Management.
Smart card
For details, see Configuring the IdM server for smart card authentication.
One time password (OTP) — this can be combined with password and Kerberos authentication.
For details, see One time password (OTP) authentication in Identity Management.
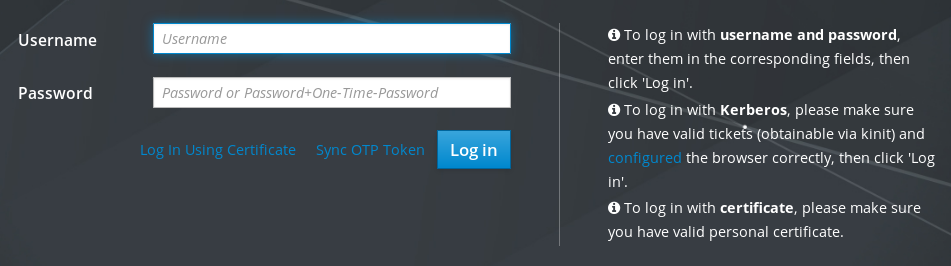
Procedure
Type an IdM server URL into the browser address bar. The name will look similarly to the following example:
https://server.example.com
You just need to change
server.example.comwith a DNS name of your IdM server.This opens the IdM Web UI login screen in your browser.
- If the server does not respond or the login screen does not open, check the DNS settings on the IdM server to which you are connecting.
If you use a self-signed certificate, the browser issues a warning. Check the certificate and accept the security exception to proceed with the login.
To avoid security exceptions, install a certificate signed by a certificate authority.
On the Web UI login screen, enter the administrator account credentials you added during the IdM server installation.
For details, see Installing an Identity Management server: With integrated DNS, with an integrated CA.
You can enter your personal account credentials as well if they are already entered in the IdM server.
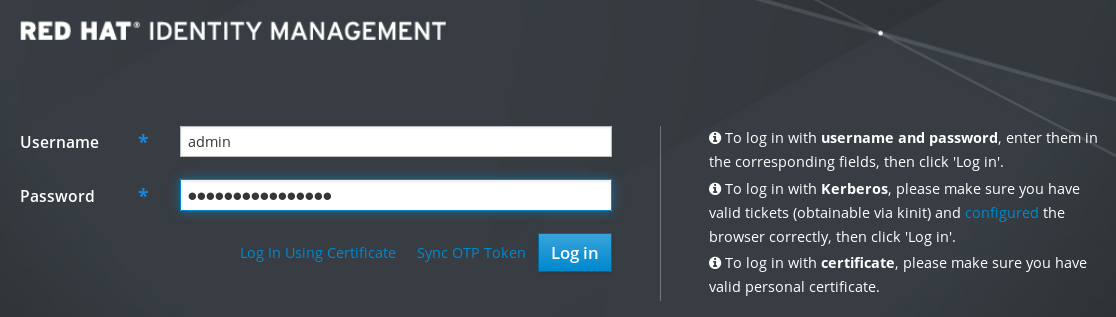
- Click .
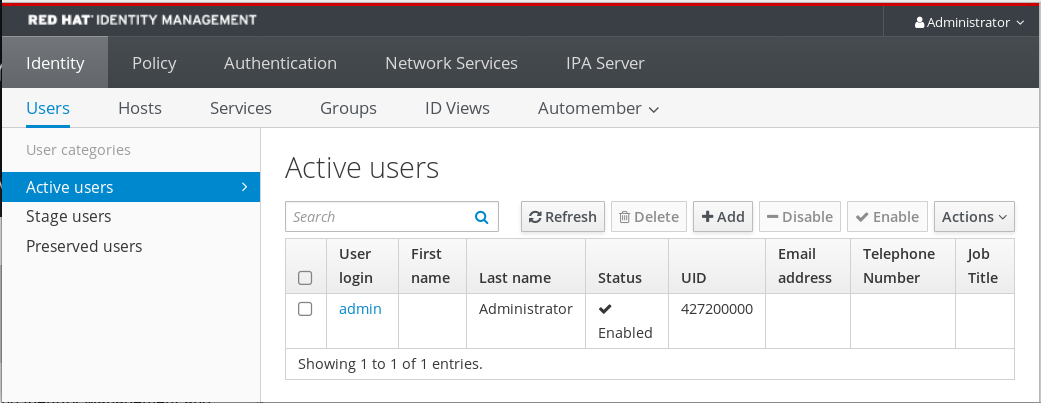
After the successful login, you can start configuring the IdM server.
Chapter 6. Logging in to IdM in the Web UI: Using a Kerberos ticket
Learn more about how to configure your environment to enable Kerberos login to the IdM Web UI and accessing IdM using Kerberos authentication.
Prerequisites
Installed IdM server in your network environment
For details, see Installing Identity Management in Red Hat Enterprise Linux 9
6.1. Kerberos authentication in Identity Management
Identity Management (IdM) uses the Kerberos protocol to support single sign-on. Single sign-on authentication allows you to provide the correct user name and password only once, and you can then access Identity Management services without the system prompting for credentials again.
The IdM server provides Kerberos authentication immediately after the installation if the DNS and certificate settings have been configured properly. For details, see Installing Identity Management.
To use Kerberos authentication on hosts, install:
The IdM client
For details, see Preparing the system for Identity Management client installation.
- The krb5conf package
6.2. Using kinit to log in to IdM manually
Follow this procedure to use the kinit utility to authenticate to an Identity Management (IdM) environment manually. The kinit utility obtains and caches a Kerberos ticket-granting ticket (TGT) on behalf of an IdM user.
Only use this procedure if you have destroyed your initial Kerberos TGT or if it has expired. As an IdM user, when logging onto your local machine you are also automatically logging in to IdM. This means that after logging in, you are not required to use the kinit utility to access IdM resources.
Procedure
To log in to IdM
Under the user name of the user who is currently logged in on the local system, use kinit without specifying a user name. For example, if you are logged in as
example_useron the local system:[example_user@server ~]$ kinit Password for example_user@EXAMPLE.COM: [example_user@server ~]$If the user name of the local user does not match any user entry in IdM, the authentication attempt fails:
[example_user@server ~]$ kinit
kinit: Client 'example_user@EXAMPLE.COM' not found in Kerberos database while getting initial credentials
Using a Kerberos principal that does not correspond to your local user name, pass the required user name to the
kinitutility. For example, to log in as theadminuser:[example_user@server ~]$ kinit admin Password for admin@EXAMPLE.COM: [example_user@server ~]$
Optionally, to verify that the login was successful, use the klist utility to display the cached TGT. In the following example, the cache contains a ticket for the
example_userprincipal, which means that on this particular host, onlyexample_useris currently allowed to access IdM services:$ klist Ticket cache: KEYRING:persistent:0:0 Default principal: example_user@EXAMPLE.COM Valid starting Expires Service principal 11/10/2019 08:35:45 11/10/2019 18:35:45 krbtgt/EXAMPLE.COM@EXAMPLE.COM
6.3. Configuring the browser for Kerberos authentication
To enable authentication with a Kerberos ticket, you may need a browser configuration.
The following steps help you to support Kerberos negotiation for accessing the IdM domain.
Each browser supports Kerberos in a different way and needs different set up. The IdM Web UI includes guidelines for the following browsers:
- Firefox
- Chrome
Procedure
- Open the IdM Web UI login dialog in your web browser.
Click the link for browser configuration on the Web UI login screen.
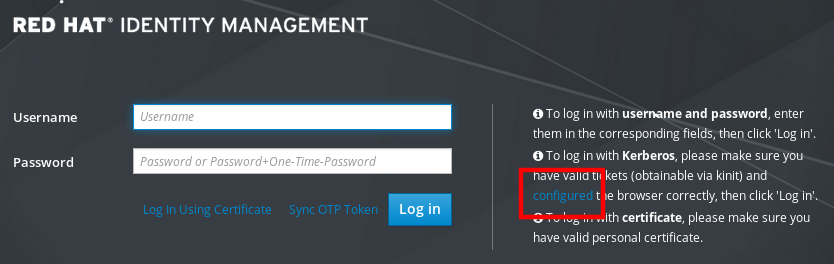
Follow the steps on the configuration page.

After the setup, turn back to the IdM Web UI and click Log in.
6.4. Logging in to the web UI using a Kerberos ticket
Follow this procedure to log in to the IdM Web UI using a Kerberos ticket-granting ticket (TGT).
The TGT expires at a predefined time. The default time interval is 24 hours and you can change it in the IdM Web UI.
After the time interval expires, you need to renew the ticket:
- Using the kinit command.
- Using IdM login credentials in the Web UI login dialog.
Procedure
Open the IdM Web UI.
If Kerberos authentication works correctly and you have a valid ticket, you will be automatically authenticated and the Web UI opens.
If the ticket is expired, it is necessary to authenticate yourself with credentials first. However, next time the IdM Web UI will open automatically without opening the login dialog.
If you see an error message
Authentication with Kerberos failed, verify that your browser is configured for Kerberos authentication. See Configuring the browser for Kerberos authentication.
6.5. Configuring an external system for Kerberos authentication
Follow this procedure to configure an external system so that Identity Management (IdM) users can log in to IdM from the external system using their Kerberos credentials.
Enabling Kerberos authentication on external systems is especially useful when your infrastructure includes multiple realms or overlapping domains. It is also useful if the system has not been enrolled into any IdM domain through ipa-client-install.
To enable Kerberos authentication to IdM from a system that is not a member of the IdM domain, define an IdM-specific Kerberos configuration file on the external system.
Prerequisites
The
krb5-workstationpackage is installed on the external system.To find out whether the package is installed, use the following CLI command:
# dnf list installed krb5-workstation
Installed Packages
krb5-workstation.x86_64    1.16.1-19.el8     @BaseOS
Procedure
Copy the
/etc/krb5.conffile from the IdM server to the external system. For example:# scp /etc/krb5.conf root@externalsystem.example.com:/etc/krb5_ipa.confWarningDo not overwrite the existing
krb5.conffile on the external system.On the external system, set the terminal session to use the copied IdM Kerberos configuration file:
$ export KRB5_CONFIG=/etc/krb5_ipa.confThe
KRB5_CONFIGvariable exists only temporarily until you log out. To prevent this loss, export the variable with a different file name.-
Copy the Kerberos configuration snippets from the
/etc/krb5.conf.d/directory to the external system. - Configure the browser on the external system, as described in Configuring the browser for Kerberos authentication.
Users on the external system can now use the kinit utility to authenticate against the IdM server.
6.6. Web UI login for Active Directory users
To enable Web UI login for Active Directory users, define an ID override for each Active Directory user in the Default Trust View. For example:
[admin@server ~]$ ipa idoverrideuser-add 'Default Trust View' ad_user@ad.example.comAdditional resources
Chapter 7. Logging in to the Identity Management Web UI using one time passwords
Access to IdM Web UI can be secured using several methods. The basic one is password authentication.
To increase the security of password authentication, you can add a second step and require automatically generated one-time passwords (OTPs). The most common usage is to combine password connected with the user account and a time limited one time password generated by a hardware or software token.
The following sections help you to:
- Understand how the OTP authentication works in IdM.
- Configure OTP authentication on the IdM server.
- Configure a RADIUS server for OTP validation in IdM.
- Create OTP tokens and synchronize them with the FreeOTP app in your phone.
- Authenticate to the IdM Web UI with the combination of user password and one time password.
- Re-synchronize tokens in the Web UI.
7.1. Prerequisites
7.2. One time password (OTP) authentication in Identity Management
One-time passwords bring an additional step to your authentication security. The authentication uses your password + an automatically generated one time password.
To generate one time passwords, you can use a hardware or software token. IdM supports both software and hardware tokens.
Identity Management supports the following two standard OTP mechanisms:
- The HMAC-Based One-Time Password (HOTP) algorithm is based on a counter. HMAC stands for Hashed Message Authentication Code.
- The Time-Based One-Time Password (TOTP) algorithm is an extension of HOTP to support time-based moving factor.
IdM does not support OTP logins for Active Directory trust users.
7.3. Enabling the one-time password in the Web UI
Identity Management (IdM) administrators can enable two-factor authentication (2FA) for IdM users either globally or individually. The user enters the one-time password (OTP) after their regular password on the command line or in the dedicated field in the Web UI login dialog, with no space between these passwords.
Enabling 2FA is not the same as enforcing it. If you use logins based on LDAP-binds, IdM users can still authenticate by entering a password only. However, if you use krb5-based logins, the 2FA is enforced. In a future release, Red Hat plans to provide a configuration option for administrators to select one of the following:
-
Allow users to set their own tokens. In this case, LDAP-binds are still not going to enforce 2FA though
krb5-based logins are. -
Not allow users to set their own tokens. In this case, 2FA is going to be enforced in both LDAP-binds and
krb5-based logins.
Complete this procedure to use the IdM Web UI to enable 2FA for the individual example.user IdM user.
Prerequisites
- Administration privileges
Procedure
-
Log in to the IdM Web UI with IdM
adminprivileges. Open the Identity → Users → Active users tab.
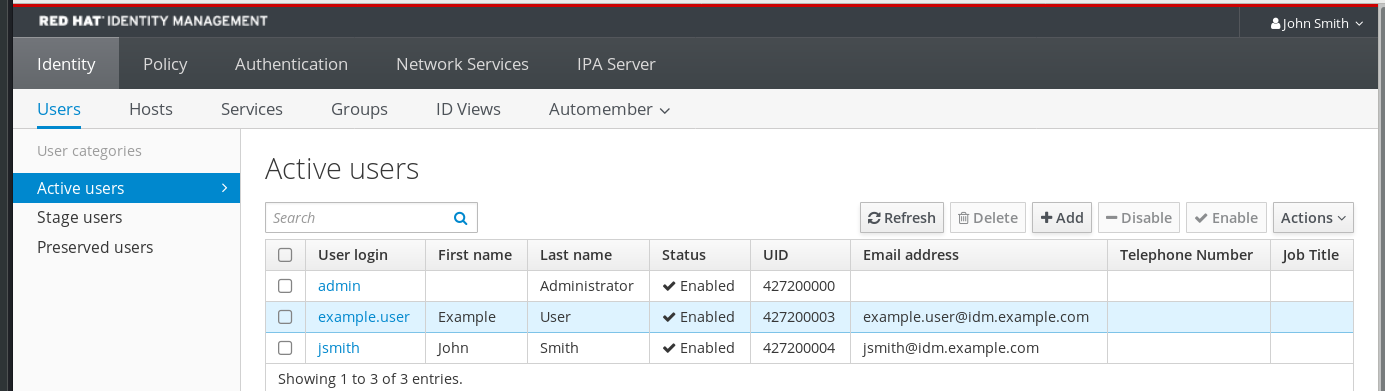
- Select example.user to open the user settings.
- In the User authentication types, select Two factor authentication (password + OTP).
- Click Save.
At this point, the OTP authentication is enabled for the IdM user.
Now you or example.user must assign a new token ID to the example.user account.
7.4. Configuring a RADIUS server for OTP validation in IdM
To enable the migration of a large deployment from a proprietary one-time password (OTP) solution to the Identity Management (IdM)-native OTP solution, IdM offers a way to offload OTP validation to a third-party RADIUS server for a subset of users. The administrator creates a set of RADIUS proxies where each proxy can only reference a single RADIUS server. If more than one server needs to be addressed, it is recommended to create a virtual IP solution that points to multiple RADIUS servers.
Such a solution must be built outside of RHEL IdM with the help of the keepalived daemon, for example. The administrator then assigns one of these proxy sets to a user. As long as the user has a RADIUS proxy set assigned, IdM bypasses all other authentication mechanisms.
IdM does not provide any token management or synchronization support for tokens in the third-party system.
Complete the procedure to configure a RADIUS server for OTP validation and to add a user to the proxy server:
Prerequisites
- The radius user authentication method is enabled. See Enabling the one-time password in the Web UI for details.
Procedure
Add a RADIUS proxy:
$ ipa radiusproxy-add proxy_name --secret secretThe command prompts you for inserting the required information.
The configuration of the RADIUS proxy requires the use of a common secret between the client and the server to wrap credentials. Specify this secret in the
--secretparameter.Assign a user to the added proxy:
ipa user-mod radiususer --radius=proxy_nameIf required, configure the user name to be sent to RADIUS:
ipa user-mod radiususer --radius-username=radius_user
As a result, the RADIUS proxy server starts to process the user OTP authentication.
When the user is ready to be migrated to the IdM native OTP system, you can simply remove the RADIUS proxy assignment for the user.
7.4.1. Changing the timeout value of a KDC when running a RADIUS server in a slow network
In certain situations, such as running a RADIUS proxy in a slow network, the Identity Management (IdM) Kerberos Distribution Center (KDC) closes the connection before the RADIUS server responds because the connection timed out while waiting for the user to enter the token.
To change the timeout settings of the KDC:
Change the value of the
timeoutparameter in the[otp]section in the/var/kerberos/krb5kdc/kdc.conffile. For example, to set the timeout to120seconds:[otp] DEFAULT = { timeout = 120 ... }Restart the
krb5kdcservice:# systemctl restart krb5kdc
Additional resources
- The How to configure FreeRADIUS authentication in FIPS mode Knowledgebase article
7.5. Adding OTP tokens in the Web UI
The following section helps you to add token to the IdM Web UI and to your software token generator.
Prerequisites
- Active user account on the IdM server.
- Administrator has enabled OTP for the particular user account in the IdM Web UI.
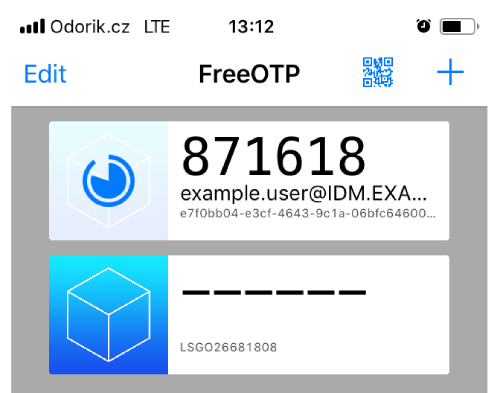
- A software device generating OTP tokens, for example FreeOTP.
Procedure
- Log in to the IdM Web UI with your user name and password.
- To create the token in your mobile phone, open the Authentication → OTP Tokens tab.
Click Add.
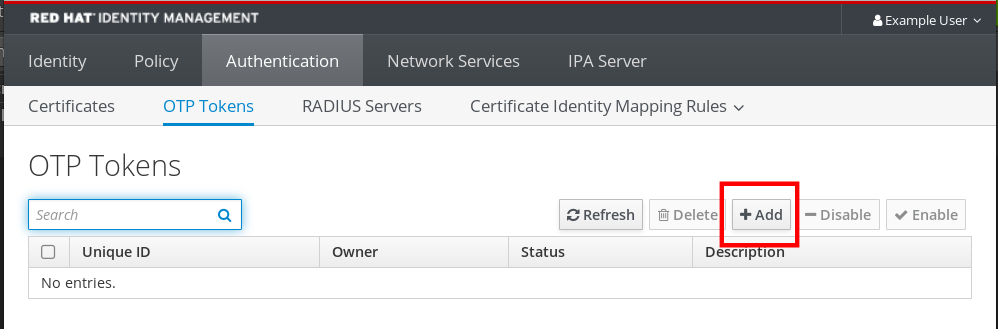
In the Add OTP token dialog box, leave everything unfilled and click Add.
At this stage, the IdM server creates a token with default parameters at the server and opens a page with a QR code.
- Copy the QR code into your mobile phone.
- Click OK to close the QR code.
Now you can generate one time passwords and log in with them to the IdM Web UI.
7.6. Logging into the Web UI with a one time password
Follow this procedure to login for the first time into the IdM Web UI using a one time password (OTP).
Prerequisites
OTP configuration enabled on the Identity Management server for the user account you are using for the OTP authentication. Administrators as well as users themselves can enable OTP.
To enable the OTP configuration, see Enabling the one time password in the Web UI.
- A hardware or software device generating OTP tokens configured.
Procedure
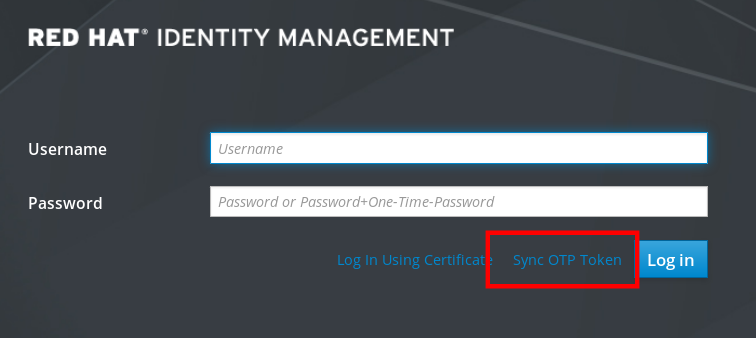
- In the Identity Management login screen, enter your user name or a user name of the IdM server administrator account.
- Add the password for the user name entered above.
- Generate a one time password on your device.
- Enter the one time password right after the password (without space).
Click Log in.
If the authentication fails, synchronize OTP tokens.
If your CA uses a self-signed certificate, the browser issues a warning. Check the certificate and accept the security exception to proceed with the login.
If the IdM Web UI does not open, verify the DNS configuration of your Identity Management server.
After successful login, the IdM Web UI appears.
7.7. Synchronizing OTP tokens using the Web UI
If the login with OTP (One Time Password) fails, OTP tokens are not synchronized correctly.
The following text describes token re-synchronization.
Prerequisites
- A login screen opened.
- A device generating OTP tokens configured.
Procedure
On the IdM Web UI login screen, click Sync OTP Token.
- In the login screen, enter your username and the Identity Management password.
- Generate one time password and enter it in the First OTP field.
- Generate another one time password and enter it in the Second OTP field.
Optionally, enter the token ID.

- Click Sync OTP Token.
After the successful synchronization, you can log in to the IdM server.
7.8. Changing expired passwords
Administrators of Identity Management can enforce you having to change your password at the next login. It means that you cannot successfully log in to the IdM Web UI until you change the password.
Password expiration can happen during your first login to the Web UI.
If the expiration password dialog appears, follow the instructions in the procedure.
Prerequisites
- A login screen opened.
- Active account to the IdM server.
Procedure
- In the password expiration login screen, enter the user name.
- Add the password for the user name entered above.
In the OTP field, generate a one time password, if you use the one time password authentication.
If you do not have enabled the OTP authentication, leave the field empty.
- Enter the new password twice for verification.
Click Reset Password.

After the successful password change, the usual login dialog displays. Log in with the new password.
Chapter 8. Identity Management security settings
Learn more about security-related features of Identity Management.
8.1. How Identity Management applies default security settings
By default, Identity Management (IdM) uses the system-wide crypto policy. The benefit of this policy is that you do not need to harden individual IdM components manually.
Red Hat recommends that you use the system-wide crypto policy. Changing individual security settings can break components of IdM.
Additional resources
-
See the
crypto-policies(7)man page.
8.2. Anonymous LDAP binds in Identity Management
By default, anonymous binds to the Identity Management (IdM) LDAP server are enabled. Anonymous binds can expose certain configuration settings or directory values. However, some utilities, such as realmd, or older RHEL clients require anonymous binds enabled to discover domain settings when enrolling a client.
Additional resources
8.3. Disabling anonymous binds
You can disable anonymous binds on the Identity Management (IdM) 389 Directory Server instance by using LDAP tools to reset the nsslapd-allow-anonymous-access attribute.
These are the valid values for the nsslapd-allow-anonymous-access attribute:
-
on: allows all anonymous binds (default) -
rootdse: allows anonymous binds only for root DSE information -
off: disallows any anonymous binds
Red Hat does not recommend completely disallowing anonymous binds by setting the attribute to off, because this also blocks external clients from checking the server configuration. LDAP and web clients are not necessarily domain clients, so they connect anonymously to read the root DSE file to get connection information.
By changing the value of the nsslapd-allow-anonymous-access attribute to rootdse, you allow access to the root DSE and server configuration without any access to the directory data.
Certain clients rely on anonymous binds to discover IdM settings. Additionally, the compat tree can break for legacy clients that are not using authentication. Perform this procedure only if your clients do not require anonymous binds.
Prerequisites
- You can authenticate as the Directory Manager to write to the LDAP server.
-
You can authenticate as the
rootuser to restart IdM services.
Procedure
Change the
nsslapd-allow-anonymous-accessattribute torootdse.$ ldapmodify -x -D "cn=Directory Manager" -W -h server.example.com -p 389 Enter LDAP Password: dn: cn=config changetype: modify replace: nsslapd-allow-anonymous-access nsslapd-allow-anonymous-access: rootdse modifying entry "cn=config"Restart the 389 Directory Server instance to load the new setting.
# systemctl restart dirsrv.target
Verification
Display the value of the
nsslapd-allow-anonymous-accessattribute.$ ldapsearch -x -D "cn=Directory Manager" -b cn=config -W -h server.example.com -p 389 nsslapd-allow-anonymous-access | grep nsslapd-allow-anonymous-access Enter LDAP Password: # requesting: nsslapd-allow-anonymous-access nsslapd-allow-anonymous-access: rootdse
Additional resources
- nsslapd-allow-anonymous-access in Directory Server 11 documentation
- Anonymous LDAP binds in Identity Management
Chapter 9. IdM log files and directories
Use the following sections to monitor, analyze, and troubleshoot the individual components of Identity Management (IdM):
Additionally, you can monitor, analyze, and troubleshoot the IdM server and client and enable audit logging on an IdM server.
9.1. IdM server and client log files and directories
The following table presents directories and files that the Identity Management (IdM) server and client use to log information. You can use the files and directories for troubleshooting installation errors.
| Directory or File | Description |
|---|---|
|
| The installation log for the IdM server. |
|
| The installation log for the IdM replica. |
|
| The installation log for the IdM client. |
|
| Log files for SSSD. You can enable detailed logging for SSSD in the sssd.conf file or with the sssctl command. |
|
|
The log file for errors returned by remote procedure calls (RPCs) and responses by the |
|
| The log rotation policies for DNS, SSSD, Apache, Tomcat, and Kerberos. |
|
|
This link points to the default Certificate Authority logging configuration at |
9.2. Directory Server log files
The following table presents directories and files that the Identity Management (IdM) Directory Server (DS) instance uses to log information. You can use the files and directories for troubleshooting DS-related problems.
Table 9.1. Directory Server log files
| Directory or file | Description |
|---|---|
|
| Log files associated with the DS instance used by the IdM server. Most operational data recorded here are related to server-replica interactions. |
|
| Contains audit trails of all DS operations when auditing is enabled in the DS configuration. Note
You can also audit the Apache error logs, where the IdM API logs access. However, because changes can be made directly over LDAP too, Red Hat recommends enabling the more comprehensive |
|
| Contains detailed information about attempted access for the domain DS instance. |
|
| Contains detailed information about failed operations for the domain DS instance. |
Additional resources
9.3. Enabling audit logging on an IdM server
Follow this procedure to enable logging on an Identity Management (IdM) server for audit purposes. Using detailed logs, you can monitor data, troubleshoot issues, and examine suspicious activity on the network.
The LDAP service may become slower if there are many LDAP changes logged, especially if the values are large.
Prerequisites
- The Directory Manager password
Procedure
Bind to the LDAP server:
$ ldapmodify -D "cn=Directory Manager" -W << EOF- Press [Enter].
Specify all the modifications you want to make, for example:
dn: cn=config
changetype: modify
replace: nsslapd-auditlog-logging-enabled
nsslapd-auditlog-logging-enabled: on
-
replace:nsslapd-auditlog
nsslapd-auditlog: /var/log/dirsrv/slapd-REALM_NAME/audit
-
replace:nsslapd-auditlog-mode
nsslapd-auditlog-mode: 600
-
replace:nsslapd-auditlog-maxlogsize
nsslapd-auditlog-maxlogsize: 100
-
replace:nsslapd-auditlog-logrotationtime
nsslapd-auditlog-logrotationtime: 1
-
replace:nsslapd-auditlog-logrotationtimeunit
nsslapd-auditlog-logrotationtimeunit: day
-
Indicate the end of the
ldapmodifycommand by entering EOF on a new line. - Press [Enter] twice.
- Repeat the previous steps on all the other IdM servers on which you want to enable audit logging.
Verification
Open the
/var/log/dirsrv/slapd-REALM_NAME/auditfile:389-Directory/1.4.3.231 B2021.322.1803 server.idm.example.com:636 (/etc/dirsrv/slapd-IDM-EXAMPLE-COM) time: 20220607102705 dn: cn=config result: 0 changetype: modify replace: nsslapd-auditlog-logging-enabled nsslapd-auditlog-logging-enabled: on [...]
The fact that the file is not empty anymore confirms that auditing is enabled.
ImportantThe system logs the bound LDAP distinguished name (DN) of the entry that makes a change. For this reason, you might have to post-process the log. For example, in the IdM Directory Server, it is an ID override DN that represents the identity of an AD user that modified a record:
$ modifiersName: ipaanchoruuid=:sid:s-1-5-21-19610888-1443184010-1631745340-279100,cn=default trust view,cn=views,cn=accounts,dc=idma,dc=idm,dc=example,dc=comUse the
pysss_nss_idmap.getnamebysidPython command to look up an AD user if you have the user SID:>>> import pysss_nss_idmap >>> pysss_nss_idmap.getnamebysid('S-1-5-21-1273159419-3736181166-4190138427-500')) {'S-1-5-21-1273159419-3736181166-4190138427-500': {'name': 'administrator@ad.vm', 'type': 3}}
Additional resources
9.4. Modifying error logging on an IdM server
Follow this procedure to obtain debugging information about specific types of errors. The example focuses on obtaining detailed error logs about replication by setting the error log level to 8192. To record a different type of information, select a different number from the table in Error Log Logging Levels in the Red Hat Directory Server documentation.
The LDAP service may become slower if there are many types of LDAP errors logged, especially if the values are large.
Prerequisites
- The Directory Manager password.
Procedure
Bind to the LDAP server:
$ ldapmodify -x -D "cn=directory manager" -w <password>- Press [Enter].
Specify the modifications you want to make. For example to collect only logs related to replication:
dn: cn=config changetype: modify add: nsslapd-errorlog-level nsslapd-errorlog-level: 8192-
Press [Enter] twice, to indicate the end of the
ldapmodifyinstruction. This displays themodifying entry "cn=config"message. -
Press [Ctrl+C] to exit the
ldapmodifycommand. - Repeat the previous steps on all the other IdM servers on which you want to collect detailed logs about replication errors.
After you finish troubleshooting, set nsslapd-errorlog-level back to 0 to prevent performance problems.
Additional resources
9.5. The IdM Apache server log files
The following table presents directories and files that the Identity Management (IdM) Apache Server uses to log information.
Table 9.2. Apache Server log files
| Directory or File | Description |
|---|---|
|
| Log files for the Apache web server. |
|
| Standard access and error logs for Apache servers. Messages specific to IdM are recorded along with the Apache messages because the IdM web UI and the RPC command-line interface use Apache. The access logs log mostly only the user principal and the URI used, which is often an RPC endpoint. The error logs contain the IdM server logs. |
|
|
Additional resources
- Log Files in the Apache documentation
9.6. Certificate System log files in IdM
The following table presents directories and files that the Identity Management (IdM) Certificate System uses to log information.
Table 9.3. Certificate System log files
| Directory or File | Description |
|---|---|
|
| The installation log for the IdM certificate authority (CA). |
|
| The installation log for the IdM Key Recovery Authority (KRA). |
|
| The top level directory for PKI operation logs. Contains CA and KRA logs. |
|
| Directory with logs related to certificate operations. In IdM, these logs are used for service principals, hosts, and other entities which use certificates. |
|
| Directory with logs related to KRA. |
|
| Includes certificate error messages among other system messages. |
Additional resources
- Configuring subsystem logs in the Red Hat Certificate System Administration Guide
9.7. Kerberos log files in IdM
The following table presents directories and files that Kerberos uses to log information in Identity Management (IdM).
Table 9.4. Kerberos Log Files
| Directory or File | Description |
|---|---|
|
| The primary log file for the Kerberos KDC server. |
|
| The primary log file for the Kerberos administration server. |
|
Locations for these files are configured in the | |
9.8. DNS log files in IdM
The following table presents directories and files that DNS uses to log information in Identity Management (IdM).
Table 9.5. DNS log files
| Directory or File | Description |
|---|---|
|
|
Includes DNS error messages and other system messages. DNS logging in this file is not enabled by default. To enable it, enter the
To disable logging, run the command again. |
9.9. Custodia log files in IdM
The following table presents directories and files that Custodia uses to log information in Identity Management (IdM).
Table 9.6. Custodia Log Files
| Directory or File | Description |
|---|---|
|
| Log file directory for the Custodia service. |
9.10. Additional resources
-
Viewing Log Files. You can use
journalctlto view the logging output ofsystemdunit files.