
Red Hat Training
A Red Hat training course is available for RHEL 8
Chapter 4. Customizing your installation
When installing Red Hat Enterprise Linux, you can customize location, software, and system settings and parameters, using the Installation Summary window.
The Installation Summary window contains the following categories:
- LOCALIZATION
- You can configure Keyboard, Language Support, and Time and Date.
- SOFTWARE
- You can configure Connect to Red Hat, Installation Source, and Software Selection.
- SYSTEM
- You can configure Installation Destination, KDUMP, Network and Host Name, and Security Policy.
- USER SETTINGS
- You can configure a root password to log in to the administrator account that is used for system administration tasks, and create a user account to login to the system.
A category has a different status depending on where it is in the installation program.
Table 4.1. Category status
| Status | Description |
|---|---|
| Yellow triangle with an exclamation mark and red text | Requires attention before installation. For example, Network & Host Name requires attention before you can register and download from the Content Delivery Network (CDN). |
| Grayed out and with a warning symbol (yellow triangle with an exclamation mark) | The installation program is configuring a category and you must wait for it to finish before accessing the window. |
A warning message is displayed at the bottom of the Installation Summary window and the Begin Installation button is disabled until you configure all of the required categories.
This section contains information about customizing your Red Hat Enterprise Linux installation using the Graphical User Interface (GUI). The GUI is the preferred method of installing Red Hat Enterprise Linux when you boot the system from a CD, DVD, or USB flash drive, or from a network using PXE.
There may be some variance between the online help and the content that is published on the Customer Portal. For the latest updates, see the installation content on the Customer Portal.
4.1. Configuring language and location settings
The installation program uses the language that you selected during installation.
Prerequisites
- You have created installation media. For more information, see Creating a bootable DVD or CD.
- You have specified an installation source if you are using the Boot ISO image file. For more information, see Preparing an installation source.
- You have booted the installation. For more information, see Booting the installer.
Procedure
From the left-hand pane of the Welcome to Red Hat Enterprise Linux window, select a language. Alternatively, type your preferred language into the Search field.
NoteA language is pre-selected by default. If network access is configured, that is, if you booted from a network server instead of local media, the pre-selected language is determined by the automatic location detection feature of the GeoIP module. If you used the
inst.lang=option on the boot command line or in your PXE server configuration, then the language that you define with the boot option is selected.- From the right-hand pane of the Welcome to Red Hat Enterprise Linux window, select a location specific to your region.
- Click to proceed to the Graphical installations window.
If you are installing a pre-release version of Red Hat Enterprise Linux, a warning message is displayed about the pre-release status of the installation media.
- To continue with the installation, click , or
- To quit the installation and reboot the system, click .
Additional resources
4.2. Configuring localization options
This section contains information about configuring your keyboard, language support, and time and date settings.
If you use a layout that cannot accept Latin characters, such as Russian, add the English (United States) layout and configure a keyboard combination to switch between the two layouts. If you select a layout that does not have Latin characters, you might be unable to enter a valid root password and user credentials later in the installation process. This might prevent you from completing the installation.
Keyboard, Language, and Time and Date Settings are configured by default as part of Installing RHEL using Anaconda. To change any of the settings, complete the following steps, otherwise proceed to Configuring software settings.
Procedure
Configure keyboard settings:
- From the Installation Summary window, click Keyboard. The default layout depends on the option selected in Installing RHEL using Anaconda.
- Click to open the Add a Keyboard Layout window and change to a different layout.
- Select a layout by browsing the list or use the Search field.
- Select the required layout and click . The new layout appears under the default layout.
- Click to optionally configure a keyboard switch that you can use to cycle between available layouts. The Layout Switching Options window opens.
To configure key combinations for switching, select one or more key combinations and click to confirm your selection.
NoteWhen you select a layout, click the Keyboard button to open a new dialog box that displays a visual representation of the selected layout.
- Click to apply the settings and return to Graphical installations.
Configure language settings:
- From the Installation Summary window, click Language Support. The Language Support window opens. The left pane lists the available language groups. If at least one language from a group is configured, a check mark is displayed and the supported language is highlighted.
- From the left pane, click a group to select additional languages, and from the right pane, select regional options. Repeat this process for languages that you require.
- Click to apply the changes and return to Graphical installations.
Configure time and date settings:
From the Installation Summary window, click Time & Date. The Time & Date window opens.
NoteThe Time & Date settings are configured by default based on the settings you selected in Installing RHEL using Anaconda.
The list of cities and regions come from the Time Zone Database (
tzdata) public domain that is maintained by the Internet Assigned Numbers Authority (IANA). Red Hat can not add cities or regions to this database. You can find more information at the IANA official website.From the Region drop-down menu, select a region.
NoteSelect Etc as your region to configure a time zone relative to Greenwich Mean Time (GMT) without setting your location to a specific region.
- From the City drop-down menu, select the city, or the city closest to your location in the same time zone.
Toggle the Network Time switch to enable or disable network time synchronization using the Network Time Protocol (NTP).
NoteEnabling the Network Time switch keeps your system time correct as long as the system can access the internet. By default, one NTP pool is configured; you can add a new option, or disable or remove the default options by clicking the button next to the switch.
Click to apply the changes and return to Graphical installations.
NoteIf you disable network time synchronization, the controls at the bottom of the window become active, allowing you to set the time and date manually.
4.3. Configuring system options
This section contains information about configuring Installation Destination, KDUMP, Network and Host Name, and Security Policy.
4.3.1. Configuring installation destination
Use the Installation Destination window to configure the storage options, for example, the disks that you want to use as the installation target for your Red Hat Enterprise Linux installation. You must select at least one disk.
Back up your data if you plan to use a disk that already contains data. For example, if you want to shrink an existing Microsoft Windows partition and install Red Hat Enterprise Linux as a second system, or if you are upgrading a previous release of Red Hat Enterprise Linux. Manipulating partitions always carries a risk. For example, if the process is interrupted or fails for any reason data on the disk can be lost.
Special cases
-
Some BIOS types do not support booting from a RAID card. In these instances, the
/bootpartition must be created on a partition outside of the RAID array, such as on a separate hard drive. It is necessary to use an internal hard drive for partition creation with problematic RAID cards. A/bootpartition is also necessary for software RAID setups. If you choose to partition your system automatically, you should manually edit your/bootpartition. - To configure the Red Hat Enterprise Linux boot loader to chain load from a different boot loader, you must specify the boot drive manually by clicking the Full disk summary and bootloader link from the Installation Destination window.
- When you install Red Hat Enterprise Linux on a system with both multipath and non-multipath storage devices, the automatic partitioning layout in the installation program creates volume groups that contain a mix of multipath and non-multipath devices. This defeats the purpose of multipath storage. It is recommended that you select either multipath or non-multipath devices on the Installation Destination window. Alternatively, proceed to manual partitioning.
Prerequisite
The Installation Summary window is open.
Procedure
From the Installation Summary window, click Installation Destination. The Installation Destination window opens.
From the Local Standard Disks section, select the storage device that you require; a white check mark indicates your selection. Disks without a white check mark are not used during the installation process; they are ignored if you choose automatic partitioning, and they are not available in manual partitioning.
NoteAll locally available storage devices (SATA, IDE and SCSI hard drives, USB flash and external disks) are displayed under Local Standard Disks. Any storage devices connected after the installation program has started are not detected. If you use a removable drive to install Red Hat Enterprise Linux, your system is unusable if you remove the device.
Optional: Click the Refresh link in the lower right-hand side of the window if you want to configure additional local storage devices to connect new hard drives. The Rescan Disks dialog box opens.
NoteAll storage changes that you make during the installation are lost when you click Rescan Disks.
- Click and wait until the scanning process completes.
- Click to return to the Installation Destination window. All detected disks including any new ones are displayed under the Local Standard Disks section.
Optional: To add a specialized storage device, click .
The Storage Device Selection window opens and lists all storage devices that the installation program has access to.
Optional: Under Storage Configuration, select the Automatic radio button.
ImportantAutomatic partitioning is the recommended method of partitioning your storage.
You can also configure custom partitioning, for more details see Configuring manual partitioning
- Optional: To reclaim space from an existing partitioning layout, select the I would like to make additional space available check box. For example, if a disk you want to use already contains a different operating system and you want to make this system’s partitions smaller to allow more room for Red Hat Enterprise Linux.
Optional: Select Encrypt my data to encrypt all partitions except the ones needed to boot the system (such as
/boot) using Linux Unified Key Setup (LUKS). Encrypting your hard drive is recommended.Click . The Disk Encryption Passphrase dialog box opens.
- Type your passphrase in the Passphrase and Confirm fields.
Click to complete disk encryption.
WarningIf you lose the LUKS passphrase, any encrypted partitions and their data is completely inaccessible. There is no way to recover a lost passphrase. However, if you perform a Kickstart installation, you can save encryption passphrases and create backup encryption passphrases during the installation. See the Performing an advanced RHEL 8 installation document for information.
Optional: Click the Full disk summary and bootloader link in the lower left-hand side of the window to select which storage device contains the boot loader.
For more information, see Boot loader installation.
NoteIn most cases it is sufficient to leave the boot loader in the default location. Some configurations, for example, systems that require chain loading from another boot loader require the boot drive to be specified manually.
Click .
If you selected automatic partitioning and I would like to make additional space available, or if there is not enough free space on your selected hard drives to install Red Hat Enterprise Linux, the Reclaim Disk Space dialog box opens when you click , and lists all configured disk devices and all partitions on those devices. The dialog box displays information about how much space the system needs for a minimal installation and how much space you have reclaimed.
WarningIf you delete a partition, all data on that partition is lost. If you want to preserve your data, use the Shrink option, not the Delete option.
- Review the displayed list of available storage devices. The Reclaimable Space column shows how much space can be reclaimed from each entry.
To reclaim space, select a disk or partition, and click either the button to delete that partition, or all partitions on a selected disk, or click to use free space on a partition while preserving the existing data.
NoteAlternatively, you can click , this deletes all existing partitions on all disks and makes this space available to Red Hat Enterprise Linux. Existing data on all disks is lost.
- Click to apply the changes and return to Graphical installations.
No disk changes are made until you click on the Installation Summary window. The Reclaim Space dialog only marks partitions for resizing or deletion; no action is performed.
Additional resources
4.3.2. Configuring boot loader
Red Hat Enterprise Linux uses GRand Unified Bootloader version 2 (GRUB2) as the boot loader for AMD64 and Intel 64, IBM Power Systems, and ARM. For 64-bit IBM Z, the zipl boot loader is used.
The boot loader is the first program that runs when the system starts and is responsible for loading and transferring control to an operating system. GRUB2 can boot any compatible operating system (including Microsoft Windows) and can also use chain loading to transfer control to other boot loaders for unsupported operating systems.
Installing GRUB2 may overwrite your existing boot loader.
If an operating system is already installed, the Red Hat Enterprise Linux installation program attempts to automatically detect and configure the boot loader to start the other operating system. If the boot loader is not detected, you can manually configure any additional operating systems after you finish the installation.
If you are installing a Red Hat Enterprise Linux system with more than one disk, you might want to manually specify the disk where you want to install the boot loader.
Procedure
From the Installation Destination window, click the Full disk summary and bootloader link. The Selected Disks dialog box opens.
The boot loader is installed on the device of your choice, or on a UEFI system; the EFI system partition is created on the target device during guided partitioning.
- To change the boot device, select a device from the list and click . You can set only one device as the boot device.
- To disable a new boot loader installation, select the device currently marked for boot and click . This ensures GRUB2 is not installed on any device.
If you choose not to install a boot loader, you cannot boot the system directly and you must use another boot method, such as a standalone commercial boot loader application. Use this option only if you have another way to boot your system.
The boot loader may also require a special partition to be created, depending on if your system uses BIOS or UEFI firmware, or if the boot drive has a GUID Partition Table (GPT) or a Master Boot Record (MBR, also known as msdos) label. If you use automatic partitioning, the installation program creates the partition.
4.3.3. Configuring Kdump
Kdump is a kernel crash-dumping mechanism. In the event of a system crash, Kdump captures the contents of the system memory at the moment of failure. This captured memory can be analyzed to find the cause of the crash. If Kdump is enabled, it must have a small portion of the system’s memory (RAM) reserved to itself. This reserved memory is not accessible to the main kernel.
Procedure
- From the Installation Summary window, click Kdump. The Kdump window opens.
- Select the Enable kdump check box.
Select either the Automatic or Manual memory reservation setting.
- If you select Manual, enter the amount of memory (in megabytes) that you want to reserve in the Memory to be reserved field using the + and - buttons. The Usable System Memory readout below the reservation input field shows how much memory is accessible to your main system after reserving the amount of RAM that you select.
- Click to apply the settings and return to Graphical installations.
The amount of memory that you reserve is determined by your system architecture (AMD64 and Intel 64 have different requirements than IBM Power) as well as the total amount of system memory. In most cases, automatic reservation is satisfactory.
Additional settings, such as the location where kernel crash dumps will be saved, can only be configured after the installation using either the system-config-kdump graphical interface, or manually in the /etc/kdump.conf configuration file.
4.3.4. Configuring network and host name options
Use the Network and Host name window to configure network interfaces. Options that you select here are available both during the installation for tasks such as downloading packages from a remote location, and on the installed system.
Follow the steps in this procedure to configure your network and host name.
Procedure
- From the Installation Summary window, click .
From the list in the left-hand pane, select an interface. The details are displayed in the right-hand pane.
Note-
There are several types of network device naming standards used to identify network devices with persistent names, for example,
em1andwl3sp0. For information about these standards, see the Configuring and managing networking document.
-
There are several types of network device naming standards used to identify network devices with persistent names, for example,
Toggle the switch to enable or disable the selected interface.
NoteThe installation program automatically detects locally accessible interfaces, and you cannot add or remove them manually.
- Click to add a virtual network interface, which can be either: Team, Bond, Bridge, or VLAN.
- Click to remove a virtual interface.
- Click to change settings such as IP addresses, DNS servers, or routing configuration for an existing interface (both virtual and physical).
Type a host name for your system in the Host Name field.
Note-
The host name can either be a fully qualified domain name (FQDN) in the format
hostname.domainname, or a short host name without the domain. Many networks have a Dynamic Host Configuration Protocol (DHCP) service that automatically supplies connected systems with a domain name. To allow the DHCP service to assign the domain name to this system, specify only the short host name. -
When using static IP and host name configuration, it depends on the planned system use case whether to use a short name or FQDN. Red Hat Identity Management configures FQDN during provisioning but some 3rd party software products may require short name. In either case, to ensure availability of both forms in all situations, add an entry for the host in
/etc/hosts`in the formatIP FQDN short-alias. -
The value
localhostmeans that no specific static host name for the target system is configured, and the actual host name of the installed system is configured during the processing of the network configuration, for example, by NetworkManager using DHCP or DNS. -
Host names can only contain alphanumeric characters and
-or.. Host name should be equal to or less than 64 characters. Host names cannot start or end with-and.. To be compliant with DNS, each part of a FQDN should be equal to or less than 63 characters and the FQDN total length, including dots, should not exceed 255 characters.
-
The host name can either be a fully qualified domain name (FQDN) in the format
- Click to apply the host name to the installer environment.
- Alternatively, in the Network and Hostname window, you can choose the Wireless option. Click in the right-hand pane to select your wifi connection, enter the password if required, and click .
4.3.4.1. Adding a virtual network interface
This procedure describes how to add a virtual network interface.
Procedure
- From the Network & Host name window, click the button to add a virtual network interface. The Add a device dialog opens.
Select one of the four available types of virtual interfaces:
- Bond: NIC (Network Interface Controller) Bonding, a method to bind multiple physical network interfaces together into a single bonded channel.
- Bridge: Represents NIC Bridging, a method to connect multiple separate networks into one aggregate network.
- Team: NIC Teaming, a new implementation to aggregate links, designed to provide a small kernel driver to implement the fast handling of packet flows, and various applications to do everything else in user space.
- Vlan (Virtual LAN): A method to create multiple distinct broadcast domains which are mutually isolated.
Select the interface type and click . An editing interface dialog box opens, allowing you to edit any available settings for your chosen interface type.
For more information see Editing network interface.
- Click to confirm the virtual interface settings and return to the Network & Host name window.
If you need to change the settings of a virtual interface, select the interface and click .
4.3.4.2. Editing network interface configuration
This section contains information about the most important settings for a typical wired connection used during installation. Configuration of other types of networks is broadly similar, although the specific configuration parameters might be different.
On 64-bit IBM Z, you cannot add a new connection as the network subchannels need to be grouped and set online beforehand, and this is currently done only in the booting phase.
Procedure
To configure a network connection manually, select the interface from the Network and Host name window and click .
An editing dialog specific to the selected interface opens.
The options present depend on the connection type - the available options are slightly different depending on whether the connection type is a physical interface (wired or wireless network interface controller) or a virtual interface (Bond, Bridge, Team, or Vlan) that was previously configured in Adding a virtual interface.
4.3.4.3. Enabling or Disabling the Interface Connection
Follow the steps in this procedure to enable or disable an interface connection.
Procedure
- Click the General tab.
Select the Connect automatically with priority check box to enable connection by default. Keep the default priority setting at
0.Important-
When enabled on a wired connection, the system automatically connects during startup or reboot. On a wireless connection, the interface attempts to connect to any known wireless networks in range. For further information about NetworkManager, including the
nm-connection-editortool, see the Configuring and managing networking document. -
You can enable or disable all users on the system from connecting to this network using the All users may connect to this network option. If you disable this option, only
rootwill be able to connect to this network. -
It is not possible to only allow a specific user other than
rootto use this interface, as no other users are created at this point during the installation. If you need a connection for a different user, you must configure it after the installation.
-
When enabled on a wired connection, the system automatically connects during startup or reboot. On a wireless connection, the interface attempts to connect to any known wireless networks in range. For further information about NetworkManager, including the
- Click to apply the changes and return to the Network and Host name window.
4.3.4.4. Setting up Static IPv4 or IPv6 Settings
By default, both IPv4 and IPv6 are set to automatic configuration depending on current network settings. This means that addresses such as the local IP address, DNS address, and other settings are detected automatically when the interface connects to a network. In many cases, this is sufficient, but you can also provide static configuration in the IPv4 Settings and IPv6 Settings tabs. Complete the following steps to configure IPv4 or IPv6 settings:
Procedure
To set static network configuration, navigate to one of the IPv Settings tabs and from the Method drop-down menu, select a method other than Automatic, for example, Manual. The Addresses pane is enabled.
NoteIn the IPv6 Settings tab, you can also set the method to Ignore to disable IPv6 on this interface.
- Click and enter your address settings.
-
Type the IP addresses in the Additional DNS servers field; it accepts one or more IP addresses of DNS servers, for example,
10.0.0.1,10.0.0.8. Select the Require IPvX addressing for this connection to complete check box.
NoteSelect this option in the IPv4 Settings or IPv6 Settings tabs to allow this connection only if IPv4 or IPv6 was successful. If this option remains disabled for both IPv4 and IPv6, the interface is able to connect if configuration succeeds on either IP protocol.
- Click to apply the changes and return to the Network & Host name window.
4.3.4.5. Configuring Routes
Complete the following steps to configure routes.
Procedure
- In the IPv4 Settings and IPv6 Settings tabs, click to configure routing settings for a specific IP protocol on an interface. An editing routes dialog specific to the interface opens.
- Click to add a route.
- Select the Ignore automatically obtained routes check box to configure at least one static route and to disable all routes not specifically configured.
Select the Use this connection only for resources on its network check box to prevent the connection from becoming the default route.
NoteThis option can be selected even if you did not configure any static routes. This route is used only to access certain resources, such as intranet pages that require a local or VPN connection. Another (default) route is used for publicly available resources. Unlike the additional routes configured, this setting is transferred to the installed system. This option is useful only when you configure more than one interface.
- Click to save your settings and return to the editing routes dialog that is specific to the interface.
- Click to apply the settings and return to the Network and Host Name window.
4.3.4.6. Additional resources
4.3.5. Configuring Connect to Red Hat
The Red Hat Content Delivery Network (CDN), available from cdn.redhat.com, is a geographically distributed series of static web servers that contain content and errata that is consumed by systems. The content can be consumed directly, such as using a system registered to Red Hat Subscription Management. The CDN is protected by x.509 certificate authentication to ensure that only valid users have access. When a system is registered to Red Hat Subscription Management, the attached subscriptions govern which subset of the CDN the system can access.
Registering and installing RHEL from the CDN provides the following benefits:
- The CDN installation method supports the Boot ISO and the DVD ISO image files. However, the use of the smaller Boot ISO image file is recommended as it consumes less space than the larger DVD ISO image file.
- The CDN uses the latest packages resulting in a fully up-to-date system right after installation. There is no requirement to install package updates immediately after installation as is often the case when using the DVD ISO image file.
- Integrated support for connecting to Red Hat Insights and enabling System Purpose.
4.3.5.1. Introduction to System Purpose
System Purpose is an optional but recommended feature of the Red Hat Enterprise Linux installation. You use System Purpose to record the intended use of a Red Hat Enterprise Linux 8 system, and ensure that the entitlement server auto-attaches the most appropriate subscription to your system.
Benefits include:
- In-depth system-level information for system administrators and business operations.
- Reduced overhead when determining why a system was procured and its intended purpose.
- Improved customer experience of Subscription Manager auto-attach as well as automated discovery and reconciliation of system usage.
You can enter System Purpose data in one of the following ways:
- During image creation
- During a GUI installation when using the Connect to Red Hat screen to register your system and attach your Red Hat subscription
- During a Kickstart installation when using Kickstart automation scripts
-
After installation using the
subscription-manager syspurposecommand-line (CLI) tool
To record the intended purpose of your system, you can configure the following components of System Purpose. The selected values are used by the entitlement server upon registration to attach the most suitable subscription for your system.
Role
- Red Hat Enterprise Linux Server
- Red Hat Enterprise Linux Workstation
- Red Hat Enterprise Linux Compute Node
Service Level Agreement
- Premium
- Standard
- Self-Support
Usage
- Production
- Development/Test
- Disaster Recovery
4.3.5.2. Configuring Connect to Red Hat options
Use the following procedure to configure the Connect to Red Hat options in the GUI.
You can register to the CDN using either your Red Hat account or your activation key details.
Procedure
Click Account.
- Enter your Red Hat Customer Portal username and password details.
Optional: Click Activation Key.
- Enter your organization ID and activation key. You can enter more than one activation key, separated by a comma, as long as the activation keys are registered to your subscription.
Select the Set System Purpose check box. System Purpose enables the entitlement server to determine and automatically attach the most appropriate subscription to satisfy the intended use of Red Hat Enterprise Linux 8 system.
- Select the required Role, SLA, and Usage from the corresponding drop-down lists.
The Connect to Red Hat Insights check box is enabled by default. Clear the check box if you do not want to connect to Red Hat Insights.
NoteRed Hat Insights is a Software-as-a-Service (SaaS) offering that provides continuous, in-depth analysis of registered Red Hat-based systems to proactively identify threats to security, performance and stability across physical, virtual and cloud environments, and container deployments.
Optional: Expand Options.
- Select the Use HTTP proxy check box if your network environment only allows external Internet access or access to content servers through an HTTP proxy. Clear the Use HTTP proxy check box if an HTTP proxy is not used.
If you are running Satellite Server or performing internal testing, select the Custom Server URL and Custom base URL check boxes and enter the required details.
Important-
The Custom Server URL field does not require the HTTP protocol, for example
nameofhost.com. However, the Custom base URL field requires the HTTP protocol. - To change the Custom base URL after registration, you must unregister, provide the new details, and then re-register.
-
The Custom Server URL field does not require the HTTP protocol, for example
Click to register the system. When the system is successfully registered and subscriptions are attached, the Connect to Red Hat window displays the attached subscription details.
NoteDepending on the amount of subscriptions, the registration and attachment process might take up to a minute to complete.
Click to return to the Installation Summary window.
- A Registered message is displayed under Connect to Red Hat.
4.3.5.3. Installation source repository after system registration
The installation source repository used after system registration is dependent on how the system was booted.
- System booted from the Boot ISO or the DVD ISO image file
-
If you booted the RHEL installation using either the
Boot ISOor theDVD ISOimage file with the default boot parameters, the installation program automatically switches the installation source repository to the CDN after registration. - System booted with the
inst.repo=<URL>boot parameter -
If you booted the RHEL installation with the
inst.repo=<URL>boot parameter, the installation program does not automatically switch the installation source repository to the CDN after registration. If you want to use the CDN to install RHEL, you must manually switch the installation source repository to the CDN by selecting the Red Hat CDN option in the Installation Source window of the graphical installation. If you do not manually switch to the CDN, the installation program installs the packages from the repository specified on the kernel command line.
-
You can switch the installation source repository to the CDN using the
rhsmKickstart command only if you do not specify an installation source usinginst.repo=on the kernel command line or theurlcommand in the Kickstart file. You must useinst.stage2=<URL>on the kernel command line to fetch the installation image, but not specify the installation source. -
An installation source URL specified using a boot option or included in a Kickstart file takes precedence over the CDN, even if the Kickstart file contains the
rhsmcommand with valid credentials. The system is registered, but it is installed from the URL installation source. This ensures that earlier installation processes operate as normal.
4.3.5.4. Verifying your system registration from the CDN
Use this procedure to verify that your system is registered to the CDN using the GUI.
You can only verify your registration from the CDN if you have not clicked the Begin Installation button from the Installation Summary window. Once the Begin Installation button is clicked, you cannot return to the Installation Summary window to verify your registration.
Prerequisite
- You have completed the registration process as documented in the Register and install from CDN using GUI and Registered is displayed under Connect to Red Hat on the Installation Summary window.
Procedure
- From the Installation Summary window, select Connect to Red Hat.
The window opens and displays a registration summary:
- Method
- The registered account name or activation keys are displayed.
- System Purpose
- If set, the role, SLA, and usage details are displayed.
- Insights
- If enabled, the Insights details are displayed.
- Number of subscriptions
- The number of subscriptions attached are displayed. Note: In the simple content access mode, no subscription being listed is a valid behavior.
- Verify that the registration summary matches the details that were entered.
Additional resources
4.3.5.5. Unregistering your system from the CDN
Use this procedure to unregister your system from the CDN using the GUI.
- You can unregister from the CDN if you have not clicked the button from the Installation Summary window. Once the button is clicked, you cannot return to the Installation Summary window to unregister your registration.
When unregistering, the installation program switches to the first available repository, in the following order:
- The URL used in the inst.repo=<URL> boot parameter on the kernel command line.
- An automatically detected repository on the installation media (USB or DVD).
Prerequisite
- You have completed the registration process as documented in the Registering and installing RHEL from the CDN and Registered is displayed under Connect to Red Hat on the Installation Summary window.
Procedure
- From the Installation Summary window, select Connect to Red Hat.
The Connect to Red Hat window opens and displays a registration summary:
- Method
- The registered account name or activation keys used are displayed.
- System Purpose
- If set, the role, SLA, and usage details are displayed.
- Insights
- If enabled, the Insights details are displayed.
- Number of subscriptions
- The number of subscriptions attached are displayed. Note: In the simple content access mode, no subscription being listed is a valid behavior.
- Click to remove the registration from the CDN. The original registration details are displayed with a Not registered message displayed in the lower-middle part of the window.
- Click to return to the Installation Summary window.
- Connect to Red Hat displays a Not registered message, and Software Selection displays a Red Hat CDN requires registration message.
After unregistering, it is possible to register your system again. Click Connect to Red Hat. The previously entered details are populated. Edit the original details, or update the fields based on the account, purpose, and connection. Click to complete.
4.3.6. Installing System Aligned with a Security Policy
This section contains information about applying Red Hat Enterprise Linux 8 security policy during installation and how to configure it for use on your system before the first boot.
4.3.6.1. About security policy
The Red Hat Enterprise Linux includes OpenSCAP suite to enable automated configuration of the system in alignment with a particular security policy. The policy is implemented using the Security Content Automation Protocol (SCAP) standard. The packages are available in the AppStream repository. However, by default, the installation and post-installation process does not enforce any policies and therefore does not involve any checks unless specifically configured.
Applying a security policy is not a mandatory feature of the installation program. If you apply a security policy to the system, it is installed using restrictions and recommendations defined in the profile that you selected. The openscap-scanner and scap-security-guide packages are added to your package selection, providing a preinstalled tool for compliance and vulnerability scanning.
When you select a security policy, the Anaconda GUI installer requires the configuration to adhere to the policy’s requirements. There might be conflicting package selections, as well as separate partitions defined. Only after all the requirements are met, you can start the installation.
At the end of the installation process, the selected OPenSCAP security policy automatically hardens the system and scans it to verify compliance, saving the scan results to the /root/openscap_data directory on the installed system.
By default, the installer uses the content of the scap-security-guide package bundled in the installation image. You can also load external content from an HTTP, HTTPS, or FTP server.
4.3.6.2. Configuring a security policy
Complete the following steps to configure a security policy.
Prerequisite
The Installation Summary window is open.
Procedure
- From the Installation Summary window, click Security Policy. The Security Policy window opens.
- To enable security policies on the system, toggle the Apply security policy switch to ON.
- Select one of the profiles listed in the top pane.
Click .
Profile changes that you must apply before installation appear in the bottom pane.
Click to use a custom profile. A separate window opens allowing you to enter a URL for valid security content.
- Click to retrieve the URL.
Click to return to the Security Policy window.
NoteYou can load custom profiles from an HTTP, HTTPS, or FTP server. Use the full address of the content including the protocol, such as http://. A network connection must be active before you can load a custom profile. The installation program detects the content type automatically.
- Click to apply the settings and return to the Installation Summary window.
4.4. Configuring software settings
This section contains information about configuring your installation source and software selection settings, and activating a repository.
4.4.1. Configuring installation source
Complete the steps in this procedure to configure an installation source from either auto-detected installation media, Red Hat CDN, or the network.
When the Installation Summary window first opens, the installation program attempts to configure an installation source based on the type of media that was used to boot the system. The full Red Hat Enterprise Linux Server DVD configures the source as local media.
Prerequisites
- You have downloaded the full installation image. For more information, see Downloading a RHEL installation ISO image.
- You have created a bootable physical media. For more information, see Creating a bootable CD or DVD.
- The Installation Summary window is open.
Procedure
From the Installation Summary window, click Installation Source. The Installation Source window opens.
- Review the Auto-detected installation media section to verify the details. This option is selected by default if you started the installation program from media containing an installation source, for example, a DVD.
- Click to check the media integrity.
Review the Additional repositories section and note that the AppStream checkbox is selected by default.
Important- No additional configuration is necessary as the BaseOS and AppStream repositories are installed as part of the full installation image.
- Do not disable the AppStream repository check box if you want a full Red Hat Enterprise Linux 8 installation.
- Optional: Select the Red Hat CDN option to register your system, attach RHEL subscriptions, and install RHEL from the Red Hat Content Delivery Network (CDN). For more information, see the Registering and installing RHEL from the CDN section.
Optional: Select the On the network option to download and install packages from a network location instead of local media.
Note- If you do not want to download and install additional repositories from a network location, proceed to Configuring software selection.
- This option is available only when a network connection is active. See Configuring network and host name options for information about how to configure network connections in the GUI.
- Select the On the network drop-down menu to specify the protocol for downloading packages. This setting depends on the server that you want to use.
Type the server address (without the protocol) into the address field. If you choose NFS, a second input field opens where you can specify custom NFS mount options. This field accepts options listed in the
nfs(5)man page.ImportantWhen selecting an NFS installation source, you must specify the address with a colon (
:) character separating the host name from the path. For example:server.example.com:/path/to/directoryNoteThe following steps are optional and are only required if you use a proxy for network access.
- Click to configure a proxy for an HTTP or HTTPS source.
- Select the Enable HTTP proxy check box and type the URL into the Proxy Host field.
- Select the Use Authentication check box if the proxy server requires authentication.
- Type in your user name and password.
Click to finish the configuration and exit the Proxy Setup… dialog box.
NoteIf your HTTP or HTTPS URL refers to a repository mirror, select the required option from the URL type drop-down list. All environments and additional software packages are available for selection when you finish configuring the sources.
- Click to add a repository.
- Click to delete a repository.
- Click the icon to revert the current entries to the setting when you opened the Installation Source window.
To activate or deactivate a repository, click the check box in the Enabled column for each entry in the list.
NoteYou can name and configure your additional repository in the same way as the primary repository on the network.
- Click to apply the settings and return to the Installation Summary window.
4.4.2. Configuring software selection
Use the Software Selection window to select the software packages that you require. The packages are organized by Base Environment and Additional Software.
- Base Environment contains predefined packages. You can select only one base environment, for example, Server with GUI (default), Server, Minimal Install, Workstation, Custom Operating System, Virtualization Host. The availability is dependent on the installation ISO image that is used as the installation source.
- Additional Software for Selected Environment contains additional software packages for the base environment. You can select multiple software packages.
Use a predefined environment and additional software to customize your system. However, in a standard installation, you cannot select individual packages to install. To view the packages contained in a specific environment, see the repository/repodata/*-comps-repository.architecture.xml file on your installation source media (DVD, CD, USB). The XML file contains details of the packages installed as part of a base environment. Available environments are marked by the <environment> tag, and additional software packages are marked by the <group> tag.
If you are unsure about which packages to install, Red Hat recommends that you select the Minimal Install base environment. Minimal install installs a basic version of Red Hat Enterprise Linux with only a minimal amount of additional software. After the system finishes installing and you log in for the first time, you can use the YUM package manager to install additional software. For more information about YUM package manager, see the Configuring basic system settings document.
-
The
yum group listcommand lists all package groups from yum repositories. See the Configuring basic system settings document for more information. -
If you need to control which packages are installed, you can use a Kickstart file and define the packages in the
%packagessection. See the Performing an advanced RHEL 8 installation document for information about installing Red Hat Enterprise Linux using Kickstart.
Prerequisites
- You have configured the installation source.
- The installation program has downloaded package metadata.
- The Installation Summary window is open.
Procedure
- From the Installation Summary window, click Software Selection. The Software Selection window opens.
From the Base Environment pane, select a base environment. You can select only one base environment, for example, Server with GUI (default), Server, Minimal Install, Workstation, Custom Operating System, Virtualization Host.
NoteThe Server with GUI base environment is the default base environment and it launches the Initial Setup application after the installation completes and you restart the system.
Figure 4.1. Red Hat Enterprise Linux Software Selection

- From the Additional Software for Selected Environment pane, select one or more options.
- Click to apply the settings and return to Graphical installations.
4.5. Configuring storage devices
You can install Red Hat Enterprise Linux on a large variety of storage devices. You can configure basic, locally accessible, storage devices in the Installation Destination window. Basic storage devices directly connected to the local system, such as hard disk drives and solid-state drives, are displayed in the Local Standard Disks section of the window. On 64-bit IBM Z, this section contains activated Direct Access Storage Devices (DASDs).
A known issue prevents DASDs configured as HyperPAV aliases from being automatically attached to the system after the installation is complete. These storage devices are available during the installation, but are not immediately accessible after you finish installing and reboot. To attach HyperPAV alias devices, add them manually to the /etc/dasd.conf configuration file of the system.
4.5.1. Storage device selection
The storage device selection window lists all storage devices that the installation program can access. Depending on your system and available hardware, some tabs might not be displayed. The devices are grouped under the following tabs:
- Multipath Devices
Storage devices accessible through more than one path, such as through multiple SCSI controllers or Fiber Channel ports on the same system.
ImportantThe installation program only detects multipath storage devices with serial numbers that are 16 or 32 characters long.
- Other SAN Devices
- Devices available on a Storage Area Network (SAN).
- Firmware RAID
- Storage devices attached to a firmware RAID controller.
- NVDIMM Devices
- Under specific circumstances, Red Hat Enterprise Linux 8 can boot and run from (NVDIMM) devices in sector mode on the Intel 64 and AMD64 architectures.
- System z Devices
- Storage devices, or Logical Units (LUNs), attached through the zSeries Linux FCP (Fiber Channel Protocol) driver.
4.5.2. Filtering storage devices
In the storage device selection window you can filter storage devices either by their World Wide Identifier (WWID) or by the port, target, or logical unit number (LUN).
Prerequisite
The Installation Summary window is open.
Procedure
- From the Installation Summary window, click Installation Destination. The Installation Destination window opens, listing all available drives.
- Under the Specialized & Network Disks section, click . The storage devices selection window opens.
Click the Search by tab to search by port, target, LUN, or WWID.
Searching by WWID or LUN requires additional values in the corresponding input text fields.
- Select the option that you require from the Search drop-down menu.
- Click to start the search. Each device is presented on a separate row with a corresponding check box.
Select the check box to enable the device that you require during the installation process.
Later in the installation process you can choose to install Red Hat Enterprise Linux on any of the selected devices, and you can choose to mount any of the other selected devices as part of the installed system automatically.
Note- Selected devices are not automatically erased by the installation process and selecting a device does not put the data stored on the device at risk.
-
You can add devices to the system after installation by modifying the
/etc/fstabfile.
- Click to return to the Installation Destination window.
Any storage devices that you do not select are hidden from the installation program entirely. To chain load the boot loader from a different boot loader, select all the devices present.
4.5.3. Using advanced storage options
To use an advanced storage device, you can configure an iSCSI (SCSI over TCP/IP) target or FCoE (Fibre Channel over Ethernet) SAN (Storage Area Network).
To use iSCSI storage devices for the installation, the installation program must be able to discover them as iSCSI targets and be able to create an iSCSI session to access them. Each of these steps might require a user name and password for Challenge Handshake Authentication Protocol (CHAP) authentication. Additionally, you can configure an iSCSI target to authenticate the iSCSI initiator on the system to which the target is attached (reverse CHAP), both for discovery and for the session. Used together, CHAP and reverse CHAP are called mutual CHAP or two-way CHAP. Mutual CHAP provides the greatest level of security for iSCSI connections, particularly if the user name and password are different for CHAP authentication and reverse CHAP authentication.
Repeat the iSCSI discovery and iSCSI login steps to add all required iSCSI storage. You cannot change the name of the iSCSI initiator after you attempt discovery for the first time. To change the iSCSI initiator name, you must restart the installation.
4.5.3.1. Discovering and starting an iSCSI session
Complete the following steps to discover and start an iSCSI session.
Prerequisites
- The Installation Summary window is open.
Procedure
- From the Installation Summary window, click Installation Destination. The Installation Destination window opens, listing all available drives.
- Under the Specialized & Network Disks section, click . The storage devices selection window opens.
Click . The Add iSCSI Storage Target window opens.
ImportantYou cannot place the
/bootpartition on iSCSI targets that you have manually added using this method - an iSCSI target containing a/bootpartition must be configured for use with iBFT. However, in instances where the installed system is expected to boot from iSCSI with iBFT configuration provided by a method other than firmware iBFT, for example using iPXE, you can remove the/bootpartition restriction using theinst.nonibftiscsibootinstaller boot option.- Enter the IP address of the iSCSI target in the Target IP Address field.
Type a name in the iSCSI Initiator Name field for the iSCSI initiator in iSCSI qualified name (IQN) format. A valid IQN entry contains the following information:
-
The string
iqn.(note the period). -
A date code that specifies the year and month in which your organization’s Internet domain or subdomain name was registered, represented as four digits for the year, a dash, and two digits for the month, followed by a period. For example, represent September 2010 as
2010-09. -
Your organization’s Internet domain or subdomain name, presented in reverse order with the top-level domain first. For example, represent the subdomain
storage.example.comascom.example.storage. A colon followed by a string that uniquely identifies this particular iSCSI initiator within your domain or subdomain. For example,
:diskarrays-sn-a8675309.A complete IQN is as follows:
iqn.2010-09.storage.example.com:diskarrays-sn-a8675309. The installation program prepopulates theiSCSI Initiator Namefield with a name in this format to help you with the structure. For more information about IQNs, see 3.2.6. iSCSI Names in RFC 3720 - Internet Small Computer Systems Interface (iSCSI) available from tools.ietf.org and 1. iSCSI Names and Addresses in RFC 3721 - Internet Small Computer Systems Interface (iSCSI) Naming and Discovery available from tools.ietf.org.
-
The string
Select the
Discovery Authentication Typedrop-down menu to specify the type of authentication to use for iSCSI discovery. The following options are available:- No credentials
- CHAP pair
- CHAP pair and a reverse pair
-
If you selected
CHAP pairas the authentication type, enter the user name and password for the iSCSI target in theCHAP UsernameandCHAP Passwordfields. -
If you selected
CHAP pair and a reverse pairas the authentication type, enter the user name and password for the iSCSI target in theCHAP UsernameandCHAP Passwordfield, and the user name and password for the iSCSI initiator in theReverse CHAP UsernameandReverse CHAP Passwordfields.
-
If you selected
-
Optionally, select the
Bind targets to network interfacescheck box. Click .
The installation program attempts to discover an iSCSI target based on the information provided. If discovery succeeds, the
Add iSCSI Storage Targetwindow displays a list of all iSCSI nodes discovered on the target.Select the check boxes for the node that you want to use for installation.
NoteThe
Node login authentication typemenu contains the same options as theDiscovery Authentication Typemenu. However, if you need credentials for discovery authentication, use the same credentials to log in to a discovered node.-
Click the additional
Use the credentials from discoverydrop-down menu. When you provide the proper credentials, the button becomes available. - Click to initiate an iSCSI session.
4.5.3.2. Configuring FCoE parameters
Complete the following steps to configure FCoE parameters.
Prerequisite
The Installation Summary window is open.
Procedure
- From the Installation Summary window, click Installation Destination. The Installation Destination window opens, listing all available drives.
- Under the Specialized & Network Disks section, click . The storage devices selection window opens.
- Click . A dialog box opens for you to configure network interfaces for discovering FCoE storage devices.
-
Select a network interface that is connected to an FCoE switch in the
NICdrop-down menu. - Click to scan the network for SAN devices.
Select the required check boxes:
- Use DCB:Data Center Bridging (DCB) is a set of enhancements to the Ethernet protocols designed to increase the efficiency of Ethernet connections in storage networks and clusters. Select the check box to enable or disable the installation program’s awareness of DCB. Enable this option only for network interfaces that require a host-based DCBX client. For configurations on interfaces that use a hardware DCBX client, disable the check box.
- Use auto vlan:Auto VLAN is enabled by default and indicates whether VLAN discovery should be performed. If this check box is enabled, then the FIP (FCoE Initiation Protocol) VLAN discovery protocol runs on the Ethernet interface when the link configuration has been validated. If they are not already configured, network interfaces for any discovered FCoE VLANs are automatically created and FCoE instances are created on the VLAN interfaces.
-
Discovered FCoE devices are displayed under the
Other SAN Devicestab in the Installation Destination window.
4.5.3.3. Configuring DASD storage devices
Complete the following steps to configure DASD storage devices.
Prerequisite
The Installation Summary window is open.
Procedure
- From the Installation Summary window, click Installation Destination. The Installation Destination window opens, listing all available drives.
- Under the Specialized & Network Disks section, click . The storage devices selection window opens.
- Click . The Add DASD Storage Target dialog box opens and prompts you to specify a device number, such as 0.0.0204, and attach additional DASDs that were not detected when the installation started.
- Type the device number of the DASD that you want to attach in the Device number field.
- Click .
-
If a DASD with the specified device number is found and if it is not already attached, the dialog box closes and the newly-discovered drives appear in the list of drives. You can then select the check boxes for the required devices and click . The new DASDs are available for selection, marked as
DASD device 0.0.xxxxin the Local Standard Disks section of the Installation Destination window. - If you entered an invalid device number, or if the DASD with the specified device number is already attached to the system, an error message appears in the dialog box, explaining the error and prompting you to try again with a different device number.
4.5.3.4. Configuring FCP devices
FCP devices enable 64-bit IBM Z to use SCSI devices rather than, or in addition to, Direct Access Storage Device (DASD) devices. FCP devices provide a switched fabric topology that enables 64-bit IBM Z systems to use SCSI LUNs as disk devices in addition to traditional DASD devices.
Prerequisites
- The Installation Summary window is open.
-
For an FCP-only installation, you have removed the
DASD=option from the CMS configuration file or therd.dasd=option from the parameter file to indicate that no DASD is present.
Procedure
- From the Installation Summary window, click Installation Destination. The Installation Destination window opens, listing all available drives.
- Under the Specialized & Network Disks section, click . The storage devices selection window opens.
Click . The Add zFCP Storage Target dialog box opens allowing you to add a FCP (Fibre Channel Protocol) storage device.
64-bit IBM Z requires that you enter any FCP device manually so that the installation program can activate FCP LUNs. You can enter FCP devices either in the graphical installation, or as a unique parameter entry in the parameter or CMS configuration file. The values that you enter must be unique to each site that you configure.
- Type the 4 digit hexadecimal device number in the Device number field.
When installing RHEL-8.6 or older releases or if the
zFCPdevice is not configured in NPIV mode, or whenauto LUNscanning is disabled by thezfcp.allow_lun_scan=0kernel module parameter, provide the following values:- Type the 16 digit hexadecimal World Wide Port Number (WWPN) in the WWPN field.
- Type the 16 digit hexadecimal FCP LUN identifier in the LUN field.
- Click to connect to the FCP device.
The newly-added devices are displayed in the System z Devices tab of the Installation Destination window.
- Interactive creation of an FCP device is only possible in graphical mode. It is not possible to configure an FCP device interactively in text mode installation.
- Use only lower-case letters in hex values. If you enter an incorrect value and click , the installation program displays a warning. You can edit the configuration information and retry the discovery attempt.
- For more information about these values, consult the hardware documentation and check with your system administrator.
4.5.4. Installing to an NVDIMM device
Non-Volatile Dual In-line Memory Module (NVDIMM) devices combine the performance of RAM with disk-like data persistence when no power is supplied. Under specific circumstances, Red Hat Enterprise Linux 8 can boot and run from NVDIMM devices.
4.5.4.1. Criteria for using an NVDIMM device as an installation target
You can install Red Hat Enterprise Linux 8 to Non-Volatile Dual In-line Memory Module (NVDIMM) devices in sector mode on the Intel 64 and AMD64 architectures, supported by the nd_pmem driver.
Conditions for using an NVDIMM device as storage
To use an NVDIMM device as storage, the following conditions must be satisfied:
- The architecture of the system is Intel 64 or AMD64.
- The NVDIMM device is configured to sector mode. The installation program can reconfigure NVDIMM devices to this mode.
- The NVDIMM device must be supported by the nd_pmem driver.
Conditions for booting from an NVDIMM Device
Booting from an NVDIMM device is possible under the following conditions:
- All conditions for using the NVDIMM device as storage are satisfied.
- The system uses UEFI.
- The NVDIMM device must be supported by firmware available on the system, or by an UEFI driver. The UEFI driver may be loaded from an option ROM of the device itself.
- The NVDIMM device must be made available under a namespace.
Utilize the high performance of NVDIMM devices during booting, place the /boot and /boot/efi directories on the device. The Execute-in-place (XIP) feature of NVDIMM devices is not supported during booting and the kernel is loaded into conventional memory.
4.5.4.2. Configuring an NVDIMM device using the graphical installation mode
A Non-Volatile Dual In-line Memory Module (NVDIMM) device must be properly configured for use by Red Hat Enterprise Linux 8 using the graphical installation.
Reconfiguration of a NVDIMM device process destroys any data stored on the device.
Prerequisites
- A NVDIMM device is present on the system and satisfies all the other conditions for usage as an installation target.
- The installation has booted and the Installation Summary window is open.
Procedure
- From the Installation Summary window, click Installation Destination. The Installation Destination window opens, listing all available drives.
- Under the Specialized & Network Disks section, click . The storage devices selection window opens.
- Click the NVDIMM Devices tab.
To reconfigure a device, select it from the list.
If a device is not listed, it is not in sector mode.
- Click . A reconfiguration dialog opens.
Enter the sector size that you require and click .
The supported sector sizes are 512 and 4096 bytes.
- When reconfiguration completes click .
- Select the device check box.
Click to return to the Installation Destination window.
The NVDIMM device that you reconfigured is displayed in the Specialized & Network Disks section.
- Click to return to the Installation Summary window.
The NVDIMM device is now available for you to select as an installation target. Additionally, if the device meets the requirements for booting, you can set the device as a boot device.
4.6. Configuring manual partitioning
You can use manual partitioning to configure your disk partitions and mount points and define the file system that Red Hat Enterprise Linux is installed on.
Before installation, you should consider whether you want to use partitioned or unpartitioned disk devices. For more information on the advantages and disadvantages to using partitioning on LUNs, either directly or with LVM, see the article at https://access.redhat.com/solutions/163853.
An installation of Red Hat Enterprise Linux requires a minimum of one partition but Red Hat recommends using at least the following partitions or volumes: /, /home, /boot, and swap. You can also create additional partitions and volumes as you require.
To prevent data loss it is recommended that you back up your data before proceeding. If you are upgrading or creating a dual-boot system, you should back up any data you want to keep on your storage devices.
4.6.1. Starting manual partitioning
Prerequisites
- The Installation Summary screen is open.
- All disks are available to the installation program.
Procedure
Select disks for installation:
- Click Installation Destination to open the Installation Destination window.
- Select the disks that you require for installation by clicking the corresponding icon. A selected disk has a check-mark displayed on it.
- Under Storage Configuration, select the Custom radio-button.
- Optional: To enable storage encryption with LUKS, select the Encrypt my data check box.
- Click .
If you selected to encrypt the storage, a dialog box for entering a disk encryption passphrase opens. Type in the LUKS passphrase:
Enter the passphrase in the two text fields. To switch keyboard layout, use the keyboard icon.
WarningIn the dialog box for entering the passphrase, you cannot change the keyboard layout. Select the English keyboard layout to enter the passphrase in the installation program.
- Click . The Manual Partitioning window opens.
Detected mount points are listed in the left-hand pane. The mount points are organized by detected operating system installations. As a result, some file systems may be displayed multiple times if a partition is shared among several installations.
Select the mount points in the left pane; the options that can be customized are displayed in the right pane.
NoteIf your system contains existing file systems, ensure that enough space is available for the installation. To remove any partitions, select them in the list and click the button.
The dialog has a check box that you can use to remove all other partitions used by the system to which the deleted partition belongs.
If there are no existing partitions and you want to create the recommended set of partitions as a starting point, select your preferred partitioning scheme from the left pane (default for Red Hat Enterprise Linux is LVM) and click the Click here to create them automatically link.
A
/bootpartition, a/(root) volume, and aswapvolume proportionate to the size of the available storage are created and listed in the left pane. These are the recommended file systems for a typical installation, but you can add additional file systems and mount points.
- Click to confirm any changes and return to the Installation Summary window.
4.6.2. Adding a mount point file system
You can add multiple mount point file systems.
Prerequisites
You have planned your partitions.
ImportantTo avoid problems with space allocation, you can create small partitions with known fixed sizes, such as
/boot, and then create the remaining partitions, letting the installation program allocate the remaining capacity to them. If you want to install the system on multiple disks, or if your disks differ in size and a particular partition must be created on the first disk detected by BIOS, then create these partitions first.
Procedure
- Click to create a new mount point file system. The Add a New Mount Point dialog opens.
-
Select one of the preset paths from the Mount Point drop-down menu or type your own; for example, select
/for the root partition or/bootfor the boot partition. Enter the size of the file system in to the Desired Capacity field; for example,
2GiB.WarningIf you do not specify a value in the Desired Capacity field, or if you specify a size bigger than available space, then all remaining free space is used.
- Click to create the partition and return to the Manual Partitioning window.
4.6.3. Configuring storage for a mount point file system
This procedure describes how to set the partitioning scheme for each mount point that was created manually. The available options are Standard Partition, LVM, and LVM Thin Provisioning.
- Btfrs support has been removed in Red Hat Enterprise Linux 8.
-
The
/bootpartition is always located on a standard partition, regardless of the value selected.
Procedure
- To change the devices that a single non-LVM mount point should be located on, select the required mount point from the left-hand pane.
- Under the Device(s) heading, click . The Configure Mount Point dialog opens.
- Select one or more devices and click to confirm your selection and return to the Manual Partitioning window.
- Click to apply the changes.
In the lower left-hand side of the Manual Partitioning window, click the storage device selected link to open the Selected Disks dialog and review disk information.
NoteClick the button (circular arrow button) to refresh all local disks and partitions; this is only required after performing advanced partition configuration outside the installation program. Clicking the button resets all configuration changes made in the installation program.
4.6.4. Customizing a mount point file system
You can customize a partition or volume if you want to set specific settings.
If /usr or /var is partitioned separately from the rest of the root volume, the boot process becomes much more complex as these directories contain critical components. In some situations, such as when these directories are placed on an iSCSI drive or an FCoE location, the system is unable to boot, or hangs with a Device is busy error when powering off or rebooting.
This limitation only applies to /usr or /var, not to directories below them. For example, a separate partition for /var/www works successfully.
Procedure
From the left pane, select the mount point.
Figure 4.2. Customizing Partitions

From the right-hand pane, you can customize the following options:
-
Enter the file system mount point into the Mount Point field. For example, if a file system is the root file system, enter
/; enter/bootfor the/bootfile system, and so on. For a swap file system, do not set the mount point as setting the file system type toswapis sufficient. - Enter the size of the file system in the Desired Capacity field. You can use common size units such as KiB or GiB. The default is MiB if you do not set any other unit.
Select the device type that you require from the drop-down Device Type menu:
Standard Partition,LVM, orLVM Thin Provisioning.WarningThe installation program does not support overprovisioned LVM thin pools.
NoteRAIDis available only if two or more disks are selected for partitioning. If you chooseRAID, you can also set theRAID Level. Similarly, if you selectLVM, you can specify theVolume Group.- Select the Encrypt check box to encrypt the partition or volume. You must set a password later in the installation program. The LUKS Version drop-down menu is displayed.
- Select the LUKS version that you require from the drop-down menu.
Select the appropriate file system type for this partition or volume from the File system drop-down menu.
NoteSupport for
VFATfile system is not available for Linux system partitions. For example,/,/var,/usr, and so on.- Select the Reformat check box to format an existing partition, or clear the Reformat check box to retain your data. The newly-created partitions and volumes must be reformatted, and the check box cannot be cleared.
- Type a label for the partition in the Label field. Use labels to easily recognize and address individual partitions.
Type a name in the Name field.
NoteNote that standard partitions are named automatically when they are created and you cannot edit the names of standard partitions. For example, you cannot edit the
/bootnamesda1.
-
Enter the file system mount point into the Mount Point field. For example, if a file system is the root file system, enter
Click to apply your changes and if required, select another partition to customize. Changes are not applied until you click from the Installation Summary window.
NoteClick to discard your partition changes.
Click when you have created and customized all file systems and mount points. If you choose to encrypt a file system, you are prompted to create a passphrase.
A Summary of Changes dialog box opens, displaying a summary of all storage actions for the installation program.
- Click to apply the changes and return to the Installation Summary window.
4.6.5. Preserving the /home directory
In a Red Hat Enterprise Linux 8 graphical installation, you can preserve the /home directory that was used on your RHEL 7 system.
Preserving /home is only possible if the /home directory is located on a separate /home partition on your RHEL 7 system.
Preserving the /home directory that includes various configuration settings, makes it possible that the GNOME Shell environment on the new Red Hat Enterprise Linux 8 system is set in the same way as it was on your RHEL 7 system. Note that this applies only for users on Red Hat Enterprise Linux 8 with the same user name and ID as on the previous RHEL 7 system.
Complete this procedure to preserve the /home directory from your RHEL 7 system.
Prerequisites
- You have RHEL 7 installed on your computer.
-
The
/homedirectory is located on a separate/homepartition on your RHEL 7 system. -
The Red Hat Enterprise Linux 8
Installation Summarywindow is open.
Procedure
- Click Installation Destination to open the Installation Destination window.
- Under Storage Configuration, select the Custom radio button. Click Done.
- Click , the Manual Partitioning window opens.
Choose the
/homepartition, fill in/homeunderMount Point:and clear the Reformat check box.Figure 4.3. Ensuring that /home is not formatted
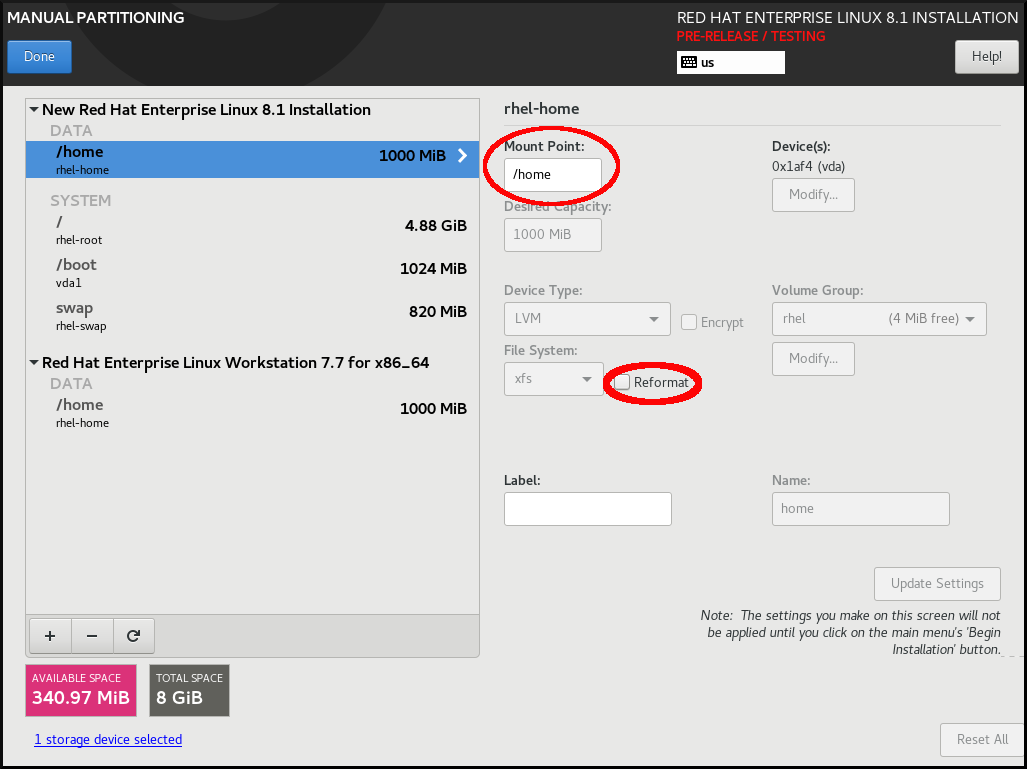
-
Optional: You can also customize various aspects of the
/homepartition required for your Red Hat Enterprise Linux 8 system as described in Customizing a mount point file system. However, to preserve/homefrom your RHEL 7 system, it is necessary to clear the Reformat check box. - After you customized all partitions according to your requirements, click . The Summary of changes dialog box opens.
-
Verify that the Summary of changes dialog box does not show any change for
/home. This means that the/homepartition is preserved. - Click to apply the changes, and return to the Installation Summary window.
4.6.6. Creating a software RAID during the installation
Redundant Arrays of Independent Disks (RAID) devices are constructed from multiple storage devices that are arranged to provide increased performance and, in some configurations, greater fault tolerance.
A RAID device is created in one step and disks are added or removed as necessary. You can configure one RAID partition for each physical disk in your system, so that the number of disks available to the installation program determines the levels of RAID device available. For example, if your system has two hard drives, you cannot create a RAID 10 device, as it requires a minimum of three separate disks.
On 64-bit IBM Z, the storage subsystem uses RAID transparently. You do not have to configure software RAID manually.
Prerequisites
- You have selected two or more disks for installation before RAID configuration options are visible. Depending on the RAID type you want to create, at least two disks are required.
- You have created a mount point. By configuring a mount point, you can configure the RAID device.
- You have selected the radio button on the Installation Destination window.
Procedure
- From the left pane of the Manual Partitioning window, select the required partition.
- Under the Device(s) section, click . The Configure Mount Point dialog box opens.
- Select the disks that you want to include in the RAID device and click .
- Click the Device Type drop-down menu and select RAID.
- Click the File System drop-down menu and select your preferred file system type.
- Click the RAID Level drop-down menu and select your preferred level of RAID.
- Click to save your changes.
- Click to apply the settings to return to the Installation Summary window.
Additional resources
4.6.7. Creating an LVM logical volume
Logical Volume Management (LVM) presents a simple logical view of underlying physical storage space, such as hard drives or LUNs. Partitions on physical storage are represented as physical volumes that you can group together into volume groups. You can divide each volume group into multiple logical volumes, each of which is analogous to a standard disk partition. Therefore, LVM logical volumes function as partitions that can span multiple physical disks.
LVM configuration is available only in the graphical installation program.
During text-mode installation, LVM configuration is not available. To create an LVM configuration, press Ctrl+Alt+F2 to use a shell prompt in a different virtual console. You can run vgcreate and lvm commands in this shell. To return to the text-mode installation, press Ctrl+Alt+F1.
Procedure
- From the left-hand pane of the Manual Partitioning window, select the mount point.
Click the Device Type drop-down menu and select
LVM. The Volume Group drop-down menu is displayed with the newly-created volume group name.NoteYou cannot specify the size of the volume group’s physical extents in the configuration dialog. The size is always set to the default value of 4 MiB. If you want to create a volume group with different physical extents, you must create it manually by switching to an interactive shell and using the
vgcreatecommand, or use a Kickstart file with thevolgroup --pesize=sizecommand. See the Performing an advanced RHEL 8 installation document for more information about Kickstart.
Additional resources
4.6.8. Configuring an LVM logical volume
Follow the steps in this procedure to configure a newly-created LVM logical volume.
Placing the /boot partition on an LVM volume is not supported.
Procedure
- From the left-hand pane of the Manual Partitioning window, select the mount point.
-
Click the Device Type drop-down menu and select
LVM. The Volume Group drop-down menu is displayed with the newly-created volume group name. Click to configure the newly-created volume group.
The Configure Volume Group dialog box opens.
NoteYou cannot specify the size of the volume group’s physical extents in the configuration dialog. The size is always set to the default value of 4 MiB. If you want to create a volume group with different physical extents, you must create it manually by switching to an interactive shell and using the
vgcreatecommand, or use a Kickstart file with thevolgroup --pesize=sizecommand. See the Performing an advanced RHEL 8 installation document for more information about Kickstart.From the RAID Level drop-down menu, select the RAID level that you require.
The available RAID levels are the same as with actual RAID devices.
- Select the Encrypt check box to mark the volume group for encryption.
From the Size policy drop-down menu, select the size policy for the volume group.
The available policy options are:
- Automatic: The size of the volume group is set automatically so that it is large enough to contain the configured logical volumes. This is optimal if you do not need free space within the volume group.
- As large as possible: The volume group is created with maximum size, regardless of the size of the configured logical volumes it contains. This is optimal if you plan to keep most of your data on LVM and later need to increase the size of some existing logical volumes, or if you need to create additional logical volumes within this group.
- Fixed: You can set an exact size of the volume group. Any configured logical volumes must then fit within this fixed size. This is useful if you know exactly how large you need the volume group to be.
- Click to apply the settings and return to the Manual Partitioning window.
- Click to save your changes.
- Click to return to the Installation Summary window.
Additional resources
4.7. Configuring a root password
You must configure a root password to finish the installation process and to log in to the administrator (also known as superuser or root) account that is used for system administration tasks. These tasks include installing and updating software packages and changing system-wide configuration such as network and firewall settings, storage options, and adding or modifying users, groups and file permissions.
Use one or both of the following ways to gain root privileges to the installed system:
- Use a root account.
-
Create a user account with administrative privileges (member of the wheel group). The
rootaccount is always created during the installation. Switch to the administrator account only when you need to perform a task that requires administrator access.
The root account has complete control over the system. If unauthorized personnel gain access to the account, they can access or delete users' personal files.
Procedure
- From the Installation Summary window, select User Settings > Root Password. The Root Password window opens.
Type your password in the Root Password field.
The requirements and recommendations for creating a strong root password are:
- Must be at least eight characters long
- May contain numbers, letters (upper and lower case) and symbols
- Is case-sensitive
- Type the same password in the Confirm field.
Click to confirm your root password and return to the Installation Summary window.
NoteIf you proceeded with a weak password, you must click twice.
4.8. Creating a user account
It is recommended that you create a user account to finish the installation. If you do not create a user account, you must log in to the system as root directly, which is not recommended.
Procedure
- On the Installation Summary window, select User Settings > User Creation. The Create User window opens.
- Type the user account name in to the Full name field, for example: John Smith.
Type the username in to the User name field, for example: jsmith.
NoteThe User name is used to log in from a command line; if you install a graphical environment, then your graphical login manager uses the Full name.
Select the Make this user administrator check box if the user requires administrative rights (the installation program adds the user to the
wheelgroup ).ImportantAn administrator user can use the
sudocommand to perform tasks that are only available torootusing the user password, instead of therootpassword. This may be more convenient, but it can also cause a security risk.Select the Require a password to use this account check box.
WarningIf you give administrator privileges to a user, verify that the account is password protected. Never give a user administrator privileges without assigning a password to the account.
- Type a password into the Password field.
- Type the same password into the Confirm password field.
- Click to apply the changes and return to the Installation Summary window.
4.9. Editing advanced user settings
This procedure describes how to edit the default settings for the user account in the Advanced User Configuration dialog box.
Procedure
- On the Create User window, click .
-
Edit the details in the Home directory field, if required. The field is populated by default with
/home/username. In the User and Groups IDs section you can:
Select the Specify a user ID manually check box and use or to enter the required value.
NoteThe default value is 1000. User IDs (UIDs) 0-999 are reserved by the system so they cannot be assigned to a user.
Select the Specify a group ID manually check box and use or to enter the required value.
NoteThe default group name is the same as the user name, and the default Group ID (GID) is 1000. GIDs 0-999 are reserved by the system so they can not be assigned to a user group.
Specify additional groups as a comma-separated list in the Group Membership field. Groups that do not already exist are created; you can specify custom GIDs for additional groups in parentheses. If you do not specify a custom GID for a new group, the new group receives a GID automatically.
NoteThe user account created always has one default group membership (the user’s default group with an ID set in the Specify a group ID manually field).
- Click to apply the updates and return to the Create User window.