
Red Hat Training
A Red Hat training course is available for RHEL 8
Chapter 68. Configuring and managing logical volumes
68.1. Overview of logical volume management
Logical volume management (LVM) creates a layer of abstraction over physical storage, which helps you to create logical storage volumes. This provides much greater flexibility in a number of ways than using physical storage directly.
In addition, the hardware storage configuration is hidden from the software so it can be resized and moved without stopping applications or unmounting file systems. This can reduce operational costs.
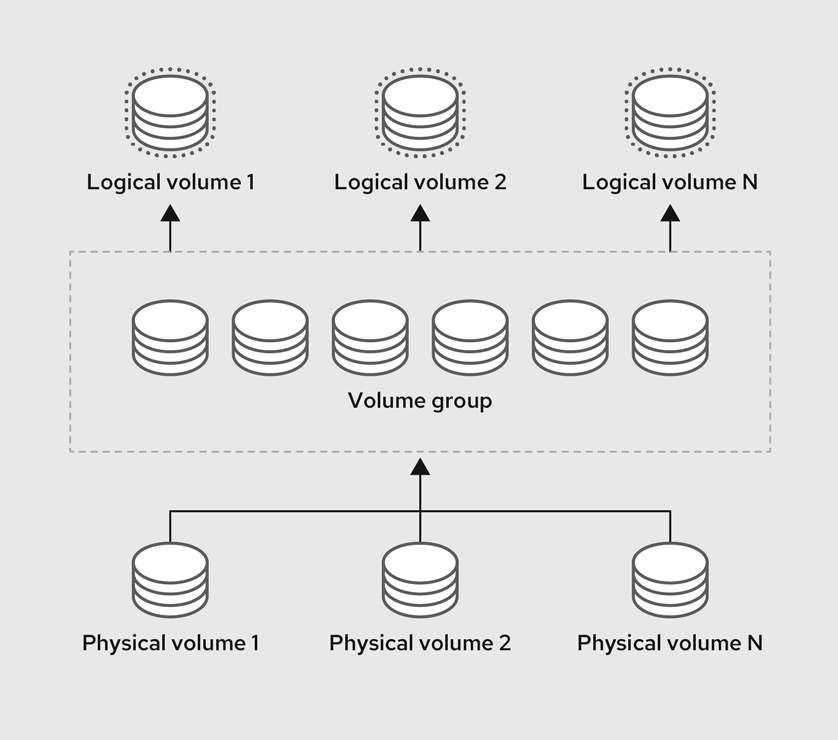
68.1.1. LVM architecture
The following are the components of LVM:
- Physical volume
- A physical volume (PV) is a partition or whole disk designated for LVM use. For more information, see Managing LVM physical volumes.
- Volume group
- A volume group (VG) is a collection of physical volumes (PVs), which creates a pool of disk space out of which logical volumes can be allocated. For more information, see Managing LVM volume groups.
- Logical volume
- A logical volume represents a mountable storage device. For more information, see Managing LVM logical volumes.
The following diagram illustrates the components of LVM:
Figure 68.1. LVM logical volume components
68.1.2. Advantages of LVM
Logical volumes provide the following advantages over using physical storage directly:
- Flexible capacity
- When using logical volumes, you can aggregate devices and partitions into a single logical volume. With this functionality, file systems can extend across multiple devices as though they were a single, large one.
- Resizeable storage volumes
- You can extend logical volumes or reduce logical volumes in size with simple software commands, without reformatting and repartitioning the underlying devices.
- Online data relocation
- To deploy newer, faster, or more resilient storage subsystems, you can move data while your system is active. Data can be rearranged on disks while the disks are in use. For example, you can empty a hot-swappable disk before removing it.
- Convenient device naming
- Logical storage volumes can be managed with user-defined and custom names.
- Striped Volumes
- You can create a logical volume that stripes data across two or more devices. This can dramatically increase throughput.
- RAID volumes
- Logical volumes provide a convenient way to configure RAID for your data. This provides protection against device failure and improves performance.
- Volume snapshots
- You can take snapshots, which is a point-in-time copy of logical volumes for consistent backups or to test the effect of changes without affecting the real data.
- Thin volumes
- Logical volumes can be thinly provisioned. This allows you to create logical volumes that are larger than the available physical space.
- Cache volumes
- A cache logical volume uses a fast block device, such as an SSD drive to improve the performance of a larger and slower block device.
68.2. Managing LVM physical volumes
The physical volume (PV) is a partition or whole disk designated for LVM use. To use the device for an LVM logical volume, the device must be initialized as a physical volume.
If you are using a whole disk device for your physical volume, the disk must have no partition table. For DOS disk partitions, the partition id should be set to 0x8e using the fdisk or cfdisk command or an equivalent. If you are using a whole disk device for your physical volume, the disk must have no partition table. Any existing partition table must be erased, which will effectively destroy all data on that disk. You can remove an existing partition table using the wipefs -a <PhysicalVolume>` command as root.
68.2.1. Overview of physical volumes
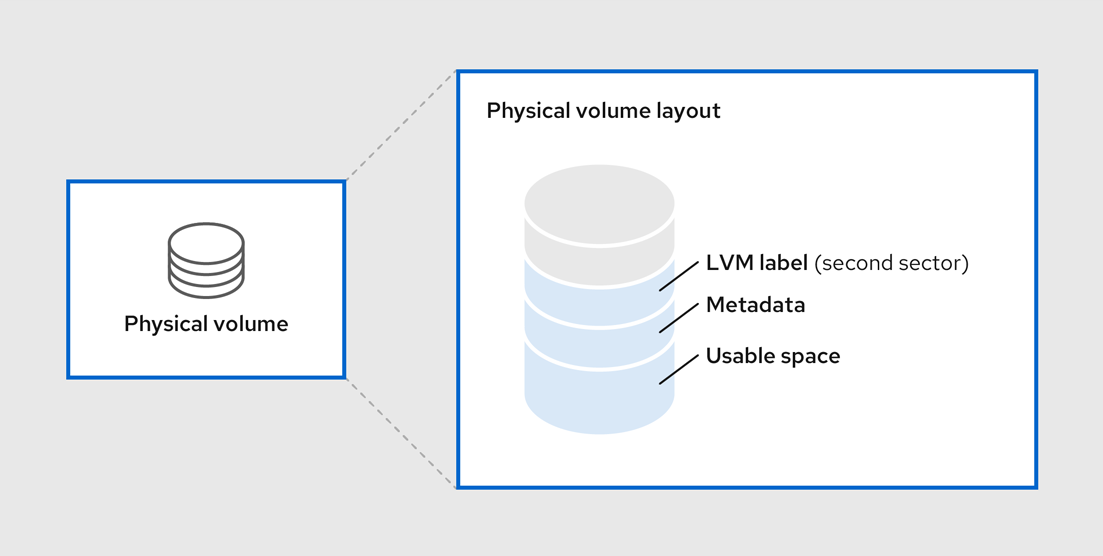
Initializing a block device as a physical volume places a label near the start of the device. The following describes the LVM label:
- An LVM label provides correct identification and device ordering for a physical device. An unlabeled, non-LVM device can change names across reboots depending on the order they are discovered by the system during boot. An LVM label remains persistent across reboots and throughout a cluster.
- The LVM label identifies the device as an LVM physical volume. It contains a random unique identifier, the UUID for the physical volume. It also stores the size of the block device in bytes, and it records where the LVM metadata will be stored on the device.
- By default, the LVM label is placed in the second 512-byte sector. You can overwrite this default setting by placing the label on any of the first 4 sectors when you create the physical volume. This allows LVM volumes to co-exist with other users of these sectors, if necessary.
The following describes the LVM metadata:
- The LVM metadata contains the configuration details of the LVM volume groups on your system. By default, an identical copy of the metadata is maintained in every metadata area in every physical volume within the volume group. LVM metadata is small and stored as ASCII.
- Currently LVM allows you to store 0, 1, or 2 identical copies of its metadata on each physical volume. The default is 1 copy. Once you configure the number of metadata copies on the physical volume, you cannot change that number at a later time. The first copy is stored at the start of the device, shortly after the label. If there is a second copy, it is placed at the end of the device. If you accidentally overwrite the area at the beginning of your disk by writing to a different disk than you intend, a second copy of the metadata at the end of the device will allow you to recover the metadata.
The following diagram illustrates the layout of an LVM physical volume. The LVM label is on the second sector, followed by the metadata area, followed by the usable space on the device.
In the Linux kernel and throughout this document, sectors are considered to be 512 bytes in size.
Figure 68.2. Physical volume layout
Additional resources
68.2.2. Multiple partitions on a disk
You can create physical volumes (PV) out of disk partitions by using LVM.
Red Hat recommends that you create a single partition that covers the whole disk to label as an LVM physical volume for the following reasons:
- Administrative convenience
- It is easier to keep track of the hardware in a system if each real disk only appears once. This becomes particularly true if a disk fails.
- Striping performance
- LVM cannot tell that two physical volumes are on the same physical disk. If you create a striped logical volume when two physical volumes are on the same physical disk, the stripes could be on different partitions on the same disk. This would result in a decrease in performance rather than an increase.
- RAID redundancy
- LVM cannot determine that the two physical volumes are on the same device. If you create a RAID logical volume when two physical volumes are on the same device, performance and fault tolerance could be lost.
Although it is not recommended, there may be specific circumstances when you will need to divide a disk into separate LVM physical volumes. For example, on a system with few disks it may be necessary to move data around partitions when you are migrating an existing system to LVM volumes. Additionally, if you have a very large disk and want to have more than one volume group for administrative purposes then it is necessary to partition the disk. If you do have a disk with more than one partition and both of those partitions are in the same volume group, take care to specify which partitions are to be included in a logical volume when creating volumes.
Note that although LVM supports using a non-partitioned disk as physical volume, it is recommended to create a single, whole-disk partition because creating a PV without a partition can be problematic in a mixed operating system environment. Other operating systems may interpret the device as free, and overwrite the PV label at the beginning of the drive.
68.2.3. Creating LVM physical volume
This procedure describes how to create and label LVM physical volumes (PVs).
In this procedure, replace the /dev/vdb1, /dev/vdb2, and /dev/vdb3 with the available storage devices in your system.
Prerequisites
-
The
lvm2package is installed.
Procedure
Create multiple physical volumes by using the space-delimited device names as arguments to the
pvcreatecommand:# pvcreate /dev/vdb1 /dev/vdb2 /dev/vdb3 Physical volume "/dev/vdb1" successfully created. Physical volume "/dev/vdb2" successfully created. Physical volume "/dev/vdb3" successfully created.
This places a label on /dev/vdb1, /dev/vdb2, and /dev/vdb3, marking them as physical volumes belonging to LVM.
View the created physical volumes by using any one of the following commands as per your requirement:
The
pvdisplaycommand, which provides a verbose multi-line output for each physical volume. It displays physical properties, such as size, extents, volume group, and other options in a fixed format:# pvdisplay --- NEW Physical volume --- PV Name /dev/vdb1 VG Name PV Size 1.00 GiB [..] --- NEW Physical volume --- PV Name /dev/vdb2 VG Name PV Size 1.00 GiB [..] --- NEW Physical volume --- PV Name /dev/vdb3 VG Name PV Size 1.00 GiB [..]
The
pvscommand provides physical volume information in a configurable form, displaying one line per physical volume:# pvs PV VG Fmt Attr PSize PFree /dev/vdb1 lvm2 1020.00m 0 /dev/vdb2 lvm2 1020.00m 0 /dev/vdb3 lvm2 1020.00m 0
The
pvscancommand scans all supported LVM block devices in the system for physical volumes. You can define a filter in thelvm.conffile so that this command avoids scanning specific physical volumes:# pvscan PV /dev/vdb1 lvm2 [1.00 GiB] PV /dev/vdb2 lvm2 [1.00 GiB] PV /dev/vdb3 lvm2 [1.00 GiB]
Additional resources
-
pvcreate(8),pvdisplay(8),pvs(8),pvscan(8), andlvm(8)man pages
68.2.4. Removing LVM physical volumes
If a device is no longer required for use by LVM, you can remove the LVM label by using the pvremove command. Executing the pvremove command zeroes the LVM metadata on an empty physical volume.
Procedure
Remove a physical volume:
# pvremove /dev/vdb3
Labels on physical volume "/dev/vdb3" successfully wiped.
View the existing physical volumes and verify if the required volume is removed:
# pvs
  PV         VG   Fmt    Attr    PSize      PFree
/dev/vdb1  	    lvm2           1020.00m   0
/dev/vdb2  	    lvm2           1020.00m   0
If the physical volume you want to remove is currently part of a volume group, you must remove it from the volume group with the vgreduce command. For more information, see Removing physical volumes from a volume group
Additional resources
-
pvremove(8)man page
68.2.5. Additional resources
- Creating a partition table on a disk with parted.
-
parted(8)man page.
68.3. Managing LVM volume groups
A volume group (VG) is a collection of physical volumes (PVs), which creates a pool of disk space out of which logical volumes (LVs) can be allocated.
Within a volume group, the disk space available for allocation is divided into units of a fixed-size called extents. An extent is the smallest unit of space that can be allocated. Within a physical volume, extents are referred to as physical extents.
A logical volume is allocated into logical extents of the same size as the physical extents. The extent size is therefore the same for all logical volumes in the volume group. The volume group maps the logical extents to physical extents.
68.3.1. Creating LVM volume group
This procedure describes how to create an LVM volume group (VG) myvg, by using the /dev/vdb1 and /dev/vdb2 physical volumes.
Prerequisites
-
The
lvm2package is installed. - One or more physical volumes are created. For more information about creating physical volumes, see Creating LVM physical volume.
Procedure
Create a volume group:
# vgcreate myvg /dev/vdb1 /dev/vdb2
 Volume group "myvg" successfully created.
This creates a VG with the name of myvg. The PVs /dev/vdb1 and /dev/vdb2 are the base storage level for the myvg VG .
View the created volume groups by using any one of the following commands according to your requirement:
The
vgscommand provides volume group information in a configurable form, displaying one line per volume groups:# vgs VG #PV #LV #SN Attr VSize VFree myvg 2 0 0 wz-n 159.99g 159.99gThe
vgdisplaycommand displays volume group properties such as size, extents, number of physical volumes, and other options in a fixed form. The following example shows the output of thevgdisplaycommand for the volume group myvg. To display all existing volume groups, do not specify a volume group:# vgdisplay myvg --- Volume group --- VG Name myvg System ID Format lvm2 Metadata Areas 4 Metadata Sequence No 6 VG Access read/write [..]
The
vgscancommand scans all supported LVM block devices in the system for volume group:# vgscan Found volume group "myvg" using metadata type lvm2
Optional: Increase a volume group’s capacity by adding one or more free physical volumes:
# vgextend myvg /dev/vdb3
Physical volume "/dev/vdb3" successfully created.
Volume group "myvg" successfully extended
Optional: Rename an existing volume group:
# vgrename myvg myvg1
Volume group "myvg" successfully renamed to "myvg1"
Additional resources
-
vgcreate(8),vgextend(8),vgdisplay(8),vgs(8),vgscan(8),vgrename(8), andlvm(8)man pages
68.3.2. Combining LVM volume groups
To combine two volume groups into a single volume group, use the vgmerge command. You can merge an inactive "source" volume with an active or an inactive "destination" volume if the physical extent sizes of the volume are equal and the physical and logical volume summaries of both volume groups fit into the destination volume groups limits.
Procedure
Merge the inactive volume group databases into the active or inactive volume group myvg giving verbose runtime information:
# vgmerge -v myvg databases
Additional resources
-
vgmerge(8)man page
68.3.3. Removing physical volumes from a volume group
To remove unused physical volumes from a volume group, use the vgreduce command. The vgreduce command shrinks a volume group’s capacity by removing one or more empty physical volumes. This frees those physical volumes to be used in different volume groups or to be removed from the system.
Procedure
If the physical volume is still being used, migrate the data to another physical volume from the same volume group :
# pvmove /dev/vdb3
  /dev/vdb3: Moved: 2.0%
 ...
  /dev/vdb3: Moved: 79.2%
 ...
  /dev/vdb3: Moved: 100.0%
If there are no enough free extents on the other physical volumes in the existing volume group:
Create a new physical volume from /dev/vdb4:
# pvcreate /dev/vdb4
  Physical volume "/dev/vdb4" successfully created
Add the newly created physical volume to the myvg volume group:
# vgextend myvg /dev/vdb4
  Volume group "myvg" successfully extended
Move the data from /dev/vdb3 to /dev/vdb4:
# pvmove /dev/vdb3 /dev/vdb4
  /dev/vdb3: Moved: 33.33%
  /dev/vdb3: Moved: 100.00%
Remove the physical volume /dev/vdb3 from the volume group:
# vgreduce myvg /dev/vdb3
Removed "/dev/vdb3" from volume group "myvg"
Verification
Verify if the /dev/vdb3 physical volume is removed from the myvg volume group:
# pvs
  PV           VG    Fmt   Attr   PSize        PFree      Used
  /dev/vdb1 myvg  lvm2   a--    1020.00m    0          1020.00m
  /dev/vdb2 myvg  lvm2   a--    1020.00m    0          1020.00m
  /dev/vdb3   	    lvm2   a--    1020.00m   1008.00m    12.00m
Additional resources
-
vgreduce(8),pvmove(8), andpvs(8)man pages
68.3.4. Splitting a LVM volume group
This procedure describes how to split the existing volume group. If there is enough unused space on the physical volumes, a new volume group can be created without adding new disks.
In the initial setup, the volume group myvg consists of /dev/vdb1, /dev/vdb2, and /dev/vdb3. After completing this procedure, the volume group myvg will consist of /dev/vdb1 and /dev/vdb2, and the second volume group, yourvg, will consist of /dev/vdb3.
Prerequisites
-
You have sufficient space in the volume group. Use the
vgscancommand to determine how much free space is currently available in the volume group. -
Depending on the free capacity in the existing physical volume, move all the used physical extents to other physical volume using the
pvmovecommand. For more information, see Removing physical volumes from a volume group.
Procedure
Split the existing volume group myvg to the new volume group yourvg:
# vgsplit myvg yourvg /dev/vdb3
  Volume group "yourvg" successfully split from "myvg"
NoteIf you have created a logical volume using the existing volume group, use the following command to deactivate the logical volume:
# lvchange -a n /dev/myvg/mylvFor more information on creating logical volumes, see Managing LVM logical volumes.
View the attributes of the two volume group:
# vgs
  VG     #PV #LV #SN Attr   VSize  VFree
  myvg     2   1   0 wz--n- 34.30G 10.80G
  yourvg   1   0   0 wz--n- 17.15G 17.15G
Verification
Verify if the newly created volume group yourvg consists of /dev/vdb3 physical volume:
# pvs
  PV           VG      Fmt   Attr   PSize        PFree      Used
  /dev/vdb1 myvg   lvm2   a--    1020.00m    0          1020.00m
  /dev/vdb2 myvg   lvm2   a--    1020.00m    0          1020.00m
  /dev/vdb3 yourvg lvm2   a--    1020.00m   1008.00m    12.00m
Additional resources
-
vgsplit(8),vgs(8), andpvs(8)man pages
68.3.5. Moving a volume group to another system
You can move an entire LVM volume group to another system. It is recommended that you use the vgexport and vgimport commands when you do this.
You can use the --force argument of the vgimport command. This allows you to import volume groups that are missing physical volumes and subsequently run the vgreduce --removemissing command.
The vgexport command makes an inactive volume group inaccessible to the system, which allows you to detach its physical volumes. The vgimport command makes a volume group accessible to a machine again after the vgexport command has made it inactive.
To move a volume group from one system to another, perform the following steps:
- Make sure that no users are accessing files on the active volumes in the volume group, then unmount the logical volumes.
-
Use the
-a nargument of thevgchangecommand to mark the volume group as inactive, which prevents any further activity on the volume group. Use the
vgexportcommand to export the volume group. This prevents it from being accessed by the system from which you are removing it.After you export the volume group, the physical volume will show up as being in an exported volume group when you execute the
pvscancommand, as in the following example.#
pvscanPV /dev/sda1 is in exported VG myvg [17.15 GB / 7.15 GB free] PV /dev/sdc1 is in exported VG myvg [17.15 GB / 15.15 GB free] PV /dev/sdd1 is in exported VG myvg [17.15 GB / 15.15 GB free] ...When the system is next shut down, you can unplug the disks that constitute the volume group and connect them to the new system.
-
When the disks are plugged into the new system, use the
vgimportcommand to import the volume group, making it accessible to the new system. -
Activate the volume group with the
-a yargument of thevgchangecommand. - Mount the file system to make it available for use.
68.3.6. Removing LVM volume groups
This procedure describes how to remove an existing volume group.
Prerequisites
- The volume group contains no logical volumes. To remove logical volumes from a volume group, see Removing LVM logical volumes.
Procedure
If the volume group exists in a clustered environment, stop the
lockspaceof the volume group on all other nodes. Use the following command on all nodes except the node where you are performing the removing:# vgchange --lockstop vg-nameWait for the lock to stop.
Remove the volume group:
# vgremove vg-name
  Volume group "vg-name" successfully removed
Additional resources
-
vgremove(8)man page
68.4. Managing LVM logical volumes
A logical volume is a virtual, block storage device that a file system, database, or application can use. To create an LVM logical volume, the physical volumes (PVs) are combined into a volume group (VG). This creates a pool of disk space out of which LVM logical volumes (LVs) can be allocated.
68.4.1. Overview of logical volumes
An administrator can grow or shrink logical volumes without destroying data, unlike standard disk partitions. If the physical volumes in a volume group are on separate drives or RAID arrays, then administrators can also spread a logical volume across the storage devices.
You can lose data if you shrink a logical volume to a smaller capacity than the data on the volume requires. Further, some file systems are not capable of shrinking. To ensure maximum flexibility, create logical volumes to meet your current needs, and leave excess storage capacity unallocated. You can safely extend logical volumes to use unallocated space, depending on your needs.
On AMD, Intel, ARM systems, and IBM Power Systems servers, the boot loader cannot read LVM volumes. You must make a standard, non-LVM disk partition for your /boot partition. On IBM Z, the zipl boot loader supports /boot on LVM logical volumes with linear mapping. By default, the installation process always creates the / and swap partitions within LVM volumes, with a separate /boot partition on a physical volume.
The following are the different types of logical volumes:
- Linear volumes
- A linear volume aggregates space from one or more physical volumes into one logical volume. For example, if you have two 60GB disks, you can create a 120GB logical volume. The physical storage is concatenated.
- Striped logical volumes
When you write data to an LVM logical volume, the file system lays the data out across the underlying physical volumes. You can control the way the data is written to the physical volumes by creating a striped logical volume. For large sequential reads and writes, this can improve the efficiency of the data I/O.
Striping enhances performance by writing data to a predetermined number of physical volumes in round-robin fashion. With striping, I/O can be done in parallel. In some situations, this can result in near-linear performance gain for each additional physical volume in the stripe.
- RAID logical volumes
- LVM supports RAID levels 0, 1, 4, 5, 6, and 10. RAID logical volumes are not cluster-aware. When you create a RAID logical volume, LVM creates a metadata subvolume that is one extent in size for every data or parity subvolume in the array.
- Thin-provisioned logical volumes (thin volumes)
- Using thin-provisioned logical volumes, you can create logical volumes that are larger than the available physical storage. Creating a thinly provisioned set of volumes allows the system to allocate what you use instead of allocating the full amount of storage that is requested
- Snapshot volumes
- The LVM snapshot feature provides the ability to create virtual images of a device at a particular instant without causing a service interruption. When a change is made to the original device (the origin) after a snapshot is taken, the snapshot feature makes a copy of the changed data area as it was prior to the change so that it can reconstruct the state of the device.
- Thin-provisioned snapshot volumes
- Using thin-provisioned snapshot volumes, you can have more virtual devices to be stored on the same data volume. Thinly provisioned snapshots are useful because you are not copying all of the data that you are looking to capture at a given time.
- Cache volumes
- LVM supports the use of fast block devices, such as SSD drives as write-back or write-through caches for larger slower block devices. Users can create cache logical volumes to improve the performance of their existing logical volumes or create new cache logical volumes composed of a small and fast device coupled with a large and slow device.
68.4.2. Using CLI commands
The following sections describe some general operational features of LVM CLI commands.
Specifying units in a command line argument
When sizes are required in a command line argument, units can always be specified explicitly. If you do not specify a unit, then a default is assumed, usually KB or MB. LVM CLI commands do not accept fractions.
When specifying units in a command line argument, LVM is case-insensitive; specifying M or m is equivalent, for example, and powers of 2 (multiples of 1024) are used. However, when specifying the --units argument in a command, lower-case indicates that units are in multiples of 1024 while upper-case indicates that units are in multiples of 1000.
Specifying volume groups and logical volumes
Note the following when specifying volume groups or logical volumes in an LVM CLI command.
-
Where commands take volume group or logical volume names as arguments, the full path name is optional. A logical volume called
lvol0in a volume group calledvg0can be specified asvg0/lvol0. - Where a list of volume groups is required but is left empty, a list of all volume groups will be substituted.
-
Where a list of logical volumes is required but a volume group is given, a list of all the logical volumes in that volume group will be substituted. For example, the
lvdisplay vg0command will display all the logical volumes in volume groupvg0.
Increasing output verbosity
All LVM commands accept a -v argument, which can be entered multiple times to increase the output verbosity. The following examples shows the default output of the lvcreate command.
# lvcreate -L 50MB new_vg
  Rounding up size to full physical extent 52.00 MB
  Logical volume "lvol0" created
The following command shows the output of the lvcreate command with the -v argument.
# lvcreate -v -L 50MB new_vg
  Rounding up size to full physical extent 52.00 MB
    Archiving volume group "new_vg" metadata (seqno 1).
    Creating logical volume lvol0
    Creating volume group backup "/etc/lvm/backup/new_vg" (seqno 2).
    Activating logical volume new_vg/lvol0.
    activation/volume_list configuration setting not defined: Checking only host tags for new_vg/lvol0.
    Creating new_vg-lvol0
    Loading table for new_vg-lvol0 (253:0).
    Resuming new_vg-lvol0 (253:0).
    Wiping known signatures on logical volume "new_vg/lvol0"
    Initializing 4.00 KiB of logical volume "new_vg/lvol0" with value 0.
  Logical volume "lvol0" created
The -vv, -vvv and the -vvvv arguments display increasingly more details about the command execution. The -vvvv argument provides the maximum amount of information at this time. The following example shows the first few lines of output for the lvcreate command with the -vvvv argument specified.
# lvcreate -vvvv -L 50MB new_vg
#lvmcmdline.c:913         Processing: lvcreate -vvvv -L 50MB new_vg
#lvmcmdline.c:916         O_DIRECT will be used
#config/config.c:864       Setting global/locking_type to 1
#locking/locking.c:138       File-based locking selected.
#config/config.c:841       Setting global/locking_dir to /var/lock/lvm
#activate/activate.c:358       Getting target version for linear
#ioctl/libdm-iface.c:1569         dm version   OF   [16384]
#ioctl/libdm-iface.c:1569         dm versions   OF   [16384]
#activate/activate.c:358       Getting target version for striped
#ioctl/libdm-iface.c:1569         dm versions   OF   [16384]
#config/config.c:864       Setting activation/mirror_region_size to 512
...
Displaying help for LVM CLI commands
You can display help for any of the LVM CLI commands with the --help argument of the command.
# commandname --help
To display the man page for a command, execute the man command:
# man commandname
The man lvm command provides general online information about LVM.
68.4.3. Creating LVM logical volume
This procedure describes how to create mylv LVM logical volume (LV) from the myvg volume group, which is created by using the /dev/vdb1, /dev/vdb2, and /dev/vdb3 physical volumes.
Prerequisites
-
The
lvm2package is installed. - The volume group is created. For more information, see Creating LVM volume group.
Procedure
Create a logical volume:
# lvcreate -n mylv -L 500M myvg
Use the
-noption to set the LV name to mylv, and the-Loption to set the size of LV in units of Mb, but it is possible to use any other units. The LV type is linear by default, but the user can specify the desired type by using the--typeoption.ImportantThe command fails if the VG does not have a sufficient number of free physical extents for the requested size and type.
View the created logical volumes by using any one of the following commands as per your requirement:
The
lvscommand provides logical volume information in a configurable form, displaying one line per logical volume:# lvs LV VG Attr LSize Pool Origin Data% Meta% Move Log Cpy%Sync Convert mylv myvg -wi-ao---- 500.00mThe
lvdisplaycommand displays logical volume properties, such as size, layout, and mapping in a fixed format:# lvdisplay -v /dev/myvg/mylv --- Logical volume --- LV Path /dev/myvg/mylv LV Name mylv VG Name myvg LV UUID YTnAk6-kMlT-c4pG-HBFZ-Bx7t-ePMk-7YjhaM LV Write Access read/write [..]
The
lvscancommand scans for all logical volumes in the system and lists them:# lvscan ACTIVE '/dev/myvg/mylv' [500.00 MiB] inherit
Create a file system on the logical volume. The following command creates an
xfsfile system on the logical volume:# mkfs.xfs /dev/myvg/mylv meta-data=/dev/myvg/mylv isize=512 agcount=4, agsize=32000 blks = sectsz=512 attr=2, projid32bit=1 = crc=1 finobt=1, sparse=1, rmapbt=0 = reflink=1 data = bsize=4096 blocks=128000, imaxpct=25 = sunit=0 swidth=0 blks naming =version 2 bsize=4096 ascii-ci=0, ftype=1 log =internal log bsize=4096 blocks=1368, version=2 = sectsz=512 sunit=0 blks, lazy-count=1 realtime =none extsz=4096 blocks=0, rtextents=0 Discarding blocks...Done.
Mount the logical volume and report the file system disk space usage:
# mount /dev/myvg/mylv /mnt

# df -h
Filesystem               1K-blocks  Used   Available Use% Mounted on

/dev/mapper/myvg-mylv   506528    29388  477140     6%   /mnt
Additional resources
-
lvcreate(8),lvdisplay(8),lvs(8),lvscan(8),lvm(8)andmkfs.xfs(8)man pages
68.4.4. Creating a RAID0 striped logical volume
A RAID0 logical volume spreads logical volume data across multiple data subvolumes in units of stripe size. The following procedure creates an LVM RAID0 logical volume called mylv that stripes data across the disks.
Prerequisites
- You have created three or more physical volumes. For more information on creating physical volumes, see Creating LVM physical volume.
- You have created the volume group. For more information, see Creating LVM volume group.
Procedure
Create a RAID0 logical volume from the existing volume group. The following command creates the RAID0 volume mylv from the volume group myvg, which is 2G in size, with three stripes and a stripe size of 4kB:
# lvcreate --type raid0 -L 2G --stripes 3 --stripesize 4 -n mylv my_vg
  Rounding size 2.00 GiB (512 extents) up to stripe boundary size 2.00 GiB(513 extents).
  Logical volume "mylv" created.
Create a file system on the RAID0 logical volume. The following command creates an ext4 file system on the logical volume:
# mkfs.ext4 /dev/my_vg/mylvMount the logical volume and report the file system disk space usage:
# mount /dev/my_vg/mylv /mnt

# df
Filesystem             1K-blocks     Used  Available  Use% Mounted on
/dev/mapper/my_vg-mylv   2002684     6168  1875072    1%   /mnt
Verification
View the created RAID0 stripped logical volume:
# lvs -a -o +devices,segtype my_vg
  LV VG Attr LSize Pool Origin Data% Meta% Move Log Cpy%Sync Convert Devices Type
  mylv my_vg rwi-a-r--- 2.00g mylv_rimage_0(0),mylv_rimage_1(0),mylv_rimage_2(0) raid0
  [mylv_rimage_0] my_vg iwi-aor--- 684.00m /dev/sdf1(0) linear
  [mylv_rimage_1] my_vg iwi-aor--- 684.00m /dev/sdg1(0) linear
  [mylv_rimage_2] my_vg iwi-aor--- 684.00m /dev/sdh1(0) linear
68.4.5. Renaming LVM logical volumes
This procedure describes how to rename an existing logical volume mylv to mylv1.
Procedure
If the logical volume is currently mounted, unmount the volume:
# umount /mntReplace /mnt with the mount point.
Rename an existing logical volume:
# lvrename myvg mylv mylv1
Renamed "mylv" to "mylv1" in volume group "myvg"
You can also rename the logical volume by specifying the full paths to the devices:
# lvrename /dev/myvg/mylv /dev/myvg/mylv1
Additional resources
-
lvrename(8)man page
68.4.6. Removing a disk from a logical volume
This procedure describes how to remove a disk from an existing logical volume, either to replace the disk or to use the disk as part of a different volume.
In order to remove a disk, you must first move the extents on the LVM physical volume to a different disk or set of disks.
Procedure
View the used and free space of physical volumes when using the LV:
# pvs -o+pv_used
  PV          VG    Fmt    Attr   PSize      PFree     Used
 /dev/vdb1 myvg  lvm2   a--    1020.00m    0         1020.00m
 /dev/vdb2 myvg  lvm2   a--    1020.00m    0         1020.00m
 /dev/vdb3 myvg  lvm2   a--    1020.00m   1008.00m   12.00m
Move the data to other physical volume:
If there are enough free extents on the other physical volumes in the existing volume group, use the following command to move the data:
# pvmove /dev/vdb3
  /dev/vdb3: Moved: 2.0%
 ...
  /dev/vdb3: Moved: 79.2%
 ...
  /dev/vdb3: Moved: 100.0%
If there are no enough free extents on the other physical volumes in the existing volume group, use the following commands to add a new physical volume, extend the volume group using the newly created physical volume, and move the data to this physical volume:
# pvcreate /dev/vdb4
  Physical volume "/dev/vdb4" successfully created

# vgextend myvg /dev/vdb4
  Volume group "myvg" successfully extended

# pvmove /dev/vdb3 /dev/vdb4
  /dev/vdb3: Moved: 33.33%
  /dev/vdb3: Moved: 100.00%
Remove the physical volume:
# vgreduce myvg /dev/vdb3
Removed "/dev/vdb3" from volume group "myvg"
If a logical volume contains a physical volume that fails, you cannot use that logical volume. To remove missing physical volumes from a volume group, you can use the
--removemissingparameter of thevgreducecommand, if there are no logical volumes that are allocated on the missing physical volumes:# vgreduce --removemissing myvg
Additional resources
-
pvmove(8),vgextend(8),vereduce(8), andpvs(8)man pages
68.4.7. Removing LVM logical volumes
This procedure describes how to remove an existing logical volume /dev/myvg/mylv1 from the volume group myvg.
Procedure
If the logical volume is currently mounted, unmount the volume:
# umount /mntIf the logical volume exists in a clustered environment, deactivate the logical volume on all nodes where it is active. Use the following command on each such node:
# lvchange --activate n vg-name/lv-nameRemove the logical volume using the
lvremoveutility:# lvremove /dev/myvg/mylv1 Do you really want to remove active logical volume "mylv1"? [y/n]: y Logical volume "mylv1" successfully removed
NoteIn this case, the logical volume has not been deactivated. If you explicitly deactivated the logical volume before removing it, you would not see the prompt verifying whether you want to remove an active logical volume.
Additional resources
-
lvremove(8)man page
68.4.8. Configuring persistent device numbers
Major and minor device numbers are allocated dynamically at module load. Some applications work best if the block device is always activated with the same device (major and minor) number. You can specify these with the lvcreate and the lvchange commands by using the following arguments:
--persistent y --major major --minor minor
Use a large minor number to be sure that it has not already been allocated to another device dynamically.
If you are exporting a file system using NFS, specifying the fsid parameter in the exports file may avoid the need to set a persistent device number within LVM.
68.4.9. Specifying LVM extent size
When physical volumes are used to create a volume group, its disk space is divided into 4MB extents, by default. This extent is the minimum amount by which the logical volume may be increased or decreased in size. Large numbers of extents will have no impact on I/O performance of the logical volume.
You can specify the extent size with the -s option to the vgcreate command if the default extent size is not suitable. You can put limits on the number of physical or logical volumes the volume group can have by using the -p and -l arguments of the vgcreate command.
68.4.10. Managing LVM logical volumes using RHEL System Roles
Use the storage role to perform the following tasks:
- Create an LVM logical volume in a volume group consisting of multiple disks.
- Create an ext4 file system with a given label on the logical volume.
- Persistently mount the ext4 file system.
Prerequisites
-
An Ansible playbook including the
storagerole
68.4.10.1. Example Ansible playbook to manage logical volumes
This section provides an example Ansible playbook. This playbook applies the storage role to create an LVM logical volume in a volume group.
Example 68.1. A playbook that creates a mylv logical volume in the myvg volume group
- hosts: all
  vars:
    storage_pools:
      - name: myvg
        disks:
          - sda
          - sdb
          - sdc
        volumes:
          - name: mylv
            size: 2G
            fs_type: ext4
            mount_point: /mnt/data
  roles:
    - rhel-system-roles.storage
The
myvgvolume group consists of the following disks:-
/dev/sda -
/dev/sdb -
/dev/sdc
-
-
If the
myvgvolume group already exists, the playbook adds the logical volume to the volume group. -
If the
myvgvolume group does not exist, the playbook creates it. -
The playbook creates an Ext4 file system on the
mylvlogical volume, and persistently mounts the file system at/mnt.
Additional resources
-
The
/usr/share/ansible/roles/rhel-system-roles.storage/README.mdfile.
68.4.10.2. Additional resources
68.4.11. Removing LVM volume groups
This procedure describes how to remove an existing volume group.
Prerequisites
- The volume group contains no logical volumes. To remove logical volumes from a volume group, see Removing LVM logical volumes.
Procedure
If the volume group exists in a clustered environment, stop the
lockspaceof the volume group on all other nodes. Use the following command on all nodes except the node where you are performing the removing:# vgchange --lockstop vg-nameWait for the lock to stop.
Remove the volume group:
# vgremove vg-name
  Volume group "vg-name" successfully removed
Additional resources
-
vgremove(8)man page
68.5. Modifying the size of a logical volume
After you have created a logical volume, you can modify the size of the volume.
68.5.1. Growing a logical volume and file system
This procedure describes how to extend the logical volume and grow a file system on the same logical volume.
To increase the size of a logical volume, use the lvextend command. When you extend the logical volume, you can indicate how much you want to extend the volume, or how large you want it to be after you extend it.
Prerequisites
You have an existing logical volume (LV) with a file system on it. Determine the file system type by using the
df -Thcommand.For more information on creating LV and a file system, see Creating LVM logical volume.
-
You have sufficient space in the volume group to grow your LV and file system. Use the
vgs -o name,vgfreecommand to determine the available space.
Procedure
Optional: If the volume group has insufficient space to grow your LV, then add a new physical volume to the volume group by using the following command:
# vgextend myvg /dev/vdb3
Physical volume "/dev/vdb3" successfully created.
Volume group "myvg" successfully extended
For more information, see Creating LVM volume group.
Now that the volume group is large enough, execute any one of the following steps as per your requirement:
To extend the LV with the provided size, use the following command:
# lvextend -L 3G /dev/myvg/mylv
Size of logical volume myvg/mylv changed from 2.00 GiB (512 extents) to 3.00 GiB (768 extents).
Logical volume myvg/mylv successfully resized.
NoteYou can use the
-roption of thelvextendcommand to extend the logical volume and resize the underlying file system with a single command:# lvextend -r -L 3G /dev/myvg/mylvWarningYou can also extend the logical volume using the
lvresizecommand with the same arguments, but this command does not guarantee against accidental shrinkage.To extend the mylv logical volume to fill all of the unallocated space in the myvg volume group, use the following command:
# lvextend -l +100%FREE /dev/myvg/mylv
 Size of logical volume myvg/mylv changed from 10.00 GiB (2560 extents) to 6.35 TiB (1665465 extents).
 Logical volume myvg/mylv successfully resized.
As with the
lvcreatecommand, you can use the-largument of thelvextendcommand to specify the number of extents by which to increase the size of the logical volume. You can also use this argument to specify a percentage of the volume group, or a percentage of the remaining free space in the volume group.
If you are not using the
roption with thelvextendcommand to extend the LV and resize the file system with a single command, then resize the file system on the logical volume by using the following command:xfs_growfs /mnt/mnt1/ meta-data=/dev/mapper/myvg-mylv isize=512 agcount=4, agsize=65536 blks = sectsz=512 attr=2, projid32bit=1 = crc=1 finobt=1, sparse=1, rmapbt=0 = reflink=1 data = bsize=4096 blocks=262144, imaxpct=25 = sunit=0 swidth=0 blks naming =version 2 bsize=4096 ascii-ci=0, ftype=1 log =internal log bsize=4096 blocks=2560, version=2 = sectsz=512 sunit=0 blks, lazy-count=1 realtime =none extsz=4096 blocks=0, rtextents=0 data blocks changed from 262144 to 524288
NoteWithout the
-Doption,xfs_growfsgrows the file system to the maximum size supported by the underlying device. For more information, see Increasing the size of an XFS file system.For resizing an ext4 file system, see Resizing an ext4 file system.
Verification
Verify if the file system is growing by using the following command:
# df -Th
Filesystem            Type      Size  Used Avail Use% Mounted on
devtmpfs              devtmpfs  1.9G     0  1.9G   0% /dev
tmpfs                 tmpfs     1.9G     0  1.9G   0% /dev/shm
tmpfs                 tmpfs     1.9G  8.6M  1.9G   1% /run
tmpfs                 tmpfs     1.9G     0  1.9G   0% /sys/fs/cgroup
/dev/mapper/rhel-root xfs        45G  3.7G   42G   9% /
/dev/vda1             xfs      1014M  369M  646M  37% /boot
tmpfs                 tmpfs     374M     0  374M   0% /run/user/0
/dev/mapper/myvg-mylv xfs       2.0G   47M  2.0G   3% /mnt/mnt1
Additional resources
-
vgextend(8),lvextend(8), andxfs_growfs(8)man pages
68.5.2. Shrinking logical volumes
You can reduce the size of a logical volume with the lvreduce command.
Shrinking is not supported on a GFS2 or XFS file system, so you cannot reduce the size of a logical volume that contains a GFS2 or XFS file system.
If the logical volume you are reducing contains a file system, to prevent data loss you must ensure that the file system is not using the space in the logical volume that is being reduced. For this reason, it is recommended that you use the --resizefs option of the lvreduce command when the logical volume contains a file system.
When you use this option, the lvreduce command attempts to reduce the file system before shrinking the logical volume. If shrinking the file system fails, as can occur if the file system is full or the file system does not support shrinking, then the lvreduce command will fail and not attempt to shrink the logical volume.
In most cases, the lvreduce command warns about possible data loss and asks for a confirmation. However, you should not rely on these confirmation prompts to prevent data loss because in some cases you will not see these prompts, such as when the logical volume is inactive or the --resizefs option is not used.
Note that using the --test option of the lvreduce command does not indicate where the operation is safe, as this option does not check the file system or test the file system resize.
Procedure
To shrink the mylv logical volume in myvg volume group to 64 megabytes, use the following command:
# lvreduce --resizefs -L 64M myvg/mylv
fsck from util-linux 2.37.2
/dev/mapper/myvg-mylv: clean, 11/25688 files, 4800/102400 blocks
resize2fs 1.46.2 (28-Feb-2021)
Resizing the filesystem on /dev/mapper/myvg-mylv to 65536 (1k) blocks.
The filesystem on /dev/mapper/myvg-mylv is now 65536 (1k) blocks long.

Size of logical volume myvg/mylv changed from 100.00 MiB (25 extents) to 64.00 MiB (16 extents).
 Logical volume myvg/mylv successfully resized.
In this example, mylv contains a file system, which this command resizes together with the logical volume.
Specifying the
-sign before the resize value indicates that the value will be subtracted from the logical volume’s actual size. To shrink a logical volume to an absolute size of 64 megabytes, use the following command:# lvreduce --resizefs -L -64M myvg/mylv
Additional resources
-
lvreduce(8)man page
68.5.3. Extending a striped logical volume
In order to increase the size of a striped logical volume, there must be enough free space on the underlying physical volumes that make up the volume group to support the stripe. For example, if you have a two-way stripe that that uses up an entire volume group, adding a single physical volume to the volume group will not enable you to extend the stripe. Instead, you must add at least two physical volumes to the volume group.
For example, consider a volume group vg that consists of two underlying physical volumes, as displayed with the following vgs command.
# vgs
  VG   #PV #LV #SN Attr   VSize   VFree
  vg     2   0   0 wz--n- 271.31G 271.31G
You can create a stripe using the entire amount of space in the volume group.
#lvcreate -n stripe1 -L 271.31G -i 2 vgUsing default stripesize 64.00 KB Rounding up size to full physical extent 271.31 GB Logical volume "stripe1" created #lvs -a -o +devicesLV VG Attr LSize Origin Snap% Move Log Copy% Devices stripe1 vg -wi-a- 271.31G /dev/sda1(0),/dev/sdb1(0)
Note that the volume group now has no more free space.
# vgs
  VG   #PV #LV #SN Attr   VSize   VFree
  vg     2   1   0 wz--n- 271.31G    0
The following command adds another physical volume to the volume group, which then has 135 gigabytes of additional space.
#vgextend vg /dev/sdc1Volume group "vg" successfully extended #vgsVG #PV #LV #SN Attr VSize VFree vg 3 1 0 wz--n- 406.97G 135.66G
At this point you cannot extend the striped logical volume to the full size of the volume group, because two underlying devices are needed in order to stripe the data.
# lvextend vg/stripe1 -L 406G
  Using stripesize of last segment 64.00 KB
  Extending logical volume stripe1 to 406.00 GB
  Insufficient suitable allocatable extents for logical volume stripe1: 34480
more required
To extend the striped logical volume, add another physical volume and then extend the logical volume. In this example, having added two physical volumes to the volume group we can extend the logical volume to the full size of the volume group.
#vgextend vg /dev/sdd1Volume group "vg" successfully extended #vgsVG #PV #LV #SN Attr VSize VFree vg 4 1 0 wz--n- 542.62G 271.31G #lvextend vg/stripe1 -L 542GUsing stripesize of last segment 64.00 KB Extending logical volume stripe1 to 542.00 GB Logical volume stripe1 successfully resized
If you do not have enough underlying physical devices to extend the striped logical volume, it is possible to extend the volume anyway if it does not matter that the extension is not striped, which may result in uneven performance. When adding space to the logical volume, the default operation is to use the same striping parameters of the last segment of the existing logical volume, but you can override those parameters. The following example extends the existing striped logical volume to use the remaining free space after the initial lvextend command fails.
#lvextend vg/stripe1 -L 406GUsing stripesize of last segment 64.00 KB Extending logical volume stripe1 to 406.00 GB Insufficient suitable allocatable extents for logical volume stripe1: 34480 more required #lvextend -i1 -l+100%FREE vg/stripe1
68.6. Customized reporting for LVM
LVM provides a wide range of configuration and command line options to produce customized reports and to filter the report’s output. For a full description of LVM reporting features and capabilities, see the lvmreport(7) man page.
You can produce concise and customizable reports of LVM objects with the pvs, lvs, and vgs commands. The reports that these commands generate include one line of output for each object. Each line contains an ordered list of fields of properties related to the object. There are five ways to select the objects to be reported: by physical volume, volume group, logical volume, physical volume segment, and logical volume segment.
You can report information about physical volumes, volume groups, logical volumes, physical volume segments, and logical volume segments all at once with the lvm fullreport command. For information on this command and its capabilities, see the lvm-fullreport(8) man page.
LVM supports log reports, which contain a log of operations, messages, and per-object status with complete object identification collected during LVM command execution. For further information about the LVM log report. see the lvmreport(7) man page.
68.6.1. Controlling the format of the LVM display
Whether you use the pvs, lvs, or vgs command determines the default set of fields displayed and the sort order. You can control the output of these commands with the following arguments:
You can change what fields are displayed to something other than the default by using the
-oargument. For example, the following command displays only the physical volume name and size.#
pvs -o pv_name,pv_sizePV PSize /dev/sdb1 17.14G /dev/sdc1 17.14G /dev/sdd1 17.14GYou can append a field to the output with the plus sign (+), which is used in combination with the -o argument.
The following example displays the UUID of the physical volume in addition to the default fields.
#
pvs -o +pv_uuidPV VG Fmt Attr PSize PFree PV UUID /dev/sdb1 new_vg lvm2 a- 17.14G 17.14G onFF2w-1fLC-ughJ-D9eB-M7iv-6XqA-dqGeXY /dev/sdc1 new_vg lvm2 a- 17.14G 17.09G Joqlch-yWSj-kuEn-IdwM-01S9-X08M-mcpsVe /dev/sdd1 new_vg lvm2 a- 17.14G 17.14G yvfvZK-Cf31-j75k-dECm-0RZ3-0dGW-UqkCSAdding the
-vargument to a command includes some extra fields. For example, thepvs -vcommand will display theDevSizeandPV UUIDfields in addition to the default fields.#
pvs -vScanning for physical volume names PV VG Fmt Attr PSize PFree DevSize PV UUID /dev/sdb1 new_vg lvm2 a- 17.14G 17.14G 17.14G onFF2w-1fLC-ughJ-D9eB-M7iv-6XqA-dqGeXY /dev/sdc1 new_vg lvm2 a- 17.14G 17.09G 17.14G Joqlch-yWSj-kuEn-IdwM-01S9-XO8M-mcpsVe /dev/sdd1 new_vg lvm2 a- 17.14G 17.14G 17.14G yvfvZK-Cf31-j75k-dECm-0RZ3-0dGW-tUqkCSThe
--noheadingsargument suppresses the headings line. This can be useful for writing scripts.The following example uses the
--noheadingsargument in combination with thepv_nameargument, which will generate a list of all physical volumes.#
pvs --noheadings -o pv_name/dev/sdb1 /dev/sdc1 /dev/sdd1The
--separator separatorargument uses separator to separate each field.The following example separates the default output fields of the
pvscommand with an equals sign (=).#
pvs --separator =PV=VG=Fmt=Attr=PSize=PFree /dev/sdb1=new_vg=lvm2=a-=17.14G=17.14G /dev/sdc1=new_vg=lvm2=a-=17.14G=17.09G /dev/sdd1=new_vg=lvm2=a-=17.14G=17.14GTo keep the fields aligned when using the
separatorargument, use theseparatorargument in conjunction with the--alignedargument.#
pvs --separator = --alignedPV =VG =Fmt =Attr=PSize =PFree /dev/sdb1 =new_vg=lvm2=a- =17.14G=17.14G /dev/sdc1 =new_vg=lvm2=a- =17.14G=17.09G /dev/sdd1 =new_vg=lvm2=a- =17.14G=17.14G
You can use the -P argument of the lvs or vgs command to display information about a failed volume that would otherwise not appear in the output.
For a full listing of display arguments, see the pvs(8), vgs(8) and lvs(8) man pages.
Volume group fields can be mixed with either physical volume (and physical volume segment) fields or with logical volume (and logical volume segment) fields, but physical volume and logical volume fields cannot be mixed. For example, the following command will display one line of output for each physical volume.
# vgs -o +pv_name
  VG     #PV #LV #SN Attr   VSize  VFree  PV
  new_vg   3   1   0 wz--n- 51.42G 51.37G /dev/sdc1
  new_vg   3   1   0 wz--n- 51.42G 51.37G /dev/sdd1
  new_vg   3   1   0 wz--n- 51.42G 51.37G /dev/sdb1
68.6.2. LVM object display fields
You can display additional information about the LVM objects with the pvs, vgs, and lvs commands.
A field name prefix can be dropped if it matches the default for the command. For example, with the pvs command, name means pv_name, but with the vgs command, name is interpreted as vg_name.
Executing the following command is the equivalent of executing pvs -o pv_free.
# pvs -o free
  PFree
  17.14G
  17.09G
  17.14G
The number of characters in the attribute fields in pvs, vgs, and lvs output may increase in later releases. The existing character fields will not change position, but new fields may be added to the end. You should take this into account when writing scripts that search for particular attribute characters, searching for the character based on its relative position to the beginning of the field, but not for its relative position to the end of the field. For example, to search for the character p in the ninth bit of the lv_attr field, you could search for the string "^/……..p/", but you should not search for the string "/*p$/".
Table 68.1, “The pvs Command Display Fields” lists the display arguments of the pvs command, along with the field name as it appears in the header display and a description of the field.
Table 68.1. The pvs Command Display Fields
| Argument | Header | Description |
|---|---|---|
|
| DevSize | The size of the underlying device on which the physical volume was created |
|
| 1st PE | Offset to the start of the first physical extent in the underlying device |
|
| Attr | Status of the physical volume: (a)llocatable or e(x)ported. |
|
| Fmt |
The metadata format of the physical volume ( |
|
| PFree | The free space remaining on the physical volume |
|
| PV | The physical volume name |
|
| Alloc | Number of used physical extents |
|
| PE | Number of physical extents |
|
| SSize | The segment size of the physical volume |
|
| Start | The starting physical extent of the physical volume segment |
|
| PSize | The size of the physical volume |
|
| PV Tags | LVM tags attached to the physical volume |
|
| Used | The amount of space currently used on the physical volume |
|
| PV UUID | The UUID of the physical volume |
By default, the pvs command displays the pv_name, vg_name, pv_fmt, pv_attr, pv_size and pv_free fields. The display is sorted by pv_name.
# pvs
  PV         VG     Fmt  Attr PSize  PFree
  /dev/sdb1  new_vg lvm2 a-   17.14G 17.14G
  /dev/sdc1  new_vg lvm2 a-   17.14G 17.09G
  /dev/sdd1  new_vg lvm2 a-   17.14G 17.13G
Using the -v argument with the pvs command adds the following fields to the default display: dev_size, pv_uuid.
# pvs -v
    Scanning for physical volume names
  PV         VG     Fmt  Attr PSize  PFree  DevSize PV UUID
  /dev/sdb1  new_vg lvm2 a-   17.14G 17.14G  17.14G onFF2w-1fLC-ughJ-D9eB-M7iv-6XqA-dqGeXY
  /dev/sdc1  new_vg lvm2 a-   17.14G 17.09G  17.14G Joqlch-yWSj-kuEn-IdwM-01S9-XO8M-mcpsVe
  /dev/sdd1  new_vg lvm2 a-   17.14G 17.13G  17.14G yvfvZK-Cf31-j75k-dECm-0RZ3-0dGW-tUqkCS
You can use the --segments argument of the pvs command to display information about each physical volume segment. A segment is a group of extents. A segment view can be useful if you want to see whether your logical volume is fragmented.
The pvs --segments command displays the following fields by default: pv_name, vg_name, pv_fmt, pv_attr, pv_size, pv_free, pvseg_start, pvseg_size. The display is sorted by pv_name and pvseg_size within the physical volume.
# pvs --segments
  PV         VG         Fmt  Attr PSize  PFree  Start SSize
  /dev/hda2  VolGroup00 lvm2 a-   37.16G 32.00M     0  1172
  /dev/hda2  VolGroup00 lvm2 a-   37.16G 32.00M  1172    16
  /dev/hda2  VolGroup00 lvm2 a-   37.16G 32.00M  1188     1
  /dev/sda1  vg         lvm2 a-   17.14G 16.75G     0    26
  /dev/sda1  vg         lvm2 a-   17.14G 16.75G    26    24
  /dev/sda1  vg         lvm2 a-   17.14G 16.75G    50    26
  /dev/sda1  vg         lvm2 a-   17.14G 16.75G    76    24
  /dev/sda1  vg         lvm2 a-   17.14G 16.75G   100    26
  /dev/sda1  vg         lvm2 a-   17.14G 16.75G   126    24
  /dev/sda1  vg         lvm2 a-   17.14G 16.75G   150    22
  /dev/sda1  vg         lvm2 a-   17.14G 16.75G   172  4217
  /dev/sdb1  vg         lvm2 a-   17.14G 17.14G     0  4389
  /dev/sdc1  vg         lvm2 a-   17.14G 17.14G     0  4389
  /dev/sdd1  vg         lvm2 a-   17.14G 17.14G     0  4389
  /dev/sde1  vg         lvm2 a-   17.14G 17.14G     0  4389
  /dev/sdf1  vg         lvm2 a-   17.14G 17.14G     0  4389
  /dev/sdg1  vg         lvm2 a-   17.14G 17.14G     0  4389
You can use the pvs -a command to view devices detected by LVM that are not initialized as LVM physical volumes.
# pvs -a
  PV                             VG     Fmt  Attr PSize  PFree
  /dev/VolGroup00/LogVol01                   --       0      0
  /dev/new_vg/lvol0                          --       0      0
  /dev/ram                                   --       0      0
  /dev/ram0                                  --       0      0
  /dev/ram2                                  --       0      0
  /dev/ram3                                  --       0      0
  /dev/ram4                                  --       0      0
  /dev/ram5                                  --       0      0
  /dev/ram6                                  --       0      0
  /dev/root                                  --       0      0
  /dev/sda                                   --       0      0
  /dev/sdb                                   --       0      0
  /dev/sdb1                      new_vg lvm2 a-   17.14G 17.14G
  /dev/sdc                                   --       0      0
  /dev/sdc1                      new_vg lvm2 a-   17.14G 17.09G
  /dev/sdd                                   --       0      0
  /dev/sdd1                      new_vg lvm2 a-   17.14G 17.14G
Table 68.2, “vgs Display Fields” lists the display arguments of the vgs command, along with the field name as it appears in the header display and a description of the field.
Table 68.2. vgs Display Fields
| Argument | Header | Description |
|---|---|---|
|
| #LV | The number of logical volumes the volume group contains |
|
| MaxLV | The maximum number of logical volumes allowed in the volume group (0 if unlimited) |
|
| MaxPV | The maximum number of physical volumes allowed in the volume group (0 if unlimited) |
|
| #PV | The number of physical volumes that define the volume group |
|
| #SN | The number of snapshots the volume group contains |
|
| Attr | Status of the volume group: (w)riteable, (r)eadonly, resi(z)eable, e(x)ported, (p)artial and (c)lustered. |
|
| #Ext | The number of physical extents in the volume group |
|
| Ext | The size of the physical extents in the volume group |
|
| Fmt |
The metadata format of the volume group ( |
|
| VFree | Size of the free space remaining in the volume group |
|
| Free | Number of free physical extents in the volume group |
|
| VG | The volume group name |
|
| Seq | Number representing the revision of the volume group |
|
| VSize | The size of the volume group |
|
| SYS ID | LVM1 System ID |
|
| VG Tags | LVM tags attached to the volume group |
|
| VG UUID | The UUID of the volume group |
The vgs command displays the following fields by default: vg_name, pv_count, lv_count, snap_count, vg_attr, vg_size, vg_free. The display is sorted by vg_name.
# vgs
  VG     #PV #LV #SN Attr   VSize  VFree
  new_vg   3   1   1 wz--n- 51.42G 51.36G
Using the -v argument with the vgs command adds the vg_extent_size and vg_uuid fields to te default display.
# vgs -v
    Finding all volume groups
    Finding volume group "new_vg"
  VG     Attr   Ext   #PV #LV #SN VSize  VFree  VG UUID
  new_vg wz--n- 4.00M   3   1   1 51.42G 51.36G jxQJ0a-ZKk0-OpMO-0118-nlwO-wwqd-fD5D32
Table 68.3, “lvs Display Fields” lists the display arguments of the lvs command, along with the field name as it appears in the header display and a description of the field.
In later releases of Red Hat Enterprise Linux, the output of the lvs command may differ, with additional fields in the output. The order of the fields, however, will remain the same and any additional fields will appear at the end of the display.
Table 68.3. lvs Display Fields
| Argument | Header | Description |
|---|---|---|
|
*
* | Chunk | Unit size in a snapshot volume |
|
| Copy% |
The synchronization percentage of a mirrored logical volume; also used when physical extents are being moved with the |
|
| Devices | The underlying devices that make up the logical volume: the physical volumes, logical volumes, and start physical extents and logical extents |
|
| Ancestors | For thin pool snapshots, the ancestors of the logical volume |
|
| Descendants | For thin pool snapshots, the descendants of the logical volume |
|
| Attr | The status of the logical volume. The logical volume attribute bits are as follows: * Bit 1: Volume type: (m)irrored, (M)irrored without initial sync, (o)rigin, (O)rigin with merging snapshot, (r)aid, ®aid without initial sync, (s)napshot, merging (S)napshot, (p)vmove, (v)irtual, mirror or raid (i)mage, mirror or raid (I)mage out-of-sync, mirror (l)og device, under (c)onversion, thin (V)olume, (t)hin pool, (T)hin pool data, raid or thin pool m(e)tadata or pool metadata spare, * Bit 2: Permissions: (w)riteable, (r)ead-only, ®ead-only activation of non-read-only volume
* Bit 3: Allocation policy: (a)nywhere, (c)ontiguous, (i)nherited, c(l)ing, (n)ormal. This is capitalized if the volume is currently locked against allocation changes, for example while executing the * Bit 4: fixed (m)inor * Bit 5: State: (a)ctive, (s)uspended, (I)nvalid snapshot, invalid (S)uspended snapshot, snapshot (m)erge failed, suspended snapshot (M)erge failed, mapped (d)evice present without tables, mapped device present with (i)nactive table * Bit 6: device (o)pen * Bit 7: Target type: (m)irror, (r)aid, (s)napshot, (t)hin, (u)nknown, (v)irtual. This groups logical volumes related to the same kernel target together. So, for example, mirror images, mirror logs as well as mirrors themselves appear as (m) if they use the original device-mapper mirror kernel driver, whereas the raid equivalents using the md raid kernel driver all appear as (r). Snapshots using the original device-mapper driver appear as (s), whereas snapshots of thin volumes using the thin provisioning driver appear as (t). * Bit 8: Newly-allocated data blocks are overwritten with blocks of (z)eroes before use.
* Bit 9: Volume Health: (p)artial, (r)efresh needed, (m)ismatches exist, (w)ritemostly. (p)artial signifies that one or more of the Physical Volumes this Logical Volume uses is missing from the system. (r)efresh signifies that one or more of the Physical Volumes this RAID Logical Volume uses had suffered a write error. The write error could be due to a temporary failure of that Physical Volume or an indication that it is failing. The device should be refreshed or replaced. (m)ismatches signifies that the RAID logical volume has portions of the array that are not coherent. Inconsistencies are discovered by initiating a * Bit 10: s(k)ip activation: this volume is flagged to be skipped during activation. |
|
| KMaj | Actual major device number of the logical volume (-1 if inactive) |
|
| KMIN | Actual minor device number of the logical volume (-1 if inactive) |
|
| Maj | The persistent major device number of the logical volume (-1 if not specified) |
|
| Min | The persistent minor device number of the logical volume (-1 if not specified) |
|
| LV | The name of the logical volume |
|
| LSize | The size of the logical volume |
|
| LV Tags | LVM tags attached to the logical volume |
|
| LV UUID | The UUID of the logical volume. |
|
| Log | Device on which the mirror log resides |
|
| Modules | Corresponding kernel device-mapper target necessary to use this logical volume |
|
| Move |
Source physical volume of a temporary logical volume created with the |
|
| Origin | The origin device of a snapshot volume |
|
*
* | Region | The unit size of a mirrored logical volume |
|
| #Seg | The number of segments in the logical volume |
|
| SSize | The size of the segments in the logical volume |
|
| Start | Offset of the segment in the logical volume |
|
| Seg Tags | LVM tags attached to the segments of the logical volume |
|
| Type | The segment type of a logical volume (for example: mirror, striped, linear) |
|
| Snap% | Current percentage of a snapshot volume that is in use |
|
| #Str | Number of stripes or mirrors in a logical volume |
|
*
* | Stripe | Unit size of the stripe in a striped logical volume |
The lvs command provides the following display by default. The default display is sorted by vg_name and lv_name within the volume group.
# lvs
  LV     VG              Attr       LSize    Pool Origin Data%  Meta%  Move Log Cpy%Sync Convert
  origin VG              owi-a-s---    1.00g
  snap   VG              swi-a-s---  100.00m      origin 0.00
A common use of the lvs command is to append devices to the command to display the underlying devices that make up the logical volume. This example also specifies the -a option to display the internal volumes that are components of the logical volumes, such as RAID mirrors, enclosed in brackets. This example includes a RAID volume, a striped volume, and a thinly-pooled volume.
# lvs -a -o +devices
  LV               VG            Attr       LSize   Pool   Origin Data%  Meta%  Move Log Cpy%Sync Convert Devices
  raid1            VG            rwi-a-r---   1.00g                                      100.00           raid1_rimage_0(0),raid1_rimage_1(0)
  [raid1_rimage_0] VG            iwi-aor---   1.00g                                                       /dev/sde1(7041)
  [raid1_rimage_1] VG            iwi-aor---   1.00g                                                       /dev/sdf1(7041)
  [raid1_rmeta_0]  VG            ewi-aor---   4.00m                                                       /dev/sde1(7040)
  [raid1_rmeta_1]  VG            ewi-aor---   4.00m                                                       /dev/sdf1(7040)
  stripe1          VG            -wi-a-----  99.95g                                                       /dev/sde1(0),/dev/sdf1(0)
  stripe1          VG            -wi-a-----  99.95g                                                       /dev/sdd1(0)
  stripe1          VG            -wi-a-----  99.95g                                                       /dev/sdc1(0)
  [lvol0_pmspare]  rhel_host-083 ewi-------   4.00m                                                       /dev/vda2(0)
  pool00           rhel_host-083 twi-aotz--  <4.79g               72.90  54.69                            pool00_tdata(0)
  [pool00_tdata]   rhel_host-083 Twi-ao----  <4.79g                                                       /dev/vda2(1)
  [pool00_tmeta]   rhel_host-083 ewi-ao----   4.00m                                                       /dev/vda2(1226)
  root             rhel_host-083 Vwi-aotz--  <4.79g pool00        72.90
  swap             rhel_host-083 -wi-ao---- 820.00m                                                       /dev/vda2(1227)
Using the -v argument with the lvs command adds the following fields to the default display: seg_count, lv_major, lv_minor, lv_kernel_major, lv_kernel_minor, lv_uuid.
# lvs -v
    Finding all logical volumes
  LV         VG     #Seg Attr   LSize  Maj Min KMaj KMin Origin Snap%  Move Copy%  Log Convert LV UUID
  lvol0      new_vg    1 owi-a- 52.00M  -1  -1 253  3                                          LBy1Tz-sr23-OjsI-LT03-nHLC-y8XW-EhCl78
  newvgsnap1 new_vg    1 swi-a-  8.00M  -1  -1 253  5    lvol0    0.20                         1ye1OU-1cIu-o79k-20h2-ZGF0-qCJm-CfbsIx
You can use the --segments argument of the lvs command to display information with default columns that emphasize the segment information. When you use the segments argument, the seg prefix is optional. The lvs --segments command displays the following fields by default: lv_name, vg_name, lv_attr, stripes, segtype, seg_size. The default display is sorted by vg_name, lv_name within the volume group, and seg_start within the logical volume. If the logical volumes were fragmented, the output from this command would show that.
# lvs --segments
  LV       VG         Attr   #Str Type   SSize
  LogVol00 VolGroup00 -wi-ao    1 linear  36.62G
  LogVol01 VolGroup00 -wi-ao    1 linear 512.00M
  lv       vg         -wi-a-    1 linear 104.00M
  lv       vg         -wi-a-    1 linear 104.00M
  lv       vg         -wi-a-    1 linear 104.00M
  lv       vg         -wi-a-    1 linear  88.00M
Using the -v argument with the lvs --segments command adds the seg_start, stripesize and chunksize fields to the default display.
# lvs -v --segments
    Finding all logical volumes
  LV         VG     Attr   Start SSize  #Str Type   Stripe Chunk
  lvol0      new_vg owi-a-    0  52.00M    1 linear     0     0
  newvgsnap1 new_vg swi-a-    0   8.00M    1 linear     0  8.00K
The following example shows the default output of the lvs command on a system with one logical volume configured, followed by the default output of the lvs command with the segments argument specified.
# lvs
  LV    VG     Attr   LSize  Origin Snap%  Move Log Copy%
  lvol0 new_vg -wi-a- 52.00M
# lvs --segments
  LV    VG     Attr   #Str Type   SSize
  lvol0 new_vg -wi-a-    1 linear 52.00M
68.6.3. Sorting LVM reports
Normally the entire output of the lvs, vgs, or pvs command has to be generated and stored internally before it can be sorted and columns aligned correctly. You can specify the --unbuffered argument to display unsorted output as soon as it is generated.
To specify an alternative ordered list of columns to sort on, use the -O argument of any of the reporting commands. It is not necessary to include these fields within the output itself.
The following example shows the output of the pvs command that displays the physical volume name, size, and free space.
# pvs -o pv_name,pv_size,pv_free
  PV         PSize  PFree
  /dev/sdb1  17.14G 17.14G
  /dev/sdc1  17.14G 17.09G
  /dev/sdd1  17.14G 17.14G
The following example shows the same output, sorted by the free space field.
# pvs -o pv_name,pv_size,pv_free -O pv_free
  PV         PSize  PFree
  /dev/sdc1  17.14G 17.09G
  /dev/sdd1  17.14G 17.14G
  /dev/sdb1  17.14G 17.14G
The following example shows that you do not need to display the field on which you are sorting.
# pvs -o pv_name,pv_size -O pv_free
  PV         PSize
  /dev/sdc1  17.14G
  /dev/sdd1  17.14G
  /dev/sdb1  17.14G
To display a reverse sort, precede a field you specify after the -O argument with the - character.
# pvs -o pv_name,pv_size,pv_free -O -pv_free
  PV         PSize  PFree
  /dev/sdd1  17.14G 17.14G
  /dev/sdb1  17.14G 17.14G
  /dev/sdc1  17.14G 17.09G
68.6.4. Specifying the units for an LVM report display
To specify the units for the LVM report display, use the --units argument of the report command.
- Base 2 units
The default units displayed in powers of 2 (multiples of 1024). You can specify:
-
human-readable (
r) with<rounding indicator -
bytes (
b) -
sectors (
s) -
kilobytes (
k) -
megabytes (
m) -
gigabytes (
g) -
terabytes (
t) -
petabytes (
p) -
exabytes (
e) -
human-readable (
h), which is the default unit
-
human-readable (
The default display is r, human-readable. You can override the default by setting the units parameter in the global section of the /etc/lvm/lvm.conf file.
- Base 10 units
-
You can specify the units to be displayed in multiples of 1000 by capitalizing the unit specification (
R,B,S,K,M,G,T,P,E,H).
The following example specifies the output of the pvs, vgs and lvs commands in base 2 gigabytes unit:
# pvs --units g /dev/sdb
  PV        VG    Fmt  Attr PSize   PFree
  /dev/sdb  test  lvm2 a--  931.00g 930.00g
# vgs --units g test VG #PV #LV #SN Attr VSize VFree test 1 1 0 wz-n 931.00g 931.00g
# lvs --units g test
  LV    VG   Attr     LSize Pool Origin Data%  Meta%  Move Log Cpy%Sync Convert
  lvol0 test wi-a---- 1.OOg
The following example specifies the output of the pvs, vgs and lvs commands in base 10 gigabytes unit:
# pvs --units G /dev/sdb
  PV        VG   Fmt  Attr  PSize   PFree
  /dev/sdb  test lvm2 a--   999.65G 998.58G
# vgs --units G test VG #PV #LV #SN Attr VSize VFree test 1 1 0 wz-n 999.65G 998.58G
# lvs --units G test
  LV    VG   Attr     LSize Pool Origin Data%  Meta%  Move Log Cpy%Sync Convert
  lvol0 test wi-a---- 1.07G
You can specify sectors (s), defined as 512 bytes, or custom units. The following example displays the output of the pvs command as several sectors:
# pvs --units s
  PV         VG     Fmt  Attr PSize       PFree
  /dev/sdb   test   lvm2 a--  1952440320S 1950343168S
The following example displays the output of the pvs command in units of 4 MB:
# pvs --units 4m
  PV         VG     Fmt  Attr PSize      PFree
  /dev/sdb   test   lvm2 a--  238335.00U 238079.00U
The purpose of the r unit is that it works similarly to h (human-readable), but in addition, the reported value gets a prefix of < or > to indicate that the actual size is slightly more or less that the displayed size. The r setting is the default for LVM commands. LVM rounds the decimal value, causing non-exact sizes to be reported. Notice the following:
# vgs --units g test
  VG   #PV #LV #SN Attr VSize   VFree
  test   1   1   0 wz-n 931.00g 930.00g
# vgs --units r test
  VG   #PV #LV #SN Attr VSize    VFree
  test   1   1   0 wz-n <931.00g <930.00
# vgs test
  VG   #PV #LV #SN Attr VSize    VFree
  test   1   1   0 wz-n <931.00g <930.00g
Note that the r is the default unit when --units is not specified. It also shows how --units g (or other --units) do not always display exactly correct sizes. It also shows the primary purpose of r, which is the < to indicate that the displayed size is not exact. In th is example, the value is not exact because the VG size is not an exact multiple of gigabytes, and .01 is also not an exact representation of the fraction.
68.6.5. Displaying LVM command output in JSON format
You can use the --reportformat option of the LVM display commands to display the output in JSON format.
The following example shows the output of the lvs in standard default format.
# lvs
  LV      VG            Attr       LSize   Pool Origin Data%  Meta%  Move Log Cpy%Sync Convert
  my_raid my_vg         Rwi-a-r---  12.00m                                    100.00
  root    rhel_host-075 -wi-ao----   6.67g
  swap    rhel_host-075 -wi-ao---- 820.00m
The following command shows the output of the same LVM configuration when you specify JSON format.
# lvs --reportformat json
  {
      "report": [
          {
              "lv": [
                  {"lv_name":"my_raid", "vg_name":"my_vg", "lv_attr":"Rwi-a-r---", "lv_size":"12.00m", "pool_lv":"", "origin":"", "data_percent":"", "metadata_percent":"", "move_pv":"", "mirror_log":"", "copy_percent":"100.00", "convert_lv":""},
                  {"lv_name":"root", "vg_name":"rhel_host-075", "lv_attr":"-wi-ao----", "lv_size":"6.67g", "pool_lv":"", "origin":"", "data_percent":"", "metadata_percent":"", "move_pv":"", "mirror_log":"", "copy_percent":"", "convert_lv":""},
                  {"lv_name":"swap", "vg_name":"rhel_host-075", "lv_attr":"-wi-ao----", "lv_size":"820.00m", "pool_lv":"", "origin":"", "data_percent":"", "metadata_percent":"", "move_pv":"", "mirror_log":"", "copy_percent":"", "convert_lv":""}
              ]
          }
      ]
  }
You can also set the report format as a configuration option in the /etc/lvm/lvm.conf file, using the output_format setting. The --reportformat setting of the command line, however, takes precedence over this setting.
68.6.6. Displaying the LVM command log
Both report-oriented and processing-oriented LVM commands can report the command log if this is enabled with the log/report_command_log configuration setting. You can determine the set of fields to display and to sort by for this report.
The following examples configures LVM to generate a complete log report for LVM commands. In this example, you can see that both logical volumes lvol0 and lvol1 were successfully processed, as was the volume group VG that contains the volumes.
#lvmconfig --type full log/command_log_selectioncommand_log_selection="all" #lvsLogical Volume ============== LV LSize Cpy%Sync lvol1 4.00m 100.00 lvol0 4.00m Command Log =========== Seq LogType Context ObjType ObjName ObjGrp Msg Errno RetCode 1 status processing lv lvol0 vg success 0 1 2 status processing lv lvol1 vg success 0 1 3 status processing vg vg success 0 1 #lvchange -an vg/lvol1Command Log =========== Seq LogType Context ObjType ObjName ObjGrp Msg Errno RetCode 1 status processing lv lvol1 vg success 0 1 2 status processing vg vg success 0 1
For further information on configuring LVM reports and command logs, see the lvmreport man page.
68.7. Configuring RAID logical volumes
You can create, activate, change, remove, display, and use LVM Redundant Array of Independent Disks (RAID) volumes.
68.7.1. RAID logical volumes
Logical volume manager (LVM) supports Redundant Array of Independent Disks (RAID) levels 0, 1, 4, 5, 6, and 10. An LVM RAID volume has the following characteristics:
- LVM creates and manages RAID logical volumes that leverage the Multiple Devices (MD) kernel drivers.
- You can temporarily split RAID1 images from the array and merge them back into the array later.
- LVM RAID volumes support snapshots.
Other characteristics include:
- Clusters
RAID logical volumes are not cluster-aware.
Although you can create and activate RAID logical volumes exclusively on one machine, you cannot activate them simultaneously on more than one machine.
- Subvolumes
When you create a RAID logical volume (LV), LVM creates a metadata subvolume that is one extent in size for every data or parity subvolume in the array.
For example, creating a 2-way RAID1 array results in two metadata subvolumes (
lv_rmeta_0andlv_rmeta_1) and two data subvolumes (lv_rimage_0andlv_rimage_1). Similarly, creating a 3-way stripe and one implicit parity device, RAID4 results in four metadata subvolumes (lv_rmeta_0,lv_rmeta_1,lv_rmeta_2, andlv_rmeta_3) and four data subvolumes (lv_rimage_0,lv_rimage_1,lv_rimage_2, andlv_rimage_3).- Integrity
- You can lose data when a RAID device fails or when soft corruption occurs. Soft corruption in data storage implies that the data retrieved from a storage device is different from the data written to that device. Adding integrity to a RAID LV reduces or prevent soft corruption. For more information, see Creating a RAID LV with DM integrity.
68.7.2. RAID levels and linear support
The following are the supported configurations by RAID, including levels 0, 1, 4, 5, 6, 10, and linear:
- Level 0
RAID level 0, often called striping, is a performance-oriented striped data mapping technique. This means the data being written to the array is broken down into stripes and written across the member disks of the array, allowing high I/O performance at low inherent cost but provides no redundancy.
RAID level 0 implementations only stripe the data across the member devices up to the size of the smallest device in the array. This means that if you have multiple devices with slightly different sizes, each device gets treated as though it was the same size as the smallest drive. Therefore, the common storage capacity of a level 0 array is the total capacity of all disks. If the member disks have a different size, then the RAID0 uses all the space of those disks using the available zones.
- Level 1
RAID level 1, or mirroring, provides redundancy by writing identical data to each member disk of the array, leaving a mirrored copy on each disk. Mirroring remains popular due to its simplicity and high level of data availability. Level 1 operates with two or more disks, and provides very good data reliability and improves performance for read-intensive applications but at relatively high costs.
RAID level 1 is costly because you write the same information to all of the disks in the array, which provides data reliability, but in a much less space-efficient manner than parity based RAID levels such as level 5. However, this space inefficiency comes with a performance benefit, which is parity-based RAID levels that consume considerably more CPU power in order to generate the parity while RAID level 1 simply writes the same data more than once to the multiple RAID members with very little CPU overhead. As such, RAID level 1 can outperform the parity-based RAID levels on machines where software RAID is employed and CPU resources on the machine are consistently taxed with operations other than RAID activities.
The storage capacity of the level 1 array is equal to the capacity of the smallest mirrored hard disk in a hardware RAID or the smallest mirrored partition in a software RAID. Level 1 redundancy is the highest possible among all RAID types, with the array being able to operate with only a single disk present.
- Level 4
Level 4 uses parity concentrated on a single disk drive to protect data. Parity information is calculated based on the content of the rest of the member disks in the array. This information can then be used to reconstruct data when one disk in the array fails. The reconstructed data can then be used to satisfy I/O requests to the failed disk before it is replaced and to repopulate the failed disk after it has been replaced.
Since the dedicated parity disk represents an inherent bottleneck on all write transactions to the RAID array, level 4 is seldom used without accompanying technologies such as write-back caching. Or it is used in specific circumstances where the system administrator is intentionally designing the software RAID device with this bottleneck in mind such as an array that has little to no write transactions once the array is populated with data. RAID level 4 is so rarely used that it is not available as an option in Anaconda. However, it could be created manually by the user if needed.
The storage capacity of hardware RAID level 4 is equal to the capacity of the smallest member partition multiplied by the number of partitions minus one. The performance of a RAID level 4 array is always asymmetrical, which means reads outperform writes. This is because write operations consume extra CPU resources and main memory bandwidth when generating parity, and then also consume extra bus bandwidth when writing the actual data to disks because you are not only writing the data, but also the parity. Read operations need only read the data and not the parity unless the array is in a degraded state. As a result, read operations generate less traffic to the drives and across the buses of the computer for the same amount of data transfer under normal operating conditions.
- Level 5
This is the most common type of RAID. By distributing parity across all the member disk drives of an array, RAID level 5 eliminates the write bottleneck inherent in level 4. The only performance bottleneck is the parity calculation process itself. Modern CPUs can calculate parity very fast. However, if you have a large number of disks in a RAID 5 array such that the combined aggregate data transfer speed across all devices is high enough, parity calculation can be a bottleneck.
Level 5 has asymmetrical performance, and reads substantially outperforming writes. The storage capacity of RAID level 5 is calculated the same way as with level 4.
- Level 6
This is a common level of RAID when data redundancy and preservation, and not performance, are the paramount concerns, but where the space inefficiency of level 1 is not acceptable. Level 6 uses a complex parity scheme to be able to recover from the loss of any two drives in the array. This complex parity scheme creates a significantly higher CPU burden on software RAID devices and also imposes an increased burden during write transactions. As such, level 6 is considerably more asymmetrical in performance than levels 4 and 5.
The total capacity of a RAID level 6 array is calculated similarly to RAID level 5 and 4, except that you must subtract two devices instead of one from the device count for the extra parity storage space.
- Level 10
This RAID level attempts to combine the performance advantages of level 0 with the redundancy of level 1. It also reduces some of the space wasted in level 1 arrays with more than two devices. With level 10, it is possible, for example, to create a 3-drive array configured to store only two copies of each piece of data, which then allows the overall array size to be 1.5 times the size of the smallest devices instead of only equal to the smallest device, similar to a 3-device, level 1 array. This avoids CPU process usage to calculate parity similar to RAID level 6, but it is less space efficient.
The creation of RAID level 10 is not supported during installation. It is possible to create one manually after installation.
- Linear RAID
Linear RAID is a grouping of drives to create a larger virtual drive.
In linear RAID, the chunks are allocated sequentially from one member drive, going to the next drive only when the first is completely filled. This grouping provides no performance benefit, as it is unlikely that any I/O operations split between member drives. Linear RAID also offers no redundancy and decreases reliability. If any one member drive fails, the entire array cannot be used and data can be lost. The capacity is the total of all member disks.
68.7.3. LVM RAID segment types
To create a RAID logical volume, you can specify a RAID type by using the --type argument of the lvcreate command. For most users, specifying one of the five available primary types, which are raid1, raid4, raid5, raid6, and raid10, should be sufficient.
The following table describes the possible RAID segment types.
Table 68.4. LVM RAID segment types
| Segment type | Description |
|---|---|
|
|
RAID1 mirroring. This is the default value for the |
|
| RAID4 dedicated parity disk. |
|
|
|
|
|
|
|
|
|
|
|
|
|
|
|
|
|
|
|
|
|
|
|
|
|
| Striping. RAID0 spreads logical volume data across multiple data subvolumes in units of stripe size. This is used to increase performance. Logical volume data is lost if any of the data subvolumes fail. |
68.7.4. Creating RAID logical volumes
You can create RAID1 arrays with multiple numbers of copies, according to the value you specify for the -m argument. Similarly, you can specify the number of stripes for a RAID 0, 4, 5, 6, and 10 logical volume with the -i argument. You can also specify the stripe size with the -I argument. The following procedure describes different ways to create different types of RAID logical volume.
Procedure
Create a 2-way RAID. The following command creates a 2-way RAID1 array, named my_lv, in the volume group my_vg, that is 1G in size:
# lvcreate --type raid1 -m 1 -L 1G -n my_lv my_vg
Logical volume "my_lv" created.
Create a RAID5 array with stripes. The following command creates a RAID5 array with three stripes and one implicit parity drive, named my_lv, in the volume group my_vg, that is 1G in size. Note that you can specify the number of stripes similar to an LVM striped volume. The correct number of parity drives is added automatically.
# lvcreate --type raid5 -i 3 -L 1G -n my_lv my_vg
Create a RAID6 array with stripes. The following command creates a RAID6 array with three 3 stripes and two implicit parity drives, named my_lv, in the volume group my_vg, that is 1G one gigabyte in size:
# lvcreate --type raid6 -i 3 -L 1G -n my_lv my_vg
Verification
- Display the LVM device my_vg/my_lv, which is a 2-way RAID1 array:
# lvs -a -o name,copy_percent,devices _my_vg_
  LV                Copy%  Devices
  my_lv             6.25    my_lv_rimage_0(0),my_lv_rimage_1(0)
  [my_lv_rimage_0]         /dev/sde1(0)
  [my_lv_rimage_1]         /dev/sdf1(1)
  [my_lv_rmeta_0]          /dev/sde1(256)
  [my_lv_rmeta_1]          /dev/sdf1(0)
Additional resources
-
lvcreate(8)andlvmraid(7)man pages
68.7.5. Creating a RAID0 striped logical volume
A RAID0 logical volume spreads logical volume data across multiple data subvolumes in units of stripe size. The following procedure creates an LVM RAID0 logical volume called mylv that stripes data across the disks.
Prerequisites
- You have created three or more physical volumes. For more information on creating physical volumes, see Creating LVM physical volume.
- You have created the volume group. For more information, see Creating LVM volume group.
Procedure
Create a RAID0 logical volume from the existing volume group. The following command creates the RAID0 volume mylv from the volume group myvg, which is 2G in size, with three stripes and a stripe size of 4kB:
# lvcreate --type raid0 -L 2G --stripes 3 --stripesize 4 -n mylv my_vg
  Rounding size 2.00 GiB (512 extents) up to stripe boundary size 2.00 GiB(513 extents).
  Logical volume "mylv" created.
Create a file system on the RAID0 logical volume. The following command creates an ext4 file system on the logical volume:
# mkfs.ext4 /dev/my_vg/mylvMount the logical volume and report the file system disk space usage:
# mount /dev/my_vg/mylv /mnt

# df
Filesystem             1K-blocks     Used  Available  Use% Mounted on
/dev/mapper/my_vg-mylv   2002684     6168  1875072    1%   /mnt
Verification
View the created RAID0 stripped logical volume:
# lvs -a -o +devices,segtype my_vg
  LV VG Attr LSize Pool Origin Data% Meta% Move Log Cpy%Sync Convert Devices Type
  mylv my_vg rwi-a-r--- 2.00g mylv_rimage_0(0),mylv_rimage_1(0),mylv_rimage_2(0) raid0
  [mylv_rimage_0] my_vg iwi-aor--- 684.00m /dev/sdf1(0) linear
  [mylv_rimage_1] my_vg iwi-aor--- 684.00m /dev/sdg1(0) linear
  [mylv_rimage_2] my_vg iwi-aor--- 684.00m /dev/sdh1(0) linear
68.7.6. Parameters for creating a RAID0
You can create a RAID0 striped logical volume using the lvcreate --type raid0[meta] --stripes _Stripes --stripesize StripeSize VolumeGroup [PhysicalVolumePath] command.
The following table describes different parameters, which you can use while creating a RAID0 striped logical volume.
Table 68.5. Parameters for creating a RAID0 striped logical volume
| Parameter | Description |
|---|---|
|
|
Specifying |
|
| Specifies the number of devices to spread the logical volume across. |
|
| Specifies the size of each stripe in kilobytes. This is the amount of data that is written to one device before moving to the next device. |
|
| Specifies the volume group to use. |
|
| Specifies the devices to use. If this is not specified, LVM will choose the number of devices specified by the Stripes option, one for each stripe. |
68.7.7. Soft data corruption
Soft corruption in data storage implies that the data retrieved from a storage device is different from the data written to that device. The corrupted data can exist indefinitely on storage devices. You might not discover this corrupted data until you retrieve and attempt to use this data.
Depending on the type of configuration, a Redundant Array of Independent Disks (RAID) logical volume(LV) prevents data loss when a device fails. If a device consisting of a RAID array fails, the data can be recovered from other devices that are part of that RAID LV. However, a RAID configuration does not ensure the integrity of the data itself. Soft corruption, silent corruption, soft errors, and silent errors are terms that describe data that has become corrupted, even if the system design and software continues to function as expected.
Device mapper (DM) integrity is used with RAID levels 1, 4, 5, 6, and 10 to mitigate or prevent data loss due to soft corruption. The RAID layer ensures that a non-corrupted copy of the data can fix the soft corruption errors. The integrity layer sits above each RAID image while an extra sub LV stores the integrity metadata or data checksums for each RAID image. When you retrieve data from an RAID LV with integrity, the integrity data checksums analyze the data for corruption. If corruption is detected, the integrity layer returns an error message, and the RAID layer retrieves a non-corrupted copy of the data from another RAID image. The RAID layer automatically rewrites non-corrupted data over the corrupted data to repair the soft corruption.
When creating a new RAID LV with DM integrity or adding integrity to an existing RAID LV, consider the following points:
- The integrity metadata requires additional storage space. For each RAID image, every 500MB data requires 4MB of additional storage space because of the checksums that get added to the data.
- While some RAID configurations are impacted more than others, adding DM integrity impacts performance due to latency when accessing the data. A RAID1 configuration typically offers better performance than RAID5 or its variants.
- The RAID integrity block size also impacts performance. Configuring a larger RAID integrity block size offers better performance. However, a smaller RAID integrity block size offers greater backward compatibility.
-
There are two integrity modes available:
bitmaporjournal. Thebitmapintegrity mode typically offers better performance thanjournalmode.
If you experience performance issues, either use RAID1 with integrity or test the performance of a particular RAID configuration to ensure that it meets your requirements.
68.7.8. Creating a RAID LV with DM integrity
When you create a RAID LV with device mapper (DM) integrity or add integrity to an existing RAID LV, it mitigates the risk of losing data due to soft corruption. Wait for the integrity synchronization and the RAID metadata to complete before using the LV. Otherwise, the background initialization might impact the LV’s performance.
Procedure
Create a RAID LV with DM integrity. The following example creates a new RAID LV with integrity named test-lv in the my_vg volume group, with a usable size of 256M and RAID level 1:
# lvcreate --type raid1 --raidintegrity y -L 256M -n test-lv my_vg
Creating integrity metadata LV test-lv_rimage_0_imeta with size 8.00 MiB.
Logical volume "test-lv_rimage_0_imeta" created.
Creating integrity metadata LV test-lv_rimage_1_imeta with size 8.00 MiB.
Logical volume "test-lv_rimage_1_imeta" created.
Logical volume "test-lv" created.
NoteTo add DM integrity to an existing RAID LV, use the following command:
# lvconvert --raidintegrity y my_vg/test-lvAdding integrity to a RAID LV limits the number of operations that you can perform on that RAID LV.
Optional: Remove the integrity before performing certain operations.
# lvconvert --raidintegrity n my_vg/test-lv
Logical volume my_vg/test-lv has removed integrity.
Verification
View information about the added DM integrity:
View information about the test-lv RAID LV that was created in the my_vg volume group:
# lvs -a my_vg
  LV                        VG      Attr       LSize   Origin                 Cpy%Sync
  test-lv                   my_vg rwi-a-r--- 256.00m                          2.10
  [test-lv_rimage_0]        my_vg gwi-aor--- 256.00m [test-lv_rimage_0_iorig] 93.75
  [test-lv_rimage_0_imeta]  my_vg ewi-ao----   8.00m
  [test-lv_rimage_0_iorig]  my_vg -wi-ao---- 256.00m
  [test-lv_rimage_1]        my_vg gwi-aor--- 256.00m [test-lv_rimage_1_iorig] 85.94
 [...]
The following describes different options from this output:
gattribute-
It is the list of attributes under the Attr column indicates that the RAID image is using integrity. The integrity stores the checksums in the
_imetaRAID LV. Cpy%Synccolumn- It indicates the synchronization progress for both the top level RAID LV and for each RAID image.
- RAID image
-
It is is indicated in the LV column by
raid_image_N. LVcolumn- It ensures that the synchronization progress displays 100% for the top level RAID LV and for each RAID image.
Display the type for each RAID LV:
# lvs -a my-vg -o+segtype
  LV                       VG      Attr       LSize   Origin                 Cpy%Sync Type
  test-lv                  my_vg rwi-a-r--- 256.00m                          87.96    raid1
  [test-lv_rimage_0]       my_vg gwi-aor--- 256.00m [test-lv_rimage_0_iorig] 100.00   integrity
  [test-lv_rimage_0_imeta] my_vg ewi-ao----   8.00m                                   linear
  [test-lv_rimage_0_iorig] my_vg -wi-ao---- 256.00m                                   linear
  [test-lv_rimage_1]       my_vg gwi-aor--- 256.00m [test-lv_rimage_1_iorig] 100.00   integrity
 [...]
There is an incremental counter that counts the number of mismatches detected on each RAID image. View the data mismatches detected by integrity from
rimage_0under my_vg/test-lv:# lvs -o+integritymismatches my_vg/test-lv_rimage_0 LV VG Attr LSize Origin Cpy%Sync IntegMismatches [test-lv_rimage_0] my_vg gwi-aor--- 256.00m [test-lv_rimage_0_iorig] 100.00 0In this example, the integrity has not detected any data mismatches and thus the
IntegMismatchescounter shows zero (0).View the data integrity information in the
/var/log/messageslog files, as shown in the following examples:Example 68.2. Example of dm-integrity mismatches from the kernel message logs
device-mapper: integrity: dm-12: Checksum failed at sector 0x24e7
Example 68.3. Example of dm-integrity data corrections from the kernel message logs
md/raid1:mdX: read error corrected (8 sectors at 9448 on dm-16)
Additional resources
-
lvcreate(8)andlvmraid(7)man pages
68.7.9. Minimum and maximum I/O rate options
When you create a RAID logical volumes, the background I/O required to initialize the logical volumes with the sync operation can expel other I/O operations to LVM devices, such as updates to volume group metadata, particularly when you are creating many RAID logical volumes. This can cause the other LVM operations to slow down.
You can control the rate at which a RAID logical volume is initialized by implementing recovery throttling. To control the rate at which sync operations are performed, set the minimum and maximum I/O rate for those operations with the --minrecoveryrate and --maxrecoveryrate options of the lvcreate command.
You can specify these options as follows:
--maxrecoveryrate Rate[bBsSkKmMgG]- Sets the maximum recovery rate for a RAID logical volume so that it will not expel nominal I/O operations. Specify the Rate as an amount per second for each device in the array. If you do not provide a suffix, then it assumes kiB/sec/device. Setting the recovery rate to 0 means it will be unbounded.
--minrecoveryrate Rate[bBsSkKmMgG]- Sets the minimum recovery rate for a RAID logical volume to ensure that I/O for sync operations achieves a minimum throughput, even when heavy nominal I/O is present. Specify the Rate as an amount per second for each device in the array. If you do not give a suffix, then it assumes kiB/sec/device.
For example, use the lvcreate --type raid10 -i 2 -m 1 -L 10G --maxrecoveryrate 128 -n my_lv my_vg command to create a 2-way RAID10 array my_lv, which is in the volume group my_vg with 3 stripes that is 10G in size with a maximum recovery rate of 128 kiB/sec/device. You can also specify minimum and maximum recovery rates for a RAID scrubbing operation.
68.7.10. Converting a Linear device to a RAID logical volume
You can convert an existing linear logical volume to a RAID logical volume. To perform this operation, use the --type argument of the lvconvert command.
RAID logical volumes are composed of metadata and data subvolume pairs. When you convert a linear device to a RAID1 array, it creates a new metadata subvolume and associates it with the original logical volume on one of the same physical volumes that the linear volume is on. The additional images are added in a metadata/data subvolume pair. If the metadata image that pairs with the original logical volume cannot be placed on the same physical volume, the lvconvert fails.
Procedure
View the logical volume device that needs to be converted:
# lvs -a -o name,copy_percent,devices my_vg
  LV     Copy%  Devices
  my_lv         /dev/sde1(0)
Convert the linear logical volume to a RAID device. The following command converts the linear logical volume my_lv in volume group __my_vg, to a 2-way RAID1 array:
# lvconvert --type raid1 -m 1 my_vg/my_lv
  Are you sure you want to convert linear LV my_vg/my_lv to raid1 with 2 images enhancing resilience? [y/n]: y
  Logical volume my_vg/my_lv successfully converted.
Verification
Ensure if the logical volume is converted to a RAID device:
# lvs -a -o name,copy_percent,devices my_vg
  LV               Copy%  Devices
  my_lv            6.25   my_lv_rimage_0(0),my_lv_rimage_1(0)
  [my_lv_rimage_0]        /dev/sde1(0)
  [my_lv_rimage_1]        /dev/sdf1(1)
  [my_lv_rmeta_0]         /dev/sde1(256)
  [my_lv_rmeta_1]         /dev/sdf1(0)
Additional resources
-
The
lvconvert(8)man page
68.7.11. Converting an LVM RAID1 logical volume to an LVM linear logical volume
You can convert an existing RAID1 LVM logical volume to an LVM linear logical volume. To perform this operation, use the lvconvert command and specify the -m0 argument. This removes all the RAID data subvolumes and all the RAID metadata subvolumes that make up the RAID array, leaving the top-level RAID1 image as the linear logical volume.
Procedure
Display an existing LVM RAID1 logical volume:
# lvs -a -o name,copy_percent,devices my_vg
  LV               Copy%  Devices
  my_lv            100.00 my_lv_rimage_0(0),my_lv_rimage_1(0)
  [my_lv_rimage_0]        /dev/sde1(1)
  [my_lv_rimage_1]        /dev/sdf1(1)
  [my_lv_rmeta_0]         /dev/sde1(0)
  [my_lv_rmeta_1]         /dev/sdf1(0)
Convert an existing RAID1 LVM logical volume to an LVM linear logical volume. The following command converts the LVM RAID1 logical volume my_vg/my_lv to an LVM linear device:
# lvconvert -m0 my_vg/my_lv
  Are you sure you want to convert raid1 LV my_vg/my_lv to type linear losing all resilience? [y/n]: y
  Logical volume my_vg/my_lv successfully converted.
When you convert an LVM RAID1 logical volume to an LVM linear volume, you can also specify which physical volumes to remove. In the following example, the
lvconvertcommand specifies that you want to remove /dev/sde1, leaving /dev/sdf1 as the physical volume that makes up the linear device:# lvconvert -m0 my_vg/my_lv /dev/sde1
Verification
Verify if the RAID1 logical volume was converted to an LVM linear device:
# lvs -a -o name,copy_percent,devices my_vg
  LV    Copy%  Devices
  my_lv        /dev/sdf1(1)
Additional resources
-
The
lvconvert(8)man page
68.7.12. Converting a mirrored LVM device to a RAID1 logical volume
You can convert an existing mirrored LVM device with a segment type mirror to a RAID1 LVM device. To perform this operation, use the lvconvert command with the --type raid1 argument. This renames the mirror subvolumes named mimage to RAID subvolumes named rimage.
In addition, it also removes the mirror log and and creates metadata subvolumes named rmeta for the data subvolumes on the same physical volumes as the corresponding data subvolumes.
Procedure
View the layout of a mirrored logical volume my_vg/my_lv:
# lvs -a -o name,copy_percent,devices my_vg
  LV               Copy%  Devices
  my_lv             15.20 my_lv_mimage_0(0),my_lv_mimage_1(0)
  [my_lv_mimage_0]        /dev/sde1(0)
  [my_lv_mimage_1]        /dev/sdf1(0)
  [my_lv_mlog]            /dev/sdd1(0)
Convert the mirrored logical volume my_vg/my_lv to a RAID1 logical volume:
# lvconvert --type raid1 my_vg/my_lv
Are you sure you want to convert mirror LV my_vg/my_lv to raid1 type? [y/n]: y
Logical volume my_vg/my_lv successfully converted.
Verification
Verify if the mirrored logical volume is converted to a RAID1 logical volume:
# lvs -a -o name,copy_percent,devices my_vg
  LV               Copy%  Devices
  my_lv            100.00 my_lv_rimage_0(0),my_lv_rimage_1(0)
  [my_lv_rimage_0]        /dev/sde1(0)
  [my_lv_rimage_1]        /dev/sdf1(0)
  [my_lv_rmeta_0]         /dev/sde1(125)
  [my_lv_rmeta_1]         /dev/sdf1(125)
Additional resources
-
The
lvconvert(8)man page
68.7.13. Resizing a RAID logical volume
You can resize a RAID logical volume in the following ways;
-
You can increase the size of a RAID logical volume of any type with the
lvresizeorlvextendcommand. This does not change the number of RAID images. For striped RAID logical volumes the same stripe rounding constraints apply as when you create a striped RAID logical volume.
-
You can reduce the size of a RAID logical volume of any type with the
lvresizeorlvreducecommand. This does not change the number of RAID images. As with thelvextendcommand, the same stripe rounding constraints apply as when you create a striped RAID logical volume.
-
You can change the number of stripes on a striped RAID logical volume (
raid4/5/6/10) with the--stripes Nparameter of thelvconvertcommand. This increases or reduces the size of the RAID logical volume by the capacity of the stripes added or removed. Note thatraid10volumes are capable only of adding stripes. This capability is part of the RAID reshaping feature that allows you to change attributes of a RAID logical volume while keeping the same RAID level. For information on RAID reshaping and examples of using thelvconvertcommand to reshape a RAID logical volume, see thelvmraid(7) man page.
68.7.14. Changing the number of images in an existing RAID1 device
You can change the number of images in an existing RAID1 array, similar to the way you can change the number of images in the implementation of LVM mirroring.
When you add images to a RAID1 logical volume with the lvconvert command, you can perform the following operations:
- specify the total number of images for the resulting device,
- how many images to add to the device, and
- can optionally specify on which physical volumes the new metadata/data image pairs reside.
Procedure
Display the LVM device my_vg/my_lv, which is a 2-way RAID1 array:
# lvs -a -o name,copy_percent,devices my_vg
  LV                Copy%  Devices
  my_lv             6.25    my_lv_rimage_0(0),my_lv_rimage_1(0)
  [my_lv_rimage_0]         /dev/sde1(0)
  [my_lv_rimage_1]         /dev/sdf1(1)
  [my_lv_rmeta_0]          /dev/sde1(256)
  [my_lv_rmeta_1]          /dev/sdf1(0)
Metadata subvolumes named
rmetaalways exist on the same physical devices as their data subvolume counterpartsrimage. The metadata/data subvolume pairs will not be created on the same physical volumes as those from another metadata/data subvolume pair in the RAID array unless you specify--allocanywhere.Convert the 2-way RAID1 logical volume my_vg/my_lv to a 3-way RAID1 logical volume:
# lvconvert -m 2 my_vg/my_lv
Are you sure you want to convert raid1 LV my_vg/my_lv to 3 images enhancing resilience? [y/n]: y
Logical volume my_vg/my_lv successfully converted.
The following are a few examples of changing the number of images in an existing RAID1 device:
You can also specify which physical volumes to use while adding an image to RAID. The following command converts the 2-way RAID1 logical volume my_vg/my_lv to a 3-way RAID1 logical volume, specifying that the physical volume /dev/sdd1 be used for the array:
# lvconvert -m 2 my_vg/my_lv /dev/sdd1Convert the 3-way RAID1 logical volume into a 2-way RAID1 logical volume:
# lvconvert -m1 my_vg/my_lv
Are you sure you want to convert raid1 LV my_vg/my_lv to 2 images reducing resilience? [y/n]: y
Logical volume my_vg/my_lv successfully converted.
Convert the 3-way RAID1 logical volume into a 2-way RAID1 logical volume by specifying the physical volume /dev/sde1, which contains the image to remove:
# lvconvert -m1 my_vg/my_lv /dev/sde1Additionally, when you remove an image and its associated metadata subvolume volume, any higher-numbered images will be shifted down to fill the slot. Removing
lv_rimage_1from a 3-way RAID1 array that consists oflv_rimage_0,lv_rimage_1, andlv_rimage_2results in a RAID1 array that consists oflv_rimage_0andlv_rimage_1. The subvolumelv_rimage_2will be renamed and take over the empty slot, becominglv_rimage_1.
Verification
View the RAID1 device after changing the number of images in an existing RAID1 device:
# lvs -a -o name,copy_percent,devices my_vg
  LV Cpy%Sync Devices
  my_lv 100.00 my_lv_rimage_0(0),my_lv_rimage_1(0),my_lv_rimage_2(0)
  [my_lv_rimage_0] /dev/sdd1(1)
  [my_lv_rimage_1] /dev/sde1(1)
  [my_lv_rimage_2] /dev/sdf1(1)
  [my_lv_rmeta_0] /dev/sdd1(0)
  [my_lv_rmeta_1] /dev/sde1(0)
  [my_lv_rmeta_2] /dev/sdf1(0)
Additional resources
-
The
lvconvert(8)man page
68.7.15. Splitting off a RAID image as a separate logical volume
You can split off an image of a RAID logical volume to form a new logical volume. When you are removing a RAID image from an existing RAID1 logical volume or removing a RAID data subvolume and its associated metadata subvolume from the middle of the device, any higher numbered images will be shifted down to fill the slot. The index numbers on the logical volumes that make up a RAID array will thus be an unbroken sequence of integers.
You cannot split off a RAID image if the RAID1 array is not yet in sync.
Procedure
Display the LVM device my_vg/my_lv, which is a 2-way RAID1 array:
# lvs -a -o name,copy_percent,devices my_vg
  LV               Copy%  Devices
  my_lv             12.00 my_lv_rimage_0(0),my_lv_rimage_1(0)
  [my_lv_rimage_0]        /dev/sde1(1)
  [my_lv_rimage_1]        /dev/sdf1(1)
  [my_lv_rmeta_0]         /dev/sde1(0)
  [my_lv_rmeta_1]         /dev/sdf1(0)
Split the RAID image into a separate logical volume. The following example splits a 2-way RAID1 logical volume, my_lv, into two linear logical volumes, my_lv and new:
# lvconvert --splitmirror 1 -n new my_vg/my_lv
Are you sure you want to split raid1 LV my_vg/my_lv losing all resilience? [y/n]: y
Split a 3-way RAID1 logical volume, my_lv, into a 2-way RAID1 logical volume, my_lv, and a linear logical volume, new:
# lvconvert --splitmirror 1 -n new my_vg/my_lv
Verification
View the logical volume after you split off an image of a RAID logical volume:
# lvs -a -o name,copy_percent,devices my_vg
  LV      Copy%  Devices
  my_lv          /dev/sde1(1)
  new            /dev/sdf1(1)
Additional resources
-
The
lvconvert(8)man page
68.7.16. Splitting and Merging a RAID Image
You can temporarily split off an image of a RAID1 array for read-only use while tracking any changes by using the --trackchanges argument with the --splitmirrors argument of the lvconvert command. Using this feature, you can merge the image into an array at a later time while resyncing only those portions of the array that have changed since the image was split.
When you split off a RAID image with the --trackchanges argument, you can specify which image to split but you cannot change the name of the volume being split. In addition, the resulting volumes have the following constraints:
- The new volume you create is read-only.
- You cannot resize the new volume.
- You cannot rename the remaining array.
- You cannot resize the remaining array.
- You can activate the new volume and the remaining array independently.
You can merge an image that was split off. When you merge the image, only the portions of the array that have changed since the image was split are resynced.
Procedure
Create a RAID logical volume:
# lvcreate --type raid1 -m 2 -L 1G -n my_lv my_vg
  Logical volume "my_lv" created
Optional: View the created RAID logical volume:
# lvs -a -o name,copy_percent,devices my_vg
  LV               Copy%  Devices
  my_lv          100.00 my_lv_rimage_0(0),my_lv_rimage_1(0),my_lv_rimage_2(0)
  [my_lv_rimage_0]        /dev/sdb1(1)
  [my_lv_rimage_1]        /dev/sdc1(1)
  [my_lv_rimage_2]        /dev/sdd1(1)
  [my_lv_rmeta_0]         /dev/sdb1(0)
  [my_lv_rmeta_1]         /dev/sdc1(0)
  [my_lv_rmeta_2]         /dev/sdd1(0)
Split an image from the created RAID logical volume and track the changes to the remaining array:
# lvconvert --splitmirrors 1 --trackchanges my_vg/my_lv
  my_lv_rimage_2 split from my_lv for read-only purposes.
  Use 'lvconvert --merge my_vg/my_lv_rimage_2' to merge back into my_lv
Optional: View the logical volume after splitting the image:
# lvs -a -o name,copy_percent,devices my_vg
  LV               Copy%  Devices
  my_lv            100.00 my_lv_rimage_0(0),my_lv_rimage_1(0)
  [my_lv_rimage_0]        /dev/sdc1(1)
  [my_lv_rimage_1]          /dev/sdd1(1)
  [my_lv_rmeta_0]         /dev/sdc1(0)
  [my_lv_rmeta_1]         /dev/sdd1(0)
Merge the volume back into the array:
# lvconvert --merge my_vg/my_lv_rimage_1
  my_vg/my_lv_rimage_1 successfully merged back into my_vg/my_lv
Verification
View the merged logical volume:
# lvs -a -o name,copy_percent,devices my_vg
  LV               Copy%  Devices
  my_lv            100.00 my_lv_rimage_0(0),my_lv_rimage_1(0)
  [my_lv_rimage_0]        /dev/sdc1(1)
  [my_lv_rimage_1]        /dev/sdd1(1)
  [my_lv_rmeta_0]         /dev/sdc1(0)
  [my_lv_rmeta_1]         /dev/sdd1(0)
Additional resources
-
The
lvconvert(8)man page
68.7.17. Setting a RAID fault policy
LVM RAID handles device failures in an automatic fashion based on the preferences defined by the raid_fault_policy field in the lvm.conf file.
-
If the
raid_fault_policyfield is set toallocate, the system will attempt to replace the failed device with a spare device from the volume group. If there is no available spare device, this will be reported to the system log. -
If the
raid_fault_policyfield is set towarn, the system will produce a warning and the log will indicate that a device has failed. This allows the user to determine the course of action to take.
As long as there are enough devices remaining to support usability, the RAID logical volume will continue to operate.
68.7.17.1. The allocate RAID Fault Policy
In the following example, the raid_fault_policy field has been set to allocate in the lvm.conf file. The RAID logical volume is laid out as follows.
# lvs -a -o name,copy_percent,devices my_vg
  LV               Copy%  Devices
  my_lv            100.00 my_lv_rimage_0(0),my_lv_rimage_1(0),my_lv_rimage_2(0)
  [my_lv_rimage_0]        /dev/sde1(1)
  [my_lv_rimage_1]        /dev/sdf1(1)
  [my_lv_rimage_2]        /dev/sdg1(1)
  [my_lv_rmeta_0]         /dev/sde1(0)
  [my_lv_rmeta_1]         /dev/sdf1(0)
  [my_lv_rmeta_2]         /dev/sdg1(0)
If the /dev/sde device fails, the system log will display error messages.
# grep lvm /var/log/messages
Jan 17 15:57:18 bp-01 lvm[8599]: Device #0 of raid1 array, my_vg-my_lv, has failed.
Jan 17 15:57:18 bp-01 lvm[8599]: /dev/sde1: read failed after 0 of 2048 at
250994294784: Input/output error
Jan 17 15:57:18 bp-01 lvm[8599]: /dev/sde1: read failed after 0 of 2048 at
250994376704: Input/output error
Jan 17 15:57:18 bp-01 lvm[8599]: /dev/sde1: read failed after 0 of 2048 at 0:
Input/output error
Jan 17 15:57:18 bp-01 lvm[8599]: /dev/sde1: read failed after 0 of 2048 at
4096: Input/output error
Jan 17 15:57:19 bp-01 lvm[8599]: Couldn't find device with uuid
3lugiV-3eSP-AFAR-sdrP-H20O-wM2M-qdMANy.
Jan 17 15:57:27 bp-01 lvm[8599]: raid1 array, my_vg-my_lv, is not in-sync.
Jan 17 15:57:36 bp-01 lvm[8599]: raid1 array, my_vg-my_lv, is now in-sync.
Since the raid_fault_policy field has been set to allocate, the failed device is replaced with a new device from the volume group.
# lvs -a -o name,copy_percent,devices vg
  Couldn't find device with uuid 3lugiV-3eSP-AFAR-sdrP-H20O-wM2M-qdMANy.
  LV            Copy%  Devices
  lv            100.00 lv_rimage_0(0),lv_rimage_1(0),lv_rimage_2(0)
  [lv_rimage_0]        /dev/sdh1(1)
  [lv_rimage_1]        /dev/sdf1(1)
  [lv_rimage_2]        /dev/sdg1(1)
  [lv_rmeta_0]         /dev/sdh1(0)
  [lv_rmeta_1]         /dev/sdf1(0)
  [lv_rmeta_2]         /dev/sdg1(0)
Note that even though the failed device has been replaced, the display still indicates that LVM could not find the failed device. This is because, although the failed device has been removed from the RAID logical volume, the failed device has not yet been removed from the volume group. To remove the failed device from the volume group, you can execute vgreduce --removemissing VG.
If the raid_fault_policy has been set to allocate but there are no spare devices, the allocation will fail, leaving the logical volume as it is. If the allocation fails, you have the option of fixing the drive, then initiating recovery of the failed device with the --refresh option of the lvchange command. Alternately, you can replace the failed device.
68.7.17.2. The warn RAID Fault Policy
In the following example, the raid_fault_policy field has been set to warn in the lvm.conf file. The RAID logical volume is laid out as follows.
# lvs -a -o name,copy_percent,devices my_vg
  LV               Copy%  Devices
  my_lv            100.00 my_lv_rimage_0(0),my_lv_rimage_1(0),my_lv_rimage_2(0)
  [my_lv_rimage_0]        /dev/sdh1(1)
  [my_lv_rimage_1]        /dev/sdf1(1)
  [my_lv_rimage_2]        /dev/sdg1(1)
  [my_lv_rmeta_0]         /dev/sdh1(0)
  [my_lv_rmeta_1]         /dev/sdf1(0)
  [my_lv_rmeta_2]         /dev/sdg1(0)
If the /dev/sdh device fails, the system log will display error messages. In this case, however, LVM will not automatically attempt to repair the RAID device by replacing one of the images. Instead, if the device has failed you can replace the device with the --repair argument of the lvconvert command.
68.7.18. Replacing a RAID device in a logical volume
You can replace a RAID device in a logical volume.
- If there has been no failure on the RAID device, follow Section 68.7.18.1, “Replacing a RAID device that has not failed”.
- If the RAID device has failed, follow Section 68.7.18.4, “Replacing a failed RAID device in a logical volume”.
68.7.18.1. Replacing a RAID device that has not failed
To replace a RAID device in a logical volume, use the --replace argument of the lvconvert command.
Prerequisites
- The RAID device has not failed. The following commands will not work if the RAID device has failed.
Procedure
Replace the RAID device:
# lvconvert --replace dev_to_remove vg/lv possible_replacements
- Replace dev_to_remove with the path to the physical volume that you want to replace.
- Replace vg/lv with the volume group and logical volume name of the RAID array.
- Replace possible_replacements with the path to the physical volume that you want to use as a replacement.
Example 68.4. Replacing a RAID1 device
The following example creates a RAID1 logical volume and then replaces a device in that volume.
Create the RAID1 array:
# lvcreate --type raid1 -m 2 -L 1G -n my_lv my_vg

  Logical volume "my_lv" created
Examine the RAID1 array:
# lvs -a -o name,copy_percent,devices my_vg

  LV               Copy%  Devices
  my_lv            100.00 my_lv_rimage_0(0),my_lv_rimage_1(0),my_lv_rimage_2(0)
  [my_lv_rimage_0]        /dev/sdb1(1)
  [my_lv_rimage_1]        /dev/sdb2(1)
  [my_lv_rimage_2]        /dev/sdc1(1)
  [my_lv_rmeta_0]         /dev/sdb1(0)
  [my_lv_rmeta_1]         /dev/sdb2(0)
  [my_lv_rmeta_2]         /dev/sdc1(0)
Replace the
/dev/sdb2physical volume:# lvconvert --replace /dev/sdb2 my_vg/my_lv
Examine the RAID1 array with the replacement:
# lvs -a -o name,copy_percent,devices my_vg

  LV               Copy%  Devices
  my_lv             37.50 my_lv_rimage_0(0),my_lv_rimage_1(0),my_lv_rimage_2(0)
  [my_lv_rimage_0]        /dev/sdb1(1)
  [my_lv_rimage_1]        /dev/sdc2(1)
  [my_lv_rimage_2]        /dev/sdc1(1)
  [my_lv_rmeta_0]         /dev/sdb1(0)
  [my_lv_rmeta_1]         /dev/sdc2(0)
  [my_lv_rmeta_2]         /dev/sdc1(0)
Example 68.5. Specifying the replacement physical volume
The following example creates a RAID1 logical volume and then replaces a device in that volume, specifying which physical volume to use for the replacement.
Create the RAID1 array:
# lvcreate --type raid1 -m 1 -L 100 -n my_lv my_vg

  Logical volume "my_lv" created
Examine the RAID1 array:
# lvs -a -o name,copy_percent,devices my_vg

  LV               Copy%  Devices
  my_lv            100.00 my_lv_rimage_0(0),my_lv_rimage_1(0)
  [my_lv_rimage_0]        /dev/sda1(1)
  [my_lv_rimage_1]        /dev/sdb1(1)
  [my_lv_rmeta_0]         /dev/sda1(0)
  [my_lv_rmeta_1]         /dev/sdb1(0)
Examine the physical volumes:
# pvs

  PV          VG       Fmt  Attr PSize    PFree
  /dev/sda1   my_vg    lvm2 a--  1020.00m  916.00m
  /dev/sdb1   my_vg    lvm2 a--  1020.00m  916.00m
  /dev/sdc1   my_vg    lvm2 a--  1020.00m 1020.00m
  /dev/sdd1   my_vg    lvm2 a--  1020.00m 1020.00m
Replace the
/dev/sdb1physical volume with/dev/sdd1:# lvconvert --replace /dev/sdb1 my_vg/my_lv /dev/sdd1
Examine the RAID1 array with the replacement:
# lvs -a -o name,copy_percent,devices my_vg

  LV               Copy%  Devices
  my_lv             28.00 my_lv_rimage_0(0),my_lv_rimage_1(0)
  [my_lv_rimage_0]        /dev/sda1(1)
  [my_lv_rimage_1]        /dev/sdd1(1)
  [my_lv_rmeta_0]         /dev/sda1(0)
  [my_lv_rmeta_1]         /dev/sdd1(0)
Example 68.6. Replacing multiple RAID devices
You can replace more than one RAID device at a time by specifying multiple replace arguments, as in the following example.
Create a RAID1 array:
# lvcreate --type raid1 -m 2 -L 100 -n my_lv my_vg

  Logical volume "my_lv" created
Examine the RAID1 array:
# lvs -a -o name,copy_percent,devices my_vg

  LV               Copy%  Devices
  my_lv            100.00 my_lv_rimage_0(0),my_lv_rimage_1(0),my_lv_rimage_2(0)
  [my_lv_rimage_0]        /dev/sda1(1)
  [my_lv_rimage_1]        /dev/sdb1(1)
  [my_lv_rimage_2]        /dev/sdc1(1)
  [my_lv_rmeta_0]         /dev/sda1(0)
  [my_lv_rmeta_1]         /dev/sdb1(0)
  [my_lv_rmeta_2]         /dev/sdc1(0)
Replace the
/dev/sdb1and/dev/sdc1physical volumes:# lvconvert --replace /dev/sdb1 --replace /dev/sdc1 my_vg/my_lv
Examine the RAID1 array with the replacements:
# lvs -a -o name,copy_percent,devices my_vg

  LV               Copy%  Devices
  my_lv             60.00 my_lv_rimage_0(0),my_lv_rimage_1(0),my_lv_rimage_2(0)
  [my_lv_rimage_0]        /dev/sda1(1)
  [my_lv_rimage_1]        /dev/sdd1(1)
  [my_lv_rimage_2]        /dev/sde1(1)
  [my_lv_rmeta_0]         /dev/sda1(0)
  [my_lv_rmeta_1]         /dev/sdd1(0)
  [my_lv_rmeta_2]         /dev/sde1(0)
68.7.18.2. Failed devices in LVM RAID
RAID is not like traditional LVM mirroring. LVM mirroring required failed devices to be removed or the mirrored logical volume would hang. RAID arrays can keep on running with failed devices. In fact, for RAID types other than RAID1, removing a device would mean converting to a lower level RAID (for example, from RAID6 to RAID5, or from RAID4 or RAID5 to RAID0).
Therefore, rather than removing a failed device unconditionally and potentially allocating a replacement, LVM allows you to replace a failed device in a RAID volume in a one-step solution by using the --repair argument of the lvconvert command.
68.7.18.3. Recovering a failed RAID device in a logical volume
If the LVM RAID device failure is a transient failure or you are able to repair the device that failed, you can initiate recovery of the failed device.
Prerequisites
- The previously failed device is now working.
Procedure
Refresh the logical volume that contains the RAID device:
# lvchange --refresh my_vg/my_lv
Verification steps
Examine the logical volume with the recovered device:
# lvs --all --options name,devices,lv_attr,lv_health_status my_vg
68.7.18.4. Replacing a failed RAID device in a logical volume
This procedure replaces a failed device that serves as a physical volume in an LVM RAID logical volume.
Prerequisites
The volume group includes a physical volume that provides enough free capacity to replace the failed device.
If no physical volume with sufficient free extents is available on the volume group, add a new, sufficiently large physical volume using the
vgextendutility.
Procedure
In the following example, a RAID logical volume is laid out as follows:
# lvs --all --options name,copy_percent,devices my_vg

  LV               Cpy%Sync Devices
  my_lv            100.00   my_lv_rimage_0(0),my_lv_rimage_1(0),my_lv_rimage_2(0)
  [my_lv_rimage_0]          /dev/sde1(1)
  [my_lv_rimage_1]          /dev/sdc1(1)
  [my_lv_rimage_2]          /dev/sdd1(1)
  [my_lv_rmeta_0]           /dev/sde1(0)
  [my_lv_rmeta_1]           /dev/sdc1(0)
  [my_lv_rmeta_2]           /dev/sdd1(0)
If the
/dev/sdcdevice fails, the output of thelvscommand is as follows:# lvs --all --options name,copy_percent,devices my_vg /dev/sdc: open failed: No such device or address Couldn't find device with uuid A4kRl2-vIzA-uyCb-cci7-bOod-H5tX-IzH4Ee. WARNING: Couldn't find all devices for LV my_vg/my_lv_rimage_1 while checking used and assumed devices. WARNING: Couldn't find all devices for LV my_vg/my_lv_rmeta_1 while checking used and assumed devices. LV Cpy%Sync Devices my_lv 100.00 my_lv_rimage_0(0),my_lv_rimage_1(0),my_lv_rimage_2(0) [my_lv_rimage_0] /dev/sde1(1) [my_lv_rimage_1] [unknown](1) [my_lv_rimage_2] /dev/sdd1(1) [my_lv_rmeta_0] /dev/sde1(0) [my_lv_rmeta_1] [unknown](0) [my_lv_rmeta_2] /dev/sdd1(0)
Replace the failed device and display the logical volume:
# lvconvert --repair my_vg/my_lv

  /dev/sdc: open failed: No such device or address
  Couldn't find device with uuid A4kRl2-vIzA-uyCb-cci7-bOod-H5tX-IzH4Ee.
  WARNING: Couldn't find all devices for LV my_vg/my_lv_rimage_1 while checking used and assumed devices.
  WARNING: Couldn't find all devices for LV my_vg/my_lv_rmeta_1 while checking used and assumed devices.
Attempt to replace failed RAID images (requires full device resync)? [y/n]: y
  Faulty devices in my_vg/my_lv successfully replaced.
Optional: To manually specify the physical volume that replaces the failed device, add the physical volume at the end of the command:
# lvconvert --repair my_vg/my_lv replacement_pv
Examine the logical volume with the replacement:
# lvs --all --options name,copy_percent,devices my_vg

  /dev/sdc: open failed: No such device or address
  /dev/sdc1: open failed: No such device or address
  Couldn't find device with uuid A4kRl2-vIzA-uyCb-cci7-bOod-H5tX-IzH4Ee.
  LV               Cpy%Sync Devices
  my_lv            43.79    my_lv_rimage_0(0),my_lv_rimage_1(0),my_lv_rimage_2(0)
  [my_lv_rimage_0]          /dev/sde1(1)
  [my_lv_rimage_1]          /dev/sdb1(1)
  [my_lv_rimage_2]          /dev/sdd1(1)
  [my_lv_rmeta_0]           /dev/sde1(0)
  [my_lv_rmeta_1]           /dev/sdb1(0)
  [my_lv_rmeta_2]           /dev/sdd1(0)
Until you remove the failed device from the volume group, LVM utilities still indicate that LVM cannot find the failed device.
Remove the failed device from the volume group:
# vgreduce --removemissing VG
68.7.19. Checking data coherency in a RAID logical volume (RAID scrubbing)
LVM provides scrubbing support for RAID logical volumes. RAID scrubbing is the process of reading all the data and parity blocks in an array and checking to see whether they are coherent.
Procedure
Optional: Limit the I/O bandwidth that the scrubbing process uses.
When you perform a RAID scrubbing operation, the background I/O required by the
syncoperations can crowd out other I/O to LVM devices, such as updates to volume group metadata. This might cause the other LVM operations to slow down. You can control the rate of the scrubbing operation by implementing recovery throttling.Add the following options to the
lvchange --syncactioncommands in the next steps:--maxrecoveryrate Rate[bBsSkKmMgG]- Sets the maximum recovery rate so that the operation does crowd out nominal I/O operations. Setting the recovery rate to 0 means that the operation is unbounded.
--minrecoveryrate Rate[bBsSkKmMgG]-
Sets the minimum recovery rate to ensure that I/O for
syncoperations achieves a minimum throughput, even when heavy nominal I/O is present.
Specify the Rate value as an amount per second for each device in the array. If you provide no suffix, the options assume kiB per second per device.
Display the number of discrepancies in the array, without repairing them:
# lvchange --syncaction check vg/raid_lvCorrect the discrepancies in the array:
# lvchange --syncaction repair vg/raid_lvNoteThe
lvchange --syncaction repairoperation does not perform the same function as thelvconvert --repairoperation:-
The
lvchange --syncaction repairoperation initiates a background synchronization operation on the array. -
The
lvconvert --repairoperation repairs or replaces failed devices in a mirror or RAID logical volume.
-
The
Optional: Display information about the scrubbing operation:
# lvs -o +raid_sync_action,raid_mismatch_count vg/lvThe
raid_sync_actionfield displays the current synchronization operation that the RAID volume is performing. It can be one of the following values:idle- All sync operations complete (doing nothing)
resync- Initializing an array or recovering after a machine failure
recover- Replacing a device in the array
check- Looking for array inconsistencies
repair- Looking for and repairing inconsistencies
-
The
raid_mismatch_countfield displays the number of discrepancies found during acheckoperation. -
The
Cpy%Syncfield displays the progress of thesyncoperations. The
lv_attrfield provides additional indicators. Bit 9 of this field displays the health of the logical volume, and it supports the following indicators:-
m(mismatches) indicates that there are discrepancies in a RAID logical volume. This character is shown after a scrubbing operation has detected that portions of the RAID are not coherent. -
r(refresh) indicates that a device in a RAID array has suffered a failure and the kernel regards it as failed, even though LVM can read the device label and considers the device to be operational. Refresh the logical volume to notify the kernel that the device is now available, or replace the device if you suspect that it failed.
-
Additional resources
-
For more information, see the
lvchange(8)andlvmraid(7)man pages.
68.7.20. Converting a RAID level (RAID takeover)
LVM supports Raid takeover, which means converting a RAID logical volume from one RAID level to another (such as from RAID 5 to RAID 6). Changing the RAID level is usually done to increase or decrease resilience to device failures or to restripe logical volumes. You use the lvconvert for RAID takeover. For information on RAID takeover and for examples of using the lvconvert to convert a RAID logical volume, see the lvmraid(7) man page.
68.7.21. Changing attributes of a RAID volume (RAID reshape)
RAID reshaping means changing attributes of a RAID logical volume while keeping the same RAID level. Some attributes you can change include RAID layout, stripe size, and number of stripes. For information on RAID reshaping and examples of using the lvconvert command to reshape a RAID logical volume, see the lvmraid(7) man page.
68.7.22. Controlling I/O Operations on a RAID1 logical volume
You can control the I/O operations for a device in a RAID1 logical volume by using the --writemostly and --writebehind parameters of the lvchange command. The format for using these parameters is as follows.
--[raid]writemostly PhysicalVolume[:{t|y|n}]Marks a device in a RAID1 logical volume as
write-mostly. All reads to these drives will be avoided unless necessary. Setting this parameter keeps the number of I/O operations to the drive to a minimum. By default, thewrite-mostlyattribute is set to yes for the specified physical volume in the logical volume. It is possible to remove thewrite-mostlyflag by appending:nto the physical volume or to toggle the value by specifying:t. The--writemostlyargument can be specified more than one time in a single command, making it possible to toggle the write-mostly attributes for all the physical volumes in a logical volume at once.--[raid]writebehind IOCountSpecifies the maximum number of outstanding writes that are allowed to devices in a RAID1 logical volume that are marked as
write-mostly. Once this value is exceeded, writes become synchronous, causing all writes to the constituent devices to complete before the array signals the write has completed. Setting the value to zero clears the preference and allows the system to choose the value arbitrarily.
68.7.23. Changing the region size on a RAID logical volume
When you create a RAID logical volume, the region size for the logical volume will be the value of the raid_region_size parameter in the /etc/lvm/lvm.conf file. You can override this default value with the -R option of the lvcreate command.
After you have created a RAID logical volume, you can change the region size of the volume with the -R option of the lvconvert command. The following example changes the region size of logical volume vg/raidlv to 4096K. The RAID volume must be synced in order to change the region size.
#lvconvert -R 4096K vg/raid1Do you really want to change the region_size 512.00 KiB of LV vg/raid1 to 4.00 MiB? [y/n]:yChanged region size on RAID LV vg/raid1 to 4.00 MiB.
68.8. Snapshot of logical volumes
Using the LVM snapshot feature, you can create virtual images of a volume, for example, /dev/sda, at a particular instant without causing a service interruption.
68.8.1. Overview of snapshot volumes
When you modify the original volume (the origin) after you take a snapshot, the snapshot feature makes a copy of the modified data area as it was prior to the change so that it can reconstruct the state of the volume. When you create a snapshot, full read and write access to the origin stays possible.
Since a snapshot copies only the data areas that change after the snapshot is created, the snapshot feature requires a minimal amount of storage. For example, with a rarely updated origin, 3-5 % of the origin’s capacity is sufficient to maintain the snapshot. It does not provide a substitute for a backup procedure. Snapshot copies are virtual copies and are not an actual media backup.
The size of the snapshot controls the amount of space set aside for storing the changes to the origin volume. For example, if you create a snapshot and then completely overwrite the origin, the snapshot should be at least as big as the origin volume to hold the changes. You should regularly monitor the size of the snapshot. For example, a short-lived snapshot of a read-mostly volume, such as /usr, would need less space than a long-lived snapshot of a volume because it contains many writes, such as /home.
If a snapshot is full, the snapshot becomes invalid because it can no longer track changes on the origin volume. But you can configure LVM to automatically extend a snapshot whenever its usage exceeds the snapshot_autoextend_threshold value to avoid snapshot becoming invalid. Snapshots are fully resizable and you can perform the following operations:
- If you have the storage capacity, you can increase the size of the snapshot volume to prevent it from getting dropped.
- If the snapshot volume is larger than you need, you can reduce the size of the volume to free up space that is needed by other logical volumes.
The snapshot volume provide the following benefits:
- Most typically, you take a snapshot when you need to perform a backup on a logical volume without halting the live system that is continuously updating the data.
-
You can execute the
fsckcommand on a snapshot file system to check the file system integrity and determine if the original file system requires file system repair. - Since the snapshot is read/write, you can test applications against production data by taking a snapshot and running tests against the snapshot without touching the real data.
- You can create LVM volumes for use with Red Hat Virtualization. You can use LVM snapshots to create snapshots of virtual guest images. These snapshots can provide a convenient way to modify existing guests or create new guests with minimal additional storage.
68.8.2. Creating a snapshot of the original volume
Use lvcreate command with the -s or --size argument followed by the required size to create a snapshot of the original volume (the origin). A snapshot of a volume is writable. By default, a snapshot volume is activated with the origin during normal activation commands as compared to the thinly-provisioned snapshots. LVM does not support creating a snapshot volume that is larger than the sum of the origin volume’s size and the required metadata size for the volume. If you specify a snapshot volume that is larger than this, LVM creates a snapshot volume that is required for the size of the origin.
The nodes in a cluster do not support LVM snapshots. You cannot create a snapshot volume in a shared volume group. However, if you need to create a consistent backup of data on a shared logical volume you can activate the volume exclusively and then create the snapshot.
The following procedure creates an origin logical volume named origin and a snapshot volume of this original volume named snap.
Prerequisites
- You have created volume group vg001. For more information, see Creating LVM volume group.
Procedure
Create a logical volume named origin from the volume group vg001:
# lvcreate -L 1G -n origin vg001
Logical volume "origin" created.
Create a snapshot logical volume named snap of /dev/vg001/origin that is 100 MB in size:
# lvcreate --size 100M --name snap --snapshot /dev/vg001/origin
  Logical volume "snap" created.
If the original logical volume contains a file system, you can mount the snapshot logical volume on an arbitrary directory in order to access the contents of the file system to run a backup while the original file system continues to get updated.
Display the origin volume and the current percentage of the snapshot volume being used:
# lvs -a -o +devices
  LV      VG    Attr       LSize  Pool Origin Data% Meta% Move Log Cpy%Sync Convert Devices
 origin vg001  owi-a-s---  1.00g                                                  /dev/sde1(0)
  snap vg001  swi-a-s--- 100.00m     origin 0.00                                 /dev/sde1(256)
You can also display the status of logical volume /dev/vg001/origin with all the snapshot logical volumes and their status, such as active or inactive by using the
lvdisplay /dev/vg001/origincommand.WarningSince the snapshot increases in size as the origin volume changes, it is important to monitor the percentage of the snapshot volume regularly with the
lvscommand to be sure it does not become full. A snapshot that is 100% full is lost completely, as a write to unchanged parts of the origin would be unable to succeed without corrupting the snapshot.You can configure LVM to automatically extend a snapshot when its usage exceeds the
snapshot_autoextend_thresholdvalue to avoid the snapshot becoming invalid when it is 100% full. View the existing values for thesnapshot_autoextend_thresholdandsnapshot_autoextend_percentoptions from the/etc/lvm.conffile and edit them as per your requirements.The following example, sets the
snapshot_autoextend_thresholdoption to value less than 100 andsnapshot_autoextend_percentoption to the value depending on your requirement to extend the snapshot volume:# vi /etc/lvm.conf snapshot_autoextend_threshold = 70 snapshot_autoextend_percent = 20
You can also extend this snapshot manually by executing the following command:
# lvextend -L+100M /dev/vg001/snapNoteThis feature requires unallocated space in the volume group. An automatic extension of a snapshot does not increase the size of a snapshot volume beyond the maximum calculated size that is necessary for the snapshot. Once a snapshot has grown large enough to cover the origin, it is no longer monitored for automatic extension.
Additional resources
-
lvcreate(8),lvextend(8), andlvs(8)man pages -
/etc/lvm/lvm.conffile
68.8.3. Merging snapshot to its original volume
Use the lvconvert command with the --merge option to merge a snapshot into its original (the origin) volume. You can perform a system rollback if you have lost data or files, or otherwise you have to restore your system to a previous state. After you merge the snapshot volume, the resulting logical volume has the origin volume’s name, minor number, and UUID. While the merge is in progress, reads or writes to the origin appear as they were directed to the snapshot being merged. When the merge finishes, the merged snapshot is removed.
If both the origin and snapshot volume are not open and active, the merge starts immediately. Otherwise, the merge starts after either the origin or snapshot are activated and both are closed. You can merge a snapshot into an origin that cannot be closed, for example a root file system, after the origin volume is activated.
Procedure
Merge the snapshot volume. The following command merges snapshot volume vg001/snap into its origin:
# lvconvert --merge vg001/snap
Merging of volume vg001/snap started.
  vg001/origin: Merged: 100.00%
View the origin volume:
# lvs -a -o +devices
  LV      VG    Attr       LSize  Pool Origin Data% Meta% Move Log Cpy%Sync Convert Devices
  origin vg001  owi-a-s---  1.00g                                                  /dev/sde1(0)
Additional resources
-
lvconvert(8)man page
68.9. Creating and managing thin provisioned volumes (thin volumes)
Red Hat Enterprise Linux supports thin provisioned snapshot volumes and logical volumes.
Logical volumes and snapshot volumes can be thinly provisioned:
- Using thin-provisioned logical volumes, you can create logical volumes that are larger than the available physical storage.
- Using thin-provisioned snapshot volumes, you can store more virtual devices on the same data volume.
68.9.1. Overview of thin provisioning
Many modern storage stacks now provide the ability to choose between thick provisioning and thin provisioning:
- Thick provisioning provides the traditional behavior of block storage where blocks are allocated regardless of their actual usage.
- Thin provisioning grants the ability to provision a larger pool of block storage that may be larger in size than the physical device storing the data, resulting in over-provisioning. Over-provisioning is possible because individual blocks are not allocated until they are actually used. If you have multiple thin-provisioned devices that share the same pool, then these devices can be over-provisioned.
By using thin provisioning, you can over-commit the physical storage, and instead can manage a pool of free space known as a thin pool. You can allocate this thin pool to an arbitrary number of devices when needed by applications. You can expand the thin pool dynamically when needed for cost-effective allocation of storage space.
For example, if ten users each request a 100GB file system for their application, then you can create what appears to be a 100GB file system for each user but which is backed by less actual storage that is used only when needed.
When using thin provisioning, it is important that you monitor the storage pool and add more capacity as the available physical space runs out.
The following are a few advantages of using thin-provisioned devices:
- You can create logical volumes that are larger than the available physical storage.
- You can have more virtual devices to be stored on the same data volume.
- You can create file systems that can grow logically and automatically to support the data requirements and the unused blocks are returned to the pool for use by any file system in the pool
The following are the potential drawbacks of using thin-provisioned devices:
- Thin-provisioned volumes have an inherent risk of running out of available physical storage. If you have over-provisioned your underlying storage, it could possibly result in an outage due to the lack of available physical storage. For example, if you create 10T of thinly provisioned storage with only 1T physical storage for backing, the volumes will become unavailable or unwritable after the 1T is exhausted.
-
If volumes are not sending discards to the layers after thin-provisioned devices, then the accounting for usage will not be accurate. For example, placing a file system without the
-o discard mountoption and not runningfstrimperiodically on top of thin-provisioned devices will never unallocate previously used storage. In such cases, you end up using the full provisioned amount over time even if you are not really using it. - You must monitor the logical and physical usage so as to not run out of available physical space.
- Copy on Write (CoW) operation can be slower on file systems with snapshots.
- Data blocks can be intermixed between multiple file systems leading to random access limitations of the underlying storage even when it does not appear that way to the end user.
68.9.2. Creating thinly-provisioned logical volumes
Using thin-provisioned logical volumes, you can create logical volumes that are larger than the available physical storage. Creating a thinly provisioned set of volumes allows the system to allocate what you use instead of allocating the full amount of storage that is requested.
Using the -T or --thin option of the lvcreate command, you can create either a thin pool or a thin volume. You can also use the -T option of the lvcreate command to create both a thin pool and a thin volume at the same time with a single command. This procedure describes how to create and grow thinly-provisioned logical volumes.
Prerequisites
- You have created a volume group. For more information, see Creating LVM volume group.
Procedure
Create a thin pool:
# lvcreate -L 100M -T vg001/mythinpool
  Thin pool volume with chunk size 64.00 KiB can address at most 15.81 TiB of data.
  Logical volume "mythinpool" created.
Note that since you are creating a pool of physical space, you must specify the size of the pool. The
-Toption of thelvcreatecommand does not take an argument; it determines what type of device is to be created from the other options that are added with the command. You can also create thin pool using additional parameters as shown in the following examples:You can also create a thin pool using the
--thinpoolparameter of thelvcreatecommand. Unlike the-Toption, the--thinpoolparameter requires that you specify the name of the thin pool logical volume you are creating. The following example uses the--thinpoolparameter to create a thin pool named mythinpool in the volume group vg001 that is 100M in size:# lvcreate -L 100M --thinpool mythinpool vg001 Thin pool volume with chunk size 64.00 KiB can address at most 15.81 TiB of data. Logical volume "mythinpool" created.
As striping is supported for pool creation, you can use the
-iand-Ioptions to create stripes. The following command creates a 100M thin pool named as thinpool in volume group vg001 with two 64 kB stripes and a chunk size of 256 kB. It also creates a 1T thin volume named vg001/thinvolume.NoteEnsure that there are two physical volumes with sufficient free space in the volume group or you cannot create the thin pool.
# lvcreate -i 2 -I 64 -c 256 -L 100M -T vg001/thinpool -V 1T --name thinvolume
Create a thin volume:
# lvcreate -V 1G -T vg001/mythinpool -n thinvolume
  WARNING: Sum of all thin volume sizes (1.00 GiB) exceeds the size of thin pool vg001/mythinpool (100.00 MiB).
  WARNING: You have not turned on protection against thin pools running out of space.
  WARNING: Set activation/thin_pool_autoextend_threshold below 100 to trigger automatic extension of thin pools before they get full.
  Logical volume "thinvolume" created.
In this case, you are specifying virtual size for the volume that is greater than the pool that contains it. You can also create thin volumes using additional parameters as shown in the following examples:
To create both a thin volume and a thin pool, use the
-Toption of thelvcreatecommand and specify both the size and virtual size argument:# lvcreate -L 100M -T vg001/mythinpool -V 1G -n thinvolume Thin pool volume with chunk size 64.00 KiB can address at most 15.81 TiB of data. WARNING: Sum of all thin volume sizes (1.00 GiB) exceeds the size of thin pool vg001/mythinpool (100.00 MiB). WARNING: You have not turned on protection against thin pools running out of space. WARNING: Set activation/thin_pool_autoextend_threshold below 100 to trigger automatic extension of thin pools before they get full. Logical volume "thinvolume" created.
To use the remaining free space to create a thin volume and thin pool, use the
100%FREEoption:# lvcreate -V 1G -l 100%FREE -T vg001/mythinpool -n thinvolume Thin pool volume with chunk size 64.00 KiB can address at most <15.88 TiB of data. Logical volume "thinvolume" created.
To convert an existing logical volume to a thin pool volume, use the
--thinpoolparameter of thelvconvertcommand. You must also use the--poolmetadataparameter in conjunction with the--thinpoolparameter to convert an existing logical volume to a thin pool volume’s metadata volume.The following example converts the existing logical volume lv1 in volume group vg001 to a thin pool volume and converts the existing logical volume lv2 in volume group vg001 to the metadata volume for that thin pool volume:
# lvconvert --thinpool vg001/lv1 --poolmetadata vg001/lv2
  Converted vg001/lv1 to thin pool.
NoteConverting a logical volume to a thin pool volume or a thin pool metadata volume destroys the content of the logical volume, as
lvconvertdoes not preserve the content of the devices but instead overwrites the content.By default, the
lvcreatecommand approximately sets the size of the thin pool metadata logical volume by using the following formula:Pool_LV_size / Pool_LV_chunk_size * 64
If you have large numbers of snapshots or if you have have small chunk sizes for your thin pool and therefore expect significant growth of the size of the thin pool at a later time, you may need to increase the default value of the thin pool’s metadata volume using the
--poolmetadatasizeparameter of thelvcreatecommand. The supported value for the thin pool’s metadata logical volume is in the range between 2MiB and 16GiB.The following example illustrates how to increase the default value of the thin pools’ metadata volume:
# lvcreate -V 1G -l 100%FREE -T vg001/mythinpool --poolmetadatasize 16M -n thinvolume
Thin pool volume with chunk size 64.00 KiB can address at most 15.81 TiB of data.
   Logical volume "thinvolume" created.
View the created thin pool and thin volume:
# lvs -a -o +devices
  LV                 VG    Attr       LSize   Pool       Origin Data%  Meta%  Move Log Cpy%Sync Convert Devices
  [lvol0_pmspare]    vg001 ewi-------   4.00m                                                           /dev/sda(0)
  mythinpool         vg001 twi-aotz-- 100.00m                   0.00   10.94                            mythinpool_tdata(0)
  [mythinpool_tdata] vg001 Twi-ao---- 100.00m                                                           /dev/sda(1)
  [mythinpool_tmeta] vg001 ewi-ao----   4.00m                                                           /dev/sda(26)
  thinvolume         vg001 Vwi-a-tz--   1.00g mythinpool        0.00
Optional: Extend the size of a thin pool with the
lvextendcommand. You cannot, however, reduce the size of a thin pool.NoteThis command fails if you use
-l 100%FREEargument while creating a thin pool and thin volume.The following command resizes an existing thin pool that is 100M in size by extending it another 100M:
# lvextend -L+100M vg001/mythinpool
  Size of logical volume vg001/mythinpool_tdata changed from 100.00 MiB (25 extents) to 200.00 MiB (50 extents).
  WARNING: Sum of all thin volume sizes (1.00 GiB) exceeds the size of thin pool vg001/mythinpool (200.00 MiB).
  WARNING: You have not turned on protection against thin pools running out of space.
  WARNING: Set activation/thin_pool_autoextend_threshold below 100 to trigger automatic extension of thin pools before they get full.

  Logical volume vg001/mythinpool successfully resized
# lvs -a -o +devices
  LV                 VG    Attr       LSize   Pool       Origin Data%  Meta%  Move Log Cpy%Sync Convert Devices
  [lvol0_pmspare]    vg001 ewi-------   4.00m                                                           /dev/sda(0)
  mythinpool         vg001 twi-aotz-- 200.00m                   0.00   10.94                            mythinpool_tdata(0)
  [mythinpool_tdata] vg001 Twi-ao---- 200.00m                                                           /dev/sda(1)
  [mythinpool_tdata] vg001 Twi-ao---- 200.00m                                                           /dev/sda(27)
  [mythinpool_tmeta] vg001 ewi-ao----   4.00m                                                           /dev/sda(26)
  thinvolume         vg001 Vwi-a-tz--   1.00g mythinpool        0.00
Optional: To rename the thin pool and thin volume, use the following command:
# lvrename vg001/mythinpool vg001/mythinpool1
  Renamed "mythinpool" to "mythinpool1" in volume group "vg001"

# lvrename vg001/thinvolume vg001/thinvolume1
  Renamed "thinvolume" to "thinvolume1" in volume group "vg001"
View the thin pool and thin volume after renaming:
# lvs
  LV          VG       Attr     LSize   Pool       Origin Data%  Move Log Copy%  Convert
mythinpool1 vg001   twi-a-tz 100.00m                     0.00
thinvolume1 vg001   Vwi-a-tz   1.00g mythinpool1         0.00
Optional: To remove the thin pool, use the following command:
# lvremove -f vg001/mythinpool1
  Logical volume "thinvolume1" successfully removed.
  Logical volume "mythinpool1" successfully removed.
Additional resources
-
lvcreate(8),lvrename(8),lvs(8), andlvconvert(8)man pages
68.9.3. Overview of chunk size
A chunk is the largest unit of physical disk dedicated to snapshot storage.
Use the following criteria for using the chunk size:
- A smaller chunk size requires more metadata and hinders performance, but provides better space utilization with snapshots.
- A bigger chunk size requires less metadata manipulation, but makes the snapshot less space efficient.
Be default, lvm2 starts with a 64KiB chunk size and estimates good metadata size for such chunk size. The minimal metadata size lvm2 can create and use is 2 MiB. If the metadata size needs to be larger than 128 MiB it begins to increase the chunk size, so the metadata size stays compact. However, this may result in some big chunk size values, which are less space efficient for snapshot usage. In such cases, a smaller chunk size and bigger metadata size is a better option.
To specify the chunk size according to your requirement, use the -c or --chunksize parameter to overrule lvm2 estimated chunk size. Be aware that you cannot change the chunk size once the thinpool is created.
If the volume data size is in the range of TiB, use ~15.8GiB as the metadata size, which is the maximum supported size, and set the chunk size according to your requirement. But, note that it is not possible to increase the metadata size if you need to extend the volume’s data size and have a small chunk size.
Using the inappropriate combination of chunk size and metadata size may result in potentially problematic situation, when user runs out of space in metadata or they may not further grow their thin-pool size because of limited maximum addressable thin-pool data size.
Additional resources
-
lvmthin(7)man page
68.9.4. Thinly-provisioned snapshot volumes
Red Hat Enterprise Linux supports thinly-provisioned snapshot volumes. A snapshot of a thin logical volume also creates a thin logical volume (LV). A thin snapshot volume has the same characteristics as any other thin volume. You can independently activate the volume, extend the volume, rename the volume, remove the volume, and even snapshot the volume.
Similarly to all LVM snapshot volumes, and all thin volumes, thin snapshot volumes are not supported across the nodes in a cluster. The snapshot volume must be exclusively activated on only one cluster node.
Traditional snapshots must allocate new space for each snapshot created, where data is preserved as changes are made to the origin. But thin-provisioning snapshots share the same space with the origin. Snapshots of thin LVs are efficient because the data blocks common to a thin LV and any of its snapshots are shared. You can create snapshots of thin LVs or from the other thin snapshots. Blocks common to recursive snapshots are also shared in the thin pool.
Thin snapshot volumes provide the following benefits:
- Increasing the number of snapshots of the origin has a negligible impact on performance.
- A thin snapshot volume can reduce disk usage because only the new data is written and is not copied to each snapshot.
- There is no need to simultaneously activate the thin snapshot volume with the origin, which is a requirement of traditional snapshots.
- When restoring an origin from a snapshot, it is not required to merge the thin snapshot. You can remove the origin and instead use the snapshot. Traditional snapshots have a separate volume where they store changes that must be copied back, that is, merged to the origin to reset it.
- There is a significantly higher limit on the number of allowed snapshots as compared to the traditional snapshots.
Although there are many advantages for using thin snapshot volumes, there are some use cases for which the traditional LVM snapshot volume feature might be more appropriate to your needs. You can use traditional snapshots with all types of volumes. However, to use thin-snapshots requires you to use thin-provisioning.
You cannot limit the size of a thin snapshot volume; the snapshot uses all of the space in the thin pool, if necessary. In general, you should consider the specific requirements of your site when deciding which snapshot format to use.
By default, a thin snapshot volume is skipped during normal activation commands.
68.9.5. Creating thinly-provisioned snapshot volumes
Using thin-provisioned snapshot volumes, you can have more virtual devices stored on the same data volume.
When creating a thin snapshot volume, do not specify the size of the volume. If you specify a size parameter, the snapshot that will be created will not be a thin snapshot volume and will not use the thin pool for storing data. For example, the command lvcreate -s vg/thinvolume -L10M will not create a thin snapshot, even though the origin volume is a thin volume.
Thin snapshots can be created for thinly-provisioned origin volumes, or for origin volumes that are not thinly-provisioned. The following procedure describes different ways to create a thinly-provisioned snapshot volume.
Prerequisites
- You have created a thinly-provisioned logical volume. For more information, see Overview of thin provisioning.
Procedure
Create a thinly-provisioned snapshot volume. The following command creates a thinly-provisioned snapshot volume named as mysnapshot1 of the thinly-provisioned logical volume vg001/thinvolume:
# lvcreate -s --name mysnapshot1 vg001/thinvolume
  Logical volume "mysnapshot1" created
# lvs
  LV          VG       Attr     LSize   Pool       Origin     Data%  Move Log Copy%  Convert
  mysnapshot1 vg001    Vwi-a-tz   1.00g mythinpool thinvolume   0.00
  mythinpool  vg001    twi-a-tz 100.00m                         0.00
  thinvolume  vg001    Vwi-a-tz   1.00g mythinpool              0.00
NoteWhen using thin provisioning, it is important that the storage administrator monitor the storage pool and add more capacity if it starts to become full. For information on extending the size of a thin volume, see Creating thinly-provisioned logical volumes .
You can also create a thinly-provisioned snapshot of a non-thinly-provisioned logical volume. Since the non-thinly-provisioned logical volume is not contained within a thin pool, it is referred to as an external origin. External origin volumes can be used and shared by many thinly-provisioned snapshot volumes, even from different thin pools. The external origin must be inactive and read-only at the time the thinly-provisioned snapshot is created.
The following example creates a thin snapshot volume of the read-only, inactive logical volume named origin_volume. The thin snapshot volume is named mythinsnap. The logical volume origin_volume then becomes the thin external origin for the thin snapshot volume mythinsnap in volume group vg001 that uses the existing thin pool vg001/pool. The origin volume must be in the same volume group as the snapshot volume. Do not specify the volume group when specifying the origin logical volume.
# lvcreate -s --thinpool vg001/pool origin_volume --name mythinsnap
You can create a second thinly-provisioned snapshot volume of the first snapshot volume by executing the following command.
# lvcreate -s vg001/mysnapshot1 --name mysnapshot2
Logical volume "mysnapshot2" created.
To create a third thinly-provisioned snapshot volume, use the following command:
# lvcreate -s vg001/mysnapshot2 --name mysnapshot3
Logical volume "mysnapshot3" created.
Verification
Display a list of all ancestors and descendants of a thin snapshot logical volume:
$ lvs -o name,lv_ancestors,lv_descendants vg001
  LV           Ancestors                           Descendants
  mysnapshot2  mysnapshot1,thinvolume              mysnapshot3
  mysnapshot1  thinvolume              mysnapshot2,mysnapshot3
  mysnapshot3  mysnapshot2,mysnapshot1,thinvolume
  mythinpool
  thinvolume           	           	     mysnapshot1,mysnapshot2,mysnapshot3
Here,
- thinvolume is an origin volume in volume group vg001.
- mysnapshot1 is a snapshot of thinvolume
- mysnapshot2 is a snapshot of mysnapshot1
mysnapshot3 is a snapshot of mysnapshot2
NoteThe
lv_ancestorsandlv_descendantsfields display existing dependencies. However, they do not track removed entries which can break a dependency chain if the entry was removed from the middle of the chain.
Additional resources
-
lvcreate(8)man page
68.10. Enabling caching to improve logical volume performance
You can add caching to an LVM logical volume to improve performance. LVM then caches I/O operations to the logical volume using a fast device, such as an SSD.
The following procedures create a special LV from the fast device, and attach this special LV to the original LV to improve the performance.
68.10.1. Caching methods in LVM
LVM provides the following kinds of caching. Each one is suitable for different kinds of I/O patterns on the logical volume.
dm-cacheThis method speeds up access to frequently used data by caching it on the faster volume. The method caches both read and write operations.
The
dm-cachemethod creates logical volumes of the typecache.dm-writecacheThis method caches only write operations. The faster volume stores the write operations and then migrates them to the slower disk in the background. The faster volume is usually an SSD or a persistent memory (PMEM) disk.
The
dm-writecachemethod creates logical volumes of the typewritecache.
Additional resources
-
lvmcache(7)man page
68.10.2. LVM caching components
LVM provides support for adding a cache to LVM logical volumes. LVM caching uses the following LVM logical volume types:
- Main LV
- The larger, slower, and original volume.
- Cache pool LV
-
A composite LV that you can use for caching data from the main LV. It has two sub-LVs: data for holding cache data and metadata for managing the cache data. You can configure specific disks for data and metadata. You can use the cache pool only with
dm-cache. - Cachevol LV
-
A linear LV that you can use for caching data from the main LV. You cannot configure separate disks for data and metadata.
cachevolcan be only used with eitherdm-cacheordm-writecache.
All of these associated LVs must be in the same volume group.
You can combine a main logical volume (LV) with a faster, usually smaller, LV that holds the cached data. The fast LV is created from fast block devices, such as SSD drives. When you enable caching for a logical volume, LVM renames and hides the original volumes, and presents a new logical volume that is composed of the original logical volumes. The composition of the new logical volume depends on the caching method and whether you are using the cachevol or cachepool option.
The cachevol and cachepool options expose different levels of control over the placement of the caching components:
-
With the
cachevoloption, the faster device stores both the cached copies of data blocks and the metadata for managing the cache. With the
cachepooloption, separate devices can store the cached copies of data blocks and the metadata for managing the cache.The
dm-writecachemethod is not compatible withcachepool.
In all configurations, LVM exposes a single resulting device, which groups together all the caching components. The resulting device has the same name as the original slow logical volume.
Additional resources
-
lvmcache(7)man page - Creating and managing thin provisioned volumes (thin volumes)
68.10.3. Enabling dm-cache caching for a logical volume
This procedure enables caching of commonly used data on a logical volume using the dm-cache method.
Prerequisites
-
A slow logical volume that you want to speed up using
dm-cacheexists on your system. - The volume group that contains the slow logical volume also contains an unused physical volume on a fast block device.
Procedure
Create a
cachevolvolume on the fast device:# lvcreate --size cachevol-size --name <fastvol> <vg> </dev/fast-pv>Replace the following values:
cachevol-size-
The size of the
cachevolvolume, such as5G fastvol-
A name for the
cachevolvolume vg- The volume group name
/dev/fast-pvThe path to the fast block device, such as
/dev/sdfExample 68.7. Creating a
cachevolvolume# lvcreate --size 5G --name fastvol vg /dev/sdf Logical volume "fastvol" created.
Attach the
cachevolvolume to the main logical volume to begin caching:# lvconvert --type cache --cachevol <fastvol> <vg/main-lv>Replace the following values:
fastvol-
The name of the
cachevolvolume vg- The volume group name
main-lvThe name of the slow logical volume
Example 68.8. Attaching the
cachevolvolume to the main LV# lvconvert --type cache --cachevol fastvol vg/main-lv Erase all existing data on vg/fastvol? [y/n]: y Logical volume vg/main-lv is now cached.
Verification steps
Verify if the newly created logical volume has
dm-cacheenabled:# lvs --all --options +devices <vg> LV Pool Type Devices main-lv [fastvol_cvol] cache main-lv_corig(0) [fastvol_cvol] linear /dev/fast-pv [main-lv_corig] linear /dev/slow-pv
Additional resources
-
lvmcache(7)man page
68.10.4. Enabling dm-cache caching with a cachepool for a logical volume
This procedure enables you to create the cache data and the cache metadata logical volumes individually and then combine the volumes into a cache pool.
Prerequisites
-
A slow logical volume that you want to speed up using
dm-cacheexists on your system. - The volume group that contains the slow logical volume also contains an unused physical volume on a fast block device.
Procedure
Create a
cachepoolvolume on the fast device:# lvcreate --type cache-pool --size <cachepool-size> --name <fastpool> <vg /dev/fast>Replace the following values:
cachepool-size-
The size of the
cachepool, such as5G fastpool-
A name for the
cachepoolvolume vg- The volume group name
/dev/fastThe path to the fast block device, such as
/dev/sdf1NoteYou can use
--poolmetadataoption to specify the location of the pool metadata when creating the cache-pool.Example 68.9. Creating a
cachepoolvolume# lvcreate --type cache-pool --size 5G --name fastpool vg /dev/sde Logical volume "fastpool" created.
Attach the
cachepoolto the main logical volume to begin caching:# lvconvert --type cache --cachepool <fastpool> <vg/main>Replace the following values:
fastpool-
The name of the
cachepoolvolume vg- The volume group name
mainThe name of the slow logical volume
Example 68.10. Attaching the
cachepoolto the main LV# lvconvert --type cache --cachepool fastpool vg/main Do you want wipe existing metadata of cache pool vg/fastpool? [y/n]: y Logical volume vg/main is now cached.
Verification steps
Examine the newly created devicevolume with the
cache-pooltype:# lvs --all --options +devices <vg> LV Pool Type Devices [fastpool_cpool] cache-pool fastpool_pool_cdata(0) [fastpool_cpool_cdata] linear /dev/sdf1(4) [fastpool_cpool_cmeta] linear /dev/sdf1(2) [lvol0_pmspare] linear /dev/sdf1(0) main [fastpoool_cpool] cache main_corig(0) [main_corig] linear /dev/sdf1(O)
Additional resources
-
lvcreate(8)man page -
lvmcache(7)man page -
lvconvert(8)man page
68.10.5. Enabling dm-writecache caching for a logical volume
This procedure enables caching of write I/O operations to a logical volume using the dm-writecache method.
Prerequisites
-
A slow logical volume that you want to speed up using
dm-writecacheexists on your system. - The volume group that contains the slow logical volume also contains an unused physical volume on a fast block device.
- If the slow logical volume is active, deactivate it.
Procedure
If the slow logical volume is active, deactivate it:
# lvchange --activate n <vg>/<main-lv>Replace the following values:
vg- The volume group name
main-lv- The name of the slow logical volume
Create a deactivated
cachevolvolume on the fast device:# lvcreate --activate n --size <cachevol-size> --name <fastvol> <vg> </dev/fast-pv>Replace the following values:
cachevol-size-
The size of the
cachevolvolume, such as5G fastvol-
A name for the
cachevolvolume vg- The volume group name
/dev/fast-pvThe path to the fast block device, such as
/dev/sdfExample 68.11. Creating a deactivated
cachevolvolume# lvcreate --activate n --size 5G --name fastvol vg /dev/sdf WARNING: Logical volume vg/fastvol not zeroed. Logical volume "fastvol" created.
Attach the
cachevolvolume to the main logical volume to begin caching:# lvconvert --type writecache --cachevol <fastvol> <vg/main-lv>Replace the following values:
fastvol-
The name of the
cachevolvolume vg- The volume group name
main-lvThe name of the slow logical volume
Example 68.12. Attaching the
cachevolvolume to the main LV# lvconvert --type writecache --cachevol fastvol vg/main-lv Erase all existing data on vg/fastvol? [y/n]?: y Using writecache block size 4096 for unknown file system block size, logical block size 512, physical block size 512. WARNING: unable to detect a file system block size on vg/main-lv WARNING: using a writecache block size larger than the file system block size may corrupt the file system. Use writecache block size 4096? [y/n]: y Logical volume vg/main-lv now has writecache.
Activate the resulting logical volume:
# lvchange --activate y <vg/main-lv>Replace the following values:
vg- The volume group name
main-lv- The name of the slow logical volume
Verification steps
Examine the newly created devices:
# lvs --all --options +devices vg

LV                VG Attr       LSize   Pool           Origin           Data%  Meta%  Move Log Cpy%Sync Convert Devices
 main-lv          vg Cwi-a-C--- 500.00m [fastvol_cvol] [main-lv_wcorig] 0.00                                    main-lv_wcorig(0)
 [fastvol_cvol]   vg Cwi-aoC--- 252.00m                                                                         /dev/sdc1(0)
 [main-lv_wcorig] vg owi-aoC--- 500.00m                                                                         /dev/sdb1(0)
Additional resources
-
lvmcache(7)man page
68.10.6. Disabling caching for a logical volume
This procedure disables dm-cache or dm-writecache caching that is currently enabled on a logical volume.
Prerequisites
- Caching is enabled on a logical volume.
Procedure
Deactivate the logical volume:
# lvchange --activate n <vg>/<main-lv>Replace vg with the volume group name, and main-lv with the name of the logical volume where caching is enabled.
Detach the
cachevolorcachepoolvolume:# lvconvert --splitcache <vg>/<main-lv>Replace the following values:
Replace vg with the volume group name, and main-lv with the name of the logical volume where caching is enabled.
Example 68.13. Detaching the
cachevolorcachepoolvolume# lvconvert --splitcache vg/main-lv Detaching writecache already clean. Logical volume vg/main-lv writecache has been detached.
Verification steps
Check that the logical volumes are no longer attached together:
# lvs --all --options +devices <vg>

LV      Attr       Type   Devices
fastvol -wi------- linear /dev/fast-pv
main-lv -wi------- linear /dev/slow-pv
Additional resources
-
The
lvmcache(7)man page
68.11. Logical volume activation
A logical volume that is an active state can be used through a block device. A logical volume that is activated is accessible and is subject to change. When you create a logical volume it is activated by default.
There are various circumstances for which you need to make an individual logical volume inactive and thus unknown to the kernel. You can activate or deactivate individual logical volume with the -a option of the lvchange command.
The format for the command to deactivate an individual logical volume is as follows.
lvchange -an vg/lv
The format for the command to activate an individual logical volume is as follows.
lvchange -ay vg/lv
You can and activate or deactivate all of the logical volumes in a volume group with the -a option of the vgchange command. This is the equivalent of running the lvchange -a command on each individual logical volume in the volume group.
The format for the command to deactivate all of the logical volumes in a volume group is as follows.
vgchange -an vgThe format for the command to activate all of the logical volumes in a volume group is as follows.
vgchange -ay vg
During manual activation, the systemd automatically mounts LVM volumes with the corresponding mount point from the /etc/fstab file unless the systemd-mount unit is masked.
68.11.1. Controlling autoactivation of logical volumes
Autoactivation of a logical volume refers to the event-based automatic activation of a logical volume during system startup. As devices become available on the system (device online events), systemd/udev runs the lvm2-pvscan service for each device. This service runs the pvscan --cache -aay device command, which reads the named device. If the device belongs to a volume group, the pvscan command will check if all of the physical volumes for that volume group are present on the system. If so, the command will activate logical volumes in that volume group.
You can use the following configuration options in the /etc/lvm/lvm.conf configuration file to control autoactivation of logical volumes.
global/event_activationWhen
event_activationis disabled,systemd/udevwill autoactivate logical volume only on whichever physical volumes are present during system startup. If all physical volumes have not appeared yet, then some logical volumes may not be autoactivated.activation/auto_activation_volume_listSetting
auto_activation_volume_listto an empty list disables autoactivation entirely. Settingauto_activation_volume_listto specific logical volumes and volume groups limits autoactivation to those logical volumes.
For information on setting these options, see the /etc/lvm/lvm.conf configuration file.
68.11.2. Controlling logical volume activation
You can control the activation of logical volume in the following ways:
-
Through the
activation/volume_listsetting in the/etc/lvm/conffile. This allows you to specify which logical volumes are activated. For information on using this option, see the/etc/lvm/lvm.confconfiguration file. - By means of the activation skip flag for a logical volume. When this flag is set for a logical volume, the volume is skipped during normal activation commands.
You can set the activation skip flag on a logical volume in the following ways.
-
You can turn off the activation skip flag when creating a logical volume by specifying the
-knor--setactivationskip noption of thelvcreatecommand. -
You can turn off the activation skip flag for an existing logical volume by specifying the
-knor--setactivationskip noption of thelvchangecommand. -
You can turn on the activation skip flag on again for a volume where it has been turned off with the
-kyor--setactivationskip yoption of thelvchangecommand.
To determine whether the activation skip flag is set for a logical volume run the lvs command, which displays the k attribute as in the following example.
# lvs vg/thin1s1
LV         VG  Attr       LSize Pool  Origin
thin1s1    vg  Vwi---tz-k 1.00t pool0 thin1
You can activate a logical volume with the k attribute set by using the -K or --ignoreactivationskip option in addition to the standard -ay or --activate y option.
By default, thin snapshot volumes are flagged for activation skip when they are created. You can control the default activation skip setting on new thin snapshot volumes with the auto_set_activation_skip setting in the /etc/lvm/lvm.conf file.
The following command activates a thin snapshot logical volume that has the activation skip flag set.
# lvchange -ay -K VG/SnapLVThe following command creates a thin snapshot without the activation skip flag
# lvcreate --type thin -n SnapLV -kn -s ThinLV --thinpool VG/ThinPoolLVThe following command removes the activation skip flag from a snapshot logical volume.
# lvchange -kn VG/SnapLV68.11.3. Activating shared logical volumes
You can control logical volume activation of a shared logical volume with the -a option of the lvchange and vgchange commands, as follows.
| Command | Activation |
|---|---|
|
| Activate the shared logical volume in exclusive mode, allowing only a single host to activate the logical volume. If the activation fails, as would happen if the logical volume is active on another host, an error is reported. |
|
| Activate the shared logical volume in shared mode, allowing multiple hosts to activate the logical volume concurrently. If the activation fails, as would happen if the logical volume is active exclusively on another host, an error is reported. If the logical type prohibits shared access, such as a snapshot, the command will report an error and fail. Logical volume types that cannot be used concurrently from multiple hosts include thin, cache, raid, and snapshot. |
|
| Deactivate the logical volume. |
68.11.4. Activating a logical volume with missing devices
You can configure which logical volumes with missing devices are activated by setting the activation_mode parameter with the lvchange command to one of the following values.
| Activation Mode | Meaning |
|---|---|
| complete | Allows only logical volumes with no missing physical volumes to be activated. This is the most restrictive mode. |
| degraded | Allows RAID logical volumes with missing physical volumes to be activated. |
| partial | Allows any logical volume with missing physical volumes to be activated. This option should be used for recovery or repair only. |
The default value of activation_mode is determined by the activation_mode setting in the /etc/lvm/lvm.conf file. For further information, see the lvmraid(7) man page.
68.12. Limiting LVM device visibility and usage
You can limit the devices that are visible and usable to Logical Volume Manager (LVM) by controlling the devices that LVM can scan.
To adjust the configuration of LVM device scanning, edit the LVM device filter settings in the /etc/lvm/lvm.conf file. The filters in the lvm.conf file consist of a series of simple regular expressions. The system applies these expressions to each device name in the /dev directory to decide whether to accept or reject each detected block device.
68.12.1. The LVM device filter
The Logical Volume Manager (LVM) device filter is a list of device name patterns.
Patterns are regular expressions delimited by any character and preceded by a for accepting, or r for rejecting. The first regular expression in the list that matches a device determines if LVM accepts or rejects (ignores) a specific device. A device can have several names through symlinks. If the filter accepts any one of those device names, LVM uses the device. LVM also accepts devices that do not match any patterns.
The default device filter accepts all devices on the system. An ideal user configured device filter accepts one or more patterns and rejects everything else. For example, in such cases, the pattern list can end with r|.*|.
You can find the LVM devices filter configuration in the devices/filter and devices/global_filter fields in the lvm.conf file.
68.12.1.1. Additional resources
-
lvm.conf(5)man page
68.12.1.2. Examples of LVM device filter configurations
The list below shows filter configurations that control which devices LVM scans and can later use. Configure the device filter in the lvm.conf file.
The following is the default filter configuration, which scans all devices:
filter = [ "|a.*|" ]
The following filter removes the
cdromdevice in order to avoid delays if the drive contains no media:filter = [ "r|^/dev/cdrom$|" ]
The following filter adds all loop devices and removes all other block devices:
filter = [ "a|loop|", "r|.*|" ]
The following filter adds all loop and Integrated Development Environment (IDE) devices and removes all other block devices:
filter = [ "a|loop|", "a|/dev/hd.*|", "r|.*|" ]
The following filter adds only partition 8 on the first IDE drive and removes all other block devices:
filter = [ "a|^/dev/hda8$|", "r|.*|" ]
Additional resources
-
lvm.conf(5)man page
68.13. Controlling LVM allocation
By default, a volume group allocates physical extents according to common-sense rules such as not placing parallel stripes on the same physical volume. This is the normal allocation policy. You can use the --alloc argument of the vgcreate command to specify an allocation policy of contiguous, anywhere, or cling. In general, allocation policies other than normal are required only in special cases where you need to specify unusual or nonstandard extent allocation.
68.13.1. LVM allocation policies
When an LVM operation needs to allocate physical extents for one or more logical volumes, the allocation proceeds as follows:
- The complete set of unallocated physical extents in the volume group is generated for consideration. If you supply any ranges of physical extents at the end of the command line, only unallocated physical extents within those ranges on the specified physical volumes are considered.
-
Each allocation policy is tried in turn, starting with the strictest policy (
contiguous) and ending with the allocation policy specified using the--allocoption or set as the default for the particular logical volume or volume group. For each policy, working from the lowest-numbered logical extent of the empty logical volume space that needs to be filled, as much space as possible is allocated, according to the restrictions imposed by the allocation policy. If more space is needed, LVM moves on to the next policy.
The allocation policy restrictions are as follows:
An allocation policy of
contiguousrequires that the physical location of any logical extent that is not the first logical extent of a logical volume is adjacent to the physical location of the logical extent immediately preceding it.When a logical volume is striped or mirrored, the
contiguousallocation restriction is applied independently to each stripe or mirror image (leg) that needs space.An allocation policy of
clingrequires that the physical volume used for any logical extent be added to an existing logical volume that is already in use by at least one logical extent earlier in that logical volume. If the configuration parameterallocation/cling_tag_listis defined, then two physical volumes are considered to match if any of the listed tags is present on both physical volumes. This allows groups of physical volumes with similar properties (such as their physical location) to be tagged and treated as equivalent for allocation purposes.When a Logical Volume is striped or mirrored, the
clingallocation restriction is applied independently to each stripe or mirror image (leg) that needs space.An allocation policy of
normalwill not choose a physical extent that shares the same physical volume as a logical extent already allocated to a parallel logical volume (that is, a different stripe or mirror image/leg) at the same offset within that parallel logical volume.When allocating a mirror log at the same time as logical volumes to hold the mirror data, an allocation policy of
normalwill first try to select different physical volumes for the log and the data. If that is not possible and theallocation/mirror_logs_require_separate_pvsconfiguration parameter is set to 0, it will then allow the log to share physical volume(s) with part of the data.Similarly, when allocating thin pool metadata, an allocation policy of
normalwill follow the same considerations as for allocation of a mirror log, based on the value of theallocation/thin_pool_metadata_require_separate_pvsconfiguration parameter.-
If there are sufficient free extents to satisfy an allocation request but a
normalallocation policy would not use them, theanywhereallocation policy will, even if that reduces performance by placing two stripes on the same physical volume.
The allocation policies can be changed using the vgchange command.
Be aware that future updates can bring code changes in layout behaviour according to the defined allocation policies. For example, if you supply on the command line two empty physical volumes that have an identical number of free physical extents available for allocation, LVM currently considers using each of them in the order they are listed; there is no guarantee that future releases will maintain that property. If it is important to obtain a specific layout for a particular Logical Volume, then you should build it up through a sequence of lvcreate and lvconvert steps such that the allocation policies applied to each step leave LVM no discretion over the layout.
To view the way the allocation process currently works in any specific case, you can read the debug logging output, for example by adding the -vvvv option to a command.
68.13.2. Preventing allocation on a physical volume
You can prevent allocation of physical extents on the free space of one or more physical volumes with the pvchange command. This may be necessary if there are disk errors, or if you will be removing the physical volume.
The following command disallows the allocation of physical extents on /dev/sdk1.
# pvchange -x n /dev/sdk1
You can also use the -xy arguments of the pvchange command to allow allocation where it had previously been disallowed.
68.13.3. Extending a logical volume with the cling allocation policy
When extending an LVM volume, you can use the --alloc cling option of the lvextend command to specify the cling allocation policy. This policy will choose space on the same physical volumes as the last segment of the existing logical volume. If there is insufficient space on the physical volumes and a list of tags is defined in the /etc/lvm/lvm.conf file, LVM will check whether any of the tags are attached to the physical volumes and seek to match those physical volume tags between existing extents and new extents.
For example, if you have logical volumes that are mirrored between two sites within a single volume group, you can tag the physical volumes according to where they are situated by tagging the physical volumes with @site1 and @site2 tags. You can then specify the following line in the lvm.conf file:
cling_tag_list = [ "@site1", "@site2" ]
In the following example, the lvm.conf file has been modified to contain the following line:
cling_tag_list = [ "@A", "@B" ]
Also in this example, a volume group taft has been created that consists of the physical volumes /dev/sdb1, /dev/sdc1, /dev/sdd1, /dev/sde1, /dev/sdf1, /dev/sdg1, and /dev/sdh1. These physical volumes have been tagged with tags A, B, and C. The example does not use the C tag, but this will show that LVM uses the tags to select which physical volumes to use for the mirror legs.
# pvs -a -o +pv_tags /dev/sd[bcdefgh]
  PV         VG   Fmt  Attr PSize  PFree  PV Tags
  /dev/sdb1  taft lvm2 a--  15.00g 15.00g A
  /dev/sdc1  taft lvm2 a--  15.00g 15.00g B
  /dev/sdd1  taft lvm2 a--  15.00g 15.00g B
  /dev/sde1  taft lvm2 a--  15.00g 15.00g C
  /dev/sdf1  taft lvm2 a--  15.00g 15.00g C
  /dev/sdg1  taft lvm2 a--  15.00g 15.00g A
  /dev/sdh1  taft lvm2 a--  15.00g 15.00g A
The following command creates a 10 gigabyte mirrored volume from the volume group taft.
# lvcreate --type raid1 -m 1 -n mirror --nosync -L 10G taft
  WARNING: New raid1 won't be synchronised. Don't read what you didn't write!
  Logical volume "mirror" created
The following command shows which devices are used for the mirror legs and RAID metadata subvolumes.
# lvs -a -o +devices
  LV                VG   Attr       LSize  Log Cpy%Sync Devices
  mirror            taft Rwi-a-r--- 10.00g       100.00 mirror_rimage_0(0),mirror_rimage_1(0)
  [mirror_rimage_0] taft iwi-aor--- 10.00g              /dev/sdb1(1)
  [mirror_rimage_1] taft iwi-aor--- 10.00g              /dev/sdc1(1)
  [mirror_rmeta_0]  taft ewi-aor---  4.00m              /dev/sdb1(0)
  [mirror_rmeta_1]  taft ewi-aor---  4.00m              /dev/sdc1(0)
The following command extends the size of the mirrored volume, using the cling allocation policy to indicate that the mirror legs should be extended using physical volumes with the same tag.
# lvextend --alloc cling -L +10G taft/mirror
  Extending 2 mirror images.
  Extending logical volume mirror to 20.00 GiB
  Logical volume mirror successfully resized
The following display command shows that the mirror legs have been extended using physical volumes with the same tag as the leg. Note that the physical volumes with a tag of C were ignored.
# lvs -a -o +devices
  LV                VG   Attr       LSize  Log Cpy%Sync Devices
  mirror            taft Rwi-a-r--- 20.00g       100.00 mirror_rimage_0(0),mirror_rimage_1(0)
  [mirror_rimage_0] taft iwi-aor--- 20.00g              /dev/sdb1(1)
  [mirror_rimage_0] taft iwi-aor--- 20.00g              /dev/sdg1(0)
  [mirror_rimage_1] taft iwi-aor--- 20.00g              /dev/sdc1(1)
  [mirror_rimage_1] taft iwi-aor--- 20.00g              /dev/sdd1(0)
  [mirror_rmeta_0]  taft ewi-aor---  4.00m              /dev/sdb1(0)
  [mirror_rmeta_1]  taft ewi-aor---  4.00m              /dev/sdc1(0)
68.13.4. Differentiating between LVM RAID objects using tags
You can assign tags to LVM RAID objects to group them, so that you can automate the control of LVM RAID behavior, such as activation, by group.
The physical volume (PV) tags are responsible for the allocation control in the LVM raid, as opposed to logical volume (LV) or volume group (VG) tags, because allocation in lvm occurs at the PV level based on allocation policies. To distinguish storage types by their different properties, tag them appropriately (e.g. NVMe, SSD, HDD). Red Hat recommends that you tag each new PV appropriately after you add it to a VG.
This procedure adds object tags to your logical volumes, assuming /dev/sda is an SSD, and /dev/sd[b-f] are HDDs with one partition.
Prerequisites
-
The
lvm2package is installed. - Storage devices to use as PVs are available.
Procedure
Create a volume group.
# vgcreate MyVG /dev/sd[a-f]1Add tags to your physical volumes.
# pvchange --addtag ssds /dev/sda1

# pvchange --addtag hdds /dev/sd[b-f]1
Create a RAID6 logical volume.
# lvcreate --type raid6 --stripes 3 -L1G -nr6 MyVG @hdds
Create a linear cache pool volume.
# lvcreate -nr6pool -L512m MyVG @ssdsConvert the RAID6 volume to be cached.
# lvconvert --type cache --cachevol MyVG/r6pool MyVG/r6
Additional resources
-
The
lvcreate(8),lvconvert(8),lvmraid(7)andlvmcache(7)man pages.
68.14. Troubleshooting LVM
You can use LVM tools to troubleshoot a variety of issues in LVM volumes and groups.
68.14.1. Gathering diagnostic data on LVM
If an LVM command is not working as expected, you can gather diagnostics in the following ways.
Procedure
Use the following methods to gather different kinds of diagnostic data:
-
Add the
-vargument to any LVM command to increase the verbosity level of the command output. Verbosity can be further increased by adding additionalv’s. A maximum of four suchv’sis allowed, for example,-vvvv. -
In the
logsection of the/etc/lvm/lvm.confconfiguration file, increase the value of theleveloption. This causes LVM to provide more details in the system log. If the problem is related to the logical volume activation, enable LVM to log messages during the activation:
-
Set the
activation = 1option in thelogsection of the/etc/lvm/lvm.confconfiguration file. -
Execute the LVM command with the
-vvvvoption. - Examine the command output.
Reset the
activationoption to0.If you do not reset the option to
0, the system might become unresponsive during low memory situations.
-
Set the
Display an information dump for diagnostic purposes:
# lvmdump
Display additional system information:
# lvs -v
# pvs --all
# dmsetup info --columns
-
Examine the last backup of the LVM metadata in the
/etc/lvm/backup/directory and archived versions in the/etc/lvm/archive/directory. Check the current configuration information:
# lvmconfig
-
Check the
/run/lvm/hintscache file for a record of which devices have physical volumes on them.
-
Add the
Additional resources
-
lvmdump(8)man page
68.14.2. Displaying information on failed LVM devices
You can display information about a failed LVM volume that can help you determine why the volume failed.
Procedure
Display the failed volumes using the
vgsorlvsutility.Example 68.14. Failed volume groups
In this example, one of the devices that made up the volume group myvg failed. The volume group is unusable but you can see information about the failed device.
# vgs --options +devices
 /dev/vdb1: open failed: No such device or address
 /dev/vdb1: open failed: No such device or address
  WARNING: Couldn't find device with uuid 42B7bu-YCMp-CEVD-CmKH-2rk6-fiO9-z1lf4s.
  WARNING: VG myvg is missing PV 42B7bu-YCMp-CEVD-CmKH-2rk6-fiO9-z1lf4s (last written to /dev/sdb1).
  WARNING: Couldn't find all devices for LV myvg/mylv while checking used and assumed devices.

VG    #PV #LV #SN Attr   VSize  VFree  Devices
myvg   2   2   0 wz-pn- <3.64t <3.60t [unknown](0)
myvg   2   2   0 wz-pn- <3.64t <3.60t [unknown](5120),/dev/vdb1(0)
Example 68.15. Failed logical volume
In this example, one of the devices failed due to which the logical volume in the volume group failed. The command output shows the failed logical volumes.
# lvs --all --options +devices

  /dev/vdb1: open failed: No such device or address
  /dev/vdb1: open failed: No such device or address
  WARNING: Couldn't find device with uuid 42B7bu-YCMp-CEVD-CmKH-2rk6-fiO9-z1lf4s.
  WARNING: VG myvg is missing PV 42B7bu-YCMp-CEVD-CmKH-2rk6-fiO9-z1lf4s (last written to /dev/sdb1).
  WARNING: Couldn't find all devices for LV myvg/mylv while checking used and assumed devices.

  LV    VG  Attr       LSize  Pool Origin Data%  Meta%  Move Log Cpy%Sync Convert Devices
  mylv myvg -wi-a---p- 20.00g                                                     [unknown](0)                                                 [unknown](5120),/dev/sdc1(0)
Example 68.16. Failed leg of a mirrored logical volume
The following examples show the command output from the
vgsandlvsutilities when a leg of a mirrored logical volume has failed.# vgs --all --options +devices VG #PV #LV #SN Attr VSize VFree Devices corey 4 4 0 rz-pnc 1.58T 1.34T my_mirror_mimage_0(0),my_mirror_mimage_1(0) corey 4 4 0 rz-pnc 1.58T 1.34T /dev/sdd1(0) corey 4 4 0 rz-pnc 1.58T 1.34T unknown device(0) corey 4 4 0 rz-pnc 1.58T 1.34T /dev/sdb1(0)
# lvs --all --options +devices

  LV                   VG    Attr   LSize   Origin Snap%  Move Log            Copy%  Devices
  my_mirror corey mwi-a- 120.00G my_mirror_mlog 1.95 my_mirror_mimage_0(0),my_mirror_mimage_1(0)
  [my_mirror_mimage_0] corey iwi-ao 120.00G unknown device(0)
  [my_mirror_mimage_1] corey iwi-ao 120.00G /dev/sdb1(0)
  [my_mirror_mlog] corey lwi-ao 4.00M /dev/sdd1(0)
68.14.3. Removing lost LVM physical volumes from a volume group
If a physical volume fails, you can activate the remaining physical volumes in the volume group and remove all the logical volumes that used that physical volume from the volume group.
Procedure
Activate the remaining physical volumes in the volume group:
# vgchange --activate y --partial myvgCheck which logical volumes will be removed:
# vgreduce --removemissing --test myvgRemove all the logical volumes that used the lost physical volume from the volume group:
# vgreduce --removemissing --force myvgOptional: If you accidentally removed logical volumes that you wanted to keep, you can reverse the
vgreduceoperation:# vgcfgrestore myvgWarningIf you remove a thin pool, LVM cannot reverse the operation.
68.14.4. Finding the metadata of a missing LVM physical volume
If the volume group’s metadata area of a physical volume is accidentally overwritten or otherwise destroyed, you get an error message indicating that the metadata area is incorrect, or that the system was unable to find a physical volume with a particular UUID.
This procedure finds the latest archived metadata of a physical volume that is missing or corrupted.
Procedure
Find the archived metadata file of the volume group that contains the physical volume. The archived metadata files are located at the
/etc/lvm/archive/volume-group-name_backup-number.vgpath:# cat /etc/lvm/archive/myvg_00000-1248998876.vgReplace 00000-1248998876 with the backup-number. Select the last known valid metadata file, which has the highest number for the volume group.
Find the UUID of the physical volume. Use one of the following methods.
List the logical volumes:
# lvs --all --options +devices Couldn't find device with uuid 'FmGRh3-zhok-iVI8-7qTD-S5BI-MAEN-NYM5Sk'.-
Examine the archived metadata file. Find the UUID as the value labeled
id =in thephysical_volumessection of the volume group configuration. Deactivate the volume group using the
--partialoption:# vgchange --activate n --partial myvg PARTIAL MODE. Incomplete logical volumes will be processed. WARNING: Couldn't find device with uuid 42B7bu-YCMp-CEVD-CmKH-2rk6-fiO9-z1lf4s. WARNING: VG myvg is missing PV 42B7bu-YCMp-CEVD-CmKH-2rk6-fiO9-z1lf4s (last written to /dev/vdb1). 0 logical volume(s) in volume group "myvg" now active
68.14.5. Restoring metadata on an LVM physical volume
This procedure restores metadata on a physical volume that is either corrupted or replaced with a new device. You might be able to recover the data from the physical volume by rewriting the metadata area on the physical volume.
Do not attempt this procedure on a working LVM logical volume. You will lose your data if you specify the incorrect UUID.
Prerequisites
- You have identified the metadata of the missing physical volume. For details, see Finding the metadata of a missing LVM physical volume.
Procedure
Restore the metadata on the physical volume:
# pvcreate --uuid physical-volume-uuid \
           --restorefile /etc/lvm/archive/volume-group-name_backup-number.vg \
           block-device
NoteThe command overwrites only the LVM metadata areas and does not affect the existing data areas.
Example 68.17. Restoring a physical volume on /dev/vdb1
The following example labels the
/dev/vdb1device as a physical volume with the following properties:-
The UUID of
FmGRh3-zhok-iVI8-7qTD-S5BI-MAEN-NYM5Sk -
The metadata information contained in
VG_00050.vg, which is the most recent good archived metadata for the volume group
# pvcreate --uuid "FmGRh3-zhok-iVI8-7qTD-S5BI-MAEN-NYM5Sk" \ --restorefile /etc/lvm/archive/VG_00050.vg \ /dev/vdb1 ... Physical volume "/dev/vdb1" successfully created-
The UUID of
Restore the metadata of the volume group:
# vgcfgrestore myvg

  Restored volume group myvg
Display the logical volumes on the volume group:
# lvs --all --options +devices myvgThe logical volumes are currently inactive. For example:
  LV     VG   Attr   LSize   Origin Snap%  Move Log Copy%  Devices
  mylv myvg   -wi--- 300.00G                               /dev/vdb1 (0),/dev/vdb1(0)
  mylv myvg   -wi--- 300.00G                               /dev/vdb1 (34728),/dev/vdb1(0)
If the segment type of the logical volumes is RAID, resynchronize the logical volumes:
# lvchange --resync myvg/mylvActivate the logical volumes:
# lvchange --activate y myvg/mylv-
If the on-disk LVM metadata takes at least as much space as what overrode it, this procedure can recover the physical volume. If what overrode the metadata went past the metadata area, the data on the volume may have been affected. You might be able to use the
fsckcommand to recover that data.
Verification steps
Display the active logical volumes:
# lvs --all --options +devices

  LV     VG   Attr   LSize   Origin Snap%  Move Log Copy%  Devices
 mylv myvg   -wi--- 300.00G                               /dev/vdb1 (0),/dev/vdb1(0)
 mylv myvg   -wi--- 300.00G                               /dev/vdb1 (34728),/dev/vdb1(0)
68.14.6. Rounding errors in LVM output
LVM commands that report the space usage in volume groups round the reported number to 2 decimal places to provide human-readable output. This includes the vgdisplay and vgs utilities.
As a result of the rounding, the reported value of free space might be larger than what the physical extents on the volume group provide. If you attempt to create a logical volume the size of the reported free space, you might get the following error:
Insufficient free extents
To work around the error, you must examine the number of free physical extents on the volume group, which is the accurate value of free space. You can then use the number of extents to create the logical volume successfully.
68.14.7. Preventing the rounding error when creating an LVM volume
When creating an LVM logical volume, you can specify the number of logical extents of the logical volume to avoid rounding error.
Procedure
Find the number of free physical extents in the volume group:
# vgdisplay myvgExample 68.18. Free extents in a volume group
For example, the following volume group has 8780 free physical extents:
--- Volume group ---
 VG Name               myvg
 System ID
 Format                lvm2
 Metadata Areas        4
 Metadata Sequence No  6
 VG Access             read/write
[...]
Free  PE / Size       8780 / 34.30 GB
Create the logical volume. Enter the volume size in extents rather than bytes.
Example 68.19. Creating a logical volume by specifying the number of extents
# lvcreate --extents 8780 --name mylv myvgExample 68.20. Creating a logical volume to occupy all the remaining space
Alternatively, you can extend the logical volume to use a percentage of the remaining free space in the volume group. For example:
# lvcreate --extents 100%FREE --name mylv myvg
Verification steps
Check the number of extents that the volume group now uses:
# vgs --options +vg_free_count,vg_extent_count

  VG     #PV #LV #SN  Attr   VSize   VFree  Free  #Ext
  myvg   2   1   0   wz--n- 34.30G    0    0     8780
68.14.8. Troubleshooting LVM RAID
You can troubleshoot various issues in LVM RAID devices to correct data errors, recover devices, or replace failed devices.
68.14.8.1. Checking data coherency in a RAID logical volume (RAID scrubbing)
LVM provides scrubbing support for RAID logical volumes. RAID scrubbing is the process of reading all the data and parity blocks in an array and checking to see whether they are coherent.
Procedure
Optional: Limit the I/O bandwidth that the scrubbing process uses.
When you perform a RAID scrubbing operation, the background I/O required by the
syncoperations can crowd out other I/O to LVM devices, such as updates to volume group metadata. This might cause the other LVM operations to slow down. You can control the rate of the scrubbing operation by implementing recovery throttling.Add the following options to the
lvchange --syncactioncommands in the next steps:--maxrecoveryrate Rate[bBsSkKmMgG]- Sets the maximum recovery rate so that the operation does crowd out nominal I/O operations. Setting the recovery rate to 0 means that the operation is unbounded.
--minrecoveryrate Rate[bBsSkKmMgG]-
Sets the minimum recovery rate to ensure that I/O for
syncoperations achieves a minimum throughput, even when heavy nominal I/O is present.
Specify the Rate value as an amount per second for each device in the array. If you provide no suffix, the options assume kiB per second per device.
Display the number of discrepancies in the array, without repairing them:
# lvchange --syncaction check vg/raid_lvCorrect the discrepancies in the array:
# lvchange --syncaction repair vg/raid_lvNoteThe
lvchange --syncaction repairoperation does not perform the same function as thelvconvert --repairoperation:-
The
lvchange --syncaction repairoperation initiates a background synchronization operation on the array. -
The
lvconvert --repairoperation repairs or replaces failed devices in a mirror or RAID logical volume.
-
The
Optional: Display information about the scrubbing operation:
# lvs -o +raid_sync_action,raid_mismatch_count vg/lvThe
raid_sync_actionfield displays the current synchronization operation that the RAID volume is performing. It can be one of the following values:idle- All sync operations complete (doing nothing)
resync- Initializing an array or recovering after a machine failure
recover- Replacing a device in the array
check- Looking for array inconsistencies
repair- Looking for and repairing inconsistencies
-
The
raid_mismatch_countfield displays the number of discrepancies found during acheckoperation. -
The
Cpy%Syncfield displays the progress of thesyncoperations. The
lv_attrfield provides additional indicators. Bit 9 of this field displays the health of the logical volume, and it supports the following indicators:-
m(mismatches) indicates that there are discrepancies in a RAID logical volume. This character is shown after a scrubbing operation has detected that portions of the RAID are not coherent. -
r(refresh) indicates that a device in a RAID array has suffered a failure and the kernel regards it as failed, even though LVM can read the device label and considers the device to be operational. Refresh the logical volume to notify the kernel that the device is now available, or replace the device if you suspect that it failed.
-
Additional resources
-
For more information, see the
lvchange(8)andlvmraid(7)man pages.
68.14.8.2. Failed devices in LVM RAID
RAID is not like traditional LVM mirroring. LVM mirroring required failed devices to be removed or the mirrored logical volume would hang. RAID arrays can keep on running with failed devices. In fact, for RAID types other than RAID1, removing a device would mean converting to a lower level RAID (for example, from RAID6 to RAID5, or from RAID4 or RAID5 to RAID0).
Therefore, rather than removing a failed device unconditionally and potentially allocating a replacement, LVM allows you to replace a failed device in a RAID volume in a one-step solution by using the --repair argument of the lvconvert command.
68.14.8.3. Recovering a failed RAID device in a logical volume
If the LVM RAID device failure is a transient failure or you are able to repair the device that failed, you can initiate recovery of the failed device.
Prerequisites
- The previously failed device is now working.
Procedure
Refresh the logical volume that contains the RAID device:
# lvchange --refresh my_vg/my_lv
Verification steps
Examine the logical volume with the recovered device:
# lvs --all --options name,devices,lv_attr,lv_health_status my_vg
68.14.8.4. Replacing a failed RAID device in a logical volume
This procedure replaces a failed device that serves as a physical volume in an LVM RAID logical volume.
Prerequisites
The volume group includes a physical volume that provides enough free capacity to replace the failed device.
If no physical volume with sufficient free extents is available on the volume group, add a new, sufficiently large physical volume using the
vgextendutility.
Procedure
In the following example, a RAID logical volume is laid out as follows:
# lvs --all --options name,copy_percent,devices my_vg

  LV               Cpy%Sync Devices
  my_lv            100.00   my_lv_rimage_0(0),my_lv_rimage_1(0),my_lv_rimage_2(0)
  [my_lv_rimage_0]          /dev/sde1(1)
  [my_lv_rimage_1]          /dev/sdc1(1)
  [my_lv_rimage_2]          /dev/sdd1(1)
  [my_lv_rmeta_0]           /dev/sde1(0)
  [my_lv_rmeta_1]           /dev/sdc1(0)
  [my_lv_rmeta_2]           /dev/sdd1(0)
If the
/dev/sdcdevice fails, the output of thelvscommand is as follows:# lvs --all --options name,copy_percent,devices my_vg /dev/sdc: open failed: No such device or address Couldn't find device with uuid A4kRl2-vIzA-uyCb-cci7-bOod-H5tX-IzH4Ee. WARNING: Couldn't find all devices for LV my_vg/my_lv_rimage_1 while checking used and assumed devices. WARNING: Couldn't find all devices for LV my_vg/my_lv_rmeta_1 while checking used and assumed devices. LV Cpy%Sync Devices my_lv 100.00 my_lv_rimage_0(0),my_lv_rimage_1(0),my_lv_rimage_2(0) [my_lv_rimage_0] /dev/sde1(1) [my_lv_rimage_1] [unknown](1) [my_lv_rimage_2] /dev/sdd1(1) [my_lv_rmeta_0] /dev/sde1(0) [my_lv_rmeta_1] [unknown](0) [my_lv_rmeta_2] /dev/sdd1(0)
Replace the failed device and display the logical volume:
# lvconvert --repair my_vg/my_lv /dev/sdc: open failed: No such device or address Couldn't find device with uuid A4kRl2-vIzA-uyCb-cci7-bOod-H5tX-IzH4Ee. WARNING: Couldn't find all devices for LV my_vg/my_lv_rimage_1 while checking used and assumed devices. WARNING: Couldn't find all devices for LV my_vg/my_lv_rmeta_1 while checking used and assumed devices. Attempt to replace failed RAID images (requires full device resync)? [y/n]: y Faulty devices in my_vg/my_lv successfully replaced.
Optional: To manually specify the physical volume that replaces the failed device, add the physical volume at the end of the command:
# lvconvert --repair my_vg/my_lv replacement_pv
Examine the logical volume with the replacement:
# lvs --all --options name,copy_percent,devices my_vg /dev/sdc: open failed: No such device or address /dev/sdc1: open failed: No such device or address Couldn't find device with uuid A4kRl2-vIzA-uyCb-cci7-bOod-H5tX-IzH4Ee. LV Cpy%Sync Devices my_lv 43.79 my_lv_rimage_0(0),my_lv_rimage_1(0),my_lv_rimage_2(0) [my_lv_rimage_0] /dev/sde1(1) [my_lv_rimage_1] /dev/sdb1(1) [my_lv_rimage_2] /dev/sdd1(1) [my_lv_rmeta_0] /dev/sde1(0) [my_lv_rmeta_1] /dev/sdb1(0) [my_lv_rmeta_2] /dev/sdd1(0)
Until you remove the failed device from the volume group, LVM utilities still indicate that LVM cannot find the failed device.
Remove the failed device from the volume group:
# vgreduce --removemissing VG
68.14.9. Troubleshooting duplicate physical volume warnings for multipathed LVM devices
When using LVM with multipathed storage, LVM commands that list a volume group or logical volume might display messages such as the following:
Found duplicate PV GDjTZf7Y03GJHjteqOwrye2dcSCjdaUi: using /dev/dm-5 not /dev/sdd Found duplicate PV GDjTZf7Y03GJHjteqOwrye2dcSCjdaUi: using /dev/emcpowerb not /dev/sde Found duplicate PV GDjTZf7Y03GJHjteqOwrye2dcSCjdaUi: using /dev/sddlmab not /dev/sdf
You can troubleshoot these warnings to understand why LVM displays them, or to hide the warnings.
68.14.9.1. Root cause of duplicate PV warnings
When a multipath software such as Device Mapper Multipath (DM Multipath), EMC PowerPath, or Hitachi Dynamic Link Manager (HDLM) manages storage devices on the system, each path to a particular logical unit (LUN) is registered as a different SCSI device.
The multipath software then creates a new device that maps to those individual paths. Because each LUN has multiple device nodes in the /dev directory that point to the same underlying data, all the device nodes contain the same LVM metadata.
Table 68.6. Example device mappings in different multipath software
| Multipath software | SCSI paths to a LUN | Multipath device mapping to paths |
|---|---|---|
| DM Multipath |
|
|
| EMC PowerPath |
| |
| HDLM |
|
As a result of the multiple device nodes, LVM tools find the same metadata multiple times and report them as duplicates.
68.14.9.2. Cases of duplicate PV warnings
LVM displays the duplicate PV warnings in either of the following cases:
- Single paths to the same device
The two devices displayed in the output are both single paths to the same device.
The following example shows a duplicate PV warning in which the duplicate devices are both single paths to the same device.
Found duplicate PV GDjTZf7Y03GJHjteqOwrye2dcSCjdaUi: using /dev/sdd not /dev/sdf
If you list the current DM Multipath topology using the
multipath -llcommand, you can find both/dev/sddand/dev/sdfunder the same multipath map.These duplicate messages are only warnings and do not mean that the LVM operation has failed. Rather, they are alerting you that LVM uses only one of the devices as a physical volume and ignores the others.
If the messages indicate that LVM chooses the incorrect device or if the warnings are disruptive to users, you can apply a filter. The filter configures LVM to search only the necessary devices for physical volumes, and to leave out any underlying paths to multipath devices. As a result, the warnings no longer appear.
- Multipath maps
The two devices displayed in the output are both multipath maps.
The following examples show a duplicate PV warning for two devices that are both multipath maps. The duplicate physical volumes are located on two different devices rather than on two different paths to the same device.
Found duplicate PV GDjTZf7Y03GJHjteqOwrye2dcSCjdaUi: using /dev/mapper/mpatha not /dev/mapper/mpathc Found duplicate PV GDjTZf7Y03GJHjteqOwrye2dcSCjdaUi: using /dev/emcpowera not /dev/emcpowerh
This situation is more serious than duplicate warnings for devices that are both single paths to the same device. These warnings often mean that the machine is accessing devices that it should not access: for example, LUN clones or mirrors.
Unless you clearly know which devices you should remove from the machine, this situation might be unrecoverable. Red Hat recommends that you contact Red Hat Technical Support to address this issue.
68.14.9.3. Example LVM device filters that prevent duplicate PV warnings
The following examples show LVM device filters that avoid the duplicate physical volume warnings that are caused by multiple storage paths to a single logical unit (LUN).
The filter that you configure must include all devices that LVM needs to be check for metadata, such as the local hard drive with the root volume group on it and any multipathed devices. By rejecting the underlying paths to a multipath device (such as /dev/sdb, /dev/sdd, and so on), you can avoid these duplicate PV warnings, because LVM finds each unique metadata area once on the multipath device itself.
This filter accepts the second partition on the first hard drive and any DM Multipath devices, but rejects everything else:
filter = [ "a|/dev/sda2$|", "a|/dev/mapper/mpath.*|", "r|.*|" ]
This filter accepts all HP SmartArray controllers and any EMC PowerPath devices:
filter = [ "a|/dev/cciss/.*|", "a|/dev/emcpower.*|", "r|.*|" ]
This filter accepts any partitions on the first IDE drive and any multipath devices:
filter = [ "a|/dev/hda.*|", "a|/dev/mapper/mpath.*|", "r|.*|" ]
68.14.9.4. Applying an LVM device filter configuration
This procedure changes the configuration of the LVM device filter, which controls the devices that LVM scans.
Prerequisites
- Prepare the device filter pattern that you want to use.
Procedure
Test your device filter pattern without modifying the
/etc/lvm/lvm.conffile.Use an LVM command with the
--config 'devices{ filter = [ your device filter pattern ] }'option. For example:# lvs --config 'devices{ filter = [ "a|/dev/emcpower.*|", "r|.*|" ] }'-
Edit the
filteroption in the/etc/lvm/lvm.confconfiguration file to use your new device filter pattern. Check that no physical volumes or volume groups that you want to use are missing with the new configuration:
# pvscan
# vgscan
Rebuild the
initramfsfile system so that LVM scans only the necessary devices upon reboot:# dracut --force --verbose