
Red Hat Training
A Red Hat training course is available for RHEL 8
Chapter 2. Managing kernel modules
Learn about kernel modules, how to display their information, and how to perform basic administrative tasks with kernel modules.
2.1. Introduction to kernel modules
The Red Hat Enterprise Linux kernel can be extended with optional, additional pieces of functionality, called kernel modules, without having to reboot the system. On RHEL 8, kernel modules are extra kernel code which is built into compressed <KERNEL_MODULE_NAME>.ko.xz object files.
The most common functionality enabled by kernel modules are:
- Device driver which adds support for new hardware
- Support for a file system such as GFS2 or NFS
- System calls
On modern systems, kernel modules are automatically loaded when needed. However, in some cases it is necessary to load or unload modules manually.
Like the kernel itself, the modules can take parameters that customize their behavior if needed.
Tooling is provided to inspect which modules are currently running, which modules are available to load into the kernel and which parameters a module accepts. The tooling also provides a mechanism to load and unload kernel modules into the running kernel.
2.2. Kernel module dependencies
Certain kernel modules sometimes depend on one or more other kernel modules. The /lib/modules/<KERNEL_VERSION>/modules.dep file contains a complete list of kernel module dependencies for the respective kernel version.
depmod
The dependency file is generated by the depmod program, which is a part of the kmod package. Many of the utilities provided by kmod take module dependencies into account when performing operations so that manual dependency-tracking is rarely necessary.
The code of kernel modules is executed in kernel-space in the unrestricted mode. Because of this, you should be mindful of what modules you are loading.
weak-modules
In addition to depmod, Red Hat Enterprise Linux provides the weak-modules script shipped also with the kmod package. weak-modules determines which modules are kABI-compatible with installed kernels. While checking modules kernel compatibility, weak-modules processes modules symbol dependencies from higher to lower release of kernel for which they were built. This means that weak-modules processes each module independently of kernel release they were built against.
Additional resources
-
The
modules.dep(5)manual page -
The
depmod(8)manual page - What is the purpose of weak-modules script shipped with Red Hat Enterprise Linux?
- What is Kernel Application Binary Interface (kABI)?
2.3. Listing installed kernel modules
The grubby --info=ALL command displays an indexed list of installed kernels on !BLS and BLS installs.
Procedure
List the installed kernels using the following command:
# grubby --info=ALL | grep titleThe list of all installed kernels is displayed as follows:
title=Red Hat Enterprise Linux (4.18.0-20.el8.x86_64) 8.0 (Ootpa)
title=Red Hat Enterprise Linux (4.18.0-19.el8.x86_64) 8.0 (Ootpa)
title=Red Hat Enterprise Linux (4.18.0-12.el8.x86_64) 8.0 (Ootpa)
title=Red Hat Enterprise Linux (4.18.0) 8.0 (Ootpa)
title=Red Hat Enterprise Linux (0-rescue-2fb13ddde2e24fde9e6a246a942caed1) 8.0 (Ootpa)
The above example displays the installed kernels list of grubby-8.40-17, from the GRUB menu.
2.4. Listing currently loaded kernel modules
View the currently loaded kernel modules.
Prerequisites
-
The
kmodpackage is installed.
Procedure
To list all currently loaded kernel modules, enter:
$ lsmod Module Size Used by fuse 126976 3 uinput 20480 1 xt_CHECKSUM 16384 1 ipt_MASQUERADE 16384 1 xt_conntrack 16384 1 ipt_REJECT 16384 1 nft_counter 16384 16 nf_nat_tftp 16384 0 nf_conntrack_tftp 16384 1 nf_nat_tftp tun 49152 1 bridge 192512 0 stp 16384 1 bridge llc 16384 2 bridge,stp nf_tables_set 32768 5 nft_fib_inet 16384 1 …In the example above:
-
The
Modulecolumn provides the names of currently loaded modules. -
The
Sizecolumn displays the amount of memory per module in kilobytes. -
The
Used bycolumn shows the number, and optionally the names of modules that are dependent on a particular module.
-
The
Additional resources
-
The
/usr/share/doc/kmod/READMEfile -
The
lsmod(8)manual page
2.5. Listing all installed kernels
Use the grubby utility to list all installed kernels on your system.
Prerequisites
- You have root permissions.
Procedure
To list all installed kernels, enter:
# grubby --info=ALL | grep ^kernel

kernel="/boot/vmlinuz-4.18.0-305.10.2.el8_4.x86_64"
kernel="/boot/vmlinuz-4.18.0-240.el8.x86_64"
kernel="/boot/vmlinuz-0-rescue-41eb2e172d7244698abda79a51778f1b"
The output displays path to all the installed kernels, and displays also their respective versions.
2.6. Displaying information about kernel modules
Use the modinfo command to display some detailed information about the specified kernel module.
Prerequisites
-
The
kmodpackage is installed.
Procedure
To display information about any kernel module, enter:
$ modinfo <KERNEL_MODULE_NAME>For example:
$ modinfo virtio_net filename: /lib/modules/4.18.0-94.el8.x86_64/kernel/drivers/net/virtio_net.ko.xz license: GPL description: Virtio network driver rhelversion: 8.1 srcversion: 2E9345B281A898A91319773 alias: virtio:d00000001v* depends: net_failover intree: Y name: virtio_net vermagic: 4.18.0-94.el8.x86_64 SMP mod_unload modversions … parm: napi_weight:int parm: csum:bool parm: gso:bool parm: napi_tx:boolYou can query information about all available modules, regardless of whether they are loaded or not. The
parmentries show parameters the user is able to set for the module, and what type of value they expect.NoteWhen entering the name of a kernel module, do not append the
.ko.xzextension to the end of the name. Kernel module names do not have extensions; their corresponding files do.
Additional resources
-
The
modinfo(8)manual page
2.7. Loading kernel modules at system runtime
The optimal way to expand the functionality of the Linux kernel is by loading kernel modules. Use the modprobe command to find and load a kernel module into the currently running kernel.
The changes described in this procedure will not persist after rebooting the system. For information about how to load kernel modules to persist across system reboots, see Loading kernel modules automatically at system boot time.
Prerequisites
- Root permissions
-
The
kmodpackage is installed. - The respective kernel module is not loaded. To ensure this is the case, list the loaded kernel modules.
Procedure
Select a kernel module you want to load.
The modules are located in the
/lib/modules/$(uname -r)/kernel/<SUBSYSTEM>/directory.Load the relevant kernel module:
# modprobe <MODULE_NAME>NoteWhen entering the name of a kernel module, do not append the
.ko.xzextension to the end of the name. Kernel module names do not have extensions; their corresponding files do.
Verification
Optionally, verify the relevant module was loaded:
$ lsmod | grep <MODULE_NAME>If the module was loaded correctly, this command displays the relevant kernel module. For example:
$ lsmod | grep serio_raw
serio_raw              16384  0
Additional resources
-
The
modprobe(8)manual page
2.8. Unloading kernel modules at system runtime
At times, you find that you need to unload certain kernel modules from the running kernel. Use the modprobe command to find and unload a kernel module at system runtime from the currently loaded kernel.
Do not unload kernel modules when they are used by the running system. Doing so can lead to an unstable or non-operational system.
After finishing this procedure, the kernel modules that are defined to be automatically loaded on boot, will not stay unloaded after rebooting the system. For information about how to counter this outcome, see Preventing kernel modules from being automatically loaded at system boot time.
Prerequisites
- Root permissions
-
The
kmodpackage is installed.
Procedure
List all loaded kernel modules:
# lsmodSelect the kernel module you want to unload.
If a kernel module has dependencies, unload those prior to unloading the kernel module. For details on identifying modules with dependencies, see Listing currently loaded kernel modules and Kernel module dependencies.
Unload the relevant kernel module:
# modprobe -r <MODULE_NAME>When entering the name of a kernel module, do not append the
.ko.xzextension to the end of the name. Kernel module names do not have extensions; their corresponding files do.
Verification
Optionally, verify the relevant module was unloaded:
$ lsmod | grep <MODULE_NAME>If the module was unloaded successfully, this command does not display any output.
Additional resources
-
modprobe(8)manual page
2.9. Unloading kernel modules at early stages of the boot process
In certain situations, it is necessary to unload a kernel module very early in the booting process. For example, when the kernel module contains a code, which causes the system to become unresponsive, and the user is not able to reach the stage to permanently disable the rogue kernel module. In that case it is possible to temporarily block the loading of the kernel module using a boot loader.
You can edit the relevant boot loader entry to unload the desired kernel module before the booting sequence continues.
The changes described in this procedure will not persist after the next reboot. For information about how to add a kernel module to a denylist so that it will not be automatically loaded during the boot process, see Preventing kernel modules from being automatically loaded at system boot time.
Prerequisites
- You have a loadable kernel module that you want to prevent from loading for some reason.
Procedure
- Boot the system into the boot loader.
- Use the cursor keys to highlight the relevant boot loader entry.
Press the e key to edit the entry.
Figure 2.1. Kernel boot menu

- Use the cursor keys to navigate to the line that starts with linux.
Append
modprobe.blacklist=module_nameto the end of the line.Figure 2.2. Kernel boot entry
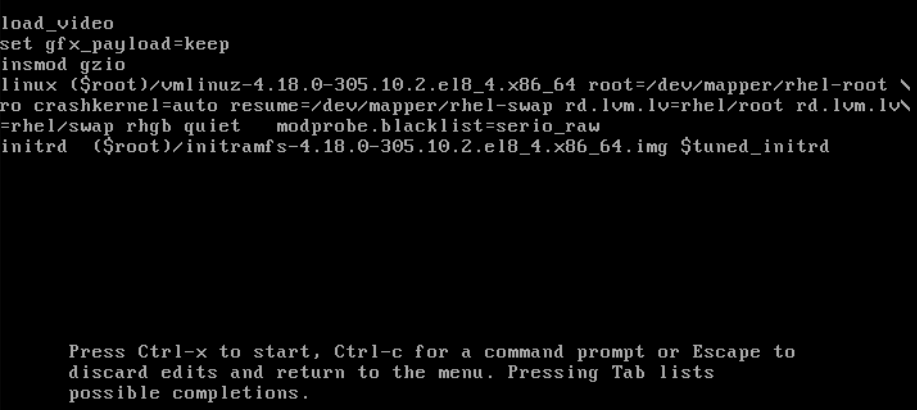
The
serio_rawkernel module illustrates a rogue module to be unloaded early in the boot process.- Press Ctrl+X to boot using the modified configuration.
Verification
Once the system fully boots, verify that the relevant kernel module is not loaded.
# lsmod | grep serio_raw
Additional resources
2.10. Loading kernel modules automatically at system boot time
Configure a kernel module so that it is loaded automatically during the boot process.
Prerequisites
- Root permissions
-
The
kmodpackage is installed.
Procedure
Select a kernel module you want to load during the boot process.
The modules are located in the
/lib/modules/$(uname -r)/kernel/<SUBSYSTEM>/directory.Create a configuration file for the module:
# echo <MODULE_NAME> > /etc/modules-load.d/<MODULE_NAME>.confNoteWhen entering the name of a kernel module, do not append the
.ko.xzextension to the end of the name. Kernel module names do not have extensions; their corresponding files do.Optionally, after reboot, verify the relevant module was loaded:
$ lsmod | grep <MODULE_NAME>The example command above should succeed and display the relevant kernel module.
The changes described in this procedure will persist after rebooting the system.
Additional resources
-
modules-load.d(5)manual page
2.11. Preventing kernel modules from being automatically loaded at system boot time
You can prevent the system from loading a kernel module automatically during the boot process by listing the module in modprobe configuration file with a corresponding command.
Prerequisites
-
The commands in this procedure require root privileges. Either use
su -to switch to the root user or preface the commands withsudo. -
The
kmodpackage is installed. - Ensure that your current system configuration does not require a kernel module you plan to deny.
Procedure
List modules loaded to the currently running kernel by using the
lsmodcommand:$ lsmod Module Size Used by tls 131072 0 uinput 20480 1 snd_seq_dummy 16384 0 snd_hrtimer 16384 1 …In the output, identify the module you want to prevent from being loaded.
Alternatively, identify an unloaded kernel module you want to prevent from potentially loading in the
/lib/modules/<KERNEL-VERSION>/kernel/<SUBSYSTEM>/directory, for example:$ ls /lib/modules/4.18.0-477.20.1.el8_8.x86_64/kernel/crypto/ ansi_cprng.ko.xz chacha20poly1305.ko.xz md4.ko.xz serpent_generic.ko.xz anubis.ko.xz cmac.ko.xz…
Create a configuration file serving as a denylist:
# touch /etc/modprobe.d/denylist.confIn a text editor of your choice, combine the names of modules you want to exclude from automatic loading to the kernel with the
blacklistconfiguration command, for example:# Prevents <KERNEL-MODULE-1> from being loaded blacklist <MODULE-NAME-1> install <MODULE-NAME-1> /bin/false # Prevents <KERNEL-MODULE-2> from being loaded blacklist <MODULE-NAME-2> install <MODULE-NAME-2> /bin/false …
Because the
blacklistcommand does not prevent the module from being loaded as a dependency for another kernel module that is not in a denylist, you must also define theinstallline. In this case, the system runs/bin/falseinstead of installing the module. The lines starting with a hash sign are comments you can use to make the file more readable.NoteWhen entering the name of a kernel module, do not append the
.ko.xzextension to the end of the name. Kernel module names do not have extensions; their corresponding files do.Create a backup copy of the current initial RAM disk image before rebuilding:
# cp /boot/initramfs-$(uname -r).img /boot/initramfs-$(uname -r).bak.$(date +%m-%d-%H%M%S).imgAlternatively, create a backup copy of an initial RAM disk image which corresponds to the kernel version for which you want to prevent kernel modules from automatic loading:
# cp /boot/initramfs-<VERSION>.img /boot/initramfs-<VERSION>.img.bak.$(date +%m-%d-%H%M%S)
Generate a new initial RAM disk image to apply the changes:
# dracut -f -vIf you build an initial RAM disk image for a different kernel version than your system currently uses, specify both target
initramfsand kernel version:# dracut -f -v /boot/initramfs-<TARGET-VERSION>.img <CORRESPONDING-TARGET-KERNEL-VERSION>
Restart the system:
$ reboot
The changes described in this procedure will take effect and persist after rebooting the system. If you incorrectly list a key kernel module in the denylist, you can switch the system to an unstable or non-operational state.
Additional resources
- How do I prevent a kernel module from loading automatically? solution article
-
modprobe.d(5)anddracut(8)man pages
2.12. Compiling custom kernel modules
You can build a sampling kernel module as requested by various configurations at hardware and software level.
Prerequisites
You installed the
kernel-devel,gcc, andelfutils-libelf-develpackages.# dnf install kernel-devel-$(uname -r) gcc elfutils-libelf-devel
- You have root permissions.
-
You created the
/root/testmodule/directory where you compile the custom kernel module.
Procedure
Create the
/root/testmodule/test.cfile with the following content.#include <linux/module.h> #include <linux/kernel.h> int init_module(void) { printk("Hello World\n This is a test\n"); return 0; } void cleanup_module(void) { printk("Good Bye World"); }The
test.cfile is a source file that provides the main functionality to the kernel module. The file has been created in a dedicated/root/testmodule/directory for organizational purposes. After the module compilation, the/root/testmodule/directory will contain multiple files.The
test.cfile includes from the system libraries:-
The
linux/kernel.hheader file is necessary for theprintk()function in the example code. -
The
linux/module.hfile contains function declarations and macro definitions to be shared between several source files written in C programming language.
-
The
-
Follow the
init_module()andcleanup_module()functions to start and end the kernel logging functionprintk(), which prints text. Create the
/root/testmodule/Makefilefile with the following content.obj-m := test.o
The Makefile contains instructions that the compiler has to produce an object file specifically named
test.o. Theobj-mdirective specifies that the resultingtest.kofile is going to be compiled as a loadable kernel module. Alternatively, theobj-ydirective would instruct to buildtest.koas a built-in kernel module.Compile the kernel module.
# make -C /lib/modules/$(uname -r)/build M=/root/testmodule modules
make: Entering directory '/usr/src/kernels/4.18.0-305.el8.x86_64'
  CC [M]  /root/testmodule/test.o
  Building modules, stage 2.
  MODPOST 1 modules
WARNING: modpost: missing MODULE_LICENSE() in /root/testmodule/test.o
see include/linux/module.h for more information
  CC      /root/testmodule/test.mod.o
  LD [M]  /root/testmodule/test.ko
make: Leaving directory '/usr/src/kernels/4.18.0-305.el8.x86_64'
The compiler creates an object file (
test.o) for each source file (test.c) as an intermediate step before linking them together into the final kernel module (test.ko).After a successful compilation,
/root/testmodule/contains additional files that relate to the compiled custom kernel module. The compiled module itself is represented by thetest.kofile.
Verification
Optional: check the contents of the
/root/testmodule/directory:# ls -l /root/testmodule/ total 152 -rw-r—r--. 1 root root 16 Jul 26 08:19 Makefile -rw-r—r--. 1 root root 25 Jul 26 08:20 modules.order -rw-r—r--. 1 root root 0 Jul 26 08:20 Module.symvers -rw-r—r--. 1 root root 224 Jul 26 08:18 test.c -rw-r—r--. 1 root root 62176 Jul 26 08:20 test.ko -rw-r—r--. 1 root root 25 Jul 26 08:20 test.mod -rw-r—r--. 1 root root 849 Jul 26 08:20 test.mod.c -rw-r—r--. 1 root root 50936 Jul 26 08:20 test.mod.o -rw-r—r--. 1 root root 12912 Jul 26 08:20 test.oCopy the kernel module to the
/lib/modules/$(uname -r)/directory:# cp /root/testmodule/test.ko /lib/modules/$(uname -r)/Update the modular dependency list:
# depmod -aLoad the kernel module:
# modprobe -v test
insmod /lib/modules/4.18.0-305.el8.x86_64/test.ko
Verify that the kernel module was successfully loaded:
# lsmod | grep test
test                   16384  0
Read the latest messages from the kernel ring buffer:
# dmesg
[74422.545004] Hello World
                This is a test
Additional resources