
Red Hat Training
A Red Hat training course is available for RHEL 8
Chapter 8. Configuring IP tunnels
Similar to a VPN, an IP tunnel directly connects two networks over a third network, such as the internet. However, not all tunnel protocols support encryption.
The routers in both networks that establish the tunnel requires at least two interfaces:
- One interface that is connected to the local network
- One interface that is connected to the network through which the tunnel is established.
To establish the tunnel, you create a virtual interface on both routers with an IP address from the remote subnet.
NetworkManager supports the following IP tunnels:
- Generic Routing Encapsulation (GRE)
- Generic Routing Encapsulation over IPv6 (IP6GRE)
- Generic Routing Encapsulation Terminal Access Point (GRETAP)
- Generic Routing Encapsulation Terminal Access Point over IPv6 (IP6GRETAP)
- IPv4 over IPv4 (IPIP)
- IPv4 over IPv6 (IPIP6)
- IPv6 over IPv6 (IP6IP6)
- Simple Internet Transition (SIT)
Depending on the type, these tunnels act either on layer 2 or 3 of the Open Systems Interconnection (OSI) model.
8.1. Configuring an IPIP tunnel using nmcli to encapsulate IPv4 traffic in IPv4 packets
An IP over IP (IPIP) tunnel operates on OSI layer 3 and encapsulates IPv4 traffic in IPv4 packets as described in RFC 2003.
Data sent through an IPIP tunnel is not encrypted. For security reasons, use the tunnel only for data that is already encrypted, for example, by other protocols, such as HTTPS.
Note that IPIP tunnels support only unicast packets. If you require an IPv4 tunnel that supports multicast, see Configuring a GRE tunnel using nmcli to encapsulate layer-3 traffic in IPv4 packets.
For example, you can create an IPIP tunnel between two RHEL routers to connect two internal subnets over the internet as shown in the following diagram:

Prerequisites
- Each RHEL router has a network interface that is connected to its local subnet.
- Each RHEL router has a network interface that is connected to the internet.
- The traffic you want to send through the tunnel is IPv4 unicast.
Procedure
On the RHEL router in network A:
Create an IPIP tunnel interface named
tun0:# nmcli connection add type ip-tunnel ip-tunnel.mode ipip con-name tun0 ifname tun0 remote 198.51.100.5 local 203.0.113.10The
remoteandlocalparameters set the public IP addresses of the remote and the local routers.Set the IPv4 address to the
tun0device:# nmcli connection modify tun0 ipv4.addresses '10.0.1.1/30'Note that a
/30subnet with two usable IP addresses is sufficient for the tunnel.Configure the
tun0connection to use a manual IPv4 configuration:# nmcli connection modify tun0 ipv4.method manualAdd a static route that routes traffic to the
172.16.0.0/24network to the tunnel IP on router B:# nmcli connection modify tun0 +ipv4.routes "172.16.0.0/24 10.0.1.2"Enable the
tun0connection.# nmcli connection up tun0Enable packet forwarding:
# echo "net.ipv4.ip_forward=1" > /etc/sysctl.d/95-IPv4-forwarding.conf
# sysctl -p /etc/sysctl.d/95-IPv4-forwarding.conf
On the RHEL router in network B:
Create an IPIP tunnel interface named
tun0:# nmcli connection add type ip-tunnel ip-tunnel.mode ipip con-name tun0 ifname tun0 remote 203.0.113.10 local 198.51.100.5The
remoteandlocalparameters set the public IP addresses of the remote and local routers.Set the IPv4 address to the
tun0device:# nmcli connection modify tun0 ipv4.addresses '10.0.1.2/30'Configure the
tun0connection to use a manual IPv4 configuration:# nmcli connection modify tun0 ipv4.method manualAdd a static route that routes traffic to the
192.0.2.0/24network to the tunnel IP on router A:# nmcli connection modify tun0 +ipv4.routes "192.0.2.0/24 10.0.1.1"Enable the
tun0connection.# nmcli connection up tun0Enable packet forwarding:
# echo "net.ipv4.ip_forward=1" > /etc/sysctl.d/95-IPv4-forwarding.conf
# sysctl -p /etc/sysctl.d/95-IPv4-forwarding.conf
Verification
From each RHEL router, ping the IP address of the internal interface of the other router:
On Router A, ping
172.16.0.1:# ping 172.16.0.1On Router B, ping
192.0.2.1:# ping 192.0.2.1
Additional resources
-
nmcli(1)man page -
nm-settings(5)man page
8.2. Configuring a GRE tunnel using nmcli to encapsulate layer-3 traffic in IPv4 packets
A Generic Routing Encapsulation (GRE) tunnel encapsulates layer-3 traffic in IPv4 packets as described in RFC 2784. A GRE tunnel can encapsulate any layer 3 protocol with a valid Ethernet type.
Data sent through a GRE tunnel is not encrypted. For security reasons, use the tunnel only for data that is already encrypted, for example, by other protocols, such as HTTPS.
For example, you can create a GRE tunnel between two RHEL routers to connect two internal subnets over the internet as shown in the following diagram:
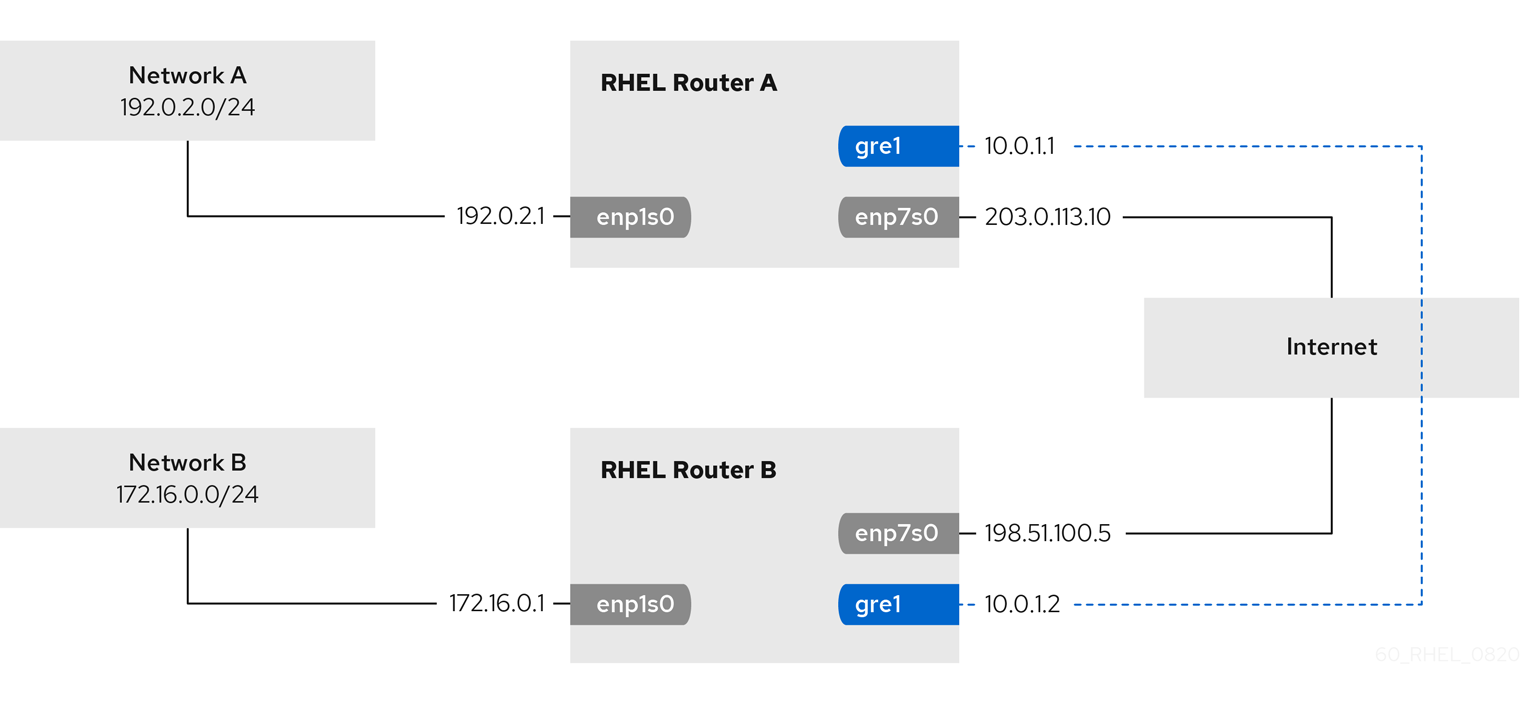
The gre0 device name is reserved. Use gre1 or a different name for the device.
Prerequisites
- Each RHEL router has a network interface that is connected to its local subnet.
- Each RHEL router has a network interface that is connected to the internet.
Procedure
On the RHEL router in network A:
Create a GRE tunnel interface named
gre1:# nmcli connection add type ip-tunnel ip-tunnel.mode gre con-name gre1 ifname gre1 remote 198.51.100.5 local 203.0.113.10The
remoteandlocalparameters set the public IP addresses of the remote and the local routers.Set the IPv4 address to the
gre1device:# nmcli connection modify gre1 ipv4.addresses '10.0.1.1/30'Note that a
/30subnet with two usable IP addresses is sufficient for the tunnel.Configure the
gre1connection to use a manual IPv4 configuration:# nmcli connection modify gre1 ipv4.method manualAdd a static route that routes traffic to the
172.16.0.0/24network to the tunnel IP on router B:# nmcli connection modify gre1 +ipv4.routes "172.16.0.0/24 10.0.1.2"Enable the
gre1connection.# nmcli connection up gre1Enable packet forwarding:
# echo "net.ipv4.ip_forward=1" > /etc/sysctl.d/95-IPv4-forwarding.conf
# sysctl -p /etc/sysctl.d/95-IPv4-forwarding.conf
On the RHEL router in network B:
Create a GRE tunnel interface named
gre1:# nmcli connection add type ip-tunnel ip-tunnel.mode gre con-name gre1 ifname gre1 remote 203.0.113.10 local 198.51.100.5The
remoteandlocalparameters set the public IP addresses of the remote and the local routers.Set the IPv4 address to the
gre1device:# nmcli connection modify gre1 ipv4.addresses '10.0.1.2/30'Configure the
gre1connection to use a manual IPv4 configuration:# nmcli connection modify gre1 ipv4.method manualAdd a static route that routes traffic to the
192.0.2.0/24network to the tunnel IP on router A:# nmcli connection modify gre1 +ipv4.routes "192.0.2.0/24 10.0.1.1"Enable the
gre1connection.# nmcli connection up gre1Enable packet forwarding:
# echo "net.ipv4.ip_forward=1" > /etc/sysctl.d/95-IPv4-forwarding.conf
# sysctl -p /etc/sysctl.d/95-IPv4-forwarding.conf
Verification
From each RHEL router, ping the IP address of the internal interface of the other router:
On Router A, ping
172.16.0.1:# ping 172.16.0.1On Router B, ping
192.0.2.1:# ping 192.0.2.1
Additional resources
-
nmcli(1)man page -
nm-settings(5)man page
8.3. Configuring a GRETAP tunnel to transfer Ethernet frames over IPv4
A Generic Routing Encapsulation Terminal Access Point (GRETAP) tunnel operates on OSI level 2 and encapsulates Ethernet traffic in IPv4 packets as described in RFC 2784.
Data sent through a GRETAP tunnel is not encrypted. For security reasons, establish the tunnel over a VPN or a different encrypted connection.
For example, you can create a GRETAP tunnel between two RHEL routers to connect two networks using a bridge as shown in the following diagram:
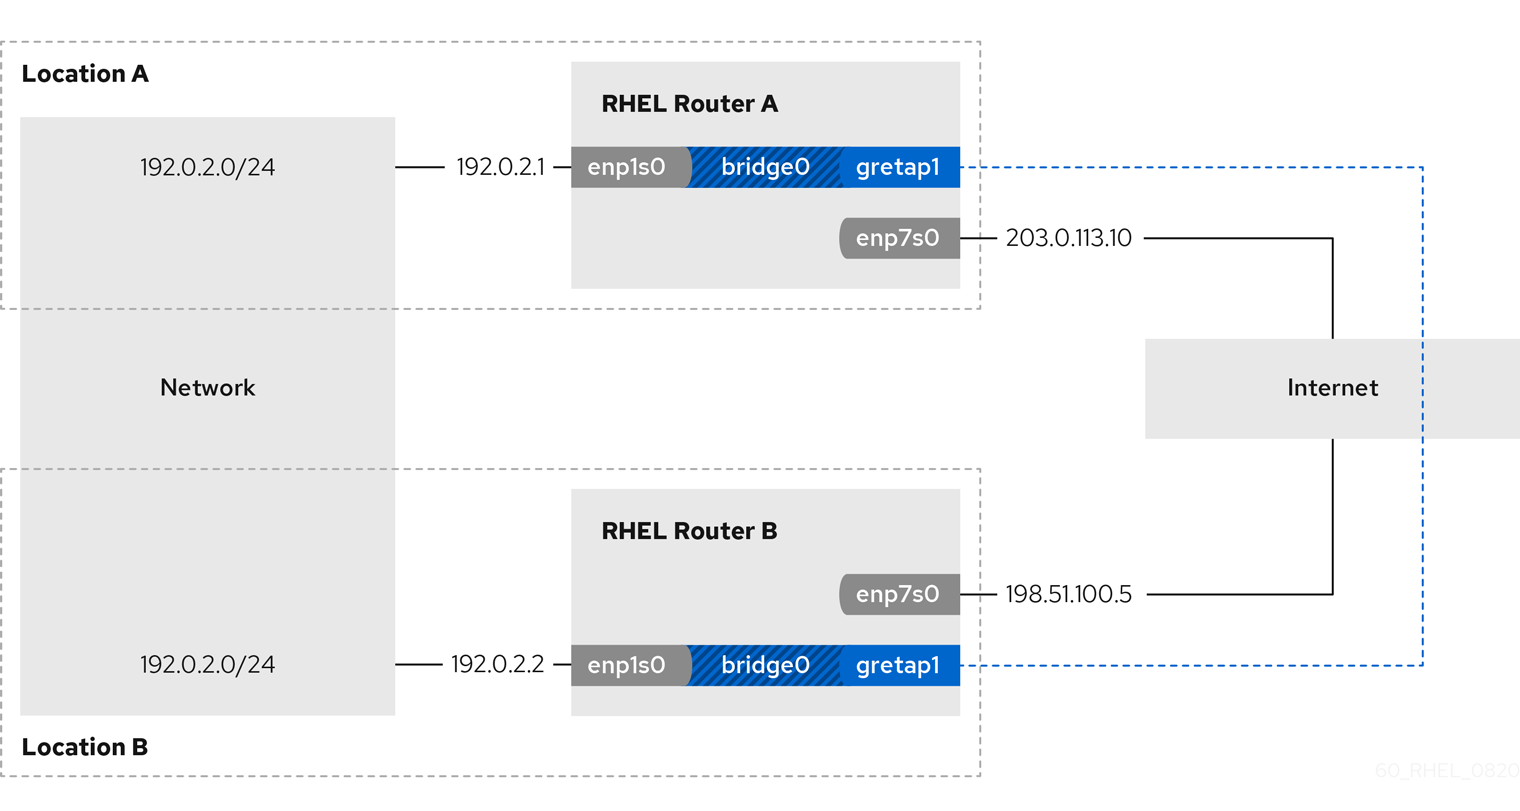
The gretap0 device name is reserved. Use gretap1 or a different name for the device.
Prerequisites
- Each RHEL router has a network interface that is connected to its local network, and the interface has no IP configuration assigned.
- Each RHEL router has a network interface that is connected to the internet.
Procedure
On the RHEL router in network A:
Create a bridge interface named
bridge0:# nmcli connection add type bridge con-name bridge0 ifname bridge0Configure the IP settings of the bridge:
# nmcli connection modify bridge0 ipv4.addresses '192.0.2.1/24'
# nmcli connection modify bridge0 ipv4.method manual
Add a new connection profile for the interface that is connected to local network to the bridge:
# nmcli connection add type ethernet slave-type bridge con-name bridge0-port1 ifname enp1s0 master bridge0Add a new connection profile for the GRETAP tunnel interface to the bridge:
# nmcli connection add type ip-tunnel ip-tunnel.mode gretap slave-type bridge con-name bridge0-port2 ifname gretap1 remote 198.51.100.5 local 203.0.113.10 master bridge0The
remoteandlocalparameters set the public IP addresses of the remote and the local routers.Optional: Disable the Spanning Tree Protocol (STP) if you do not need it:
# nmcli connection modify bridge0 bridge.stp noBy default, STP is enabled and causes a delay before you can use the connection.
Configure that activating the
bridge0connection automatically activates the ports of the bridge:# nmcli connection modify bridge0 connection.autoconnect-slaves 1Active the
bridge0connection:# nmcli connection up bridge0
On the RHEL router in network B:
Create a bridge interface named
bridge0:# nmcli connection add type bridge con-name bridge0 ifname bridge0Configure the IP settings of the bridge:
# nmcli connection modify bridge0 ipv4.addresses '192.0.2.2/24'
# nmcli connection modify bridge0 ipv4.method manual
Add a new connection profile for the interface that is connected to local network to the bridge:
# nmcli connection add type ethernet slave-type bridge con-name bridge0-port1 ifname enp1s0 master bridge0Add a new connection profile for the GRETAP tunnel interface to the bridge:
# nmcli connection add type ip-tunnel ip-tunnel.mode gretap slave-type bridge con-name bridge0-port2 ifname gretap1 remote 203.0.113.10 local 198.51.100.5 master bridge0The
remoteandlocalparameters set the public IP addresses of the remote and the local routers.Optional: Disable the Spanning Tree Protocol (STP) if you do not need it:
# nmcli connection modify bridge0 bridge.stp noConfigure that activating the
bridge0connection automatically activates the ports of the bridge:# nmcli connection modify bridge0 connection.autoconnect-slaves 1Active the
bridge0connection:# nmcli connection up bridge0
Verification
On both routers, verify that the
enp1s0andgretap1connections are connected and that theCONNECTIONcolumn displays the connection name of the port:# nmcli device nmcli device DEVICE TYPE STATE CONNECTION ... bridge0 bridge connected bridge0 enp1s0 ethernet connected bridge0-port1 gretap1 iptunnel connected bridge0-port2From each RHEL router, ping the IP address of the internal interface of the other router:
On Router A, ping
192.0.2.2:# ping 192.0.2.2On Router B, ping
192.0.2.1:# ping 192.0.2.1
Additional resources
-
nmcli(1)man page -
nm-settings(5)man page
8.4. Additional resources
-
ip-link(8)man page