
Red Hat Training
A Red Hat training course is available for RHEL 8
Chapter 28. Managing role-based access controls using the IdM Web UI
Learn more about role-based access control in Identity Management (IdM) and the following operations which are run in the web interface (Web UI):
28.1. Role-based access control in IdM
Role-based access control (RBAC) in IdM grants a very different kind of authority to users compared to self-service and delegation access controls.
Role-based access control is composed of three parts:
- Permissions grant the right to perform a specific task such as adding or deleting users, modifying a group, and enabling read-access.
- Privileges combine permissions, for example all the permissions needed to add a new user.
- Roles grant a set of privileges to users, user groups, hosts or host groups.
28.1.1. Permissions in IdM
Permissions are the lowest level unit of role-based access control, they define operations together with the LDAP entries to which those operations apply. Comparable to building blocks, permissions can be assigned to as many privileges as needed.
One or more rights define what operations are allowed:
-
write -
read -
search -
compare -
add -
delete -
all
These operations apply to three basic targets:
-
subtree: a domain name (DN); the subtree under this DN -
target filter: an LDAP filter -
target: DN with possible wildcards to specify entries
Additionally, the following convenience options set the corresponding attribute(s):
-
type: a type of object (user, group, etc); setssubtreeandtarget filter -
memberof: members of a group; sets atarget filter -
targetgroup: grants access to modify a specific group (such as granting the rights to manage group membership); sets atarget
With IdM permissions, you can control which users have access to which objects and even which attributes of these objects. IdM enables you to allow or block individual attributes or change the entire visibility of a specific IdM function, such as users, groups, or sudo, to all anonymous users, all authenticated users, or just a certain group of privileged users.
For example, the flexibility of this approach to permissions is useful for an administrator who wants to limit access of users or groups only to the specific sections these users or groups need to access and to make the other sections completely hidden to them.
A permission cannot contain other permissions.
28.1.2. Default managed permissions
Managed permissions are permissions that come by default with IdM. They behave like other permissions created by the user, with the following differences:
- You cannot delete them or modify their name, location, and target attributes.
They have three sets of attributes:
- Default attributes, the user cannot modify them, as they are managed by IdM
- Included attributes, which are additional attributes added by the user
- Excluded attributes, which are attributes removed by the user
A managed permission applies to all attributes that appear in the default and included attribute sets but not in the excluded set.
While you cannot delete a managed permission, setting its bind type to permission and removing the managed permission from all privileges effectively disables it.
Names of all managed permissions start with System:, for example System: Add Sudo rule or System: Modify Services. Earlier versions of IdM used a different scheme for default permissions. For example, the user could not delete them and was only able to assign them to privileges. Most of these default permissions have been turned into managed permissions, however, the following permissions still use the previous scheme:
- Add Automember Rebuild Membership Task
- Add Configuration Sub-Entries
- Add Replication Agreements
- Certificate Remove Hold
- Get Certificates status from the CA
- Read DNA Range
- Modify DNA Range
- Read PassSync Managers Configuration
- Modify PassSync Managers Configuration
- Read Replication Agreements
- Modify Replication Agreements
- Remove Replication Agreements
- Read LDBM Database Configuration
- Request Certificate
- Request Certificate ignoring CA ACLs
- Request Certificates from a different host
- Retrieve Certificates from the CA
- Revoke Certificate
- Write IPA Configuration
If you attempt to modify a managed permission from the command line, the system does not allow you to change the attributes that you cannot modify, the command fails. If you attempt to modify a managed permission from the Web UI, the attributes that you cannot modify are disabled.
28.1.3. Privileges in IdM
A privilege is a group of permissions applicable to a role.
While a permission provides the rights to do a single operation, there are certain IdM tasks that require multiple permissions to succeed. Therefore, a privilege combines the different permissions required to perform a specific task.
For example, setting up an account for a new IdM user requires the following permissions:
- Creating a new user entry
- Resetting a user password
- Adding the new user to the default IPA users group
Combining these three low-level tasks into a higher level task in the form of a custom privilege named, for example, Add User makes it easier for a system administrator to manage roles. IdM already contains several default privileges. Apart from users and user groups, privileges are also assigned to hosts and host groups, as well as network services. This practice permits a fine-grained control of operations by a set of users on a set of hosts using specific network services.
A privilege may not contain other privileges.
28.1.4. Roles in IdM
A role is a list of privileges that users specified for the role possess.
In effect, permissions grant the ability to perform given low-level tasks (such as creating a user entry and adding an entry to a group), privileges combine one or more of these permissions needed for a higher-level task (such as creating a new user in a given group). Roles gather privileges together as needed: for example, a User Administrator role would be able to add, modify, and delete users.
Roles are used to classify permitted actions. They are not used as a tool to implement privilege separation or to protect from privilege escalation.
Roles can not contain other roles.
28.1.5. Predefined roles in Identity Management
Red Hat Identity Management provides the following range of pre-defined roles:
Table 28.1. Predefined Roles in Identity Management
| Role | Privilege | Description |
|---|---|---|
| Enrollment Administrator | Host Enrollment | Responsible for client, or host, enrollment |
| helpdesk | Modify Users and Reset passwords, Modify Group membership | Responsible for performing simple user administration tasks |
| IT Security Specialist | Netgroups Administrators, HBAC Administrator, Sudo Administrator | Responsible for managing security policy such as host-based access controls, sudo rules |
| IT Specialist | Host Administrators, Host Group Administrators, Service Administrators, Automount Administrators | Responsible for managing hosts |
| Security Architect | Delegation Administrator, Replication Administrators, Write IPA Configuration, Password Policy Administrator | Responsible for managing the Identity Management environment, creating trusts, creating replication agreements |
| User Administrator | User Administrators, Group Administrators, Stage User Administrators | Responsible for creating users and groups |
28.2. Managing permissions in the IdM Web UI
Follow this procedure to manage permissions in Identity Management (IdM) using the web interface (IdM Web UI).
Prerequisites
- Administrator privileges for managing IdM or the User Administrator role.
- You are logged-in to the IdM Web UI. For details, see Accessing the IdM Web UI in a web browser.
Procedure
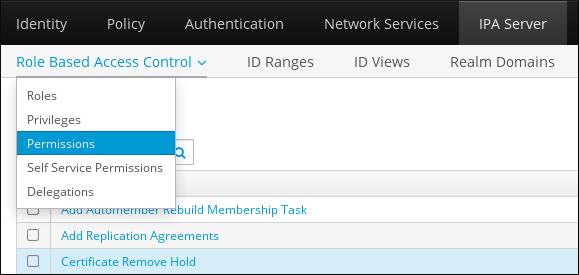
To add a new permission, open the Role-Based Access Control submenu in the IPA Server tab and select Permissions:
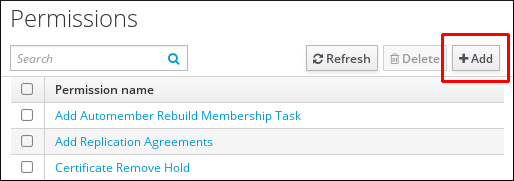
The list of permissions opens: Click the Add button at the top of the list of the permissions:
The Add Permission form opens. Specify the name of the new permission and define its properties accordingly:

Select the appropriate Bind rule type:
- permission is the default permission type, granting access through privileges and roles
- all specifies that the permission applies to all authenticated users
anonymous specifies that the permission applies to all users, including unauthenticated users
NoteIt is not possible to add permissions with a non-default bind rule type to privileges. You also cannot set a permission that is already present in a privilege to a non-default bind rule type.
- Choose the rights to grant with this permisthsion in Granted rights.
Define the method to identify the target entries for the permission:
- Type specifies an entry type, such as user, host, or service. If you choose a value for the Type setting, a list of all possible attributes which will be accessible through this ACI for that entry type appears under Effective Attributes. Defining Type sets Subtree and Target DN to one of the predefined values.
-
Subtree (required) specifies a subtree entry; every entry beneath this subtree entry is then targeted. Provide an existing subtree entry, as Subtree does not accept wildcards or non-existent domain names (DNs). For example:
cn=automount,dc=example,dc=com -
Extra target filter uses an LDAP filter to identify which entries the permission applies to. The filter can be any valid LDAP filter, for example:
(!(objectclass=posixgroup))
IdM automatically checks the validity of the given filter. If you enter an invalid filter, IdM warns you about this when you attempt to save the permission. -
Target DN specifies the domain name (DN) and accepts wildcards. For example:
uid=*,cn=users,cn=accounts,dc=com - Member of group sets the target filter to members of the given group. After you specify the filter settings and click Add, IdM validates the filter. If all the permission settings are correct, IdM will perform the search. If some of the permissions settings are incorrect, IdM will display a message informing you about which setting is set incorrectly.
Add attributes to the permission:
- If you set Type, choose the Effective attributes from the list of available ACI attributes.
If you did not use Type, add the attributes manually by writing them into the Effective attributes field. Add a single attribute at a time; to add multiple attributes, click Add to add another input field.
ImportantIf you do not set any attributes for the permission, then the permissions includes all attributes by default.
Finish adding the permissions with the Add buttons at the bottom of the form:
- Click the Add button to save the permission and go back to the list of permissions.
- Alternatively, you can save the permission and continue adding additional permissions in the same form by clicking the Add and Add another button
- The Add and Edit button enables you to save and continue editing the newly created permission.
- Optional. You can also edit the properties of an existing permission by clicking its name from the list of permissions to display the Permission settings page.
Optional. If you need to remove an existing permission, click the Delete button once you ticked the check box next to its name in the list, to display The Remove permissions dialog.
NoteOperations on default managed permissions are restricted: the attributes you cannot modify are disabled in the IdM Web UI and you cannot delete the managed permissions completely.
However, you can effectively disable a managed permission that has a bind type set to permission, by removing the managed permission from all privileges.
For example, to let those with the permission write the member attribute in the engineers group (so they can add or remove members):

28.3. Managing privileges in the IdM WebUI
Follow this procedure to manage privileges in IdM using the web interface (IdM Web UI).
Prerequisites
- Administrator privileges for managing IdM or the User Administrator role.
- You are logged-in to the IdM Web UI. For details, see Accessing the IdM Web UI in a web browser.
- Existing permissions. For details about permissions, see Managing permissions in the IdM Web UI.
Procedure
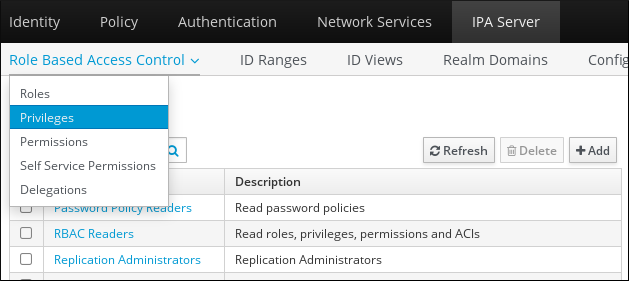
To add a new privilege, open the Role-Based Access Control submenu in the IPA Server tab and select Privileges:
The list of privileges opens. Click the Add button at the top of the list of privileges:

The Add Privilege form opens. Enter the name and a description of the privilege:

- Click the Add and Edit button to save the new privilege and continue to the privilege configuration page to add permissions.
- Edit the properties of privileges by clicking on the privileges name in the privileges list. The privileges configuration page opens.
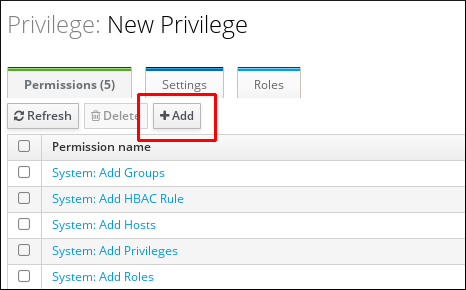
The Permissions tab displays a list of permissions included in the selected privilege. Click the Add button at the top of the list to add permissions to the privilege:
Tick the check box next to the name of each permission to add, and use the > button to move the permissions to the Prospective column:
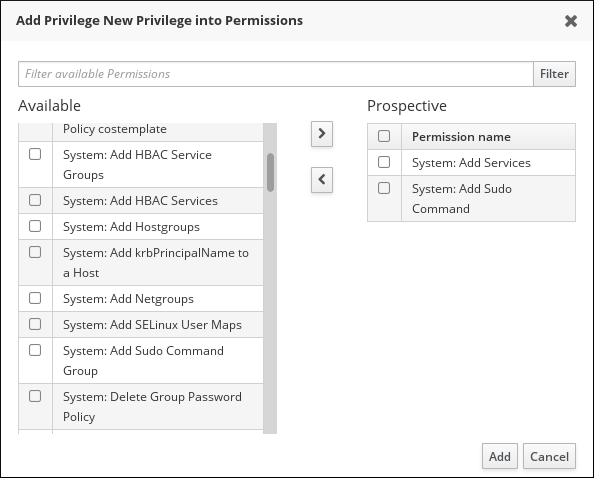
- Confirm by clicking the Add button.
- Optional. If you need to remove permissions, click the Delete button after you ticked the check box next to the relevant permission: the Remove privileges from permissions dialog opens.
- Optional. If you need to delete an existing privilege, click the Delete button after you ticked the check box next to its name in the list: the Remove privileges dialog opens.
28.4. Managing roles in the IdM Web UI
Follow this procedure to manage roles in Identity Management (IdM) using the web interface (IdM Web UI).
Prerequisites
- Administrator privileges for managing IdM or the User Administrator role.
- You are logged-in to the IdM Web UI. For details, see Accessing the IdM Web UI in a web browser.
- Existing privileges. For details about privileges, see Managing privileges in the IdM Web UI.
Procedure
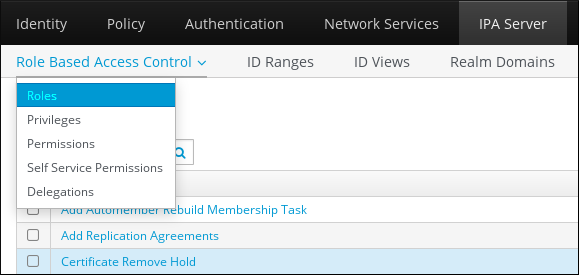
To add a new role, open the Role-Based Access Control submenu in the IPA Server tab and select Roles:
The list of roles opens. Click the Add button at the top of the list of the role-based access control instructions.
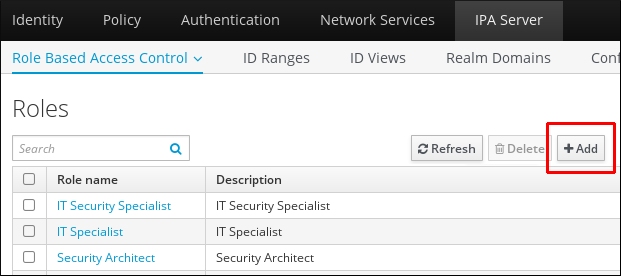
The Add Role form opens. Enter the role name and a description:

- Click the Add and Edit button to save the new role and go to the role configuration page to add privileges and users.
- Edit the properties of roles by clicking on the roles name in the role list. The roles configuration page opens.
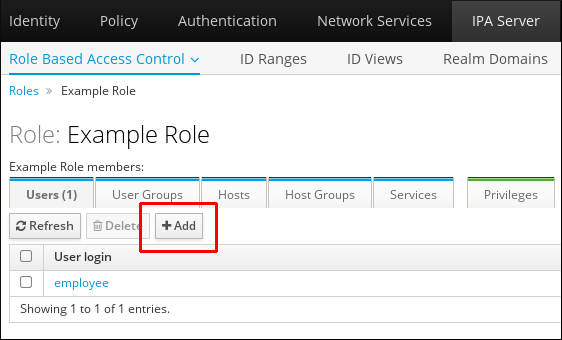
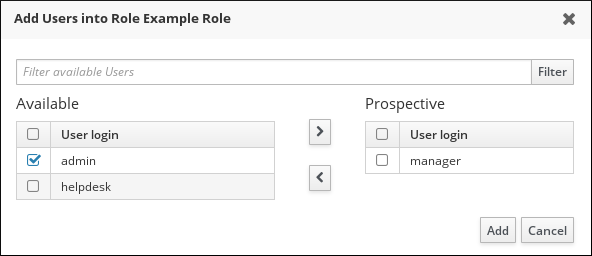
Add members using the Users, Users Groups, Hosts, Host Groups or Services tabs, by clicking the Add button on top of the relevant list(s).
In the window that opens, select the members on the left and use the > button to move them to the Prospective column.
At the top of the Privileges tab, click Add.
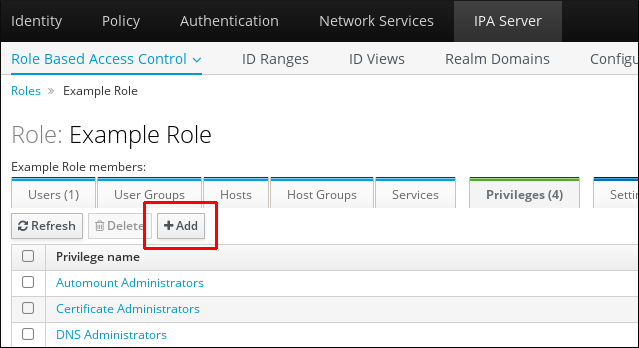
Select the privileges on the left and use the > button to move them to the Prospective column.
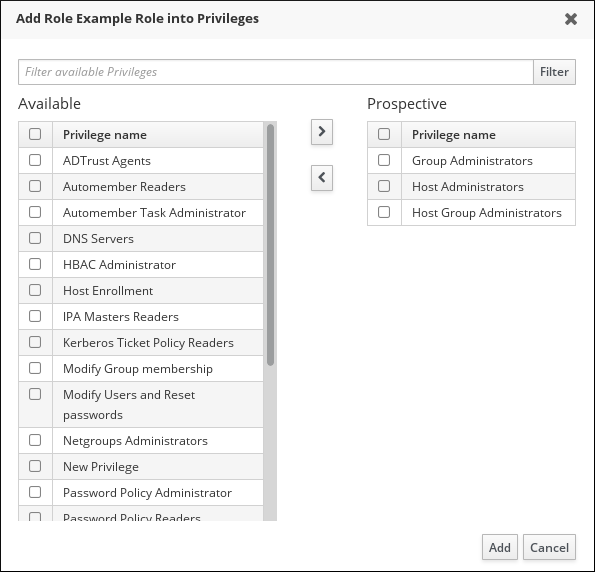
- Click the Add button to save.
- Optional. If you need to remove privileges or members from a role, click the Delete button after you ticked the check box next to the name of the entity you want to remove. A dialog opens.
- Optional. If you need to remove an existing role, click the Delete button after you ticked the check box next to its name in the list, to display the Remove roles dialog.